How to hang a chandelier on the ceiling - mounting options. How to hang a chandelier from the ceiling: different mounting methods for different occasions How to hang a ceiling lamp
When the question arises of how to hang a chandelier on the ceiling, many developers think that this process is complicated and only professionals should do it. In fact, there is nothing complicated in the work, and even an inexperienced master can understand the process. I will tell you about all the important aspects so that you can carry out a quality installation without outside help.
The working process
First, I will talk about how to deal with the electrical part, it is the same in all cases, and then I will consider in detail the 4 mounting options that are used most often. Safety is important in electrical work, so carefully follow all the recommendations in the next section.
Wire connection
If you doubt that you can handle an electrician, then it is better to involve a specialist, but if you have at least minimal knowledge and skills, then you can handle the workflow yourself.
Let's figure out what you need to have on hand:
- To work, we need an indicator, this is the name of a special tool with which you can determine the phasing of the wires, that is, figure out where there is voltage in order to correctly connect the switch;

- In order to securely and safely fasten the wires, we need special connectors. The time of electrical tape and twists has long passed, it is better to purchase standard terminals or modern self-clamping options in order to fasten the wiring not only very quickly, but also very reliably. You can buy such elements at any electrical store;

- Also, we can not do without a screwdriver, pliers and a construction knife. These tools are used most often during work, and such a simple set is quite enough to cope with the installation with high quality.
Let's figure out how to connect the wiring correctly, the process is the same for all types of fasteners, so I will consider it here, and below I will specifically deal with fasteners.
The workflow looks like this:
- To begin with, you need to turn off the current supply in the electrical panel, in new houses there is a special machine, in old ones you need to unscrew the plugs. That is, we de-energize the network to prevent electric shock;
- If you had an old chandelier, then you need to remove and disconnect it, sometimes this process takes longer than installation, somehow I tore out a structure nailed to a beam with nails 150 mm long, probably there were no shorter products at the time of attachment;
- Then you should strip the ends of the wires that are connected to the chandelier and move them apart so that they do not touch each other in any case. Cleared areas should have free access from any direction;
- The power on the panel is turned on and the wires are checked. This is done as follows: first, the switch is placed in the “on” position, then the indicator is taken in the right hand, the thumb is located on the patch at the end, and the probe is pressed against the end of the wire on the ceiling. Where there is a phase, the indicator will light up, where there is none, nothing will burn;

- It is necessary to check the circuit again with the light off, naturally there should be no current in this case. If it is, then the switch needs to be replaced.
When checking the current, work with one hand; it is strictly forbidden to hold the wire with the other hand, even for an insulated area.
- When you figured out the wires, you can start connecting, most often there is a diagram with a chandelier, everything is shown clearly there. As an example, the diagram below shows the connection of a two-gang switch, everything is very simple and clear, the main thing is not to confuse anything;

- When you figured out the circuit, you can connect the wires; for this, a terminal or a special connector is put in place of the connection. Everything is simple here, and the main thing is to securely fix the wires, in no case should they hang out at the junction.

Fastening option No. 1 - anchor bolt with hook
This is a classic solution, which in my opinion is the simplest and most reliable. Anchors are suitable for concrete ceilings and are used for chandeliers that are hung on a special eye. Below is shown what this fastener looks like, the most commonly used anchors are 10 mm in diameter and 50-80 mm in length of the working part, this is quite enough to withstand a load of even tens of kilograms.

Let's figure out how to fix the chandelier to the ceiling using anchors with a hook:
- First of all, you need to stock up on the required tool, we will use a puncher with a drill of the appropriate diameter. It is worth working from a ladder or table, it is important to ensure stability, since working with a hammer drill requires some effort, and you must stand securely;
- Further, the place of drilling is marked on the surface of the ceiling, it should be located so that the decorative part of the chandelier covers the place of attachment and connection of wires;
- Drilling is carried out 10 mm more than the working part of the anchor, this is necessary for its reliable location in the ceiling. When working, make sure that the punch is vertical;
- An anchor bolt with a hook is inserted into the hole until it stops, after which it must be tightened. There can be two options: either you twist the hook with your hands and due to this the sleeve bursts inside, or you need to turn the nut, which happens in some product options. The scheme of work is shown below - everything is very simple and clear;

- Lastly, the wires of the chandelier are connected, and it is hung on a hook. At this stage, it is better to involve an assistant, since you are unlikely to be able to hold the structure and connect the wires. After hanging, the attachment point is closed with a cap, which is fixed in the required position.

If you have wooden floors, then you can use not an anchor bolt, but a hook screw. Its installation is similar to the one described above, with the only difference being that you need to drill a hole 2-3 mm smaller than the diameter of the fastener, and then screw it in like a screw. Very simple and at the same time reliable.

Option number 2 - mounting plate
Such fasteners are used in most modern chandeliers; a special plate with two threaded studs and several holes for fixing to the ceiling is included. The system is simple, but quite reliable, which is why it has gained such high popularity.

For massive products, a reinforced version is used - a cruciform design, which allows you to fix the chandelier at four points. Such a system can withstand even a lot of weight, so it is used with heavy chandeliers.
Let's figure out how to install a chandelier on a plate.
The work instructions look something like this:

- For work, in addition to the bracket itself, we need fasteners, for concrete ceilings, quick-mount dowels 6x40 are used, and for wooden structures, self-tapping screws 30-40 mm long are used. Drilling is done using a rotary hammer, which can be rented, it is needed literally for half an hour;
- The plate is attached in the place you need, after which, with a pencil, you need to mark the points at which drilling will be performed. It is important to place the element correctly so that the structure is held securely and the wires reach the connection point;
- Drilling is done at marked points, for a standard plate you need two holes, and for a cruciform one - four. The work is simple, the main thing is to hold the puncher vertically and control the depth, it should be 5 mm more than the length of the dowels used;

- Next, you need to fix the bracket, for this, dowels are hammered into the holes, after which a plate is attached and fastened with self-tapping screws or impact screws. They do not need to be twisted - they are clogged with a hammer. After fastening, check the reliability of fixation, there should not be any backlash;

- The chandelier is connected using terminals, this process is described above, so there is no point in dwelling on it;

- Lastly, the chandelier is put in place and secured with nuts and washers that are screwed onto the studs. Mounting hardware is included, so you don't need to buy anything extra.
Option number 3 - dowels for hollow structures
If you have a plasterboard ceiling or need to fix the chandelier in a hollow slab, then a special dowel may be the best option, which is a spacer on one side and a hook on the other.

Let's figure out how to hang a chandelier with your own hands using this mounting option:
- First you need to mark the point where the dowel will be located, if the work is done on a plasterboard structure, then there is not much difference, but if you are dealing with a reinforced concrete slab, then you need to calculate the location of the void. Sometimes you have to make several holes until you get where you need to;
- Then drilling is done, everything is simple here, the main thing is to have a tool with a drill of the appropriate diameter on hand (most often it is 10 mm). Drywall can be drilled with any equipment; for concrete, a special drill is needed;
- The spring part of the dowel is compressed with fingers, after which it must be inserted into the hole and lifted up so that the spacers move apart and fix the fasteners in the void. Everything is simple here, and you can easily understand this part of the workflow;
- Lastly, you need to fix the fasteners in the hole, for this you need to tighten the threaded part with a nut, under which an oversized washer should be located. The whole process from start to finish is shown in the diagram below, you will clearly see all the steps and make sure everything is simple;

- Further work does not differ from the options described above: you must first connect the wiring, and then hang the chandelier on a hook. Everything is done in the same way as in the case of an anchor bolt.
I would like to talk about the fastener options that are used when mounting the chandelier on the plate, in this case you can use several types of products, for convenience, I will present the information in the table.

| Fastener type | Product features |
| Dowel "butterfly" | This option is very popular and is a design with spacers that fix the elements by tightening with a self-tapping screw. Everything is simple and at the same time reliable, for such fasteners it is necessary to drill holes with a diameter of 10 mm |
| Dowel "Molly" | Builders call this option "carrot" because of the similar shape of the products. They are cone-shaped elements with a wide threaded part, in some versions there is a drill in front so as not to make holes on purpose. The material of manufacture can be nylon, polypropylene or metal, of course, the price varies depending on this factor |
| Metal dowels | They are similar to the “butterfly” option, but unlike it, they are made of metal and burst not in two, but in four directions. This is the most reliable option of all, which is used for massive structures. |

Remember that if the weight of the chandelier is very large, then the drywall simply cannot withstand the load, even the most durable dowels will not help. In this case, you need to drill a hole in the concrete and fix the structure with long anchor bolts.
Option number 4 - installation on the platform
This type of structure is in great demand due to the fact that it is used in conjunction with stretch ceilings, which are gaining more and more popularity. To hang a chandelier, you need to build a special structure called a platform, the essence of the installation is shown in the diagram below.

Let's figure out how to hang a chandelier in this case:
- It is possible to adjust a piece or boards of a certain size, but it is much easier to buy a ready-made platform in which there is a hole for the wire and holes for mounting are made around the entire perimeter. Of course, a self-tapping screw can be screwed anywhere, because plastic is easy to process. Products have a standard diameter of 180 mm, but if desired, you can find a larger option;

- First you need to clearly define the level of the stretch ceiling, this is very important, because the platform must be located strictly along the plane of the canvas. It is best to pull the cord in order to clearly see the landmark and not make mistakes when working;
- Four straight drywall hangers are attached to the platform. If you have a lot of fastener lengths, then you can cut the suspensions into pieces of the required size. It is easiest to assemble the structure using sharp bugs - small self-tapping screws for a metal profile, in the end you should get something like the one in the photo below;

- Next, you need to determine the location of the platform on the ceiling, after which you can begin to mount. The design is set to the desired level, the suspensions, if necessary, are bent to the required position. Mounting is carried out using fast mounting dowels.

Conclusion
The video in this article will clearly show some of the important points described above, and it will be even easier for you to understand the nuances of editing. If you still have questions, then feel free to write them in the comments under this review, you will receive a prompt response and will be able to understand the process up to m "width="640" height="360" frameborder="0" allowfullscreen="allowfullscreen »>
Conclusion
You yourself have to decide how to hang the chandelier, it all depends on the type of ceiling and the weight of the structure. The options discussed above allow you to fix any option, the main thing is to use the necessary fasteners and follow all the recommendations for the workflow.
The video in this article will clearly show some of the important points described above, and it will be even easier for you to understand the nuances of editing. If you still have questions, then do not hesitate to write them in the comments under this review, you will receive a prompt response and will be able to understand the process to the smallest detail.
One of the last stages of apartment renovation is the installation and connection of lighting sources. Despite the popularity of drywall and stretch analogues, the classic in the form of a painted ceiling will always remain popular. With its arrangement, the height of the rooms remains unchanged. Whereas drywall and stretch, due to the frame, eat up precious centimeters. And if these options involve the installation of a hidden guide for lighting, then what to do with the classic version? How to hang a chandelier on a concrete ceiling? Let's take a closer look.
Mounting methods
There are three methods for fixing chandeliers on:
- With a hook. This is one of the popular ways that allows you to mount fairly large fixtures, including on a leg.
- On a hanging bracket. This method makes it possible to install lamps designed for low ceilings. These lamps are not massive, have a small height, are pressed close to the ceiling.
- On the cross plank. This method is designed for weighty structures.
The question "how to hang a chandelier on a concrete ceiling" largely depends on the chosen model of the light source.
and wiring
Concrete structures are canvases with hollow channels.
Cables for lighting are laid in these holes. In new buildings, three-core grounding wires are provided. This feature does not allow for the installation option with a two-key switch, since, of course, it is possible to attach a chandelier to a concrete ceiling, but you will need to use a four-wire cable. For this process, it is best to contact a professional electrician. Or abandon the idea of a two-gang switch.
Choice of lighting
The abundance of lighting fixtures sometimes makes it difficult to choose a light source. And besides, the market is flooded with many low-quality Chinese products. When choosing, you should take into account a number of nuances:
- Design. Most often, lighting is selected for it. It can be a set of ceiling lamp and sconce, or just a chandelier.
- From how many buttons you plan to connect. If there are only 2 wires on the ceiling at the installation site, then a 2-gang connection should not be considered. And accordingly, it is better not to purchase multi-track lamps. Otherwise, large electricity bills will come in the future. Otherwise, appropriate wiring will be required.
- Ceiling height. Massive chandeliers will look out of place in low rooms, and, conversely, a small lamp will be lost on high ceilings.
- Room dimensions. If the room is large, it is better to provide two sources of lighting. When zoning, both identical models and different ones can be used.
Given these features, you can choose the right type of lighting. in this case, it will not be difficult, and he will ergonomically fit into the design.
Features of modern lamps
Nowadays, lighting is striking in its diversity and options.

There are models with built-in fans, various modes through the remote control, the use of more lamps with 12 W consumption. All these products can have additional connection blocks in their design. In such cases, the installation instructions are requested from the seller. And if you're not sure you can do it yourself, it's best to call an electrician who knows exactly how to hang a chandelier from a concrete ceiling.
Preparation and security
There are several important points at this stage of work:
- Electricity is best used during daylight hours. This will make the job easier. No additional lighting in the form of flashlights is required, and, accordingly, an assistant.
- Prepare the instrument. These are: a drill or a hammer drill with the desired type of drill / drill, an indicator screwdriver, a regular screwdriver and a key for assembling a chandelier, a fastener, electrical tape, pliers.
- Before installation, turn off the electricity in the shield.
- Dismantle old lighting, if any.
- Separate the ends of the wires. Connect electricity. Determine the phase and zero with an indicator screwdriver. When in contact with the bare end and pressing the button on the tool, the screwdriver lights up - phase, no - zero. Isolate the ends.
- Determine the location of the wiring in the ceiling space. Floor slabs have hollow channels that are used for cable laying. For these works, a special electronic detector is used. Experienced owners always draw up or request a wiring diagram when doing electrical installation. In the future, this avoids many problems even with simple operations (such as "driving a nail into the wall").
- Since hanging a chandelier on a concrete ceiling, by and large, is quite simple, but the process itself is unsafe, you should not forget about turning off the electricity from the shield at the time of dismantling, installing and connecting the chandelier. This will avoid the risk of electric shock.
Chandelier assembly
Depending on the complexity of the design, you may need instructions for assembling the lighting fixture.

The process can be difficult when you need to hang a chandelier on a two-key connection system. This installation allows you to further adjust the degree of illumination in the room by turning on all the lamps or some of them.
To do this, a model with such connectivity is selected or the existing option is slightly modernized if:
- In the lighting device, a two-wire wire comes out for connecting to the network - it can be replaced with a three-wire (phase, phase, zero).
- The lamp has a three-core cable, but one of the wires is designed for grounding (it has a yellow color with a green stripe). If the house is old, then grounding is usually not provided for chandeliers. Therefore, this wiring can be used to connect to the second phase.
If you need to hang a chandelier on a two-gang switch, then one group of horns is connected to the first phase, the second to the other.

Having assembled and prepared the lighting device, proceed to install the fastener. Consider all types.
Fastener "hook"
Previously, such a mount was used for lamps. In such cases, after dismantling the old lighting, a new chandelier should be hung on the existing fasteners. If this type of fixation is not provided, then you should first purchase it. The market today allows you to choose the best option for any occasion. Here is a range of products:
- Hook with petals. This view is suitable if the hole has fallen into a void in the slab. When it is installed, the petals open and securely fix the hook.
- Ceiling A drill is selected that matches the diameter of the anchor, a hole is made, fasteners are inserted, the element is tightened.
- Folding spring dowel with ring, rod, hook. A hole is drilled according to the diameter of the element, fasteners are inserted, twisted. In this case, sometimes a plaster mortar is used for greater reliability. The hole is filled with the mixture and then the dowel is installed. Time is given for freezing.
- Steel screw with ring, L-shaped hook with plastic dowel. Mounted according to the previous option.
Since you can hang a ceiling chandelier, as we have already mentioned, quickly enough, but the process itself is associated with the risk of receiving an electric shock, it is better to pre-insulate the wires coming out of the ceiling.
Fastener "hanging bracket"
The fixing plate and fasteners for it are included with the lamp.

But it is better to buy more powerful dowels. This will be a more reliable option, especially if you are not particularly sure that you know exactly how to hang a chandelier from a concrete ceiling. The hole for each hole is first marked with a pencil. It is drilled, dowels are inserted, a fixation bar is applied and fixed with self-tapping screws. Mortar can also be used in this fastening method for greater fastening strength. It is important to screw the bolts on it to fix the chandelier before fixing the bar. The cross bar is mounted in the same way.
final stage
After installing the fastener, you can begin to consider the question "how to attach a chandelier to a concrete ceiling." For this:
- The electricity in the panel is turned off.
- The insulation is removed from the wires of the ceiling cable.
- A terminal connection is made or by twisting and tape.
- The chandelier is fixed on the fastener.
There are a number of features for each type of chandelier.

For models with fixation on the hook, the lamp is hung on it and the wires are connected. And then they are closed with a special decorative cap. Lighting with mounting on the bracket: the mounting cover from the lamp is fixed, the wires are connected, the lamp is attached to the cover. After installation, you should check the correct connection, turning on the keys one by one. If the circuit did not occur, it means that you managed to hang the chandelier correctly with your own hands.
Copper and aluminum cable
In old houses you can still meet and modern lamps are equipped with copper wires for connection. In such cases, the connection is made only using special terminals.

Otherwise, the installation will not meet fire safety standards. And this, in the end, can lead to sad consequences. So, we looked at how to properly hang a chandelier to a concrete ceiling with our own hands. The complexity of installation lies only in the discrepancy between the number of cores of the ceiling cable and the wire of the chandelier. These problems can be solved if there is self-confidence. But since working with electricity is fraught with health risks, it is better to trust a professional.
Laziness made a man out of a monkey. Tired of climbing a palm tree for a banana - the monkey picked up a stick. Tired of the hostess forever painting and greasing the cracks on the ceiling - ordered. No hassle - beautiful, smooth, hygienic. There is only one small but urgent question: how to hang it on a stretch ceiling? On the one hand, it seems like you shouldn’t fool yourself, it’s easier to invite specially trained people for such work. But on the other hand, how do you know if they did everything right and whether, God forbid, what troubles will happen after such an installation? After reading this material, you can not only control employees, but also install a lighting fixture yourself.

Requirements for a chandelier for a stretch ceiling:
- the stream of light should be directed down or to the side, but not up;
- it is desirable that the shades have a closed shape;
- the distance from the ceiling to the ceiling must be sufficient to prevent heating of the material;
- at a standard room height, the tension structure already lowers the ceiling, you should not install a bulky chandelier;
- the lighting device must have a long suspension, sufficient to be fixed to the base behind the stretched canvas.
Ceiling chandeliers for stretch ceilings can be equipped with different ones. When choosing one or another type, consider the features of the contract with PVC:
| Lamp type | Description |
| incandescent lamp | Behind the cheapness of these devices lies a high consumption of electricity and a high-temperature effect on surrounding objects. Such lamps are least suitable for synthetic ceilings. The minimum distance from the lamp to the PVC surface is 40 cm, and then, provided that the device is not more powerful than 60 watts. The solution could be to install reflectors between the film and the lamp, but does it make sense to fence such a design if there are other options? |
| A great option for a chandelier under a stretch ceiling. These devices are characterized by high efficiency and long service life. Such devices are very weakly heated and pose a danger to PVC film. Lighting can be warm or cool, depending on your preference. | |
| Halogen | Halogen lamps heat up slightly, but during prolonged operation this heat is enough to deform the stretched material. A 40 W lamp should not be closer to the ceiling than 40 cm. |
Designer Tip! On a stretch ceiling, a chandelier in a contrasting color looks best. On black - white or silver, on light, respectively, dark metal.

Basic requirements for mounting a chandelier
Fixing a chandelier to a stretch ceiling should be not only durable, but also aesthetic. For stretch ceilings, suspension devices mounted on a hook or mounting plate are suitable. Overhead chandeliers that are attached tightly to the ceiling on a patch panel are not suitable.
Important! The height of the suspension of the chandelier should be sufficient, taking into account the distance between the base and the stretched material.
As an option, you can consider moving the hook for fastening below the level of the PVC film, but then this moment should be foreseen in advance, even before the pulling procedure.

A little about the correct location of the chandelier for stretch ceilings
The height of the chandelier placement depends on several factors:
- ceiling height;
- ceiling covering;
- purpose of the premises.
How to hang a chandelier on a stretch ceiling in living rooms? From the floor to the bottom of the device must be at least two meters. So you eliminate the danger of accidentally hitting her when moving around the room. But it is better if this distance is greater, especially when the ceilings in the room are low.

Compact height devices are suitable for halls. This design will not interfere with opening doors. Also, keep in mind that in the corridor people often raise their hands to take off their hats or straighten their hair or close their umbrellas. So, the higher the lamp is located, the better.
Compact placement is relevant and. Here there is a risk not only to touch the structure with your hands, but also to accidentally get a jet of water from the shower.

If the ceilings in the room are higher than 3 meters, you are in luck: you can choose any shape and place it anywhere, even above. For example, it is logical to hang a lamp not in the center of the room, but above the dining group. At the same time, it is organized for the working area.

Advice! Classic ceiling lights have a suspension in the form of a chain. You can adjust its length by removing and adding links.
The most difficult question is how to fix the chandelier to the stretch ceiling at the location and the "second light". The peculiarity of the location requires a powerful light flux that can spread over two, or even three floors. In this case, take a closer look at the designs of several tiers or a falling cascade of lamps.

Note! The electrical installation rules recommend selecting hooks for lighting fixtures that can withstand five times the weight of the chandelier for at least 10 minutes. After removing the excessive load on the mount, there should be no damage left.
Thus, the choice of a chandelier must meet not only the requirements of design, but also the rules of safety and ease of use.
Tools for the job
The main tool in this matter is your confidence in your own abilities. Independent installation of a chandelier on a stretch ceiling is not so much difficult as troublesome and requires extreme accuracy. And there are tools for work in almost every home:
Drill
Ankera
wood block
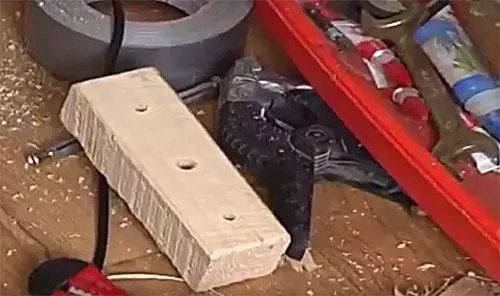
self-tapping screws
Screwdriver
Indicator screwdriver
Insulating tape
Pliers
Terminals
The basis for fastening the chandelier
There is a distance between a concrete or wooden ceiling and stretch PVC material. It can be different, depending on the characteristics of the room. If initially the ceilings have a defect, but with the help of a tension structure it is easy to fix it. It turns out that in order to fix the chandelier, the empty space needs to be filled with something, to create a rigid base.

If the distance is large, a thick bar cannot be dispensed with, you will have to make a frame. In this case, the place of film perforation must be reinforced with a gasket; it will additionally protect the PVC from the temperature effects of the lamp. Such gaskets are made in the form of rings, internal and external. They are hidden behind the decorative frame of the wiring and are completely invisible.

Options for installing a chandelier on a stretch ceiling with your own hands
If you have already decided to take up the installation of the lamp, take care in advance to prepare the base. After the ceiling is stretched, you will not have the opportunity to mount the stand and do the wiring. Usually the master asks in advance where you plan to hang the chandelier. You can prepare the base yourself and bring the wires to the right place in advance.
There are several ways to mount a chandelier. Let's briefly review the main ones.
With a hook
Hook - the most familiar and common way to hang a chandelier. The only thing you have to do is adjust the length of the hook to the height of the stretch fabric. If the hook was installed earlier, most likely it will have to be replaced, since the stretch ceiling will “steal” at least 3 ÷ 5 centimeters.

For fastening, a hole is drilled in the concrete ceiling, a dowel is inserted and a hook with a threaded leg is screwed into it. If the distance between the canvas and the ceiling is too large, a bar is attached to the ceiling and a hook is screwed into this base.
Advice! After installing the stretch ceiling, all wiring will be hidden from your eyes. For your own peace of mind, place it in a protective casing.
When attaching the chandelier to the hook, make sure that the decorative cup fits snugly against the ceiling canvas

With mounting plate
Fastening with a strap is found on modern models of lamps. The bar itself is a metal plate with holes for fasteners. This bar is attached to the prepared base directly through the ceiling canvas. You only need to cut a small hole for the wiring.

Important! When screwing the bar to the bar, be careful not to damage the wiring cord.
To facilitate the work and not damage the lighting device, it is disassembled before installation. It is necessary to remove the ceiling lamps, lamps and hinged decorative elements.
With cross bar
Mounting on a cruciform bar is not much different from hanging on a regular bar. Cross-shaped fasteners are usually used for heavy chandeliers. The only caveat is in the preparation of the base. For obvious reasons, the bar is not suitable in this case.

In this platform, a hole should be drilled for electrical wiring. To bring the platform under the height of the canvas, metal "legs" are used.
How to choose dowels for mounting a chandelier
For interior work, plastic dowels are used. Considering the possible external temperature effect of the lighting device, it is preferable to use nylon-polyamide inserts.
If the ceiling in the room is concrete, spacers will be required. In the case when the ceilings are multilayer structures with voids, it is better to use dowels.
The thickness of the element depends on the expected load. The suspended structure tends to pull the dowel out of the wall, so it is important that it has expansion antennae and notches that additionally hold the material in the skin.

To more securely fix the element in the hole, you can use construction glue, they lubricate the dowel before clogging. Do not try to screw in a thicker screw, it can split the liner. It is considered correct to use screws for spacer inserts.
Advice! A chandelier weighing 5 ÷ 10 kilograms is fixed with an impact dowel with a diameter of 8 mm and a length of 80 mm. You will need at least 4 dowels to complete the task.
Master class for homemade: how to fix the lamp on a stretch ceiling
And now directly about how to fix the chandelier on a stretch ceiling. As already mentioned, it is necessary to follow a clear algorithm of actions and be puzzled in advance by the location of the lighting device and the preparation of the base.
We offer you a small master class on how to attach a chandelier to a stretch ceiling:
| A photo | Description of works |
 | The first step will be marking the location of the lamp and pulling the cord to indicate the height of the canvas. The cord is pulled from the frame through the entire room. |
 | A bar is attached to the main ceiling at the location of the chandelier. To do this, holes are drilled in the ceiling, dowels are inserted and the base is screwed with self-tapping screws. |
 | There can be several bars - depending on the height to which you need to bring the fasteners, or you can use metal "legs" that are easily adjustable in height. It is important to sand the surface of the bar well, which will be in contact with the canvas. |
 | The wiring is passed under the bar or between two elements. So she will not stretch in case of an unforeseen situation. |
 | To accurately bring the surface of the base to the level of dense, use lining elements. After pulling the PVC material. |
 | A special glue for PVC is applied to the thermal ring for the hole. |
 | Next, you should feel the base with your hands and glue the ring directly on the canvas in the center. It will take time for the glue to dry. |
 | A canvas is cut out in the inner part of the ring. Be extremely careful not to damage the wiring. After that, a wire is released into the hole for connection. |
 | Feel the position of the bar and place the mounting plate correctly. |
 | Attach the mounting plate with self-tapping screws. Don't forget to pre-insert the studs. |
 | Attach the chandelier so that the studs fit into the intended holes. Fix the lamp with decorative bolts. |
How to decorate the place where the lamp is attached
If you have not forgotten to use a thermal ring, the place where the chandelier is attached will already look neat. A small hole will hide behind the base of the lighting fixture. But if the interior design requires the creation of some additional element, use lightweight polyurethane sockets. They imitate
One of the essential elements of any repair related to the ceiling surface is the installation of lighting fixtures. Recently, spots of various configurations have become most popular, but for the most part their main function is additional lighting. The role of the main one is rightly assumed by classical chandeliers. With their purchase in the store, all questions are not resolved - it remains to be seen how to hang the chandelier on a concrete ceiling correctly, in case you have to deal with a clean ceiling base. We offer you a detailed article-instruction with 51 photos and 2 videos that will help you with this.

Surface analysis, drawing up a work plan

For starters, take a good look around. What way chandelier mounting suits you best? Recall that this can be done through:
- anchor hook;
- mounting plate;
- clamping hanger.


Of course, work with anchor hook always the easiest. But only if it is already installed, as is often the case in old apartment buildings. In this case, you can safely fix a heavy and massive chandelier on it.

If the hook is missing, then first inspect the plate where it is planned to be fixed. Ideal for hollow concrete foundations - clamping hanger. And although it does not provide such a reliable fastening as the same anchor hook, it can handle a fairly large chandelier weighing no more than 7 kg without any problems.


Mounting plate, which is often referred to as an invoice among masters - the third option on how to properly hang a chandelier on a base ceiling. It can be used most often when the use of the two options discussed above is not possible. In most modern chandeliers, the package includes everything you need to fix the lighting fixture in this way. So why not take advantage of this?

Necessary materials and tools

- perforator with a drill;
- set of wrenches;
- a knife with a sharpened blade;
- screwdriver;
- mounting foam for sealing wiring;
- pencil;
- dowels;
- anchor bolts;
- terminal connectors.

- hook;
- patch plate from the kit;
- hanging hook.


Anchor hook installation

As noted above, this is the easiest and most reliable way to hang a chandelier on a concrete ceiling base. In many old houses, it is already prudently mounted in advance, so the whole process takes a modest amount of time and does not cause any difficulties even for an unprepared person.

If the hook needs to be installed, then the algorithm of work will be as follows:
- select the fixation point on the concrete base;
- we drill a hole of the required depth and diameter in a concrete base - we take into account the size of the decorative cap of the lighting device;
- we insert the anchor hook into the concrete base and twist it with a wrench.

Gimbal installation


This option is relevant primarily for hollow concrete structures, as it provides good bearing capacity even in the case of bulky light sources. The clamping hanger is a reliable design consisting of a spacer rod and a hanging bar with all the necessary holes for fastening.


The correct sequence of operations when working with a gimbal:
- the prepared spacer rod is inserted into the hole in the concrete base;
- the hanging bar is placed inside the concrete slab;
- the spacer rod is threaded through one of the holes on the plank: if you want to shorten the distance from the ceiling to the hook, then choose one of the end holes.


Installing the trim strip

In terms of reliability, this installation method is in no way inferior to the two discussed above. Due to the fact that a variant of such a bar is always included with a newly purchased chandelier, it is also noticeably lighter - there is no need to waste time on a tedious search for the necessary materials.
May be in the form:
- crosses;
- narrow plate.


The overhead plank is attached to the concrete ceiling surface with dowels and anchor bolts. Most often there are a pair of them - either 2 or 4.
Installation and connection of the chandelier

The main condition that requires strict execution is to observe electrical safety precautions. To do this, pay attention to the following recommendations:
- turn off the power supply at the switchboard;
- check the location of the wiring with a conventional tester;
- seal the wiring entry: for this, you can use mounting foam with active resistance
- fire or non-combustible mineral wool;
- Avoid twisting copper and aluminum wires.


If you are dealing with a metal hook, then it will help to reliably protect yourself from a short circuit. insulation. To do this, use a conventional insulating tape or a rubber cover. Both can be easily found at any hardware store.


It is also necessary to take into account some features of the electricians of old houses - they lack grounding. In order to hang the chandelier correctly in such conditions, you first need to determine the phase on one of the wires of the power cable and connect it to the end of the lighting device, and the second to what remained on the power cable. If the lamp did not work, then the same second wire is grounding. In this case, it must be disconnected and fixed with the other free end of the power cable.


Algorithm for direct installation of a chandelier on a concrete ceiling:
- remove all decorative elements from it to avoid damage and possible fall when fixing to the ceiling;
- on a pre-grounded hook-loop at the end of the chandelier's output rod;
- connect the mounting ends of the chandelier to the power cable;
- if the mounting method you have chosen is an overhead mounting plate, then after the previous paragraph, put the cap on the plate in such a way as to get on the desired holes, and use the nuts to securely fasten it;
- fix the decorative cap so that it completely covers the mounting hole in the ceiling;
- check the correct operation of the lighting device.


All stages of mounting a chandelier on a concrete ceiling in one video
Conclusion
After carefully studying the proposed article-instruction, you will quickly understand how easy and, most importantly, correctly hang a chandelier on a concrete ceiling without spending a lot of precious time on it. In comparison with other installation conditions for lighting fixtures - for example, on stretch fabrics - a clean base involves a simplified algorithm of actions (read how to fix a chandelier to a stretch ceiling if it is already stretched). In fact, the most difficult thing is not to make a mistake when directly connecting the light source to the wiring. Only a serious attitude to electrical safety issues and scrupulous adherence to the proposed work plan will help you easily overcome this stage and after some time enjoy spectacular lighting on your concrete ceiling.


A chandelier is not only a source of light, but also an effective design technique. True, such a decorative element has its own installation features, which directly depend on the design of the chandelier itself. At first glance, it may seem that hanging a chandelier is very simple, but in fact there are many nuances in this procedure that are very important to consider.
Ways of fastening chandeliers
On a hanging hook
How to hang a chandelier on the ceiling? Such fasteners are often mounted directly into the ceiling at the stage of construction or renovation of the premises. Before installing a chandelier for false ceilings, you must make sure that the hook can support its weight. To do this, a load is suspended from it, equal in mass to the lamp, or simply pulled by it. After you are convinced of the reliability of such a fastening, you can proceed with the installation of the chandelier.
To install the hook, it is necessary to drill a hole in the ceiling, screw an anchor or self-tapping screw into it in the form of a hook. The first type of fastening is used for concrete floors, the second - for wooden ones. After that, the anchor or self-tapping screw must be wrapped with insulating tape in two layers. The chandelier is hung on a special ring.
On the bar
In this case, the chandelier is not hung on a hook, but directly on a bar, which is fixed on the ceiling. For its installation, you need to mark the place where you want. Then holes are drilled in the ceiling, into which dowels are hammered. They must match the holes on the mounting plate, which is fixed with screws. The lamp, in turn, is attached to the bar. It is mounted so that the element covering the wires and the mounting place fits snugly against the ceiling.
How to hang a chandelier from the ceiling
Installation of a chandelier to a stretch ceiling should be carried out very carefully, since the canvas is sensitive to various kinds of mechanical damage. Therefore, everything must be done very carefully (in more detail: "").
There are several ways to install a chandelier on a false ceiling:

To create a strong mount on the ceiling, special plastic rings are used. Their size depends on the type and size of the chandelier itself. Such a ring is glued to a stretched canvas. After that, a hole for the wiring and a hook is cut out along its inner diameter.
How to hang a chandelier on a plasterboard ceiling? Everything is quite simple. It is better to mount ceiling suspended chandeliers with the help of special fasteners - dowels of "butterflies". When a self-tapping screw is screwed into them, the dowel unfolds in the hole and is able to hold a fairly large weight. On the GKL canvas itself, the places for attaching the chandeliers are marked in advance with the exact indication of the points for drilling. The holes are made 3-4 mm larger than the diameter of the dowel.

What to do if the chandelier is heavy
The method of fastening a large and heavy chandelier depends on the material of the ceiling itself.
Concrete floor
How to hang a chandelier from a concrete ceiling? The surface is drilled with a puncher, how to hang a chandelier on a concrete ceiling with a conventional drill will not work (read: "How to hang a chandelier on a concrete ceiling - mounting options and rules"). An anchor spacer hook is inserted into the resulting hole. It is fixed until it stops, while it is necessary to put a coupling on the end of the threaded part. Thanks to this, it is possible to create a strong and reliable fastening of the chandelier, regardless of its weight.
If the ceiling is made of plasterboard, then the lamp is fixed to the base base.

For this you will need:
- anchor collet;
- eye nut;
- threaded stud, 10 mm in diameter.
How to fix a Chinese chandelier
In order to hang a Chinese chandelier, you do not need to use mounting hooks. The entire set of fasteners is already included in the kit for the lighting fixture.
A bracket is applied to the place indicated on the ceiling. Using a drill or a puncher, a hole is made into which dowels are then inserted. And with the help of self-tapping screws, the bracket is fixed to the ceiling.

How to hang a chandelier from the ceiling? The above bracket has a special mount, to which a chandelier is suspended by means of a decorative plate.