Gabions step by step instructions. DIY gabions - step-by-step instructions
Walking through someone's dacha, you can hear an admiring exclamation: “look how cute and beautiful the gabion is”! What is hidden under this concept?
Gabions are light and transparent mesh boxes made of rigid wire, which are filled to the top with filler, usually natural or artificial stone. These are practical and elegant containers made of metal and stone have a number of advantages:
- easy to install,
- durable and stable,
- compact,
- are not afraid of soil shrinkage and follow all the contours of the soil,
- environmentally friendly,
- with good sound insulation,
- waterproof,
- goes well with any country landscape,
- of course - very beautiful.
Thanks to these properties, for the construction of fences, parapets, retaining walls, for the design of reservoirs, installation garden furniture, and also as a variety of picturesque decorative elements on.
Types of gabions
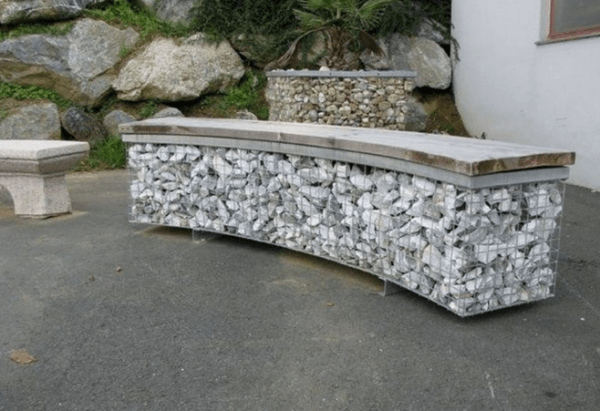
Most often, a gabion has the shape of a spacious box in the form of a regular rectangle 1.0-6.0 m long, 0.5-2.2 m high and 0.1-1.0 m wide. For example, gabions 1x0.5x0.5 m are sold; 4x1x1 m; 1.5x1x1; 3x2x0.3m; 6x2x0.5 m; 1.5x1x0.5 m, etc. Such containers are great for fencing a flower bed, lawn or recreation area, as a “leg” for garden furniture, for delimiting an area or building a fireplace, mini-waterfall, retaining wall, fence, etc.
There are also so-called flat (“mattress”) gabions, which are usually used to strengthen the bottom of the pond, strips coastline or slope. Their traditional filler is river pebbles of all shapes and types. Due to their small height - up to 30 cm - such structures easily follow the curves of the ground surface.
Finally, there are cylindrical baskets, which are suitable for strengthening various retaining walls, for laying bottom foundations, as well as in decorative purposes(“columns”, “legs”, “columns”, etc.).
General design of gabions
For mesh boxes, special galvanized or galfan wire is used with a coating strength 4-5 times higher than that of a conventional mesh - chain-link (the latter is not suitable for gabions!). Also, sometimes the wire under gabions is covered with a layer of PVC, especially for underwater structures, to protect them from corrosion. The thickness of the wire, taking into account the coating, is usually 2-6 mm.
Container cells have the form of a rectangle or hexagon. Additionally, the strength of the basket is achieved through double torsion technology or welding. In the first option, double-twisted steel wire is attached to a rigid frame, and in the second, the rods are welded at their intersection at an angle of 90 degrees.
The opposite sides of one gabion are fastened with special strong braces. If there are several containers, they are linked into one monolithic structure using staples or a spiral. Large containers can be equipped with intermediate diaphragm compartments, which reduce the risk of swelling.

Filler selection
More often as a filler for a gabion in the country different ones are selected rocks , both natural and artificial formations. Suitable:
- granite,
- basalt,
- limestone,
- marble,
- diorite,
- pebbles,
- travertine, etc.
The main colors of this filler are grey, black and white, but you can also get red boulders or colored glass stones to achieve a beautiful decorative effect.
Optimal stone size- within 7-20 cm. The main thing is that the stones do not fall out of the mesh. For “land” containers, it is recommended to choose stones whose size is approximately 30% larger than the size of the gabion cell, and for underwater structures - 50%.
It is also very important that the filler is durable (grade of stone - not lower than 400M, optimally - 1000M), frost-resistant (from 200-300F) and does not erode (not lower than 0.6% of weight), has specific gravity from 17.5 kN/cub.m.
As an alternative for purely decorative purposes to fill gabions, you can use brick, paving stones, wood, glass, broken tiles, concrete, etc. For example, installing gabions with imitation logs underneath is very popular.
Let's go into more detail now let's get acquainted with installation of gabions at home.

Installation of gabions
Tools and materials:
- shovel;
- level;
- wire cutters and pliers;
- bucket;
- a flat board and a pole or crowbar for leveling stones;
- gabions;
- supports, sand, cement (for high gabions);
- long, straight rail;
- reinforcement for corners and bracing cables;
- metal spiral or wire crimps;
- geotextiles;
- filler for gabion;
- small crushed stone for filling the base.
Step 1. Preparing the base on the site
Clean up the site of the future gabion well. The site must be planned, without strong unevenness. Approximately the length of a shovel or a little less, remove the turf, making a small, even trench the width of the container, trim and compact it.
Step 2. Folding the box
Unpack the package, lay the gabion horizontally on a flat area and make sure that it is free of defects. Then bend all the walls and collect the gabion into a container.

First, wire the corners of the box together, making sure that all the tops of the sides of the container are in line. Then “tie” the ribs with wire. Reinforcement must be driven, welded or inserted into the corners.
You can buy more durable structures already in finished form in the form of welded sections.

Step 3. Installing an empty box
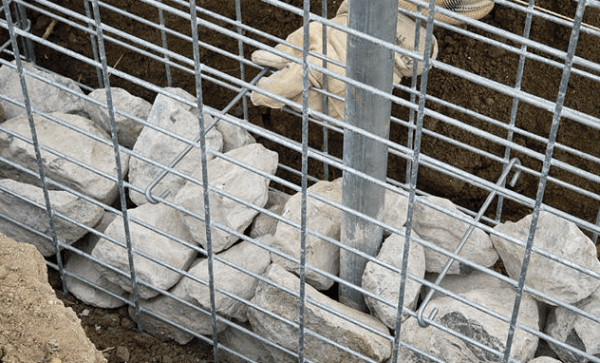
Install the gabions evenly, without distortions, controlling everything level. It is allowed to slightly deepen the box by 5-10 cm into the prepared groove - the container will then sag under the weight of the stones and “fix”.
And here for high fences or retaining walls As a rule, support columns are set up and concreted in advance (for example, 60*40 mm). Then a gabion mesh is “dressed” on top of them, which is secured to the supports using assembly pins with bolts or by welding. It is recommended to concrete the supports to a depth of approximately 50-70 cm with an interval of 1-1.5 m based on the length of the basket. To lower the gabion, the mesh from below must be cut in advance. After filling the stone, the support pipes will not be visible.
For standard gabions You can weld longer reinforcement pins in the corners, which are then dug in or even concreted - this way the box will stand more securely. The empty box is temporarily supported with wooden spacers while the concrete hardens.

Step 4. Installation of subsequent blocks (if necessary)
To connect individual blocks, use a metal spiral or crimp brackets, thanks to which all your baskets will become one solid structure. After joining, be sure to check the straightness of adjacent edges and faces.
Temporarily attach to the outside of several empty containers wooden slats to ensure the levelness of the façade of all gabions while the stone is being laid. At the end of the work, the slats are removed.
Step 5. Filling with filler and installing braces
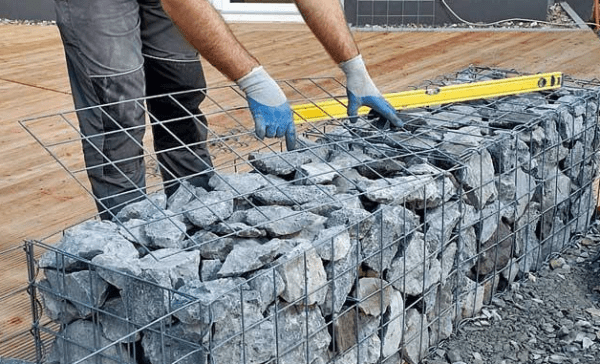
First, line the box with stones up to half its height. To do this, lower stone by stone one at a time, or even better, using a small board, trimming them with a pole. For smaller fractions, you can pour the filler out of the bucket, leveling it right in the basket with a crowbar and your hands. Select stones according to their shape so that when laid, they fill all the voids to the maximum and fit as tightly as possible.

After filling the lower half of the box, tighten the opposite walls of the gabion with special bracing cables in the form of stiffening ribs to prevent further swelling of the container walls under the weight of the stones. Place horizontal braces evenly in 4-5 cells across the entire width of the basket in increments of approximately 25-40 cm.
Then proceed to further filling the remaining half of the mesh with filler to the very top of the container.
It is recommended to fill taller gabions by a third first. That is, in this case for tall structures everything is done in three approaches: filling a third of the stones, then placing braces, filling again up to 2/3 of the container, ropes again, and finally stones to the top.
Invisible places of the gabion, its middle, but no more than 15-20% of the total volume, can be carefully laid out with smaller stones or even construction waste, having previously covered the slag or scrap with geotextile. This does not deteriorate the properties of the container, but you can save money and time.
Finally, close the lid of the mesh box by pulling it tightly and securing it with wire. First, pre-tie the corners of the lid, checking that the sides fit evenly everywhere, and then secure the ribs.
After installation, hose down the cobblestones to remove dust.

Step 6. Finishing the top of the gabion
Most often, the top of the container is left to “breathe”. If desired top part structures can be finished with wood or various decorative boards. For example, with reverse side decorative panel Metal brackets are installed in advance, and after filling the stone, they are attached to the top of the container using wire.
To refresh the gabion and give it a natural style, you can plant greenery in the space between the pebbles. climbing plants- it will turn out very picturesque.
At this point the work is completed. As a result, the gabions will be long years serve as practical and very beautiful decoration landscape of your dacha, bringing into it a bit of aristocracy and elegance!
Installation of a multi-level gabion in photographs

1. There are many options for landscaping a personal plot. One of the most popular today is gabions. What are gabions?
The word comes from the Italian gabbione, meaning “large cell.” This is a structure whose frame is made of metal wire with an anti-corrosion coating. Natural stone can be used as a filler,
crushed stone, pebbles, or even rings of wooden logs. With the help of gabions, you can build a wide variety of structures on the site, and the technology itself
manufacturing is so simple that making gabions with your own hands is quite a feasible task.

You can purchase ready-made gabions, although they are transported to
disassembled, so in any case, the gabions will have to be assembled on site. In addition to the fact that gabions are quite simple to manufacture and assemble, there are a number of undeniable
advantages of this solution, which makes gabions so popular:
— reliability and durability. Gabions are not sensitive to ground movement.
- gabions allow you to make a structure of almost any shape and size, which makes them simple an indispensable tool landscape designer.
— gabions do not require special care.
- allow you to use a wide variety of materials as filler.
Types of gabions
2.
Gabions can perform a wide variety of functions; next we will get acquainted with the main types of gabions and their purpose.
— Gabions flat shape.
They are also called Reno mattresses - part of the name of the river near Bologna, where a similar design was first used in the 19th century. to prevent
floods of the river of the same name. Such structures are most often used to strengthen river beds, as well as as a platform for massive structures.

Flat gabions
— Gabions in the shape of a box. They are used as fortifications of river banks or barrier structures. The main purpose of such structures is to prevent landslides,
in areas where dams or bridges are being constructed. As a rule, these are very impressive structures, for greater strength, they are constructed in the form of protrusions.

Box shaped gabions
— Cylindrical gabions. The scope of their application is quite wide, but most often they are used in landscape design.

Cylindrical gabions
— Gabions of non-standard shape. Such gabions can imitate the outlines of animals, fairy tale characters etc. The main functional purpose is decorative.

Gabions of non-standard shape
Despite the fact that gabions were first used as fortifications (they were known and widely used already during the Napoleonic Wars),
Nowadays, this technology is increasingly used for purely decorative purposes. For example, such as decorating flower beds, making bases for garden tables, benches, benches, making paths, stairs, fences and even gates, etc.
Step-by-step instructions for installing gabions with your own hands
3.
Now let's look at the main stages of production and installation of gabions. To make gabions, we need a mesh (as we said earlier, it must be covered
anti-corrosion coating), reinforcement - it will make our structure more durable, connecting brackets, and of course the filler - stones, or
other material. It is important to keep in mind that the dimensions of the filler elements must be at least 1.5 times larger than the dimensions of the frame cells.
In the case of laying the gabion on the bottom of a stream or river - where, among other things, the filler will be affected by moving water, this ratio should be 2:1. However, the use of filler smaller than the frame cells can be used. Such elements are placed in the middle of the box, so that larger elements prevent them from falling out.
We cook from tools pliers, stapler, shovel, pry bar.
The first step is to prepare the base. To do this, the soil on which the gabion will be installed must be properly compacted. If the structure is massive enough,
It makes sense to pour a small foundation.


If the box is quite massive or has a non-standard shape, it makes sense to install stiffeners. After the box is filled with storage, we perform final stitching. There are several tricks for installing the drive:
if a multi-format drive is used, then larger elements are placed along the edges - small ones in the middle. If the reservoir is a small fraction approximately equal in size, for example pebbles, then
it is poured into the box in layers. Before filling each subsequent layer, the previous one is compacted.

Thus, box by box, the entire structure is mounted. When using several boxes stacked on top of each other, the boxes are rigidly fastened.
So, in this article we talked about what a gabion is and how to make gabions with your own hands.
4.Video: how to make gabions with your own hands
Landscape design uses many simple designs allowing you to decorate your estate beautifully and at a minimum cost. Meet interesting solution: cell from steel wire filled with stones. Such structures are called gabions. They are manufactured in different geometric shapes and solve decorative and functional tasks. Any summer resident can make gabions with his own hands. To do this, you need to buy a metal mesh, build a certain structure out of it and fill it with large building material.
Types of gabions
The dimensions and shapes of gabions depend on their purpose. For example, they will be used as retaining walls, fences, bases for other structures (benches, flowerpots, lamps). They are also used to decorate fences, borders, swimming pools, and ponds.
These structures do not require a foundation. It is enough just to make a frame from galvanized mesh. It is divided into the following types:
- flat;
- box-shaped;
- cylindrical.
Flat “cages” are used for fencing, fences, and dividing a site into zones. Box-shaped are the bases for any structures, cylindrical ones are used to create decorative walls, curbs, fences.

Types of fillers
 The construction market offers to buy ready-made frames and fill with one of the following materials:
- beam;
- granite;
- crushed stone;
- pebbles;
- sandstone;
- broken brick.
Ready-made frames are offered by the retail chain. They are sold disassembled and assembled at the installation site. However, making gabions with your own hands is much more interesting. First, you will create exclusive design your site. Secondly, you will be proud of the work done. Thirdly, you will save on costs if you plan to use a lot of gabions.
 To build the frame you will need the following materials:
- metal grid, staples, pins;
- spiral wire for connecting structural elements.
Wire cross-section, mesh size, dimensions individual fragments depend on the purpose of the gabion. Work begins with the creation of a drawing: they depict on paper general form of the future frame and calculate its dimensions. The cells should be such that the filler does not fall out. The simplest solution: buy a galvanized chain-link mesh. However, it should be borne in mind that a metal mesh made of thicker rods has greater rigidity. This allows you to quickly give the frame an accurate shape.
 An example of creating a box-shaped gabion:
- Rectangles are cut out of galvanized steel mesh to fit the bottom, sides, front, rear walls and "lids".
- They are connected using twisted wire made of the same steel.
- Carefully level the place where the box will stand.
- Install the structure. They are fixed into the ground at the corners using long metal pins.
- The stone filling must be dense to prevent possible movement of the material. It is better to lay it in two or three layers. In this case, each layer is separated by wire intertwined in the longitudinal and transverse directions. This gives the box additional rigidity and retains its shape.
Other designs
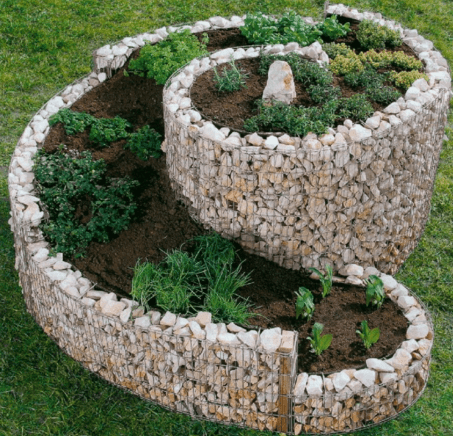
A cylindrical frame, on the contrary, is flexible. It is made in the form of a narrow bag. Allows you to make round, winding volumetric fencing for flower beds and ponds. Flat rectangular gabions are made for fencing. They are suitable for making original fence. The frame, 15-25 cm thick, 1.5-3 m long and of the required height, is attached to posts that are installed for fences. Other original solutions allow you to create multi-tiered gabions complex shapes and decorate the site with them.
How to reduce filler consumption?
In volumetric gabions, stone consumption can be reduced in the following way: geotextile bags with sand are placed in the middle of the frame. Decorative stones located along the internal walls of the structure. The thickness of the layer should be such that the bags are not visible from the outside through the cracks between the filler.
A gabion is a large metal cage made from twisted wire. This design is very easy to manufacture and place on your site. Similar design not expensive, and at the same time reliable to use. There is no need to take extra care of it.
Advantages of gabions
If we compare gabions with other similar structures, it becomes clear that gabions have great advantages. Their advantages include:
- high strength, as it can withstand heavy loads;
- each mesh design can be attached to the other, for this you only need galvanized wire, as a result you can get a monolithic structure;
- they go well with the rest of the landscape, so over time the effectiveness of such a structure will only increase;
- low usage and installation costs;
- ease of installation due to the light weight of the product.
Gabions have many advantages, thanks to which they are widely used in various fields and regions.
Types of gabions
Depending on the type, the following gabions are distinguished:
- box-shaped;
- cylindrical;
- flat.
It follows from this that the frame shape will be similar to a cylinder, a flat figure or the shape of a box; it must be made from a mesh or from a welded structure.
In a welded structure, the rods, which are laid perpendicular to each other, are welded at the intersection points. Welded boxes have rectangular shape, in order to connect the walls, a wire spiral is made.
The mesh structure is created by attaching a steel mesh to a rigid frame. Each cell of such a grid is hexagonal in shape.
How to make gabions with your own hands
Before you start making gabions, you should ensure that you have next material which you will definitely need:
- metal mesh, the thickness of which should be from 0.2 to 0.8 cm, depending on the parameters of the product. In this case, it is worth taking into account the operating features;
- fittings With its help, the frame is strengthened and given rigidity;
- wire staples and metal spirals. These materials are used to hold structural parts together;
- geotextile. This material is required to provide backfiltration and to reduce the consumption of sand or other fill material during installation work.
Be sure to stock up on stones. If for you appearance this is the main thing, then choose the material, different colors or unusual shapes. To do this, you must give free rein to your imagination.
To carry out work on the manufacture and installation of gabions, you need simple tools, many of which you probably already have: pliers or pliers, a stapler for installation, a pry bar, a shovel and anchors.

Attention ! If reinforcing bars are used in the manufacturing process, then it is necessary to use welding, since connecting parts with wire is a rather difficult process, which, moreover, cannot guarantee the required rigidity of the frame.
We make a frame
Since the weight of even a small structure will be significant, the manufacture and assembly of the gabion frame must be carried out at the site of its installation.
The gabion manufacturing process takes place in several stages. First, let's prepare the base; if possible, it is better to strengthen it, for example, compact the soil or remove upper layer soil. Use sand to make a pillow, the thickness of which will be from ten to twenty centimeters. Everything will depend on the weight and parameters of the gabion.

Attention ! If a fence is being built from gabions, then at a shallow depth it is necessary to build a strip foundation. This is especially necessary in cases where gabions are combined with sections made of traditional materials.
To prevent grass and other weeds from growing on the gabion mesh, it is necessary to make a shallow ditch around the entire structure. After which the ditch should be covered with geotextile fabric or ordinary black film, secure it by bending one edge under future design.

Then you need to cut the mesh in accordance with the pre-calculated dimensions and begin connecting it.
First of all, it is necessary to install the bottom of the structure, and lay the sides to it and secure them together with metal wire. The remaining wire must be tightly twisted and secured using pliers.

If your gabion needs to be quite large or with one of its sides disproportionately long, you should consider stiffening diaphragms. One of the sides should be open so that the structure can be filled with stones.
The last stitching should be done after all installation work is completed and the entire volume is completely filled.
After completing all work on the manufacture of the structure frame, it must be finally installed and fixed. To ensure the strength and reliability of the structure not only due to its own weight, the structure should be secured using anchors or homemade stakes. You can also use fittings, the diameter of which should not exceed 1 cm.
When manufacturing a structure consisting of more than one tier, it is possible to allow for the possibility of saving material, for example, when constructing fences. In this case, the gabion mesh of the lower tier can become the bottom for the upper one.
Filling the gabion with stones
After ready-made designs installed and firmly fixed to each other, you can proceed to the next stage - laying the stones. This is not a difficult stage, but it requires compliance with certain rules:
- you need to start filling when the gabion is in its place;
- if for internal filling stones of different sizes are selected, then large ones need to be laid along the edges, and the center should be filled with smaller stones;
- if you use small stones that have the same size and shape, then you need to lay them in bulk, in several steps, compacting all parts;
- with a gabion height of more than 1.5 meters, stones should be laid in several layers, the thickness of each of them should be from 15 to 25 cm. In addition, after the structure is filled to 1/3, it will be necessary to make stretchers, which will opposite sides are fastened to prevent deformation;

Advice ! If the structure has a height of more than a meter, then this procedure should be done again after a certain period, for example, after filling two-thirds and three-quarters of the volume
- if the gabion consists of many levels, then the bottom row should be filled with stones, taking into account their shrinkage under the influence of their own weight, as well as under the action external load, so they need to be filled an average of 5-7 centimeters higher top edge designs;
- sometimes it is possible to use stones that have a smaller fraction than the parameters of the cell, but then they must be laid in the middle of the structure or at the bottom of the structure; they must first be wrapped in geofabric, which will not create an obstacle to water, seeping through the gabion, but will not allow it to wash the filler from the gabion;
- after completing the installation and filling of the gabion, you need to perform the last step - cover installed structure cover and secure it with a metal spiral made of wire.
Advice ! To ensure that the stones do not move and the image does not lose its appearance, perform the steps in several stages. Lay out the stones by hand, making sure to compact each layer in the gabion.
Conclusion
Gabions are a good tool for creating cheap and cheerful decor in your personal plot or garden. This type landscape design is flexible and mobile. And this gives free rein to your imagination.

Your masterpieces will look respectable and beautiful. And the main thing is to make a gabion with your own hands and with minimal costs. Show a little imagination and imagination, be a designer, create and give joy to your loved ones and those around you. After all, when your eyes are pleased with such beautiful elements of landscape design as gabions, your mood will improve and your soul will be at ease.
What is a gabion in landscape design? Manufacturing Designer Lessons