How to make a small house for dolls. Pets for dolls
Every princess dreams of her own dollhouse. Right now in modern world, you can buy such a house in any children's store, but the price is too high for it. Therefore, there is a simple budget solution- to make such beauty yourself. You don’t need to buy anything specifically for this, you can use all the tools at hand: the remnants of old wallpaper, bamboo sticks, beads, plastic, fabric and much more.
The most important thing is to draw a sketch correctly, and decide on the dimensions.

Take a sheet of fiberboard and cut everything necessary details: walls, roof and floors of our floors. We carefully glue all the parts with PVA glue. Sometimes sawdust is added to it for strength, but if your glue is thick, this will be enough.

We glue the roof of the house with corrugated cardboard of any color.

We disassemble the bamboo kitchen napkin into parts, for exterior finish our home.

On the first floor, for decoration, we glue the “bricks” previously cut out of cardboard.

We take a large sheet of fiberboard, for stability, and glue our entire finished house.
Now we proceed to the most time-consuming process - sculpting various accessories from plastic. These will be various flowers, dishes, products, accessories for home interior.

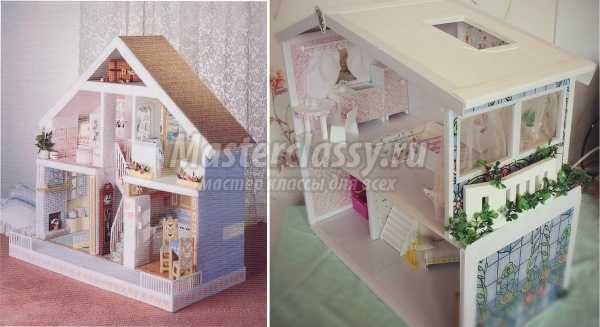
We cut out the window frames from cardboard and glue them on both sides (outside and inside).

We glue cardboard window sills on the ends and decorate them with pots of flowers on top.

Next, we make a balcony. We take toothpicks and stick them into the cardboard on both sides, into the floor and railings (see photo). And on wire hooks to the railing we hang a cardboard box in which there are molded flowers.

We insert a dormer window (it can just be a thick cover for a book or notebook).

We wrap the front door. You can print a picture of the door and stick it to the desired place. The handle is made of plastic.

We glue the grass lawn from hard green washcloths. We make small flowerbeds from cardboard boxes, and insert flowers molded in advance from plastic into them.
Interior decoration dollhouse.
Living room
We paste over the walls with colored cardboard, take a cellulose kitchen napkin on the floor, a suitable pattern, for the ceiling you will need plain white paper.

After we have glued the ceiling, we hang the chandelier - make a hole in the fiberboard with an awl (but not through, so as not to accidentally get out on the floor top floor) and glue a wire ring to hang the finished chandelier.
Children's room

We paste over the walls with gift paper, for wrapping, with a pattern of a children's theme. If not, we take any paper with a children's drawing. We glue colored cardboard on the floor, which resembles a laminate.
We make cornices for curtains: we put the curtain on a bamboo skewer and insert it into the fasteners on the wall from thin strips of cardboard. We hang a chandelier on a wire ring.
Kitchen

We paste over the walls with a napkin with the desired pattern, or we take the remnants of real wallpaper, as in this case.
We fasten the curtains in the same way as in the nursery; for beauty, you can sew on tiny home-made plastic buttons. We hang the chandelier on a wire ring. We take a ruler and draw a “tile” on the floor.

Bathroom
Draw the floors and bottom of the walls with a gel pen, imitating tiles. For the top of the walls, take a paper table napkin with a "marine theme". Glue it to the cardboard for strength, glue our walls.
A dollhouse is every girl's dream. And just such a toy can become original gift for your daughter. Of course, you can buy such a toy, but it will be much cheaper to make it yourself. And if you do not plan to present the house as a surprise, then you can work on it with your child, doing joint creativity. This article will discuss how to make a house for dolls from improvised materials and at no extra cost.
Materials and tools
So, how to make a house for Barbie with your own hands? First of all, you should decide on the material for the frame. It can be plywood, cardboard boxes, or an old bookcase. Depending on the selected material, the course of work is further determined.
If we choose as the basis plywood sheets, then you will need to stock up on a saw or a jigsaw, you will also need a tape measure, pencil or marker and a large ruler. To work with cardboard boxes, glue, scissors and a clerical knife are useful, and if you use a rack as a frame, you can only get by with a brush and paints.
Do-it-yourself house made of cardboard
Of course, Dollhouse should be multi-storey, any girl will tell you that! Therefore, it will take several cardboard boxes. So, in order to make a frame, all the boxes are stacked on top of each other with their sides and glued together. Next, this design must be pasted over with wallpaper and outline where the windows will be, which are then cut out with a ruler and a clerical knife. The openings are decorated with edging tapes used in the repair, or the frames are simply painted with paints. If the boxes are pasted over with wallpaper for painting, then with the help of water-based paint it will be possible to give the toy absolutely any color, both outside the house and inside.
How to make a house for Barbie interesting and fashionable? By painting the rooms pink, of course. It is this shade that is most comparable with this glamorous doll. Pink walls in combination with a white ceiling, window frames and some kind of tiger or leopard fur rug on the floor will look very harmonious and stylish.

House for Barbie from plywood
To make the structure of the house stronger, plywood sheets should be used as the material for the frame. To connect the parts to each other, bars are usually used, to which the elements of the house are nailed with small carnations. So, let's figure out how to make a house for Barbie with your own hands from plywood sheets?
Even before starting work, you need to do some calculations. First of all, the area of \u200b\u200bthe house is determined and the bottom is cut out, then the width and height of the walls are calculated. Such a house can also be multi-storey. In this case, the walls are made high enough so that ceilings can be attached to them. Using miniature canopies, the house can be made with an opening front wall and roof. In order to facilitate the work, windows, doors and other holes are cut out on blanks using a jigsaw. Only after all the elements of the future house are ready for assembly, they are connected together. First, two parts of adjacent walls are nailed to a block, then the same is done with the remaining parts, and then the bottom and roof are attached. If the house is multi-storey, then the blocks for decorating the floor are also nailed before the parts are assembled and another element is prepared, the same size as the bottom of the house. In this detail, you can make a hole for decorating the stairs.

Decorating a plywood house
After the frame is ready, it's time to start designing. As a finish, it is best to use ordinary oil paint. Of course, it is not worth working in the house with her, it is better to do it on the street. As a result, you will get beautiful glossy surfaces. Using stencils on the house, you can draw various patterns in the form of flowers and butterflies, which will add sophistication and charm to the dollhouse. Frames and doorways should also be colorfully highlighted. In order for the house to look harmonious, it is best to use no more than three colors in the decoration, while you can play with shades.
How to make a house for Barbie with your own hands as glamorous as the doll itself? Details are very important here. For example, an old earring with numerous beads can be hung from the ceiling as a chandelier, and the walls can be striped or decorated with a heart-shaped ornament. Exactly decoration will play a significant role here.

House from an old rack
If the house has an old rack that is long overdue to be replaced, there is no need to rush to throw it away, because it can be a great toy! How to make a house for Barbie with your own hands from old shelf? Yes, very easy!
First of all, the rack should be shortened, leaving right amount floors. Can be made from waste pitched roof, which immediately determines new life old shelf. For a child, the realism of the toy is not always important, and therefore it will be enough to paint the windows with paints, hang pictures of Barbie on the walls of a small house and furnish the rooms with doll furniture.
Stores offer customers wide range of all kinds of toys, including dollhouses. Every girl dreams of getting one of them, while parents can easily make a beautiful and durable doll house in just a few days. Moreover, the child will be able to take an active part in the process and express all his wishes about the size and design. To make a do-it-yourself dollhouse out of plywood, you will need a diagram that you can draw yourself or find a ready-made one on the Internet.
We make a drawing of a plywood dollhouse with the dimensions of all structural elements
A toy house and plywood cannot be built without a detailed drawing, on which the dimensions of all its parts will be applied. To do this, you must first determine the approximate dimensions of the future house, and imagine what shape it will be.
When reducing or increasing the design, it should be remembered that all dimensions should also be proportionally changed.

The house consists of the following parts:
- Back wall: has the shape of a pentagon. Its sides are 76 cm, and the base is 106 cm. The upper side is an uneven triangle, the top of which is at a height of 91 cm.
- Gender: has rectangular shape. Its dimensions are 106x38 cm.
- Overlapping of the second floor: a rectangle with dimensions of 104x36 cm.
- Side wall (2 parts): is a rectangle 36x76 cm.
- Inner wall with right side: rectangle 25x50 cm.
- Inner wall on the left side: rectangle 25x43 cm.
- Left side of the roof: rectangle measuring 76x39 cm.
- The right side of the roof: a rectangle with parameters 45x39 cm.
How to make a house for a doll with your own hands from plywood: a step by step guide
After cutting out the parts with a jigsaw or hacksaw, you need to carefully process them sandpaper with a fine spray, and then proceed with the assembly. At this stage, windows of arbitrary sizes are cut out and also carefully processed with sandpaper.

Making a house step by step:
- The side walls are attached to the base with the help of self-tapping screws and building glue, and then the ceiling of the second floor and internal partitions.
- The roof is being installed.
- Decorative tiles made of cardboard, colored paper or other materials are glued onto the roof.
- Next, the house is painted with paints (acrylic, gouache, watercolor);
- The rooms are pasted over with wallpaper, fabric, film.
- The floors are covered with pieces of linoleum, laminate, carpet, felt.
- Furniture and interior items are arranged.
Near the house you can do small garden ik placed in a box in which trees cut out of cardboard will grow.
If the parts were not cut too evenly and a gap formed between them, then it can be covered with wood putty and then painted over.
How to assemble a plywood house for children with your own hands easily and quickly
A small plywood house designed for games will appeal to any child. After all, he will have his own space there. It is not difficult to assemble such a structure yourself if you first make drawings and cut out the details.

What you need for work:
- Sheets of plywood, the thickness of which is not less than ten millimeters. The required quantity is easy to determine by adding up all the areas of future parts.
- Beam for the frame size 40x40 or 50x50 mm.
- Plexiglas or plastic for windows.
- Canopies for doors.
- Finishing materials (wallpaper, non-toxic paint, putty).
Blanks are made from timber and plywood and sanded with sandpaper until completely smooth. The frame is assembled from a bar, and plywood blanks are attached to it. Next, windows and doors are installed. Then the house can be painted inside and out or wallpapered. Furniture is being brought in. From the remnants of plywood, you can make decorations and install them around the house. The children's play house is ready.
Fasteners must be hidden so that the child cannot be injured.
We make a plywood castle with our own hands: drawings and recommendations
Plywood is one of the easiest materials to process, so you can make not only simple houses from it, but also beautiful castles for princesses and knights. To do this, you need to be patient and carefully draw every detail of the future castle. The drawings are made by analogy with the drawings of a dollhouse, but towers, balconies and terraces are added to the details. There are a lot of themed sites interesting models which are easy to build yourself.

Tools needed for work:
- Simple pencil;
- Ruler (simple and curly);
- Electric jigsaw;
- Screwdrivers or screwdriver;
- A hammer;
- Sandpaper;
- Tassels;
- Fasteners.
Ice cream sticks can be used to fence balconies.
Beautiful plywood doll furniture: drawings and manufacturing methods
Plywood can be used to make almost any piece of furniture. toy house: beds, tables, chairs, cabinets, sofas, shelves. The furniture made according to the drawings turns out to be quite large, so it is suitable for both Barbie dolls and baby dolls.
Furniture parts can be glued or connected with self-tapping screws and furniture studs. Basically, plywood is taken, about 4 mm thick.

What you need to make furniture:
- Pencil and paper;
- Jigsaw manual;
- Fine sandpaper;
- Liquid nails or wood glue;
- Paints and varnish.
When assembling small furniture, it is better to use glue, because fasteners can damage parts.
For all furniture details, you first need to draw and cut out a template. Then circle it on plywood and cut out structural elements with a jigsaw. Edges are frayed. The parts must be connected together, and then painted and varnished or upholstered with a cloth using a stapler.
We make a plywood house for a doll with our own hands (video instruction)
From plywood, you can make durable and beautiful toys that will please the child for a long time. With drawings, free time and a modicum of patience, this will not be difficult even for those who do not have any skills in this matter. And by showing imagination, you can create real masterpieces that will cause surprise and delight not only in the child, but also in others.
A dollhouse is an essential attribute of any play area. This is the place where girls learn to be homemakers. Arranging furniture, laying out things and hygiene items in the house, the child learns how to behave in Everyday life. If you want your child to be passionate about the game and at the same time explore the surrounding space, take an interest in how to make a house with your own hands. Costs will be the minimum and do not have to buy expensive designs in the shop.
Cardboard doll house
Such a house for dolls can be successfully made from a box from under a TV or other medium-sized equipment. So, do-it-yourself dollhouse: a master class.
The main materials and tools needed to make a house are:
- cardboard box;
- PVA glue and adhesive tape;
- scissors;
- colored paper;
- paints.


The roof of the house is glued with adhesive tape.

A large box must be divided by partitions so that 3 floors are obtained.

Then each floor is divided into rooms.

Next - the most interesting: you need to finish the rooms and put the furniture. We glue wallpaper on the wall: on the ceilings white paper, on the wall - colored. For this, trimmings from real wallpaper, which remained after the repair, are suitable.
We build another rectangle around the house, which will serve as a courtyard.

Exterior decoration of the house includes gluing the ends, back and roof of the house with another layer of cardboard (for greater reliability), gluing the edges with decorative tape and painting with patterns.

All kinds of pebbles, wooden blocks and artificial flowers are suitable for decorating the yard - we put all this on glue. Improvised grass can be made from a green sponge. We decorate the fence with white paint and a black marker.


It remains only to fill the finished house with furniture and guests. Furniture for the home can be bought, or you can, again, do it yourself.

Our house turned out to have seven rooms, and in the yard there is a cozy seating area.
You can also make a Monster High dollhouse yourself, and it will only differ from the usual one interior. What can I say - you will see for yourself in the photo! For example, here great idea how to make a house for monster high dolls with your own hands from cardboard boxes.

You can adapt unnecessary shoe boxes by gluing them together like rooms, pasting the walls and painting them with paints or gouache. Suitable for furniture matchboxes or other old toys and blocks. Here are some photo options.
In dreams, every girl has thoughts about her own doll house. Modern toy stores are full of different goods ... But the doll houses in them are almost all of the same type, and, moreover, unreasonably expensive.
There is an opportunity to avoid unnecessary family waste and at the same time to satisfy and please the child - to make do-it-yourself dollhouse. This idea, in most of its variety, is budgetary, and the craft itself will be one of a kind, exclusive. In addition, the happy owners will be able to furnish unique housing for Barbie or Monster High own will and discretion.
The “construction” of a new house is best done by the whole family. First, in certain moments brute male power will be required (especially when working with wood). Secondly, the child will be able to control the entire process and make adjustments, expressing certain wishes. Thirdly, when creating a masterpiece, decorating and furnishing, you will need the help of your mother, her innate sense of style and taste. Therefore, in the work on the lesson there will be for all households!
Master classes offer options for a variety of doll houses. At the same time, they use the following materials: wood (plywood, laminate trimmings), drywall, old bookshelves, cardboard (including boxes, folders for papers) ...
This list is by no means full list that can be put into action. In most models, for the convenience of the game, the front wall is either completely absent, or opens and closes like a door. So what material to choose? This decision is made by the child. And his assistants are just getting ready to get down to business with enthusiasm!

Dollhouse with your own hands. plywood house
The most practical and durable option - do-it-yourself plywood dollhouse, laminate and other types of pressed or solid wood. Such a toy is certainly worthy of attention.
Small models are made from plywood, as well as toy houses for the children themselves. A well-made case is convenient to decorate both inside and out. But it’s worth mentioning right away that without male help you can’t cope with it. The sketch is sketched independently or taken ready. A drawing is being prepared.

Plywood for crafts is taken sheet with a thickness of 7..10 mm or trimmings, the remains of a laminate are used. Of the tools and aids will be needed:
PVA glue or carpentry,
Roulette, ruler,
Wallpaper (remaining after repair),
A simple pencil or stylus,
The film is self-adhesive,

One of important details is an " Do-it-yourself plywood dollhouse "scheme. After all, it is on it that all the required for specific model details, determine the location of windows and doors, partitions and the size of rooms.
Having settled on the scheme you like or sketching it personally, they cut out all the elements of the future home.
The structure is assembled with glue and, for reliability, is fixed at several points with small nails or thin screws. Having laid the side walls, floors-spans and interior partitions, the roof is attached.
It can be made from corrugated cardboard (which is much lighter and does not load the structure with excessive weight) or the same plywood, finishing with painting “under the tiles”.
The house is located on a sheet of thick plywood or wood, which will give it stability. On request, wheels are attached to it for mobility.

If the front wall is missing, then all ends and joints are treated with end tape for beauty and aesthetics. appearance. The floor is covered with a self-adhesive film. The inner walls are covered with wallpaper.
And finally, you can arrange the furniture. Additionally, the interior is decorated with textiles: drape carpets, cotton curtains, linen tablecloths, etc. If the housing is planned as, then around it you can make a small garden or at least a lawn.

DIY dollhouse: Compressed foam
You can also make an excellent toy house from the scattered pieces of foam. Depending on its estimated dimensions, the material is taken with a thickness of 0.5..1.5 cm; but mostly leftovers.
In addition to this, you will need:
bamboo sticks
toothpicks,
glue or glue gun
tassel,
a piece of foam rubber or a foam rubber sponge,
acrylic paint,
wallpaper cuttings,
ruler, pencil,
corrugated board,
remnants of the ceiling plinth,
pieces of carpet, curtains, tulle, linoleum.
First of all, armed with everything necessary, the model is considered and the detailed drawing with detail. For a small children's room, the house can be "gaining" in height - multi-storey - to save free space. Sheet foam is cut according to the drawing.
When cutting material for crafts " How to make a dollhouse with your own hands»It is advised to cut it with a hot knife so as not to crumble. Together with the child, they decide on the location of windows, doors, interfloor stairs, and holes and openings are made in the required places.

Next, assembly begins. To create a strong and robust design fasteners will be toothpicks broken in half. First, the elements of the house are interconnected by them, and then by means of adhesive base. Ceiling and floor reinforce bamboo sticks as building beams or in the form of columns.
The interfloor ladder is made of thin foam or wooden planks; toothpicks are used for railings. Those who have the skills to complete will replace some of the details with this material.
On the roof, corrugated cardboard or polystyrene is cut into small pieces in the shape of a tile and, imitating a real tiled roof, glue the "cut" on the house, placing each subsequent piece with an overlap on the previous one.
The roof can be painted both completed and on preliminary stage. Outside, a balcony or veranda is attached, taking polystyrene for the base, and the sides made of bamboo sticks.
The exterior of the house is painted with acrylic bright colors. The premises are cleaned with carpet or linoleum; the walls are covered with wallpaper. Instead of window sills, cut and glue ceiling plinths. All sorts of accessories bring comfort: curtains on the windows, imitations of lamps on the ceiling, walls and other little things. The final point is the arrangement of furniture.
By the way, they are often made of foam do-it-yourself dollhouse furniture and other interior elements: a bed, a sofa, armchairs, tables, a fireplace, chest of drawers ... Styrofoam furniture is decorated with fabric, wallpaper or simply painted acrylic paint in the required color.

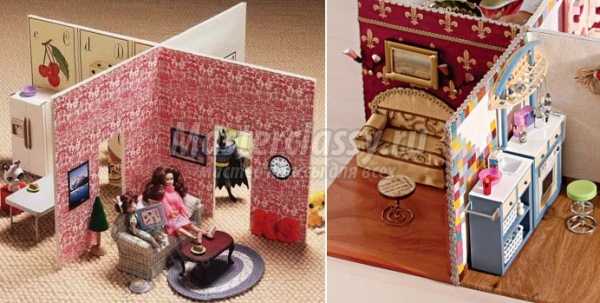
From drywall
In a minimalist version, a toy house can be represented as flat base and cruciform partitions, as in " Do-it-yourself dollhouse "photo. External walls and the roof are missing, which contributes to the convenient location of the dolls, and will not squeeze the child in space. The craft is not expensive either in time or in consumables. In addition, it will significantly save space in the child's room.
A drywall house has many advantages. In it, as in manufacturing, the weight of the product is important. After all, the lighter the doll, the more pleasant it is to play with it. So it is with the house, which children sometimes move, transfer from place to place ... Drywall is just what you need: with a relatively low mass, it has sufficient strength. It's easy to work with him. And thanks white color the completed house will not have to be whitewashed and painted, and the ends will look neat. But there is also a comparative disadvantage - brittleness.
From large sheets This material will turn out a full-fledged house for children's games. For him, you can even use the above diagram and description of the work, as for plywood.
DIY dollhouse: Out of the box
A cute house made of unnecessary boxes is attractive to craftsmen because there are practically no hassles with its manufacture: it is done quickly and from cheap, improvised means. DIY dollhouse out of the box easily drawn with colored felt-tip pens, pencils or watercolors. At the same time, it can be completed at any time in width or an additional floor can be attached.

You will need one to work on a cardboard house big box, which can be divided into 2-3 floors (based on the doll's height of 25..30 cm). You will also need:
Scissors or knife (cutter),
Painter's and regular tape,
Decor materials (colored and wrapping paper, fabric scraps, wallpaper trimmings, etc.)
Boxes master-dreamers and do-it-yourselfers have long been put into use. Thus arose. The doll house is one of the most successful.
According to the instructions for the house, a larger box is taken; preferably new or not too shabby and worn. It is cut in half, and the upper folding sides of both halves are cut off. The cut off parts will go to work: on the triangle of the side wall of the roof and the ceiling for the second floor with a hole for the stairs. The formed parts, as well as the subsequent ones, are glued with adhesive tape or glue.
Made from waste pieces gable roof and ceiling for the attic. Windows are cut out on the back side wall of the house with a clerical knife, Entrance door. The remains of the cardboard go to the interfloor stairs.
Each element is pre-drawn on the frame of the house. Sections, if desired, can be covered with masking tape. “Finishing” consists in painting all surfaces with paints or pencils: a tiled roof is drawn, window frames and doorways, from the outside you can even mark the lower formwork and apply a grid brickwork white marker.
In another version internal walls upholstered with scraps of fabric or pasted over with wallpaper, scrapbooking paper.

When the "repair" reaches the final point, you can take on the furniture. At the same time, cardboard can be made not only do-it-yourself dollhouse from boxes but also create furniture. Cardboard cubes are easily "turned" into interior elements by painting. And you can put other nice little things to them.

