DIY multifunctional workbench table. Instructions for making a carpentry workbench with your own hands with drawings and videos
All photos from the article
When carrying out carpentry work in his home, any amateur craftsman must have for them convenient device. It will guarantee the comfort and safety of your activities, and will also significantly intensify them.
Our article is devoted to how to make a woodworking bench on your own.

Typical desktop design
A carpentry workbench, in essence, is a massive and extremely stable work table on which wooden workpieces are processed different sizes. The larger the device, the heavier and larger elements can be processed on it.
However, you can work on it hand tools: saw, chisel, brace, etc., as well as mechanical: electric jigsaw, plane, drill, etc.
Layout of elements

A workbench for working with wood has the following typical elements.
- The working surface (tabletop, lid) is made of boards. They must be dry and have a thickness of at least 5 - 6 cm. The best option- use impregnated drying oil: oak, hornbeam, beech. Otherwise, the cover will wear out quickly.
- A vice is installed on the front side of the tabletop to secure the workpieces.
Pay attention! If the length of the workbench is more than one meter, it is best to hang a couple of different vices for processing small and large elements. Large vices can be made of wood, and small ones can be made of metal.
- The supports (legs) are usually made from soft rocks: linden, pine, maple, etc. They are mated to each other with longitudinally spaced planks. This way the structure gains strength and stability.
- Fixed on supports in the space below the workbench cover, you can place pull-out or tightly fixed shelves, drawers or cabinets for tools.
- On the front side of the tabletop, before making a workbench for wood, you should drill holes for mounting wedges, clamps and other devices for fixing large workpieces.
- A recess should be made on the back side of the cover, necessary for processing small parts.
A garage is a multifunctional space. In it you can install and repair cars, design and make various things and mechanisms with your own hands.
If a person likes to spend time in the garage doing repair work, he needs to properly equip his workplace. A workbench is a multifunctional work table on which you can process various materials, carry out metalworking, electromechanical and installation work. Also in the design of the workbench, you can consider shelves and drawers to store tools and other items.

Types of workbenches
Workbenches are made for processing metal (metalwork) and wood (carpentry). The designs differ in the material of the countertops. For metalwork models, the tabletop is in mandatory must be metal, since working with metal involves using machine oil and other liquids that are wooden surface may leave marks.

Also when processing metal parts effort and the use of a sharp tool are often required, so it is best to equip the workbench with a metal tabletop.
Woodworking benches are designed for working with wood, so they are not as durable or functional as bench models.

Workbench design
If the design of a work table for a garage is made by hand, then first of all you need to carefully think through every detail, figure out where the tools will be placed, what work will be carried out on the workbench. The model of the garage table depends on this.

Standard models are often equipped with drawers, which can be made of wood or metal. Also, the table design can be supplemented with shelves, a power shield for hanging tool, which will always be at hand. But most importantly, the workbench must be stable, durable and reliable.

Tool
Screwdriver.
Jigsaw for cutting plywood.
Grinder with a circle for cutting metal and a grinding disc.
Welding machine and electrodes. Overalls and protective equipment for welding work.
Materials
Angle 50 mm by 50 mm, thickness 4 mm, length 6.4 m.
Square pipe 60 mm by 40 mm, thickness 2 mm, length 24 m.
Angle 40 mm by 40 mm, thickness 4 mm, length 6.75 m.
Steel strip 40 mm wide, 4 mm thick, 8 m long.
Steel sheet for tabletop 2200 mm by 750 mm. Thickness 2 mm.
Steel sheet for making drawer holders. Thickness 2 mm.
Wooden boards for the tabletop. Thickness 50 mm.
Plywood for making drawers and for the side and back walls of the table. Thickness 15 mm
Guides for desk drawers.
Screws for assembling plywood boxes.
Self-tapping screws for metal.
Anchor bolts.
Paint for wood and metal.
The workbench, which will be made from these materials, has quite impressive dimensions: table length 220 cm, width - 75 cm. The overall design and large tabletop allow you to place a vice and, for example, emery or other tools at different ends of the table.
The first step in making a workbench is cutting the available material into elements. Profile pipe intended for the manufacture of frames. The steel angle is designed to create stiffeners. It is cut into pieces and a power frame is formed from it. Also, a steel corner is needed for edging the tabletop on which the boards will be laid.
The steel strip is intended for the manufacture of guides on which they will be mounted side panels. This material will also be used for brackets for fastening boxes and plywood.
Table drawers are made of plywood.
Second step - welding power frame workbench. The tabletop elements are welded first - 2 pipes 2200 mm long and 2 pipes 750 mm each. The frame must be welded so that another frame of corners can be welded on top of it, into which the tabletop boards will be laid. To reinforce the tabletop, it is necessary to weld a few more after 40 cm steel pipes, which will serve as stiffeners.

Then 4 side legs are welded along the edges of the workbench. Their length is 900 mm. Power bridges are welded between the legs to strengthen the structure.

Once the basic frame is ready, you can begin welding the structure for the boxes. To do this, square frames are formed from steel pipes, which are welded to the tabletop on both sides of the table. The frames are reinforced with longitudinal stiffeners.
The third step is making a frame for the tabletop. Two steel angles, 2200 mm long, and two more angles, 750 mm long, are needed to make the frame. The structure is welded so that wooden boards fit inside it.

The angle frame is laid on a pipe frame and welded. The result is a reinforced tabletop, 8 cm high with internal stiffeners.

The metal frame of the workbench is almost ready, all that remains is to weld the panel sheathing for attaching the tool. This requires one metal corner 2200 mm long and 4 corners having a length of 950 mm. Two elements are attached to the sides of the structure and two in the middle for reinforcement. The tool panel is welded to the tabletop.

The frame of corners and pipes is ready. You can begin to strengthen the structure. Brackets are welded to the sides of the table, which are cut from a steel strip. A total of 24 parts are needed. A hole is drilled in the middle of each bracket. Using these holes, the side and back walls of the plywood table will be attached to metal frame workbench.


The fourth stage is making drawers for the table. Plywood is cut into blanks, which are screwed together with screws. The number of drawers depends on what will be stored in the table. If the parts are small, then you can build 3 drawers; if the parts are large, then 2. It all depends on personal preference.

Drawers can be placed on both sides of the table, or mounted on one half retractable structures, and on the second there are ordinary open shelves.
After the drawers are assembled, you need to weld metal strips with holes between the sides of the drawer compartments. The slides for the drawer guides will be attached to these holes on the inside.


The fifth stage is laying the boards into the tabletop frame. Boards 50 mm thick are cut into pieces of a certain length. If you have a long board available, then you need three blanks with a width of 245 mm and a length of 2190 mm. If there are no long boards available, then you can lay the blanks across the table. For this purpose, wood 205 mm wide is cut into 10 pieces 740 mm long.
Before laying the wood into the table frame, it must be treated with an antiseptic solution. This will protect the material from rotting and damage by beetles.

Then it is imperative to paint the entire metal structure workbench. This will protect the metal from corrosion. It is best to use a weather-resistant and anti-corrosion coating option. Welding seams need to be painted especially carefully. Drops of metal and unevenness are recommended before painting works clean thoroughly. This can be done using an angle grinder with a metal grinding disc.


After the structure has dried, you can begin laying the boards on the countertop. They should not be driven too tightly into the frame. This is due to the fact that wood tends to expand and dry out when temperature and humidity change. It is better to leave a small gap of a few millimeters between the boards. The surface of the wood needs to be sanded, this will simplify installation metal sheet on top of the tree. The boards around the entire perimeter of the table are screwed to the frame with self-tapping screws.


The sixth stage is fastening the top steel sheet. It can be welded to the countertop, but there is wood inside the structure, which can ignite during the welding process. Therefore, it is best to attach the steel sheet with hidden screws to wooden boards. The metal must first be painted on both sides with a rust converter. This covering material looks like transparent paint coating, is easily restored and reliably protects the metal from rust. You can also paint the metal tabletop with the same paint that was used to cover the frame. It will be beautiful, but over time the paint may scratch and the table will not look very new.


The last stage is installing the drawers on the guides and attaching the plywood to the side walls, shelves and power shield in front of the table. This work can be called finishing the workbench. After work with plywood is completed, it must be coated with a composition that will protect the material from exposure environment. Also, do not forget about the design of a power shield for tools. You can attach special hooks or screws to it, from which the necessary things will be hung.


To make it convenient to work at a workbench, you can attach a special lamp with a bendable stand to the power panel. In this case, you can optionally direct the flow of light to the desired location.
Video - The process of making a workbench
Installing a vice on a bench
A vice is an indispensable attribute of a mechanic's workbench. It is not recommended to attach a clamping tool that weighs several tens of kilograms to the tabletop itself. It is best to place a 1 cm thick metal gasket between the metal of the table and the tool. You need to drill holes in the gasket for the anchor bolts. Then, in the same places, drill holes of the same size in the tabletop. The entire structure is fastened with anchor bolts.


Safety requirements for a homemade workbench design
- If the garage area is not too large, then you can make a smaller table for plumbing work with your own hands. But it is worth knowing that the entire structure must be stable, not sway or budge with little effort.
- The workplace should be organized so that nothing disturbs a person. When working with a vice, all unnecessary tools should be removed from the tabletop.
- Corners and protruding parts of the table should not be too sharp or have cutting edges.
- After repair work behind the workbench you need to clear the workplace from metal shavings, drops of oil and other materials.
- If homemade workbench made correctly, it can easily withstand a load of 200 kg.

Plywood for board


Video - Do-it-yourself workbench in the garage
Reading time ≈ 3 minutes
In any private home, workshop or garage carpentry workbench is very the right item. With its help it is convenient to make or repair any things, and it also combines the functions of a table and a shelf for tools at the same time. It can be equipped with a bench vice, and a machine for sharpening various tools can be installed on it. If you purchase metal workbench in a store, it will cost a considerable amount of money, but it is quite possible to make a workbench from wood with your own hands.
Required tools and materials
So for self-made For a workbench in the garage you will need the following tools:
- Hacksaw or electric jigsaw;
- Roulette;
- Square;
- Construction level;
- Wrenches;
- Drill;
- Screwdriver.
Materials:
- bars for supports;
- 2 sheets of plywood or OSB (one of the sheets is cut to fit the shelf required size);
- boards for the frame;
- self-tapping screws;
- bolts;
- washers;
- nuts
Before work, you need to make a drawing of the workbench with dimensions for ease of assembly.
Step-by-step instructions for making a workbench
For making upper frame it is necessary to saw off the boards based on the required size of the workbench (see photo).

Using self-tapping screws, secure 2 long and 2 short boards to form a rectangular frame. Using a tape measure, mark the distance to the middle of the frame, and perpendicularly, between two long boards, secure the remaining short board, attaching it with self-tapping screws at both ends.

To make the legs of the workbench, you will need to saw off 6 equal bars. From the inside of the resulting base, secure one leg to each corner of the frame using bolts, washers and nuts (see diagram of the workbench).

To make the structure rigid, it is necessary to install additional boards, which will also serve as the basis for the lower shelf. To do this you need to saw off 4 boards.

Using a tape measure, you need to measure an equal distance of 30 cm from each leg, at the resulting level, fasten the board to the back of the structure to 3 legs, and from the front, fasten the board between the outer and middle legs, in the place where the future shelf is planned.


The remaining two boards must be secured to the legs, at the same level as the boards for the shelves.

From one or more sheets of plywood or OSB using a hacksaw or electric jigsaw cut out the required sections. We fix them flush to the top of the workbench using self-tapping screws. Additionally, you can fasten a sheet of hardboard on top, because it can be easily replaced with a new one if the old one is very worn out. The bottom shelf is made using the same scheme. Using a tape measure, measure the distance between the outer and middle legs of the workbench; a sheet of material is cut to this size and installed on the resulting base.

When attaching legs or crossbars, it is necessary to use a square to obtain an equal distance between parts of the structure. Using a level at the installation site, you need to check whether the workbench you made yourself is level. If there is a slope, it must be leveled by placing wooden chips under the legs of the workbench.
At this carpenter's workbench reliable frame, durable work surface and plenty of storage compartments convenient storage tools and devices. You will make the main structure with your own hands in two days, and you will add various useful additions gradually.
Tools for work
To process solid wood and sheet materials you will need the following tools:
- Hacksaw.
- Electric planer.
- Circular saw.
- Grinding machine.
- Drill and drill bits.
- Clamps.
- Screwdriver.
- Pencil.
- Square.
- Roulette.
- Brush.
Carpentry workbench frame
Take even pine boards without large knots with a cross-section of 50x150 mm. Dry the raw lumber: the lower the moisture content of the boards, the less likely the structure will warp. The carpentry workbench in question is designed for comfortable work by a craftsman with a height of 170–180 cm. To change the height of the structure, make the legs higher or lower.


Table 1 - list of frame parts
|
Name |
Finish dimensions, mm |
Material |
Quantity |
|||
|
Leg detail |
||||||
|
Lower spacer |
||||||
|
Upper spacer |
||||||
|
Cross leg |
||||||
|
Cover cross member |
||||||
|
Longitudinal leg |
||||||
|
Longitudinal drawer |
||||||
|
Bottom shelf |
||||||
|
Table top spacer |
||||||
All elements of the base of the carpentry workbench are paired, so mark two parts of the same length on a 150 mm wide board at once.

File everything wooden blanks in length, with the exception of spacers: it is more convenient to cut short ones already planed, and long ones should be sawed off later “in place.”
Measure the width of the board, subtract the thickness of your circular saw blade and divide the result in half. Set the calculated size on the measuring scale and make sure that the saw blade is perpendicular. Unfold the boards exactly in the middle.

Plan and process parts sandpaper medium grit.

File the bottom spacers and sand the ends. After cleaning the surfaces from dust, apply glue to the small leg and to the end of the leg.

Squeeze the parts together with a clamp, wipe off any squeezed out glue, and drill holes with a countersink drill.

Fasten the workpieces with 6.0x70 screws. Prepare the remaining legs of the woodworking bench frame.

Bevel the bottom ends to reduce the likelihood of the wood splitting when the workbench moves.

Prepare the joints connecting the legs with the longitudinal legs for gluing. Fasten the parts with screws, setting a right angle.

Screw all four legs into place.

Place the frame halves and longitudinal drawers on the floor, measure the length of the upper spacers.

File the parts and secure them with glue and screws.

Collect at flat surface top frame of a carpentry workbench. Fasten the bars with wood glue and 6.0x80 mm screws, drilling guide holes for them.

Collect bottom trim workbench, I use clamps and auxiliary boards for convenience.

Replace the top frame and level the entire structure. Connect the frame parts with screws.

Cut from sheet material 16 mm thick bottom shelf and secure it to the bars

Workbench table top for carpentry work
Use sheets of MDF, chipboard or plywood 16–20 mm thick for the workbench cover. Glue the slabs in two layers and get a tabletop 32–40 mm thick.

Drawing and arrangement of the workbench cover: 1 – edge strips (birch, maple); 2 – working surface (hard fiberboard); 3 – load-bearing board (chipboard, plywood or MDF).
For the countertop, you can take sheets of chipboard left over from unnecessary furniture. For example, walls are suitable wardrobe. Take them as a base and add small pieces so that the carpentry workbench lid measures 670x1940 mm.

Place narrow slabs closer to back wall and to the center of the workbench. Place large sheets in top layer countertops. Glue the cut pieces together.
Fasten the sheets with self-tapping screws, deepening them into the countersunk holes. Trim edges manually circular saw at a distance of 20 mm from the edge.

Align the tabletop with the frame and secure with screws.

Sharpen slats for edge trims. Saw off the 45° bevels and cut the planks to length. Place a piece of fiberboard on the lid of the workbench, add a flat panel on top and secure it all with clamps.

This makes it easier to attach the pads. Align the ends with the edges of the tabletop and press the rail against the panel - the top plane will be flush with the workbench lid. Holding the bar with one hand, drill pilot holes and secure the parts with screws.

Move the device to the other side and install the remaining pads. Sand the slats with a sander.

Drill a hole in the corner of the slab so that the fiberboard can be easily pushed out of its recess when replacing it.

Clean the surfaces from dust and cover the wooden parts of the frame with stain. Place the fiberboard into the recess of the lid. If you are using pieces of material, secure them with double-sided tape. Place a carpenter's vice on your workbench.

Boxes for storing tools in a carpentry table
When filling the space under the cover of a carpentry workbench, use a modular principle. It is easier to make individual blocks and more convenient to change them later when you need space for a new tool. There will be a certain waste of material, but the weight of the workbench will increase and its stability will be enough to work with power tools.

Scheme of organization of storage places: 1 – full extension drawer; 2 – spacious plywood box; 3 – chipboard container; 4 – wide box; 5 – compartment for portable tool box; 6 – space for cases and workpieces.
Use boxes from old furniture
Select suitable sized junk boxes desk or chest of drawers.

Sign wooden elements and carefully separate them. Clean the glue from the spikes and eyes.

Trim the planks to width, removing worn corners and cracked grooves. If the original bottom of the box is flimsy, prepare thicker plywood or fiberboard. Make new grooves on a circular saw.

Assemble the box “dry”, adjust the parts if necessary. Clean the surfaces and glue the structure. Use mounting angles to accurately assemble right angles.

Once the glue has dried, sand the corners and sides of the box, securing it in place for ease of work.

Prepare guide strips and calculate the dimensions of the module.

Calculation of a block for three drawers
File the bottom, top and side panels. Screw the guide rails with screws.

Assemble the panels into a module and test the movement of the drawers. Place the block inside the workbench with supports underneath it.

Drill pilot holes, countersink and tighten the screws. Attach the chipboard to the top beams and to the legs of the workbench.

Install front covers on the drawers. Having marked the location of the housing, secure it with one screw. Insert the drawer into place and adjust the position of the panel. Carefully remove the drawer and tighten the remaining screws.

Secure the remaining linings - the module with wide drawers is ready.

Carpentry table compartment for portable box
The middle module is made to the full height of the bench to enhance the rigidity of the carpentry workbench. For the body take Chipboard thickness 16 mm and cut out two sides, a bottom and a lid.

Middle module housing: 1 – frame diagram; 2 – side wall; 3 – lower and upper panels.
Attach the guide strips to the sides, assemble the frame with screws and install it close to the right block.

Prepare the parts for the drawer.

Drawings of box elements: 1 – long wall; 2 – short wall; 3 – bottom; 4 – front trim; 5 – rail.
Use a circular saw to select grooves in the walls, which can be done with a regular disk. Set the cutting depth to 6 mm and the width to 8 mm. Run all four parts through. Move the saw fence 2 mm and make a test cut. Check the groove and adjust the stop if necessary. Run the rest of the workpieces.

Assemble the module and install the rails underneath that protect chipboard edges from chipping and providing a smoother ride.

Secure the front panel with screws and place the drawer in place.

How to make modules with convenient drawers
The design of the housings of these modules is identical to the previous designs. The retractable container placed on roller guides is made taking into account the installation gap, so its width will be 26 mm less than the internal size of the case (for common guides with a thickness of 12 mm).

Module structure and box parts: 1 – assembly diagram; 2 – back and front walls; 3 – front panel; 4 – bottom; 5 – side walls.
Before assembling the housing, attach the limiting bars to the sides. wooden slats and metal guides.

Installation diagram of guides on the walls of the housing.
Secure ready module under the workbench lid.

To install the drawer rails, unclip the latches and pull out the small rails.

Fasten the parts to the walls. Determine the required distance from the edge to the guide yourself based on the specific design and the 10 mm gap between the wall of the box and the top panel of the frame.

Pull out the middle rails all the way.

Insert both rails at the same time, holding the middle rails with your fingers. If the drawer is too tight, take it out and try again.

Replace the front trim.

How to make a carpentry workbench drawer from plywood
Saw the box body blanks from 10mm plywood, and for the bottom take a 5mm thick sheet.

Scheme of cutting parts for two plywood boxes: 1 – front panel; 2 – rear liner; 3 – side wall; 4 – front liner.
Sand the workpieces with a grinder.

Make grooves for the plywood bottom in the side walls, back and front liner. Remove burrs with sandpaper.

Glue and screw together the parts of the front and back walls.

Apply glue to the joints and into the groove.

Assemble the structure using angles and clamps.

Fasten the parts with screws, drilling guide holes.

Assemble the second plywood box with your own hands.

Install a panel on the back wall of the carpentry workbench designed to increase the rigidity of the structure and to accommodate hand tools.

Cover the drawers and cut ends of the particle boards with finishing compound.

Connect power to your homemade workbench and start filling the containers with tools.
It is not difficult to assemble a carpentry workbench with your own hands.
A good workbench should be in the household of everyone who works with wood or performs carpentry work.
Before we look at the drawings and start assembling the workbench, let’s get acquainted with its structure and manufacturing nuances.
The workbench consists of a workbench board and a base (underbench).
The board has a vice - one or two, in which the master clamps the parts with screws.
You can place the emphasis directly on the working board of the workbench using wedges that are inserted into holes in the board itself, thereby you can adjust the length of the emphasis in accordance with the length of the workpiece.
The bench board is made of dry wood or plywood up to 8 cm thick. The bench board is made of bars with a thickness of 6 cm.
The underbench is supported by 2 racks, which are transversely fastened together by beams with screws/wedges.
This is necessary so that the workbench does not “move” from side to side when planing and sawing.
Workbench structure in detail:
- The worktop is made of solid wood/plywood with a thickness of 6 to 8 cm;
- Vise on the front of the table top;
- Workbench supports are made of solid wood/plywood, connected by cross bars for stabilization;
- You can install shelves and a tool box on the supports;
- Holes for wedges are drilled in the tabletop to support the workpieces;
- You can make a recess on the side or back of the work board to store tools.
The complete structure of the workbench is shown in the photo below.
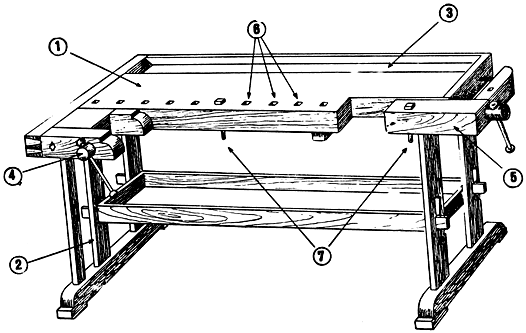
1 - cover; 2 - subsurface; 3 - tray; 4 - front clamp; 5 - rear clamp; 6 - sockets; 7 - adjustable wedges (combs)
Workbench dimensions
Here we meet the first important nuance, which cannot be ignored when making a workbench with your own hands - its height and length.
Minimum permissible height workbench – 130 cm, length – no more than 260 cm.
The height of the workbench is adjusted to the height of the person working on it:
- too high will not allow you to push hard, which is important when planing;
- a low workbench will force you to constantly hunch over, which will have a bad effect on your back health after just a couple of months;
- the height will be normal if you stand straight, have your back straight and can place your hands on the board without bending your elbows.
Manufacturing nuances
Making a workbench has its own nuances, the observance of which guarantees the production of a workbench that will perform its functions flawlessly.
There are a lot of nuances, so we structure them in relation to each stage of the future assembly process:
- Initial stage of work. You need to start with a working board. Someone will rush to look for an expensive solid piece of wood, and not just any kind, but according to science - oak, beech or ash. Experts will advise you to take a ready-made wooden table top, which will cost an order of magnitude less;
- Working with the future work surface workbench. The surface must be made smooth, therefore any wood prepared for the role of a workbench board must be properly sanded. To varnish or not is up to you;
- An important point is that a workbench is a type of table. Your task, in essence, is to make a table on which they cut not sausage, but wood. Therefore, having assembled the workbench, fasten it thoroughly on four legs and then connect them with transverse slats to each other for stability;
- Drawers – important element comfort. Take the drawer out of the bedside table and pay attention to how it is installed: there are a pair of guides in the shape of the letter “P” along which the side slats of the drawer slide. Nail two guide rails at a distance from each other equal to the width of the drawer and you’re done;
- You need a sawing table if you are going to saw. The table is placed 20-30 cm beyond the board itself. It is a small board that is attached to the desktop with screws (see photo);
- The bench board must be straight. Planing, sawing, burning, carving and other manipulations can be carried out strictly on a flat surface and nothing else;
- Don't forget the wedges! Wedges are needed to provide emphasis when planing the workpiece. In the table, at a certain step (10-15 cm), you need to drill a row of holes (several rows in a row), into which you will then insert rounded wedges. If possible, use an attachment for drilling square holes - wedges square section They hold the stop better due to their shape than rounded ones, which are prone to deviation of the vector of the applied load - the workpiece will fly out of the stop every now and then.
Practical instructions for creating a workbench
So, it's time to make your own carpentry workbench. Each stage of assembly is accompanied by a description and photo of the process.
At the end practical instructions Watch the video summarizing the assembly process step by step. We do not provide drawings of the folding version, since it is much more difficult to manufacture.
Let's look at the assembly step by step.
Step 1 – take measurements
Is your back very tense or not? If everything suits you, measure the distance from your palm to the floor - this will be the total height of the workbench.
Step 2 - making the legs
Take ready-made bars of the required height, or purchase plywood and cut the sheets into strips of the required width.
Now they need to be glued together: take wood glue or powerful epoxy, put several layers on top of each other, simultaneously gluing them together.
You may need 10 of these strips of plywood for each leg. It is better to glue together 10 sheets of plywood at once and, after drying, cut them into 4 parts.

Step 3 - making the frame of the workbench
We take a ready-made board, 4 cm thick - 4 pieces, which will be the sides of the frame-box and assemble the box, placing the sides on the screws.
In another case, you can also take several sheets of plywood, glue them together and then saw them evenly.
But in order to properly connect them together later, it is better to use a router and lamellas.
Having drilled the necessary holes, we assemble wooden box: we place it on PVA glue using the dowels of the board, clamp it with clamps. After drying, we attach the legs to the box with self-tapping screws.
Step 3 – assembling the tool shelf
From glued plywood (5-6 sheets) we cut out a shelf that is placed in the grooves.
The shelf needs to be secured with confirmations: use special drill(see photo), which simultaneously chamfers and drills.

The confirmation must be recessed, since this part of the shelf will be used as a guide for the drawer. Now the base of the table is ready.
Step 4 – making a drawer for the countertop
We take a sheet for the bottom and again 4 strips of plywood from several glued layers. By internal parties We will make grooves on two side walls for the bottom of the box.
And on the outside of these walls we make grooves by milling so that the box can move freely on the shelves. We select the cutters as follows: the smaller one is the thickness of the bottom, the larger one is the thickness of the side strips + 1-2 mm.
To secure the side wall, we install dowels: drill holes for the dowels at the ends of the walls, mark a point for drilling on the adjacent wall with a pencil and drill to a small depth.
Then we place the dowels in both holes using PVA glue. For final assembly When installing a drawer, you should use countersunk screws that will not interfere with the opening and closing of the drawer.
Step 5 - making the tabletop itself
Again we cut strips of plywood glued together in several layers for the base of the tabletop. We connect the strips into a box using dowels and PVA.
If you use round dowels, then you need to take at least 4 of them for each connection.
While the tabletop box is drying, we assemble its working board: we take wide sheets of plywood and glue them together in several layers.
You can also pick up a tabletop from an old desk and then simply adjust it to size. We glue the tabletop onto a box reinforced with dowels.
Step 6 - install the vise
As soon as the glue has set and the tabletop is ready, we drill holes in it for wedges for stops and for attaching a vice.
Typically, the vice is placed on 3 holes: two for fastening with bolts, one for the screw that imparts pressure when the handle rotates.
The vice can be taken from an old workbench or purchased ready-made and then simply adjusted to the tabletop by drilling holes of the required pitch.
A bench vise is a metal screw with guides and a wood clamp.
You can take several layers of plywood about 5-7 cm thick and simply drill holes in it and put it on a screw - you will get a stop, then put snap brackets so that the vice does not fall out and you're done.
In the stop, you can drill holes to fit the size of a large-diameter dowel, then attach it with a screw to a square of plywood, having previously drilled a recess in the square.
Make 4 such stops and place them all over the tabletop to fix the workpieces with the stop in a vice.
Our workbench is ready!
(All the above steps are shown separately in the video of the assembly process)
Rules of care and use
There are a number of rules that must be strictly followed in order for the workbench to last as long as possible:
- Clean the surface from dust and glue after each use;
- Wipe the surface once a month with hot drying oil;
- Do not flood the workbench with water or place anything adhesive on it, including parts to be glued.
- The chopping workbench is not used under any circumstances;
- Place a board or plywood under the workpiece if you want to use a cutting tool.
- Do not over-tighten the vice screws;
- When the screws are tightened, do not hit the vice;
- The workbench is attached to its permanent location using strips with screws or nails;
- The bench board should not move. Otherwise, strengthen all its connection points;
- Wipe wooden screws with dry soap, paraffin or graphite, and metal screws only with machine oil.