Epoxy resin jewelry. We make souvenirs from epoxy glue Maria Glukhova and her works from epoxy http
Today's detailed master class dedicated to working with epoxy resin. With this waterproof material, you can make original jewelry and bright magnets.

Materials for work:
- Any curly molds;
- Soft magnetic sheet;
- Any dye (you can also use food);
- Mixing containers;
- Frame pendant of any shape;
- Color pictures;
It will take some time for the resin to dry. Just a day later, the products will be ready. But since it is not recommended to move them until they are dry, empty any tray where you can place the blanks before the resin appears on them. Then this tray can be hidden in a secluded dark place where no one will disturb them.
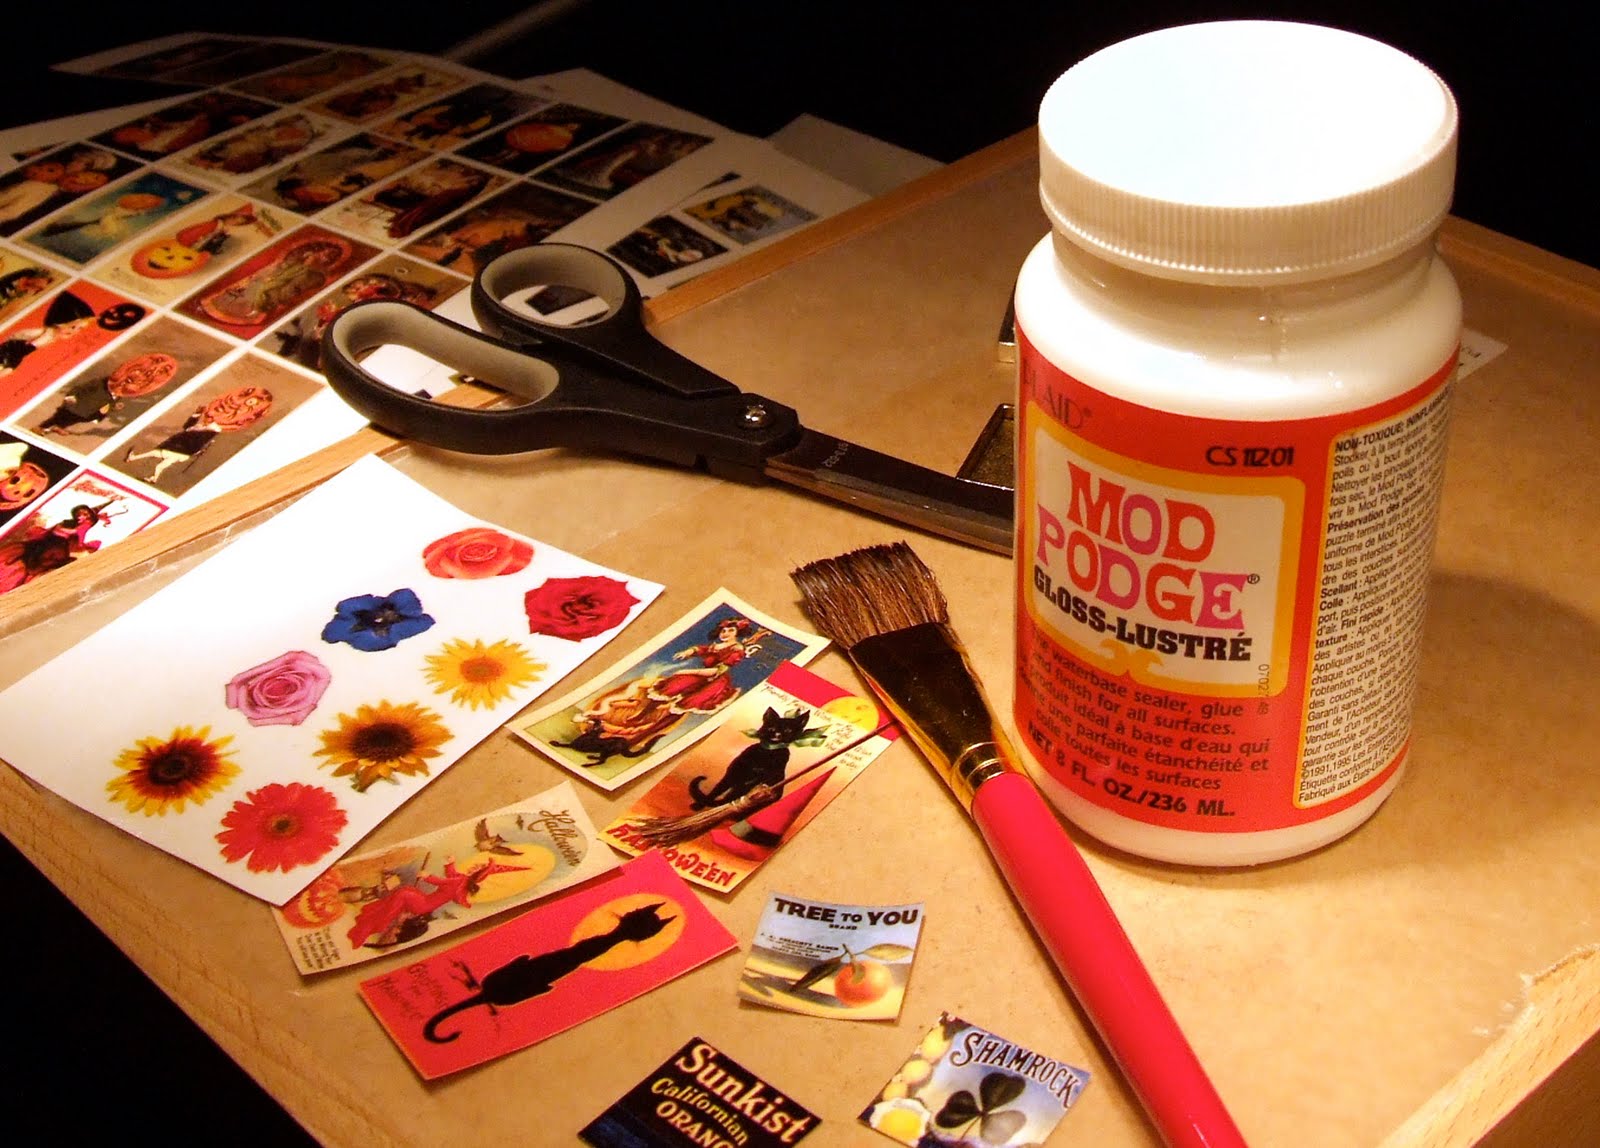
Choose the appropriate pictures, which will then turn into pendants and pendants. You can print it separately on a printer, or you can use a picture from any magazine or book.
To form a flat magnet, cut off a fragment from the magnetic sheet, the size of the future drawing, and glue these two parts.


To prepare the resin for work, it needs to be slightly warmed up. To do this, pour into the container a little hot water, and place the resin bottles there. This will help you make the surface of the cured resin uniform, free of air bubbles.
We mix the resin with the hardener according to the proportions indicated on the package. In this case, you need to stir gently and slowly.


Next, we carefully fill in the prepared magnets with pictures. If you overdid it and the resin spilled around the magnet, then it's okay. Just move the product to a dry place, where it will dry perfectly.
To make a three-dimensional pendant, you first need to add a little resin without dye to the mold. We lay out the prepared drawing on top (in this case, it is a flower) and leave it to dry completely. The mold must not be filled to the brim as there must be another layer of resin.


When the mold is dry, you take another batch of resin with a hardener and mix it with the color of your choice. After that, the color mixture is poured into molds to the brim. After drying, you will get an interesting multi-colored pendant or magnet (if you stick the magnet to back wall products).


http://www.sarahbober.com/2009/11/tutorial-resin-3-ways.html?m=1

Both epoxy and jewelry wire, in the sense of jewelry, are special. Regular wire is uncoated and will darken over time. This can of course be used as an advantage, but it is not a fact that oxides will not spoil the product in the process. More or less suitable aluminum wire can be in flower shops. But again, most likely without coverage.

We take the wire soft enough, but not too thin. I have aluminum 1.5 mm coated. We turn the ring. It is advisable to use some obviously even shape.

Cut the long end of the wire with side cutters. Keep in mind that in this case one tip (here it will be on the right) will be sharp, and the second will be perpendicular to the wire, which is what we need.

In the same way, we cut the tail very, very close (or better, even with a meager margin) to the first cut.

We connect the ends of the ring. The closer they are to each other, the better.

And now we stick our ring on a wide adhesive tape, which is desirable to first fix on a flat surface (I have ceramic tiles or glass) with the sticky side up.

Since it is better to dilute epoxy with at least 10 ml, then several blanks should be made at once, unless of course you want to throw away excess diluted epoxy. It is very important to check the tightness of the ring to the surface.

Next, I fill the frames with artistic debris - inlays. In fact, it is advised to first pour the bottom layer, and then pour in the garbage, but since the time from kneading to solidifying the epoxy is limited, I do it in a different order.

So, the blanks are laid out, the tightness is checked, you can breed.

I use Ice Resin (odorless, liquid and almost no bubbles - the last point is important). I measure the same amount of resin and hardener...
It is very important to measure the exact amount of liquids. Epoxy is an insidious thing: a little more hardener and it will start to "goat" (that is, reach for the tool with such horns) too quickly; a little less - and you will wait until the lenses harden forever. :) Once again: special epoxy, jewelry Ice Resin or Crystal Resin. It differs from the industrial one by the absence of smell, greater transparency and less bubbling. I ordered it here: http://vkontakte.ru/club13872192 - here it is: 
Once upon a time I tried to make fills with epoxy glue- the quality is much worse, it is more difficult to work with it, and in general it is not intended for jewelry purposes.

I knead. At first, the resin becomes cloudy, opalescent stains appear in it - this is normal. We continue to stir for another minute and a half ... Until the mixture becomes transparent. Large bubbles will come out on their own, small ones gradually too. However, in the product they will need to be helped to "hatch". From the beginning of the kneading to the beginning of the "rising" of the epoxy, we have somewhere around 30-40 minutes.

Filling lenses. I use a rubber glass for oil (it will be further in the frame), I also expel bubbles with it.
Primary filling, as seen in the photo, does not completely cover the "garbage". This is fine. At this stage, we only need to create a "bottom" and fix the drawing. You can even pour even less - I overdid it in the frames in the lower right corner. :) For everything about everything, we have half an hour: pour, expel bubbles with a needle or a stack, make sure that the lenses are filled more or less evenly.
Now we exhale for 8-10 hours and hide our plates with fills on the far, dust-free shelf and cover with a lid, leaving a small gap for air between it and the shelf.

Stage two. After 8-10 hours the lenses are ready for refilling. Knead the epoxy again and carefully apply the second layer. It should cover all protruding parts.

Epoxy does not contain solvents, so it does not shrink when cured. In addition, it is viscous, so if you pour it "with a slide", then it will leak to the edge and stop there. But here it is important not to overdo it.

After another 8-10 hours, we open our lenses from adhesive tape. On the
At this stage, they look terrible. Now we take the solvent and wash off the remnants of adhesive tape. Alcohol, gasoline, white-spirit, acetone or nail polish remover will do.

Pour the third layer from the inside and dry for another 8-10 hours. Voila. :) You can drill, insert into a frame, braid with wire and everything else that your heart desires.
More epoxy work


My favorite heather. :)

Heather bracelet


The poppies are plastic, but the lemon balm petals and blades of grass are natural (and the herbarium came in handy).

A bracelet " Fresh water". River pearls, mother-of-pearl and other rubbish. :)

Jasper chips, aventurine glass, fluorite sand and mother-of-pearl chips in jewelry epoxy and gilded wire. Pendant "tie"

Lapis lazuli, mother-of-pearl, dried heather, fluorite sand in epoxy and gilded wire. A bracelet.

Bracelet and medallion.
Wonderful bracelet made of twigs and epoxy resin
Many have probably seen original epoxy resin jewelry in stores. Such products are very popular, because each piece of jewelry combines magic, romance, and creative design ideas. Like frozen drops of spring water clear water with amazing compositions inside, earrings, rings, brooches attract fashionistas who want to emphasize tenderness, femininity, extraordinary taste in choosing accessories. Undoubtedly, to buy such a product, you will have to spend a lot of money, because the price of author's works is fairly high. Do you want to look stylish and elegant, spending a minimum of money? We offer you to learn how to make beautiful epoxy resin jewelry with your own hands. The process is incredibly creative, interesting, will appeal to all lovers of beautiful hand made bijouterie.
What is epoxy resin
You need to be able to choose the resin for creativity. This is, first of all, a synthetic product, its choice should be approached very responsibly.

Round earrings with leaves and flowers

Epoxy resin jewelry with leaf
![]()
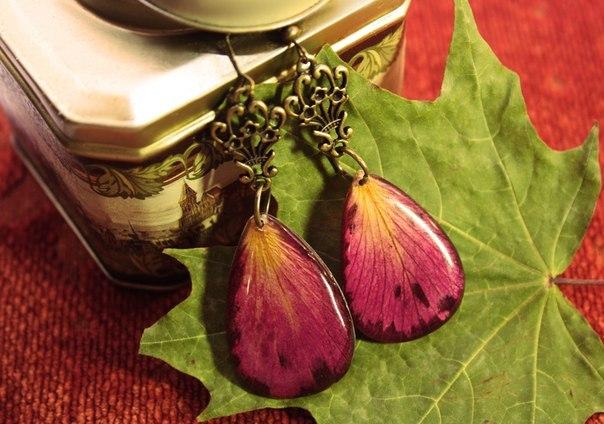
Unusual earrings with roses
It’s not worth saving, because cheap and low-quality material can turn yellow, has too sharp and bad smell, low degree of plasticity and transparency.
All these properties determine the quality, aesthetics of jewelry. It is important that the resin completely imitates glass or transparent ice; amazing compositions from any natural materials are frozen in it. How to choose epoxy resin? The material is safe, it is a transparent liquid, it contains chemical resins and hardeners. In the process of mixing these ingredients, polymerization and solidification occurs.
Valuable for its unique properties the product has been widely used by decorators, designers, artists, jewelry manufacturers and souvenir products. If you learn correct work with epoxy resin, you can create magical 3D effects, protect any craft from dust, scratches, moisture. As a rule, for creativity, manufacturers prepare complex kits that include the chemical product itself, gloves, a measuring cup for ease of mixing, and a stick for kneading the substance. Preference should be given to proven manufacturers in order to avoid harm to precious health. The main secret success - strict adherence to the instructions and proportions of the epoxy composition.
Epoxy resin
Despite the relative chemical safety, maximum care should be taken in the work:
- avoid getting the resin on the mucous membranes, skin of the hands, work with gloves, a medical mask or a protective petal;
- if glaze particles still get on the skin or mucous membranes, immediately rinse the area with running water;
- it is forbidden to use resins for the manufacture of products that come into contact with food;
- work with the epoxy composition should be carried out in a ventilated area;
- when turning products, be sure to wear a respirator so that the particles do not get on the mucous membrane.
Compliance with simple safety rules can make the creative process more comfortable.
How to work with epoxy
5 main secrets
Many craftswomen were able to turn their favorite hobby into a successful home business, because beautiful and original jewelry is at the peak of popularity today.
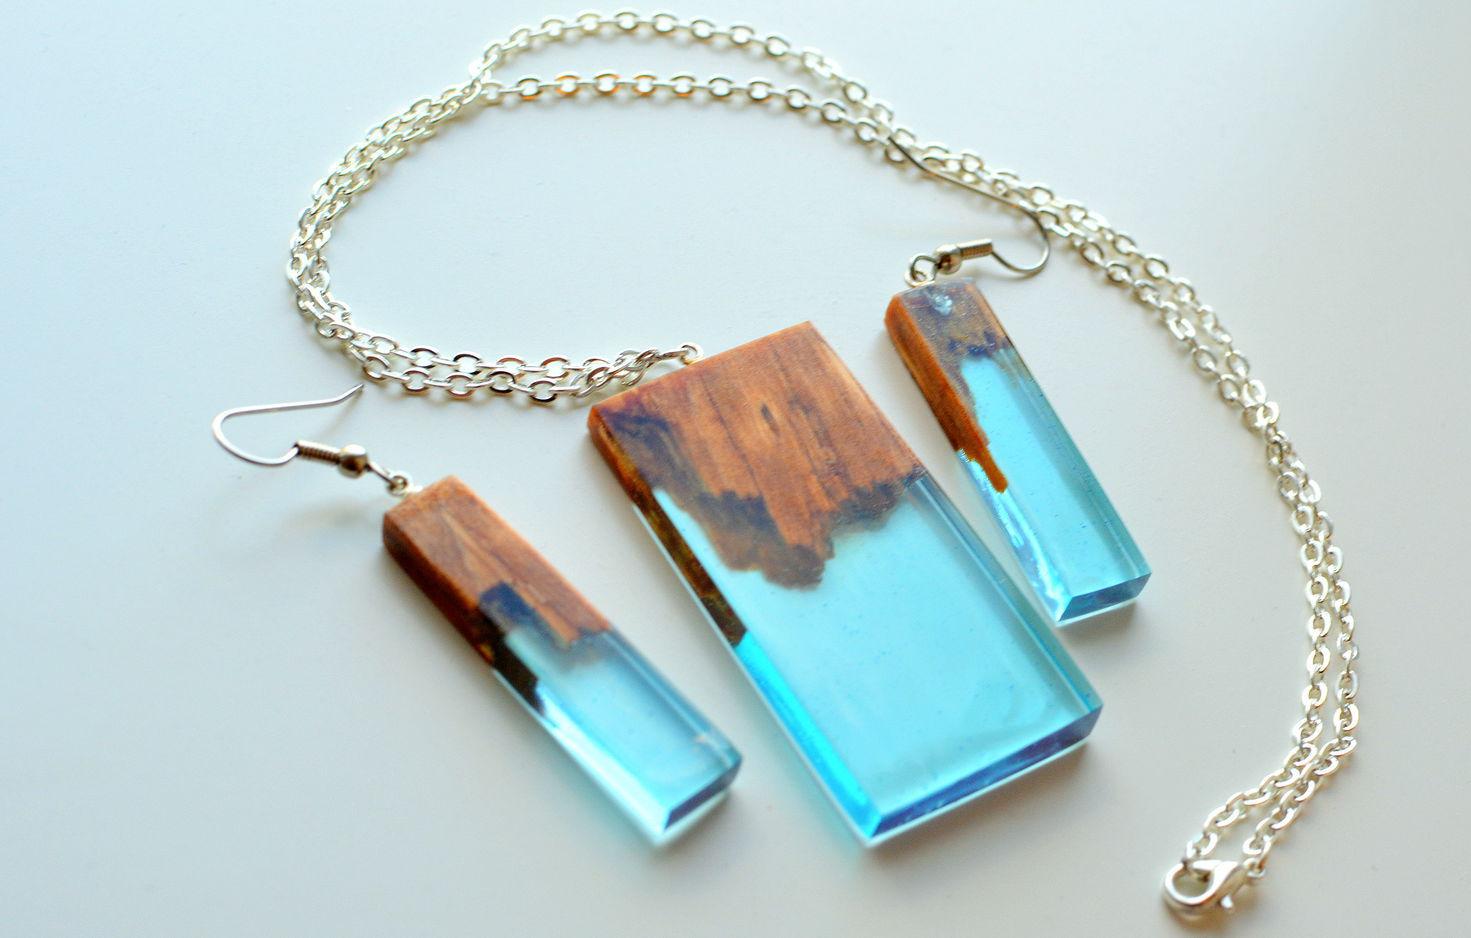
Jewelry made of wood and epoxy resin

DIY epoxy resin studs

Pendant with dandelion on a chain
To learn this art, experienced needlewomen have a few secrets:
- Filling forms. The forms, which the craftsmen call molds, must be made of high quality platinum silicone. This type of molding makes it possible to control the filling at any stage, as well as to comfortably remove the product after solidification. After work, be sure to wash the molds with warm soapy water.
- Temperature regime. You should know that the polymerization process is closely related to the release of heat. During chemical reaction resin can be heated up to high temperature even up to 60 degrees. Please note that the form for pouring blanks must be heat-resistant.
- Required consistency. Before the polymerization stage, the resin retains the properties of a viscous liquid. If dry filler is used, such as cork, wood slices or chips, it sinks down. This should be taken into account when distributing the composition.
- Transparency. The main difficulty faced by newcomers and experienced craftsmen, are air bubbles.
To make the surface and structure of the product as transparent as possible, you can let the mixture stand for a bit and then heat it up. So the bubbles will float up, after which they can be carefully removed.
- Decor use. In this matter, everything is limited only by the imagination of needlewomen. Small cones, leaves and flowers, dried flowers, glitters, rhinestones, beads are the most popular decor for making beautiful epoxy resin jewelry. Using leaves and flowers, it is better to dry them first. The classic way is like at school, between the pages of a book.
You should not save on accessories for your jewelry, the stingy, as they say, pays twice! Agree, because it is very important what the compositions nurtured with such difficulty are framed inside a transparent drop.
Video tutorial on epoxy resin
DIY epoxy jewelry
Armed with theoretical knowledge and the secrets of experienced needlewomen, you can move on to the practical part of the creative process. We offer several simple and interesting master classes for beginners in making original jewelry.

Transparent ring with grass
Mysterious DIY ring made of wood and resin
Decoration with dried flowers
To create beautiful earrings, you need high-quality epoxy resin, a beautiful dried flower of heather, forget-me-not, veronica oak or any other flowering forest herbs. You will also need a hook for earrings. We will use the simplest method without special molds.

Brooch and earrings with ferns

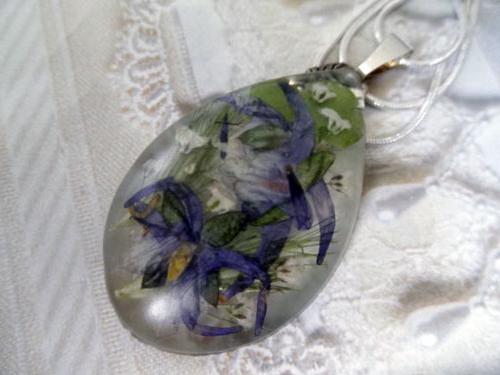
The blue flower pendant looks like it's alive

Round pendant with cute flowers
The algorithm of work is the following:
- Let's prepare the epoxy. Strictly according to the instructions, knead all the ingredients, and then leave the resin to set the desired viscosity, for about 2-3 hours. Do not be afraid, initially a lot is collected in the resin air bubbles. After the mass settles, they gradually disappear.
- We draw several stencils on a sheet of paper. You can make them of any shape, oval, round or even irregular, so the product looks more interesting.
- While the mixture thickens, prepare the surface. This stage is very important, because every small speck of dust will break the delicate aesthetics of a transparent decoration. The surface should be perfectly flat, it can be covered with oilcloth or cling film on top.
- We lay out our stencils on the oilcloth, and cover them with ordinary stationery files on top. We begin to pour the resin directly onto the file, distributing it according to the stencil, and adjusting the edges with a stick or a toothpick. The height of the workpiece should be equal to 2-3 centimeters. Cover the top with a domed lid.
- We leave the blanks until completely solidified for a day. After we remove them from the files, they are separated from the polyethylene surface without any extra effort. We give the correct shape with a nail file or sandpaper, slightly turning the edges of the product.
- We knead a new portion of the resin, and in the meantime lay out the dried flowers. We drip a little viscous mass onto the base and apply dried flowers, cover with a lid and let dry. To make the coating voluminous, like a lens, we cover it again with resin. We give the final shape with a file or sandpaper.
- We drill a hole at the base with a needle and thread the fasteners. The product is ready.
![]()
Daisies on a red background
Epoxy resin and dried flower decorations
skeletal leaves
Designer bracelet
Amazing accessories with any filling are cast from epoxy resin. We offer interesting lesson to create an original bracelet.

Bracelet with flowers

Bracelet with weed and red berries

Bracelet with delicate flowers
Useful for work:
- special mold for the bracelet;
- two-component resin with hardener;
- plastic container for mixing the mass;
- wooden stick;
- dry leaves or flowers.
Of the tools, simple toothpicks and scissors, as well as sandpaper for grouting, will come in handy.
DIY epoxy resin and wood bracelet
Let's get to work:
- Wash and dry form. We knead the epoxy "dough" in the proportion indicated by the manufacturer. Stir the mass until the bubbles come to the surface.
- Let's prepare a decorative filler. We cut the leaves so that they do not look out of the mold.
- When the resin has thickened and settled, carefully pour it into the mold.
Filling must be done slowly, in a thin stream. The more accurately the substance is poured into the mold, the less polishing is required for the product.
- Immediately lay the leaves in the resin in a circle, straightening them with a toothpick. In order for all air bubbles to come out of the resin, you can put the mold in the oven for 10 minutes, heated to 80 degrees, and then turned off.
- After heating, we take out the workpiece, leave to harden.
When the decoration is frozen, remove it from the mold, grind the bumps and sharp edges with fine-grained sandpaper. To make the surface of the bracelet glossy, open it with acrylic varnish.
DIY epoxy bracelet
Colored resin products
The creative materials industry keeps pace with the development of the creative industry. Today, epoxy resin can be used to make not only transparent, like a tear, products, but also bright colored jewelry of any color of the rainbow. Jewelery of any shades made of epoxy resin and wood is especially popular. They will easily complement the image in boho style, creating a romantic mood. We offer you to create a creative miracle with your own hands by making an original and fashion accessory. In the work we will use transparent resin, pieces of acrylic, cuts from wood, luminous pigments. To shape the product you need a grinder.

Bracelet made of colored epoxy resin leaves

Pendant with the head of a chanterelle with colored splashes

Epoxy Rainbow Earrings
Let's start the process:
- Prepare a sketch of the decoration on paper. Distribute the areas where the resin should be, and where wooden decor, define color transitions.
- We glue the pieces of acrylic, put the cuts of wood according to the sketch on the bottom, glue them to the base so that they do not float in the resin mass.
- Mix resin and hardener desired ratio, add a fluorescent pigment of blue or green color to the mass. If you use a simple luminous pigment, the resin will simply acquire a milky hue. With colored pigments, the product looks brighter, more original.
- Knead the resin, stirring with a stick strictly in a circle so that the bubbles come to the surface. We fill the workpiece.
The polymerization time depends on several factors: room temperature, correct mixing and the ratio of ingredients.
We cover the workpiece with a lid to avoid getting dust particles on the delicate surface.
- After a day, if the workpiece is frozen, we disassemble the formwork and remove the block. It's time to give it the right shape.
We level the surface with a grinder, cut out the desired shape according to the sketch, process the edges of the product.
From one block, you can make several decorations at once in the same theme for yourself, as well as as a gift for relatives and friends.
Epoxy resin jewelry is always stylish and original. Each product combines natural fragility, tenderness and the unique creative thought of the master. Having learned all the secrets of unusual art, you can create with pleasure, creating collections of unusual designer accessories.
Epoxy and paint colored glass earrings
fruit rings
Imitation of amber, do it yourself
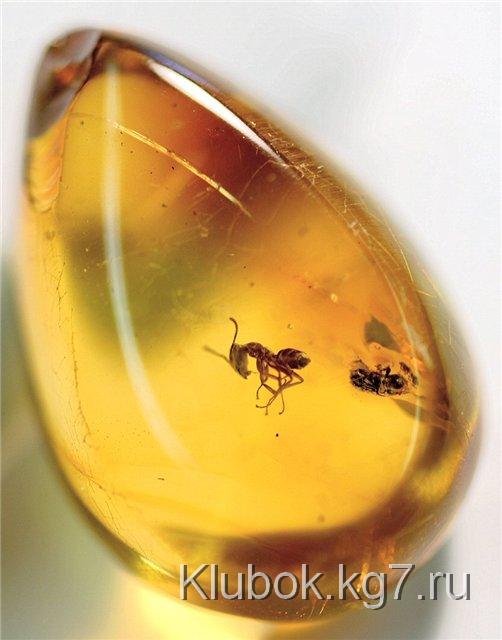
Wonderful jewelry, isn't it? But it's just epoxy. And… a little imagination.
If you find time to experiment a little, you can make a good gift for your loved ones: a pendant, a brooch, a bracelet made of homemade amber, which appearance not easy to distinguish from the real one.
Materials: epoxy resin, which is used by modellers for gluing parts, harden to it, organic glass 1.5-2 mm thick, a little glycerin, sandpaper, GOI paste.
heated metal object extrude your chosen shape into the organic glass. When the glass has cooled, grease the inside of the mold with glycerin. Mix resin with hardener (nine parts resin and one part hardener) and pour into mold. Now drop 2-3 drops of water there and stir with a thin daddy a little in a circular motion so that the water in combination with the resin forms a unique amber pattern.
Remove the hardened product from the mold, clean it with fine sandpaper and polish with GOI paste.
Inside homemade amber, you can wall up a dead insect, a blade of grass, a small leaf, a flower petal. In this case, water should not be buried. It is necessary to pour a little resin on the bottom of the mold, let it harden slightly, then stick an insect to it and pour the mold to the brim.
It is necessary to work with resin in a ventilated area, wearing thin rubber gloves.


Home technology making souvenirs, crafts and decorative items epoxy resin and polyester varnish
Such souvenirs can be made in the following way: From the sample you like, remove the mold, make 8-15 castings. And we are already making the main form from them, so one form will make 8-15 castings in one pour. If you need to increase productivity, it is enough to make a few more forms.
It is good to tint epoxy resin with oil paints, only before that it is desirable to squeeze the paint out of the tube onto old newspaper to remove the oil from it.
By adding bronze or aluminum powder to the resin, we get a solution of gold or silver color. You can dip the castings in an alcohol stain and, after letting it dry a little, wipe it with a cloth soaked in a nitro solvent. In this case, the convex places will be lighter, and the recesses darker.
In order to give additional strength in the manufacture of haberdashery, powder fillers can be introduced.
If the cast blanks stick to your hands, they must be lowered into water with washing powder, that is, how to stretch the product.
Shopkeepers generally don't work with epoxy, they prefer polyester lacquer because it's much cheaper and easier to find in large quantities. They work with varnish in the same way as with epoxy, only in addition to it, in addition to the hardener, an accelerator is added to speed up the hardening process. Since the accelerator is added, 5-10 times higher than the norm, the varnish becomes very hot during hardening and may crack. To prevent this from happening, the lacquer casting must be lowered in time into cold water and then rinse in warm water with washing powder.
Due to the high temperature during hardening, the varnish can only be poured into sealant molds. In stores there are products about which sellers say that they are made of artificial bone. In fact, they are made of polyester varnish.
Also, various models of toy tanks, figurines, etc. are made in a similar way.
Casting parts from epoxy resin
Radio amateur constructs miniature electronic devices, and he needs, for example, miniature plugs. What to do? Do it yourself, from resin. A pawn or other chess piece is lost, the handle is cracked gas stove someone liked business card with embossed letters entrance doors- they can also be made by casting from resin (Fig. 1). With this method, you can make as many buttons of various shapes as you like, small hangers of your own design, frames for family photos, floats for fishing rods, figurines of soldiers, models of old cannons, cars, and many other items.
From the same resin, it is possible to restore the missing metal elements of antique furniture according to the existing model, and make them active, and not props. Resin castings can help repair antique, ornate frames. If there are any defects in antique furniture, and the carved decoration is partially damaged, it is also worth turning to resins resembling wood and casting the missing details from them.
In order to start casting, you must have a model of the object being cast. It can be made from wood, plaster, wax or even plasticine. The model can also be the item we want to copy. We needed a decorative metal element for furniture or another figure of a soldier - we take a sample and use it to make a mold for casting. It is necessary to act as follows.
A cardboard box, metal or plastic jar must be lined inside with aluminum foil, in which chickens are usually baked, pressed against the walls of the dish and smoothed out at the bottom. And now a rather ridiculous, but necessary procedure: the model, that is, the knob of the regulator or any other object that needs to be made a copy, should be thoroughly lubricated with shoe cream (you need to use good cream with a high wax content). After the cream dries, the model should be brushed with a soft brush so as not to erase the wax and get a smooth, flat surface. Wax should isolate the model from the resin.
When using plasticine, the model must be glued to the foil at the bottom of the dish and poured with resin mixed with a hardener. In order not to spend a lot of resin, it is necessary to add a filler to it - the easiest way is dry flour. The filler should not be too much so that the resin does not turn into a paste. The resin should be fluid, easily filling the mold - for this it can be slightly diluted with acetone or a nitro thinner.
When the resin hardens, everything together with the foil is removed from the dish. Then the plasticine is removed and the model is cleaned of it. The cream is again applied to the model and to the bolt, as well as to the surface of the mold. Cover everything with foil and re-fill with resin. Thus, two halves of the form are obtained with a model inside.
After the form is removed from the dish, it must be unscrewed (it is screwed together), the model is removed, a filling hole and a hole (or even more than one) are made to remove air. If the screw is to be fixed in the handle, it must be washed thoroughly and smeared with cream again. Also thoroughly lubricate with cream inner part shape and clean it up. Fold the molds and fill with resin. After the resin hardens, the finished casting is removed from the mold, but not quite beautiful, since its color is the same as the resin.
But epoxy resins can be tinted. To get White color, it is necessary to add zinc white. In order for the objects made from it to be durable, it is necessary to add a filler to the resin. Such a filler can be, for example, aluminum powder or copper filings - a very original color is obtained. You can add brass or brocade dust, etc. When carbon black is added, the resin becomes stronger and blacker. Mica will increase electrical resistance. You can even add sand - only dry and fat-free, it should be “washed” in water with the addition of detergents and then dry well. Flour, as a filler, should not be skeptical - resin mixed with flour becomes hard as a stone.
Easy way to make epoxy resin key chains
I bring you the simplest technology production of key chains and various souvenir handicrafts. They can be made from scraps of sheet brass on tin solder with rosin.
First, a strip about 5 mm wide is cut from a sheet of metal, then pieces of the required length are bent on mandrels and placed on a pre-tinned brass sheet. To collect such key chains and crafts, a soldering iron is not required. Place the base plate on the iron (see Fig. 2), sprinkle it with rosin, carefully lay out the craft elements with tweezers and let the solder flow into all joints, adding it as needed. It remains to turn off the iron, wait until it cools down, and fill the holes of the “petals” with epoxy resin, tinted with a small amount oil paint. After the resin has cured, the base is cut around the perimeter of the craft and polished. From the casting side, the keychain is sanded until shiny brass ends appear, and then polished.
Such simple souvenir products are always in great demand. Especially if you make such souvenirs for any memorable events, events, anniversaries. For example, memorable souvenir crafts for the anniversary of the city, Christian holidays, etc. http://klubok.kg7.ru/7/51/2418/

Materials and tools:
- Scotch tape (wide one-sided)
- silicone molds for pouring balloons, which can be purchased at a craft store
- Good mood for yourself. Well, gloves with a respirator would be nice

Working process
We fill the silicone mold with a two-component epoxy resin to the middle.

Then we carefully place our rose in it, trying not to break it.

After that, fill the mold already to the brim. Everything, nothing else depends on us. We are waiting 24 hours.

Take the ball out of the mold. Under warm water this process will be much easier. At the ball, we cut off the ugly top in the place where the mount will be.

If there are bumps or scratches on the ball itself, you can polish it. This will require a separate mini-drill at low speed and special polishing nozzles.

We attach a hat to the top of the ball (you can also glue it on a drop of resin), then attach the fastener.

Like this, almost without special efforts we made an original and unusual decoration!

Master class on creating DIY jewelry from fresh flowers and epoxy resin
List of everything you need:
- Epoxy resin, two-component
- Two syringes without a needle (sold at any pharmacy)
- Container for mixing resin and hardener ( a plastic cup)
- Stick for this very mixing (wooden)
- Ceramic tile or cardboard (in general, any flat hard surface, preferably on a flat table)
- Scotch tape (wide one-sided)
- Accessories for jewelry (connectors, fasteners, connecting rings, bases)
- Mini drill (sold in almost any construction store, take the cheapest one, I personally use the DREMEL 300)
- A set of nozzles for it (a small drill and an emery head for turning)
- Good mood for yourself;) Well, gloves with a respirator would be nice

Advice: Before you shop, make sure you have a suitable workspace. If you live in a odnushka with your grandmother and mother, you will have to wait a little while making resin jewelry. Need at least separate room, where you can inhale the harmful fumes of resin (if you do not take care of ventilation) in splendid isolation.
This work is dirty, noisy and generally not conducive to health, but a few simple manipulations will reduce negative influences creativity to a minimum.
Epoxy Resin Safety Precautions:
- if you are not a drug addict, at least open the window
- always keep a rag handy - believe me, it is much easier to wipe the resin than to chip it off the linoleum later
- don't want thrills? Then remove all carpets in sight
- take pity on your neighbors in living space, do not turn jewelry while they are at home. Wear a respirator while doing this.
Speaking of leaves
Leaves (petals, flowers) must be well dried. This is not a quick business (4 weeks), so prepare them in advance. I put fresh petals in a folded white paper, then into the book (this is so that letters are not imprinted on the flowers). The thicker the book, the better (old Soviet textbooks are great). To store dried leaves, you can use magnetic photo albums.

If you decide to work with buds (for pouring into balls), you will need a dark, dry space, such as a closet. You thread the needle, tighten the knot thicker at the end of the thread and pass the needle through the legs of the buds (it is for this operation that these same legs should be left). We tie the resulting garland to two hangers and hide it in the closet. Four weeks and the material is ready.

It is worth bearing in mind that many petals visually change during operation, and completely cease to resemble what you picked in the garden. Some shrink to something awkward, some blacken or completely discolor. And if you don’t feel sorry for the stupid chamomile, then the ruined expensive hydrangea flowers will definitely make you sad.

accessories
The lion's share of the pleasure of working with jewelry is precisely the choice of accessories. It's simple: the more expensive it is, the better it is. In the whole process of creating jewelry, you can save money, but not on accessories, this is exactly the case when the miser pays twice. Not only do the fasteners made in China regularly break, but they also look frankly pathetic and, most likely, your hand will not rise to stick something like that on your leaf that has been nurtured with such difficulty.

Resin preparation
Well, all the preparations are completed, we can begin. To get started, read the instructions for your resin - mixing ratios vary from brand to brand. I personally use Crystal resin, 4 ml of resin per 1.2 ml of diluent.
We collect both resin and hardener with syringes without needles, naturally different. After use, it is better to throw them away, they cost a penny. It is better to carefully lower the hardener along the wall of the cup so that it does not splash.
![]()
After that we start mixing. There is nothing phenomenal here: you can interfere with even a finger, 3-4 minutes. Do not be embarrassed by the abundance of bubbles in the resin, let it settle and they will go away.
Stir the resin periodically. The mixture, ready to use, should resemble honey in consistency. It is difficult to explain on the fingers exactly how much to mix it, it naturally depends on the number of cooked petals, their size and, noteworthy, the density of the resin. Fresh instantly spreads and it turns out that you have pitched the tray itself more than the petals. So it's important to seize the moment here.
While the resin is settling - prepare workplace. Clear the table, take out the tray and flowers. It is desirable to do wet cleaning, because there is nothing more offensive than a potentially beautiful decoration, smeared with dust.
Tray preparation
Requires a flat table, which is not a pity to splatter, and a tray. The key point here is the choice of coverage, which should have a number of properties, such as:
- cheap
- affordable
- should not stick to the resin
- must be glossy (matte surface mattifies cured resin)
Storefront immediately comes to mind. plastic bag, but to a deep regret it does not satisfy the 3rd point and tightly sticks. At one time I used food bags for baking, but they also periodically let down and ruined entire trays of jewelry.
Advice: Tape the tray with tape and forget about such a problem as sticking decorations forever.
fill

So, the resin has thickened, the petals are laid out on a surface covered with adhesive tape, we begin to create. We take our battle stick, dip the tip into the resin and put a drop on the petal.
In principle, you can smear it on it, holding the leaf with your finger (in latex gloves, so that there are no greasy marks left), but it itself spreads well. Here you will check how even your table is. Having covered all the prepared petals with the first layer of resin, cover our miracle tray with a lid and leave it all for 24 hours. Then we apply another layer of resin (for now, both layers fall on the front part).

After a day, we turn the petals over and apply the last layer, but already on back sides our products.

Turning
Now these shapeless epoxy blots with petals inside need to be processed.
![]()
It's time to uncover our mini drill. Attach an emery nozzle to it and grind the jewelry (with a shudder I remember how I sharpened them manually with a nail file). Keep the edge of the product perpendicular to the drill. After turning, you can varnish the edges of the products or make another fill.

If the resulting decoration suits you, make holes for attaching the rings. We make holes with the same drill, but with a drill (diameter 0.5 mm).

In general, we have done the most difficult work, now it remains only to attach the fittings. We thread a ring into the drilled hole, and a fastener into it. Our real flower petal earrings are ready!

Rules for the storage and care of flower decorations
- Products coated with jewelry resin should not be wiped with alcohol or any other solvent, as this may damage the glossy surface. Epoxy is generally not friendly with chemicals, so keep it away from detergents, air fresheners, etc.
- Put on jewelry after applying decorative cosmetics, perfumes, deodorants. Do not expose the glossy surface to acetone. It is better to wash off nail polish without rings, since acetone is a volatile substance, and it is not so far from the nail to the ringlet with the leaf.
- Do not wear jewelry while playing sports and do not go to bed in them.
- Attach brooches to clothing before putting it on (this way you will be sure that the pin is well fastened).
- The cured epoxy itself is very strong, but with the right degree of diligence, you can break anything, and in this case it is no exception, store the products in caskets.
- Do not leave them in the open sun for a long time.
Epoxy resin for jewelry is a modern chemical material that is very popular among craftsmen who create jewelry. handmade. From the plastic mass, you can make products that completely imitate glass. Looks amazingly attractive natural materials(cones, dry flowers, leaves, etc.), filled with a transparent gloss.
People who are indifferent to beautiful decorations and those who are fond of creating all kinds of crafts with their own hands, we invite you to find out together what jewelry epoxy is, what are the rules and subtleties of working with it. As part of the article, we will conduct a small master class on making a pendant.
The word "resin" is usually associated with natural origin substances. But in this case we are talking about a chemical product. Externally, the glaze is a transparent liquid, which consists of two components: resin and hardener.
When combined, substances enter into a chemical reaction, polymerizing with each other. As a result, the resin is completely cured. Before polymerization begins, solid fillers can be added to the glaze, which can change the properties of the resulting plastic in the desired direction.
Varieties of modified plastic
It is made by hand on the basis of well-known brands of glue domestic production- ECF and EDP. You can buy them in stores selling household supplies. A small package of 280 g costs about 70-80 rubles.
The ratio of modified resin to hardener should be between 8:1 and 10:1. chemical process polymerization occurs when room temperature and lasts for several hours. It will take at least 12 hours for complete solidification. The hardener for epoxy resin affects the rate of polymerization: the more it is in the composition, the faster the shape of the product will be fixed. The ratio of components must be measured very accurately - this directly affects the final result.
Another product of the domestic chemical industry is epoxy resin ED-20. It is very convenient to work with it at home, and the price looks more attractive (half the price of ECF and EDP). A significant disadvantage is a large packaging: 6 kg of resin and 1 kg of hardener. 
On sale you can also find two-component formulations of foreign production. Based on them, excellent epoxy resin products are obtained. In addition to the main raw materials, protective gloves, plastic measuring cups, wooden stirring sticks can be found in the package. Such sets are much more expensive than domestic counterparts. The mixing ratio in them can be very different: 2:1, 1:1 or otherwise. It is possible that the proportions will have to be calculated using a special formula. In any case, the manufacturer's recommendations must be followed.
We are careful at work
Epoxy resin has a wide range of applications in construction, finishing work as well as in the printing industry. Raw materials for technical purposes have a pronounced chemical smell, and fumes irritate the respiratory system. When working with industrial material, protective equipment should be used.
Epoxy resin for jewelry and decorative works proven manufacturers does not harm health. Although safety rules should not be neglected. Usually there is detailed information about them on the factory packaging, but it would be useful to mention this now. So, precautions when working with chemical glaze:
We maintain the temperature
The polymerization process is accompanied by the release of heat. As a result of a chemical reaction, the resin can heat up to 60 degrees. This feature must be taken into account when choosing casting molds, it is desirable that they be heat-resistant.
Preheating of the initial components accelerates the polymerization process. As the temperature rises, the fluidity of the resin increases and its viscosity decreases. Pouring small parts with epoxy resin will be faster and better if the solution is preheated to 25-30 ° C. Then the filler is introduced into it and only after that the hardener.
A decrease in air temperature and an excess of moisture adversely affect polymerization. Under such conditions, the process may take too long or not reach completion at all.
Getting the right consistency
Until the epoxy resin for jewelry has entered the polymerization stage, it retains the properties of a viscous liquid. If a dry filler is introduced into the solution, then it can sink down (cement, gypsum) or rise to the surface (wood chips, cork). This feature of the material must be taken into account when choosing an injection mold and distributing the composition over it. 
The use of aids
The main difficulty that you will have to face in the process of work is air bubbles. If you let the mixture stand a little or warm it up slightly, they will float to the top. To get rid of bubbles stuck to the mold, you can use a regular toothpick. To make the epoxy resin with your own hands the perfect consistency, pour in a thin stream through a fine strainer.
Easy to use with frosting disposable tableware to prepare a separate portion of the mixture. Plastic jars from dairy products (yogurts, curds) are well suited for these purposes. Stir the mixture conveniently with wooden ice cream sticks.
To make an accurate dosage of the components, you can use medical syringes of various capacities. Please note that in this case the epoxy must be poured into the container from above. And the hardener is drawn into the syringe in the usual way.
It is advisable to grease the molds for pouring with a protective solution. It can be replaced by ordinary petroleum jelly or parquet mastic. Apply thin layer and remove excess conveniently with a cotton swab. If the molds are made of silicone, polyethylene or plexiglass, then they do not need pre-lubrication. 
Let's talk about fillers
Solid and liquid additives affect how the final epoxy jewelry will turn out. Most often, alabaster, cement, chalk, wood chips or glitter (sparkles) are used for these purposes. The content of the additive in the total volume of the mixture is not more than 50%.
Dry fillers provide a hard but brittle plastic. Liquid plasticizers are used to neutralize undesirable quality and improve the plasticity of the material. The simplest and most affordable supplement can be Castor oil. Usually one or two drops is sufficient.
Choosing the composition for the manufacture of the pendant
A special transparent epoxy resin for jewelry will help us create an ornament. As an example, we can take the two-component Gedeo composition produced by the French company Pebeo with a capacity of 150 ml.
The material perfectly imitates glass and is used not only in the manufacture of jewelry, but also for multi-layer coatings, surface decoration, restoration of cracks. The basis for the application can be glass, metal, faience, silicone, plastic, painted wood. The icing is exceptionally clear, odorless and easy to prepare. The finished product is characterized by increased strength and does not turn yellow over time. 
step by step

If you don't want to wait too long, you can speed up the drying process by slightly warming the mold in the oven. Try not to overheat, otherwise bubbles may form on the surface.
A hole for the lace can be made with wooden stick while the product is in a soft state. If you are late with this - it does not matter, you can carefully drill a hole in the frozen pendant.
Make sure that the surface where the form is located is absolutely smooth. This will prevent the mass from rolling in one direction.
After removing the finished decoration from the mold, sand it with a non-rough sandpaper to smooth the edges. Thread a string through the hole and wear the pendant to your health.