Experiments and experiments (senior, preparatory group) on the topic: Experimental activity “Volcanic eruption. Homemade volcano
Volcanic eruption on a tropical island - very spectacular and beautiful chemical experience(experiment) for children at home. Master class with photo.
Experience (experiment) "Volcano" for children
This experience (experiment) is quite easy and well-known, but kids (and also preschoolers and even junior schoolchildren, if they were not familiar with him yet) he invariably delights, and they are ready to repeat it again and again!
Optionally, you can purchase a set for the experiment "Volcano", but everything you need for this is usually in every home. For the most simple option This experience will only require:
- vinegar
- small container (bottle, bottle, glass or glass)
- soup plate
be careful: children can experiment with vinegar only under adult supervision!
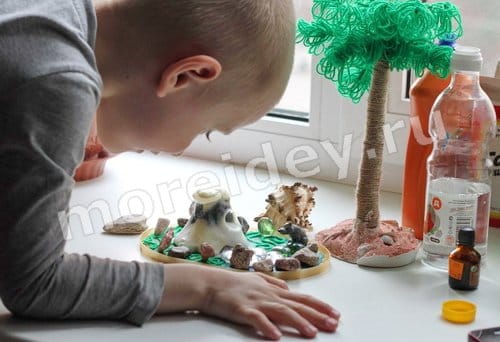
And although my daughter and I also did this experience more than once in several versions, the photos of the volcano from this article, surrounded by a beautiful tropical landscape, are so inspiring that I immediately want to do the same.
Moreover, in addition to intellectual development and expansion of ideas about environment the child will develop fine motor skills, as well as creative thinking. Indeed, in this version of the experiment, it is proposed to conduct it not in a laboratory flask or a container replacing it, but to do it yourself beautiful background. This background can later be used for geography lessons with the child, for games and thematic installations.

This work and master class were created specifically for participation in. Authors: Kolya Curly (4 years old, St. Petersburg) and his mother Julia. Many thanks to them for their participation and the article with step-by-step instructions.
How to make home experience "Volcano Eruption". MK
If there is enough soda, vinegar and dishwashing detergent at home, you can easily arrange a small domestic cataclysm - a volcanic eruption. And at the same time introduce the child to the simplest chemical reactions.
Fun activity for a very long time! We've had "eruptions" for several days!
Materials and tools
What you need:
- a jar (we have a half of a plastic Kinder Surprise egg)
- plasticine
- decorations (pebbles, beads, strings... In general, anything that helps visually create a tropical island)
- pallet (ideally - a tray)
- vinegar
- dishwashing liquid
Stages of work
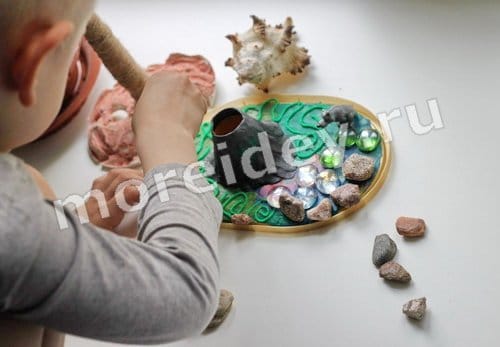
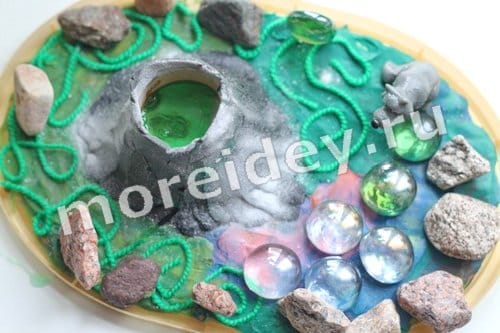
To begin with, Kolechka and I created our own miniature island with a dormant volcano. They covered the jar with plasticine, decorated it with stones, colored glass, threads ... They put a toy wolf to watch.


Then we started chemistry!

Kolya poured a full teaspoon of soda into the volcano. I dropped a couple of drops of iodine and about a teaspoon of dishwashing detergent into it.

To make sure everything was even, we stirred the mixture with a stick and, holding our breath, poured some vinegar into our volcano! Immediately, everything hissed, snorted, and thick foam, brightened with iodine, flowed from the mouth of the volcano! It became clear that our model of the volcano really works and looks spectacular!

The process of pouring soda and pouring it with vinegar lasted a couple of dozen times. The enthusiasm of the young chemist did not subside, the vinegar was running out. Then I had to run for a towel and arrange cleaning, so it’s better to do the “volcano” right away on a deep tray.
_____
I propose to look at other articles with the tag or all articles from the heading "Developing and educational activities".
© Julia Sherstyuk, https: // site
All the best! If the article was useful to you, please help the development of the site, share a link to it on social networks.
Placing site materials (images and text) on other resources without the written permission of the author is prohibited and punishable by law.
- Color rain - an experiment with water, paint and foam ...
- Rising paint - experience with color, paints ...
During a volcanic eruption, ash clouds are thrown into the air, and lava flows along the slopes. This is a very exciting sight, it is life-threatening to watch it in close proximity.
But you can make a volcano at home and conduct experiments daily, admiring the eruption without a threat to life and health. By showing an active volcano to your friends, you will surprise them. You can prepare a presentation for a school lesson, and thereby add variety to boring lessons, and teachers in geography and chemistry will surely mark your efforts with good grades.
First make the volcano itself.
How to make a paper volcano
To make a volcano, it is best to use thick paper or cardboard.
Draw a large circle on paper. Cut it out and glue the cone.
From the second sheet of paper, twist the tube and glue it. This will be the mouth of the volcano. Put a cone on it and fasten the structure with glue.
Cut out the ground from the third piece of paper. It can be given any shape, as long as it is larger than the base of the volcano. Glue the volcano to the ground, cover it with tape. Apply superglue on top and sprinkle with sawdust, sand. You can use colored sand. Paint the model with gouache or acrylic paints and give the volcano a natural look.
To prevent paint from running during or after an eruption, cover the volcano protective layer. The composition can be prepared independently: mix 1 part glue and 3 parts water. After thorough drying, the volcano model is ready for use. Lava in a test tube is inserted into the mouth of a volcano.
How to make a volcano video
Volcano how to make from plasticine
Plasticine is divided into 2 parts.
The first part is rolled into a pancake (base or land). From the second part, fashion a hollow cone, with a hole in the middle.
Place a bottle with a cut neck on the base. Put a cone on top, stick around the bottle opening with plasticine. Fasten the base and cone of the volcano together to form an airtight structure.

Color the model and sculpt the slopes. The prepared substance for lava is poured into the bottle through a watering can.
How to make a plasticine volcano model the second way

Instead of plasticine, you can use salt dough, modeling mass, papier-mâché.
Glue the bottle to the base (upside down plastic bowl, thick cardboard, chipboard) with tape so that you get a cone-shaped tent.

Cover with plasticine on top. Form lava flows, mountain range elements, channels. If you used salt dough, dry the volcano.

Now you can paint the model. For a more spectacular eruption, red paint can be applied to the mouth of the volcano. Once the paint is dry, apply a clear sealer.

Attach plastic plants to the base (usually they decorate aquariums) - you get trees and shrubs. Dry the volcano well again before use.
How to make a cold porcelain volcano model
If you wanted to use modeling mass to make a volcano, but did not find it in stores, or the price turned out to be high, you can prepare cold porcelain. This is soft material, homogeneous in structure. It is convenient to sculpt small parts from it, because. it is very plastic, and hardens when solidified.
Mix one part starch (corn or potato), soda, water. Add a drop of vegetable oil.
Put the mixture on the fire and cook until it thickens, stirring constantly. Remove the thick mass from the pan and cover with a damp towel. When the mass becomes warm, knead it. It should be soft, and resemble plasticine. The mass can be dyed desired color during cooking. Best for this Oil paint. But keep in mind that then "cold porcelain" will quickly harden. So that the mass does not stick to your hands, grease them with oil or a fat cream. Sculpt the volcano as described above and let it dry. Then paint with acrylic paints.
Eruption preparation.
How to make a soda volcano
The easiest way to make lava is from baking soda and vinegar. The quantity is given for a volcano with a "volume" of 100-150 ml.
1 st. mix a spoonful of soda with 1 teaspoon of dishwashing detergent (preferably red), and red dye (beetroot juice can be used). Stir the mixture well, if the lava is very thick, add water. Pour it into the crater of the volcano.
To start the eruption, you need to add 2.5 tbsp. spoons of vinegar. The vinegar will react with the baking soda and carbon dioxide will be released. As a result, a bubbling red foam will form.
How to make a homemade green ash volcano
For this experiment, you will need ammonium dichromate (NH4) 2Cr2O7. It is included in any standard set"Young Chemist" The experiment must be carried out on a non-combustible surface.
Pour ammonium dichromate into an unnecessary jar of tin 7 cm high. In the center of the slide, make a recess and put a cotton swab moistened with alcohol.
From brown paper, roll a cone 15 cm high, 20 cm in diameter. Cut off the top of the cone by 5 cm. Cover the reagent jar with the cone. Make sure that the cone is slightly lower than the slide, if necessary, cut the paper further. Set fire to the cotton wool and admire the flying green flakes.
How to make a do-it-yourself volcano that erupts with a sheaf of sparks
The eruption turns out to be spectacular, but it must be carried out, observing the rules for working with combustible substances, and conducting the experiment on the street under the supervision of adults. If careless, you can start a fire or get fourth-degree burns.
Mix 4 parts of potassium nitrate with 2 parts of aluminum (source of sparks) sawdust and 1 part of sulfur. To get enough sawdust, drill a few holes in the metal.
On the bottom of the cardboard sleeve (you can buy it or take it after the used factory pyrotechnics, you can make it yourself) install a clay plug. The wall thickness of the sleeve is 4 mm. Pour and tamp the mixture into a sleeve. Cover with a cardboard circle on top (its diameter is equal to the inner diameter of the sleeve), and then fill it with plaster.
In the middle of the plaster plug, drill a hole for the pyrotechnic mixture and pass the wick. This will be the crater of the volcano, before the eruption, light the fuse and move to a safe distance.
All children are curious, many of them are interested in a variety of natural phenomena. Any child wants to know what a tsunami, or tornado looks like. All of these can be used as ideas for creativity and home schooling. How to make a real volcano at home? It is not at all difficult to build an eruption model with your own hands from improvised materials.
Volcanoes - what is it?
Recall that under the solid crust is magma - molten rock that can solidify, seep to the surface through thin cracks or erupt through large holes. In the latter case, we are talking about volcanoes. Most often, these are mountains located at the junctions of continental plates. But sometimes volcanoes can appear for a relatively short span time in an area with almost flat terrain. Most often, lava-spewing mountains are depicted as quite high and having the correct shape. But in fact, volcanoes are different, including low ones, they can visually resemble small hills. At the time of the eruption, magma and gases under significant pressure come to the surface of the earth. Explosions often occur at this moment, and some volcanoes gush with red-hot lava, like geysers.

We make a blank for the "fiery mountain" with our own hands
"How to make a volcano model at home?" - a popular question of parents who decide to spend an interesting creative activity with their children. To make this craft, you will need: cardboard or a plastic bottle, paper or gypsum plaster, paints and some auxiliary tools that can be found in every home.
Prepare some kind of basis for creating crafts. It can be a piece of plastic, such as a lid from a food tray, or other dense material - plywood, cardboard. trim upper part bottles, this will be a volcano, respectively, and leave the height for it at your discretion. Alternative option- make a base from a cardboard cone right size. Attention: if your volcano is an active model that will erupt more than once, the base must be an airtight container. Glue the cut off part of the bottle tightly onto plastic base using waterproof adhesive or sealant. You can cut off the bottom and top of the container and insert them into each other.

Volcano decor
The workpiece should be a kind of cone or cylinder with a narrow top on a stand. Once this design is dry, it's time to start decorating it. To decorate the slopes of the mountain, take decorative plaster or prepare paper pulp from which you can create papier-mâché. In the second case, it is better to take white napkins, paper towels or toilet paper. Grind the raw material, after wetting it, with a mixer and add a little PVA glue. In this case, the mass will be homogeneous and will be easy to apply.
How to make a do-it-yourself volcano model from an existing blank? Everything is very simple. Cover a cardboard cone or piece plastic bottle chosen sculptural material. Form the likeness of a mountain - with an extension at the foot and a sharp top. Don't forget to leave a crater hole at the top. Your volcano will look much more interesting if you make the surface ribbed, covered with a network of channels through which lava will flow picturesquely. When modeling is completed, dry the workpiece well. After that, you can start coloring it. If you are using non-waterproof paints, you can additionally cover the craft with a clear varnish. That's all - the volcano (model) is ready, if you wish, work on the surrounding landscape. If the size of the stand allows, make trees, draw grass or sand, you can add figures of people and animals.
A simple plasticine craft
If the method of making a homemade “fire mountain” described above seems too laborious for you, try making it using a simpler technique. A small volcano can be molded from plasticine. Take brown modeling material or mix all the sticks in the kit until you get a uniform "dirty" shade. Blind a cone with a hole on top, outline the relief if desired. If your volcano is an active model and is being made to perform an "eruption", stick it on a modeling board or a plastic panel/tray from a food package. Try to make the connection airtight. Additionally, you can decorate the craft with red plasticine, depicting frozen lava on the slopes of the mountain.

The eruption begins!
Most often, a "volcano" is made to carry out a home "eruption". Do not be afraid, this experiment is completely safe. Take no a large number of baking soda, dye suitable shade and a drop of dishwashing detergent (can be replaced with a couple of pinches of washing powder). Mix all the ingredients and place them inside the mountain (take care of a special recess in advance). In order for hot lava with foam to rise from the crater of the volcano, you just need to drop quite a bit of vinegar inside. Such interesting experiment will amaze the kids and surprise the schoolchildren. The model will help not only to interest children, but also to tell them in an interesting way about the interaction of soda and vinegar.

Fun or fun chemistry?
Making such a craft, even with the smallest children, should be combined with training. Tell us about volcanoes and their formation, give interesting historical facts. Similar homework will surely be remembered better than subsequent chemistry lessons. When conducting the "eruption" also try to explain that with the help of home we only imitate a real natural phenomenon. The reaction itself deserves special consideration. Invite the child to think and describe the interaction of two substances. It is also useful to draw a conclusion with a chemical explanation of the experiment.

Sectional volcano model: how to make?
In addition to making crafts depicting general form fiery mountain, at home it is not difficult to make another training layout. We are talking about a sectional model of a volcano - respectively, its half with a demonstration inner layers. What is the mountain, spewing lava and ashes, made of? Volcano is a collection various breeds, respectively, layers can be made in various colors: from yellow to dark brown. Do not forget to mark the crater at the top and from it to the very bottom lay a channel through which the lava rises. It is most convenient to make such a model of a plasticine volcano. Your layout can be three-dimensional (mountain cut in half) or flat. Use materials of different colors and combine layers in correct sequence. If you are doing a flat layout, you can additionally show how the magma rises to earth's crust and finds a way out to the surface through the crater of the volcano.
A lot has already been written about the use of baking soda in one area or another. The properties of this substance make it possible to use it in the kitchen when cooking, in everyday life for cleaning various surfaces from fat and plaque, in treatment various diseases etc. Another use of sodium bicarbonate is the ability to arrange educational performances for children, for example, you can make your own volcano out of soda.
Stock up on baking soda and vinegar because your kids will be asking you to do it again and again!
This is possible due to the ability of soda to react violently with certain substances, such as vinegar. And one of the most common experiences associated with this property of sodium bicarbonate is a demonstration of a volcanic eruption. Below is a detailed look at how to make a baking soda volcano.
Experience "volcanic eruption"
The first thing you need to know is why such a reaction occurs when soda and vinegar are combined. Without going into details: soda has pronounced alkaline properties, while vinegar, on the contrary, is acidic. When their molecules are combined, both media are neutralized to neutral, as a result of which carbon dioxide, the rapid release of which causes the appearance of foam.
Experience with the combination of these substances can be used not only as a demonstration of a natural phenomenon. This is a good moment to explain the basics of the interaction of various substances and the reactions between them.
Preparation for the experiment begins with the manufacture of the volcano itself. This can be done in several ways, which will result in a reusable inventory or, accordingly, a disposable one. To create the first, you will have to make more efforts and time, while the second is suitable for a spontaneous decision to please children with an interesting spectacle.
Method number 1
In this case, just a reusable model is created for repeated execution of the experiment.
To make the body of the "volcano" you need the following components:
- an ordinary plastic bottle for any drink with a volume of 1.5 liters;
- a flat plastic lid (for example, from disposable food containers);
- adhesive tape of any kind;
 It is not necessary to sculpt a "volcano" from a new plasticine, an already used one is quite suitable
 - gypsum or alabaster (can be replaced with salt dough);
- gouache with PVA glue, in a ratio of 1: 1 (replacement is possible acrylic paint);
- cutting tray or cutting board (as a base);
- paper;
- foil.
Sequencing:
- Building the foundation. The plastic bottle must be cut by measuring the desired height of the cone (you need the upper part). The resulting base is carefully attached with adhesive tape to the above plastic cover.
- Attaching the base of the volcano to the base. The resulting design is attached with adhesive tape to a tray or cutting board. You can also use a suitable piece of plywood or a thin board as a base.
- Cone formation. With the help of pieces of paper and adhesive tape, a cone is formed around the bottle with an upper base at the edges of the neck. To avoid subsequent soaking of the paper pulp, the cone is wrapped in foil.
- Finishing the "walls" of the volcano. Dilute gypsum or alabaster to a state of thick sour cream. The resulting mixture covers the slopes of the "fire-breathing mountain". With the help of a toothpick or a fork, the relief of the "mountain slopes" and the troughs are formed for the preferred movement of the "lava".
- Final finishing. After the "slopes" have completely dried, they should be painted with gouache mixed with PVA. It's best to use brown and black paint and paint the "lava" chutes a little red.
After preparing the "volcano" it is necessary to deal with the "lava". It, of course, must be prepared immediately before the demonstration of the "eruption". The components in this case are:
- baking soda - 10 gr;
- dishwashing detergent - 2 drops;
- gouache or red food coloring;
- vinegar - 10-15 ml.
This number of ingredients is indicated for the minimum amount of "lava" and low "volcano". If it is necessary to increase the intensity of the "eruption", the number of all components increases accordingly. The sequence of actions in this case is as follows:
- Mix the baking soda, the chosen type of dye and dishwashing detergent, mixing thoroughly.
- Pour the resulting mixture into the "crater of the volcano".
- Add vinegar carefully to the "vent" and enjoy the result.
For a more active reaction, vinegar can be poured quickly. By the way, the added dishwashing detergent is responsible for this.
Method number 2
As mentioned above, a volcano made according to the previous method makes it possible to obtain props that can be used repeatedly. However, this takes a significant amount of time. For a single use, you can make props using a simplified method.
 The spectacle is really spectacular
 In this case, the ingredients will be:
- a sheet of cardboard;
- plasticine;
- small jar;
- tray or cutting board (as a base).
The sequence of actions is as follows:
- Fold the cardboard into a cone, giving the required angle of "slopes". Glue it in this position or secure with tape. Cut off the top to get a "vent".
- The outer part of the cardboard is covered with plasticine, with the formation of "ledges" and "gutters".
- Before the demonstration of the experiment, the jar is filled with a mixture of soda, dishwashing detergent and dye, after which it is placed on the base and covered with a “mountain” cone.
- Next, vinegar is poured into the vent and the "eruption" begins.
It is possible to experiment with citric acid or lemon juice. In this case, vinegar is not used, and soda should be poured last.
The properties of baking soda allow you to use this product in a variety of situations. And as all of the above shows, even as a means of entertainment or to expand the horizons of children. Thanks to the simple preparation and the property of soda to enter into a violent reaction with vinegar, you can give your children an unforgettable spectacle, which they will ask for pleasure more than once.
Surely, many of you have seen on TV or on videos on the Internet such a bewitching and unusual sight as a volcanic eruption. Of course, to observe this manifestation of the natural elements live is very difficult and even extremely dangerous. However, you can easily make a model of a volcano quickly and easily with your own hands and admire this natural beauty at home. With this model, you can easily demonstrate to your children how volcanoes work. No doubt young explorers will love it.
Before you start working on the layout, it would be best to find out how the volcano actually works. Read thematic literature, watch videos and pictures of the volcano in the section. This will give you a better idea of where to start working on the layout. We only recall that the volcano must consist of magma, craters and lava.
We offer you some unusual and interesting options making a model of a volcano quickly and easily with your own hands.
We make a model of a volcano from polyurethane foam and polystyrene with our own hands
Thanks to this model of the volcano, you can clearly demonstrate the structure of this natural mystery to children with your own hands, show it in section and action.
For work, you will need mounting foam, polystyrene foam, tile adhesive, varnish and paints. As you can see, all necessary material very affordable.
Styrofoam is used here, as well as the basis of the structure, and to form the cone of the volcano: we glue the pieces of foam in layers. From polyurethane foam we make lava flowing from the mouth of the volcano. We paint the resulting model of the volcano with paints, cover it with a layer of varnish and enjoy the result.

In order to make a model of a plasticine volcano, you will need:
- Plasticine
- Large plastic bottle
- Building mix
- Brush and watercolors
- Scissors
- table vinegar
Get to work. First, cut off the top of a large plastic bottle with a neck. Bottom part you won't need it, so put it aside. Carefully cut off the neck from the top of the bottle, leave a small gap on it.
Knead the plasticine in your hands until soft and sticky. Paste the cut part of the bottle with plasticine and give the workpiece the necessary shape of a volcano.
AT building mix add water and knead until the consistency of thick sour cream. Next, apply the mass to the base of plasticine.
Insert the cut neck of a plastic bottle into the mouth of the volcano, cap down. Mask all flaws with building mixture.
Leave the resulting structure in a warm and dry place until completely dry.
You can demonstrate the action of a volcano with a mixture of soda and table vinegar. Simply pour two tablespoons of baking soda into your volcano's crater, then pour in the dyed vinegar. Enjoy the eruption of a homemade volcano.

A model of a volcano at home can also be easily made from paper using the papier-mâché technique.
You will need the following materials:
- Thick cardboard
- Plastic bottle
- Acrylic paints
- Paper tape
- Paper
- tassel
Form from thick cardboard and a plastic bottle the base of your volcano model. To do this, glue the bottom of the bottle to the cardboard. Next, starting from the neck of the bottle and ending with its base, stick the strips of tape so that they form a cone. Glue strips of paper to the resulting cone.
Cook the paste: mix one part flour with two parts water. Saturate pieces of paper with this composition and glue the entire base of your structure, giving it the shape of a volcano. Leave the layout to dry completely in a warm and dry place.
Then, start painting the structure. At this stage, you may well entrust the work even to your children. Again, leave the layout to dry completely.
Now you can start demonstrating the eruption of a makeshift volcano. Pour warm water with liquid soap into a bottle and add table vinegar there. Get ready for an exciting spectacle!
Video on the topic of the article
A self-made model of the volcano will be very useful if you want to take part in the exhibition themed crafts, or just have fun and unusually spend time with children, watch exciting experiment. And if you have any difficulties when creating a model of a volcano or when conducting an experiment, pay attention to the attached videos.