New Year's candles for home decoration: warmth and comfort on winter evenings. DIY candles (10 master classes with photos and videos)
Learn how to make candles with your own hands without high costs and have fun.

The interest today is more common among women, but making this device is a manly skill that can be traced over many years. Especially in medieval times, trade in them was vital for kingdoms and villages because light was a necessity.

Today, when candles have no practical value, they can add an atmosphere of comfort, coziness, and romance to any room. They have a very meditative, relaxing effect and can be thought-provoking. Their main drawback- enough high price. What does it take to do it yourself?
Materials: what is needed for manufacturing

The process will not take you more than two hours, but the resulting products will complement your home or work interior and will be a good gift for loved ones.
Wax
This is the heart of a candle, of which there are three main types.
Paraffin. Traditional, used for hundreds of years to make a torch. Now it continues to be the most common among all species. It's cheap and you can easily add color and scent to it. The main problem with paraffin remains its potentially toxic nature. Paraffin is a by-product of petroleum, which automatically gives it a bad rating for most consumers. If natural products are your credo, it is best to look for an alternative option.

- Soybeans. New to the market, it is becoming an increasingly popular main ingredient. Soy was created in the 90s, when the natural food movement was actively gaining momentum. It is usually made from soybean oil, but is sometimes mixed with paraffin and other waxes (palm, beeswax, etc.) It also easily takes on colors and scents.
- Beeswax. Oldest crafting ingredient; candles from beeswax were found in the great pyramids of Egypt. As the name suggests, it is produced by bees and is a by-product of the honey process. Because of this, it has a natural golden color and a subtle sweet aroma. This is completely natural product, but you won't be able to add other flavors to it. The natural smell will overwhelm other aromas. Bee is also the most expensive option.

Most types sold in stores come in granule form. This makes the job easier as the granules melt faster. If you bought a block, use a sharp knife to cut it into small pieces.
Wick

The wrong wick can ruin your homemade candle. the main problem- this is the size, or more precisely the width. For container ones, which will be discussed, you need a wide wick. The length of the wick is not important - you can trim it.
Aroma oils

Without the smell, your wax just burns. It looks nice, but doesn't create the subtle scent that candles are used for. There are thousands of scents to choose from - just search online. you can use essential oils, but with them the final product will not be as good. Men should choose from such "masculine" scents as a mixture of clove, amber and sandalwood, apple and maple bourbon, blue spruce, butter rum, coffee, whiskey.
Melting utensils
A saucepan with a double bottom will do the job best. Melting directly over the flame in a regular pan will be too strong, so use a double boiler.
Form

Coffee mugs, glassware, jars - anything that can withstand heat is used as a container. With a lid, they can be transported, sent, so you can easily give them to your loved ones.
Accessories: thermometer, spatula, old pen

Having a thermometer on hand allows you to quickly take your temperature. When you buy wax, especially the kind that is used for making, it will have instructions on it as to what temperature the fragrance oil is added to, when to pour into the container, etc. Use a spatula or spoon to spread it and dissolve large chunks. Later you will find out why old pens/pencils are good helpers for homemade candles.
Workflow: how to do it?

Prepare your work area
Working with wax is quite a dirty business. It melts, drops can get everywhere, you won't even know it until it dries. Place newspaper or paper towels around work area. Use them to set the thermometer, spatula - be careful, they will probably stick a little. Luckily, the wax isn't that difficult to clean; you can simply scrape it off with your fingernail. Prepare your molds and wicks.
Melt the wax

Using a double bottom pan or water bath, melt the wax. Place about 200-300 grams, watch it melt by breaking it into pieces with a spatula and stirring it. It melts in about 10-15 minutes. Remember to monitor the temperature - you want it to be between 70 - 75 degrees. If the temperature starts to rise, remove it from the heat.
Secure the wick

While it is melting, attach the wick to the container. The rare wicks have a small sticker embedded on the bottom, but the main part does not. Super glue is one option, but you can use an old candle trick: dip a metal wick tongue into melted wax, then quickly attach it to the bottom center of the container. After a couple of minutes, when it hardens, the wick will be fixed to the bottom.
Add aromatic oils, stir

When completely melted, add desired fragrance oils. Each type is different and requires a different amount per kilogram, so follow the instructions on the package. Taking a block that is suitable for different purposes, remember the following proportion: 60 grams of oil per kilogram of wax. Pour it into the pan, stirring for one minute to ensure even distribution.
Add color if desired

This step is optional. Your candles will come out a natural milky white, but you can add a little color by using a non-toxic colored pencil or block. For example, you can add half a millimeter of red pencil to 500 grams of wax to get a soft pastel shade. Want to bright color? Use more pencil.
The color will be much brighter in the melted mixture, but will turn milky as it cools.
Let the mixture cool

After adding the aromatic oil, turn off the heat and let cool for a couple of minutes. Optimal temperature for pouring into a container is about 55-60 degrees. This won't take long - just a few minutes - so pay attention to your thermometer. Once it is properly cooled, pour it into the container. Hold the wick so that it remains in the center, without over-tightening it. We recommend leaving some in the pan - you will need it at the end.
The secret to attaching the wick

The wick, attached to the bottom, may initially wobble a little in the liquid wax. You definitely want it to stay level and centered while everything cures. Simply place the handle on top of the mold, tie a wick to it, and leave to set for a few hours.
As the candle cools, you will notice a slight dip in the wick. The wax will also come away from the edges of the jar. Reheat the remaining mixture in the pan and fill the holes that appear.
Trim the wick

You will probably have a few extra inches of wick sticking out. A wick that is too long will burn too brightly. Light it and check it: if the flame is more than 2.5 centimeters, cut the thread.
Admire your own handcrafted candles
Cool the candles at room temperature to avoid the formation of cracks.
Beautifully decorated candles are often used for decoration. banquet hall. In addition, they participate in a beautiful and solemn ceremony of handing over the hearth. We will tell you how to decorate wedding candles with your own hands.
The wedding ceremony is one of the most important events in human life, has a magical and symbolic nature. Almost all details of the ritual have some hidden meaning, rooted in the distant past. Candles at a wedding also have their own meanings. Firstly, this is a reference to Orthodox rite weddings, when the future husband and wife hold candles in their hands. The fire of the candles symbolizes the pure and fiery love of the young people for each other. Husbands and wives keep wedding candles for the rest of their lives. Nowadays, church weddings are more a rarity than a rule, but candles carry the same meaning.
In addition, a live fire correlates with the warmth and comfort of a home, warming the whole family. It is this meaning that is played out in the now popular ritual of handing over the hearth. This is a beautiful and deeply symbolic ceremony that will require three beautiful decorated candles. Each couple - the groom's parents, the bride's parents and the newlyweds - take a candle. The older generation lights their candles and together brings the fire to the candle of the young family, passing on to them a piece of their wisdom, experience and love. During this ceremony, parents usually give advice to the newlyweds and talk about how they managed to preserve and carry the fire of their love through all the years of their life together.

Now in stores you can find a huge number of all kinds of candles that will decorate the interior of a banquet hall. However, homemade decor is much more valuable. What candles should you prepare for? original design? Firstly, in mandatory candles are decorated for the ceremony of handing over the hearth. Secondly, if the newlyweds do get married in church, then a modest, discreet, but stylish decoration. Thirdly, candles can become a key detail in the interior design of a banquet hall - in this case, you also need to prepare a special decoration for them.
Rules for decorating wedding candles
The choice of technique and style for decorating a wedding candle depends on its purpose. For wedding candles, the most appropriate would be a small wreath of fresh flowers, combined with flowers from the bride’s bouquet, or a wreath of artificial flowers created from ribbon and fabric. A small ribbon bow decorated with rhinestones would also be appropriate.

More interesting, complex and varied are the ways of decorating interior candles and candles for the ceremony of handing over the hearth.

The main rule for the first type of candles is that the decor should be made in accordance with the colors and style of the wedding. For example, for an orange wedding, you can make your own cheerful orange candles in the shape of an orange, or candles into which dried orange is fused.
Candles for the hearth should be decorated in the same style with other wedding accessories - glasses of the newlyweds, champagne, an album for wishes, a pillow for rings and others. Most often, ribbons and lace are used for decoration. We will look at all the ways to decorate candles for a wedding with your own hands below.

Fresh exotic flowers - very bright and beautiful decoration. So decorating a candle in this way is very simple - just attach it to the candle with a glue gun or regular glue bright flower, matching the wedding colors. An example of this design for wedding candles is shown in the photo:

However, more often flowers are used to create compositions for candlesticks or wreaths into which candles are inserted. Artificial flowers made from fabric and ribbons can also perform the same function.

Fabric decor is the most common: firstly, it looks very beautiful and stylish, and secondly, it is simple to implement. There are several techniques. Firstly, creating flowers from ribbons or fabric, which are attached to the surface of the candle with glue, creating beautiful pattern.
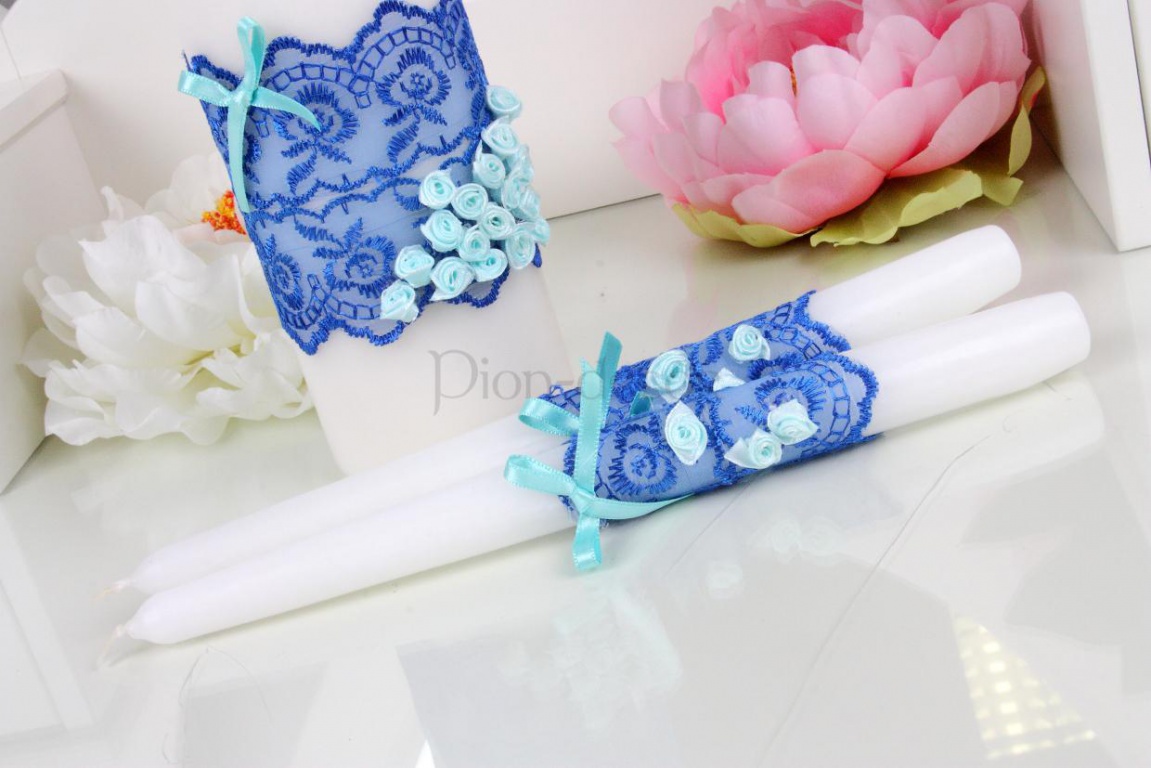
The easiest way is to make flat multi-colored roses from ribbon. You can make flowers different sizes and colors, securing them on a wide green ribbon in the center of the candle and additionally decorating them with rhinestones or beads. You will learn how to make the desired decoration from ribbons with your own hands from this master class:
The combination of lace and wide satin ribbons in a contrasting shade to the lace looks very beautiful. You can also combine satin ribbons different widths and contrasting shades. They are attached to the candle using glue. Good master class The application of this technique is shown in the video:
Decorating a wedding candle using decoupage
Decoupage is a very simple way to decorate a candle with your own hands, which at the same time gives a very good result. You will need a thick candle, an ordinary napkin or a napkin for decoupage, as well as an iron or a hot spoon that can be heated over a stove or over another candle. A thin napkin easily melts into paraffin. The technique is shown in the video:
You can not use the entire napkin, but cut out individual designs - this will look more stylish. In addition, a small pattern will go well with ribbons or other decor.
Other ways to decorate candles for a wedding
Wedding candles decorated with beads, rhinestones, flowers or other elements made from polymer clay look very beautiful. These decorative methods can also be combined with decoration with ribbons or lace. There are many options. You can cover the entire surface of the candle with beads without leaving gaps, as in the photo below - a good option for a wedding in disco style.

Can be made of rhinestones different colors and the beads have a beautiful pattern. The easiest way to attach these decorative elements is with a glue gun. Transparent glue holds well and will not be noticeable.
Another interesting option- create original jewelry from polymer clay. Plastic can be bought at the store. The technique for creating such decor is shown in the video:
Usually, ready-made candles are taken for decoration. white or a pastel shade of one of the brighter colors. However, you can make a candle yourself at home. These candles look the most original. An interesting technique is in which sea shells, dried petals, flowers, etc. are melted into a candle. coffee beans and so on. To do this, take two forms of different sizes (for example, two boxes), one of which is inserted into the other. Grains, petals, and dried fruits are poured into the gap formed between the forms. After this, the gap is filled with candle mass. To obtain it, store-bought candles, broken into pieces and freed from wicks, are melted on the stove. After the candle hardens internal shape the smaller size is removed, the empty space is again filled with paraffin so that the candle is not hollow, not forgetting to insert and secure the wick.
An ideal way to decorate for almost any holiday event - beautiful candles how to quickly and easily do which you will learn for yourself by reading detailed instructions. Today, candles in the interior can both bring aesthetic pleasure to the owners and guests of the house, and become an assistant in case of an unexpected power outage.
Also, self-made candles can easily become an interesting gift for family and friends, who will certainly appreciate the effort and time spent.

Some people think that candles are an exceptionally cute decorative element, which is true, except when they are placed in the house. scented candles, because they can replace the most expensive psychotherapeutic agent, creating the right atmosphere for relaxation.

Is it possible to make beautiful candles with your own hands?
Of course, today candles are sold in almost all souvenir shops, however, if this time you plan to give it as a gift to a loved one, it is much more pleasant to make this piece of furniture yourself.


If you are wondering how to make candles with your own hands, then don’t worry, because the task may seem quite difficult only at first. With the right approach, you will quickly understand that the process of creating a candle is quite easy.

You can confirm this fact by simply contacting people who decided to start producing candles, but got involved so quickly that it became not easy additional income, but also a fun activity. The more often you practice making candles yourself, the better quality they will be every day.

To create a candle at home you will not need large financial expenses, therefore, in addition to the pleasure that you will get from the creation process, you will also be able to save a lot of money.

What materials are needed to make candles?
You really can’t make candles at home without special materials. You should prepare:
- Vessel (the wax will melt in it);
- Molds used for candles;
- A saucepan (useful during the water bath);
- Two sticks;
- Various decorative elements (so the candle will look original);
- Wax crayons;
- Stubs from used candles
- Paper threads


Sequence of work
First, you need to lower the prepared paper thread into the mold that you took for pouring the wax/paraffin that was subsequently melted. With help wooden stick, which should eventually end up on top of your form, you need to fix the upper end at the future wick.

Secondly, cut the paraffin (wax) into small pieces and place it in the prepared bowl. Next, a saucepan with clean water you need to put it on low heat, place a bowl with wax in it and melt it. The main thing is not to forget to stir regularly so that lumps do not form.

Thirdly, pour a little of the previously melted wax into the mold, position the lower end of the wick directly in the center. All you have to do is wait until all the wax thickens slightly.

Fourth, fill with the remaining wax that was melted into the mold, and once the candle has completely hardened, cut off the part of the wick that will be superfluous. It is advisable to do this in no case earlier than twenty-four hours later.

Important point. You should not light what you think are ready-made candles until they are completely hardened. Remember that at least a day must pass from the moment the candle is created to its first use.

Decorating candles
The real pinnacle of craftsmanship when creating candles yourself is not at all scenting or coloring them, but decorating them with a variety of natural materials, starting from coffee beans and ending with pine cones, seashells or herbs with an incredible aroma.

Important point. The materials should be laid out on the bottom of the mold prepared for the candle until the melted wax is poured into it.

Another popular way of decorating today is the decoupage technique, which involves decorating with napkins of different colors.


How to turn an old candle into a new one?
If you liked the instructions on how to make a candle with your own hands, then first of all you should know that to create a new candle you will need essential oils.


To give a decorative element a scent, just add a couple of drops of oil to the already melted wax immediately before pouring the mold.

If you want to achieve the relaxing effect of candles, you can use a combination of bergamot and lavender oils.

If you want to get rid of bad thoughts, it is better to choose rosemary and lemon oils. For peace of mind No better option than rose or geranium.

How to create a gel candle?
In order to create a candle, you must first purchase a special gel that will be used instead of paraffin. It has a number of advantages:
- It is completely transparent. In practice, this makes it possible to achieve interesting contrast with various decoration techniques;
- During combustion, the gel does not emit odor or soot that is unpleasant for households.

The technology for creating any gel candle is generally similar to the process of creating a wax candle, but there is a difference: it is necessary to pour pre-melted gel, not paraffin, into the prepared form. Moreover, this must be done in compliance with a couple of nuances.


Firstly, before the gel is poured into the mold, it must be heated. This will avoid the formation of unwanted bubbles on the candle.


Secondly, the form for creating any gel candle must always be not only transparent, but also beautiful. After all, in the future the candle will not be taken out of it.

The imagination of a person with a creative nature is practically unlimited: the cost of materials needed to create candles with your own hands is quite affordable today.

The process is quite interesting, it does not take much time, as it might initially seem when you see a photo of candles made by yourself. Having created a beautiful, unusual candle once, you will definitely decide to repeat the experiment.

Knowing how to make truly exclusive candles yourself, being inspired interesting works talented people, you will always have an idea of what you can give as a gift to your friends, and how to decorate the table for a holiday, creating an incredible atmosphere of comfort.


Photos of candles with your own hands


To organize a beautiful and interesting wedding, you need to pay attention to even minor details. Wedding candles play a special role at a wedding. This decorative item is considered not only decoration, but also important detail in many wedding ceremonies.
Some newlyweds prefer to make candles for their wedding with their own hands. Guests can also make candles and then give them as a gift. Candles created by the mother of the bride or groom will be very symbolic. By the way, if you wish, you can make a whole set for your wedding: wedding candles, bottles of champagne, and you can decorate them in the same style.
What wedding rituals use candles?
As noted above, this is used in some wedding ceremonies. And first of all, this is, of course, a wedding. According to tradition, after the wedding the candles remain with the newlyweds. You need to keep them all your life, because it is believed that wedding candles are a symbol of the strength of the marriage union. The decoration of wedding candles should be quite modest.
Wedding candles are also used during the ceremony of lighting the family hearth. Candles for the family hearth should be decorated as elegantly as possible. After all, it is believed that the richer the design, the more prosperous it will be new family. The newlyweds should have one common thick candle, which symbolizes the family hearth, and one thin candle separately for the bride and groom.
How to make wedding candles with your own hands?
Currently, candles for weddings can be made in two ways.
Method 1. Ready-made candle + DIY decor
This option for making wedding candles is the simplest and most affordable. You need to buy a ready-made candle and design it yourself. The candle can be decorated with various decorative elements to suit your taste, but remember, all decorative items should not be flammable, they should be completely fire-safe.
Method 2. Making and decorating candles by hand.
This method of making candles for a wedding is more complicated, as it involves making the candle itself with your own hands and then decorating them.
A candle can be made using candle mass or special wax. But you can buy ordinary white candles, melt them, giving them a shape to your liking. To make the candle melt faster, chop it finely with a knife.
- Colored candles. If you want to make colored candles, for example, a pale pink or light candle blue color, then add a little food coloring to the prepared candle crumbs, or grind wax crayons.
- Aroma. To make the candle have a pleasant aroma, add a little aromatic oil to the raw material.
- Wick. You can buy a wick in a store, or you can use it from candles that have been melted down. Cotton thread is also suitable, but it should first be thoroughly soaked in wax. On one side, attach a weight to the wick, and on the other, tie it to the stopper and install this small structure in the middle of the mold.
- Molds for candles. Nowadays there are a lot of different shapes for candles in stores.
But the best thing to buy is a classic cylinder. This shape will fit into any wedding decor.

You can also make a candle mold with your own hands. To do this, take a suitable plastic bottle. In this case, a ketchup bottle is used. Cut off the neck and bottom of the bottle. Then make 8 cuts at the top of the workpiece at equal intervals. Mark triangles on each square. Cut along the marked lines. Now connect the resulting teeth, insert a wick between these teeth and seal with tape.
Before pouring wax, the mold must be thoroughly greased. vegetable oil. Decorative elements can be pre-attached to the sides of the mold. If you like, cover the bottom of the mold with pretty glitter or shells.
Pour paraffin into the mold, after melting it in a water bath.
Now let the wax harden completely. In order for the candle to cool completely, it is enough for it to be at room temperature.
The end result is a candle like this.
DIY wedding candle decoration
You can decorate wedding candles using various materials: rhinestones, bugles, beads, lace, ribbons, polymer clay, chains, porcelain, decorative paper and much more.
The most common way to decorate wedding candles is decoupage, modeling and painting. As main topic love stands out, so they decorate the candle with hearts, cupids, drawings with wedding rings and pigeons.
Decorative items are attached to the product using glue.
Carved candles
A carved candle is a real work of art. The technique of making carved candles is complex. But very exciting.
1st step: The finished paraffin candle needs to be dipped into liquid colored wax. During the immersion process, it is important to constantly monitor the temperature of the liquid wax. If the wax is not at sufficient temperature, it will become hard quickly enough and it will not be easy to cut a pattern out of it.
2nd step: The process of carving a candle is perhaps the most interesting part. Carving requires special tools. The master must think through the idea in advance future candle. It must act quickly and accurately, since only 20 minutes are allotted for this stage, because paraffin hardens very quickly.
3rd step: To give the candle a beautiful shine and protect it from dust, the candle is placed in a special acrylic varnish.
Candle decor with flowers
This candle decor option is ideal for shabby chic or vintage style weddings. All candles are decorated in soft pastel colors.
Candles can be decorated with rhinestone threads that are glued on top of satin ribbons. A candle symbolizing the hearth can be decorated with a large soft pink flower and a ribbon made of rhinestone thread.
Read more:
As you can see, it is not easy to make some wedding candles with your own hands, but this process makes us think about the importance and integrity of the marriage union. Keep your wedding candles for the rest of your life and always remember how important it is to preserve family warmth and comfort for many happy years.
New Year- This is a holiday loved by everyone. These days everyone is waiting for a miracle, albeit small. And it comes. Houses and streets are transformed: garlands of multi-colored lights are burning everywhere, elegant Christmas trees sparkle welcomingly in squares and apartments. People rush to buy gifts, hang decorations and prepare holiday treats.
Candles in the interior
Decorating the interior with candles is a long-standing tradition that comes from times when there was no electricity in homes. Then even small candles were placed on the branches of fir trees. It is also a Catholic tradition to light a red candle every Sunday during the Nativity Fast. And on the Christmas table there should have been four such lights burning.
Today, despite electric garlands and a lot of all kinds of decorations, interest in candles has not faded. On the contrary, living fire has become a symbol of celebration, romance and love. In cities, candles are the only way to see the flame. But this is a real antidepressant, allowing you to relieve tension and quench sadness.

Of course, today you can buy almost everything, but a New Year’s candle made with your own hands is excellent decorative decoration and a wonderful gift. There are many design options. You can buy ready-made candles that match the design and decorate them, or make them yourself. But in the second option, you will need to master simple skills. In any case, creating such a decorative element as a New Year's candle with your own hands is an exciting activity that lifts your spirits and develops Creative skills. In addition, during the evening you can prepare gifts for all your loved ones and for your home.
Colored cones
The easiest way to make such decorations is to use white paraffin candles or cinders. Original element New Year's decor there will be burning cones. They will symbolize Christmas trees. Easy to do New Year's candles with your own hands. A master class on how to make them is given below.

Whole products must be carefully broken into pieces and the wick removed. You will need it later for work. Place fragments of candles in an old metal ladle or pan and place in a water bath, that is, in a pan bigger size with boiling water. If you need to make colored candles, it is most convenient to use wax pencils that children use to draw. The selected chalk is grated and poured into the pan along with pieces of paraffin. To ensure coloring occurs evenly, you need to stir.
While the contents of the pan are melting, you need to roll a bag from the page of a thick glossy magazine. IN sharp end cone, secure the tip of the wick so that it protrudes at least a centimeter. Secure the edges of the bag with tape. Attach the other end of the wick to a toothpick and place it in the upper part of the cone. All that remains is to place the force in some stable container, for example in a glass, so that it does not swing or turn over when pouring and hardening.
Carefully pour hot paraffin into the cone. It is advisable to do this in several stages, allowing the previous layer to harden slightly. In this way, you can make candles of different colors, pouring in a portion of a different shade each time. Leave until completely hardened at room temperature. Do not refrigerate. This may worsen the final result.
Remove the finished candle from the mold. If there are irregularities, they can be eliminated by blowing a stream of hot air from a hairdryer onto the workpiece.

The next stage is decoration. This DIY New Year's candle is almost ready for use right away. But if you add a few decoration elements, it will turn from ordinary into festive. And there are a lot of design options.
Following these instructions, you can prepare candles of any shape: cubic, spherical, cylindrical. Or buy special plaster molds in the store and make figured versions in the form of Father Frost and the Snow Maiden. In order for the candles to be removed better later, the blanks must be lubricated from the inside. sunflower oil or dishwashing detergent. If you missed this stage, it doesn’t matter. You can dip the mold with the frozen candle in hot water for a few minutes and calmly remove the candle.
Citrus aroma
Many people associate the New Year with the aroma of pine needles and citruses. This theme can be played up by decorating New Year's candles. Cut the orange into thin slices and dry in the oven over very low heat. You can also use lemon, lime or tangerine. You will need a ready-made candle and a mold a couple of centimeters wider. It could be Bottom part from a carton of milk or a wide glass. In this case, you should not choose a thin candle to avoid smoke or fire. Place a candle in the center of the mold. Place pieces of dried citrus fruits around it in the free space. You can use pine needles, coffee beans, shells, sparkles, Christmas tree beads or beads as elements.

In a separate container, melt paraffin or wax candles without wick. Carefully pour the molten mixture into the empty space and insert the wick. When everything has hardened, you need to take it out and blow it with a hairdryer so that the decor of the New Year's candle appears.
Decoupage
Decorating candles with bright pictures with a New Year theme is simple and affordable way decoration. The result will always be original. Using the "decoupage" technique, making a New Year's candle with your own hands is quite simple.
You need to prepare a picture specifically for this technique. But if you don’t have one in your arsenal, it’s not a problem. Regular napkins with a New Year's theme will do. Cut out the picture to fit, or individual elements, from which to subsequently create a composition. Remove carefully upper layer, attach the paper to the surface of the candle and blow with a hot hairdryer. A delicate napkin will stick to the slightly melted wax instantly.

Another option is to use a hot spoon heated over a flame. She needs light movements move over the drawing, pressing it into the surface. For this method, only thick candles are used that do not burn out completely.
Decor
There are many decoration options. Beads, beads, serpentine, bows, grains, twigs and other decorations suitable for the occasion can be used. You can use regular or large-diameter wax candles as a basis. This is done in the interests fire safety. Each element is heated under a stream of hot air or over a flame. It is convenient to hold small parts with tweezers. After which they are immediately applied to the surface. If the element cannot be heated, for example a bow made of fabric, then it is fixed using safety pins. They can also act as decorations. Bright colored heads can make up a pattern or an inscription.

Frost
The candles look original, as if covered with frost. And making them is not at all difficult. A DIY New Year's snow candle made using this method will bring frosty freshness to the interior. The surface is generously lubricated with glue and rolled in salt. You can take marine, culinary or decorative. And even tinted. Alternatively, you can use colored sand or semolina. In general, everything that is at hand.
Candles in a glass
Glass glasses can become original holiday candlesticks. They can be played in different ways. New Year's candles in a glass will sparkle transparent glass, filling the house with comfort. First, the main element is installed, and then the decorative ones. You can pour dried berries or grains into the bottom of a wide glass. Beads and other non-flammable elements will also be appropriate there. In this case, it is best to use small tablet candles. It will be safer this way.

Another option. Place several glasses with stems upside down on a flat dish. Under each one you can put tinsel or a flower or a tiny spruce paw, if you have one at hand. And put a small candle on the stand. It looks original and stylish.

Candlesticks
Not only the candles themselves can become a decorative element and object of decoration, but also stands for them. Candlesticks can be decorated in different ways. For example, glue a candle to the center of an old disk or flat saucer. Place tinsel around beautifully and secure with glue. Decorate with pine cones, acorns, and Christmas tree decorations.
You can use cut branches of spruce or fir. They must be held together in the shape of a wreath either with strong threads or thin wire. And the rest is a matter of taste.
Orange candlestick
How to make New Year's candles so that they smell like a holiday? Nothing could be simpler. Cut a whole orange into two unequal halves. Hole out the pulp with a spoon and eat, insert a wick into the peel and pour in melted wax. Simple and original. You can make a candlestick from this material. Cut out figures in the peel sharp knife. Insert a flat candle in a foil casing inside. The aroma will fill the whole house.

Safety precautions
All described options are suitable for use. But you need to be careful. Do not leave candles lit on long term unattended. All components must be firmly installed in the composition. Do not use flammable elements for decoration.
A handmade New Year's candle is a gift that brings warmth to the heart.