Making wooden boxes with your own hands. How to make a wooden box with your own hands
The main advantage of a flower box made of wood is the variability of solutions: you can make it yourself from leftover building materials, and the dimensions and shape will be determined only by specific needs. Such compositions are extremely cheap, and with a skillful approach they are in no way inferior to others. decorative elements landscape design.
The key advantage of the solution is considered to be extremely low cost; we are also pleased with the possibility of creating a unique composition that fully matches the interior or landscape design. The special structure of the wood helps to maintain optimal microclimate for plants, with a skillful approach can be used natural beauty and fibrous material.
All the disadvantages of such boxes are due to the susceptibility of wood to rot and biological damage. If you want to plant plants directly in a container, you need to take care to protect the boards from contact with moisture and soil substrate. When used outdoors, wood is relatively short-lived and therefore needs protective impregnations and paintwork.
What materials and tools will be needed for manufacturing?
To make a wooden flower box with your own hands, you need to prepare the following basic tools:
- jigsaw or saw;
- grinding machine;
- forceps;
- tape measure with a square;
- plane;
- screwdriver;
- hammer.
The design of the future box is selected in accordance with the equipment present: if all manipulations have to be performed manually, it is better to give preference to the simplest form. The presence of power tools allows, in turn, to realize any design ideas.
As base materials you can use:
- slats and boards with a thickness of at least 1 cm;
- OSB scraps;
- plywood sheets, including those that can be reused.
Subsequent surface treatment will be carried out using an antiseptic, a variety of paints and varnishes, and stains. Nails, waterproof glue, and self-tapping screws are suitable for connecting parts.

Manufacturing technology for a simple street model
In its most primitive form, the work is performed in the following steps:
- Boards, the width of which varies between 15-20 cm, are cut into blanks. Three long pieces will be needed to make the bottom and sides, the ends will be decorated with two short ones (here you need to leave allowances equal to the thickness on three sides).
- The boards are planed with a plane, they can be sanded with coarse sandpaper, the cuts must be carefully processed.
- Thin holes are made along the edges of the workpieces: 3 in the side parts, 4 in the end parts.
- Using screws, first fix the sides and bottom, then attach the end blanks.
- The assembled structure is sanded with fine sandpaper.
All surfaces must be thoroughly impregnated with an antiseptic; varnish, stain or enamel can be applied to the outside.

Used cargo pallets are often used as the base material; this is a very cheap raw material that is easy to process. Instructions for assembling an outdoor flower box:
- the pallet must be disassembled using a nail puller; pliers will be needed to remove fasteners;
- Rotten and damaged boards are rejected;
- a rough sketch of the box is drawn up indicating the planned dimensions;
- in accordance with the notes, the wood is sawn and cleaned using sandpaper;
- assembly begins by fixing the lower base and upper frame;
- The side edges are attached to the two parts of the container with nails;
- the joints are masked with narrow decorative strips.
Here, too, the final stage is the application of protective and paint compositions.
If necessary, you can nail legs made of beams to the container; with their help, complete ventilation of the bottom edge is ensured. Flowers can be placed inside in pots or planted directly in the container. In the second case, it is necessary to cover the box with film and equip it with drainage holes.

Decoration options
Miniature flower boxes made of wood are in great demand, in which the decoration is directly from the vegetation: hanging stems and long leaves form a single composition in which greenery predominates.
Craftsmen decorate wood boxes with saw cuts (that is, what is left after work), thin boards in the style of a picket fence, and figured thick cuttings of branches, cleared of bark and coated with varnish.
For those who have the skills of figured wood carving, it will not be difficult to create beautiful flower containers that imitate the shape of tool boxes, baskets, ships, or interior items. There are no restrictions - you can draw inspiration from the surrounding landscape design.

If you plan to use decorative boxes indoors, to create a unified stylistic composition it is worth paying attention to the possibilities of decoupage. Paints, brushes, glue and special napkins will help you easily transform any container and create a designer interior element based on it.
For those who do not like to overload their perception, we can recommend a monochrome design of the tree - for example, paint it in a bleached grey, lilac, blue or light green shade. Such pastel notes look rich, but at the same time restrained.
Products can be floor-standing or hanging. Variations installed on high legs have become widespread: they allow you to care for plants without squatting, which greatly simplifies all manipulations. To assemble wall models, you will need special holders: when choosing them, you need to take into account the potential weight of the structure filled with soil and flowers.
Boxes hung outside the window are in fashion - they are fixed on outside window sill using special strong loop fasteners. Curly products, polished or stained, look especially impressive.
This article is about how to do wooden box for tools. If you have a lot of tools and want to keep them organized, the best thing you can do is create a simple toolbox out of wood. From our experience, we find them very useful as they are lightweight, durable and provide plenty of space for storing tools. Don't forget that you can adjust the size and design to suit your needs.
The main components of the tool box are made from 20mm boards as they have a beautiful appearance, and very durable. In addition, we recommend that you glue the joints and fasten everything with cuts. Try to screw in the cuts themselves as symmetrically as possible.
Once assembly is complete, you will need to sand the entire surface of the box. Make sure all edges are smooth, otherwise you may hurt your hands on the sharp edges. Also, be sure to check that all screw heads are level with wooden surface. Get rid of dust and shavings before painting.
To make a wooden tool box, you will need the following:
Materials
Tools
- Protective gloves, glasses
- ruler,
- Chalk, tape measure, level, carpenter's pencil
- and drills
Adviсe
- Pre-drill holes in wood components before installing screws
- Make a handle from a cylindrical stick
Time
- 1 hour
Box decoration
Making a simple wooden tool chest is one of those projects that can be done in less than an hour, but it can make your life easier, especially if you work with tools a lot.
Smart Tip: Before joining the parts, add a little glue to the joints. Immediately remove excess glue with a dry cloth, otherwise it will be difficult to remove once dry.
The first step of the project is marking. As you'll see in the next step of the project, we'll be using 1x8 boards to make a toolbox. Therefore, you should use a carpenter's pencil and a straight edge to mark the lines on the wooden boards.

In order to get precise cuts, we recommend using an electric jigsaw or a good circular saw. Make sure the saw has smooth teeth, otherwise it may tear off the edges.
Smart Tip: Also, make sure the blade will fit exactly along the cut line before sawing.

The picture shows all the components needed for the box. Circular machine can make the job easier since many cuts need to be made at an angle.

You should use this plan when making the components for the box. Make sure you double check all measurements, otherwise the components may not fit correctly.

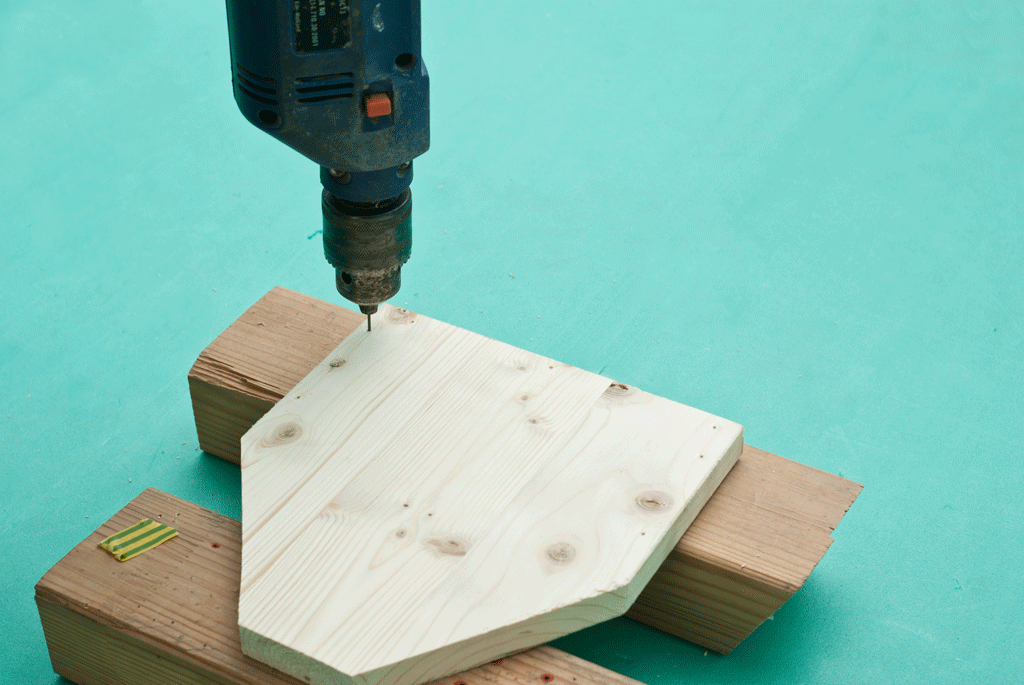
After creating the wooden pieces, you need to drill holes along the edges. As you can see in the picture, you need planks on wooden block to prevent surface damage. Drill three holes in the bottom and two holes in the sides.
Smart Tip: If you are not experienced in woodworking, you should draw guidelines for pilot lines. Allow some space from the edges to prevent the wood from splitting.
If the edges of the bottom are not smooth, you should sand them thoroughly with 120-grit sandpaper before assembly.
Coat the bottom ends with wood glue to strengthen the connection. Remove excess glue with a dry cloth, otherwise you will waste time cleaning it.
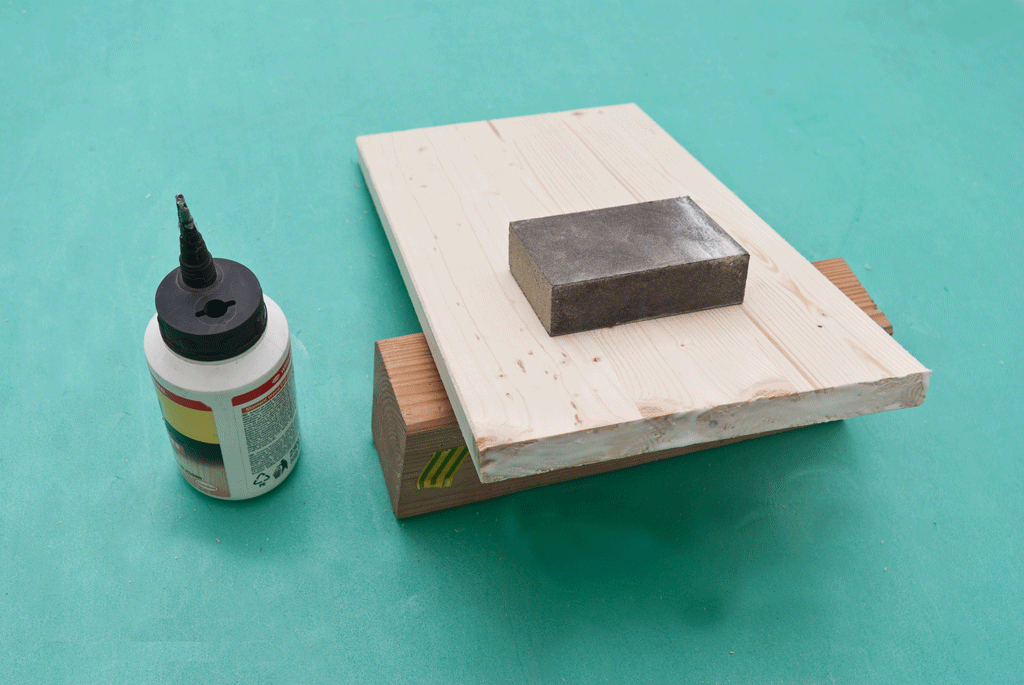
Press the ingredients firmly and leave for half an hour. If you are using good glue, it will hold the joints together well.
However, still tighten the cuts themselves drilled holes.

In order to receive robust construction We recommend using self-cutting tools. Work carefully to prevent damage to wood components.
Smart Tip: Align all parts before twisting. As you can see in the picture, the edges should be smooth.

After installing all the components together, the toolbox should look similar to the one in the image.

Make a handle from a cylindrical wooden rod. The diameter of the handle is approximately 20 -25 mm.
Smart Tip: Use a ruler to cut the rod to the desired length.

Add a little wood glue to both ends of the rod before placing it in place. Then, drill a hole and tighten the cut itself. Hold the handle while screwing, otherwise it may move out of place.
Smart Tip: Leave about 15 mm from top edge to the wooden handle.

Remember to smooth the edges of the wooden components with sandpaper.
Smart Tip: Clean the box of dust and shavings before painting.

Then completely sand the entire surface of the box with sandpaper.
Smart Tip: Apply several coats of paint, varnish or stain to improve the appearance of the wood and protect the materials from rotting.

Thanks for reading our article on how to make a wooden tool box. What kind of toolbox do you have? Tell us in the comments below.
We are very rarely bothered by things and objects that we are forced to use at home, on summer cottage or in the office. We decided to think with you about regular box made of wood. You can store different things in it, make it beautiful flower pot, box for letters and correspondence. We look at a photo of a wooden box for different purposes and tasks.
On manufacturing plant Such a container is indispensable as a container; we’ll talk about the advantages a little later. The most important question that arises is: “How to make a wooden box?” To make it, chipboard boards, plywood and pine lath are used.

Today we will start making ordinary wooden boxes with our own hands from wood for correspondence or a summer house. No special materials or tools are needed here; a standard home kit will suffice.

Advantages and disadvantages of a wooden box:
- Weighs less than metal containers;
- Only natural material is used;
- Simple assembly of the structure, elementary elements;
- Strength is higher than ordinary cardboard and parchment;
- Low purchase cost of the material, wide distribution;
- At correct processing surfaces, the service life increases.

Advantages of using a wooden box:
- Increased weight of transported items;
- Wood treated with an antiseptic lasts quite a long time.


Ways to use a wooden box:
- In domestic conditions for storing vegetables, fruits and products.
- Souvenir packaging for a gift.
- Packaging of expensive devices and equipment.

Attention! When making a box for a specific product or product, you should take into account its size and weight. Toy boxes have standard sizes and characteristics.

Necessary tools and equipment
Before you begin your wood box project, you need to gather all your tools and equipment in one place.

We will need a machine for processing wood; there must be a jointer and circular saw. Otherwise, we buy the strips we need in the store - size and thickness. You can’t do without a pencil, tape measure, construction angle and hammer.

We will use the machine for unprocessed wooden blanks, which we will make from boards 2.5 x 25 x 150 cm.

Instructions for making a wooden box
We take a circular saw and cut it to the size we need wooden elements, trimmed pieces are obtained. First we cut along the edges, then we set it to a width of 20 cm and finally saw it.

Be sure to wear special safety glasses while working. It is better if you have a good partner holding the boards you are sawing.

Having installed the carriage at an angle of 90 degrees, we cut the board into 5 pieces, 4 of which are 20 cm, and another one is 24 cm.

Set the plane parameters to a height of 1 mm and process each of the blanks from all sides to create rough versions of the board. For finishing work, the height value should be set to 0.5 mm. The thickness of the finished boards should be 2 cm. We will get boards 2 x 20 x 20 cm.


There is no need to polish the workpiece until it shines; the box will be used for storing vegetables and fruits. Tool boxes are made according to the same principle.

We cut the remaining blanks to a width of 4.5 cm, taking into account the direction of the fibers. If you want to make the box ventilated, there will be 3 additional blanks in stock.

Assembling a wooden box
The entire assembly process is very simple, no tricks or hidden mysteries. We take the most ordinary nails 5 by 0.15 cm. Why thin nails? So that the structure is tightly fastened and the boards do not crack.

First we nail the top and bottom strips from the end, then place the remaining ones wooden blanks. Screw it to the bottom wooden base strips 24 cm long, use 35 mm screws.

Drawings and dimensions of wooden boxes are presented below.

Wooden box as a flower pot
Wood in its properties and qualities - universal material, it can be used to make boxes where we will place our plants.

In the previous example, we already figured out that wood is very easy to process to a fine finish; you can remove absolutely all the irregularities and make the surface perfectly smooth. No special skills or abilities are required for this.


Below we suggest getting acquainted with the options for boxes that you can make yourself without any skills with my own hands. The shape and appearance of the structure will depend on your personal imagination.

It may not be used at all when working with wood. electric tool, saving some money, but much more time will be lost, keep this in mind. With a set of all the tools, you will get exactly what you planned in the shortest possible time without making any effort.

Be sure to stock up on paint and antiseptic to cover the surface of the finished products.

If the box was originally planned for planting flowers, then you can first purchase ordinary plastic pots where the flowers will be planted or plant them directly in the box. If you are going to plant it in a box, do not forget to spread a polyethylene film and make holes for drainage.

DIY photo of wooden boxes


In the course of his life, a person accumulates a lot of small property, which can only sometimes be useful for some need. In our cramped living spaces, there is often a problem with the location of such things.
To solve this issue, you will need a neat container that can be placed in any corner of your living space. The most practical and environmentally friendly option, of course, is a wooden box.
With him independent production You can use all your imagination and make a unique masterpiece. Fortunately, wood is the material that allows you to make truly original designs.
Why tree
Since ancient times, folk craftsmen have used to make various designs tree. Houses were built from this material and served their owners. for many years, providing them with comfort and coziness for living.
The tree is natural material, which is easy to process and has high environmental performance. Wooden structures have an aesthetic appearance and emit favorable odors.
Of course, this material has its drawbacks, the main ones being rotting and flammability. But when the right approach to wood processing and caring for it in the future, such troubles can be easily avoided.
Any man wants to produce some product with his own hands. Wood is exactly the material with which you can experiment and make something that will not only become necessary item furniture, but will also add unusual aesthetics to the interior of the living space.

To work with wood, you will need a special tool, which a good owner always has at hand. The choice of material must be approached thoroughly, giving preference to the most durable types of wood so that the product lasts as long as possible.
The very first thing to do is to determine the place where the wooden box will be located and carefully take the required dimensions.
- according to the measurements received, cut structural elements drawers - four walls, a lid and a bottom;
- connect one by one side walls using nails or self-tapping screws;
- we screw the bottom of the product, starting from opposite corners, to avoid its displacement;
- Finally, we install the lid of the box, which allows it to be tilted using piano hinges.
With the help of simple manipulations, the wooden box is ready for use. The product is refined based on your preferences and tastes.
Box - necessary thing in everyday life. There is no point in buying or ordering it, because it is much easier to make something with your own hands from boards. The main thing is to follow the technology step by step, choose the right boards and know how to make a box. Then everything will work out.
Choosing a board and making parts
The size of the boards largely depends on the size of the intended product. There is a common belief that low-quality boards are suitable for a box. Is this true? If the surface of the wood is uneven, with knots and deformations, then a person may be injured when sawing or processing the board. In order to create such a structure, there is no point in taking high-quality expensive wood. It is best to choose a board that is medium in size and quality. How to make the simplest box where you can put your tools?
To make such a design you will need:
- boards;
- self-tapping screws;
- sanding paper;
- carpenter's pencil;
- ruler or triangle;
- jigsaw or circular saw.

22 mm wide boards are best suited for this. Self-tapping screws will be required for fastening, and for working off boards and surfaces finished product- sanding paper. It all starts with markings, which require a carpenter's pencil and an ordinary ruler. It is best to take a triangle ruler, because with its help it is more convenient to mark the boards from which the box will be made.
Practically not used for cutting wood hand tools. To make the box, you will need a circular saw or jigsaw. Be sure to pay attention to the teeth of the power saw. They should be small and even. Such designs for household needs not made from thick wood. A powerful saw, which is usually used for cutting down trees and landscaping work, is not needed here. There is one more nuance: when starting to saw off boards, they first make a test cut on the wood to see how it will be sawed, and only then begin the main operations. In order not to be mistaken with the dimensions of the finished structure, for this purpose it is best to prepare a “pattern” in advance: make its bottom and walls from paper. This is very convenient, because then you just need to attach the “pattern” to the wood and transfer the necessary parameters to the boards.
Once everything is cut out wooden parts, they are sanded. Then 3 holes are drilled at the bottom of the side walls of the finished product. The lower ends are coated with wood glue. To remove excess it, you will need a dry cloth. The components of the box are assembled and pressed tightly together. Screws are screwed into the drilled holes. Before finally screwing in the screws, it is necessary to check the correct location of all parts of the finished product. To make the tool box convenient to use, a handle made of a cylindrical rod is attached to the top of it. The rod can be made of wood or metal. How to make similar designs for flowers? Repeat the same operations from the beginning. And use self-tapping screws to secure the handles on the sides to make the flower box more convenient to use.
Manufacturing of a retractable structure

It is believed that a retractable structure is more difficult to manufacture than an ordinary one. This is true. Calculations and measurements when making such boxes require more complex ones. Before you start making a retractable structure, you need to decide where it will be located. If necessary drawers for a cabinet, it is better to first make one for any other piece of furniture in order to understand the principle of operation and master the manufacturing technology in practice. To begin with, it makes sense to try to restore old cabinet, making drawers for it. First, the doors are removed from it and unscrewed door hinges. The first thing to measure is the “working depth”. This term means inner surface sidewalls, that is, the distance over which the boxes move. Each of them has an external part, which is usually called a facade. The bedside table also has a facade. Based on this, all drawer fronts are calculated. The height of the cabinet facade is divided by their number. From the resulting figure, subtract the distance of the gaps multiplied by their number.
The selection and calculation of guides is the most critical stage of the work. For retractable design It is best to select full rollout guides. When you already have experience in manufacturing retractable bedside tables, it makes sense to switch to roller guides, the installation of which is much more complicated. There is no point in skimping on drawer slides. The better quality they are, the more functional and reliable the piece of furniture will be. Marking the guides is not as difficult as it seems at first glance, the main thing is to show maximum care. The calculation of guides starts from the top. The upper pair of guides will not differ on the right and left sides. The marking is carried out at a height equal to half the height of the upper facade. All the following markings are made in accordance with the dimensions of the drawer and the front of the bedside table. Once the markings are completed, they proceed to the manufacture and assembly of the products themselves.
Securing the guide elements

Drawers are best made from solid wood or fiberboard. Each drawer requires a furniture handle. Assembling fiberboard boxes is almost no different from assembling wooden ones, but it has its own nuances. Before installing the boxes, their edges are glued. This operation at home does not require complex equipment. Using an iron and a dry cloth, apply the edge to the desired end and gently heat it with the iron. To trim off excess edges, you will need an ordinary kitchen knife. It should not be sharp so that the laminate that makes up the edge is not damaged. If the box is made of solid wood, this operation is not necessary.
When the drawers are assembled, it is necessary to properly strengthen the guide elements. The full rollout guides must be divided into 2 parts. The wide part is attached to the side of the cabinet, the narrow part to the side of the drawer itself. The guides are fixed with a slight indentation from the side of the cabinet (about 3 mm) and then proceed to attaching the drawer fronts. First of all, holes are drilled in them for further fastening of the handles. Through the same holes the facade is attached to the main part of the box.
The rough fastening is done first; once it is completed, you need to check the functioning of the box and only then fix everything completely.

There are various types fasteners, however, as experts say, it is best to use confirmed fasteners for drawers. If the drawers are small, the number of corners in them is counted and the number of required confirmations is obtained. Drawers also need a pattern. The most difficult stage in their manufacture is the bottom. Since the drawer is retractable, unlike an ordinary one, it is mounted in 2 stages. First, they do everything rough, check that the drawer is installed correctly in the bedside table, and only then attach everything completely.
If the box is made of solid wood, after finishing assembly it is better to immediately open it with varnish. When you need drawers for laundry intended for washing, and there are no large sheets of wood for them, then you can make them from thin strips. They are suitable for making frames, bottoms and fronts of drawers.
And for the manufacture of sidewalls you can use plastic mesh, which will provide additional ventilation to things. In some cases, metal mesh is also used to make such boxes.
If you need one large non-pull-out linen drawer, it is made using the same technology as for tools, only the dimensions are adjusted.