Causes of breakdowns of a gas water heater and methods for their elimination. What are the main malfunctions of the boiler
A water heater is now in every home. Therefore, it is not surprising that more and more people are looking online for information about the causes of a breakdown, since this technique is quite capricious and requires attention to itself. But ease of use more than covers all the shortcomings, so the popularity of water heaters various types does not fall. Therefore, in order for the boiler to last longer, you should know what to fear.
Common causes of breakdowns
Most frequent breakdowns occur due to the following:
- Untimely replacement of the anode. It is installed in the water tank in order to protect the tank from scale. Therefore, it must be cleaned and replaced every three to four years. Otherwise, a layer of settled salts will significantly impair the operation of the installation.
- blockages. Rusty or dirty water that gets inside will clog the inlet and outlet pipes. Accordingly, after a while they will be completely clogged and will not be able to provide water movement. Therefore, experts recommend using special filters at the inlet and periodically cleaning the connections from dirt or sediment.
- Voltage drops. Any electrical appliance sensitive to changes and the water heater is no exception. Control circuits can also burn out and fail, as in a computer or TV, so you should take care of a fuse or stabilizer. This will help prevent surges and protect the equipment.
- Thermal sensor failure. This problem occurs quite often and can lead to overheating of the boiler and its failure. Most often, the temperature sensor is simply covered with a layer of scale and cannot work properly, the settled salts block the free access of water. Because of this, it receives the wrong temperature, and the electronics do not turn off the heating in a timely manner. Therefore, it is necessary to regularly check the condition of all elements inside the water heater and clean them periodically.
Water heater: Errors in installation and use
In addition to possible breakdowns during operation, often malfunctions occur due to errors during installation and assembly of the boiler. To prevent this, you need to know what points you need to pay attention to:
- Connection errors. Incorrect connection to the inlet and outlet pipes may cause leaks or cause steam to form. This adversely affects the operation of the water heater and can lead to damage. Therefore, it is necessary to carefully check all connections before starting work.
- Errors in the installation of the thermostat and heater. If such a defect is allowed, then not the entire volume of water can be heated, but only some part of it. Because of this, the water temperature will be much lower, although the thermostat will show a higher water temperature and turn off the heating.
- Hull deformations. If the thermostat is installed incorrectly, a vaporization effect may occur. This leads to an increase in pressure inside the water heater and deformation of the housing.
- bacterial infection. Before a long break in work, it is necessary to drain all the water from the boiler. If this is not done, then a bacterial infection of the container is possible. The water in it will "bloom" and acquire bad smell, which is very difficult to derive in the future. In particular advanced cases bacterial contamination may lead to tank replacement.
In addition to the above, there are many other causes of breakdowns, which are too long to list. Therefore, in order for the water heater to serve for a long time and without fail, it is necessary to follow the following rules.
Hardware installation and general installation must be left to the professionals. Only in this case, all work will be performed correctly, and in case of any problems, repairs will be made under warranty.
It is necessary to conduct regular preventive examinations. This will allow timely cleaning of clogged connections, descale the container and prevent problems from accumulating.
Troubleshooting should also be left to the professionals. Only experienced workers can accurately diagnose the cause of the breakdown and eliminate it. Amateur intervention can lead to a worsening of the situation.
If you follow these simple and understandable rules, you can significantly extend the life of the product and reduce the cost of possible repair. But despite this, many owners are trying to save a hundred or two and go to craftsmen who cannot provide quality repair. Therefore, the boiler will break down again and again until it requires a complete replacement.
Video How to repair a water heater with your own hands
This publication will not consider options for improper installation (this can be read in another article) and operation (described in the instructions) of the water heater. We will only talk about those cases when the repair of the boiler is really required. Let us also state that internal organization water heaters from different manufacturers is slightly different. Accordingly, the images may not match your model, but nevertheless will give an idea of how to repair the boiler.
The internal structure of the water heater on the example of one of the Termex models.

Malfunctions and their causes
An electric water heater is a relatively simple device, so there are only 3 types of malfunctions, but they can have different causes.
1) The boiler does not heat water or does it noticeably slower than before:
- Burnt out or ;
- the thermostat is out of order;
- control board not working.
2) The water heater is energized:
- burst heating element;
- Faulty electronic panel or control board.
2) The device is leaking:
- defective heating element;
- outdated sealing gasket;
- internal tank corrosion.
Preparation for boiler repair
To identify the cause of most breakdowns, it is necessary to disconnect the water heater from the network, drain the water from it (a separate article is devoted to this) and remove it from the wall. Then unscrew and remove the cover that hides access to the heating element and other working units. For boilers located vertically, this is the bottom cover, for horizontal ones - the left one, for compact models - the front one. When repairing Termex boilers, you need to pay attention to the screw in the middle of the cover, often covered with stickers.
First, fastons are removed from one or two heating elements and a protective thermostat, fixing nuts and screws are unscrewed.
Fastons are marked with red arrows, screws with green arrows, nuts with blue arrows. The protective thermostat is marked with a yellow oval.

The protective thermostat is removed, the temperature sensors are removed from the heating element.
Under no circumstances should the temperature sensor tubes be cut! Inside them is a special liquid that will leak out and the device will have to be completely changed. Wrapping a damaged tube with electrical tape will do nothing.
Thermal sensors are marked with a blue oval.

Now you can diagnose parts that may be faulty.
How to repair a boiler with a faulty thermostat?
The easiest way to check the operation of the protective thermostat is with a lighter. After making sure that the button is pressed, we heat the copper tip of the temperature sensor. A working part will work soon defense mechanism, opening the circuit and pushing the button. A faulty thermostat will have to be replaced - it cannot be repaired.
The green circles mark the buttons in the different models of thermostats.

How to change or clean the heater in the water heater?
Most often, it is the heating element that fails in these devices. In order to check its serviceability, you need a tester. On it you need to select the resistance scale (Ohm) and take measurements on the contacts of the heating element. If the device does not show anything, then a heating element does not work. Boiler repair in this case consists in replacing a defective part, it cannot be repaired.
We unscrew the nuts holding the heating element, remove it and replace it with a similar new one.
The heating element fastening nuts are marked with red arrows.

If the boiler began to slowly heat the water, make noise during operation, and the tester shows that everything is in order with the heating element, you need to descale the heating element. To do this, take it out of the heater and clean it from the overgrown layer. You can use special chemicals Or use a regular knife. Be sure to rinse the tank after that, as part of the scale crumbles into it.
Boiler leak repair
To determine the cause of the leak, you need to find out where the water comes from. If it runs from the side seam, from under the top cover or control board, then the tank has corroded. If water appears from under the bottom cover, it must be removed. If the leak is located near the flange, then the problem is in the gasket or heating element. If not, it's tank corrosion.
Black arrows mark the places where water can flow from with an outdated gasket or a cracked heating element. Red indicates an internal tank leak.

There will be no problems with how to fix a boiler with a leaking gasket on your own. You just need to remove the heating element and put a new one.
A boiler with an internal tank leak cannot be repaired. You need to find documents for him and check guarantee period devices. And either contact the service center, or you have to buy new water heater. Examples of successful tank welding are very rare, and the device does not last long after that.
Control panel or board failure
Electronic or touch control panels can also fail. If, after checking and replacing other parts, the boiler does not work, the problem may be in them. It is almost impossible to repair them yourself, since deep knowledge in electronics is required. There are no diagrams of these boards on the Internet. New ones are available only in specialized service centers where you have to go.
When purchasing spare parts for repairing a boiler with your own hands, it is better to take the faulty ones with you. Exist a large number of varieties of heaters, gaskets and thermostats, so it's easy to make a mistake and buy the wrong part.
When removing the bottom cover during the repair of the Termex boiler, the silver sticker with the serial number must not be damaged. If it interferes, you can carefully remove and save in the product passport. This nameplate may be needed when calling the wizard from the service center.
Regular cleaning of the tank and heating elements, the use and timely replacement of magnesium anodes and the mandatory draining of water during a long period of boiler downtime can significantly extend its service life.
Video: do-it-yourself boiler repair
To date storage water heater can be found in most houses and apartments. Like any other type of equipment, electric heating tanks occasionally fail due to wear of spare parts or improper operation. Do-it-yourself boiler repair is not difficult if you identify the malfunction in time and fix it correctly. Next, we will tell you how to repair the water heater yourself, and what breakdowns are most common! We immediately draw your attention to the fact that this instruction suitable for most models of such well-known companies as Ariston, Burning, Termex, Electrolux, etc.
Reasons for failure
The main cause of boiler failure is considered poor quality water. Because of this, scale forms on the surface of the heating element, the inner walls of the tank are susceptible to corrosion, which in the future entails more serious consequences and costly repairs in the service center. In addition, the water heater may stop working due to improper connection to the mains and hot/hot circuits. cold water.
As for the latter, when it is necessary to install a safety valve between the pipe coming out of the tank and the cold water supply pipe, which will protect the tank from rupture during a water hammer. You should also connect according to the instructions and, no less important, do not confuse where something is connected. Sometimes situations arise that, if the installation is incorrect, the water heater does not draw water. Please note that in this case you should not panic. It’s better to look again at how to properly connect the equipment to the pipes and, most likely, you will understand why your water is not getting.
So that you understand how to repair a storage water heater in different conditions, then we will separately consider ways to repair all possible breakdowns with our own hands.
We remove the scale
If the boiler does not heat the water to the desired temperature, but still makes noise when turned on, it means that scale has formed on the heating element, which you need to clean yourself. This is not difficult to do, you just need to disconnect the equipment from the network, drain the water from the tank and disassemble the case to remove the heating element. You will not have any difficulties with disconnecting the plug from the outlet, but draining the water can make repairs a little difficult. We immediately recommend watching a video tutorial that shows a simple method for solving this difficulty:
Master class on draining water
After you empty the tank, you will need to disassemble the boiler with your own hands. To do this, carefully disconnect all fastons connected to the thermostat and unscrew the bolts, which are usually 6 pieces.

During the extraction of the heating element, some more water will pour out, which remained in the tank. The heating element itself is recommended to be cleaned immediately, while it is wet and the scale deposits have not hardened. For cleaning, we recommend using special means which can be sprayed onto the heater. After some time, deposits are effortlessly removed with a wooden spatula or even a dull knife. Also, for repair, you can boil the heater in a bucket with the addition of a special acid to the water, which will effectively solve the problem. In order to get rid of scale for sure, we recommend fine-grained sandpaper(“Sandpaper”) to clean the tubes to a metallic color.
Simultaneously with the repair of the boiler, which heats water for a long time or weakly, it is recommended to replace the magnesium anode, which protects the tank from corrosion. To do this, dismantle the worn rod and purchase exactly the same one to do the replacement yourself!
Descaling at home
After that, you need to assemble the boiler in the reverse order and check whether it was possible to repair the weak heating of the water. Do not forget that the first thing you must do is fill the tank completely with water, then connect the plug to the mains and start it up.
We draw your attention to the fact that there is a situation when the boiler does not heat water, because the heater is broken. In this case, self-repair consists in the fact that you need to ring it with a multimeter by setting the resistance measurement mode. We will talk about this below!
Checking the circuit with a tester
If the light on the boiler is on, but the water is not heating up, then it is likely that the heater, which we talked about above, is not working. Checking it at home is quite simple, you need to install the tester probes on the contacts of the heating element and look at the resistance on the scoreboard. For a working heater, the resistance can vary between 0.4-0.7, as shown in the photo below. If you see “1” on the display, it means that a break has occurred and you need to replace the part with a new one, because. it is almost impossible to repair it.

By the way, if the boiler is energized or when it is turned on by itself, then the cause of the breakdown, again, is in the heater from which the leak occurs. You can check the malfunction by connecting one probe to the contact of the heating element, and the second to the tube itself. You will see “1” on the display, the part is in good condition and there is no need for repair, a minus value or too large - a replacement is required. In more detail about that, we told in a separate article.
Another reason why the boiler does not heat water, or vice versa, heats up a lot, is the failure of the thermostat. You can check it in two ways - with a tester or a lighter. Everything is clear with the tester, you need to act according to a similar methodology, but as for the lighter, everything is more interesting here. First, dismantle the thermostat and press the button on it (it is circled in the photo below). After that copper contact thermostat needs to be warmed up. If after some time the button returns to its original position (it will be knocked out), the thermostat is working. If the thermostat does not work, you can repair a boiler that does not turn off or turn on by replacing this part with a new one. I would also like to note here that there is no need to drain the water to replace the thermostat on the water heater. It is enough just to disconnect the equipment from the network and disconnect all the wires.

How to independently check the performance of a water heater with a multimeter
Also, sometimes there is a breakdown - the temperature is not shown on the display of the water heater or the display does not work at all. In this case, check all the elements of the circuit and if you do not find a break, most likely the control unit has broken. You will not succeed in repairing electronics with your own hands in the absence of experience and knowledge, so you will have to take electric water heater for repairs to a service center.
Getting rid of leaks
If you notice that water is dripping from the boiler, it is not always possible to repair it yourself. Well, if the cause of the leak is the wear of the seal on the flange. In this case, the gasket must be replaced with the same size, which will allow you to repair the breakdown. Things are much worse if the water heater is leaking due to wear on the tank itself. Some advise to glue or solder the holes, but, as practice shows, after a short period of time you still have to say goodbye to the boiler, because. such methods of repairing leaks are extremely short-lived.
About repair instantaneous water heaters the principle of operation of this household equipment was given, so that it would be easier for a novice master to understand the essence of the problems that arise.
In this continuation of the article, the protection elements will be discussed in more detail and an algorithm for troubleshooting in instantaneous water heaters will be given.
There will also be shown videos recorded by home craftsmen in the process of repairing their flow heaters water.
Thermal protection in instantaneous water heater
If the flow sensor is damaged and stuck in the on position, then when the tap is closed, the water in this small heating zone is very overheats quickly which could damage the heater itself due to the increase in pressure. Also, due to the lack of cooling, the heating elements will overheat. To prevent this from happening, instantaneous water heaters must have temperature control sensors.
Water flow sensor for KISPEL water heater
In the model considered in the previous article, the sensors T1 and T2 are made in the form of one element, although their purpose is different. The temperature sensor T1 is set to operate when the temperature exceeds 60ºС, it interrupts the circuit. After cooling, T1 returns to the working on position again. Exceeding the temperature in this case is possible for a number of reasons not related to a breakdown in the water heater.
 Thermal sensors T1 and T2 are combined in one device, indicated as an overheating sensor
 The temperature sensor T2 is set to a temperature of 90ºС - one might say - this is the extreme line of protection. It will work in the event of a breakdown of the flow sensor and temperature sensor T1. Such a breakdown will not be eliminated by itself, so this protective device after operation it is necessary enable manually after the repair of the water heater. For water heaters with a digital interface, breakdowns or incorrect sensor readings will be displayed as a flashing error code on the display. An example of eliminating one of the errors is shown in the video below, which also talks about the function of thermal fuses and about repairing the electronic unit of one of the Termex water heater models:
Varieties of instantaneous water heater control systems
Depending on the model and design of the water heater, the control system for its operation can be implemented in different ways. For example, in the THERMEX STREAM model, temperature control is carried out by controlling the water flow. Myself flow adjustable special nozzles for the shower or washbasin included in the delivery. In this case, the protection components are a pressure switch and a thermal fuse (temperature sensor).
 Disassembled THERMEX STREAM flow heater
 Accordingly, electrical circuit diagram of this water heater differs significantly from the above wiring diagram - here the phase current passes in series through the pressure switch and the thermal fuse, which returns to the on position after the temperature drops. Before self-repair water heater, be sure to study the electrical diagram and instructions from the manufacturer.
 An example of the THERMEX STREAM instantaneous water heater circuit
 As can be seen from the comparison of two circuits from the same manufacturer, the principle of control and protection in these models of water heaters differs significantly. Water heaters have a completely different design, respectively, and the circuit will be different. Below, for example, the electrical circuit of the Atmor water heater is shown.
 Scheme of instantaneous water heater ATMOR, power 7 kW
 Also, some models may have an electronic interface directly connected to the power control relays for heating the heating elements. This means that a breakdown in this electronic board, or algorithm failure may cause the water heater to stop working. Some instantaneous water heaters may have temperature control, which is achieved by switching heating elements, or using an electronic circuit.
Troubleshooting algorithm for instantaneous water heater
Above are some examples of electrical circuits instantaneous water heaters, where common components are heating elements and protective sensors. A careful study of the design and layout of an existing faulty water heater will help you understand the principle of operation and build a troubleshooting algorithm for yourself. It will also be very helpful information from masters who carried out such repairs, therefore, you need to look for information on the forums and be patient, waiting for an answer to your question. You can also find a helpful repair video.
Unfortunately, it is not always possible to find an exact guide to action when repairing an instantaneous water heater with your own hands in each case. Therefore, one has to follow own experience and generally accepted approaches to solving this problem. Any repairs must be made with minimal cost forces, energy and means, and what is important - the nerves of the master. Therefore, first of all, you should check if there is a breakdown that blocks the operation of the equipment somewhere outside its case.
 A showerhead clogged with lime that caused a water heater to fail can be cleaned with a plastic bag of vinegar.
 For example, as mentioned above, pressure (water flow) is often controlled by spout nozzles, which can become clogged due to sediment deposits. poor quality water. Often the solution to a problem with an instantaneous water heater can be to clean the hose or nozzle, as well as bring the inlet pressure of the water supply to normal parameters. Indeed, if the inlet pressure is below 0.05 MPa, then the sensors will not allow the heating elements to turn on. The same can be said about the correspondence of electrical parameters, which are also shown in the table below.
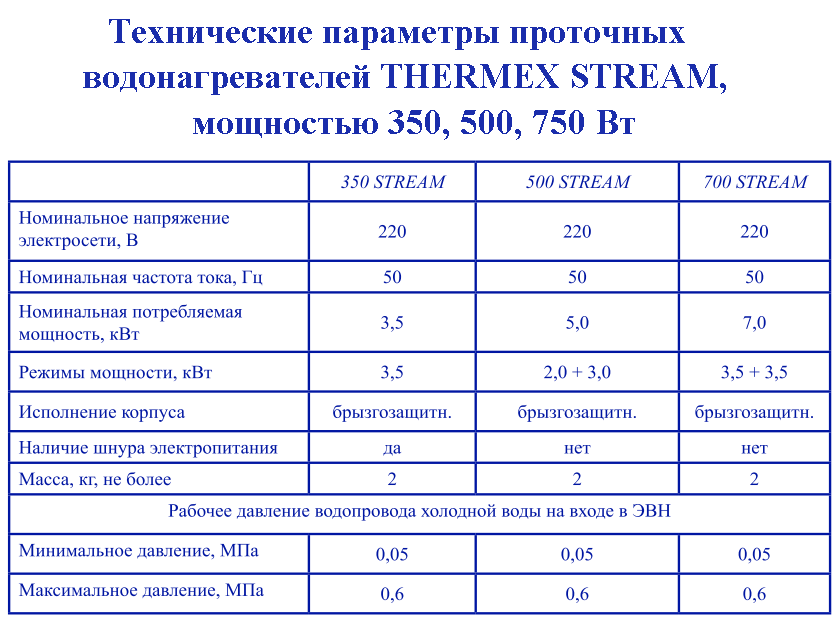 Operating parameters of instantaneous water heaters Termex Stream
 Repair of electrical components of instantaneous water heater
If the failure of the instantaneous water heater is accompanied by the operation of the RCD that protects this power line, then the breakdown is obvious - a breakdown of the heating element on the body. In this case, a great success for the master will be a short circuit to the body in some other node - for example, a wire that has fallen off (burned out) from the terminal. To check the heating element for a breakdown, switch the multimeter to the megohm measurement mode - ideal resistance - infinity. Considering the conditions of use of a water heater that are critical for human health, the leakage resistance in the heating element below Megaohm can be potentially dangerous.
Even without disassembling the water heater, it is possible to carry out its preliminary diagnostics by changing the operation of the equipment, paying attention to noise and light indication
For example, you can check the health of the flow control system by clicking on the power relays for turning on the heating element. In this case, there is often burnout of the terminals and poor contact on them, or failure of the heating elements themselves. If you have a tester or even a homemade probe, it will not be difficult to ring the active coil of the heating element. The dialing of various conductors has been discussed many times on other pages of this resource. Depending on the power of the heating element, its resistance will be within units - tens of ohms.
 Continuity of the heating element of the water heater
 After making sure that the heating element is working and checking the reliability of the contacts, you should test the relay itself - the operation of its magnetic system and a click do not guarantee the serviceability of this unit. Contact pads inside the relay are subject to burnout and wear. Therefore, you should ring the pairs of contacts of the power relay. If a lack of conduction is detected in a closed pair of contacts, the relay must be replaced.
 Instantaneous water heater power relay
 Many craftsmen successfully disassemble even non-separable relay designs if a replacement cannot be found. Here is a repair tip - to learn as much as possible about the design of this relay, the sequence and the possibility of disassembling it in order to get to the switching contacts in order to be able to clean them, bend, fix - in a word - eliminate the problem of the missing contact.
Water flows - but does not heat up with a working relay and heating elements - which means that the fluid flow sensor itself is faulty. As mentioned above, you can check the water flow sensor with a powerful magnet by bringing it close to this component. If the suspicion is confirmed, the faulty sensor must be replaced.
 Water flow sensor, often used in various models of instantaneous water heaters
 The serviceability of thermal fuses and pressure sensors (pressure switches), if the pressure parameters correspond, can be checked by checking them with a tester. By temporarily shunting their outputs with a wire, you can make sure that the problem was precisely in them. The shunt should never be left to work on a permanent basis - because in this case the equipment will be deprived of protection, which can lead to very disastrous consequences - faulty protective components must be replaced.
Breakdowns of instantaneous water heaters due to the fault of the manufacturer
Many owners of instantaneous water heaters complain about the poor assembly of their products. The most common problem is the mismatch of the wires and terminals with the load currents flowing in them. Very often, unscrupulous manufacturers of instantaneous water heaters install cheap and low-quality components, as well as save on wires and terminals.
 Burnt and melted terminals cause loss of contact
 If, before the breakdown, during the operation of the instantaneous water heater, a characteristic smell of insulation melting was noticed, then the cause of the malfunction may well be loss of contact or even burning out too fine wire. Replacing the contact terminals and wires with better and more reliable substitutes can eliminate this problem.
To save yourself from such breakdowns in the future, you should choose equipment only from trusted manufacturers. You should also explore the possibility of disassembling the equipment before buying, because some compact models instantaneous water heaters have a non-separable body design, which is almost impossible to disassemble without damaging appearance and functionality of the device itself.
Repairing a water heater with your own hands is not as easy as it seems initially: each manufacturer of heating equipment uses various technologies, and each of them strives to bring something new and unique to their products. As a result of all this, the diagnosis of malfunctions of a water heater from one manufacturer will differ significantly from the diagnosis of a device manufactured by another company. Some of the existing breakdowns can be easily fixed on your own, because of some, the equipment will have to be transported to a service center.
The main causes of malfunctions
Malfunctions rarely occur on their own, and each of them has its own cause:
- voltage instability in the network;
- absence after-sales service and preventive examinations equipment;
- incorrect installation of the heater;
- the formation of scale and corrosion on the heater elements;
- the presence of manufacturing defects in equipment;
- lack of timely replacement of damaged parts.
The main malfunctions of water heaters
Often formed by the presence of corrosion or a hole in the heater tank itself. This tank needs to be replaced. Unfortunately, many owners of boilers themselves weld leaks in tanks, dooming themselves to the risk of an exploding tank and causing irreparable harm to their health. You can not brew the tank yourself! It is not uncommon for water to drip from plumbing joints, rubber hoses, or plastic pipes- it is for this reason that these types of connections are categorically not recommended for installation. If water drips from safety valve when water is heated, this cannot be considered a malfunction: when heated, the liquid expands, excessive pressure is created in the boiler. However, if too much water flows out (more than one and a half liters per day) or the valve is completely dry, it is broken and must be replaced.
 If a- most likely, the heating element is broken due to excess scale on it or the thermostat, which has deteriorated due to a critical increase in humidity. The cause of the breakdown can also be hidden in electronic modules, fuses, switches, or emergency cut-off. The latter often occurs if the boiler is turned on to run on maximum temperatures. Another breakdown is the long heating of water, due to which the water comes not hot, but warm. In this case, both the heating element and the thermostat, switch or fuse could fail. In the opposite situation with excessive overheating of the water, only the thermostat or electronics can be “guilty”.
If a hot water enters the faucet weak pressure , you need to evaluate the pressure of cold water entering the tank, as well as the performance of the mixer. If both devices work normally, it may be faulty - clogged with dirt or boiled salts. In this case, the valve must be cleaned.
If the water heater is gas and parapet, in winter time his chimney may suffer from frost formation- steam, settling on the grate, turns into ice, which blocks all paths to remove smoke. As a result, it will turn on for no more than a few minutes. Removing ice masses will help fix the breakdown.
may the surrounding equipment: its plug, socket, wall and so on. But if heating the walls is not such a fire hazardous situation, then attention should be paid to the socket and plug. So, the reason for this may be poor contact in the outlet itself or in the outlet, the consumption of such an amount of electricity that the outlet is not designed for. Occasionally, this may indicate a breakdown of the heating element.
 An equally rare cause of breakdowns is the incorrect operation of the RCD.. In heaters Low quality and often made in China, simple and cheap disconnect devices are used that break too often. If the device works too often, completely turning off the boiler, the neutral conductor and the ground conductor may be confused. Often, due to the lack of the ability to ground the wires, the owners of the heaters prefer to “zero” them using some kind of quasi-grounding. With this type of “zeroing”, the conductor of “zero” and grounding are connected, but the RCD does not accept this and turns off the boiler.
If the heater does not heat enough water, the cause can be sought in the incorrect installation of the device: the inlet and outlet pipes could be mixed up or connected incorrectly.
Malfunctions of Thermex heaters
It is important to distinguish between Spanish-made water heaters, the name of which is written in Latin, and allegedly Russian, but in fact Chinese Termex heating devices. Spanish boilers are also called Fagor. There are four main signs of a malfunction. So, the boiler is broken if:
- water heats up for an excessively long time, does not heat up at all;
- the heater turns on and off too often;
- while working, the device makes unusual sounds;
- water from the boiler comes with an unusual smell or color.
Often, these signs that appeared on a Spanish-made heater from around the world famous name, they talk about a breakdown of the tubular heater or that a sufficiently large amount of scale has accumulated on the walls of the tank. To return the heater to normal operation, the broken heating element must be replaced, and the tank must be cleaned of solid salts on its walls.
Faults
The water heater manufactured by this company most often suffers from the following malfunctions:
- the sensor, heating element and switch failed (both each device separately and all at once) - the reason lies in the breakdown of the electronics;
- if - the water heater does not have enough voltage in the network for normal operation, and in order to give it the opportunity to heat the water, all other devices will have to be turned off;
- if the ignition does not work on the device, the reason may be hidden in the power supply - low-quality extension cords and so on.
Faults
Water heaters of this company have several weaknesses: breakdown check valve and the need to replace the magnesium anode. However, it is important to remember that both Spanish or Swedish devices, as well as Chinese ones, are produced under this brand. Obviously the equipment Chinese made will break much more often and in the most unexpected places.
However, all these breakdowns are quite simple and can be easily fixed at home. But remember that service centers employ specialists who will cope with the task faster and perform it better!