Errors on the dashboard audi a6 c5. Instrument panel audi a6 c5 decoding
How to make test performers with VAG COM 409.1 KKL USB adapter on Audi A6 C5. To do this, connect the cable for VAG 409.1 ...Repair dashboard Audi A6 C5 (Magneti Marelli) - how to disassemble and repair the dashboard
How to disassemble and repair the dashboard of Magneti Marelli (from the Audi A6 C5 98) by soldering all ...How to remove the instrument panel Audi A6 C5
Instructions on how to remove the dashboard (shield) Audi A6 C5. The entire procedure for removing the shield is divided into ...The meaning of the icons on the car dashboard
Meanings of icons on dashboard vehicle This infographic will arm you useful information and save...MEANING OF THE ICONS ON THE DASHBOARD OF THE VEHICLE
You are familiar with this situation: on the dashboard, some symbol suddenly starts flashing, which you never ...Brake pad wear - the reasons why the Audi A6 C5 pad wear indicator is on on the panel
The brake pad wear indicator on the Audi A6 C5 may come on not only due to worn front brake pads...Audi A6 C5 fuse diagram, block location and decoding
The layout of the fuses Audi A6 C5 1997-2004. Wiring diagram: 1 Heated washer jet...Attention!!! Dashboard indicator lights!
In this video, we will return to the topic of self-diagnosis of the car and control lights on the dashboard! Be careful...Introductory Information
- Content
Daily checks and troubleshooting
Vehicle operation in winter
A trip to the service station
Instructions for use and maintenance
Maintenance Consumables
Warnings and safety regulations when working on a vehicle
Basic tools measuring instruments and how to work with them
The mechanical part of gasoline engines with a volume of 2.4 l v6 and 2.8 l v6
Mechanical part of a 2.5L diesel engine
1.9L Diesel Engine Mechanical
The mechanical part of a 2.0 liter gasoline engine
The mechanical part of a 3.0 liter gasoline engine
The mechanical part of a gasoline engine with a volume of 1.8 l / 1.8t l
Engine cooling system
Lubrication system
Supply system
Engine management system
Intake and exhaust system
Engine electrical equipment
Clutch
Transmission
Drive shafts and axles
Suspension
Brake system
Steering
Body
Passive safety
Air conditioning system
Vehicle electrical equipment and wiring diagrams
Dictionary - Introduction
INTRODUCTION
With the introduction of the new indexing of Audi models in 1994, the era of the more than successful Audi 100 model series ended. It was replaced by the A6 series, the first generation of which, which appeared at the same time, was only a restyled version of the last generation of the “weave”.
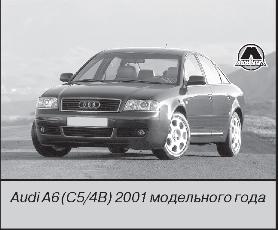
The premiere of the all-new Audi A6 sedan, built on the C5 platform of the Volkswagen Group, took place at the Geneva Motor Show in 1997. In February 1998, the station wagon version, the A6 Avant, was presented to the public.
The style of the new body, which received the factory designation 4B, has become the "brand name" of the entire line of Audi cars. Its design to this day does not look outdated: a sloping roofline, a massive stern and no protruding bumpers. In addition, the drag coefficient, which is rather low for this class (0.28), significantly affects fuel efficiency. As before in the Audi 100 models, the body of the A6 is fully galvanized and has a 10-year manufacturer's warranty against rust through. To reduce weight, the hood of all modifications, regardless of engine size, is made of aluminum alloy.
The interior of the spacious cabin is consistent with the appearance of the car. There are three options interior decoration, differing in design: Advance ("Perfection"), Ambition ("Ambition") and Ambiente ("Calm"), The instrument panel can be inlaid with wood or aluminum.
The basic equipment of the car includes a steering wheel adjustable for height and reach, four airbags, electric drive and automatic heating of exterior rear-view mirrors, electric windows for all doors with a safe closing function (in case of pinching, the glass automatically lowers) and a function automatic closing when locking the car, dual-zone climate control system, electric headlight range control, fog lights, central locking, immobilizer, five head restraints with height and tilt adjustment and a rear seat armrest with a hatch with a protective cover for transporting long loads (for example, skis).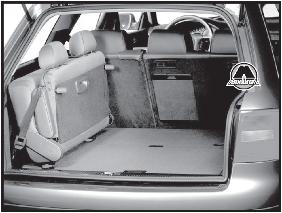
Station wagon versions of the Audi A6 Avant are equipped with an additional third row of seats, making the car seven-seater. The trunk volume of the sedan is 510 liters. The cargo compartment of the wagon with the third row seats folded has a volume of 455 liters, and after folding the second row of seats (they can be folded separately in a ratio of 40:60) usable space increases to 1590 l, thanks to which the car can easily transport a refrigerator or a washing machine.
The model was equipped with a wide range of both gasoline and diesel engines. Both the first and second were four-cylinder in-line (petrol 1.8- and 2.0-liter and 1.9-liter turbodiesels) and V-shaped six-cylinder (petrol 2.4- and 2.8-liter and 2.5 liter turbo diesels).
Paired with engines, a new five-speed Tiptronic gearbox with sequential shifting was used (manual shift keys are available as an option). Along with it, a four-band "automatic" or a stepless variator could be installed on front-wheel drive versions. All automatic transmissions were equipped with a dynamic DSP shift program (or DPR control for the CVT). Manual transmissions were five- or six-speed with full synchronization of all gears.
In addition to front-wheel drive versions, models with quattro permanent symmetrical all-wheel drive were produced. All-wheel drive Quattro® models are equipped with a Torsen center differential with 50% torque distribution to the front axle and 50% to rear axle. In the event of a slip on one of the axles, the moment can be distributed arbitrarily depending on the degree of slip of the axle: from 25% to the front and 75% to the rear axle and vice versa, from 75% to the front and 25% to the rear axle. The distribution of torque is instantaneous. The Torsen differential is very reliable as it is completely mechanical device, responsive to torque and without electronic components. As a result, it is fault-tolerant, unlike systems with electronic locking and torque distribution (viscous coupling, Haldex, etc.).
Excellent driving performance of the car is provided load-bearing structure bodies with a front subframe and a new suspension made of aluminum alloy (front suspension independent multi-link, rear - semi-independent in front-wheel drive versions or independent multi-link with anti-roll bar).
The steering mechanism with hydraulic booster can be equipped with the Servotronic system, which changes the force on the steering wheel depending on the speed of the vehicle, at the request of the customer.
The safety of the Audi A6 is ensured by a wide range of different means. Robust interior section with defined crumple zones, seat belts with pretensioners, front and side airbags for the driver and passenger in the front seat are already standard equipment, as well as side airbags for passengers in the front seat. rear seats and safety curtains installed at the request of the customer.
Active safety is provided by the ASR traction control system, the EDS / EDL electronic differential lock system for all-wheel drive versions, the ABS anti-lock braking system and the ESP electronic stabilization program.
During the production of the Audi A6 (C5 / 4B) was twice restyled. The first time the model was remade in 1999, when the body structure was strengthened, the shape of the headlights and rear-view mirrors was changed. The second time the model underwent changes in 2001: the headlights changed again (xenon or bi-xenon became available as an option), taillights, turn signal repeaters, hood, front and rear bumpers ( exhaust pipes brought outside). The most significant change in the technical part was the discontinuation of the 2.8-liter engine, which was replaced by a 3.0-liter one. In addition, a new two-liter four-cylinder gasoline engine has appeared. All other engines have also been upgraded - their power and efficiency have increased. A car diagnostic system via the CAN bus has appeared.
Audi A6 is a great representative of the legendary German car industry. This car, which is distinguished by excellent dynamics and handling characteristics, as well as comfort, is in constant demand among motorists even a decade after the end of production, since it is able to successfully compete even with many novelties in the automotive market.
This manual provides instructions for the operation and repair of all modifications of the Audi A6 / Audi A6 Avant with the factory designation C5 / 4B, produced from 1997 to 2004, taking into account updates in 1999 and 2001.Audi A6/Audi A6 Avant (C5/4B) 1.8(125 HP)
Body: sedan/station wagon
Engine size: 1781 cm3
Drive: front
Fuel: gasoline AI-95
Consumption (city/highway): 12.2/6.5 l/100 km1.8T (150 or 180 HP)
Body: sedan/station wagon
Engine size: 1781 cm3Gearbox: manual/automatic
Drive: front / fullFuel tank capacity: 80 l
Fuel: gasoline AI-95
Consumption (city / highway): 11.5 / 6.7 l / 100 km1.9TDI (110 or 130 HP)
Years of release: from 1997 to 2004
Body: sedan/station wagon
Engine size: 1896 cm3Gearbox: manual/automatic
Drive: front / fullFuel tank capacity: 80 l Fuel: diesel
Consumption (city/highway): 7.5/4.6 l/100 km2.0 (130 HP)
Body: sedan/station wagon
Engine size: 1984 cm3Gearbox: manual/automatic
Drive: front / fullFuel tank capacity: 80 l
Fuel: gasoline AI-95
Consumption (city / highway): 11.7 / 6.4 l / 100 km2.4 V6 (130 HP)
Years of release: from 1997 to 2004
Body: sedan/station wagon
Engine size: 2393 cm3Gearbox: manual/automatic
Drive: front / fullFuel tank capacity: 80 l
Fuel: gasoline AI-952.5TDI (150 or 180 HP)
Years of release: from 1997 to 2004
Body: sedan/station wagon
Engine size: 2496 cm3Gearbox: manual/automatic
Drive: front / fullFuel tank capacity: 80 l
Fuel: diesel2.5TDI (163 HP)
Years of release: from 2001 to 2004
Body: sedan/station wagon
Engine size: 2496 cm3Gearbox: manual/automatic
Drive: front / fullFuel tank capacity: 80 l
Fuel: diesel
Consumption (city/highway): 7.5/5.1 l/100 km2.8 V6 (193 HP)
Years of release: from 1997 to 2001
Body: sedan/station wagon
Engine size: 2771 cm3Gearbox: manual/automatic
Drive: front / fullFuel tank capacity: 80 l
Fuel: gasoline AI-95
Consumption (city/highway): 14.3/7.3 l/100 km3.0 V6 (220 HP)
Years of release: from 2001 to 2004
Body: sedan/station wagon
Engine size: 2976 cm3Gearbox: manual/automatic
Drive: front / fullFuel tank capacity: 80 l
Fuel: gasoline AI-95
Consumption (city/highway): 13.8/7.4 l/100 km - Actions in emergency situations
- Exploitation
- Engine
Audi A6 / A6 Avant user manual from 1997 to 2004 Controls, dashboard, interior equipment
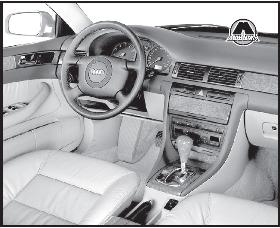
2. Controls, dashboard, interior equipment
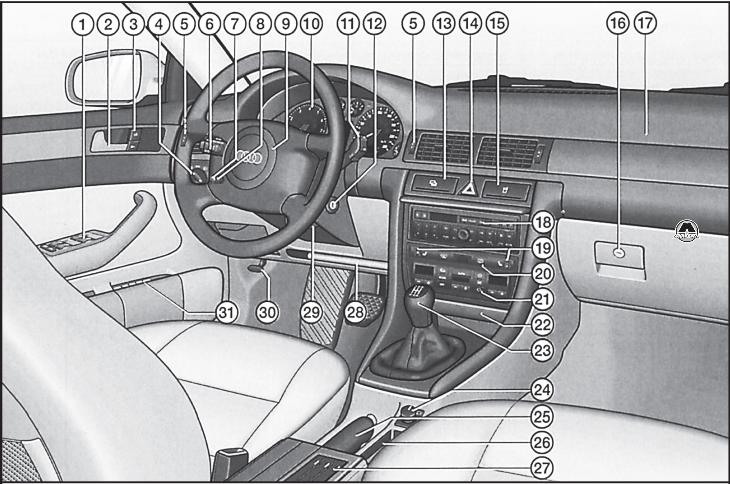
Controls, instruments and equipment
1. Power window switch with electric drive. 2. Internal handle door lock. 3. Control key for central locking. 4. Headlight switch. 5. Side ventilation nozzle. 6. Steering column switch for turn signal and headlights, cruise control control. 7. Dashboard dimmer. 8. Headlight corrector. 9. Multifunctional steering wheel. 10. Instrument cluster. 11. Steering column switch for windshield wipers and washers, on-board computer function switch. 12, Ignition lock. 13. Sunshade switches, dynamic stabilization systems and acoustic parking assistance devices. 14. Emergency light switch. 15. Cup holder. 16. Glove box lock. 17. Passenger airbag in the front seat. 18. Radio receiver or navigation system. 19. Seat heating regulator. 20. Rear window defroster switch. 21. Air conditioning control. 22. Ashtray and cigarette lighter. 23. Selector lever. 24. Switch for adjusting the position of the outside mirror. 25. Parking brake lever. 26. Niche for small things. 27. A niche for storing cassettes. 28. A niche for storing documents. 29. Adjustable steering column locking handle. 30. Hood opening handle. 31. Button for remembering the position of the driver's seat.
NoteThe availability of some equipment depends on the vehicle configuration.
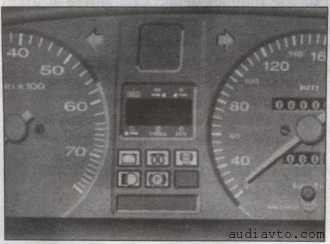
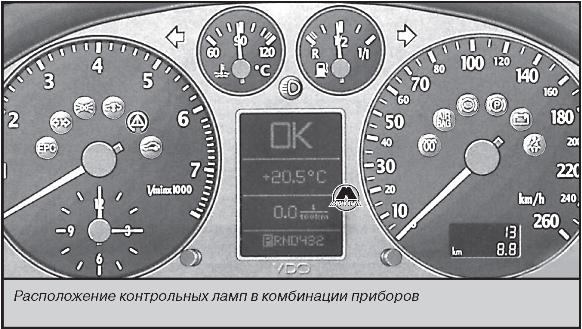
Instruments and indicators

instrument cluster
1. Engine oil temperature gauge. 2. Tachometer equipped with an electronic clock with digital display. 3. Pilot lamps. 4. Coolant temperature gauge. 5. Fuel gauge. 6. Speedometer with digital odometer. 7. Voltmeter. 8. Clock setting button / control button. 9. Digital display indicating the frequency of maintenance, outdoor temperature, trip computer and driver information system. 10. Button for resetting readings by one position of the odometer (daily mileage counter) and indicating the frequency of maintenance.
NoteLocation control devices depends on specific model vehicle and engine type.
Engine oil temperature gauge
Until the engine oil has warmed up, it is not recommended to use the engine at full power. If the pointer of the engine oil temperature gauge has entered the red zone, it is necessary to reduce the engine speed, as a result of which the pointer should return to the normal temperature range.
If the arrow remains in the red zone, stop, stop the engine and check the engine oil level.
NoteThe on-board navigation system, installed on the vehicles by the manufacturer, is supplied with manuals for use.
If the oil level is correct and the oil pressure warning light does not light up after starting the engine, avoid high engine speeds and drive to the nearest Audi workshop to have the problem rectified.
Tachometer
In no case should the tachometer needle enter the red zone of the scale.
NoteTimely shifting to a higher gear saves fuel and reduces engine and transmission noise!
It is necessary to switch to a lower gear as late as possible, shortly before the moment when jerks appear during engine operation.
During the break-in period, avoid running the engine with high frequency rotation of the crankshaft.

The clock is located on the tachometer scale. The time is set using the tuning knob. By briefly pulling the handle, the clock is corrected. If the knob is pulled out and held, the clock is corrected slowly for a while and then more rapidly.
Coolant temperature gauge
The pointer works when the ignition is on.
If the arrow is in the left area of the scale, it is necessary to avoid increasing the engine speed and engine load.
When the vehicle is moving under normal conditions, the arrow should be in middle zone scales.
When the engine is heavily loaded and high temperature outside air, it is possible from time to time that the pointer enters the right area of the scale. This should not cause an alarm until the warning light starts flashing.
If the coolant overheat warning lamp flashes while driving, the first thing to do is to check the temperature of the coolant temperature gauge.
If the pointer is in the normal operating temperature, add coolant to the cooling system as soon as possible.
If the arrow is in the right zone of the scale, the coolant temperature is too high. You should stop the car, stop the engine and determine the cause of the increase in coolant temperature.
Fuel gauge
The vehicle's fuel tank capacity is approximately 70 liters.
If the pointer has reached the red zone and the warning lamp is on, this means that there are about 9 liters of fuel left in the fuel tank.
ATTENTIONNever run out of fuel until the tank is empty, as an irregular supply of fuel leads to interruptions in the ignition system. In this case, unburned fuel entering the exhaust system causes overheating and damage to the catalytic converter.
Speedometer
The speedometer is equipped with a digital trip odometer, trip odometer and interval indicator after-sales service.
Trip counter
The top counter registers the total mileage of the vehicle.
The lower counter registers the distance traveled by the vehicle since the counter was last reset. The counter resolution is 100 m.
Resetting the readings (zeroing the counter) is carried out by pressing the corresponding button (see figure above).
Maintenance interval display
After switching on the ignition, instead of the distance meter, an indication of the number of kilometers until the upcoming maintenance is displayed for a few seconds.
If it is time for service, a message is displayed in the display field for 60 seconds after starting the engine, which should appear 1000 km or 10 days before.
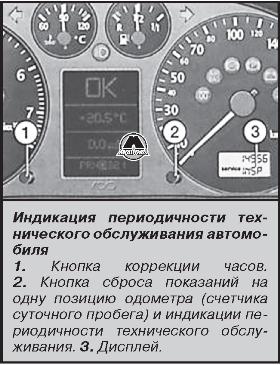
By briefly pressing the button (2), you can display on the display (3) the indication of the number of kilometers until the next maintenance.
The following messages may be displayed:
- "service OEL" - oil change service;
- "service IN S P" - maintenance service.
After the service has been carried out by an Audi Service Center, the display returns to its original position as follows:
Turn off the ignition;
With the button (2) pressed, turn on the ignition. In this case, the display will show the inscription “service OEL”;
Pull out the button (1) and hold it until the display shows "service";
Pressing the button (2) again will cause the indication “service INSP” to appear on the display, which can be corrected by pulling out the button (1);
If there is an error, "dEF" is displayed in the display field.
NoteWhen the terminals are disconnected from the battery, the maintenance indication data is retained.
Voltmeter
The voltmeter shows the voltage of the car's on-board network.
The normal voltage of the on-board network should be between 12-14 V. If the voltage drops below 12 V with the engine running, the alternator and battery must be checked at an Audi service center.
When the starter is running, the voltage in the vehicle's on-board network may decrease to 8 V.
Pilot lamps
The location of the indicator lamps in the instrument cluster depends on the vehicle model and engine version.
Engine Management System (EPC)
The EPC (Electronic Power Control) control lamp lights up for 3 seconds after the ignition is switched on, after which it goes out.
If a malfunction occurs in the engine management system while driving, the EPC warning lamp lights up. The engine control unit switches to emergency operation when the engine power is reduced. You need to contact as soon as possible service center Audi for troubleshooting.
Direction indicator when driving with a trailer
The control lamp flashes simultaneously with the direction indicators on the vehicle and trailer. If one of the direction indicator lamps on the car or trailer fails, the indicator lamp does not flash.
External lighting
The control lamp burns at inclusion of external illumination and ignition.
ride height adjustment
After switching on the ignition, the control lamp lights up for a few seconds.
The indicator lamp lights up when the rear suspension installation height is changed and turns off after the adjustment process is completed.
The flashing of the control lamp indicates an excessive lowering of the rear of the car after a long parking.
The constant burning of the control lamp indicates the presence of malfunctions in the ride height control system or the excessive inclination of the vehicle relative to the rear suspension.
ATTENTIONDo not drive the vehicle while the warning lamp is flashing, otherwise you may touch lower parts body and pavement.
Traction control (ASR) with engine torque reduction
The control lamp lights up at inclusion of ignition and should go out approximately in 2 with. The lamp flashes when driving during the operation of the traction control system. When the traction control system is turned off or if its operation is disturbed, the control lamp lights up constantly. Since the traction control system works in conjunction with the anti-lock braking system and the anti-skid system with braking of a spinning wheel, if there is a malfunction in the anti-lock braking system (ABS), the anti-skid system (ASR) warning lamp is also on.
Electronic Dynamic Stability Program (ESP)
The control lamp lights up at inclusion of ignition and should go out approximately in 2 with. The lamp flashes when driving during the operation of the dynamic stabilization system.
Since the dynamic stabilization system works in conjunction with the anti-lock braking system, if there is a malfunction in the ABS, the indicator lamp for the dynamic stabilization system (ESP) also lights up.
Electronic anti-theft system
When the ignition is switched on, the ignition key code is automatically requested. The coincidence of the data is confirmed by the short-term switching on of the control lamp. If an uncoded key is used, the control lamp starts flashing with short breaks. The car cannot be used.
high beam headlights
The control lamp burns at the included main beam of headlights and at giving of a light signal.
Turn indicator
The control lamp starts flashing when the left or right direction indicator is turned on (synchronously with it). If one of the direction indicator bulbs is burnt out, the indicator lamp flashes at double the frequency (except when driving with a trailer).
Preheating system
After switching on the ignition, the control lamp, depending on the temperature of the engine coolant, may signal the need for preheating.
Turn the key in the ignition switch to position 2 - the preheating control lamp will light up. The lamp will go out after reaching a temperature sufficient to ignite the fuel.
Immediately after turning off the control lamp, start the engine.
If the engine does not start, turn on the preheat again and try to start the engine as described above. If the engine still does not start this time, check fuse preheater.
At an outside air temperature above +8 °C, the engine can be started immediately, without preheating. During starting, do not press the accelerator pedal.
If the control lamp of inclusion of preheating does not light up, the engine can be started.
Airbag system
After switching on the ignition, the control lamp lights up for about 3 seconds. On vehicles with the airbag deactivated opposite the front passenger seat, the warning lamp flashes for approximately 15 seconds.
If the lamp does not go out or lights up while driving, the airbag system is defective. Such a system should be immediately checked in the service center.
Anti-lock braking system (ABS)
The control lamp warns of a malfunction in the anti-lock and anti-slip systems with braking of the slipping wheel.
The control lamp lights up for a few seconds after the ignition is switched on or during engine start and goes out after the end of the process of automatic system performance check.
If the control lamp does not light up a few seconds after the ignition is turned on, does not go out, or lights up while driving, then the ABS system is faulty.
If there is a malfunction in the system, the following is possible:
If the anti-lock braking system warning light comes on while driving and the vehicle's braking system is functioning without anti-lock braking system, contact an Audi workshop as soon as possible;
If the ABS warning light comes on together with the brake warning light, both systems are faulty.
ATTENTIONIn the event of malfunctions in the anti-lock braking and braking systems, which are signaled by both warning lamps, the rear wheels may lock up prematurely when braking. In this case, you must immediately contact the service center.
The Electronically Controlled Differential Lock System (EDS) works in conjunction with ABS. A malfunction in the EDS system is indicated by the ABS warning lamp. Try to contact the service center as soon as possible.
Parking brake
When the car is braked with the parking brake and the ignition is on, the control lamp is on. It should go out when the parking brake lever is released.
Discharging the battery
The control lamp lights up at inclusion of ignition, after start of the engine dies away. The generator is driven by a V-belt.
If the warning lamp lights up while driving, stop, stop the engine and check the condition of the V-belt.
If the belt tension is loose or broken, you cannot continue driving: the engine cooling system pump is not activated. Replace belt if necessary.
If the warning light is on and the coolant pump drive belt is in good condition, you can continue driving to the nearest Audi workshop.
NoteTo reduce battery discharge, turn off all non-essential power consumers.
Reminder to fasten your seat belt
After the ignition is switched on, the control lamp lights up for a few seconds as a reminder to fasten the seat belt.
Warnings in the information display
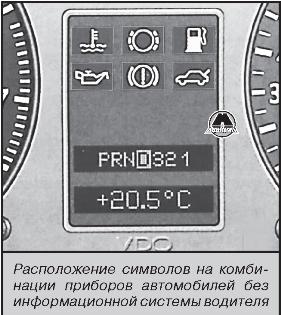
On vehicles without a driver information system, there are several symbols in the central part of the instrument cluster, which are illuminated by indicator lamps.
Coolant temperature/coolant level
If the symbol lights up or flashes while driving, the temperature may be too high or the coolant level may be low. When the symbol lights up, a warning signal sounds.
You should stop, stop the engine and check the coolant level, if necessary, bring it to normal.
If the coolant level is normal, the malfunction of the cooling system may be caused by a malfunction of the fan. Check fan fuse and replace if necessary.
If the control lamp does not go out, while the coolant level is normal and the fan fuse is working, you must stop driving - qualified assistance is needed.
If the cause is a malfunction of the fan and provided that the coolant level is correct and the symbol on the display has disappeared, you can continue driving to the nearest Audi service center. To use oncoming air to cool the engine, avoid idling if possible and drive at low speed.
Excessive brake pad wear
Contact an Audi Service Center to check the condition of the brake pads.
Since the brake pad wear indicator indicates wear on the front brake pads only, it is recommended to check the condition of the rear brake pads at the same time as replacing the front brake pads.
Minimum fuel
The vehicle needs to be filled with fuel.
ATTENTIONNever run out of fuel completely, as an irregular supply of fuel leads to interruptions in the ignition system. In this case, unburned fuel entering the exhaust system causes overheating and damage to the catalytic converter.
Engine oil pressure
If the symbol appears while driving, it is necessary to stop, stop the engine, check the oil level in the engine and, if necessary, bring it to normal. When the symbol lights up, a warning tone will also sound.
If the symbol flashes, despite the fact that the engine oil level is normal, you cannot continue driving. The engine is not allowed to run even at idle - qualified assistance is needed.
Brake system
The symbol appears when the brake fluid level is insufficient, and a warning horn also sounds.
It is necessary to stop the car and check the level of brake fluid in the supply tank.
If the level in the tank drops below the “MIN” mark, it is necessary to drive with extreme caution to the nearest service center.
In the event of a malfunction in the ABS system, the control of the braking force of the rear brakes is stopped, so the brakes tend to block the rear wheels earlier.
ATTENTIONIf the brake fluid level in the supply reservoir is too low, you should immediately find the nearest service center to check the working brake system. While driving, it is necessary to press the brake pedal harder when braking and take into account the possibility of increasing the braking distance and free play of the pedal.
If the brake fluid level is normal, there may be a malfunction normal operation ABS.
In this case, when braking, there is a danger of early blocking of the rear wheels. Under certain circumstances, this can lead to failures in the operation of the rear brakes.
It is necessary to proceed immediately with extreme caution to the nearest service center for troubleshooting.
trunk lid
After switching on the ignition with the trunk lid open, the control lamp lights up and should go out after the trunk lid is closed.
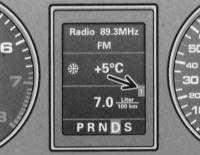
Outdoor temperature display

The outside temperature is displayed when the ignition is on.
At temperatures from +5 to -5 °C, a symbol in the form of an ice crystal appears before the indication of the temperature value, which indicates a possible icing.
Driver information system
The driver information system is the information center of the car, which informs about the technical condition of the car. Information is displayed on the display located in the center of the instrument cluster. On vehicles with automatic transmission, information is only displayed after the driving range has been switched on.

When the ignition is switched on while the vehicle is moving, the fault monitoring system constantly checks certain functions and the status of the vehicle's systems. If a fault occurs or maintenance is required, the system reminds you with a warning tone and a red or yellow symbol on the display.
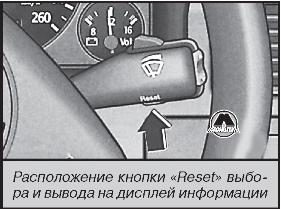
The "Reset" button for selecting and displaying information is located at the bottom of the wiper control lever.
By successively pressing the "Reset" button, the following information can be displayed on the display:
Outside temperature, on-board computer, fault monitoring system;
Navigation system, telematics;
Turn off the display.
Not warning closed door and trunk lid
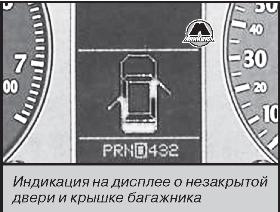
After switching on, the symbol on the display indicates that at least one door or boot lid is open.
The symbol shows which door (or doors) has not been closed. If the trunk lid is open, the trunk symbol is lit.
When the doors and trunk lid are closed, the warning will go out and the corresponding functions of the driver information system will be shown on the display.
RF indication
If no second priority faults are shown and the radio is on, the display shows the frequency or the name of the received radio station after the OK indication is turned off.
Indicator lamps on the dashboard of the Audi 100/A6 c4
The illustration shows the location of the warning lamps on a vehicle without an automatic diagnosis system.
— Control lamp of the cooling system
The lamp signals overheating or a drop in the coolant level. When the ignition is turned on, it starts flashing, confirming its readiness for work.
If the lamp does not go out after starting the engine or starts flashing on the go, then this serves as a signal either
- about overheating of the coolant, or
- about the fall of its level below the norm.
In this case, stop, turn off the engine and check the coolant level. Add fluid if necessary.
Attention!
- Be careful when opening the cork expansion tank cooling systems!
- The cooling system of a warm engine is pressurized and there is a risk of burns if fluid escapes. Therefore, before unscrewing the plug, let the engine cool down.
- Do not put your hands under the fan! It can suddenly turn on - even when the ignition is off!
If the coolant level is normal, then the cause of overheating may be a failure of the cooling fan.
On a four-cylinder engine, the V-belt in the coolant pump drive may break. If the pump fails, you cannot continue driving.
If the control lamp of the cooling system does not go out, you cannot continue driving - you need to use qualified help.
If the cause of the malfunction lies only in the cooling system fan, provided that the coolant level is normal and the control lamp goes out, then you can drive to the nearest Audi company or to a technical assistance point. At the same time, idling and crawling speeds should be avoided in order to fully utilize the cooling effect of the oncoming air flow.
— A control lamp of brake system
When the ignition is switched on, the control lamp starts flashing, confirming its readiness for operation. If it does not blink, then you need to find out the reason as soon as possible so that this lamp can realize its control and signal functions.
The reason for turning on and then burning this lamp may be:
- brake fluid level drop below normal;
- wear of the brake pads of the front wheels.
Stop the car and check the brake fluid level.
If the fluid level in the brake fluid reservoir has fallen below the “Min” mark, then you can still drive with caution to the nearest service station, where you should contact to check the level and find out the causes of fluid leakage.
If the level of brake fluid in the filling tank fell below normal and at the same time the free play of the brake pedal clearly increased, then one of the circuits of the dual-circuit hydraulic brake drive may have failed.
AT In this case, although it is possible to drive with caution to the nearest service station, however, on the way there, you should remember to increase the braking distances and efforts on the pedals.To check the brake linings, you must contact the service station.
Since the brake pad wear warning system only monitors the brakes on the front wheels, it is recommended to check the rear wheel pads at the same time.
- Engine oil pressure warning light
The control lamp should light up when the ignition is switched on and go out after starting the engine.
If the control lamp does not go out or lights up while the car is moving (and if the speed exceeds 2000 min 1, then the buzzer sounds at the same time), then you need to stop, turn off the engine, check the oil level and, if necessary, add it to the engine.
If the lamp continues to burn, although the oil level is normal, you cannot continue driving. At the same time, it is impossible to allow the engine to idle - you should use qualified help.
— Control lamp of indexes of turn
The control lamp flashes synchronously with the included direction indicators. If one of the direction indicators fails, the control lamp flashes approximately twice as often. This does not apply to the case of driving with a trailer.
When the emergency light signaling is on, both control lamps of the direction indicators flash synchronously with it.
— Control lamp of the discharge of the accumulator
The lamp lights up when the ignition is on. After starting the engine, it should go out.
If the lamp does not go out or lights up while the car is moving, then you can usually still drive to the nearest service station. Since, however, a continuous discharge of the battery occurs, it is necessary to turn off all current consumers, except for those absolutely necessary.
On vehicles with an automatic diagnostic system, there is also an additional warning lamp that allows you to monitor the battery voltage.
— Control lamppreheating
This lamp is only on vehicles with diesel engines. If the engine is not warm, then the lamp lights up when the ignition is turned on.
If it does not light up, then a malfunction in the preheating system is not ruled out. Qualified help should be sought.
As soon as the lamp goes out, immediately start the engine.
If the engine is warmed up to operating temperature, the control lamp does not light up. The engine can be started immediately.
— Control lampanti-lock braking system and electronic differential lock
The readiness for operation of the main components of the PBU is checked before and during the movement of the intended for this electronic system control.
The control lamp lights up when the ignition is switched on and should go out immediately after starting the engine or even earlier.
If the differential lock is enabled on an all-wheel drive vehicle, the control lamp goes out only after the lock is turned off.
If the PBU control lamp does not go out or lights up on the go, then the device is faulty. In this case, it is possible to brake the car using a conventional, i.e. not containing PBU, brake system. You should still contact the service station as soon as possible.
Note for vehicles with electronic differential lock
The electronic differential lock system works in conjunction with the PBU. The failure of this system is signaled by the PBU control lamp. In case of refusal, it is recommended to contact the service station as soon as possible.
- High beam warning lamp
The control lamp lights up when the main beam is turned on, as well as when using an intermittent light signal.
— A control lamp of a manual brake
The control lamp lights up at the included ignition if at the same time the manual brake is tightened. After removing the car from the handbrake, it should go out.
The location of the indicator lamps depends on the modification of the car and on its equipment.  non-standard equipment.
The indicator lamps shown here are located on the right side of the instrument panel, above additional devices, i.e. to the left of the drawer for small things.
— Control lamp of the index of turns on the trailer
When driving with a trailer, the control lamp flashes synchronously with the turn indicators on.
If one of the direction indicators on the vehicle itself or on the trailer fails, the indicator lamp does not flash.
— A control lamp of system of pillows of safety
The control lamp should light up after turning on the ignition and go out no later than 10 seconds after that. The system is faulty if the control lamp:
- does not light up when the ignition is turned on,
- does not go out after the ignition is turned on or
- lights up while the vehicle is moving.
On a car with two airbags, their malfunction is first signaled by a flashing, and then a constant burning of the control lamp.
In the event of a system malfunction, it should be checked by Audi as soon as possible. Otherwise, there is a risk that the airbags will not deploy properly in the event of an accident.
— A control lamp of electronics of management engine operation
This lamp is only found on vehicles equipped with a 85 kW turbocharged diesel engine.
The control lamp lights up when you turn on electrical appliances and should go out after starting the engine.
If the control lamp does not go out or lights up while the vehicle is moving, then either the engine itself or the system is faulty. electronic control his work.
The electronics automatically switches to the emergency program, and the engine power is slightly reduced. It is necessary to contact the service station as soon as possible.
— Control lampparking lighting
The control lamp burns at the included ignition and parking fires.
General information
The Driver Information System (FIS) is information center car.
"FIS" is the information center of your car. This system easily and quickly informs you about the current technical condition of the vehicle. For example, you can find out the mileage until the next maintenance for the purpose of performing repair and maintenance work, and much more. In addition, with the appropriate vehicle equipment, the driver can receive data from the radio, telephone, telematics and navigation systems.
On vehicles with Audi navigation* or Audi telematics*, the display is multi-coloured and has a higher resolution.
The display of the driver information system is displayed on the centrally located dashboard display.
Standard dashboard
Information on the current operational condition vehicle is displayed on the display located in the center of the dashboard.
Outside temperature display - Driver Information System (FIS)
Door and Trunk Open Warning - Driver Information System (FIS)
Multitronic selector lever positions - Automatic transmission (AT)
- Driver Information System (FIS)
Driver Information System (FIS)
Driver Information System (FIS)
Controls and instruments
Driver information system with trip computer
Outside temperature display - Driver Information System (FIS)
Door and Trunk Open Warning - Driver Information System (FIS)
5-speed automatic transmission selector lever positions - Automatic transmission (AT) Multitronic selector lever positions - Automatic transmission (AT)
Driver Information System (FIS)
Fault Monitoring System - Driver Information System (FIS)
Handbrake Warning - Driver Information System (FIS)
Maintenance interval indication - Controls and gauges
Lamp Function Malfunction - Driver Information System (FIS)
Radio indication
If, after monitoring by the fault monitoring system, there is no indication of faults of the 2nd priority level and the radio is on (depending on the radio configuration), after the “OK” indication goes out, the name of the radio station or radio frequency appears on the display with additional information.
This indication is additional information on the radio display.
Outdoor temperature display
The outside temperature is shown on the display when the ignition is switched on. On vehicles with automatic transmission, the display only appears after the drive mode has been switched on.
At temperatures from +5°С to -5°С, a snowflake is displayed to the left of the temperature display. The appearance of the snowflake symbol warns the driver to take extra care due to the danger of ice. When the vehicle is stationary or when driving at very low speed, the display may be slightly higher than the actual temperature due to the heat generated by the engine.
On vehicles with air conditioning, when the display switches to Fahrenheit (°F), the outside temperature display, Heater, Ventilation and Air Conditioning automatically changes accordingly.
Fuel range
The display shows the fuel range in km. This display shows how many kilometers your vehicle can still travel on the actual remaining fuel in this driving mode. The fuel range is determined by discrete values measured in steps of 10 km.
Open Door and Trunk Warning
The pictogram is displayed if at least one door, hood or trunk is not closed when the ignition is on. The pictogram also indicates which door or doors are not closed, the driver's door and the right rear door are shown as an example.
The hood or trunk depicted on the display icon flashes when they are not closed. Immediately after the complete closing of all doors, hood and trunk, this icon goes out.
Indication of a pictogram warning of an open door and trunk, vehicles with information system driver and trip computer* can be disabled by briefly pressing the trip computer control keys. However, the icon will immediately reappear after changing the position of the doors, hood or trunk.
Fault monitoring system
Introduction
With the ignition on and while driving, the automatic fault monitoring system continuously monitors certain functions and technical condition car systems.
The system notifies of emerging malfunctions or the need for urgent repair and maintenance work with an audible signal, accompanied by red and yellow light symbols on the dashboard display, depending on the degree of priority.
Red symbols indicate danger, and the yellow ones are signal symbols. In addition, in certain situations, instructions to the driver appear in addition to the red symbols.
Driver's instructions
In addition to warning lamps and symbols, the instrument panel displays instructions for the driver.
If a lamp function error message appears after checking the lamp function, when driving with the handbrake applied, and before switching on the drive mode for vehicles with automatic transmission, the corresponding indication of the driver's instruction is displayed on the display.
In addition, when a symbol of the first degree of priority flashes on the display, the driver can display the corresponding instructions on the display.
Displaying instructions for the driver
For example, the engine oil pressure malfunction symbol appears on the display. If you now press the "SNESK" button, the following instruction will appear on the display:
Motor abstellen, Ölstand prüfen(switch off engine, check oil level)
This display indication goes out after about 5 seconds. By briefly pressing the "SNESK" button, the instruction can be displayed again.
Handbrake warning
When driving inadvertently with the handbrake applied, a buzzer (beep) sounds and the instruction appears on the display:
Handbremse angesolen(hand brake applied)
This warning appears when driving for more than 3 seconds at a speed of more than 5 km/h.
Vehicles with manual transmission
Function control: manual transmission
When the ignition is switched on, the fault monitoring system automatically checks the functions. If the functions checked by the fault monitoring system are in order, the “OK” indication lights up for a few seconds.
The presence of malfunctions is indicated by the corresponding indication instead of the “OK” indication. At the same time, a warning signal sounds.
Vehicles with automatic transmission
Function control: automatic transmission
When the ignition is switched on, the fault monitoring system automatically checks the functions.
With the selector lever in position "P" or "N" instruction appears on the display
Beim Einlegen einer Fahrstufe im Stand Fussbremse betatigen(when you turn on the motion mode of a stationary vehicle, press the brake pedal).
If you now turn on the driving mode ( "R", "D" etc.), the instruction goes out and automatic function control is carried out. If the controlled functions are in order, then the indication "OK" is displayed for a few seconds.
In the event of malfunctions, approximately 15 seconds after starting the engine, the above instruction to the driver is replaced by the display of the corresponding malfunction symbol. At the same time, a warning signal sounds.
If there is no “OK” indication, as well as a malfunction, the vehicle’s malfunction monitoring system itself is subject to verification.
Red symbols
The red symbol indicates danger.
Check the faulty function. Seek qualified assistance if necessary.
Red symbols indicate a malfunction of the first priority level (danger).
When a red symbol appears, three consecutive
warning sound. The flashing of the symbol continues until the fault has been rectified. If several violations of the functioning of the first degree of priority occur at once, the symbols appear sequentially, with the duration of indication of each of them for 2 seconds.
Brake system malfunction
Repair the brake system problem as soon as possible.
A flashing symbol on the display indicates a brake system fault. Additionally, one of two instructions is displayed on the display:
Fahrzeug anhalten Bremsfl. und Hudr.-Öl prüfen
Vorsicht! Storung Bremse (ABS) Service aufsuchen
If the ABS fails, the ABS warning lamp comes on together with the brake system malfunction symbol.
Cooling system failure
Repair the cooling system problem immediately.
The reason for the flashing of the symbol while driving may be overheating or a drop in the coolant level. Additionally, the display shows the following instruction:
Motor abstellen und Kuhlmittel prufen (stop engine and check coolant level)
If the coolant level is normal, then the cause of overheating may be a failure of the cooling fan.
If the low battery warning light is also on, see Controls and Instruments, the cause may be a broken ribbed belt.
Low engine oil pressure
Repair the problem immediately.
A flashing symbol on the display indicates that the oil pressure has dropped below normal. Additionally, the display shows the following instruction:
Motor abstellen Ölstand prüfen(switch off engine, check oil level)
The drop in the level of impellent oil below normal
Top up the engine oil when its level falls below normal, see the Head Routine care and maintenance.
Normal engine oil level
You must not continue driving if the symbol flashes at a normal oil level. Also, do not let the engine idle.- use qualified help.
yellow symbols
Yellow symbols are warning symbols.
Standard Models
|
Reserve fuel |
|
|
Brake lining wear |
|
|
Speed alarm |
|
Models with FIS trip computer
|
Reserve fuel |
|
|
Check engine oil level |
|
|
Malfunction of the engine oil level sensor |
|
|
Brake lining wear |
|
|
Speed alarm |
|
|
Dynamic Headlight Range Control Malfunction |
|
|
Falls below normal washer fluid level |
|
|
Speed alarm 2 |
|
|
Battery voltage deviations from the norm |
|
|
Lamp function malfunction |
Yellow symbols signal a malfunction of the second priority level (warning).
When the yellow symbol appears, one warning tone sounds. Check the corresponding function. In case of several violations of the functioning of the second priority level at once, the symbols appear sequentially, with the duration of indication of each of them 2 seconds.
Reserve fuel
If a given symbol lights up for the first time, it means that about 8-10 liters of fuel are left in the reserve. Refuel the car, see Refueling the car.
Check engine oil level
When the symbol appears, check the oil level (Chapter Current care and maintenance) and top up if necessary.
Engine Oil Sensor Malfunction
If the symbol appears, check the oil level sensor. Check the oil level every time you refuel the car with fuel (Chapter Routine care and maintenance).
Brake lining wear
When the symbol appears, check the brake pads of the front (and one rear) wheels.
The appearance of the symbol means that the actual speed has exceeded the entered speed value. Reduce your speed.
Vehicles with dynamic headlight beam throw adjustment
Headlamp leveling device malfunction
The appearance of the symbol indicates a malfunction of the dynamic headlight beam throw adjustment. Repair the headlamp leveling device.
Washer fluid level drop
The appearance of the symbol means that it is necessary to add washer fluid to the glass and headlight washer filling reservoir *, see the Routine care and maintenance chapter.
Speed alarm
The appearance of the symbol means that the actual speed has exceeded the entered speed value of the second warning level. Reduce your speed.
Battery voltage abnormal
When the symbol appears, check the following components:
- v-belt
- voltage regulator
- battery status
Also be aware of the low battery warning light, see Controls and Gauges .
Lamp function malfunction
The lamp function monitoring system monitors the condition of the vehicle's lamps.
In the event of a lamp malfunction or failure, an explanatory text is displayed for the first five seconds along with the symbol. For example, if the function of the rear left turn signal is violated, the following text appears on the instrument panel display:
Blinker hinten links(rear left turn signal)
After 5 seconds, this additional display goes out. To recall the indication, briefly press the "SNESK" button.
Possible causes of lamp malfunction:
- defect of the incandescent lamp, see the Head Onboard electrical equipment.
- blown fuse, see Head Onboard electrical equipment.
- wiring defects.
Replace/repair wiring connections and bulbs.
Speed alarm
Introduction
The overspeed alarm allows you to set a speed limit that must not be exceeded.
The overspeed alarm warns the driver if a pre-set speed is exceeded. As soon as the actual speed exceeds the entered value by approx. 10 km/h, a warning signal sounds. At the same time, an alarm symbol appears on the display.
The overspeed alarm allows you to program two warning levels*, which function independently of each other and perform not quite the same tasks.
Warning level 1: function
The value of warning level 1 can be changed while driving.
Warning level 1 makes it possible to set a speed limit while driving. The entered speed value is stored in the memory until the ignition is turned off, if there has not been a change in speed or cancellation of the entered restriction beforehand.
The signal symbol of the first degree of warning appears on the display when the actual speed exceeds the entered value. The symbol goes out when the speed drops below the programmed value.
The symbol also goes out when the speed is increased by approx. 40 km/h above the entered value for at least 10 seconds. However, this does not reset the memory of the entered speed limit.
Warning level 1: programming
Warning level 1 is programmed with the SNESK button.
Successful entry into the memory is confirmed by a short light on the display of the signal symbol of the speed limit when the button is released. The entered speed value is stored in memory until the next short press of the button at a different speed or until you cancel the entered limit by pressing for more than 1 second.
Warning level 2: function
The value of warning level 2 can only be changed when the ignition is switched off.
Warning level 2 makes it possible to program and override the maximum speed limit only when the ignition is switched off. Programming this warning is recommended when a general reminder is needed for the driver to maintain a certain maximum speed. For example, when driving in a country with a speed limit, the maximum speed when driving with winter tires. The signal symbol for the second level of warning appears on the display when the actual speed exceeds the entered value. The symbol goes out, in contrast to warning level 1, only when the speed drops below the programmed value.
Warning level 2: programming
Warning level 2 is programmed and overridden by switches in the wiper handle.
Maximum Speed Programming
|
PROCEDURE |
Cancellation of the entered speed limit
A few seconds after the programming or cancellation process, the illumination of the odometer and digital clock turns off.
trip computer
Introduction
The trip computer analyzes and displays the current and average fuel consumption, average speed, fuel range and travel time.
The trip computer analyzes and displays the following information on the FIS display:
- Fuel supply on the go
- Travel time
- Average fuel consumption
- average speed
- Current fuel consumption
Information (fuel range, travel time, average fuel consumption, average speed and current fuel consumption) is displayed on the FIS display in the above sequence. All indicators (fuel range, travel time, average fuel consumption, average speed and current fuel consumption) are displayed in metric, and in certain export options in English system units.
Memory device
The trip computer is equipped with two automatically working memory devices.
 |
Trip computer: memory location 1 |
The indication of the number of the included storage device is displayed on the display with a negative display digit. The appearance of the number 1 on the display means the output of the data indication of the one-time storage device (memory 1). The appearance of the number 2 on the display means that the data indication of the general storage device (memory 2) is displayed.
Information is entered into the one-time storage device from the moment the ignition is turned on until the moment it is turned off. When traffic resumes within 2 hours after turning off the ignition, a new one is added to the already entered information. When there is a break in traffic more than 2 hours memory data is automatically erased.
Shared storage
It is not possible to automatically erase data from the shared storage memory. In this it differs from a one-time storage device. Thanks to this, you yourself can set the time interval for the analysis of information or data.
Reset button
The button for selecting and displaying various parameters on the display is installed in the wiper control handle.
By successive short pressing of the “Reset” button, the following indication is selected:
- one-time storage device (memory cell 1)
- shared storage (memory location 2)
- navigation/telematics*
- display off
The fault monitoring system fault indication also appears when the display is off.
Use
The trip computer is controlled by two switches installed in the wiper control handle.
Function selection
Erasing information
|
PROCEDURE |
|
|
The reset button can be used to set the following zero values:
- travel time
- average fuel consumption
- average speed
The trip computer only works when the ignition is on. When the ignition is switched on, the last function at the time the ignition was switched off is displayed. Short press function switch (A) or reset buttons (B) you can also turn off the indication of a reminder about the need to break the movement.
Fuel range
This display helps with planning.
The display shows the range in kilometers. This display shows how many kilometers the car can still travel on the actual remaining fuel in this driving mode. The fuel range is determined by discrete values measured in steps of 10 km.
The fuel consumption for the last 30 km is taken as the basis for calculating the range. With a more economical subsequent movement, the range increases.
Travel time
The travel time indication reminds you of the need for a break in traffic.
The display shows the travel time counting from the moment of the last reset of the storage device memory data. If you want to start counting the travel time from a certain moment clear the memory by pressing the "Reset" button (B).
Disposable storage device
If the break in movement is more than two hours, then the travel time indication is automatically reset.
Shared storage
The travel time value is stored when the ignition is switched off. When you continue moving, the following movement time is added to it.
Reminder to take a break from driving
Two hours after the start of the movement, regardless of the programmed function, there is an automatic switch to the indication of the travel time. A flashing 2:00 view reminds the driver to take a break from driving.
By briefly pressing the top or bottom side of the function switch or the "Reset" button, this indication can be turned off.
If you continue driving or if the break is less than 10 minutes, then every next two hours, a reminder of the need to stop for a rest will be repeated with an indication of the travel time of the form 4:00, 6:00, etc. If the break lasts more than 10 minutes with the ignition off, the travel time data is reset.
Average fuel consumption
The display shows the average fuel consumption in liters per 100 km calculated since the last memory reset. With this display, you can select the driving mode that corresponds to the optimal fuel consumption. If you want to determine the average fuel consumption again, you must reset the memory data by pressing the "Reset" button. When driving the first 30 m after the reset, a zero value is displayed on the display.
Disposable storage device
If the traffic break is more than 2 hours, then the average fuel consumption data is automatically reset.
Shared storage
When the ignition is off, the value of the average fuel consumption is stored in memory. When driving continues, the subsequent consumption data is taken into account.
Average moving speed
This indication helps with planning the movement.
The display shows the average speed in km/h calculated since the last memory reset. If you want to determine the average speed again, you must reset the memory data by pressing the "Reset" button.
Disposable storage device
If the break in movement is more than 2 hours, then the average speed data is automatically reset.
Shared storage
When the ignition is off, the average speed value is stored in memory. When you continue driving, new data is also taken into account.
Current fuel consumption
Indication of the current fuel consumption helps to save fuel.
The display shows the value of the current fuel consumption, measured in l / 100 km. With this display, you can select the driving mode that corresponds to the optimal fuel consumption.
Consumption is calculated for each 30-meter section of the track. When the vehicle is stopped, the last calculated value is displayed.
If, after starting the engine, the function for determining the instantaneous fuel consumption is called, then on the first 30-40 meters of the way, its average value is displayed.
Menu display (models with auxiliary heater)
Introduction
Through the appropriate commands menu Your vehicle can be configured, switched on and controlled (eg auxiliary heater/fan*) by individual functions. In addition, you can use the menu to display FIS necessary information. The device only works when the ignition is on. Controlled by key