Finishing a wooden house inside with modern materials. Features of the interior decoration of houses made of wood
More and more people are thinking about the environmental friendliness of their homes, so decorating the inside of the house with wood is gaining massive popularity. Indeed, this solution can be considered one of the best. It should be borne in mind that the material has many excellent qualities, but it is not without some significant disadvantages. Working with wood is not always easy, but the result is worth it.
Currently, the construction market is quite extensive and allows you to choose the most suitable option for a particular situation. Even wood products for finishing work, there are several types. The following products are especially popular:
- lining;
- block house;
- wallpaper based on wood;
- panels.
Each variety has its own characteristics that must be considered when choosing.
clapboard
This option consists of thin boards made of various types of wood, which are connected according to the tenon-groove principle. This technology makes it possible to carry out installation in a short time. Due to the hidden fastening, the coating is very harmonious.

Material advantages:
- Strength. Allows you to withstand various mechanical influences.
- Long service life. This figure can be decades. But to achieve such a result, the lamellas need pre-treatment and some care.
- decorative properties. The resulting surface creates an excellent atmosphere in the room. If necessary, the coating can be subjected to multiple staining.
On a note! Most often, the lining is laid on a pre-built frame, which creates some difficulties, but allows you to make an additional layer of sound and heat insulation.
 The lining is laid on the frame, which allows you to additionally insulate the room
 We must not forget that there are also negative sides:
- If the humidity and temperature indicators are not observed, the lamellas gradually dry out, which leads to the formation of numerous deformations.
- If impregnation with special compounds has not been performed, then the boards become an excellent breeding ground for fungus and insects.
- High cost. The cost depends on the class of the product, but in any case it is a significant part of the budget.

Despite the presence of negative factors, this option is successfully used for sheathing all rooms in a house or apartment, as well as baths and saunas.
Block house
This material for the interior decoration of the house with wood is relatively new, but already loved. Particular popularity is due to the fact that the details allow you to imitate a log cabin.

This product has a number of advantages:
- Excellent aesthetic properties. The surface acquires a very effective and extremely natural look.
- Additional heat and sound insulation of the room. Indeed, the tree has the ability to level noise pollution and maintain a special microclimate in the room.
- Ease of installation. Even a novice home master will cope with this task, the main thing is to correctly complete a number of preparatory steps.
In principle, such material in its characteristics does not differ much from lining. The significant difference lies in the appearance and price, the block house is much more expensive.
Wallpaper based on natural wood
Natural wallpapers are similar in appearance to traditional varieties. The difference lies in the production technology: for the manufacture of the product, a solid base is used, on which a thin veneer is glued (see photo).

Product Features:
- Wide decorative range. Many different types of wood are used in production. But it must be borne in mind that each type has its own characteristics. For example, cherry veneer changes color over time.
- Almost all rooms can be tiled with wallpaper, but the coating is afraid of moisture. The veneer and the base absorb water, which leads to a deterioration in appearance.
- Potential for mold and insect damage.

In fact, the material is quite specific, therefore, it requires special conditions for installation and operation.
Panels
The most commonly used decorative panels are MDF or inexpensive wood cores covered with various types of veneer. There are so-called elite panels, they can be completely made of precious wood, but this is unreasonably expensive.

The material has the following advantages:
- Exquisite decorative effect. The resulting surface is distinguished by respectability and a high level of comfort.
- Durability. Many types of trees used by themselves have good strength, and due to special processing, the service life is estimated at many tens of years.
- Creation of a special microclimate. For this, the external finishing of the panels should be carried out only with natural compounds: varnish and wax.
Thus, each option is suitable for a specific situation, which makes the choice easier.
The use of wood for interior decoration
The use of material for working inside a wooden and brick house does not have significant differences, but in the first version such a solution would be more preferable. In any case, careful preparation of the base is carried out. The product can be applied on the following surfaces:
- Floor. For this purpose, a simple processed board or slab materials are used. Due to the high mechanical load, the flooring must have excellent strength. To give a decorative look, various compositions are used. A well-finished floor can become an indispensable part of the interior.

- Walls. They are lined with various options. Great importance is attached to careful preparation, the surface should not have significant irregularities or defects.
- Ceiling. Wooden ceilings are a rather time-consuming task, because you first need to create a crate. But when performed correctly, the effect is amazing. This method is more suitable for high rooms.

Interior decoration with wood can be carried out in almost any room, but in order to achieve a more practical result, one should take into account the peculiarities of using the material for different rooms.
kitchen area
For the kitchen, the product is selected based on the following nuances:

On a note! If the kitchen is small, then it is better to use the method of combining different materials.
 Decorating the walls of the kitchen with wood
 Living room
Rules for decorating the living room:

These tips should be followed when decorating the bedroom. The main thing is to maintain harmony.
The interior, made of wood and other natural materials in an eco-style, is certainly one of the most sought after today. This is not only a tribute to fashion, but also an understanding that it is the most healthy and close to nature way of organizing a room.
Sheathing floors, walls, as well as other elements of the interior space with natural wood finishing materials is designed to make the room attractive, insulate and protect it from excessive moisture.
When finishing with natural wood inside the house, a multilayer structure with heat-insulating and sound-proofing qualities is usually placed between the crate and the finishing surface.
Benefits of wood finishes
If grown in ecologically clean areas, wood is one of the cleanest materials for finishing the interior of a home.
Cosiness and comfort in the house
Wood can be used for any surfaces inside the house and serve as a material for:
- walls;
- gender;
- ceiling;
- flights of stairs;
- floors;
- door structures;
- window frames;
- decorative elements.
Wood trim is able to create a special healthy microclimate in the home, in which all life processes proceed normally: sleep well, work, breathe. Unlike artificial materials that emit harmful fumes, wood does not cause a headache, as well as a feeling of chronic fatigue and is able to neutralize the harmful effects of other materials.
The tree reduces dampness in the room, prevents the development of broncho-pulmonary diseases, as well as the appearance of mold and other consequences of excessive moisture.
The choice of wood for interior decoration
Before you start finishing work, you should decide on the choice of wood species. First you need to decide whether it will be softwood or hardwood. Here the criterion will be the operating conditions and requirements for wear resistance. For rooms with excessive humidity (baths, bathrooms, saunas), coniferous wood should be chosen. And well-ventilated ordinary rooms can be decorated with hardwood (alder, oak, linden).
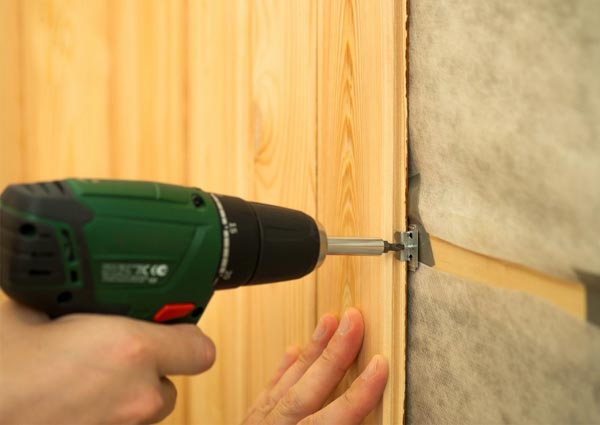
 Choosing the right material for the job
 clapboard
Clapboard is a collective concept that combines all finishing materials equipped with a locking system. Fastening is carried out by the tongue-to-groove method and can be "butt" or "overlap".
A feature of the use of this material is its exceptional ease of installation, which allows you to complete the work on the interior decoration of the house in a short time. Having information about the area and shape of the room that is planned to be sheathed, you can accurately calculate the required amount of lining.
The material has practicality, versatility and high decorative properties, thanks to which it is perfectly combined with any design trend. Sheathing clapboard can be carried out in the vertical and horizontal direction.
Lining with proper care and attitude can last a very long time. Its popularity only grows over time, not yielding to more modern finishing materials. In its production, carefully dried wood is used, both with a smooth and untreated surface.
The advantages of lining:
 Practical and versatile material
 - naturalness;
- environmental friendliness;
- nice smell;
- unique appearance;
- hygroscopicity;
- ease of installation;
- availability;
- durability;
- thermal insulation and sound insulation.
Disadvantages:
- the possibility of deformation;
- sensitivity to temperature changes;
- swelling from exposure to moisture.
The quality of eurolining production is strictly controlled at all its stages. For its manufacture, raw materials of the highest grade are used, obtained from coniferous wood, often grown specifically for this purpose. Euro lining is divided into 1-3 quality classes and meets all accepted European standards.
 The material is manufactured in accordance with European standards
 This material differs from ordinary wall paneling in precisely calibrated dimensions, as well as in the presence of a special furrow that provides ventilation and moisture removal. This design feature enhances durability and prevents the cladding from warping and swelling when used in wet environments. The excellent quality of the material makes it possible to assemble with the smallest tolerances. Thanks to this, the result of the work has a high decorative effect.
In the conditions of industrial production, the surface of the eurolining is covered with a special composition, which frees the owners of the house from the need for additional processing with paints and varnishes.
Difference of eurolining from usual lining:
- much smoother surface;
- strict observance of quality standards;
- minimum humidity level (12% versus 15-28% for lining);
- polyethylene packaging;
- the presence of a special protective coating;
- larger spike size;
- the presence of a groove at the junction;
- more ventilation grooves.
floor board
There are two varieties: solid board and glued. The first option is made from a solid array, and the other is made from spliced pieces. In addition, the floor board is divided into grooved (having spikes and grooves) and non-grooved.
 Wooden floor board options
 There is a regular board and euroboard. The latter is manufactured using a special technology on the latest equipment from high-quality raw materials in compliance with European standards. This board is quite expensive, but it is of high quality. It has a smooth surface, perfect shape, low humidity and is completely free of defects (holes, knots, blue). The massive Euroboard is equipped with ventilation slots to avoid deformation due to load distribution, to eliminate the risk of mold growth, and to increase the service life.
Pros and cons of conventional solid wood floor boards
 The material is environmentally friendly and easy to install
 Advantages:
- naturalness;
- environmental friendliness;
- speed and ease of installation;
- durability;
- the beauty of the material;
- low thermal conductivity, sound insulation;
- healthy microclimate at home.
Disadvantages:
- resin pockets are sometimes present;
- knots that reduce the quality of the board.
Also, one of the main advantages of such a board is the possibility of its repeated restoration. It can be polished up to 15 times, which extends its service life to at least 100 years.
In order for the floor board to last as long as possible, you should choose a suitable substrate and follow simple rules for caring for it.
This material looks very noble in large rooms with good natural light.
Wooden block house
This material is used for interior and exterior decoration. It is practical, convenient, easy to care for, while it looks very decorative. All these qualities, as well as environmental friendliness and affordable price of the material, make it popular among consumers. A high degree of wood drying eliminates deformation, premature damage and cracking of the material. Treatment with antiseptics and flame retardants prolongs its full use.
For the manufacture of a block house, a tree of various species is used, but the most used species are larch and pine. A block house made of linden, birch or cedar looks very decorative.
 Affordable and environmentally friendly material
 Various unattractive surfaces, such as concrete or brick, look more than worthy after finishing work using a block house. The feeling of a solid facade is created due to the fact that its individual elements in the corners are joined by special corners.
Block house made of larch wood has a beneficial effect on the nervous, as well as the cardiovascular system and respiratory organs, due to the release of volatile substances by larch wood - phytoncides. This property completely covers the inconvenience in the processing of this hard, resinous material.
 Imitation of timber will favorably highlight the most comfortable areas
 This product is a spectacular material for interior decoration, which allows you to change the space of the house without drastic measures.
 The material is not subject to deformation
 Imitation of a bar is made on special technology. First, it is dried for 8-12 weeks using special chambers until the moisture is almost completely evaporated and the pests are destroyed. Then the finished boards are sorted and cut. Panels made in this way are not subject to deformation, cracking, and also perfectly retain their original shape.
The assembly of the web from individual elements thanks to the tenon-groove system can be done by hand without special qualifications.
The cost of the product depends on the class and type of wood. The most popular materials are pine and spruce. They have a low price, and in some technical characteristics they even surpass more expensive species, for example, the same larch.
Imitation timber, like all natural wood products, has low thermal conductivity and perfectly saves heat in the room. If necessary, additional thermal insulation of the building can be made using layers of insulation placed between the finishing coating and the wall of the house.
 Installation of wooden bars
 The variety of types of finishing material allows you to create your own unique design of the house, and the richness of colors will help you choose it for almost any type of interior.
Interior decoration with wood is an excellent contribution to a healthy lifestyle, the opportunity to surround yourself with elements of ethnic style created by nature itself.
The final stage of construction is the finishing of a wooden house inside, and in this case, photos can help the owners decide on the style of the future home, but you will have to choose the materials yourself, as well as carry out a series of preparatory work. Wood makes special demands on the subsequent finishing, therefore, when carrying out interior work, its properties and characteristics should be taken into account. In addition, do not forget that a wooden house is not only beautiful and warm, but also has a special energy. Its design from the inside can either emphasize unity and harmony with nature, creating an atmosphere of unique comfort, or be ultra-modern, but no less comfortable.
When to do interior work
The interior decoration of a wooden house should be carried out only after the main shrinkage has passed (this applies only to “fresh” log cabins). At this stage, there is an active shrinkage of the tree, the timber or logs change their size down, and the insulation is pressed. If the interior finishing is done before the end of shrinkage, then as a result you can get a curved coating, which, moreover, can fall off and you have to start all over again.
The duration of shrinkage is affected by:
- House construction type.
- Material (beam, log, etc.), its initial moisture content.
- Climatic zone of construction.
- Construction time.
In particular, a house made of glued laminated timber gives the main shrinkage 3-4 weeks after construction, this is the fastest time. Other types of wooden houses require several months or even years to shrink. On average, finishing inside the house can be started only 10-12 months after the completion of the construction itself.
The natural beauty and graceful texture of wood delights everyone and always, so the decoration of a wooden house inside is only intended to emphasize nature and protect it from the effects of time. We can simply cover log walls with high-quality varnish that preserves all the charm of this natural material, and with more complex solutions, it is necessary to maintain an optimal balance of other materials used.
Decoration Materials
Today there is something to decorate a wooden house inside. For its design, a traditional lining, an innovative Block House, the usual drywall, or an ordinary board () are suitable.
At the same time, it is modern materials that are valuable for their advantages: they are easy to use, attractive, durable and environmentally friendly.

- wood cladding traditional and well sets off the natural appeal of the building, even with its ultra-modern interiors.
- A rock- an excellent and indestructible material, advantageously contrasting with wood. A stone-lined fireplace, part of the wall is spectacular and very appropriate.
- Drywall easy to use and relatively light in weight - it will favorably highlight adjacent walls, successfully decorate the ceiling, and its price is low.

- Assortment of ceramic tiles striking, and we can find in color and texture reminiscent of wood. But the variant of its contrast with the tree, which enhances its natural virtues, is interesting.
Finishing nuances

Finishing options inside a wooden house are numerous and varied.
- When designing a new building, we plan its future interior and, accordingly, choose the method of cladding. And when redecorating an old log house, we will only update its finish.
- Usually, a wooden house needs up to 8 years to shrink, although its greatest degree occurs only in the first year. Let's take this moment into account.
Note! On glued laminated timber and dry logs, we make the cladding in about three weeks, and before it starts, it is necessary to heat the room even in summer, because the circulation of warm air will speed up the drying of the wood.
- It is important to start work with antiseptic impregnation (Pinotex, Pirilax or Tikkurila), which will make any coating as reliable and durable as possible - they protect the structure from decay and instant ignition.
- The instruction from experts states that the decoration of only load-bearing structures should be started after grinding the surfaces of the walls, and the impregnation here is better tinted, with a stable decorative effect.
Interior styles

Finishing inside wooden houses is a limitless scope for our imagination. And in the end - a beautiful, cozy design, the most comfortable and functional. Country style and ultra-modern hi-tech favor the rough and simple texture of materials to create a cute cozy interior.

In the photo - Scandinavian style in decoration
On the Scandinavian peninsula, houses made of modern glued laminated timber are popular.
Their architecture increases the flow of daylight into the building:
- big windows;
- luxurious stained-glass windows;
- glass exterior walls.
Color solutions are also subordinated to this goal - light yellow or colorless tinting of wood, covering it with white paint.
Internal lining with imitation timber
The unique technology made it possible to achieve absolute similarity of imitation with natural timber.
Work order

Do-it-yourself decoration inside a wooden house always begins with measuring the walls for an accurate calculation of the amount of materials.
Note that the dimensions of this beam are different.
- Prepare wall surfaces.
- We stuff a frame of rails on them.
Note! The slatted frame will hide the unevenness of the walls - an obstacle to joining the panels. In addition, we will hide the communications in this way and at the same time insulate the room with the resulting air cushion.
- We attach the details of imitation timber to the slats with kleimers and small nails.
- The thorn-groove system speeds up and simplifies our work: we lay the panels horizontally without joining seams.
Finishing the premises with a block house

- Renovation of old houses, their insulation, decoration is possible with the help of such innovative panels.
- The view of a prosperous Russian hut, old-fashioned comfort, beauty and warmth gives a block house.
- The material is also made of tree species, but similar to rounded logs, only without cracks and knots.
- Advanced technologies provide high resistance of these panels to temperature extremes, moisture.

Drywall finishing
![]()
Today, the construction of wooden houses, and especially houses made of logs and wild logs, is again at the peak of popularity. And even despite the rather high cost and long construction period, such houses can be increasingly seen outside the city. If earlier wooden houses were built practically without any finishing, today, thanks to the development of technologies and the emergence of new materials, the finishing of a log house is becoming the norm. The log house is being finished inside and out, while everyone decides for himself how the house will look after that. Will the natural appeal of wood be preserved or will the logs be completely hidden under artificial materials.
Features of finishing a log house
Do-it-yourself finishing work for a log house has a number of features, many of which are often overlooked when finishing a log house with your own hands. Such miscalculations can ultimately lead to dampness of wood and its decay, the appearance of fungi, mold. In order to finish the walls of a log house correctly, the following requirements must be met.
First of all, all finishing work is carried out after shrinkage of the house. In this case, it is necessary to take into account which log the house is made of. If from rounded, then its shrinkage will be less due to pre-drying. For a wild log house, the term and strength of shrinkage will be greater due to the natural moisture content of the wood. A newly built house is left unfinished for at least a year. During this time, the logs will shrink, and it will be possible to more accurately measure and further install windows, doors, as well as finish the walls of a log house.
Secondly, it is extremely important to create the correct heat and vapor barrier when finishing. For proper vapor barrier, one simple rule must be followed - the vapor permeability of each subsequent layer of finish towards the street must be higher than that of the previous one. The result of a violation of this rule will be the appearance of mold, fungus and rotting logs, and in addition constant dampness in the house. A heat-insulating layer for the walls of the house may be required only in the case of finishing an old, already slightly dilapidated house. A house made of a new beam with a diameter of 26 cm has the same thermal conductivity as a house with a one and a half meter thick brick walls. It will be better to perform competently thermal insulation of floors, floors and roofs.

Thirdly, for finishing a log house choose natural materials. Despite the fact that modern building materials have a number of undeniable advantages, it is much better if the wall decoration of a log house is made of the same natural materials. The result will exceed any expectations, since natural materials are much better combined with each other than a combination of artificial and natural.
Finally, the following should be noted. Try to preserve and highlight the natural beauty of the house, instead of sheathing the walls with sheets of MDF or drywall. Thus, turning a country house made of natural wood into the same gray apartment as in the city. The option of wall cladding can be justified only in one case, when the wooden house is old and the wood has darkened and lost its warm natural color.
Interior decoration of a log house
Wooden houses, and especially log houses, due to the natural color of the wood, have a beautiful interior that is desirable to preserve. Therefore, when planning the interior decoration of a log house, it is necessary to carefully consider every detail. What the interior will be like is discussed and planned at the stage of creating a house project. During the interior decoration, it is enough just to bring everything to life. The finishing of a log house begins after the arrangement of water supply and sewerage.
Ceiling
We start the interior decoration of the house from the ceiling. This is dictated by the fact that during finishing it is possible to stain or damage the surface of the walls and floor, and it is more difficult to redo it than to do it again. The execution of ceiling finishing work is somewhat more difficult in comparison with walls and floors due to the inconvenience of applying and fixing materials. But with a certain skill, everything can be done in the shortest possible time.

The ceiling in a log house is a structure of beams and planks. It is from this that you will have to build on when finishing it. In a way, this makes things a lot easier. Insulation, electrical wiring can be laid in the space between the beams, and sheets of plasterboard, plywood, sheathed with clapboard or a stretch ceiling can be fixed on top of the beams themselves, or simply sanded wood and coated with clear varnish. Consider the options for finishing the ceiling, the most organically combined with log walls. This is lining the ceiling with clapboard, veneered panels and varnishing or painting.

Clapboard ceiling lining made quite simply. This is facilitated by the fact that wooden beams are used in the ceilings of the house, to which the lining will be attached. The lining boards relative to the walls of the room can be installed both diagonally and straight, or by combining these two methods. The slats themselves are fastened with nails or self-tapping screws, which are placed in a recess in the grooves of the slats. And also with the help of clamps, which is much more convenient. We start creating a ceiling from a lining with laying and fixing insulating materials, if any, and laying electrical wiring. Then we proceed to fastening the slats. It should be noted that when installing the lining, it is required to leave a small ventilation gap of 5 mm near the walls. On the first bar, we carefully cut off the spike, set it in place and fix it using one of the methods described above. We install all subsequent strips with a spike in the groove of the previous one, finish it off carefully with a mallet and fix it in place. At the end, we grind the surface and open it with varnish.

They are one of the most expensive finishes. The ceiling trimmed by them will look impressive, showing their wealth and good taste of the owners. Installation of panels is not particularly difficult due to the tenon-groove fastening. In fact, their installation resembles the installation of lining. The difference lies in the need to create a frame to which the panels will be attached, but this is only if there is a need to hide the floor beams. Alternatively, such panels can be placed between the beams.
The most simple and at the same time attractive will look ceiling with clear lacquer. Of course, surface preparation will require considerable effort. Since you will have to carefully sand and varnish every centimeter, but as a result you can always admire the natural beauty of wood. To speed up the grinding process, you will have to use a special tool and several types of sandpaper of various grain sizes. First, grinding is done with coarse-grained sandpaper, and at the end - with fine-grained paper. This is done in order to first remove the exfoliated pieces of wood, and at the end to make the surface of the wood smooth, without any roughness.
Important! After grinding, the surface of the wood must be impregnated with protective compounds - flame retardants and antiseptics. This applies not only to the ceiling, but to all parts of the house.

Another unpopular, but at the same time, an excellent option for finishing the ceiling is its painting. Only one clarification needs to be made. Paints must have high vapor permeability, that is, "breathe". Therefore, any acrylic, silicone and similar paints cannot be used. The best option would be to use lime and water-based paints, or it can be ordinary whitewash.
Walls
The next after finishing the ceiling will be finishing the walls. As has been noted more than once, a log house has its own atmosphere and wall decoration must be approached in a special way. The best option would be grinding and wall coverings with special compounds and caulking with a decorative rope. Simply put, preserving and emphasizing the natural beauty of wood. But in some cases, the log house is sheathed with drywall, MDF, tiled and other similar materials.
Grinding and caulking walls carried out both inside and outside the house. For grinding, a special tool and several types of sandpaper are used. If you have to do such work yourself for the first time, then it will not be superfluous to practice on the workpiece and then move on to the main work. Then the surface of the wood is treated with special compounds that allow you to preserve the natural color of the wood and protect it from the effects of negative factors.

Caulking log joints is a must, but using decorative materials can make the walls of the house more attractive. To perform the work, you will need a special tool - a caulk and a hammer. If you have already performed similar work when building a house, then decorating with a caulk will not cause any special problems. Otherwise, you will have to practice a little.
Sheathing a log house with plasterboard, MDF and wall panels are used to hide electrical wiring or create a flat surface for tiles or other facing material. And also to protect the walls of the log from the negative effects of moisture. This finish is appropriate in the kitchen, bathroom or bathroom. For living quarters, living rooms, corridors and hallways, it will be better to preserve the natural beauty of wood, in extreme cases, you can sheathe it with clapboard. Before sheathing a log house with drywall sheets, MDF or wall panels, it is necessary to create a reliable frame to which the sheets will be attached. For these purposes, you can use either wooden slats or a metal profile. The vertical slats of the frame are installed in increments of 600 mm. The transverse planks are placed in such a way that in one row the bar is at a level of 75 cm from the floor, and in the next row it is 75 cm below the ceiling. This is done so that the fixed sheets are placed in a checkerboard pattern. The frame itself is attached at the points of contact with the logs using self-tapping screws. Further work consists in sheathing with sheets, which, if necessary, are cut and attached to the frame with self-tapping screws. The final finishing of the walls sheathed in this way can be done with tiles, wallpaper, decorative plaster or otherwise.

Important! When sheathing the walls of a house, very often insulation and vapor barrier are placed in the free space. This has very deplorable consequences for log walls. Therefore, it is better to leave an air gap, and lay the vapor barrier layer from the outside.
Separately, it should be noted wall painting. As in the case of the ceiling, you can use natural paints - lime and water-based paints. This will allow the walls of the house to "breathe" and keep them from mold and mildew. The only drawback is that after a while you will have to repair the chipped paint, as the house will shrink for some time.
Floor
The completion of the interior decoration of a log house is the creation of the floor and laying the floor covering. Most of the floor has already been created. Floor beams, subfloor and logs were laid at the stage of building the house. All that remains is to finish what we started. The design of the floor of a log house is known in advance, so there will be no particular difficulties when choosing a floor covering either. In such houses, a wooden floor is created on the logs, which means that the finish coating can be parquet, massive board, carpet, linoleum, vinyl.
Which of the above will be laid depends on the choice of the owners and the purpose of the premises. In any case, you will have to do some work to create the floor. Firstly, this is the creation of a lower subfloor, laying a waterproofing layer and insulation in the space between the lags. Secondly, laying the subfloor boards. And only after that you can start creating the finish coating. If a floor will solid board, then you can lay it directly on the subfloor boards. The process of laying is carried out as follows. A spike is cut off at the first board, then it is laid against the wall. Several spacers 2.5 cm thick are installed between the wall and the board, which are removed after the laying of the floor boards is completed. We fix the board itself with self-tapping screws in the sweat, under which we drill holes in advance. We lay subsequent boards with a spike in the groove of the previous one. For reliable fastening, we finish it with a mallet along the entire length and then fix it with a self-tapping screw to the logs. At the same time, it is necessary to remember about the 2.5 cm gap between the boards and the wall, in the future it will act as a ventilation hole.

After laying the boards, their surface polished and varnished. We install a skirting board around the perimeter of the room.

Parquet installation in some ways similar to the laying of a massive board - the similarity in the tenon-groove system. The difference lies in the fact that this work is very painstaking and time-consuming, and an absolutely flat surface is required under the parquet, and the planks themselves can be laid on glue. To create a parquet floor, we first equip a finishing substrate of moisture-resistant plywood on top of the subfloor. We lay the plywood sheets in a run-up and fix them with self-tapping screws. Further work will consist in laying and fixing parquet planks. Finally, the surface is sanded and varnished.
Laying floor coverings such as linoleum and carpet is not particularly difficult. The main thing when creating them is to ensure a flat surface. This can be done, as in the case of parquet, using plywood sheets.
Finishing work of a log house, in addition to the interior, includes the facade of the building. At the same time, the walls and basement are finished. If everything is quite simple with the plinth, you can plaster it, overlay it with clinker tiles or decorative stone. Then the walls of a log house will require a special approach.

The simplest option for such a house is log sanding, decorative caulk and coating the surface with special compounds that preserve the natural color of the wood and protect the logs. But quite often, especially with old log houses, this is difficult to do. So sheathe a log house with siding, clapboard, make a simple hinged facade with metal or plastic panels.
As already noted, in order to save logs from rot, fungus and mold, they are treated with special substances. In addition, it is necessary to comply with the vapor barrier rule. With the first condition, everything is simple, but the second must be taken into account when the log house is sheathed with siding, a hinged facade is created, or sheathing is performed with other materials.

Before sheathing a log house with siding, you will have to take care of the ventilation and vapor barrier of the walls of the house. To do this, we fill the walls with spacers that will provide ventilation. We take the strips themselves with a thickness of 10 - 15 mm and install them in increments of 50 cm, we use self-tapping screws as fasteners. Now, on top of the spacers, we lay a layer of vapor barrier, which we fix with thin wooden slats.
The next stage is log house wall insulation. But here we must turn to the performance characteristics of wood, namely thermal conductivity. As a result, it may turn out that the insulation layer will be completely out of place.

If you decide to insulate the house, then we create a crate frame for the siding panels, between which we lay the insulation, and on top of the wind protection. For the frame, we use wooden blocks, equal in thickness to the thickness of the insulation, and with the help of self-tapping screws we fix them on the previously installed strips.

It remains to mount the siding panels in place. All work is carried out from the bottom up. We first set the initial profile, fix it with nails or self-tapping screws. Further work will be similar to the assembly of the designer, since subsequent panels are brought into the previous one and fixed to the crate. Pay special attention to corners, door and window openings. For them, siding of a certain shape is used, and this should be remembered during installation.
Finishing a log house inside and out is a matter that must be approached with great care. And it's not even that some types of finishing work are complex, but that wood itself is a beautiful finishing material. And the main task when decorating a house from a log is, if possible, to preserve and emphasize the natural beauty of the tree.