Dollhouse from a large box. Do-it-yourself cardboard house for children - step-by-step photos
A large and impressive craft, but what can’t you do for your beloved children!
Materials:
- cardboard,
- glue “Moment crystal”,
- acrylic paints,
- acrylic lacquer,
- padding polyester,
- pieces of fabric,
- braid,
- beads,
- wooden sticks,
- tassels,
- modeling mass,
- scissors,
- wire,
- beads,
- mirror,
- bead pendants,
- pieces of wallpaper,
- pencil,
- ruler,
- disposable containers,
- fantasy.
Operating procedure:
It so happened that one of my daughters fell ill with chickenpox, and I needed to keep them occupied with something at home. We decided to make everything together house for our dolls. They made it according to the principle: I made it out of what I had. We didn’t have a ready-made box, but we did have a fairly large piece of cardboard and many small pieces of varying thickness and texture. I thought that our house would be a small one consisting of two rooms, but that was not the case: 2 young designers had their own thoughts about our house.
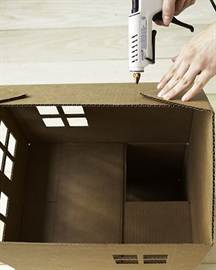
As a result, we began to do dollhouse 3 floors with 5 rooms(later the upper floor was divided into 2 parts and there were 6 rooms).
Layout
I cut out 1 piece from a large piece of cardboard - this is the back wall of our house and 2 side ones (see photo 1).

Next I bent 2 side walls and began gluing the floor and ceiling (photo 2).

The house has dimensions: height - 74 cm, width - 50 cm, depth - 30 cm.
I covered the blank for our house with pieces of wallpaper and suitable paper (see photo 3).

The outside of the house is covered with wallpaper, the roof is strips of cardboard measuring 3 cm by 31 cm, glued overlapping.
The frames are glued together from strips of cardboard.

Our house needed a variety of puppet, which we tried to make with our own hands from scrap materials. I glued everything by eye without preliminary drawings or patterns. I simply cut a cardboard rectangle and glued the necessary pieces to it. All furniture is painted with acrylic paint and covered with acrylic varnish.
Bedroom
So, room No. 1 - bedroom. There is a lot of furniture in it, and the first thing we’ll start with is this. It is quite easy to glue it together, just look at photo 4.

I covered the cardboard blank with acrylic paint, after the paint had dried, varnished it, glued a soft mattress, added a few soft pillows and a blanket.
The next pieces of furniture are a chest of drawers and a bedside table (photos 5 and 6).


The principle of their manufacture is the same - a small cardboard box to which false drawers are glued. There was also a place in the bedroom for a comfortable rocking chair (photo 7).

Big and spacious wardrobe also found its place (photo 8).
 In photo 9 the whole room is in color.

You can also watch how to make a bed for dolls (and other furniture) on the “Homemade” channel:
common room
Room number 2 - common room to watch TV. The TV in our house is flat - a large cardboard rectangle was covered with black acrylic paint, after drying, a suitable picture was glued and the whole thing was covered with acrylic varnish.
The main place in this room is occupied by a spacious one, which houses a large family of dolls.
The base of the sofa is a cardboard blank (photo 10).

The back and armrests are covered with paint and varnish, and the base is glued with padding polyester and fabric. My daughters already had a table - it was a wooden construction set, onto which we glued a piece of cardboard and painted it all together.
We see room No. 2 in photo 11.

Video on how to make a cabinet:
On the second floor of our house there is a music room and a kitchen.
Living room
IN music room there is a fireplace (photo 12).

It, unlike all our furniture, is covered with cracks. At the beginning it was covered with white acrylic paint. After it dries, a layer of craquelure medium is applied. After this layer has dried, a layer of black acrylic paint is applied. After drying, the entire product is coated with matte acrylic varnish.
Since our living room is musical, then from 6 matchboxes the piano was glued together (photo 13). It was immediately covered with colored paper, but the paper turned out to be of poor quality, and later it was painted, like all the furniture in the house. In addition, I glued 2 square beads to it - these are pedals.

The piano stool (photo 14) is glued together from cardboard, painted and decorated with a velvet cushion.

Sofa (photo 15) and armchair (photo 16). I glued them together from cardboard and decided not to cover them with fabric, but simply paint them with paint; my daughters were happy to help me with this. After applying varnish, they are very similar to leather.


The entire music room after painting the furniture (photo 17).

Kitchen
Room No. 4 is the kitchen, it is small but roomy. The kitchen set is Big cupboard in the shape of the letter G (photo 18).

The sink is a small plastic jam container, the faucet is made from modeling clay, and there is a small hanging cabinet:

The stove is electric with 4 burners (photo 20), its door opens.

In the kitchen we have 2 chairs (photo 21) and a table (photo 22).


Dishes were also made from small items (photo 23).

Photo 24 shows our kitchen after applying paint and varnish.

Actually top floor we accommodated children's and toilet room.
Children's room
IN children's The main place is occupied by a bunk bed (photo 25).

She has soft mattresses and pillows. In the room there is a small table (photo 26) and a chair (photo 27).


There is also a cabinet for toys (photo 28).

In this room I did not cut a window, but simply glued a cardboard one to the side wall. The room is decorated with a colorful alphabet (cut from paper packaging from a children's toy). Photo 29 shows a children's room in color.

Almost all the chandeliers in our house are glued together from disposable containers, beads, cockerel sticks and braid.
Only one, which is in the music room, is made of beads, wire and bead fittings.
I also glued a ladder to the house, but we have it attached for now, because I am afraid that if it is glued, it will interfere with two children playing at the same time.
Bathroom and toilet
For toilet room we needed a toilet, sink and bathtub. It was necessary to make them quickly and simply.
And I decided to just sculpt them from modeling material. Which is what we subsequently did with our daughters (photo 30).

They may not be ideal, but they were made together.
Our works took about a day to dry. Next, we painted them with white acrylic paint and coated them with glossy acrylic varnish. After drying, the tank turned out to be quite heavy, then I replaced it with a lighter one (cut it out of cork and painted it). To keep the sink stable on the wall, I glued a nightstand underneath it. The bedside table was painted like all the furniture in the house. Next, I glued the bedside table to the wall and floor of the house, and then glued the sink. A tap (made from modeling clay) and beads are glued to the sink. There was no ready-made mirror, and ours is also made of cardboard.
The toilet is made of several parts - the base, cockerel sticks, a tank (made of cork), chains and beads.
This entire structure is complemented by a seat - cut out of cardboard and covered with plain fabric.
In photo 32 the entire toilet room is in color.

So quickly and cheerfully, together with our daughters, we built from scrap materials our dollhouse. Such crafts always bring joy to children.
It may be quite simple for now, but my daughters are quite happy with it and enjoy playing together.
And another video on how to make a house for dolls with your own hands from plywood:
Did you like the product and want to order the same from the author? Write to us.
More interesting:
See also:
Knitted bear cubs Mashutka and Mishutka
The next work of Elena Steshenko - knitted bear cubs Mashutka and Mishutka - is very suitable for the name...
Fabric octopus - a simple do-it-yourself toy
A new master class from Irina Kalinina - how to make a simple toy with your own hands. Which adult...
Felt matryoshka dolls
We are all accustomed to the fact that nesting dolls are traditionally made of wood. But for your baby, these nesting dolls...
Drawing a doll's face
If you are partial to dolls, love to sew and create interesting characters - this article is for you! ...
Dog in a New Year's cap
Many are preparing in advance for 2018. Let's knit a funny symbol of the year of the Dog in a New Year's cap. ...
Little children are giants of engineering, because only they can build an excellent hut for games from chairs, tables, blankets and pillows in a few minutes. What remains for parents? Just be surprised at their resourcefulness and take apart the halabudas? No: the most creative moms and dads can compete with the little fidget and build the perfect play space for him - a house made of cardboard boxes.
Is it hard for you to compete with your baby's wild imagination? It is for such parents that we have created a selection best ideas. The little one will definitely love his new personal mansion made of cardboard boxes.
Cozy house
A small door and windows, a red facade and a tiled roof - such a house would look great in a small European village or in your little one’s playroom. You'll need one big box for the base and several sheets of cardboard to cut out the decor. To decorate, use paints, scissors and your imagination. It will turn out very beautiful!
What about without a hallway?
Are dad or mom engineers? Then you simply must “complete” your baby’s cardboard house small hallway or several rooms. Did you really study strength of strength in vain? This is what a play hut should look like for a child of engineer parents.

House with opening windows
The sun can wake up the little owner cardboard house and interfere with his carefree games. Consider this: shutters or curtains on cardboard windows are a great solution. And a cheerful decor designed by a child won’t hurt.

Today here, and tomorrow - there
A good option for small apartments is a transformable cardboard house. After games, you can easily fold up such a hut and hide it so that it doesn’t take up extra space. Simple and functional!

House with interior
The house is built, but it’s empty? Disorder! We take leftover cardboard and other unnecessary cardboard boxes, remember our childhood, turn on our imagination and create. Shelves, cabinets, kitchen set - necessary furniture in a hut for a child. Games in such a house will be even more interesting!

Whoop - and off we go
And if planet Earth gets boring, a cardboard house can turn into a fast space shuttle. Add a few necessary details from cardboard to the base - and forward to the stars to surf the expanses of space.

Houses from a fairy tale
A city made of cardboard boxes, where there are tall castles and small cozy shacks, - cool idea for playing with a child. In this kingdom you can settle doll princesses, and on its streets you can arrange races for cars.

Mansion for dolls
Oh, all of us girls, as children, simply dreamed of a house for Barbie. After all, your favorite doll should be comfortable. Three floors and a bedroom in the attic - not bad, right? And the boys could use a three-story garage for cars. Does a small oligarch need to store his fleet of vehicles somewhere?
A house made from a cardboard box will delight a child. From this material you can make a car, a palace for dolls, spaceship and much, much more.
How to make a cat house out of a box?
Probably, many cat owners have noticed that as soon as they buy something new for the house in a cardboard box, their furry pet, after sniffing it, will definitely climb inside. You can take advantage of this animal’s predilection by giving it a cozy home individual project. Purchased cat houses are not cheap, but you won’t spend a ruble on this one. In addition, such housing can be made at least every week, fortunately, there is enough material for this.
There are a lot of options here. You can build a house for your pet from a cardboard base, then cover it with colored paper and draw patterns. Children like this kind of work, so you can decorate a house for a cat yourself, or with the help of a little helper. To make the structure last longer, it is constructed from corrugated cardboard or covered with felt on the outside.
You can make such a spacious home in 30–60 minutes. To create it you should have on hand:
- large cardboard box;
- pencil;
- stationery or construction knife;
- white paper and glue.

Cut from the box top part. Where the entrance or window will be, draw with a pencil round hole. For the template, you can use a large plate, dish, or draw a shape using a compass. Now cut the hole according to the markings.
In order for a house for a cat to be durable, it should have beautiful view, cover its corners with wide white electrical tape or paper.
Cut out a rectangle from the remaining cardboard, also strengthen it and place it on top of the structure as a roof.
To make the cat house more comfortable for animals, place a rug or piece of carpet on the floor. It is better if the materials are natural and can be taken out and cleaned or washed at any time.
By creating such housing for animals, if the space allows, you can create a whole system where a cat will go from one house to another. In one cat house she will eat food. Then you need to place containers for food and water here. Another spacious home will become a place for games; place the animal’s favorite toys and a scratching post there.
When decorating a cardboard house you made yourself, avoid decorating it with small or sharp objects so that the cat does not swallow them and get hurt.
Speaking about how to make a house for a cat, it should be noted that the windows in it can look like real ones.
As you can see in the photo, you first need to draw a window consisting of 4 sections, then cut it out. Login according to the principle regular door for humans or double for animals, as shown in the photo on the right. The roof in this case was constructed from blue garbage bags held together with tape.

Here's how to make a cat house out of waste material. Cardboard gives you many more ideas that will help you make a home for a doll, a springboard for a child’s games, and interesting toys with your own hands.
Given time, material, and imagination, the packaging container will turn into a real palace, an Indian wigwam, an ancient castle.

The child will play with pleasure in such spacious housing. To make such a house for children with your own hands, you must have:
- large cardboard box;
- masking tape;
- scissors and stationery knife;
- ruler;
- pencil.
To prevent the cardboard from tearing, reinforce it with masking tape where the door will bend when opening and closing.
Next, creating children's playhouse with your own hands, mark the outlines of the windows and cut them out. On the second floor, make the attic window semicircular on one side, and the other windows will protrude outward.
The roof is created from 4 opening parts of the top; they need to be trimmed a little and secured with tape. Let the middle of the roof be uncovered for air access. You can decorate your home with accessories made of the same material; for this you need to make beads from cardboard or a garland on which swallows are located, as shown in the photo.
A house for a princess

It’s even easier to create such a medieval castle. For it you will need a tall cardboard box, for example, from under a refrigerator. Its top is removed, and small rectangles need to be cut out in order to frame the top of the walls in the desired style.
Next, a paper castle is made in the following way. A rectangle is cut out in place of the door so that the lower part remains in place. A thick rope is attached to its top, one edge of which is passed through the right and the other through the upper left corner. Now the rope needs to be secured in the house itself, passing it inside through the doorway.
In such a house you can play out a fairy tale; the girl will love being a princess who is waiting for a noble knight to free her. There are many plots, it’s good if several people are involved in a home performance.
Large house for dolls out of a box

Housing for toys is also made from cardboard. All you need is:
- box or sheets of cardboard;
- wrapping or colored paper;
- markers;
- scissors.
To do interfloor ceilings, cut out 3 sheets of cardboard. Their width should be equal to the width of the walls to which the ceiling will be attached, and their length should be slightly more distance between two opposite walls so that this sheet can be folded on both sides and glued to the internal parts of the house.
Before attaching the interfloor ceilings, glue a sheet of packaging or colored paper; you can also use fabric for this. This doll house looks very stylish.
For the roof, take a rectangular sheet of cardboard, pre-decorated with colored paper or fabric. It needs to be bent in half and secured with tape to top part walls
The child will be happy to play with the new structure; he will be interested in arranging it there. doll furniture at your own discretion. Such skills will certainly be useful to children in life.
Small house for dolls from a box or storage container
See what other house for dolls you can make with your own hands. It is created from a small box. Holes for windows, doors, then internal and outer part pasted over with fabric or colored paper.
The following master class clearly shows how to do this so that as a result you get such a nice box. You can use it not only to make a house for dolls, but also a box for storing things and all sorts of little things.
For needlework you will need:
- cardboard shoe box or other;
- bright fabric;
- glue;
- scissors;
- ruler;
- tape measure;
- pencil.

If you are making a container for storing things, then you need to take a box that will fit in the closet. Usually the height of its sides does not exceed 10 cm. To make such boxes for storing things or for dolls durable, measure 10 cm in height, bend the edges inward, and glue them. If the container is already dense, then trim off the excess according to the markings.

The size of the canvas should be such that, bending it inward, one of them goes to the bottom by 2 cm.

To cover a container with fabric, place the fabric on flat surface, and place the box on top. First apply glue to one side of it in the manner shown in the photo and glue it.

Then decorate the other 3 sides of the cardboard box in the same way.

This is what you have at this stage.

To make the bottom of the storage box you made yourself decorative, you need to mark it and cut out a piece of cardboard according to these measurements. Now it is placed on the fabric and pasted over on one side and then on the other.

As a result, you will get such a cute little thing, in which every little thing will be in its place. If you are planning to make a house out of it for dolls and toys, then cover the cardboard lid with fabric or colored paper, then cut out the windows and door.

Empty containers will give many other gifts interesting ideas.
Wigwam for children made from cardboard boxes
By making it with you, the child will expand his horizons, as he will know in which house the Indians live.
A wigwam for children is very easy to make. The cardboard box needs to be disassembled, cut on the side, then cut diagonally. The resulting triangle must be covered inside and outside with white paper. If you have light cardboard, then you don’t need to do this, go straight to the next step.
The wigwams need to be folded 2 times to define two side and one back wall, and then paint them on the outside with zigzag stripes. Top - yellow, middle - blue, bottom - of blue color. To do this, use felt-tip pens or colored pencils.

There are many other interesting ideas that will tell you what can be made from cardboard, for example:
- kitchen stove;
- space rocket;
- ship;
- automobile;
- airfield and much more.

The toy stove looks like a real one. To make it, place the box on its side. Cover the opening part with tape and place the stove so that this part is at the back. Reinforce the folds with dark strips of elastic tape or paper. Cut out circles for the burner from cardboard and cover them with brown paper. Make the gas switch out of yellow.
Cut a hole for the oven on the front panel and cover the door with paper.
Having cut out a circle in a rectangular sheet of cardboard, glue a red triangle on top, and two similar figures on the sides, pasting them with blue paper. These are the stages of an interplanetary spaceship. All that remains is to attach the hose from the old vacuum cleaner and you can go on a virtual flight on a spaceship.

You can also make a racing car out of cardboard. Front and back wall the car is straight, the sides are rounded at the top. The wheels are made from round pieces of cardboard. The car has no bottom, so you can run a race while holding it.
You can make these crafts from paper and cardboard with your own hands, attracting children:
Every little girl dreams of the biggest and most beautiful dollhouse for Barbie. And every domestic cat dreams of his own house made of cardboard, where he can retire without getting in the way of his owners. By learning how to make cardboard houses with your own hands, you can not only please your children and pets, but also decorate the interior in an original way. This article shows the most requested do-it-yourself cardboard house plans with MK.


Necessary materials
Materials and tools do not require additional costs; everything you need can be found in the household of any family:
- cardboard boxes different sizes;
- glue gun or super glue;
- knife and scissors;
- pencils, felt-tip pens, markers;
- watercolor paints, gouache;
- sparkles and other decorations.

Helpful Tips:
— when creating a box, it is better to use corrugated cardboard;
— only adults should cut cardboard;
— for the stability of the product, it is better to take cardboard pipes;
— in a house for children, it is advisable to make a door that opens outward. This will provide more space for games;
- do not throw away small cardboard boxes.
Shelter for a cat
A cardboard house for cats can be built by the whole family in a very short amount of time. The first thing to do is to draw doors and windows using templates.

Start assembling the bottom of the box. Bend the opposite flaps, apply glue to them and fold the remaining flaps on top. Press them together until the glue dries. At the top end of the box, cut off two wide flaps. Next, cut half of the remaining sash and bend it. Do the same with the second whole sash. Secure them with glue in this position.

The next stage is creating the roof. On the top of the second box, on the small flap, draw lines from the center of the top to bottom corners. Do the same with the second flap. Then cut out one large flap. Cut the edge along the first drawn line and fold the second one. Repeat the same steps with the second leaf.

At the bottom of the second box, cut off the wide flaps, and from the first smaller one, cut off exactly half so that when gluing the two boxes there is a hole. Glue the boxes together. Then take the first wide cut flap and glue it to the bottom of the second tier to strengthen it.
The second box will be used to make the roof. To do this, cut a piece measuring 45 by 115 centimeters. Fold it in half along the long side. Apply glue to the triangles of the small flaps on the top of the second box and glue them to the wide flap. Apply glue on top and glue only the first side of the roof so that the cat can look out from under it.
The house is ready!

Dollhouse
You can make this wonderful gift for children yourself from ordinary cardboard boxes.
The house will consist of two floors and two rooms. First, connect the boxes together. Glue another sheet on the bottom, side and sides thick cardboard. Strengthen the structure of the house with tape and let the glue dry.
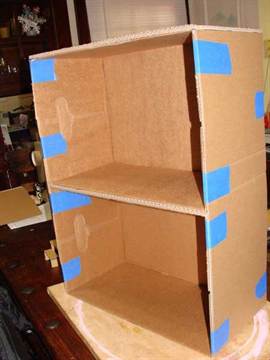
To make the structure more durable, strengthen the walls with thin cardboard.

The next stage is decorating the rooms and appearance house. Decorate the walls with applications made of colored paper, add mirrors, curtains to the windows, toy furniture. In order for the dolls to “climb” to the second floor, the house will need a staircase, which will consist of two parts.
Cut steps from thin paper for the end of the stairwell. Make the same cut out of cardboard. Select the desired width and height of the steps.

Cut out a couple more pieces from a thick sheet of cardboard. You will need a couple of rectangles for the steps and the bottom.

Glue the side parts of the ladder together and press them together with your hands to make them more dense.
You will need:
White cardboard
Sequins
Ruler
Latex primer (optional)
Glue stick
Scissors
Stationery knife
Decorations (tinsel, bells, balls).

1. To get started, download the template from THIS link or you can draw a house of similar dimensions yourself.
2. Cut out all the parts from paper and glue them to white cardboard using a glue stick or double-sided tape.
3. Cut out the pieces from cardboard. Use a utility knife to cut out doors, windows and other details.

4. Fold all the elements along the fold lines and glue everything together.
5. If desired, you can apply a primer to the paper house to prevent it from deforming.
6. Paint your house and after the paint has dried, start decorating it.
The house can be hung on the Christmas tree using a thread attached to the roof so that it hangs level, or you can simply place it on a flat surface to decorate the house.
DIY craft "House made of paper tubes"

You will need:
Thin paper (regular printed paper is fine)
Scissors
Pencil
Decorations.

1. Roll each sheet (or identical pieces of sheets) into a tube. It's better to use a pencil - it's easier to twist.
2. Draw windows and a door on paper or cardboard and cut them out.
3. Glue the tubes together as shown in the image (to make a hut).
4. Glue the windows and door to the hut.
5. Decorate the house to your liking.
Another option:


DIY Santa Claus house (master class)

You will need:
Cardboard box or
Scissors
Sandpaper
Stationery knife
Tassels
Polyurethane foam and gun (optional).
1. Prepare cardboard box and make a house out of it. You will need to cut the pieces and glue them together.
2. Use a utility knife to cut out the windows and door. You can draw them in advance with a simple pencil.

3. Paint the house or you can decorate it polyurethane foam. To do this, you need to apply foam in strips so that each strip is 1.5 cm wide. As it dries, the foam will swell, so it is better to leave 3-4 mm between the strips.
4. After you have covered the house with foam, leave it for 30 minutes to allow the foam to dry.


Making a stand for the house.
Cut out a rectangle from cardboard that should be larger than the base of the house.
Glue the house to the stand and decorate the perimeter of the stand with foam.

*Use of foam is optional. To imitate snow, you can use cotton wool, which should be glued with PVA glue.
*Can also be cut from paper or white cardboard snow slides, snowdrifts, snowman or Christmas tree and glue them to the base, bending bottom part and applying glue to it.

If you used foam, then after it dries, cut off the excess parts with a stationery knife and sand it with sandpaper.

Paint all the desired parts.

DIY cardboard house: gnome's home

You will need:
Cardboard cylinders from toilet paper
White paper
Colored paper
Black felt-tip pen
Glue stick
Hot glue or PVA glue
Sequins different colors(including white).
1. Cut one toilet paper cardboard cylinder in half, and the second and third so that you have two long and two short pieces. This way you will have houses of different sizes.

2. Cut white paper into strips 15 cm long and 2-3 cm wider than the height of the cylinder that you will wrap with this strip.

3. Cut out windows and doors from colored paper. Use a marker to draw door handles and window details.
4. Using a glue stick, glue the windows and doors to the white stripes.
5. Wrap the strips around the corresponding cylinders and secure them with glue. The extra part bend the paper inside the cylinder.

6. Make several cones from colored paper different color, glue the ends of the cones, and glue the cones themselves with PVA glue to the house cylinders.
*You can add a little glue to each roof of the house and sprinkle glitter on it to imitate fallen snow.


DIY paper house: paper New Year's village

You will need:
Corrugated cardboard (cardboard from regular packaging)
Stationery knife
Scissors
Ruler
Pencil
White acrylic paint and a brush
LED garland.

1. Prepare cardboard and use a pencil to draw several houses connected to each other on it. You can use a ruler. You will end up with a small village. Cut out a village from cardboard.


2. Bend the cut out piece like an accordion along the lines that connect the houses. To make even folds, place a ruler on the fold line and bend the cardboard.


3. Draw and cut out a Christmas tree on cardboard. Trace the tree onto another piece of cardboard and cut out a second tree. Make a cut on one tree from the top to halfway, and on the other from the bottom to halfway and connect both parts to get a 3-D tree.


4. Apply white paint on the roofs of houses and Christmas trees to imitate snow.
5. Place the village and Christmas tree on a white cloth or felt and place an LED garland next to it.
DIY house (photo)

Paper or white cardboard, on which you can print.
*You can draw a similar drawing yourself and cut it out.
Scissors
Stationery knife
Glue stick
Battery operated candles.
1. Print and cut out the house drawing. Cut out windows and doors with a utility knife.
2. To make the roof, cut a rectangle measuring 15x9 cm. Bend it in the middle.
3. Assemble and glue the house and glue the roof to it.
* You can make several houses to make a small village.
* You can also cut out Christmas trees from green cardboard.
4. Place a candle with batteries inside the house.
*You can decorate the house to your liking. Use markers, glitter with glue, cotton wool (snow), etc.
DIY box house

You will need:
Box (of cereal, pasta, for example)
Ruler
Pencil
Scissors
PVA glue
Clothespin or masking tape (if necessary).

1. Open the box completely and place it on the table.

2. Draw a straight line along the unfolded box 2.5 cm below the middle.

3. Make cuts from the original fold lines of the box to the line you drew (see image). The white dots indicate the places where the cuts need to be made.

4. Cut off those parts of the box where the X is written.

5. Turn the box over and apply glue to a small bend (see image).

6. Fold the box with the pattern facing inward and secure with glue.


7. Fold the opposite narrow sides to form a roof. Each part needs to be bent in half (see image).

8. Cut the wide sides so that they can be glued to the part of the roof that was formed in step 7. You need to cut with a margin so that this margin can be bent and glued.


