Drawings of wooden chairs. How to make carved furniture with your own hands - an overview of the necessary tools and material. Wooden chair: cutting and installation
- Chair Thread Examples
- Stages of manufacturing carved furniture
- How to collect chairs?
Carved furniture has always been popular, but its cost in stores is sometimes too high, especially when it comes to a complex pattern. Having some experience with natural wood, you can make an unusually beautiful and stylish furniture for your own home.
The ancient Greeks took inspiration from the Egyptian and Assyrian peoples, creating massive, heavy furniture, while during the Romans, the first elements of decorative sculpture appeared on pieces of furniture. Since ancient times, bas-relief has been used by artists to decorate buildings, statues, monuments and interiors with important scenes in their lives.
The most representative work of bas-relief from Roman times is Trajan's Column, which can be seen in episodes of impressive dynamism from the two Dacian wars. Individual furniture can vary greatly from one manufacturer to another, both in quality and models, but especially in the quality of prices. What determines the cost of church furniture? Pieces of church furniture can be made different ways. They may first be carved from oak, lime, maple, cherry, or other wood essences. The wood used dictates the price of ordinary furniture from the very beginning.
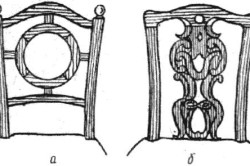
Compression of chair joints during gluing: a - clamps and a belt tie, 1 - a clamp, 2 - a belt tie, 3 - a piece of a bar or board, b - a rope.
Tables, chairs, armchairs, cabinets - all this is available for hand-made production. All you need is skill, imagination and patience, as wood carving is a long and painstaking process.
Oak is a more durable wood that is more time-consuming, but it has a higher degree of difficulty in making sculptures compared to, for example, lime, which is a more easily modeled material under the chisels of sculptors.
That's why it should be as strong as possible, but as strong as possible, but at the same time, it should have a nice look. All church furniture is only made to certain standards, but there are also items that can vary depending on the budget of each place of worship. If you want to use a certain company to order a fairy tale, you must make sure that they have at least one person among their employees who is very good at sculpture.
If there is no experience in doing such work, then you can start by making a small stool with carved legs. Gradually, you can switch to the manufacture of tables, chairs, carved panels for the room. It is necessary to do the work based on certain rules and requirements, choosing the type of thread that is most suitable.
Chair Thread Examples
Wood carving can be traditional and extraordinary. The choice of a specific method depends on whether there is work experience, what tools are available. Furniture decoration methods include:

Figure 1. Drawing of a stool.
- Through thread, which is considered one of the simplest. 2 methods are used: sawn thread, when the sections are cut out, and slotted, when through holes knocked out with chisels or chisels. If a relief ornament is used, then this variant of the through thread is called openwork.
- Flat thread. It has a flat background decorative elements like going deep into it. There are many subspecies of such carving. Popular contour, based on cutting grooves with a corner chisel, with knives. Staple carving is leaving a mark on the tree in the form of a bracket. The ornament is unusual. Geometric carving is performed in 2 stages. This is a tattoo of a drawing and its trimming, as a result, beautiful trihedral patterns are obtained, they are rhombuses, honeycombs, viteiki, radiances, chains and so on. Black-lacquer carving involves the use of a varnished surface as a background. On the finished background, patterns of various depths are cut through. The result is an unusual and contrasting carving, which gives the product an original look. appearance.
- Relief carving for furniture, which is often used, but it is necessary to have experience in such work. It features a flat-relief carving, that is, a kind of ornament with a selected background. The difference is that the background is made below the ornament, it is specially chosen for this with a chisel. Unusual Kudrinskaya carving depicting birds, animals, flowers, incredible beautiful garlands with leaves. Art originated thanks to the master Vasily Voronov from the village of Kudrino, from where its name came from.
- Sculptural carving is a separate variety, it is used extremely rarely for furniture, as it requires skill.
If there is no experience, then it is best to start with simple options gradually improving skills. In addition, for complex types of threads, special machines are used that allow processing volumetric parts. Back to index
Stages of manufacturing carved furniture
A do-it-yourself stool is an option for beginners. For work, it is necessary to prepare certain materials and tools:
Dependence of the quality of the structure on the design: a - fragile part due to a large number connections, b - a solid part of a solid carved board.
- Pine boards. They are the easiest to process, have a beautiful appearance and aroma of needles. You can take not only pine, but also birch boards, alder, linden, oak or elm is suitable for work.
- A set of carpentry tools, including a hammer, chisel, jigsaw, saw, drill.
- Screwdriver and a set of elements for fasteners.
- Stain for painting furniture of the selected color, instead of it you can use oil, paint. To protect the wood, a transparent glossy or matte varnish is used.
Before making a carved chair, you need to draw up a drawing, choose a pattern for carving, draw up a diagram of its implementation. If there is no experience, then it is better to start with simple patterns.
For the back, you can even use plywood sheets, which are easier to cut than wooden plank and their cost is lower.
An example of a scheme for a stool is shown in Fig. 1.
How to get started? The process of carving and making a chair includes the following steps:

- Start to make carved chairs and stools from wood processing, as the appearance of a piece of furniture, durability, and the absence of cracks on the surface will depend on this. Wood is taken in autumn or winter harvest so that the movement of juices in it is minimal. These blanks will not crack. If ready-made boards are used, they must be perfectly dried, free of large defects, such as falling knots, resin drips, cracks, and so on. The best materials pine, oak, birch, alder, linden, birch are considered for home furniture.
- For work, you need to choose only high-quality tools that are designed for carving. Today in stores you can buy ready-made kits, but their cost is quite high, and separately such tools can come out much cheaper. Some of them are in many homes. These are chisels, kosyachki, thicknesses, cranberries, corners, bevel, tsarazik, files, mallet, chased, cut, electric jigsaw, drill and others. It all depends on what kind of thread is required, what will be the level of difficulty.
- The boards are laid out on horizontal surface, start cutting. To do this, it is necessary to mark the surface of the boards in accordance with the drawing. It is advisable to put a designation on each element to make it easier to assemble finished parts. If there is a circular saw, then cutting is much easier. If it is not there, you can use an electric jigsaw. If you use thicker elements for furniture, then they will have to be glued with PVA.
- After all the parts are cut and glued, it is necessary to clean up. Beginners make the mistake of using sandpaper for sanding. In the manufacture wooden furniture At this stage, you need to use only looping. Then the finished carving blank is mounted on a workbench, a pattern is applied to the surface with a simple pencil and a stencil (if used). It is necessary to fix the part carefully, since during operation it is necessary to observe maximum accuracy and accuracy, otherwise the hands can be easily injured.
- When the markup is applied, you can start cutting. It all depends on which method will be used to work. For simple options, just cut holes various shapes using a jigsaw. If a complex volumetric thread is used, then special machines will be needed. Therefore, experts recommend starting with simple forms.
One has only to search for an unmistakable sign of wealth in the house, evidence of the wealth of the owner, and the furniture immediately comes into view. If a carved furniture made by hand, it keeps in itself not only the warmth of the hands of the master, but also the special light of his creative spirit, the artistic vigilance of the look. Few things can compare in beauty, intricacy and elegance with carved furniture. Harmony of lines, strict observance of proportions, magnetic originality immediately attract attention to it, regardless of where it is located: in the living room or in the kitchen.
In practice, carved furniture has many advantages over upholstered furniture. It is enough to wipe the wood with a sponge moistened with water or a damp cloth, and it shines as if it had just been varnished. Upholstered furniture behaves differently: it has the ability to quickly greasy and tear. Dust from it is not easy to remove even with a vacuum cleaner. During his life, a person may well wear out three sets upholstered furniture and then take it to the dacha.
And most importantly, perhaps, lies in the fact that excellent carved furniture can be made at home, using only those tools that are at hand. In the past, our cabinet makers, making carved components, worked with ordinary tools and achieved amazing results. The masters turned out magnificent masterpieces of real art! Now there is more possibilities to make quality carved furniture than it was in the past.
Preparatory stage of work
Before you start making carved furniture, you need to prepare high-quality material for it. It is best to stock up on wood from autumn to mid-January, when the juice does not move in the trunk. This is important so that the tree does not crack. The material intended for the manufacture of carved furniture must be thoroughly dried. Its best examples are wood from birch and oak, alder and linden, elm and walnut.
In the process of work, you will need a lot of the most diverse tools, but from the range that is available to everyone and is not difficult to practical application. The main list will not be long:
Need jigsaws and compasses
Cranberries and chisels
Mallet and carpenter's square
Rasps and thicknesser
Skewers and tsarazik
Files and malka
Corners, chasers and drill
It is easiest to cut the material into blanks on a circular saw and plan them on a planer or planer. In the event that very wide blanks are needed, it is necessary to use PVA glue, with which the planks are easily glued together, after which they can be planed and cleaned by hand. The workpieces are aligned during the scraping process, grind them with sandpaper no need. The future ornament is marked with an ordinary pencil after the workpiece is fixed on the workbench in the most convenient way for work.

Clean and varnish
As soon as the markup is over, they begin to cut out the details necessary for the further process of work. Larger elements are fixed in the machine, with small ones you can work on the table. When all the elements are cut out, assembly begins.
One of the common methods of fastening is screwing them with screws. To clean the finished products from fine dust, it is enough to wipe them twice with a break with a wet cloth and dry.
Three hours later, the product is sipped with nitro-lacquer with varnish, after which it is left for twenty-four hours to dry the coating. Needs more sanding and polishing. Four days will pass, it is necessary to polish the furniture with polish with alcohol. The treated surface will shine like a fifty-kopeck piece just released from the mint.
Carved furniture made with my own hands, is able to ennoble the interior of the room in such a way that other items purchased expensively in the store cannot do. The tradition of using carved ornaments in the manufacture of furniture goes back many centuries. Skill, gradually accumulating, gave rise to special artistic values, expressed in the appearance next to a person of elegant and beautiful products from wood. A bed with carving elements can transform the interior of a bedroom. The carved table brings new, elegant and attractive features to the kitchen design.

Wooden carved furniture has become a sign good taste, to the highest degree contributing to the formation of a cozy atmosphere in the home. In the manufacture of such products, it is not by chance that the most valuable species of wood are used. As a result, carved furniture has served faithfully for many generations, turning into a kind of family heirloom. In order for it to naturally fit into the interior, a well-thought-out decoration of the room and its specific style are required. You can find a worthy place for carved furniture in an eclectic interior.
Little box for big joy
Carved wooden furniture can be found in offices, living rooms, dining rooms and bedrooms. It matches the interior of any cottage or cottage. All of the above applies in full to the wooden box in which the housewives keep their most valuable things. The oval box, which looks like a toy tram, looks especially attractive. You can make it from birch.

The wood must be thoroughly dried beforehand. The manufacturing process can only be started after it is clear that the material is dry. First you need to process necessary boards on a planer, after making sure that they do not have defects and knots. The size of the blanks that is required is made on the surface gage. After that, it is necessary to saw off the existing material in width, trim in length. A circular saw allows you to do everything at a good level.
It is necessary to start gluing the box in such a way that this gluing is reliable and the boards do not crack at the seam. Glue must be used the most reliable. The process is best done in a carpenter's vise, using conventional spacers to help avoid damage to the box.
A wooden rectangle needs an even one, the angle from the inside is ninety degrees. This is where templates for the outer and inner oval come in handy.
It is best to sketch it first on paper, then transfer it to plywood sheet three millimeters thick and, using a jigsaw, cut out. If the wall of the box is one centimeter, then the outer oval should exceed the inner one by two centimeters in width and by the same number of centimeters in length. To cut out the inner oval, you also need a drawing from the template on both one and the other side for greater clarity when cutting out. The jigsaw allows you to do this neatly and accurately, so that the feature itself is preserved. From the inside, as a result of careful grinding, a perfectly clean oval comes out.
We glue the bottom and lid with the box in a vice; so as not to damage the parts, we use gaskets. Now it remains to adjust the parameters of the lid and bottom to the size of the box. It is necessary to draw an oval on them from the outside, carefully cut out and glue the legs. Grinding the box from the outside allows you to bring its appearance to the required condition. It is necessary to make a cut and grind the blank of the box and the lid: there should not be a gap between them.
Beauty is not superfluous
To begin the beauty of the box, it is necessary on its lid with grinding machine make a neat bevel, gradually, slowly, adhering to the inner pattern of the oval, carefully rotating the lid. Given the size of the product, it is better to put two small loops than one for the entire length of the box. After that, you can start carving on the box. Easiest to apply to wooden surface geometric carving. It can be drawn with maximum accuracy directly on the box and then cut out.

Patterns, which are a necessary addition, must first be drawn, then transferred to the product through a carbon paper. A bright thin spiral left by burning will look good on the edges of the lid and base. Varnishing the box can be started with nitro varnish, let it dry, treat the entire surface with fine-grained sandpaper and repeat the process twice, using oil varnish. It remains to glue the product from the inside with velvet, applying a layer of glue only to the bottom and walls. The beauty is ready for everyone to see and admire.