How to make white cardboard for dolls. How to make cardboard furniture for dolls: patterns, instructions
Necessary materials:
- Thick cardboard (~ 1.5 mm)
- Thin cardboard
- Foamboard
- Wooden or plastic pin of suitable diameter
- Fleece / other dense material suitable for padding
- Textile
- Glue for cardboard
- Fabric glue (you can use regular glue stick)
- Scissors
- paper knife
- Ruler
- Pencil
From the translator:
Good afternoon!
I present to you a translated master class on making an upholstered chair in 1:12 scale. The author of this MK is Chris Compass, who lives in Illinois, USA. Hence, several features of MK - the presence of the names of some unfamiliar or inaccessible materials and the traditional (non-metric) system of measures. All dimensions in the original MK are given in inches, and for convenience, I translated them into centimeters we are used to, so most of the numbers are fractional.
As for the materials, I tried to find a description of all those that are not as well known in our country as in the country of the author, and offer their analogues or replacements.
1. Tacky glue - a water-based polymer emulsion glue, a fairly thick relative of PVA, it is difficult to buy it in Russia and neighboring countries. Fast setting and drying, non-marking, used on cardboard, paper, fabric and some plastics. I found glue Moment Joiner - I liked it. Also a kind of PVA, it dries quickly enough and sticks firmly together. Bonds cardboard, wood and fabric. Inexpensive.
2. Foamboard - looks like drywall, only between the cardboard layers is not gypsum, but polyurethane foam. Description .
It is sold in Russia, but not everywhere. I found a replacement for him, because. I could not buy in my city - various substrates for parquet and laminate. Only they are not so convenient to glue, because. they do not have a cardboard surface.
3. Thermolam Plus - a kind of lining fleece for warming clothes, making shoulder pads, lining the sleeves, also used for quilting (patchwork). There are many analogues. BUT! Do not use synthetic winterizer - it will break into layers when glued.
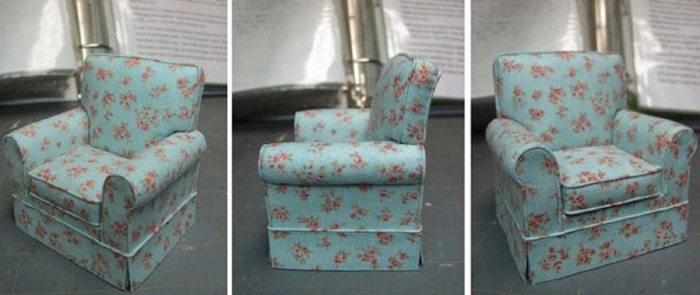
I started by typing “upholstered living room chairs” into the Google Image search bar. The result of the search was a lot of images. I was looking for a simple skirt design, no legs, no T-shaped pillows, simple lines. I know it's very boring, but you have to learn how to walk before you can run. You can make a huge number of changes to this chair once you learn how to make upholstered furniture.
And I found what I was looking for - along with the dimensions. The dimensions indicated are very important, and the more dimensions given, the easier it will be for you to work. The parameters of full-size furniture are not immortalized in stone; you are not required to convert dimensions to thumbnails exclusively. Make changespossible, and sometimes even necessary. So, I started to make a pattern, some sizes were arbitrary. And then I decided to give you a pattern and show you how the chair is made.
Converting the size of a full-size chair is a really great starting point. I recommend going to a furniture store with a measuring tape and taking a few standard measurements: back height of chairs of different styles, width, armrest width, seat width and depth, armrest height from the floor, seat cushion height from the floor, and others that I might forget. Take some photos if possible.
Also, do not forget that modern furniture is larger than furniture in the 19th century. Dollhouse rooms are smaller than the rooms we live in. Knowing this, we understand that the dimensions of the furniture will need to be adjusted accordingly.
This is the chair I used as a template for drawing up a pattern. I changed the back - I did not make a separate pillow, but a solid upholstery. With some experience, you can change the presented pattern - round the back, change the armrests, make them larger, make the base of the chair thinner, remove the "skirt" and attach the legs, you can increase the length of the chair to the size of the sofa, lengthen the seat and get a deck chair - in general , as always, have fun, develop my ideas and make them better.
Before we start, I'd like to talk about fabric. My opinion is that if a piece of furniture fails, it is because of the fabric. There are a lot of beautiful fabrics, but not many of them are suitable for miniatures. Do yourself a favor and start with regular cotton. I would even recommend making the first chair out of muslin just to understand the process itself. I want everything to work out for you and therefore I advise this material for the first chair. I always go with muslin or white fabric first, just to make sure everything is calculated and measured correctly.
And I'm not ashamed to say that several chairs ended up in the bin simply because not everything worked out the first time.
If you want to make a chair, then look at the cotton for the quilt, choose something with a floral pattern, but not a fabric whose parts of the pattern will have to be combined. Keep in mind the size of the doll's hand 1:12 for comparison with the largest flower present in the picture. Take a sample of the chair with you so that you can attach the fabric to it and see how it will look as upholstery. Try to avoid fabric stores for the time being, because you may fall in love with material that is "The Right Thing!", but it can be difficult to work with. Adhesive incompatibility, loose edge, too thick are just a few of the problems that can be encountered. Let's leave that for later.
I may confuse you with a few more things, but I think you'll like it better if I finally start building.
Here are the details of the chair. For you, I wrote a lot of information on them. I print patterns on cardboard and store them in zip bags with the name of the pattern.
First we will make the base for the seat. I used Tacky glue to hold the parts of the chair together.
Cut out 0.5 cm thick foam board into 4 rectangles measuring 6.8 X 5.7 cm. And 2 more rectangles of the same size from thick cardboard.
Glue all layers and make sure that the glue is evenly distributed over the entire surface and there is enough of it in the corners. I used a square to make sure all the pieces are even.
Make sure all parts are well glued together.
Transfer the front piece and back piece to thick cardboard. Check the alignment of the lines of both parts. We need it for the next step.
Cut out the details.
Glue the parts on the seat base to the sides 6.8 cm long. There should be 2 mm left on both sides - this is a margin for the thickness of the cardboard that will be glued to the sides of the chair.
From a wooden or plastic pin with a diameter of 1.3 cm, cut 2 pieces suitable for the size of the armrests. Use fixatives before the glue dries.
The base of the armrests is cut out of foam board - 4 pieces of the desired length and a width of 0.8 cm. Glue the pieces of foam board in pairs and glue them to the base of the chair under the pin.
This detail (1 in the photo above) is needed for pasting the armrest. On the part, I wrote "Trying on before gluing." This part should always be tried on before applying glue to it. We are not machines and each chair will be different from the previous one, each will have a slight difference.
So, bend the part, as shown in the photo, and attach it to the base of the armrest. Make the necessary changes to the part. Transfer to cardboard and cut out. Bend them and try them on again. Apply glue to the armrest base and pin.
If there were no base under the pin, but the glued cardboard could be very easily deformed during upholstery.
I did not make a pattern for the sidewall. Cut out a strip of cardboard from the base of the chair to the wooden pin. Attach the strip to the side of the chair and measure the desired length of the part. On one side, I marked 2 mm - the thickness of the cardboard. The sidewall piece must fit between the front and back pieces.
Your chair is ready.
Here you see the first sample. I used plain white fabric for the upholstery. It is as easy to work with as muslin.
To upholster the bottom of the chair, place it on cardboard and circle it. This part will need to be glued to the base of the chair. Mark the front on it and cut out the piece. For gluing fabric and cardboard, I use a glue stick.
Turn the part over and apply glue. Press the piece to the wrong side of the fabric. Cut off the corners.
Apply glue to the bottom of the chair and spread over the entire surface. Align the edges of the part and the chair and glue them together. Glue the loose edges of the fabric to the base of the chair.
For stuffing furniture I use Thermolam Plus ( Note. per.: hereinafter - fleece).
Measure the length of the armrest from the backrest and cut a strip of fleece the same width. From the strip cut a piece large enough to cover the armrest from the beginning of the seat to the joint with the sidewall under the pin.
Apply glue to the entire surface of the cardboard covering the armrest. Glue fleece.
Cut out 2 rectangles of fabric measuring 7 x 8.3 cm. On the wrong side, measure 0.6 cm from the edge of the long side, draw a line and make V-shaped notches to it.
Align this line with the line of the back and glue the fabric under the armrest. Cover the armrest with a cloth and glue the free edge of the cloth. Glue the fabric to the back of the armrest. Make a diagonal cut towards the corner of the chair base.
Make V-shaped notches around the circumference of the front of the armrest and glue the fabric.
Cut a strip of foam board with sides of 0.6 and 4.4 cm - this is the separator for the seat cushion. Glue the strip to the back. This will give the pillow a slope and make it look more comfortable.
Measure the length and height of the side of the chair. Transfer your measurements to cardboard and cut out the pieces.
Apply glue to them and stick to the wrong side of the fabric. Trim the corners as shown in the photo.
Apply glue to the bottom and top and fold over the excess fabric.
Apply glue to the base of the chair and glue the sidewall. Glue the excess fabric.
Transfer the front part of the chair to cardboard and cut it out. Glue it to the wrong side of the fabric. Cut the fabric as shown in the photo. Apply glue to the cardboard and wrap all fabric allowances except for the largest one (top middle). Glue the piece to the base of the chair. Glue the loose allowance to the seat base.
Try on the back cushion pattern. Make the necessary changes to the part. Cut out one piece of foam board. Try again.
I carefully bent the base of the back. This will help the chair look less awkward.
There will be 4 layers of fleece on the back. Cut out a piece of fleece the size of a seat cushion and cut off about 6mm from the edges.
The second layer follows the contour of the foam board base on all sides except the bottom. From below, it is also shorter by 6 mm.
The third layer is the same size as the base.
Alternately glue 3 layers to the base, starting with the smallest.
The fourth layer outlines coincides with the base, but in the upper part from the sides you need to make an allowance, which will be enough to bring the edges of the fleece to the cardboard base. Glue the 4th layer.
Cut out a rectangle of fabric 11.4 cm wide and 12.7 cm high.
Cut the fabric as shown in the photo.
Glue the fabric to the bottom of the pillow. Trim the corners as shown in the photo.
Glue the loose fabric along the line of the armrests. Don't worry if there isn't enough fabric to reach the cardboard base. Because the fabric is glued to the cut of the foam board, then the edge of the fabric will not be visible.
Apply glue to the top of the back and divider. Glue the pillow.
Right angles create a bit of a problem. I want to show you a way to hide them.
Glue the loose fabric to the back of the chair.
Fold the fabric as shown in the photo, pull hard. First fold the fabric from the sides, and then the top free edge. Inject some glue into the crease. Cut off the excess fabric and glue the top layer.
Here is what should happen. It already looks good.
Try on the pattern for the back of the chair. Make the necessary changes to the part. Cut out one piece of cardboard.
Glue it to the wrong side of the fabric. Cut the fabric as shown in the photo. Apply glue to the cardboard and wrap all the fabric allowances. Glue the piece to the chair.
Some may not like the look of the back with a visible seam. If you are among them, then it's time to make a side back.
Measure the width of the corner. Do not include the thickness of the back piece in the width. The side will be glued immediately next to it.
I measured the width of the back - 1 cm - and marked the strip on the wrong side of the fabric.
At the junction of the back and the top of the armrest, I applied a little glue and, using a toothpick, hid the beginning of the portico in the seam. Spread the glue evenly over the top and side surfaces of the back and glue the side. Make sure that the edge is glued over the entire area.
While the glue is still wet, you can stick on the edging or any other materials for finishing/decorating the edge.
Try on the seat cushion pattern. Make the necessary changes to the part. Cut out one piece of foam board. Try again.
The seat cushion will have 3 layers of fleece on top of the cardboard base and 1 underneath. Cut out the first layer, which will be 6mm smaller on each side than the pillow base. The second layer and base should be the same size.
Glue on the fleece, starting with the smallest piece.
Cut a strip of fleece the width of the seat cushion. One end of the strip must be glued to the bottom of the base, the other to the top, thus wrapping the pillow in front. Trim the edges of the fleece so that all layers are on the same level.
Cut a 6.4 x 8.9 cm rectangle from the fabric. Apply glue to the bottom of the pillow and glue the fabric allowances in front and back.
Apply glue to the front and back of the pillow and stick the fabric as if you were wrapping a gift.
Make a small "eye" at the base of the pillow by gluing the fabric together. This should only be done at the base.
Here is a photo of the pillow, front view. Here you can see the thickness and bulk of the fleece. The photo shows that I made the "ears" only from the bottom, and the fabric on top is located freely.
Apply glue as shown in the photo and form the corners of the pillow.
This is the side of the seat cushion. I cut off the glued corners of the fabric. The joint will be closed with a piping.
Measure the width of the seat corner. I got almost 1.3 cm. It is better if the side is a little narrower. I usually make it 1 cm wide. Make the rim the same way you did on the back.
Usually at this stage I glue the piping. Sorry, I forgot about him. You will see the piping in the photo of the finished chair. ( Note. per.- MK, which shows how to make edging, will be translated a little later. Link to its English version).
So, let's imagine that we already have an edge.
Cut a strip of cardboard 1.7 cm wide for the future "skirt".
Cut a rectangle from the strip that matches the length of the front plane of the chair. Glue it to the wrong side of the fabric. Cut the fabric as shown in the photo. Apply glue to the cardboard and wrap all the fabric allowances. Glue the part to the chair only along the top edge.
Repeat for the other three sides.
When all the details of the "skirt" are glued, you can attach the edging.
Here is a picture of the finished chair. I hope you try this.
And as usual,
Have fun, develop my ideas and improve them…………And just keep making miniatures!
Chris
Parents who have already been able to make a dollhouse on their own or bought it in a store, while spending a significant amount, are thinking about how to make furniture for dolls with their own hands. Toy furniture is not cheap, so why not save the family budget. You can easily make it with your own hands from improvised means.


Types of materials that are often used
To equip your daughter's dollhouse, you may need the materials that we most often throw out:
- cutting plywood sheets;
- matchboxes:
- plastic jars and boxes of cosmetics;
- shoe boxes;
- colored sponges for dishes;
- viscose napkins;
- plastic bottles;
- egg tablets;
- textile;
- foil
- wire and many other small things, the place of which we often determine in the trash can.


When choosing materials, everything will depend only on your imagination.
Plywood
Plywood and wood are the most popular and durable materials for making doll furniture. However, the process of creating interior items from them is laborious, you will need skills to work with them. But if you still make such furniture, it will serve the dolls for a very long time and will please your daughter for just as long.

In order to make miniature plywood furniture, you will need:
- plywood sheets;
- jigsaw;
- sandpaper;
- small cloves or self-tapping screws;
- glue;
- sheets of cardboard;
- pencil;
- ruler;
- varnish or acrylic paint;
- scissors;
- the attributes that you will use to decorate each type of furniture: fabric, beads, pieces of leather, and much more...

Common for all types of furniture stages of work:
- Think over or search the Internet for furniture design schemes that are suitable for printing.
- Draw on cardboard or use ready-made printouts of furniture details, cut them out.
- Attach the resulting templates to plywood sheets and circle.
- Cut out pieces of plywood with a jigsaw.
- Treat all parts with sandpaper, the surfaces will become smooth.
- We assemble the structure. We glue the parts or fasten them with self-tapping screws.
- We cover the finished item with paint or varnish and let dry.
- If necessary, we sheathe with textile elements and decorate.
So one piece of doll furniture was made.


Cardboard
Making cardboard dollhouse furniture is very easy. A child can also be involved in the manufacturing process. Cardboard is the most affordable material for work. You can use both sheets of cardboard, and take small cardboard boxes as a basis.


Necessary:
- cardboard or cardboard boxes;
- white sheets of paper;
- pencil;
- ruler;
- scissors;
- glue (if necessary);
- jewelry details.

Stages of work:
- We think over the details of the future piece of furniture and make templates on paper.
- We transfer the templates to cardboard.
- Cut out the details.
- We make the necessary cuts in the joints of the parts.
- Assembling a piece of furniture. We glue where necessary.
- We give a finished look, decorating the design.
You can decorate the doll house with a new piece of furniture.


matchboxes
From matchboxes you can design almost any piece of furniture. The advantage of such furniture will be drawers. It is enough to show your imagination and think over the image of future furniture in detail.


We will need:
- matchboxes, the quantity depends on what piece of furniture you will be making;
- glue;
- decorations for future furniture.

Stages of work:
- We prepare the required number of matchboxes.
- We glue them together in the sequence that is necessary for the interior detail.
- We decorate the resulting piece of furniture. Acrylic paint and varnish are suitable for coloring.
Your daughter's dolls will be happy with the new thing.

You can make a rack for matchbox dolls yourself by watching the following video.
plastic jars
Plastic jars can perfectly play the role of furniture in your dollhouse. Sometimes, you don't even need to do anything with them. In finished form, they can be used, for example, as a bath. The child will be able to really bathe his dolls, the water will not spill out of them anywhere. You can construct more complex interior items from plastic jars, lids from toothpaste tubes, and other little things. They can simply be glued together in the required sequence.


A master class on making a toilet bowl for dolls from a shampoo container, see the following video.
Wire
From a wire that bends easily, you can decorate the interior in the Provence style. Beds, the frame of which will resemble a forged product, will look very elegant. It will be possible to supplement with a forged candlestick, an unusual forged chandelier. Almost any interior detail can be made using a wire frame. Your imagination will guide you in the right direction.


Egg tablets
Using egg tablets, you can perfectly equip the rooms of the dollhouse. Both plastic tablets and cardboard ones are useful in the work. All that will be needed is to carefully consider the composition and cut out the necessary parts of the tablets.

The job may require:
- egg tablets;
- scissors;
- glue;
- acrylic paint;
- double sided tape;
- helium pen refills
and much more. Everything will depend on how your imagination plays out.

Master classes
In this section, you are offered some ideas for creating furniture for dolls with your own hands.
Bed with drawers for matchbox dolls
We will need:
- matchboxes;
- glue;
- pencil;
- scissors;
- a sheet of white cardboard;
- sheets of white paper;
- paints;
- beads;
- thin wire;
- decorative elements according to your taste.

Step-by-step instruction:
- Measure the height of the doll for which the bed is intended. The number of matchboxes that will be required depends on this.
- We glue the required number of boxes with the side walls to each other. This will be the base of our bed.
- If you want to make the bed taller, then you can glue peculiar legs in the form of additional boxes to the extreme boxes from below.
- We glue the base of the bed with white paper so that the sliding elements remain open.
- On cardboard, draw the desired shape of the headboard and cut it out.
- Glue the backs to the sides of the base.
- We paint the bed in the desired color.
- We attach beads to the sliding elements of the boxes at the base with the help of wire. These are the handles of our bed.
- We decorate, cover with bedding and you can put the doll to sleep.

In the next video you will see a master class on making a cardboard bed for a doll.
In the same style, you can arrange a bedside table.
We will need:
- 2-3 matchboxes;
- glue;
- White list;
- the same paint and decor elements that decorated the bed;

Step-by-step instruction:
- We glue the boxes together, placing them on top of each other with bases.
- We paste over with white paper, leaving the sliding elements open.
- We paint in the style of an already made bed.
- We fasten the beads to the boxes.
- We decorate.

See the next video for a master class on making a bedside table from matchboxes.
Sofa for plywood dolls
We will need:
- plywood;
- jigsaw;
- glue or small cloves;
- sandpaper;
- cardboard;
- pencil;
- ruler;
- varnish or acrylic paint;
- pieces of fabric;
- cotton wool

Step-by-step instruction:
- We decide on the design and dimensions of the future sofa. We make drawings for the back, seat, side backs on cardboard. We take into account that with the help of the back and side backs the sofa will become stable.
- Cut out.
- We apply the resulting templates to a sheet of plywood and circle.
- Using a jigsaw, we cut out the details of the sofa.
- If you want to make upholstered furniture, then at this stage we wrap every detail of the sofa with a thin layer of cotton wool and sheathe it with a cloth. If the sofa is not sheathed, it is necessary to process the details with sandpaper.
- We fasten the sofa parts to each other with glue. If you have a soft sofa, then you need to fix it with the help of small nails.
- We cover parts that are not sheathed with fabric with varnish or paint.
- We sew small pillows for the sofa.
- Decorate to your liking and give to the use of the doll.
Chairs can be made the same way.

You can see how to make a sofa for a doll with your own hands in the next video - a master class.
Floor lamp
For manufacturing you will need:
- thick cardboard;
- glue;
- pencil;
- lace stripes;
- empty core from a helium pen;
- thin wire;
- a small diameter lid (caps from jars of medicines, from ketchup are suitable)

We draw a cone blank on cardboard. Cut and glue it. Cut off the top of the cone. It turned out the base of the lampshade of the floor lamp. Wrap it with lace. We bend the wire in half and pass it through the rod. From above, we fasten the lampshade to the wire, from below to the lid - to give stability to the floor lamp. The lid can be decorated with a lace skirt. Instead of a rod, you can use beads as a stand by passing the wire through them. In this case, we also decorate the lampshade with beads.

Watch the video for a master class on making doll furniture from old boxes.
Chandelier
To make a chandelier, we need a small container. You can use measuring cups for medicines, disposable plastic piles, the simplest candles in a metal case.

To decorate the chandelier, you will need strips of lace, thin strips of satin ribbon. They need to glue the plastic base of the chandelier. The metal case can not even be decorated, you get the original chandelier. We attach an LED to the base of the container that we used, if you thought over a house with real lighting. We hang it from the ceiling. The method of fastening to the ceiling will depend on the materials from which the house is made.
Thus, you can make lamps in any room of your dollhouse.

dollhouse kitchen
For the manufacture of the kitchen will be convenient to use small boxes. If there are no such boxes, then it will be necessary to make them from cardboard. It is quite easy to do this. It will be convenient to use if the boxes are glued together, making a single structure.

If hanging cabinets are planned near the kitchen, then we glue a sheet of cardboard to the back wall of the cabinets, on which we paste these cabinets. You can strengthen the structure by gluing long flat sticks to the back of the cardboard sheet. In boxes it is necessary to cut through the doors of the lockers.
To decorate our kitchen, we use self-adhesive paper, or any other beautiful paper. We glue the cabinets, with the help of wire and beads we make handles for them. A faucet can be made from wire, mixer handles from small beads. The sink has a deep lid. We attach it to the tabletop. Stove burners can be made from buttons. You can decorate the space between the cabinets in the form of a tiled apron. To do this, find a suitable picture on the Internet and print it. Stick it on a sheet of cardboard on which the cabinets are fixed.

We arrange dishes and products. The kitchen is ready, you can send the hostess to cook!
You can see a master class on making a kitchen in the next video.
dressing table for doll
We will need:
- cardboard box;
- a sheet of cardboard;
- foil;
- a small piece of ceiling plinth;
- glue;
- pencil;
- colored, wrapping or self-adhesive paper.

Stages of work:
- We measure the required height of the table on the box so that the doll is comfortable to sit at it.
- We cut off the excess.
- The base of the table is the bottom of the box. From the part that is located below, cut out the legs.
- Paste the resulting table with self-adhesive paper
- On cardboard, draw the desired shape of the mirror and cut it out. We stick the foil as a mirror surface.
- We decorate the frame of the mirror with the help of thin strips of the ceiling plinth.
- Glue the mirror to the table.
We make a dressing table chair in the same way. Change only the required height. Instead of a mirror surface, we make the back of a chair.

Almost any piece of furniture can be made from improvised means. This requires free time, your imagination and desire. Your girl will be very happy with the new clothes of the dollhouse!


The process of making a dressing table for dolls from matchboxes and cardboard, see the following video.
How to make a dining table for dolls, see the following video.
A huge range of toy furniture is offered by manufacturers from all over the world. Models of different colors, made of combined materials, always attract a child's eye. The cost of such things is often high, so the idea of \u200b\u200bself-manufacturing furniture from cardboard comes to mind. Do-it-yourself items made from improvised material will bring much more aesthetic pleasure and emotions in the process of creativity than the usual options from the store.
Materials for cardboard doll furniture: everything is suitable for work
Probably, as a child, each person tried to help his parents when they were doing interesting things. When making cardboard doll furniture, any kid will be interested in the process, so this activity will captivate the child for a long time. A good bonus of self-construction of furniture - for this, improvised means available in the house are suitable.
Key Materials: Diversity of Ideas
To create furniture for toys, it is not at all necessary to go to a needlework store. For the manufacture of chests of drawers, chairs and tables, it is not forbidden to use matchboxes, and shoeboxes will be a good material for beds and sofas. Plastic bottles will allow you to create original chairs, and foam plastic, polymer clay and plasticine are ideal for making all your fantasies come true.

Cardboard is the main raw material
It is a fundamental material intended for children's creativity. With the help of cardboard, you can come up with great pieces of furniture for dolls using diagrams, drawings and instructions. Since it is sold in A4 sheets, it can be used to make reamers for sofas, beds and other furniture models.
Most of the schemes can be downloaded on the network, but it is better to draw it yourself. To do this, just measure the doll (for example, Barbie) and draw the appropriate scan. Then the scheme is cut out, bent along the marked lines and glued. Acrylic is suitable for finishing cardboard (if it is not in the house, then you can use gouache - it can always be found in the arsenal of schoolchildren).

Glue - a fastening element of furniture
Glue will be a good material for gluing furniture elements. Today in stationery stores you can find the following types:
- gel;
- pencil.
The first option is suitable for fastening sheets of plain paper. It dries for a long time, leaves wet marks after application, but is considered the most common and can always be found at home. Gel glue is available in jars with a spout from which it is convenient to apply the substance. It is aimed at gluing solid materials - cardboard, paper, fabric. Perfect for work when creating furniture in a dollhouse. Glue stick is only suitable for paper thin parts.

Paper - material for easy solutions
The main difference between furniture made of paper is its light weight and low stability. It will not be possible to put additional accessories on such surfaces during the game, but pieces of paper are considered the most accessible and simple material for creativity. From a simple white sheet, you can make a dressing table for Barbie, and also use this material to create decor in the doll's room.

The paper lends itself well to gouache staining. There is one small remark: after gluing the parts with PVA glue, you must wait until it dries, only after that paint the surfaces with the compound. It is easy to work with paper blanks, because it is convenient to cut and glue them together, they dry quickly, but wear out with frequent use.

Scotch will help to realize fantasies
In those places where PVA glue is powerless, universal adhesive tape comes to the rescue - adhesive tape. In this case, furniture assembly is faster and more accurate, because you do not need to put the parts under a press so that the glue grabs. Using adhesive tape, you can make original furniture models that were invented by the child in the drawing.
Adhesive tape is considered safe for children, it is non-toxic and has high strength characteristics, resistant to aggressive environments. The only negative is that the adhesive tape cannot be painted, since the paint will not fall on it.

Other materials
In addition to the listed tools for creativity and the production of doll furniture, the following waste materials are also suitable:
- packs of cigarettes. To use such material, you must first dry it (to weather the tobacco smell);
- boxes from baby powder or perfume - they are perfect for creating lockers, cabinets, bathtubs for dolls;
- pieces of plywood or chipboard - come in handy to make the base for furniture, as well as to make a frame for the house;
- scraps of fabric, leather, gauze - suitable for curtains and interior decoration of the living room, bedroom of dolls;
- plastic or eggs from Kinder Surprise;
- threads, laces, old belts;
- nail polishes, beads and buttons are suitable as a finishing material.

If you have minimal skills in drawing, wood carving or sewing, then you can create creative and individual pieces of furniture with your child.

Auxiliary materials
Do-it-yourself furniture for Barbie dolls from improvised materials is often made from cardboard or unnecessary old boxes. But many parents forget that there are auxiliary tools that will help decorate the surface of finished products and give them an attractive appearance.

Wire: how to make wrought iron furniture
The technology of working with wire has been known for a long time (for example, in the Middle Ages, wonderful jewelry for women was made from flattened copper thread). This idea can be used in the manufacture of furniture for dolls. Several variants:
- garden swing for Barbie - made with a long piece of wire and pliers;
- chairs made of wire and caps from bottled beer - look great in the princess's house;
- bed - a frame for a berth is made of wire;
- decorative stands for flowers in the house.
Working with wire is easy: you can create several dozen beautiful hangers from it in half an hour, just using pliers.

Ice cream sticks
Among children, not only cardboard furniture, but also wooden furniture is in demand. If the house does not have sheets of plywood, then ice cream sticks are well suited. Shelves, tables, chairs, bunk beds, garden furniture can be made from this material. All models look natural and stylish, and to improve the aesthetics of the sticks, you can paint them in different colors. A good idea would be to build a ladder for the dolls.

Plastic jars and lids
A common option for creativity are jars and lids from them. Plastic products have a round shape, so it is convenient to build a toilet bowl for baby dolls from them:
- For work you will need cardboard, a jar of yogurt, a box of toothpaste.
- A toilet seat is cut out of cardboard.
- The box of pasta is cut in half - this will be an imitation of a tank.
- A jar of yogurt will serve as a toilet bowl.
You can leave the finished product white or continue your creativity and glue the “seat”, making it from a soft material.

Wallpaper and newspapers
Ideal for finishing the rooms of the house or the furniture itself. Colored and bright motifs will appeal to the child. Having leftover wallpaper in the house after repair, you can completely recreate your child's room in the dollhouse. With the help of newspapers, it is easy to make a modern style of the interior, paste over some pieces of furniture with them.

How to make gorgeous furniture for dolls with your own hands: a selection of ideas with step-by-step instructions
Making toy furniture out of cardboard is a fast process, but sometimes it can be labor intensive. In order not to burden yourself with lengthy attempts to create magnificent furniture from store materials, you should use the tools at hand - working with them is easy, safe and fast.

Universal chest of drawers from a matchbox: a simple master class
If previously there was no experience in the skill of creating layouts of various crafts, then you can start your creative activity with a child with a matchbox. To make a chest of drawers of a universal type, you will need 4 containers from matches, glue, as well as finishing materials. Process step by step:
- Boxes are freed from matches, cleaned of excess dust.
- Next, you need to properly glue the blanks: they are stacked on top of each other in a row or 2 boxes in a line.
- When the product is glued, it is left to dry.
- A dried chest of drawers for dolls is decorated: colored paper or the remains of wallpaper are glued to the surface.

To make the model as realistic as possible, you can put small dots on the "boxes". If you paint each element in a different color, you get a cheerful and bright piece of furniture.


Children love to repeat a lot of things after adults, so they will probably want to put a fireplace in Barbie's cozy house. To recreate the design of the product, you can view photos of real devices, and then proceed to work. For the pattern, you will need a cardboard box, as well as foam tiles, glue and paints. The step by step process looks like this:
- On the box, draw a window for the fireplace and cut it out with a clerical knife.
- A home fireplace for dolls can be angular or rectangular - it all depends on your imagination, so you need to think over the scheme in advance.
- From the ceiling gypsum tiles, you need to cut out "bricks" to display the real masonry. Cutting can take place with the child.
- The resulting rectangles are glued to the surface of the fireplace.
- The final step will be painting the product in the desired color.
To fix the paint layer, the fireplace can be varnished - an odorless acrylic varnish is suitable for this.


The easiest way to create a cabinet is to use a finished box, where parts of it will serve as doors. But this option is too light and inconspicuous, so you can make a doll cabinet out of cardboard with your own hands. Creation process step by step:
- To begin with, it’s tedious to calculate the size of the model and figure out what will be stored in it. To do this, it is enough to estimate the number of doll clothes.
- On the printer, print a scan of the cabinet body, cut it out and glue it.
- Use scissors to decorate the doors for the product, as well as the shelves inward in size.
- Attach doors and shelves with adhesive tape.
- You can decorate the cabinet under a tree with the help of wallpaper.

In order for the doll’s clothes to be beautifully hung in the closet, you can attach the wire inside the product and place the hangers made in advance there.


Egg pads
Furniture for dolls from improvised materials is made quickly and easily: in one evening you can build several sets of bedroom sets. A good idea is to make ottomans in the doll's bedroom from egg tablets. Such a product can be made by a child on their own. Step by step process:
- Volumetric tablets are cut into cells.
- Cut off the top so that the cell is stable when turned upside down.
- The pouffe is ready. It remains only to cover it with paint and make it varnished.
By the same principle, you can create a small chair or stool. The high chair requires a backrest, which is cut from the same egg plate and attached with glue.
From the group of matchboxes, not only dressers for dolls are made, but also beautiful roomy chairs. The easiest option is to connect 2 boxes together in the shape of the letter "G" - the chair is ready. But such a model is too primitive, and there is a step-by-step master class to create a more believable product:
- For work you need 4 matchboxes, glue, finishing materials.
- The model template is simple: one of the boxes is placed vertically, a horizontally located matchbox is glued to the bottom. Two boxes are glued on the sides, arranged with ribs (these will be the armrests).
Ready! To make the chair multi-colored, you can stick paper and paint the surface. If you need a high product, then it is better to first calculate the number of boxes to increase the back. On the finished model, the doll can watch TV or just relax. One of the conditions is that the seat of the chair should be the same size as the doll.


A floor lamp for a toy can be made from cardboard or paper. You will also need a Chupa Chups stick and a stand (you can use a bottle cap instead). A cone is cut out of cardboard, wrapping it in the form of a cap. Cut off the top - it turns out a lampshade. It is covered with white or colored lace.
Another option is origami. According to the scheme, it is necessary to fold the product, but it will be difficult to decorate it. It is better to immediately take colored cardboard. Such a floor lamp can be placed in the kitchen, wardrobe or living room of the dollhouse.


Cardboard bed
If there is thick corrugated cardboard left in the house, you can safely use it to make a doll bed. It will take 5 parts, each of which is cut in a certain amount. An incision is made on each element - this is a groove into which another part will be inserted.
The bed can be rectangular or square, it consists of a berth, a headboard, a lower plank and protective bases on the sides. It is better to paint the finished product traditionally or leave it like that, imitating the appearance of a tree. A homemade bedside table is placed near the bed, and bed linen and pillows are also sewn.

Newspapers are used not only for decoration, but also for the creation of new products. One of these innovations is the technique of twisting newspaper tubes and then making objects out of them. The correct creation of the tubes will allow you to get solid blanks for the future wardrobe.
To make doll furniture with your own hands from cardboard or other materials, you need to choose them correctly. In this case, magazine sheets and thick pages are best suited. The work process is as follows:
- A tube is twisted from each newspaper page, the tip is moistened with glue.
- When a sufficient amount of material is ready, it is glued together in the form of a future cabinet.
- Glossy magazine pages can also be used, but after gluing they must be covered with paint.
- The inside of the cabinet is decorated with hangers and holders.
In this master class, it is better to work with hot glue: it securely fixes the workpieces and dries quickly.


There are several options for making a coffee table, examples will help you better understand the technique of furniture production:
- cardboard and a jar lid. The latter has a gloss, so it will serve as a countertop. The legs are made of cardboard: three elements are cut out and glued under the lid;
- bottle and plastic cap. Before you make a toy table out of cardboard, you need to choose the right bottle (it should be small). The top and bottom of the product are cut off, leaving a hollow cylinder. A lid is glued on top - a hi-tech table is ready;
- discs and plugs. In the latter, you need to make slots into which you need to insert a CD. Older children may well create such a model on their own.
The advantage of home-made furniture is that every year you can come up with new products, and it will not be a pity to send the old ones for recycling. After all, they were made from waste material.

To make a good and reliable sofa-type sofa, you will need the skill of working with wood panels, a screwdriver and hinges. First, the frame of the sofa is assembled, an additional part is fixed to it, which will be laid out forward. If there are no such materials at home, you can use improvised means:
- Thick cardboard is cut into blanks according to the schemes and glued together.
- The resulting parts are combined into a single product.
- The place of the fold is best treated with additional material, for example, roll-type polyethylene foam.
To open the sofa, you need to sew a ribbon loop to it. The finished model can be aged with PVA glue, varnish and a hair dryer.

Other do-it-yourself furniture ideas for dolls
Despite the large list of proposed furniture options, there are several more interesting and easy-to-implement ideas:
- microwave. The possibility of constructing a cardboard box immediately comes to mind, but everything is simple here - an ordinary children's sharpener is suitable for a microwave. A child of the third grade in a pencil case will find such an object that will only be ennobled externally;
- fridge. It is done simply: a blank is cut out of cardboard or paper, filled with cardboard shelves. On the door you can hang plastic pockets for products;
- washing machine. For work, you need a box of cookies, a glass of yogurt. A round slot is made in the box, a glass is inserted - this is the drum of the machine. It remains to decorate and draw buttons: such a technique can be placed in the bathroom of a toy house;
- dressing table. The simplest product for an evening dress can be made from matchboxes. Several parts are glued in height, then a mirror is arranged. A piece of foil enclosed in cardboard is suitable for him. On the table, you can put an imitation of a box, as well as make carved elements on the sides of paper;
- bath. It is easy to equip a restroom or a bathroom. Earlier it was told how to make a toilet for a doll, and the bathroom is done even faster. No stencils and schemes are needed here. It is enough to take an old oblong container for food - it will serve as a bathroom. As legs, you can use plastic beads in the form of a rhombus.
In order for the atmosphere of the dollhouse to be real, it is advisable to arrange flowers in the rooms, hang pictures, and make rugs from fabric.
Cardboard furniture is a great solution for children whose imagination knows no bounds. Original, compact and bright furnishings will allow you to create improvised home remedies. The combination of several materials will make the furniture functional and reliable.
The desire of the child to play with dolls must be encouraged and supported. Do-it-yourself doll furniture will be an excellent tool for rapprochement between the older and younger generations. A variety of furnishings that copy an adult interior contribute to the development of a child's imagination and logical thinking. Dare, create, and the dollhouse will turn into a small masterpiece.
Variety of doll furniture
Doll furniture sets amaze with their variety and elegance. It is easiest to buy a ready-made kit, but it is much more interesting to make miniature furniture for dolls with your own hands. In addition to the standard interior elements in the form of a bed, chair and table, almost any item can be made from improvised materials. The main thing is to be smart and allocate some free time. Kitchen and bedroom sets are most often found in a set for playing with dolls. But the child will be delighted with the desk, floor lamp and bath.
The complexity of making doll furniture is determined by the material chosen as the basis. Dimensions must match the height of the doll. It is very easy for little babies to make furniture based on matchboxes. The hostess of the dolls herself is often involved in the process. For larger copies, cardboard and plywood are chosen.

The materials at hand, which are often used in the manufacture of do-it-yourself doll furniture, are presented in the following list:
- Plywood sheets. The most durable option for decorating doll furniture. Processing plywood sheets is not for everyone and often requires the possession of a jigsaw. But the doll furniture, which came out from under the hands of the master, is striking in its sophistication.
- Thick cardboard. It is much easier to process, a school-age child can work with it on their own without the help of adults. Often, ready-made cardboard boxes are selected as the basis for doll furniture.
- Match boxes. Optimal for a miniature dollhouse, where the main resident is small.
- Plastic containers for cosmetics. Do not rush to throw away an elegant jar after the cream and the container from under the shampoo. Perhaps they will be transformed into an elegant ottoman or a comfortable doll chair. Even a small plastic bottle can become the basis for a chair. The following video demonstrates how to make a comfortable toilet.
- Viscose napkins and sponges for dishes. They are used to decorate the soft part of doll furniture.
- Egg container, wire, beads, skewers. This list is endless. The choice of additional elements depends on the complexity of the puppet design and the desired decor.
Exclusive sets of furniture for dolls, decorated by wood craftsmen, are shown in the photo:


Chair manufacturing options
There are several ways to make a comfortable doll chair. The choice of material depends on the dimensions of the doll, whether you have a desire to involve a child or you will arrange everything with your own hands. The presented options differ in complexity, so everyone will be able to choose the most suitable piece of furniture for themselves.
Model 1
For work you will need:
- cardboard 1.0-1.5 mm thick;
- foam board about 5 mm thick, it can be replaced by 3 mm corrugated cardboard;
- thick white paper;
- tube Ø 15-25 mm, for doll furniture a thread tube or marker body is suitable;
- thin foam rubber or fleece;
- upholstery fabric;
- glue, scissors, pencil, ruler.
Algorithm for making a doll chair with your own hands:


Comment! The external aesthetics of the doll chair and any other furniture depends on the finish. Therefore, take care of a beautiful upholstery material.
Cut out the upholstery elements according to the previously prepared drawing, only make allowances of 15 mm. Before making out the back, it is initially closed on one side with foam rubber. This element can be made removable or stationary. Making a pillow for doll furniture with your own hands is even easier, the steps repeat the algorithm with the back.


The work, of course, is painstaking, but the result deserves admiration.
Model 2
You can make a chair for a doll even simpler. The base is a small cardboard box. Based on the size of the base, a foam rubber blank is cut out, which will simultaneously be the back and armrests. Tape will help secure it to the seat. The chair is decorated with upholstery fabric, complemented by a miniature pillow. If you take the box not square, but oblong, a chic doll sofa will come out.

Model 3
A plastic bottle can become a frame for furniture. After cutting the workpiece, it is sheathed with a cloth. For stability, the inside is filled with something heavy. In order for the furniture to correspond to the ideas about the chair, a pillow and a soft seat are prepared. You can make a small chair from a 0.5 liter bottle or take a larger container, then it will be something like a throne.

If there is a desire to make a puppet rocking chair, we offer a diagram of an interesting design for study. You will need experience with a jigsaw, reliable and durable furniture is made of plywood.


Bed design methods
Playing with dolls often turns into a real spectacle when the beloved Barbie is already a mother herself, and her little child needs a crib. Matchboxes with cardboard are an affordable and free material to make a doll bed. The whole process consists of three steps:
- glue 2 boxes;
- backs are cut out of cardboard;
- for beauty, doll furniture is pasted over with colored paper.
Instead of cardboard, legs can be made from ice cream sticks.
It is not much more difficult to make a bed with drawers. To do this, matchboxes are glued in 2 layers. From the side that will be used as a box, beads are glued or fastened with wire. After connecting with the backs, the furniture is decorated with paper. Additionally, it is desirable to sew bedding.


A small bed can be made from cardboard sheets:
- Initially, they print the proposed drawing or draw it on their own.
- Details are cut out of paper, then transferred to cardboard or plywood.
- Assemble an interesting design of doll furniture.
Comment! If plywood is used in the work, the edges of the blanks are carefully polished so that the child does not get hurt during the game.
Sofa, chest of drawers and desk
Plywood is the most suitable material to make doll furniture. Like a bed, you can make an exclusive doll sofa out of plywood.
Manufacturing master class:
- We draw up a drawing of the future sofa, the diagram includes a seat, armrests, backrest. It is important to consider that the side elements and the backrest determine the stability of the furniture.
- The drawing on paper is transferred to plywood.
- Details are cut with an electric jigsaw.
- A doll sofa is a soft part of the furniture, so the blanks are wrapped with thin foam rubber and decorated with upholstery fabric.
- Connect individual elements of doll furniture with carnations.
The order of operations can be slightly changed. First, the elements of the plywood puppet sofa are fixed together with Moment glue. The finished sofa is varnished and small soft pillows are sewn onto it.

You can make a sofa according to the principle of an armchair, model 1. If you try hard, you will get a masterpiece that is close to the model in the photo:

It is somewhat easier to make a chest of drawers from matchboxes. The main stages of the creative process:
- Matchboxes are coated inside and out with paint.
- When the blanks are dry, they are glued together in a vertical order.
- The contour of doll furniture is sheathed with braid. It will be beautiful and give the chest of drawers strength.
- Beads attached to the bottom act as legs.
- It is also desirable to equip each drawer with beads for ease of use of doll furniture.
Photo collage demonstrates the process of making do-it-yourself doll furniture and the result.

Matchboxes are a kind of constructor, extremely affordable and with an unlimited resource of crafts. A desk or desk is another example of doll furniture that is easy for a child to make on their own.
Key moments of creativity:
- three matchboxes are fixed vertically to each other;
- pre-future boxes are equipped with beads on a wire;
- the function of the second leg of the table can be performed by a matchbox without insides;
- both elements of doll furniture (fastened boxes and a leg) are connected with cardboard using glue;
- the workpiece is painted or pasted over with colored paper.
An approximate result of the work is shown in the photo:

An easy way to make kitchen furniture
First, consider a simple option, how to make kitchen cabinets from matchboxes. The lower part is formed from 9 elements according to the principle of a chest of drawers. The function of the handles can be performed by staples from the stapler. For hanging cabinets 3, the box is fixed on a cardboard wall and cut in the middle to make doors. Of course, it is better to paste over the boxes with paper or paint in advance. Naturally, the entourage plays a big role:
- Complete your dollhouse kitchen with mini lights.
- Decorate the window with a lace curtain.
- You can make a sink out of foil.
Doll furniture will sparkle with new colors. You can complement the kitchen set with a table and chairs made of cardboard.


We will not describe complex options on how to make doll furniture for the kitchen out of plywood. Imagine only the result of the painstaking work of the master:


Floor lamp and chandelier
To make a cute doll floor lamp, you will need quite a bit:
- The basis of the lampshade can be thick cardboard or suitable caps from perfumes.
- rod from the handle;
- lace;
- wire.
If there is no lid, we prepare the base for the lampshade from thick cardboard. We glue the workpiece with lace. The wire is passed through the rod. A lampshade is fixed on the upper edge of the rod, and a stand is fixed on the lower edge.

Comment! In order for the floor lamp to gain stability, the stand must be wider than the lampshade and heavy.
An interesting and easy way to make a floor lamp in addition to doll furniture is presented in the video:
Similarly, you can make a chandelier for a dollhouse. The basis of the lampshade is a small container. Decorative candle molds fit perfectly. The chandelier will be attached to the wire. The lampshade is decorated with lace. If you involve dad in creativity, you can make a luminous chandelier. To do this, an LED is fixed inside the lampshade.


DIY furniture for dolls can be simple and intricate designs. When choosing material for crafts, they are guided by their own experience and the availability of free time. Crafts can be done by adults or in tandem with children, it will be much more interesting. A school-age child is able to cope with the task of making doll furniture from matchboxes or cardboard on their own.
Do-it-yourself furniture for dolls - what could be better for the joint creativity of parents and a child? On the one hand, this is a great way to save the family budget, because buying miniature sofas and doll lockers in specialized stores are not so cheap. Well, on the other hand, needlework classes help to instill in your girl accuracy, perseverance, and creative skills. So, let's figure out how to create doll furniture with your own hands and make it truly original, because you will not find exactly the same furniture set anywhere else!
Making furniture for dolls with your own hands: what tools will come in handy?
If you want to please your baby with a new thing for the doll's interior house, do not rush to get rid of the following:
- matchboxes (of which it is easy to build real drawers for dressing tables and cabinets)
- cardboard boxes for shoes, cosmetics and small household appliances;
- plastic bottles;
- bright sponges for washing dishes and viscose napkins for cleaning;
- plywood;
- flaps and scraps of fabric and leather;
- flexible wire and foil;
- plastic food containers, egg molds;
- threads for knitting and other little things that will be useful in creating doll furniture.
Advice! In addition, polymer clay, beads, beads, rhinestones and other decor of your choice may come in handy: after all, the brighter and more elegant the interior of the doll’s home is, the better.
Workshops on creating furniture for dolls: detailed instructions for your creativity
Any mother knows that her daughter's best friend is a doll. And this means that you will have to make every effort to create a decent home for your princess's favorite toy. And you can't do without furniture filling. We offer you several master classes that will tell you how to make furniture for Barbie, Monster High dolls, Winx dolls, baby dolls and so on with your own hands, and you just have to choose the appropriate option.
Do-it-yourself furniture for dolls from boxes
We offer you two simple options for making miniature furniture from cardboard boxes. We will make a dressing table and chest of drawers.
For the manufacture of dressing table we will need:
- a small cardboard box (hair dye packaging is suitable);
- scissors or stationery knife;
- Ruler and pencil;
- foil;
- glue;
- white or colored paper for pasting the finished product.
To begin with, determine how high the future table will be so that the doll is comfortable in front of it. If you are making furniture for a standard height doll (Barbie, Monster High, Winx, etc.), this may be 6-8 cm. Cut the box at this height.
Cut off a flat piece of cardboard from the rest of the box (a blank for a mirror), the width of which matches the width of the table and has a height of 15-16 cm. Lubricate it with glue and attach it to the base.
Decorate the upper edge of the future mirror with figured openwork patterns or simply make it rounded.
Paste a table with a mirror with white or colored paper.
Decorate the workpiece with painted doors and drawers (they will not open and slide out). You can also decorate the walls of the table and the place for the mirror with any patterns.
The final touch: you need to cut out the foil " mirror” and handles for drawers and doors, and stick them on the places provided for this.
Advice! Complete the dressing table with cardboard crib made in the same style (for example, you can decorate its headboard with patterns similar to the decor of a table and a mirror). This will help to design the interior of the doll's bedroom in a single way.
Connect the matchboxes together with glue so that their drawers slide out. When the furniture is ready, cover it with decorative paper.
As you can see, making furniture for dolls with your own hands from cardboard is very easy, and at the same time it looks just as beautiful as the purchased one.
Do-it-yourself plywood furniture for dolls
We offer you a simple master class on making a round coffee table for a doll.
For its manufacture you will need:
- plywood;
- a device for cutting plywood (for example, a jigsaw);
- glue;
- varnish or acrylic paint.
First you need to cut out two identical round elements (table surface and shelf), as well as legs and racks for the shelf. Next, connect them together with glue, as shown in the diagrams given by us, and cover with varnish or paint.
Do-it-yourself wooden doll furniture
We suggest you make a puppet sofa from wood and fabric. For this we need the following:
- flat wooden planks about 1 cm thick;
- wood cutting tool;
- glue;
- wrapping fabric.
Cut out five elements of the future sofa: the base (H6 cm * D16.4 cm), the same back and bottom (H6 cm * D14 cm) and two armrests, smoothly expanding towards the top (H4 cm * D6 cm at the bottom * D7 cm at the top).
Glue them together (except for the bottom).
Cut fabric elements of the same size and stick them on a wooden blank.
Separately, glue the bottom of the sofa with a cloth and lay it on the base.
Do-it-yourself furniture for paper dolls
To make a miniature paper doll table with a paper top mosaics, we will need:
- very thick paper or cardboard for the base;
- ruler;
- awl;
- scissors / clerical knife;
- colored plain cardboard for mosaic;
- toothpicks or wooden skewers;
- thick threads;
- glue.
First of all, we cut out the base for the countertop from cardboard or thick paper. Its dimensions can be any. Make small holes for the legs on it in the corners with an awl, and on the four sides for the racks that you will need to decorate the table with weaving.
Cut small squares of the same size from colored cardboard to decorate the table. Glue them to the top of the countertop in the form of a mosaic.
Insert toothpicks or skewers into the holes and additionally fix them with a small amount of glue. Braid the legs of the table in a spiral with threads, the edges of which are fixed with glue.
Glue the end of a thick thread to the underside of the countertop near one of the racks. Start braiding the legs and racks, passing the thread alternately under them, then over them. Make sure that the weaves of threads are tight, but do not tighten the racks too much, as this can lead to deformation of the finished product. Braid the table as much as you want, then decorate the lower and upper edges of the weaving with a decorative pigtail from the same threads.