How to make scaffolding from boards yourself. How to make scaffolding with your own hands
A person's height is less than the height of the house, so it is impossible to lay walls or finish the facade without scaffolding or scaffolding. These designs allow you to safely work at heights and make it possible to always have a supply of consumables on hand.
Builders have their own terminology used to refer to such devices.
They call forests structures that are quite long and tall. “Goat” scaffolds are usually called low portable tables that can accommodate no more than two people.
If you have to lay walls, insulate, repair or decorate the facade, then think in advance about what scaffolding or scaffolding will be required for the work. For our part, we will tell you how to make scaffolding with your own hands strong and stable, saving a lot of money on their rental.
Scaffolding design options
Despite the wide variety of species scaffolding, their designs contain elements that are identical in purpose:
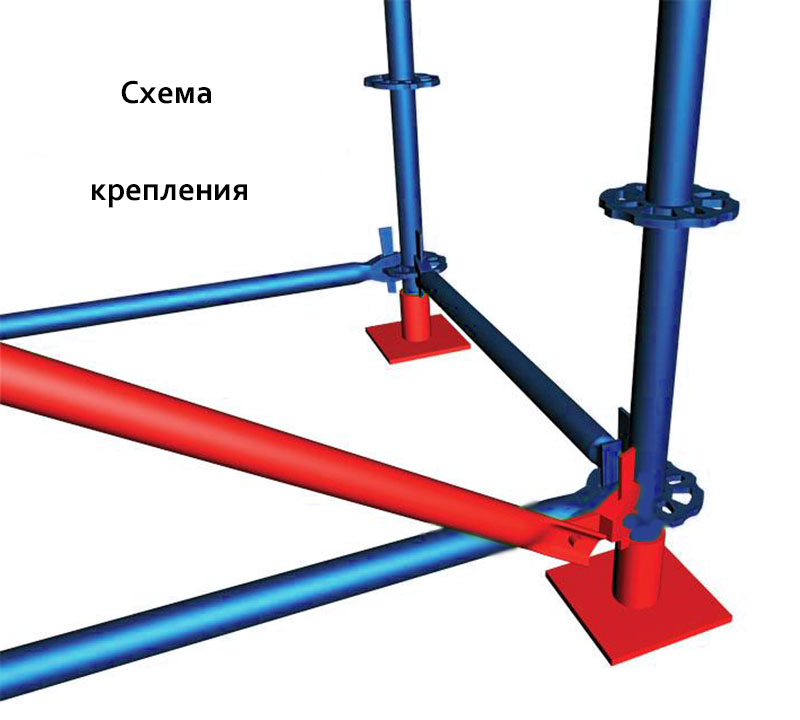
- Vertical posts (accept the work load and transfer it to the ground).
- Diagonal and horizontal couplers (provide spatial rigidity of the frame).
- Jumpers (short side elements of the scaffolding on which the flooring is laid).
- Flooring (boards knocked together that serve as a working platform for builders).
- Persistent slopes (protect scaffolding from tipping over).
- Railings (protect workers from falling).
- Stairs (used for ascent and descent from work platforms).

The material for assembling scaffolding and scaffolding is traditionally wood or metal. Wooden structure cheaper than steel, but withstands no more than two or three reassemblies. After that, it is only suitable for firewood.

Metal scaffolding is several times more expensive than wood, but has no restrictions on the number of cycles of use. They are easily dismantled and moved to a new location. Their design allows you to build additional tiers as work progresses, increasing the working height.

If your plans include the construction of several residential buildings and outbuildings, then it is better to make homemade scaffolding from profile metal. If high-altitude work will be carried out only once and at one site, then it is more profitable to assemble a structure from beams and boards.
Features of making wooden and metal scaffolding with your own hands
Before you start preparing parts for assembly, you should do schematic drawing and put on it the main dimensions of the structure.
There is no need to fantasize here, since construction practice has already determined optimal dimensions forests:
- maximum height of the structure - 6 meters;
- distance between racks from 2.0 to 2.5 meters;
- The width of the working floor is 1 meter.
Ergonomics has shown that maximum performance is achieved when the builder’s hands during work are 30-40 cm below chest level. Therefore, jumpers for installing the first flooring must be placed at a height of 40-50 cm from ground level. This will save you from having to put together low scaffolding.
It is better to provide fastenings for the second level flooring at a height of 180-200 cm. The third flooring is placed at a level of 360-400 cm.
If you decide to make a structure from boards, then buy the following set of lumber and fasteners in advance:
- For cutting racks and thrust braces - timber with a section of 10x10 cm or boards at least 10 cm wide and 5 cm thick.
- Spacers, ties and railings can be made from edged boards"thirty".
- For the flooring and the lintels on which it will lie, boards 4-5 cm thick will be required.
When choosing between nails and self-tapping screws, you should remember that nails are more difficult to remove when dismantling scaffolding. Self-tapping screws, on the contrary, are quickly unscrewed from wood with a screwdriver. However, they are worse at breaking than nails, since they are made of brittle hardened steel. Therefore, for the manufacture of small scaffolding, we can recommend the use of nails, and for extended and tall structures– self-tapping screws.

Scaffolding from boards is assembled in the following order:
- on a flat area, parallel to each other, lay out 4 racks of timber or boards, cut “to size” according to the height of the scaffolding;
- the racks are connected by horizontal jumpers on which the working flooring will be laid;
- the two resulting “ladder” frames are placed vertically one against the other and connected with diagonal and horizontal ties;
- a flooring made of boards is placed on the horizontal lintels and secured;
- the scaffolding is fixed on two side bevels;
- Railings are nailed to the racks, the ladder is placed and fixed for climbing.

If there is a need to install two or more sections of wooden scaffolding, then they can be tied together with wide sections of boards, stuffed onto adjacent racks. To prevent nails from splitting short boards, drill holes in them before nailing.
Scaffolding from profile pipe their design is similar to that of wood. The difference between them is the use of adapters. They are used to increase the number of storeys of a metal structure.
A set of blanks for assembling one section includes the following elements:
- Profile pipe 30x30 or 40x40 mm for racks and lintels (4 pieces of 1.5 m and 4 pieces of 1 meter).
- Thin-walled round pipe with a diameter of 20 mm (4 pieces of 2 meters each for diagonal ties).
- Profile pipe 25x25 mm or 35x35 mm (8 pieces of 10 cm each for the manufacture of adapters and bearings). To make railings, you can take the same pipe - 1 piece 2 meters long.
- Steel plates 10x10 cm, 2-3 mm thick (4 pieces) for thrust bearings;
- 10 bolts with nuts and washers for connecting the diagonal ties together and securing them to the frame posts.

Assembling a single-level section metal scaffolding consists of several operations:
- Scaffolding posts are rigidly fixed to the assembly panel (OSB sheet) with clamps (high precision when working with metal is a very important factor);
- horizontal jumpers are welded to the racks;
- adapters from pipe scraps are inserted into the upper ends of the racks 5 cm and fixed by welding;
- having removed the racks with jumpers from the assembly board, they are turned over 90 degrees and in this position are again fixed to the board with clamps;
- the ends and middle of thin-walled pipes intended for diagonal bracing are flattened with a hammer and holes for bolts are drilled into them;
- Having tightened two diagonal ties in the middle with a bolt, they are placed on the racks and the places for drilling holes are marked;
- the couplers are fixed to the racks with bolts and tightened with nuts;
- holes are drilled on posts and railings for bolted connections;
- plates (thrust bearings) are welded to pipe sections;
- the assembled structure is placed vertically and thrust bearings are inserted into the lower ends of the pipes;
- Flooring made from “magpie” boards is laid on the side lintels.
Helpful advice: to prevent longitudinal displacement of the flooring, you need to screw 30x30 mm steel corners to its lower part at the point of contact with the lintels.
Diagonal ties must be fastened on one side of the scaffolding, and horizontal ties on the other, so that they do not interfere with each other during assembly.
If the installation of scaffolding is carried out with the extension of a section of the third tier (4.5 meters), then holes must be made in its racks for attaching a profile pipe of a thrust bevel, which protects the structure from falling.
In the lower and upper parts of the racks of each section, it is necessary to drill holes for bolted connections with other sections (when extending the scaffolding in length).
During the construction or finishing of a house, you cannot do without scaffolding. To build them, you don’t have to turn to professionals; you can easily do everything yourself. The structure can be erected either from wood or from a profile pipe. The first structures will be disposable, but the second ones can be used large number once. Next, we’ll look at how to properly build both types of scaffolding with your own hands.
What does the structure consist of?

Before proceeding to the construction of scaffolding, it is necessary to clearly determine what elements they consist of. So, the design includes:
various braces that give rigidity to the structure;
floor crossbars;
boards that will serve as the floor of each floor;
supports that will give stability;
fencing;
staircase for ascending to the floors of a structure.
A homemade structure – isn’t it dangerous?


It’s very easy to make scaffolding yourself, but is it worth it? First of all, I would like to note that this is not a small portable design, but quite a voluminous structure, which then needs to be stored somewhere. Even if it is disassembled, the existing boards and pipes will need to be attached somewhere. It’s good if the house can be heated with wood, then it can be useful, but if not, the wood will simply deteriorate over time. With metal scaffolding, everything is somewhat simpler - they can be rented out, but again, if there is a demand for them.
It is also worth noting that the use of hand-made structures is possible no higher than the second floor. The construction of scaffolding, especially of wood, at a higher height can be hazardous to health. In addition, you need to understand that if the structure will no longer be used, is it worth spending a lot of time on its construction? It might be easier to rent. Having assessed all of the above, you can decide whether homemade scaffolding is needed during the construction or renovation of a house. If the answer is yes, it will be necessary to create drawings where not only appearance design, but also indicates the amount of material required.
Installation of a wooden structure


In order to create a structure made of wood, you will need to prepare the following materials:
wooden boards for racks approximately 5x10 centimeters thick;
boards for the floor and crossbars 5 centimeters thick;
wooden boards for fencing and braces with a thickness of at least 3 centimeters;
In this case, the step between the posts should be approximately 2.3 meters, the width of the floor, in order for it to be safe to walk on, should be at least 1 meter, and the height of the structure should be no more than 5 meters. So, in order to create scaffolding from boards with your own hands you need:
use braces to fasten four posts together;
secure the crossbars at the required height;
fasten the boards that serve as the floor to the crossbars;
attach boards that will act as a fence;
install supports;
fix the ladder in the right place;
check the drawings.
All work on creating a structure made of wood is carried out only with the help of nails and a hammer (see video).
Metal structure


A structure made from a profile pipe is more reliable than a structure made from boards. When building a structure, it is necessary to take into account that the dimensions of one section should be approximately 1.5x1x1.6 meters (see photo). You also need to prepare materials such as:
pipe for supports cross section 3x3 centimeters and 1.5 meters long;
pipe for braces with a diameter of 1.5 centimeters;
pipe for connections with a cross section of 2.5x2.5 centimeters;
the floor is made of boards about 5 centimeters thick and about 2 meters long;
So, in order to create a structure from a profile pipe you need:
cut pipes for braces for horizontal elements of 1 meter and for vertical elements of 2 meters;
cut two-meter braces at each end, which will greatly simplify their fastening;
connect two supports to each other with horizontal braces, the distance between which should be approximately 30 centimeters;
secure the connecting elements;
drill holes for bolts on the braces and supports;
assemble the structure from a profile pipe to the end;
clean the structure and paint it;
check the available drawings.
How to do without forests?
It is worth thinking about scaffolding even at the stage of creating house drawings, but if this does not happen, what is the right thing to do? If the construction or finishing work of the building is carried out by professionals, then there is no need to think about them, because every team should have such structures. If they have a chance self-construction lost or no more work is planned where they might be needed, the structure can easily be rented.
But in order for scaffolding to really no longer be needed, all finishing work must be carried out immediately to the highest possible quality. For example, it is better to use as finishing materials facing brick or other similar ones, because, for example, plaster and siding will require additional attention.
Scaffolding is one of the most popular structures, without which almost no construction can be completed. If you are building a house, cottage or country cottage, then do not rush to give money for finished product. In our material we will share the best instructions How to make a design yourself.
1. What is scaffolding: a brief educational program
In the most general sense, scaffolding is frame device, created from components and sections, the parameters of which are standardized to international standards. They are designed to protect the activities of workers who are working on the construction or restoration of multi-story buildings.

1.1. Types of scaffolding
Scaffolding is made from metal and wood. Now let's figure out what modifications there are, depending on the type of connection of their components:
Wedges. They are indispensable when using massive materials and assemblies. This means you can be sure that they will not let you down even with the most extensive workload. Another significant advantage is the speed of dismantling.

Pin. They are especially loved by foremen for the speed of assembly/disassembly of the product. Based on the name, it is the pin that is the connection point.

Frame. They are relevant for finishing manipulations with plaster and paint. They differ from the others by a special frame, which is rigidly fixed with nodal fastenings to diagonal and horizontal posts. The cost won't hurt your wallet.

Clamps. They themselves are quite complex in execution: they are applicable to objects of increased importance. Produced in accordance with the individual parameters of the room. Literally every nuance is taken into account here.

Let's take a closer look at the installation methods for each type of scaffolding.
1.2. Device

The products have details such as:
- flooring lintels;
- spacers;
- enclosing element;
- stops;
- plank flooring;
- racks;
- stepladder (ladder).
2. Rules for installing wooden and metal scaffolding with your own hands
The first step begins with a well-designed drawing. Listen to the advice of professional builders: the width of the flooring should not exceed one meter; product height - six meters; the gap between the racks is in the range from two to two and a half meters. Standard level the location of the jumpers for the initial flooring is about half a meter from the ground.
For the next one, it is mounted at a height of 180 to 200 cm. And finally, for the third, it is installed at a height of 360-400 cm.
2.1. Wooden scaffolding: how to make it yourself
Do-it-yourself scaffolding from boards involves the following materials:
- boards 4-5 cm thick (for flooring and lintels);
- boards (width - from 10 cm, thickness - 5 cm) or timber with a special section (10*10 cm). They will be needed for processing thrust braces and racks;
- edged board “30” is useful when forming railings, couplers and spacers;
- screws and nails. The former are relevant when disassembling and assembling tall scaffolding, and the latter - at a break and for compact products.

Step No 1. Four posts are cut to the height of the scaffolding. In an area cleared of debris and foreign objects, they are laid out parallel to each other.

Step No 2. Then we securely fix with horizontal jumpers those of the racks on which you plan to place the flooring.

Step No 3. As a result, we have two “ladder” frames. Next we mount it in vertical position relative to each other. We strengthen with ties (horizontal and diagonal).

Step No 4. We prepare a strong flooring from bars. Then we securely mount it on the horizontal jumpers.

Step No 5. Now comes the turn of direct manipulation of the forests. They are connected at two side bevels.

Step No. 6. And only after this the railings and stairs are nailed. Ready!


2.2. Products made from profile pipes: detailed instructions
According to its principle this type forests are collected in a similar way. However, consider some nuances. They consist in the use of adapters, with the help of which an increase in product levels is achieved.
However, let's figure out what you need to buy to create one section:
- Bolts with nuts and washers (ten pieces). They are very easy to fasten diagonal ties and then fix the base of the scaffold to the posts.
- Profile pipe. You need to take about eight pieces of them. Material parameters: 25×25 mm or 35×35 mm. Provide an additional copy for installing railings. You will need one piece (up to two meters).
- For the thrust bearings, buy four plates. Their material: metal. Thickness: two to three millimeters. Other parameters: 10×10 cm.
- For racks and lintels, take eight segments: equally 1 and 1.5 meters each, respectively.
- Diagonal ties must be formed from four segments ( optimal length- about two meters) round pipe. It is best if its value does not exceed two centimeters.
Now let's get to work
- The first thing to start assembling scaffolding with your own hands from a profile pipe is: connecting the structure post to OSB sheet, which is the assembly shield. Clamps are ideal for this manipulation.
- Next, we securely attach the jumpers (horizontal) to the racks, and only then fix the adapters (from parts of pipes) into the upper ends of the racks (the optimal indentation is five centimeters). We use a welding machine.
- Afterwards, the finished device (tandem jumpers with stands) is first unfastened from the assembly board for the following manipulation: after changing the orientation (rotated by 90 degrees), it is returned to the structure: clamps are also useful for connecting to the board.
- Do not forget about such a necessary moment during installation as correct processing thin-walled pipes (for diagonal braces). For our purposes, we beat off their ends and middle with a hammer. Using a drill, we obtain spans for the bolts.
- Very carefully (in the center) screw the bolts into a pair of diagonal ties. Pre-measure the areas where the rack fixation points will be located.
- We join the racks with ties with nuts and bolts.
- Now let's deal with the railings and posts separately. We make a few holes on them with a drill.
- Thrust bearings (plates) are fastened to pieces of pipes. For this we use a welding machine.
- At the final stage, the structure is installed in a strictly vertical position. But it is necessary to provide thrust bearings. They are attached to the lower ends of the pipes.
- From an ordinary edged board we make a high-quality and solid flooring, which is placed above the side lintels. Experts recommend using lumber called “magpie” for these purposes.
Pay attention to the secrets that anyone who decides to assemble scaffolding themselves should know:
- If you are faced with the task of increasing the length of the scaffolding, then you need to obey the following logic: in the existing sections (in the upper and lower parts) make holes. The bolts that will be located there will be link with subsequent racks.
- When you attach the ties, make sure to alternate: on scaffolding they are mounted on different sidewalls.
- Not always, but when major renovation or large-scale construction, you may be faced with the need to add sections of the third tier (4.5 m). And then you cannot do without a profile pipe for a persistent mowing, which serves for the stability of the scaffolding. What you need to do: Create holes in the posts.
- Metal corners(3*3 cm) will prevent the flooring from shifting. They are mounted in the area where the contact contacts the jumpers.

3. Universal dismantling scheme
This procedure has its own characteristics: the technology involves dismantling the structure from top to bottom in a sequence reverse installation. However, do not forget that before the main manipulations you must:
- inspect the scaffolding flooring for the absence of any foreign objects: garbage, equipment, etc.;
- fence the site to avoid unforeseen situations;
- All exits to the balcony and window openings are tightly closed;
- make sure that the tools are in working order;
- a safety belt is required when the structure long time has not been used and there is a possibility that defects or traces of rust may form.
All types of products are dismantled tier by tier, section by section. Special attention Pay attention to the fastenings to the wall, which are disassembled according to a similar principle: remove the fastening hooks, which are located above the tier subjected to manipulation. When disassembling almost all scaffolding (except for the clamp variety), craftsmen advise removing the components of the tier and placing them on the ground.
So let's get started.
- First, take into account the strict sequence: fences - posts and fastening devices above the flooring of each tier - diagonal connections within the boundaries of this tier.
- Secondly, we move on to the flooring panel. It is not completely removed: one of the fragments will be useful for laying the tier under the one in question.
- Thirdly, at stairwells remove the railings, then the posts. And then - the boards of the platforms and stairs. And finally, it’s the turn of the tier frame: the crossbars (transverse and longitudinal) are removed.
- The wall mounts are disassembled. And the holes from them are rubbed with a special compound.
Throughout the entire process, you cannot do without ropes and blocks - reliable lifting devices. The elements obtained after dismantling must be inspected and packaged in order to store or transport scaffolding.
4. Video: making scaffolding yourself
Having mastered the technology of scaffolding installation, it’s time to put the acquired knowledge into practice. And if you are seriously wondering where, then the Stroika ru portal will come to the rescue here too. In our catalog you can always find and order high-quality products from reliable suppliers.
Photos and videos: www.google.ru.
Traditionally, metal or wood is used to install scaffolding. Wooden structures are suitable only for one-time work. They have a simple structure, so anyone with basic woodworking skills can handle their assembly. Metal devices are reusable and dismountable; they can be reused on other objects. If you have the tools and knowledge of metal processing, it will be very easy to assemble scaffolding with your own hands.
Types of scaffolding
In addition to the type of material, scaffolding differs in functionality, fastening method and design. Based on these characteristics, structures are divided into several main groups.
Wedge
To connect the parts of the structure, a special wedge clamp is used. Such devices are very reliable, and, most importantly, durable. Their rigidity can withstand heavy weights and mechanical loads. Assembling wedge scaffolding with your own hands is very simple, and most importantly, after disassembling it is as easy to assemble as the first time. This design significantly speeds up and facilitates the work of lifting large loads and materials.
Frame
The basis of frame scaffolding is a rigid frame in the form of a frame. Similar devices are used in finishing and painting works. Horizontal and diagonal scaffolding elements are connected using knotted fasteners. The advantage of such forests is their low cost, they allow you to create convenient device without high costs.

Pin
The parts of the pin scaffolding are fastened using metal pins. Such designs are most often used in conventional construction work due to the fact that they are more convenient to assemble on site. The time for assembling pin scaffolding depends on the length of the object; as a rule, the process does not take more than a day.

Clamp
For buildings of unusual, complex structure, clamp scaffolding is used. The frame parts are connected in a specific way, which is very popular in professional construction. Important characteristic in the installation and construction of drawings of such scaffolding, the step between the racks and crossbars is important. This distance is chosen depending on the configuration of the building and its dimensions.

General structure of forests
Regardless of the type of connection of parts of the structure and its type, all scaffolding consists of similar elements, such as:
- vertical ribs (racks);
- diagonal stiffeners (make the entire structure strong)
- horizontal cross members;
- jumpers for flooring;
- boardwalk for moving workers;
- stops that give the device stability and prevent it from falling back and forth;
- safety guard to protect workers from falling during work;
- ladder for moving between rows.
The number and size of elements varies depending on the scale and complexity of the object. To facilitate the assembly of the scaffolding, you can draw a schematic drawing.
Plank forests
Perhaps many builders and professionals have their own tricks for assembling and designing scaffolding; there are also many similar instructions on the Internet. Most the structures do not differ in anything except the size of the racks and the thickness of the flooring. To understand such instructions, you should be guided by several dimensions:
- the step between the posts is 2-2.5 meters;
- the average width of the flooring is 1-1.2 meters;
- the structure should not be higher than 6 meters.

Compliance with these rules will create functional and safe forests. To construct scaffolding with your own hands, you will need:
- boards for thrust structures and beams 5-10 cm wide, you can use square and round beams;
- material for spacers and protective structure 3 cm thick;
- lintel boards and wooden flooring- 5 cm thick;
- nails (self-tapping screws in similar designs use is not recommended).

After preparing all the materials, you can begin assembly. First, 4 racks are fastened at a distance of 2-2.5 meters; to connect them, diagonal struts are used on all four sides. Then on required level lintel boards are mounted, and flooring boards are attached to them. For protection, a fencing board is installed on the posts. The final stage is the installation of supports and the installation of stairs to reach the top of the scaffolding.
When assembling scaffolding from boards, it is worth considering the following nuances:
- racks and supports are attached in parallel, their location is checked with a building level;
- horizontal jumpers are used to attach the racks to each other;
- Crossbars can be added to the protective railings for better protection.

To extend wooden scaffolding, several sections are used, and boards are used to fasten them together. Fastening boards are placed directly on the supports.
Advice! Often, when fastening with nails, wood cracks where the fasteners are immersed. To protect the boards from such damage, it is worth drilling grooves in the places where the nails will be driven in.
Metal profile scaffolding
Metal products are more convenient if you plan to build several projects. They can be disassembled at any convenient time and reassembled in a new place. To mount the simplest scaffolding with your own hands (height 150 cm, width 100 cm and length 165 cm), the following instructions will do:


When the work is completed, it is enough to remove the bolts and disassemble the scaffolding into frames. The service life of such a structure is tens of times longer than the service life of wooden scaffolding. And when proper care they can last for many years.
Pros and cons of different designs
Construction devices are convenient when creating an object, but after the work is completed, the issue of their storage is acute. Even when disassembled, the structure takes up a lot of space.
Wooden devices can be dismounted, but this is not easy, especially if the boards were fastened with nails. And even plank scaffolding needs to be stored somewhere. In addition, in the places where the nails are attached, after disassembly, small cracks and crevices remain, which will contribute to rotting. Often solvent or paint remains on such structures.

Advice! If you still have dismountable metal scaffolding after construction, you can sell it at a good price or rent it out.
Self-assembled scaffolding is not suitable for working on large objects. As a rule, they are intended for buildings of 1-2 floors. Exploitation of forests at high altitudes is dangerous.
Such structures are used infrequently (for repairs or finishing of facades), therefore their installation is not always appropriate. Painting work can be completed without scaffolding.
Often scaffolding is made with a length of 6 meters, which increases its weight and cost. Such a structure will be problematic to move from place to place, and its disassembly and assembly will take a very long time.
Alternative to scaffolding
The assembly of scaffolding and its design should be thought through before building a house. If you will be hiring for finishing and repair work specialists, then you shouldn’t even think about how to make scaffolding. Typically, professional teams have a full range of equipment and tools, including scaffolding.
Often, when scaffolding is dismantled and after construction, scaffolding remains idle and is thrown away or sold. However, they may still be required for repairs or finishing works Oh. There are many other construction aids that can replace traditional scaffolding.

Before dismantling or renting out the scaffolding, you should make sure that the façade is in proper condition. Do not skimp on finishing work, otherwise you will have to restore the decorative layer. Brick is considered one of the most durable and easiest to maintain facing materials. Today you can find many varieties of this material, differing in colors, size and texture.
As a rule, others finishing materials(plaster, paint and panels) will need frequent repairs, which will lead to significant costs. To do this, you will have to hire a crew or rent scaffolding. If you have your own design from a profile pipe for finishing work, you can significantly save on cosmetic repairs. To store such a structure, you can allocate a separate room or build a simple shed.
When constructing walls or exterior finishing scaffolding is used in buildings. This design makes it possible to safely work at height and keep it at hand. necessary tools and stock of materials used.
Types of scaffolding
Despite the fact that scaffolding comes in many types, their structures contain identical parts that serve the same purpose:
- Vertical supports.
- Ties connecting supports horizontally and vertically.
- Cross members.
- Flooring.
- Support slopes.
- Handrails.
- Stairs.


Material for production
In the manufacture of scaffolding they use:
- lumber;
- metal.

A wooden structure is much cheaper than a metal one, but it can only be used for two or three assemblies. In the future, it is only suitable for “throwing away”.

Scaffolding made from metal pipes, although much more expensive than wooden ones, are not limited in use. They are easy to dismantle and move as needed. In addition, scaffolding made from pipes can be increased in height, complementing the tiers.

Making scaffolding from wood
To make scaffolding from wood and pallets with your own hands, you must first develop drawings and determine dimensions.

There is no need to invent anything in this regard. Many years of practice have independently determined and established dimensions that are convenient to use:
- maximum height of the structure - 6 meters;
- the distance between supports can vary from 2.0 to 2.5 meters;
- The width of the working platform is 1 meter.

Manufacturing of scaffolding
Step-by-step production of scaffolding with your own hands:
- On flat surface of soil, two supports are laid out, preferably from timber, but it is also possible from a fiftieth board, parallel to each other, equal in height.
- The supports are fastened horizontally with crossbars, on which the work platform will subsequently be laid.
- The resulting two fastened structures are installed vertically opposite each other and connected diagonally and horizontally by crossbars.
- Boards are laid and secured onto the horizontal crossbars, which will subsequently serve as flooring.
- To fix the scaffolding, side supports are installed.
- A cranial block is nailed onto the supports, which will act as a railing.
- At the last stage, the climbing ladder is installed and fixed.


If you need to install two or more sections, then they are connected to each other by a wide board, which is placed on adjacent supports. To prevent nails from splitting, you need to pre-drill holes for them.

Specifics of manufacturing scaffolding from pipes
When starting to make collapsible scaffolding from pipes with your own hands, you need to know that in terms of their design data they are identical to wooden scaffolding. The difference between them is represented by adapters, which are used to increase the height of the structure.

Detailing for assembling one metal section
To assemble one section you will need:
- Profiled pipe for supports 40x40 mm - 4 pcs. 1.5 m each.
- Profiled pipe for crossbars - 4 pcs. 1 m each.
- Thin-walled pipe with a diameter of 20 mm - 4 pcs. 2 meters for screed diagonally.
- Profiled pipe 35x35 mm - 8 pcs. 10 cm each, which will play the role of adapters.
- Profiled pipe 35x35 for railings - 1 piece 2 - m.
- Steel plate for thrust bearings 10x10 cm, thickness 3 mm - 4 pieces.
- To connect the crossbars diagonally to the frame, you will need 10 bolts with nuts and washers.

Assembly of metal scaffolding of one level
To assemble the structure, you must follow the instructions: how to make scaffolding correctly.

Assembly of scaffolding from pipes includes the following operations:
- The scaffolding supports are secured to the OSB sheet using clamps.
- Cross members are welded horizontally to the supports using welding.
- Adapters measuring 5 cm are welded to the upper end of the racks.
- Having lifted the racks with crossbars from the shield, they must be rotated 90 degrees, laid back on the shield and secured to the shield with clamps.
- The edges and middle of the pipe, intended for diagonal stretching, are flattened and a slot for the bolts is drilled.
- Two diagonal crossbars are tightened in the center with a bolt, applied to the racks and the location for drilling is determined.
- The crossbars are secured to the posts with bolts and tightened with nuts.
- Holes are drilled on the supports and handrails and bolted together.
- Thrust bearings are welded to the base of the pipes.
- The finished structure is installed vertically.
- Boards are laid on the side crossbars, which serve as the base of the working platform.

Photos of how to make scaffolding can be seen below.

It is important to remember that diagonal crossbars must be secured on one side of the structure, and horizontal ones on the opposite side. Then during assembly they will not interfere with each other.

Photos of DIY scaffolding

Pay attention! 


Pay attention! 


