Large house made of cardboard with your own hands - diagrams. Cozy house made of cardboard: making it together with children
How to make a playhouse for children from cardboard box with your own hands? But not from a shoe box, but from a box, for example, from washing machine so that children can climb into it and play inside. We offer you simple to genius step by step instructions how to make a house out of a cardboard box.
Large cardboard box household appliances is an invaluable resource for gaming. There are hundreds of ideas for using it: from toy storage containers to. We have already written about what cool things you can do. And today - a special master class for especially large boxes. We will learn how to make a house out of boxes with our own hands.
Children will definitely appreciate this play space, which allows them to have privacy even in the middle of a noisy living room. Don't forget to knock on doors if you decide to stop by for a visit.
How to make a house out of boxes with your own hands
To make a game house from a cardboard box, you will need:
- Large cardboard box.
- Stationery knife
- Hot glue gun
- Fast drying acrylic paints.
Open the box and cut the sides of the top cover as shown in the picture. Cut off the bottom parts of the lid completely.
.png)
Use scraps of a cardboard box to form a roof for your house, and connect the parts with a glue gun.


First, draw and then cut out the windows and door with a sharp stationery knife.

Lay out the cardboard on the roof of the house to resemble the tiles. Place cardboard trim around windows and doors.

Make a hole in the roof and form an attic window. Secure the window roof with wide tape.
.png)
Paint your box house with quick-drying paints acrylic paints in two or three layers. If the child is very small, it is better to pre-seal the cardboard sections with tape. so that the baby does not get scratched.

If the cardboard is thick enough, a cardboard box house can be equipped with real fittings: door handles, license plate, etc. Don’t forget about window curtains for even more cozy atmosphere in the house.
Every little girl dreams of the biggest and most beautiful dollhouse for Barbie. And every domestic cat dreams of his own house made of cardboard, where he can retire without getting in the way of his owners. By learning how to make cardboard houses with your own hands, you can not only please your children and pets, but also decorate the interior in an original way. This article shows the most requested do-it-yourself cardboard house plans with MK.


Required materials
Materials and tools do not require additional costs; everything you need can be found in the household of any family:
- cardboard boxes different sizes;
- glue gun or super glue;
- knife and scissors;
- pencils, felt-tip pens, markers;
- watercolor paints, gouache;
- sparkles and other decorations.

Helpful Tips:
— when creating a box, it is better to use corrugated cardboard;
— only adults should cut cardboard;
— for the stability of the product, it is better to take cardboard pipes;
— in a house for children, it is advisable to make a door that opens outward. This will provide more space for games;
- do not throw away small cardboard boxes.
Shelter for a cat
A cardboard house for cats can be built by the whole family in a very short amount of time. The first thing to do is to draw doors and windows using templates.

Start assembling the bottom of the box. Bend the opposite flaps, apply glue to them and fold the remaining flaps on top. Press them together until the glue dries. At the top end of the box, cut off two wide flaps. Next, cut half of the remaining sash and bend it. Do the same thing from the second whole sash. Secure them with glue in this position.

The next stage is creating the roof. On the top of the second box, on the small flap, draw lines from the center of the top to bottom corners. Do the same with the second flap. Then cut out one large flap. Cut the edge along the first drawn line and fold the second one. Repeat the same steps with the second leaf.

At the bottom of the second box, cut off the wide flaps, and from the first smaller one, cut off exactly half so that when gluing the two boxes there is a hole. Glue the boxes together. Then take the first wide cut flap and glue it to the bottom of the second tier to strengthen it.
The second box will be used to make the roof. To do this, cut a piece measuring 45 by 115 centimeters. Bend it in half along the long side. Apply glue to the triangles of the small flaps on the top of the second box and glue them to the wide flap. Apply glue on top and glue only the first side of the roof so that the cat can look out from under it.

The house is ready!

doll house
You can make this wonderful gift for children yourself from ordinary cardboard boxes.
The house will consist of two floors and two rooms. First, connect the boxes together. Glue another sheet on the bottom, side and sides thick cardboard. Strengthen the structure of the house with tape and let the glue dry.

To make the structure more durable, strengthen the walls with thin cardboard.
The next stage is decorating the rooms and appearance house. Decorate the walls with applications made of colored paper, add mirrors, curtains to the windows, toy furniture. In order for the dolls to “climb” to the second floor, the house will need a staircase, which will consist of two parts.
Cut steps from thin paper for the end of the stairwell. Make the same cut out of cardboard. Select the desired width and height of the steps.

Cut out a couple more pieces from a thick sheet of cardboard. You will need a couple of rectangles for the steps and the bottom.

Glue the side parts of the ladder together and press them together with your hands to make them more dense.
Today we will make movable “real estate”, . If kids take part in the construction process, that’s great! I will definitely mention the advantages of each craft. But such a characteristic as the availability of the main material is common to all “buildings”.
How to do
pitched roof, thanks to the top flaps of a large four-flap cardboard box? 
Here's a simple way:

All that remains is to cut out the windows and door. Paste everything beautiful paper. Choose the decoration of the house at your discretion. You can take the same one as on photo , you can come up with something of your own.
Source
Cozy corner for games
Now you can buy any house. But it’s much more interesting to do it yourself. Especially when the idea is too simple, as in this craft. And there is one more plus! The structure is taking shape! Need more space? Or has the baby stopped liking the corner? It can be easily and simply removed.
Making:


Construction of parts - drawings and diagrams of a children's house
The difference between this craft and the previous one is that it consists of separate cut out pieces of cardboard. Therefore they are used big boxes.

We will need: 
- 2 rectangles measuring 40 by 60 cm. This is the floor;
- 2 – 60×60. Side walls;
- 2 – 60×50. Roof;
- 2 parts measuring 40(bottom)×60(side)×50(top)×90(side). Rear wall;
- 36 parts 20 by 10 cm. Roof tiles. (there are a lot of details, so if convenient, use templates ).

Making:

Such a house is easy to assemble and hide, and if necessary, take it out.
Form and ideas
The shape of the house depends only on the wishes of your baby. Cardboard allows you to do anything, even round designs. You just need to stock up on hot glue, tape and a utility knife. And how easy it is to dispose of the toy later! I burned it and that’s it, there’s no trash in the house!


Another simple MK with step-by-step photos:
Castle for princesses
Houses may be different. For example, if you have a princess, she definitely needs a real castle!
Please note video
, what a huge box is needed for this design. But you can use several smaller boxes. Just connect them first, and then model the “lock”.
We work:
- We secure all seams with tape. Special attention We pay attention to the bottom and top of the box.
- We cut out the jagged parapet on top.
- We make semicircular windows in the front of the castle, and heart-shaped windows on the sides.
- Gates in a castle are different from doors. To make them, cut a hole with an arch on top. But don't cut off at the bottom. We thread the ribbon under the gate. We pass the tape into the lock so that by pulling it, you can close the gate.
- We cover the walls of the princess's palace with fabric, self-adhesive film or wallpaper.
More ideas for castles - pictures can be enlarged by clicking on them.


Build cardboard house you can do it yourself without any effort special effort. Designs can be different - this is dollhouse, and a garage or parking lot for toy cars. Children will be delighted to participate in joint creativity. After all, the process of making crafts in the form of a hut is fascinating.
At the same time, you can create a cozy nest out of cardboard, which will accommodate a little fidget.

How to make a craft with your own hands
Taking a little time working together with children and giving free rein to your imagination, you can build many original designs. And we will tell you how to do this further.


New Year's hut
When making crafts, you need to focus on diagrams and templates of cardboard houses. After you choose the most suitable option, the markings should be transferred to the workpiece. Well, then there’s nothing complicated:
Cut out the parts according to the template white sheet paper and stick them in the prescribed sequence on the cardboard. You can use glue or double-sided tape.

All cardboard parts are carefully cut out. To arrange windows and doors, you should use a stationery knife.


Adhering to the drawn folds, bend the workpiece and glue the structure. For strength, a primer can be applied to the house.

The hut should be decorated and decorated, for example, the roof is often sprinkled with glitter. Having attached a rope to the structure, the hut is used as a Christmas tree decoration.

House made of cardboard and foam
This option is more labor intensive. But our instructions on how to make a house out of cardboard will help you quickly cope with the construction.


Take a regular cardboard box. The size is selected individually. A house is built from it - you need to cut the necessary parts and glue them together. After the window and door openings are drawn on the structure, they should be cut out with a stationery knife.

The hut can be decorated or covered with colored paper. But the decoration will look more original polyurethane foam. It is applied in strips, leaving 3-4 mm gaps between them for swelling. The foam will dry in 30-40 minutes.

In the meantime, you can build a stand:
- cut a piece of cardboard into a rectangle with an area slightly larger than the base of the house;
- attach the stand to the building frame with glue;
- imitate snow using foam or cotton wool glued to the stand with PVA.

Excess foam from the craft is cut off with a knife, and then the structural elements are painted in the chosen color scheme.

Housing for gnomes
The task can be simplified if you use existing blanks, for example, cylinders from rolls toilet paper. In order for the composition to be original and attractive, as in the photo of a cardboard house, you need to be patient. You can take 2-3 cylinders and cut them into two parts so that you get parts of different lengths.

Then you should cut out the paper strips. Their length will be about 150 mm, and their width will be 15-30 mm greater than the height of the cylinder used as a house. Windows and doors are cut out of colored paper and glued to a white strip.

The cardboard cylinder should be wrapped in paper with windows, after applying an adhesive mass to the surface. The edges of the paper extending beyond the cardboard are folded inward. You need to make cones out of colored paper that will serve as a roof. They are attached to the cylinders with glue. The village for the gnomes is ready.


House made by a child
Many people are interested in how to make a cardboard house with their own hands. Even your baby can handle the proposed technology. Apply to white cardboard marking the house or print a template from the Internet. The kid himself will be able to cut out the entire structure along clear lines.

To make a roof, you should take a rectangle of cardboard of suitable length and width for the slopes. This sheet is folded in half and attached to the assembled frame of the house.


Cardboard dollhouse
If your child asked to make a home for dolls, then you should not immediately run to the garage and start sawing boards.

Everything can be done much easier - just use our instructions on step by step production houses for beginners:
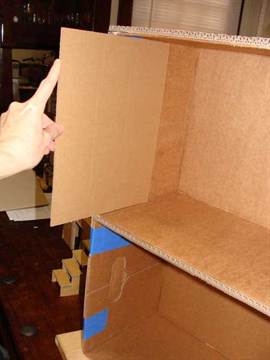
Take a cardboard box the right size. For example, this could be packaging for parcels or household appliances. Open it from the bottom and top.

Two small side parts from above are cut off so that triangles are obtained on both sides, pointing upward. The triangles on top are aligned vertically, and the longitudinal long elements of the lid are attached to them with glue or tape, forming bottom part roof slope.

It will not always be possible to form a roof completely - its top (ridge) will remain open. You can solve this problem by cutting off the lids from the bottom of the box. The longitudinal elements are attached to each other in the form of a hut and fixed to the already constructed part of the roof. As a result, the roof ridge will be built. The main thing here is to take all measurements and fasten, observing the joints.


Windows and a door are drawn on the walls of the house, which are then cut with a knife. The roof can be painted to look like tiles and the walls can be painted in your preferred color.


Cozy house for children
You can make a structure that will accommodate a child from an ordinary cardboard box from large household appliances.

It is advisable that the height of the walls be at least 1-1.5 m for a comfortable stay for the child. If this option is difficult for you to choose, then a cardboard house for children can be made from two boxes connected to each other with tape.

The top cover must be tightly closed and the joints secured with tape. A sheet of thick box cardboard is placed on top to strengthen the structure. The roof can be made in several ways:
By fastening two rectangles of cardboard together, this is how the roof slopes are formed. If you make them with a slight launch beyond the boundaries of the walls of the house, you will get a more durable mount.

Rafters are mounted on top. They are made from two intersecting plastic pipes small diameter. They are attached to the house at the corners of the structure. A piece of wide pipe should be placed in the middle so that the rafters do not bend. Placed on top of the rafters light bedspread or a blanket.


It’s quite simple to build a house for dolls, decorating a Christmas tree, or having fun for your child. This requires the use available material. Your child’s participation in construction will help you to use your imagination to the maximum and keep your child busy with exciting work.

Photos of cardboard houses


Paper is the simplest and most suitable material for a variety of creativity. Since three months, the child has been paying attention to the rustling leaves and is busy with them for a long time and with enthusiasm. As they get older, children do not lose interest in paper and love to make different objects out of it. They are incredibly happy when adults work with them.
And if you ask your child what he wants to do, most often it turns out that it’s a house. Moreover, both boys and girls love to create houses with their own hands. Apparently, children, albeit unconsciously, already perceive home as the main attribute of life. How to quickly and easily make a house out of paper?
Tools and materials for creating a paper house
When you decide to brighten up a family evening or a child at school gets an assignment to make such a craft, you will need a little imagination, paper, glue and just a few tools. The paper can be any: thin from colored sets, sheets of notebooks or albums, drawing paper (which, by the way, sticks together perfectly) or pieces of wallpaper. You will need scissors, a ruler and a pencil, and sometimes a glue brush.
If you have a stationery knife, it will help you quickly and accurately make slits for windows and doors. A wide variety of glue is suitable: in tubes, PVA glue, wallpaper glue, glue stick, homemade paste or paper paste in bottles, tape. The selection of items to decorate the future house depends on the scope of your imagination with your child. Paints, gouache, colored pencils, beads, cotton wool, lace and other items for applique are suitable.
You can enjoy the magical action at a table on wide window sill or sitting on the floor. As long as the surface is smooth and resistant to glue and scratches (you can put a board or plywood on it).
Preparing a sketch of a paper house
When constructing a house, small or voluminous, simple or complex, first create a sketch. Work begins with a drawing. If you only have small sheets to make a larger house, you can cut the drawing along the dotted lines and complete each part separately.


When cutting the drawing, remember that the right side will remain without a bend for applying glue and it needs to be completed. You can add a floor to your house sketch. But is it necessary? Without it, it is more convenient for the child to place toys: dishes, furniture, “tenants” of various sizes, but not everything can fit through the door.

Connecting parts, decorating and assembling a paper house
Then they cut out parts of the house and begin “construction”, coating and gluing special bends.
It will take some time to dry the product.
The new building lacks stability - it is better to install and glue it onto a cardboard frame.

The design of the house can be complicated by adding an extension, a porch, an attic, a second floor, a balcony and other elements. The stages of work remain the same: creating a sketch - cutting out parts - decor - gluing - drying.
Other options for paper houses
Round shaped houses made from paper are very interesting.
When creating a sketch, a body of this design looks like a solid long rectangle. The craft is glued together one fold at a time. And the roof is often drawn separately in the form of a circle, then trimmed and connected to the body with glue.

But it is also possible to construct a drawing in unity with the roof. Then many cuts are made for the roof, which can then be glued together overlapping, creating a conical shape.

With great enthusiasm, children make fabulous “log” huts.
The materials used for the work are the same, but the technology for building such a house is completely different. Here they first prepare building material. Using a pencil, tubes called “logs” are made from identical long paper rectangles.

Whether it will be a small house or a voluminous house depends on the size and number of rolled tubes. Usually children compete with adults or among themselves to see who can roll or glue the most.
Then from finished material The walls are neatly folded. There are options here: the walls are glued with gaps, where there are two logs in a row, or a continuous masonry of four tubes is glued, with them shifted to the edges in the next row. The roof of the house can be “log” or smooth.
Patterns and layouts of houses
Save the diagram to your computer and print it out.
You can make a house out of paper using origami technique
Creation of origami figures, including houses, according to ready-made schemes serves the development of the child’s logical and spatial thinking, activation of his thought processes. You can practice origami anywhere, for example, in line at the doctor’s office.
Having created the first simple houses made of paper, you can come up with many other unusually interesting crafts and make them more often with your beloved child.