How to make an iron man helmet: step-by-step instructions. How to make an Iron Man helmet: step-by-step instructions Make Iron Man with your own hands
The theme of superheroes is always popular with children. The boys take great pleasure in trying on the costumes of the most famous characters. Of course, many stores offer to purchase the appropriate outfit at various prices. Particularly popular is the comic book character and three wonderful films - Iron Man. It is his armor that almost every boy wants to try on. But on the shelves there are typical carnival costumes, but I want something realistic. Then the question arises for every parent: how to make an Iron Man suit?
Iron Man Suit: The Beginning
If you decide to make a wonderful costume of your favorite character for a child with your own hands, then first be patient. This work will require a lot of time and perseverance from you. Before you make the costume iron man, it is necessary to study the real character in detail. View photos of the film hero and flip through the comics. This will allow you to get an overall picture of the future outfit. Of course, it will be impossible to create real Iron Man suits, but every parent can make an imitation.
After a detailed review of the necessary drawings, draw up a rough diagram of all the main parts of the costume. You can use the provided drawing. But before that, do not be lazy to measure all the main dimensions of your child: head circumference, height, arm length, waist and pelvis circumference.
DIY Iron Man: material for a suit
Making an Iron Man suit with your own hands is quite a difficult task, but it can be done. After the introductory part with the character, you need to decide on the material from which the superhero outfit will be made. There may be several options:

Let's get started: Iron Man helmet
It's better to use Iron Man suit plans tailored to your son's size. Otherwise, the child will feel uncomfortable and quickly tear his outfit. Study the presented diagram in detail and increase it in proportion to the actual height and girth of body parts. The easiest way to make Iron Man is from thick paper (160 g/m2). It's better to start with the helmet. This way you will gain the necessary skills, and it will be easier to remake it.

We cut out each part separately with an indentation of about one centimeter from the edge. After we glue the parts together, it is better to do fittings at each stage. This is the only way you can perfectly adjust your product to the required dimensions of a person.
Hero Corps

The back and chest are done separately. Again, it is necessary to draw up a detailed drawing. Don't forget to measure your chest volume. All fans know that a specific lantern glows in the middle of the superhero’s chest. It can be imitated using a basic night light of the appropriate diameter. Just take a walk through the hardware store and you'll definitely find necessary element decor. Or use foil, which will simply shimmer beautifully.

In fact, it all depends only on your creative ingenuity. No established rules, how to make an Iron Man suit.
Arms and legs
The arms and legs are the most mobile parts of any suit's body. It is necessary to make gaps or special transitions at the bend points. Keep in mind that children are very mobile and their movements should not be hampered. You can simply make shields and gloves.

For footwear, it is better to choose sneakers or sneakers. Apply red paint from a spray can. Next, take a brush and draw the corresponding lines. You can also make only shin guards for your calves.

The key point is rigidity
Now you know how to make an Iron Man suit. After this, the structure must be made more rigid. To do this, purchase epoxy glue. Using a wide brush, apply adhesive to all parts and wait for complete drying. It is better to leave the product for a day to air and dry completely, only after that we apply paint and other decorative elements.

Be prepared right away that the process will take several days. You want to create a high-quality costume for your child, and not just dress him up in a box from household appliances. Don't confuse the robot with Iron Man. If in doubt about the availability of any parts, consult your son. He knows everything about his favorite character.
If you still don’t have a good idea of what Iron Man looks like, pictures of the costumes will help you finally figure it out.
You are not the first person who will try himself as a designer of a famous suit.

Many craftsmen were able to create very realistic outfits for themselves and their children. This means that you too can please your child. Just stock up on desire and patience. Your child’s satisfied smile will be an excellent reward for her titanic work and diligence.
The appearance of the image of Iron Man on cinema screens created a worldwide huge wave popularity and many fans of the beloved hero-inventor. Now every self-respecting fan of the science fiction genre strives to make his dream idea come true - to create his own image of Iron Man.
Instructions
And some have significantly succeeded in this, for example, the Norwegian John Beckensten (a famous sculptor in the film industry) spent more than a year creating the most successful copy of the costume of his favorite hero, using plastic and fiberglass.
Another noteworthy example was made by Anthony Lee (Colorado), who used polyurethane slabs for the costume and a special mixture of resin and sculpting clay for the helmet. Also, more than a thousand rivets, old auto parts, LEDs, servos, etc. were used to make the image more realistic.
And how many more of our home-grown craftsmen pore over their original inventions, using any available material and inexhaustible imagination!
If you decide to join the ranks of design fans, you will need fresh ideas, an original approach to the choice of material (foil, aluminum, tin, etc.) and inexhaustible inspiration.
First we need a detailed development of all components suit taking into account the dynamics of movements.
You can start creating an image with a helmet, with a built-in interface (optional), a frame and connecting the electronics you have provided.
To make a helmet, use soft metal or tin. Be sure to trim the edges after cutting out the pieces. Don't forget to leave functional gaps.
Use the drawings!
It is preferable to fasten parts using staples and rivets; this is both faster and less dangerous.
The inside of the created helmet frame should be glued with a soft cloth, and reflective lenses (or glasses from sunglasses) should be inserted into the eye slits.
The basis for the “body” can be any turtleneck jumpsuit made of thick dark fabric with lycra thread (this will avoid the formation of wrinkles when moving).
Attach the “armor” to the fabric. For convenience, use a mannequin.
If you have the necessary skills, use hydraulic devices to organize the articulation and free movement of parts. In this case, the body frame must be cut out completely and include technological holes and fastenings for auxiliary elements.
Whether it will be a fancy dress or a high-tech invention depends entirely on the level of your technical training and inventive skill.
After the film Iron Man, which thundered throughout the world, a huge crowd of fans appeared. Iron Man has gained the most popularity. And not so much himself, but his wonderful suit. Since such an outfit costs a fantastic amount, fans had the idea of making a costume at home.

Instructions
Making a helmet - draw a diagram of the helmet and, after cutting it out, glue the parts together. Cover the future mask and lower jaw with tape. To impart hardness, coat the entire surface with a small amount of epoxy glue. After drying, the inner side is glued with fiberglass.
Creation of the back - also made according to drawings with gluing of all parts. For the strongest adhesion, it is best to use clamps. The finished back is also glued epoxy glue.
Making the chest shell - cut out small semicircular strips and a circle wide enough to insert the reactor. Then glue them to a piece of paper. It turns out to be a shell with a hole for the reactor in the middle. The manufacture of the limbs follows the same pattern as the rest of the parts.
After covering all parts with epoxy glue and allowing them to dry completely, begin painting. For more effective type Cover the costume parts with acrylic paint, apply evenly, without any white spots.
Now move on to assembling the costume. Glue a wide and thick elastic band to all moving parts of the costume - the torso, the bends of the knees, and so on. It is recommended to attach a narrow elastic band to your fingers.
A snap hook is used to connect the parts. It is glued to all parts from the inside in the following areas: shoulders and forearms; chest shell and Bottom part torso; sides; lower limbs.
Since all parts must move without restricting movement, fasten them together with nuts. Make the lower limb so that your foot can easily fit into it in shoes.
Support the mask - to prevent the mask from falling, glue magnets and iron strips to the inside.
Lighting: Insert a flashlight or battery-powered night light into your chest. In your hands - flashlights, buttons from computer mouse place it under your thumb and solder everything together.
Children are often attracted to very simple, unpretentious toys, while expensive and more “ornate” items go unnoticed. The whole point is that the child is drawn to objects that are made with love. Such a toy could be a railroad that you assembled. To make it you will need cardboard, glue and paints.

You will need
- - cardboard;
- - ruler;
- - pencil;
- — scissors/stationery knife;
- - glue;
- - paints.
Instructions
Decide how much area the entire building will occupy - railway tracks, stations, landscape elements. Based on this, determine the approximate length of the rails. Cut them out of cardboard. Furniture or appliance boxes are suitable for this. Draw strips of the required length on the cardboard. Their width also depends on the overall scale of the building. For example, for a train 10 cm high, you will need rails 2 cm wide. If a piece of cardboard is not large enough, assemble the rails from individual pieces. In addition to straight strips, cut several arched ones - iron the road You can make a loop or just make a few turns.
Paint the blanks with gray acrylic paint with metallic effect. Then cut the sleepers into strips 2.5 cm wide and 8 cm long. On the underside of each sleeper, make marks with a pencil 3-5 mm from each edge - it is at these points that the rails will need to be laid out. Since sleepers are often made of wood, the top side can be painted brown.
Lay out the pieces of rail in the desired sequence, then turn them over so that the bottom side is on top. Using a ruler and pencil, divide the blanks into equal sections. Place sleepers on these marks. Lay them out one at a time, pre-lubricating the intersection with the rails with glue.
While the railroad is drying, make a train. It can be depicted in a simplified way - in the form of parallelepipeds. For carriages, use unwanted cardboard boxes (for example, juice boxes) or glue them together yourself. The locomotive can be made from two boxes - a horizontally located “nose” part can be glued to the vertical cabin. Paint the entire train the same color. When it dries, glue the wheels to the cars and connect the composition together with cardboard strips. On each carriage you can draw windows, curtains and even the faces of passengers behind the glass.
Using the same scheme, make one or more stations. Apply a layer of paint to the base box, and then paint the surface using felt-tip pens. Space around railway can be filled with cardboard silhouettes of trees and village houses, and placed next to the station paper figures of people.
Tip 4: How to film Iron Man in 2017
Iron Man is a science-fiction action film that was released worldwide in 2008. Its main character is the character of the same name from the comic book series created by Marvel.

Instructions
Development of the Iron Man film began in the 1990s with the participation of New Line Cinema, 20th Century Fox and Universal Studios, and in 2006 the filming rights were purchased by Marvel Studios, making the film the first completely an independent project companies. Confirmed director Jon Favreau chose California as the filming location, making Iron Man stand out from other superhero films typically set in New York.
Many actors auditioned for the role of millionaire inventor Tony Stark, who later became Iron Man, including Tom Cruise and Nicolas Cage, but in the end it went to the charismatic Robert Downey Jr. Gwyneth Paltrow was cast in the role of Virginia Pepper Potts. The actress said that she would agree to filming only if it took place near her home. The creators of the film agreed to meet her and placed the site a 15-minute walk from the house. Robert Downey Jr. spent a long time preparing for his role, studying the image of the American inventor and billionaire Elon Musk, founder and owner of PayPal, Tesla Motors and SpaceX.
Iron Man comic book artist Adi Granov took part in creating the design of the Mark 3 suit. The costume was produced by Stan Winston Studios. The metal and rubber components of the armor were eventually supplemented with computer graphics.
After its release, the film received many positive feedback from critics. Representatives of the American Film Institute included it in the top ten best films 2008. Iron Man was also nominated for an Oscar in the Best Visual Effects and Best Visual Effects categories. Best Editing Sound", but lost the award to other contenders.
The Minecraft game is interesting because you can create whatever you want there, even humans are not an exception. There are several ways to create this mob, you just need to choose the right one.

A person in Minecraft is the first mob in the history of this game. However, starting from version 1.8, it will no longer be possible to create it, since the developers have simplified this function. However, the players did not lose anything, since this character did not play a special role, and it was impossible to transform him later, but meanwhile many people liked him.
Man in Classic Minecraft
In Classic Minecraft, a human mob could be created very simply by pressing the G key. However, now there is no such option. The person's mob in Minecraft was not very good good features, so he did not have the opportunity to perform actions to destroy or create blocks. He simply wandered around the game world without a specific goal.
The human mob was affected by liquids and other blocks, just like the player. Fans of Minecraft often believe that they will be able to control it and use it in some kind of action. But a person in Minecraft never had such functions, since in the game he acted precisely as a mob, and was no different from animals.
iron Man
IN latest versions The game has mobs for every taste, except for humans. But it can be returned to Minecraft, only it will be made of iron. To create it, you will need to find and download the people mod for Minecraft 1.3.2. Thanks to this expansion, the player will be able to feel like Iron Man. He was created by the developers based on the movie superhero, and has almost the same capabilities that Tony Stark had. The player can shoot, fly like a bird, and invent.
For Minecraft version 1.4.2, you can also install mods for people. As soon as the expansion is unpacked, representatives of the human race will appear in the game world. The behavior of these mobs is practically no different from the realities of life. In Minecraft, they must be governed by the same laws as an ordinary person.
Magic Villager Egg
If you don’t want to install mods, you can create a person in Minecraft using a magic villager egg. This is a very rare artifact that is not so easy to find. In most cases, it appears in treasuries and mob spawn areas. One egg allows you to add one person to the game. When there is no time to search for this artifact, you should find a village and build many houses in it, then the number of inhabitants there will automatically increase.
It always amazes me when a person difficult situation remains calm and cool. He does not express emotions of worry, fear or sadness, but deals with the problem calmly. They say about such people that they have nerves of iron.

No excessive emotions
Some people are not naturally inclined to express emotions strongly. For example, phlegmatic people are somewhat slow in the speed of perceiving information; they like to remain calm and not show their feelings in public.
However, someone is made unperturbed by the environment of upbringing or communication. If emotional communication is not initially accepted in a family or company, and an open expression of feelings may be considered bad manners or a weakness of character, a person develops the habit of behaving accordingly.
Game approach
If you want to come across as a person with nerves of iron, learn to control your emotions and not show them in front of strangers. At the same time, it is necessary to learn not to dramatize the situation, and to distinguish well when it is worth pulling yourself together, and when there is no problem as such, in order to react emotionally.
It is worth learning not to take all events seriously, but sometimes strive to include a playful approach to the situation in your behavior, as if you were consciously participating in a play. Ability to engage in improvisation new role not only have creative people, but also among those who are considered to have nerves of iron.
Liberation from negativity
It is worth noting that nerves of iron are not necessarily inherent in people who are callous and cold-blooded by nature. Simply the ability to properly manage your emotions creates the impression of such a strong and unbending personality.
Since completely suppressing emotions is unhealthy, a balanced person understands that negative thoughts and feelings need to be released. He consciously strives to avoid tension and promptly frees himself from negativity. But he does not do this as a weak person, taking out his anger on others or panicking from anxiety.
A strong personality does not show emotions in public, but looks for an opportunity to relieve tension. At this time, he tries, for example, to meditate, hit a punching bag, or go into nature and shout in the forest. In this way, a person is able to stabilize his emotional background and continue to act productively in any situation.
Long practice
If a person is determined to win and achieve, and not to feel sorry for himself, then he is able to make his nerves of iron. In any case, for this you need to have a certain experience of impeccable behavior. Each new practice of calm behavior in stressful situations will temper your nerves and make them iron.
Do robot easiest of all cardboard boxes. If the components are bolted together, the limbs will move and the “iron man” will be able to stand, sit, bend his arms at the elbows and turn his head.
The character of many animated series, cartoons and three wonderful films, is gradually becoming extremely popular among both cosplayers and children. What child doesn’t dream of such a wonderful outfit that will not only make him almost invulnerable, but also allow him to fly? Of course, it is impossible to assemble a real suit for obvious reasons, but a child’s imagination surprisingly well compensates for all the shortcomings if the iron man suit becomes his own. Read on to learn how to assemble it yourself!
Collecting in parts
In order to make your child an iron man suit that is as similar to the real one as possible, all you need to do is show a little imagination and invest a little work and free time into it. It is best to use aluminum for these purposes. It is light, durable, bends well, and you don't need many tools to process it. To make the costume more realistic appearance It is recommended to paint its parts using spray cans of yellow and red paint. The slits for the eyes can be sealed from the inside with glasses from dark glasses. In addition, you will need any yellow turtleneck with a neck and long sleeves. 

In general, there are now quite a few professional imitators trying to copy this superhero. Iron Man suits are made from the most various materials. They can be of any shape and color. Lots of cosplay photos of Tony Stark and his awesome costume have surfaced! Don’t be lazy and give your child a dream, because who among us in childhood did not dream of being a superhero and accomplishing great feats?
Hi all!
Do you know who Iron Man is?
If yes, then you are reading the right article!
This article will describe in detail the method of making an iron man helmet; for greater visual perception, the author attaches full photo report.
Let's start making!
We will need the following:
Tools:
- soldering iron;
- scissors;
- ruler;
- stationery knife;
- sandpaper.
Materials:
- cardboard (not too thick);
- polyester resin or epoxy;
- fiberglass;
- paint (red and gold);
- switch;
- 2 batteries;
- 6 LEDs;
- wires;
- transparent plastic;
- small magnets or Velcro;
- 2 small wooden blanks.

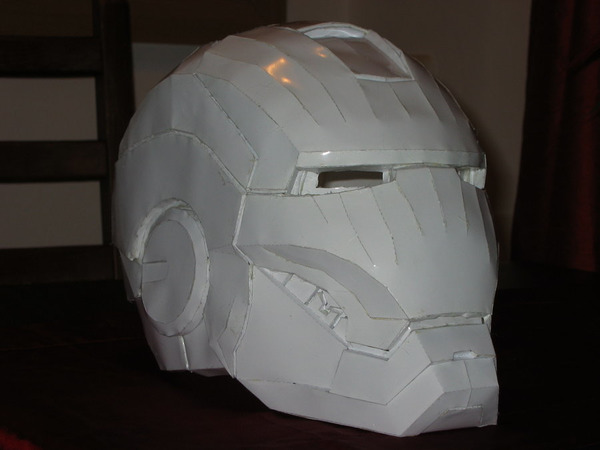
As you probably already understood, the helmet will be made of paper, namely medium-hard cardboard. We do the following, download the template provided by the author, and print it on a printer.
When all the parts are printed, be patient and begin to cut them out of cardboard, for this we use scissors; when working with smaller parts, it is best to use a stationery knife.

Next, you need to download a small program called Pepakura Viewer 3, it will help you when gluing parts; when you set certain settings, the program will show the order of gluing parts. (Google will tell you how to set these settings correctly, in one go you will learn and read about what this program is).
As you can see in the photo, the parts have numbering, so each number should be glued with the same number (that is, for example, 122 with the number 122). It is best to immediately arrange the parts by number, this will make gluing easier.

Take your favorite glue and start gluing the parts together. Since you will have to bend the edges of the cut parts, it is best to use a ruler for this. The gluing process is very long and quite tedious, so we must be patient; it is best to glue intermittently.
After spending many hours gluing the parts together, you should end up with the following.

This helmet has a removable part, it is located at the bottom, so there is no need to glue it to the base of the helmet. There are also two triangular parts, they will help the helmet keep the correct shape until the helmet is covered polyester resin.
We carry out the process of coating the helmet with resin.
To do this, we use fiberglass and resin; these two components will make your helmet quite durable. First, cover the outer side with resin, evenly apply fiberglass, and use a brush to spread the resin over the entire area of the helmet. Next we do the same operation with inside, leave the product to dry.
Important!
This operation with resin should not be carried out on a carpet or sofa, etc. inappropriate places; for this, select a special workplace, use gloves when working with resin.


When the product is dry, coat it again with two-part epoxy resin and leave the part to dry.
After the part has completely dried, we take sandpaper and clean the surface, removing all the irregularities and giving the helmet a cast shape.


When you have achieved the desired result, you can paint the helmet. We cover with tape the places that will be painted a different color. We apply one color first, in this case red, then gold.
It should look like this.


Now let's move on to the back of the helmet, which is removable.
We cover it with resin and fiberglass, and then clean it sandpaper. If there are deep uneven areas, you can additionally use automotive putty.
Pay attention to the ears of the helmet, on paper they are simply round, the author decided to make them from wood, namely, cut them from thin plywood, then use glue to fix them in place.


Since the helmet, as planned, will be put on the head, and you can put it on without taking it off back If it doesn’t work, we make a fixing removable element that will connect these two parts to each other, for this we use small magnets, if there are none, you can use Velcro.


We make the teeth from two pieces of wood 10 * 2.5 cm, having previously made notches on them, paint them black, and then glue them to the helmet from the inside.


Now let’s move on to the electronic part; to make the helmet look impressive, we add lighting. For this we use 6 LEDs of blue color. Take a soldering iron and solder the parts according to the diagram presented.
All boys love watching films about Iron Man, heroic adventures and interesting pastimes. Many young men dream of feeling like they are in the shoes of the main character, Iron Man Tony Stark. To become one, you need to have a super suit like the main character. Of course, the costume has no real analogues yet. Such uniforms are a figment of the author’s imagination. Every father wants to give his son a fairy tale and make a similar set like Tony’s. To start making it, you need to understand its unique structure.
To start making heroic outfits detailed instructions, you need to study the structure of the original in detail. This is necessary to draw up a detailed sketch.
The energy source is fusion reactor technology. Tony also has an indispensable weapon that he constantly uses throughout the film - these are gloves with a jet beam. The hero rises into the air thanks to a powerful stream of energy gushing from under the hero’s feet. In reality, there are no analogues of jet shoes, but there is a jetpack jetpack. In addition, when Tony was inside the armored structure, a holographic screen lit up; similar technologies are already being prepared for implementation. Now let's try to make a simple version of heroic equipment.
First, you need to familiarize yourself with the works of the masters who succeeded in this and created a similar iron man design. A resident of Norway, John Beckensten, managed to recreate the heroic equipment; he used fiberglass and plastic as the basis for its creation.
State resident Anthony Lee managed to make another successful copy, using polyurethane slabs to create it. To create the helmet, he needed a special mixture of resin and sculpting clay. Rivets, old auto parts, LEDs, and servomotors were used to connect the plates. They all added realism to the image.
If you decide to become a design fanatic and join their ranks, then you will need fresh ideas and a unique approach to the choice of metal (thin foil, durable aluminum or tin), endless inspiration.
To start creating equipment, you need a detailed plan of all components, taking into account the dynamics of movements in it. You can create an image from a helmet; to form it we use soft metal or tin.
After cutting out the parts, it is necessary to process the edges so that they are not so hard and do not injure the owner of the costume.
When designing a helmet, leave functional gaps, use ready-made drawings that are available online, or create them yourself. We connect the parts with strong staples or rivets, this is less dangerous. For ease of wearing, we glue the frame inside the helmet with soft fabric, and insert special lenses into the eye slits to reflect sunlight. As the basis for the costume, we take any jumpsuit made of thick fabric. We will fix the armor onto the fabric. For convenience, we attach metal plates to the fabric on the mannequin. The body frame must be completely cut out and all slots for attaching auxiliary components must be provided.

After the release of the film of the same name, he gained many enthusiastic fans around the world. Hero equipment has become very popular. To make it, we perform the following sequence of actions:
- We form a helmet - to do this, we accurately depict the helmet diagram, cut out the parts, and fix them together with safe connections. Cover the entire mask and lower jaw with tape for strength. To give the structure hardness, treat it a small amount epoxy glue. After drying, the inner side is glued with safe fiberglass;
- Next comes the manufacture of the back, this also needs to be done based on the drawing. To firmly fix the back parts, we use special clamps. The finished back is glued with a layer of epoxy glue for strength;
- Now we begin to form the chest shell, cut out small semicircular strips, circles of such a width that you can insert the reactor. We form the limbs according to a similar pattern as the previous parts;
- When all the parts of the costume are covered with epoxy glue, wait until they are completely dry, then start painting the uniform. To give the design a spectacular look, apply evenly. acrylic paints, try not to leave white spots on the surface;
- Begins complete assembly important components: we glue a wide, dense elastic band to the moving parts of the suit; a thin elastic band is needed to the fingers;
- To firmly connect all the parts to each other, we use a snap hook; it goes to all parts of the iron equipment in the following places: shoulders and forearms, chest armor, lower torso, sides, lower limbs;
- Since all parts must move without creating obstacles to movement, fix them together using ordinary nuts. Shape the lower limbs so that your shoeed foot fits into it;
- To support the mask so that it does not fall at the wrong time, glue magnets and iron strips to the inside;
- Don’t forget about lighting: mount a compact flashlight or battery-powered night light in your chest. Have flashlights in your hands, place the computer mouse buttons under your thumb, and secure everything together with a soldering iron.
One of our versions of the miracle design is ready for use.

Children's design should be simple and increased security, so you shouldn’t install all the accompanying electronics there in order to recreate glowing eyes or other elements of the hero’s image. You can create simple equipment for your child using paper, thick cardboard, strong gluing special technology. To make the design and helmet more realistic, you need to use diagrams or drawings to create it.
You can find ready-made patterns, take the child’s measurements, then adjust the patterns to the child’s specific parameters. Ready-made schemes can be printed on a printer, then transferred to thick Whatman paper. To create hero gear for your child, you will need:
- A good stationery knife;
- Special cutting mat;
- Dense fiberglass;
- Awl;
- Glue or glue gun;
- Scissors;
- High quality epoxy resin;
- Respirator;
- Latex gloves;
- High quality acrylic paints (red and golden colors);
- Transparent plastic;
- Sandpaper.
Let's begin the step-by-step assembly:
- First comes the making of the helmet. To do this, we print out all its details. Then we cut out all the parts from thick cardboard and secure it all tightly with glue. The back of the mask, which is pulled out, does not need to be glued;
- When the helmet is completely assembled, cover it with the mixture. epoxy resin and hardener. We fix all the components of the helmet on the back side using office clips and cover it with glue. When assembling, we maintain the correct proportion so that the product can dry and be suitable for use;
- We reinforce the helmet from the inside with fiberglass. We cut the material into thin strips, and glue several layers of this material from the inside of the product. Cover the top with epoxy glue. After the glue has dried, we sand the helmet so that it looks like it’s cast, so that small parts are not visible;
- Next comes painting. finished product. Since you need to use all the colors, you will have to secure with tape those places where you are supposed to paint with a different color. Paint red, leave those areas where there should be gold;
- We do the back part separately. Ears on paper are easy to do round shape, but you can make them out of wood and then glue them to the helmet. To make the helmet easy to take off and put on, you can use magnets, simple manual mechanism;
- Similarly, we assemble the neck, chest, back, shoulders, arms, legs, and other parts of the iron man’s body. It is necessary to constantly do fittings to make sure that all parameters are in order. When painting, make sure that no gaps or gaps appear;
- We carry out general assembly parts, giving them mobility. For this purpose, a glue gun will be useful, and you will also need wide and narrow elastic bands. Plastic snap fasteners are also required for large parts;
- If desired and possible, additional luminous elements can be formed;
- To make the chest of the iron man glow, you need to glue a battery-powered LED flashlight into it, and for the hands we use a small flashlight. On the side index finger place a mouse button, then the wearer of the equipment can easily form a glow at will;
- The eyes are made using glowing LED lights. You will also need a switch, batteries, and wires. Cut two pieces of clear plastic and place the lights just below the eye holes.

If you decide to make an excellent outfit of your favorite character for your child with your own hands, then first you need to be patient. The work will require a lot of time and some perseverance. Study all the details of the main character, look through the comics. All these actions will help to create a detailed picture of the future outfit. It will be impossible to create real equipment, but every parent can imitate a similar design.

DIY legendary hero: material for equipment
Creating heroic equipment with your own hands is quite a difficult task. After getting acquainted with the character, you need to decide on the material from which the superhero outfit will be made. There may be several options:
- Paper or cardboard is the most practical, pliable material. It's easy to cut out necessary details and glue everything into a single structure;
- Aluminum sheets are also interesting option. Due to the texture of the metal, a realistic effect is formed. Parts need to be painted car paint. It is necessary to take into account the safety of the connections for the child, otherwise he may get injured;
- Foam rubber is also a pleasant material that is easy to work with. The only downside is that this design is quite hot. It is quite difficult to stay in a foam outfit for a long time;
- Fabric is a material that any parent can work with. To do this, you need to find a sports uniform that serves as the basis for future equipment. Next, sew the volumetric parts into the appropriate places. We use thin foam rubber as padding. Acrylic paints will give the costume an interesting effect and realism.
In order for the equipment to fit perfectly, it is better to use drawings adapted to the size of your child, otherwise he will experience inconvenience and quickly tear his outfit. Of all the proposed options for creating heroic equipment, thick cardboard and aluminum sheets are suitable. You need to start working with the helmet. In this way you will gain the necessary skills, this part needs to be redone. We cut out each part separately, making indents from the edge of about 1 cm.
Forming a hero's body
The back and chest are made separately and require a separate drawing. We measure the size of the chest. A specific lamp should glow in the middle. It can be imitated using a basic night light suitable diameter. Just walk through the hardware store, you will definitely pick up the necessary decorative element. You can use foil, which will shimmer perfectly.
Upper and lower limbs
Arms and legs are the most mobile parts of our heroic equipment. In places of direct bending, transitions or gaps need to be formed. It is important to take into account that children are quite mobile; nothing should hinder their movements in this design. For convenience, you can make shields and gloves in addition to them. You can use sneakers or sneakers as shoes. Only separate shields can be glued to the calves, this will ensure mobility.
An important point is the rigidity of the structure
After the equipment is completely assembled, you need to add rigidity to the structure. For this purpose, you need to purchase epoxy glue, apply it in an even layer to all parts and wait until it dries completely. To ventilate and dry completely, leave it for a day. Only after the glue has completely dried do we begin to apply paint and other decorative elements to the structure.
Required for initial stage be prepared that construction will take several days. You want to make your child some real hero gear, not dress him up in appliance boxes. A robot should not be confused with an iron man. If you are not sure about the presence of some details, then just ask your son about it, because he knows almost everything about his favorite hero. If you have a vague idea of what Iron Man looks like, pictures of the costumes will help you finally understand the image of this hero.
As you begin the creative process, remember that you are not the first person trying his hand at designing heroic equipment for the first time. Many craftsmen have been able to recreate realistic Iron Man uniforms for themselves and their children. This means that you can make your child happy too. You just need to arm yourself with enthusiasm, be patient, and the joy on your child’s face and satisfied smile will be the best reward for titanic work and diligence. When creating a model, remember that the design is safe for the child; nothing should scratch his delicate skin or create obstacles to movements.
You can involve your child in a common cause; this creative process is a great way to get closer to your child. Nothing brings people together more than the fun process of creating cool hero gear. Our simple guide will help you create your own version of the heroic equipment, or you can create a similar copy of it. It is quite easy to create such a design, since in order to make it, you do not need to purchase expensive materials and equipment. All you need is thick cardboard, which will form the basis of our costume.
After you learn how to make uniforms from paper, you can switch to soft aluminum or tin. These metals will help increase your skills in crafting iron equipment. Then you will be able to create more realistic images, and your child will be able to appreciate the result.
You can see the step-by-step creation of realistic iron equipment in this video, namely the assembly of a helmet.