How to solder microcircuits. Tinning of a large metal surface
Everyone knows what a soldering iron is and what it is for, but not everyone knows how to use it. And this tool is very useful not only in the television workshop, but also in the household. With it, you can qualitatively restore a broken cable, repair power tools, household appliances and much more. However, you must be able to wield a soldering iron, and you must also be able to choose the right consumables.
If we are not talking about soldering microcircuits and high-voltage equipment, then the process itself does not present any difficulty. Most household tasks can be done on your own, without contacting a specialist.
Soldering iron device
An electric soldering iron must have a heater. The heater can be nichrome or ceramic. Ceramic heaters are good in their own way, but they are quite demanding on working conditions. Therefore, for household electric soldering irons with a spiral heater (EPSN) are best suited. These are quite unpretentious and, importantly, inexpensive devices.
The working part of the soldering iron is the tip. The heater brings it to high temperature, which allows to melt tin solder, which is used for soldering. The body of the soldering iron usually has a screw that fixes the tip and with which you can adjust its reach. The soldering iron handle has an extension or a separate apron that prevents the hand from even accidentally slipping onto the heated part.

AT last years compact gas soldering irons appeared, immediately competing with electric soldering irons. They are filled with purified butane, exactly the same that is used to refuel lighters. Soldering with a gas soldering iron occurs due to the action of an open flame of a miniature nozzle. The flame temperature can be adjusted within 750-1200°C. At one gas station, the soldering iron can work 60-90 minutes, depending on the setting. Such a tool can completely replace a 150 W electric soldering iron. For household needs it is more than enough, unless, of course, we are talking about soldering pipes or pans.
Soldering iron selection
First of all, it is necessary to determine for what purposes the soldering iron is purchased. For the home, they usually take a device that can be used to solder cables, wires, repair equipment plugs, etc. For these purposes, a device with a power of 25 watts is suitable. More powerful devices are used for soldering massive parts, and this is already an industrial application. At the same time, you should not buy too low-power soldering irons for 5-15 watts. They are designed for soldering microcircuits and fine equipment, for example, for repairing mobile phones.
Pay attention when buying a soldering iron for the home and its input voltage. It is necessary that it be a device operating from 220 V, and not from 12 or 24 .... It is desirable that the soldering iron has a European-style plug. modern houses are already increasingly equipped with grounding, which in this case will eliminate electrical injury in the event of a breakdown on the case.
If the tip in the soldering iron is removed, then, if necessary, it can be replaced. It is very easy to find out - soldering irons with a replaceable tip have a fixing bolt (bolts) on the body. The bolt allows you to adjust the length of the overhang, and it in turn affects the temperature of the open part.
Stings are copper and nickel-plated. The latter do not burn, so they practically do not need care. However, they are somewhat more expensive. Red-copper tips from time to time need to be cleaned of solder and filed. There are no difficulties in these operations - a file is taken and with its help the sting is given the required shape. It is advisable to do this with the sting removed, clamped in a vise.
As for the shape of soldering irons, in addition to the classic "handle" form, the so-called "guns" can be found on sale. The difference between them is only in the shape of the handle. There are also fast-heating soldering irons with a transformer, but they already belong to professional-class devices. Many experts believe that the classic shape of the soldering iron is more convenient to use.

Consumables for soldering
Solder. The connection of parts by soldering involves the use of solder - an alloy of tin and lead. The soldering process can be compared to hot bonding. The glue in this case is solder.
The proportions of tin and lead in solders can be different. Manufacturers apply markings, where the percentage of tin is indicated by a number, for example POS-61 - tin-lead solder, in which the tin content is 61%. Solder from such an alloy will melt at a temperature of 180 ° C. This is much lower than the melting point of copper or aluminum, which are the most commonly soldered.
Changes in the ratio of lead and tin are also reflected in the melting point of the solder. For example, if there is 40% tin in the solder, then the melting point of such an alloy will be 240 ° C, and if tin is 90%, then the alloy begins to melt only at 310 ° C.
The labeling of imported solders differs from the domestic one. To understand what kind of alloy is in front of you, you need to look at the accompanying documents or look for a decoding of the marking on the Internet. However, in household soldering, the solder alloy does not really matter. The most refractory solder melts at 300°C, which is also below the t(pl.) of copper or aluminum. But it is easiest to work with low-melting solders, so balanced solders should be preferred, where tin and lead are approximately the same.

It is most convenient to use solder in the form of a wire with a diameter of 1-3 mm. On sale there are solders in the form of a tube filled with flux. Such solder is not for everyone; many professionals prefer a simple solder wire, which leaves the possibility of more accurate dosing of solder and flux.
Flux needed to protect metal parts from thermal oxidation. The copper tip of a soldering iron quickly oxidizes, resulting in the formation of a non-metallic film on it, to which the solder does not adhere well. The flux removes the oxide film and promotes uniform solder distribution. Processing parts and contacts with flux is called tinning.

There are two types of fluxes - acidic and non-acidic. Acid fluxes are most often used when soldering iron alloys (cast iron, steel). After working with acid flux, it is necessary to remove its residues so that the acid does not corrode the metal. It is necessary to work with acid fluxes very carefully, because. acid easily corrodes the skin.
Of the non-acidic fluxes, rosin is the most common - purified pine sulfur. For most household tasks, rosin is enough. Quality rosin is transparent and has an amber color; it does not stain the sting so quickly and does not smoke much. Orthophosphoric acid may also be on hand for cases where oxidation is significant.
Soldering technology

When you need to solder one part to another, solder a contact or the ends of wires, our task is to fix the solder with solder.
- Good contact and soldering strength depends on the quality of the work. The parts to be soldered must be well cleaned, degreased and warmed up.
- If soldering is in progress electric wire or any other electrical components, you must make sure that they are not energized.
- Soldering is best done under kitchen hood so that the rosin smoke is immediately removed from the room.
- It is very important not to overheat the soldered parts. They themselves are unlikely to melt from a soldering iron, but plastic (for example, wire insulation) can suffer from heat. Therefore, the time of exposure to high temperature on the parts should be minimal. It is advisable to solder in one go.
- The parts to be joined by soldering must be tinned - treated with flux and solder. Tinned wires stop bending, so they are twisted without tinning and only then soldered.
- When splicing cables or wires, the ends are stripped of insulation, the wire itself is mechanically stripped and treated with a flux using a soldering iron. In order to qualitatively insulate the soldered wires, it is necessary to first put on them tubes made of heat-shrinkable polymer. After that, the ends of the wire are twisted together and fixed with solder, which should eventually cover the entire contact part.
- The place of the soldering is closed with a heat-shrinkable cambric, which, after heating, envelops the soldering and reliably isolates it from contact with other wires.
- Wire solder is conveniently fed to the place of soldering, and not to pick up tin with a sting. But since a person has only two hands, solder can only be applied if the parts are securely fixed. Do not try to solder the navisu - just waste your time and nerves. It is better to first fix the parts to be soldered with a clamp, and only then solder them.
That's actually the whole technology. As you can see, she is simple. The main thing is to observe a few simple rules and understand what is being done and in what order.
About how to solder correctly it was said earlier - "How to solder with a soldering iron". But sooner or later, the moment comes when you start soldering microcircuits.
Every person who understands little about microcircuits asked himself the question: “How to solder microcircuits if there is a very small distance between them?” Recall that microcircuits are of two types. In this article, I will explain to you how microcircuits are soldered, in which all the leads are located along the perimeter of the mikruha.
Each electronics engineer has his own secrets on how to solder microcircuits. Some use solder paste, others solder each part separately, and someone refines it under “wave soldering” (and a small depression is made in the tip of the soldering iron, liberally lubricated with flux and carried all over the mikruha).
To be honest, I have not used this method, but you can try. But most of all, I and the rest of the electronics people like the other method. So let's get started.
Remembering the original position
Each chip has such a kind of "key". This is a label from which the conclusions are read. In the circuits, the conclusions are not counted as usual, but counterclockwise. It happens that even on the most ordinary board it is shown how the mikruha should stand correctly. Before soldering the mikruha, remember how it stood initially, but rather sketch it.
Dismantling the chip
Set the temperature of the hair dryer to 350-380 degrees, and begin to solder our mikruha around the perimeter in a circular motion. Perhaps you will have such a thing in the kit, I call it a “chip lifter”. If you have it, you are very lucky. As soon as you see that the solder is slowly melting, take the mikruha by the edge and lift it up. If it rises partially, then you need to warm it up with a hair dryer.
If you lift the mikruha with tweezers, then we have a lot of chances to pull out the contact tracks. Thanks to the antennae, the microcircuit is unsoldered from the board when the solder is completely melted. The main thing in this work is not to spare the flux.
Removing solder residue
Removing old solder is necessary in order to level the surface. This will simplify the process of installing the chip in the future. In order to remove the remaining solder, a copper braid and a soldering iron are used. To avoid soldering the tracks, we all need to use our favorite Flux Plus.
At this stage, the main thing is not to overheat the tracks. Beginning radio amateurs quite often make this mistake. Overheating of the tracks can lead to the fact that they begin to flake off the textolite.
Installing the chip
Peculiar mounds will appear on which you need to plant mikruha. Using a cotton swab dipped in Flux Off, clean the surface of carbon deposits. At the end, brush again with flux.
Each novice electronics engineer asked himself the question: “How to solder microcircuits, because the distance between their conclusions is very small?” Pro Various types Chip cases can be found in this article. Well, in this article I will show how I solder microcircuits, the conclusions of which are located along the perimeter of the microcircuit.Each electronics engineer has his own secret of soldering such microcircuits. In this article, I will show my method.
Dismantling the old chip
Each chip has a so-called "key". I highlighted it in a red circle.
This is the label where pin numbering starts. In microcircuits, the conclusions are counted counterclockwise. Sometimes the PCB itself will indicate how the chip should be soldered, as well as showing the pin numbers. In the photo, we see that the edge of the white square on the printed circuit board itself is cut off, which means that the microcircuit should be keyed in this direction. But most of the time they don't show it. Therefore, before unsoldering the microcircuit, be sure to remember how it stood or take a picture of it, since mobile phone always at hand.
To begin with, we generously lubricate all the tracks with Flux Plus gel flux.

Ready!

We set the temperature of the hair dryer to 330-350 degrees and begin to “fry” our microcircuit with calm circular movements around the perimeter.

I want to brag about one thing. It came with my soldering station. I call it the chip extractor.
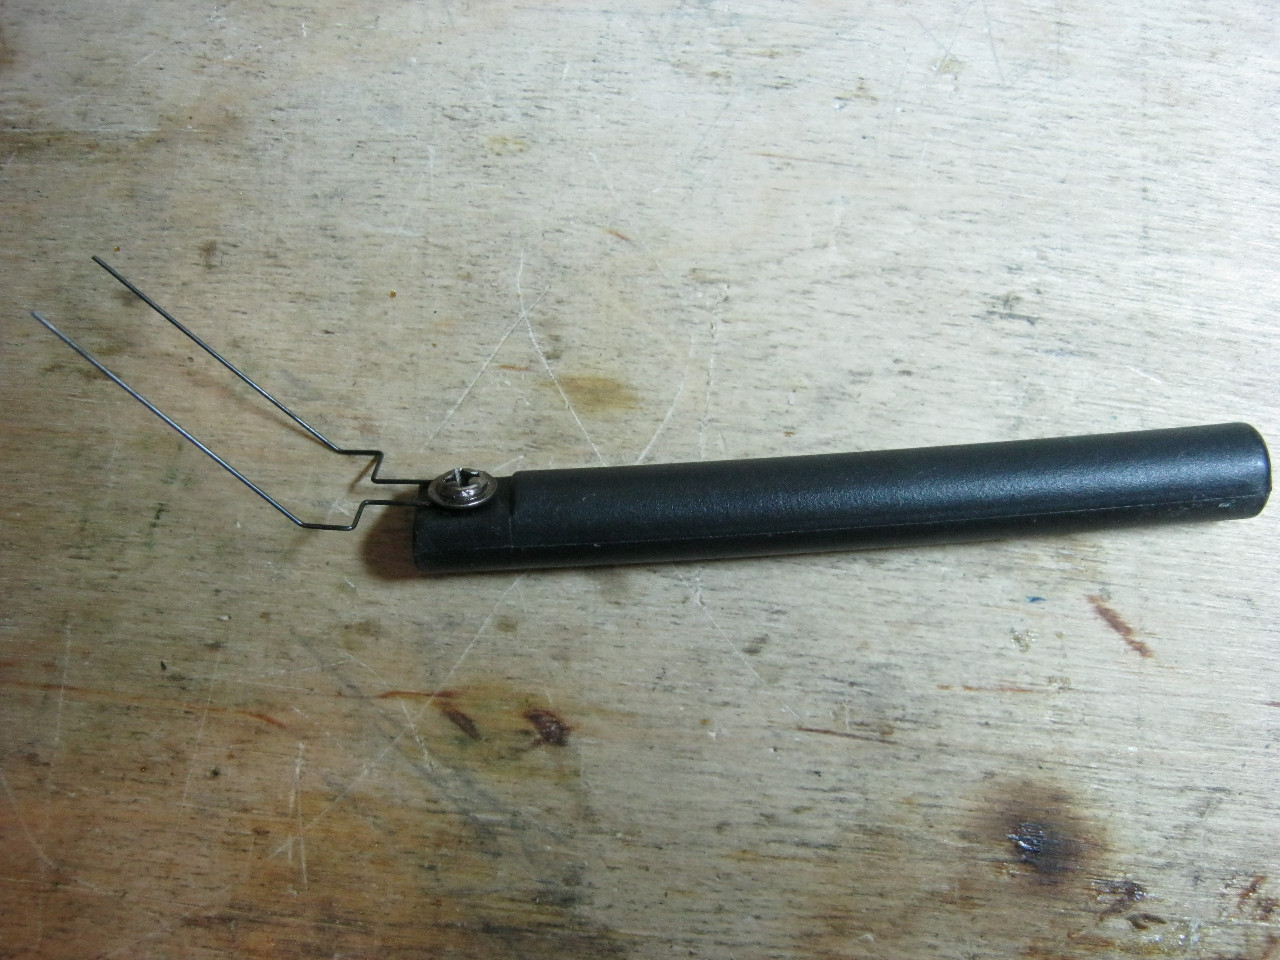
Currently, the Chinese have finalized this tool, and now it looks something like this:

This is how the nozzles look like for him

You can buy by this link .
As soon as we see that the solder begins to melt, we take the edge of the microcircuit and begin to lift it up.
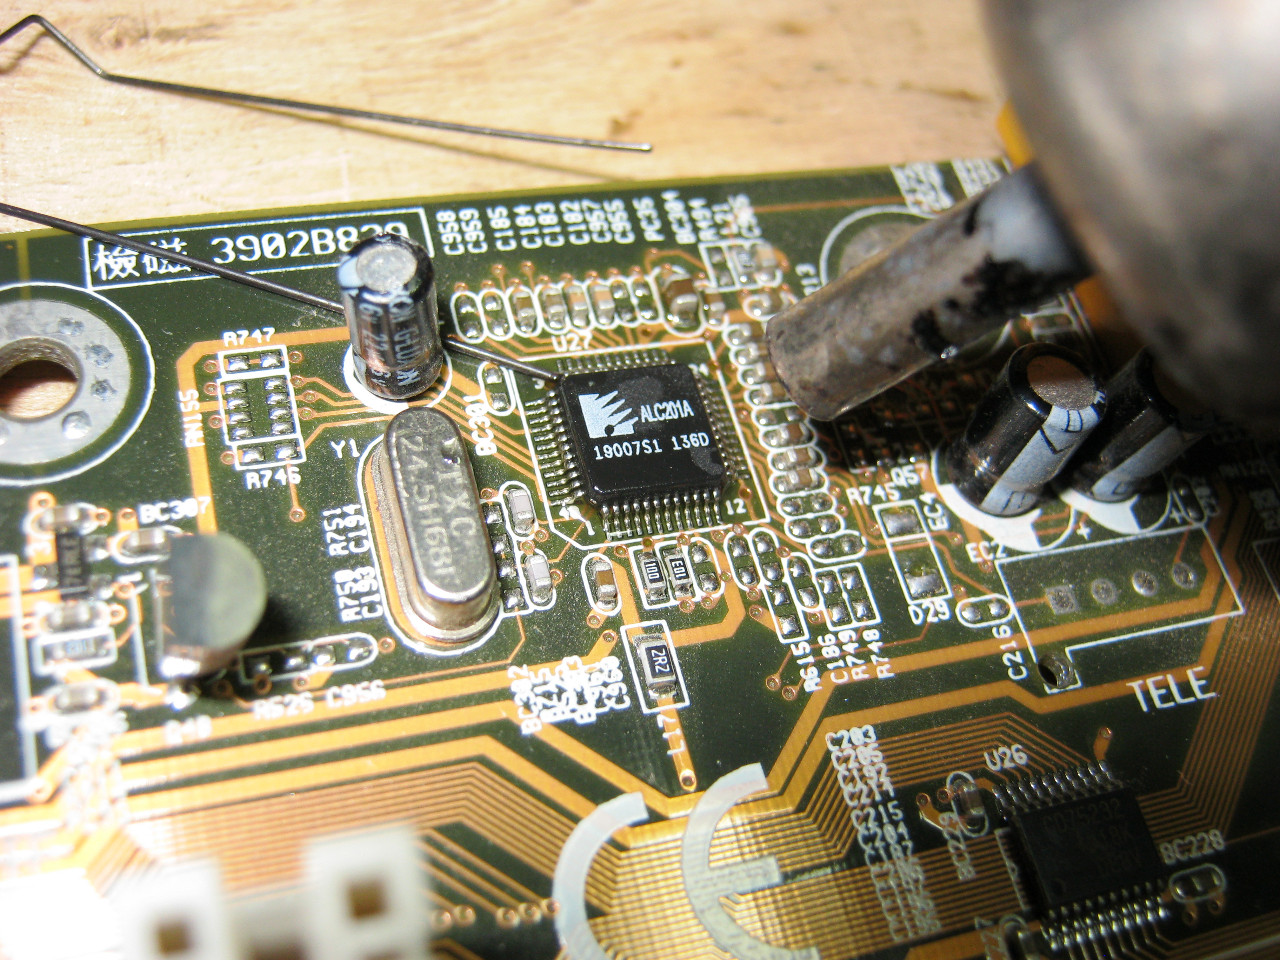
The antennae of the chip extractor have a very large springy effect. If we lift the microcircuit with some kind of piece of iron, for example, with tweezers, then we have every chance to tear out the contact tracks (piglets) along with the microcircuit. Thanks to the springy antennae, the microcircuit is unsoldered from the board only at the moment when the solder is completely melted.
That moment has come.

Mounting a new chip
With the help of a soldering iron and a copper braid, we clean the patches from excess solder. In my opinion the best copper braid is goot wick.

Here's what we got:


It should turn out like this

The main thing here is not to spare the flux and solder. It turned out a kind of mounds, on which we will plant our new microcircuit.
Now we need to clear this whole thing from different kind soot and debris. To do this, use a cotton swab dipped in Flux-Off, or in alcohol. More about chemistry. We must have clean and beautiful contact tracks prepared for the microcircuit.

Finally, all this is a little smeared with flux

We put a new chip on the key and start frying it, while holding the hair dryer as vertical as possible, and in a circular motion we drive it around the perimeter.

Finally, we lubricate a little with flux and “smooth” the contacts of the microcircuit to the nickels along the perimeter using a soldering iron.

I think this is the easiest way to solder SMD chips. If the microcircuit is new, then it will be necessary to tin its contacts with LTI-120 flux and solder. Flux LTI-120 is considered a neutral flux, therefore, it will not harm the microcircuit.

I think now you know how to solder microcircuits correctly.
Soldering microcircuits today is an indispensable procedure that modern radio electronics constantly needs. Electronic equipment like mobile devices, telephones and the like requires the use of radio elements (microcircuits) in a bga-type package.
This package allows you to save significant PCB space by placing pins on bottom surface element, as well as the implementation of these conclusions in the form of flat contacts, with a solder coating in the form of a hemisphere.
In a case of this kind, semiconductor microcircuits are performed. Soldering of this element is carried out by heating the body of the element, and, as a rule, heating printed circuit board, connectors, using hot air, as well as infrared radiation.
Soldering bga-elements can be accompanied by some difficulties, and therefore, in most cases, expensive equipment is mainly used to carry out this procedure.

However, in soldering bga microcircuits, connectors, a minimal simple set of tools and materials can be used. Thus, the following equipment can be used: hair dryer, microscope, tweezers, flux, cotton wool, flux removal liquid, mounting awl designed to correct the element on the board, foil for thermal protection.
Of course, this set of auxiliary items for soldering may differ depending on the choice of the shareholder, supplemented with other tools and materials, for example, a soldering station.
Soldering at home
In the context of rapid development technical progress there is a constant need to improve the field of radio electronics and related areas. Yes, in recent times there is a tendency to increase the density of mounting, as a result of which bga-type cases for microcircuits were born.
Thus, the placement of pins under the microcircuit housing made it possible to place a sufficient number of pins in a small volume. Many modern mobile devices or just electronic devices are in dire need of these enclosures. If you have a computer, you may need to connect bga connectors and more. others
At the same time, soldering and repairing such microcircuits are becoming more complex procedures, since the processing of microcircuits, computer connectors, every day becomes more demanding for the sharer's accuracy, as well as knowledge of the technological process. But still, soldering can be done at home and for this you need a certain set of tools.
For work you will need:
- Soldering station, in the set of which there is a hot air gun;
- Solder paste;
- Stencil for applying solder paste to the chip;
- Spatula for applying solder paste;
- Flux;
- Tweezers;
- Braid for desoldering;
- Insulating tape.
Work order:
- Organize workplace by placing the tool kit in a position convenient for you. Before you start working with the microcircuit, make marks on the board along the edge of the microcircuit case.
- The temperature of the hot air that the hair dryer blows out should fluctuate in the range of 320-350 gr. C. The temperature is selected according to the size of the chip. It is desirable that the hair dryer blows air at a minimum speed, otherwise it is very likely hot air can simply blow away nearby small parts. The hair dryer must be held perpendicular to the board. The hot air gun should heat for one minute, and the air should not be directed in the center, but more along the edges, covering the entire perimeter. In this case, there is a high probability of overheating the crystal. It is worth noting the special sensitivity of memory to temperature overheating.
- Next, the microcircuit is hooked over the edge, after which it rises above the board. The most important thing at this point is not to apply any special, excessive force: if the solder is not completely melted, there is a possibility of separation from the track.
- At the end of the soldering, the microcircuit and the board can be operated. If you apply flux at this stage and then heat the surface, you will see how the solder forms uneven balls.
- Apply alcohol rosin (during soldering on the board, it is undesirable to use alcohol rosin due to low resistivity), after which we heat it.
- A similar procedure is done with a microcircuit
- The next step is to clean the boards, as well as the chips from the old solder. It should be noted that enough good results shows in this case soldering with a soldering iron. But in a particular case, we use a hot air gun. It is highly undesirable to damage the solder mask, since then the tinol will spread along the tracks.
- Next comes the rolling of new balls. Thus, it is quite possible to use new ready-made balls (a rather laborious procedure). We use "stencil" technology that allows you to get balls faster and better. It is worth noting that in this case it is desirable to use high-quality solder paste, since a lot depends on the solder paste in the soldering process. You can tell that you are using quality solder paste by heating a small amount of solder mix material: quality paste forms a smooth ball, while poor quality product breaks up into numerous small balls. It is interesting to know that even a heating temperature of 400 g does not help low-quality solder paste. WITH.
- Then the microcircuit is fixed in a stencil, after which we proceed to apply solder paste, smearing it on a finger, or using a spatula.
- We hold the stencil with tweezers and melt the paste, while the temperature blown by the hair dryer should be a maximum of 300 gr. C. The heat gun should be held perpendicular and only perpendicular (remember, because this is important). The stencil should be held with tweezers until the solder solidifies completely.
- After the solder has cooled down, you can begin to remove the mounting tape, after which the hair dryer comes into play, the heating temperature of which is 150 g. C. Thus, gently heat the stencil until the flux melts.
- We separate the microcircuit from the stencil and we can observe how even and neat balls came out. So, the microcircuit is completely ready for installation on the board.
- In the event that the risks on the board, which were mentioned at the very beginning, are not met, positioning is divided in the following way: the microcircuit is turned upside down, after which it is applied with an edge to the nickels; we pinpoint where the edges of the circuit should be; the microcircuit is installed according to the risks on the board, while trying to catch nickels at the maximum height with balls; We heat the microcircuit until the solder melts. The flux should be applied in small quantities. The temperature of the air blown out by the hot air gun should be 320-30 degrees at this stage. WITH.
Soldering in this way can be done at home. All that is required is the sequence and correctness of actions.
Soldering with a soldering iron is a physical and chemical technological operation obtaining a permanent connection of metal parts by introducing a metal with a lower melting point into the gap between them.
Soldering with a soldering iron is much easier than it seems at first glance. The technology of soldering with a soldering iron was successfully used by the Egyptians 5 millennia ago and little has changed since then.
Requirements to technological process soldering and installation of radio elements are set out in OST 107.460092.024-93 “Soldering of electrical connections of radio electronic equipment. General requirements to standard technological operations.
The process of soldering with a soldering iron begins with the preparation of the surfaces of the parts to be soldered. To do this, it is necessary to remove traces of dirt, if any, and an oxide film from the surfaces. Depending on the thickness of the film and the shape of the surface, it is cleaned with a file or sandpaper. Small areas and round wires can be stripped with a knife blade. The result should be a shiny surface without stains of oxides and shells. Fat contamination is removed by wiping with a cloth soaked in acetone or white spirit solvent (purified gasoline).
After preparing the surfaces, they must be covered with a layer of solder and tinned. To do this, flux is applied to the surface and a soldering iron tip with solder is applied.

For better heat transfer from the soldering iron tip to the part, you need to apply the tip so that the contact area is maximum. The cut of the tip of the soldering iron with solder should be parallel to the surface of the part.
The most important thing when soldering with a soldering iron is to heat the surfaces to be soldered to the temperature of the molten solder. With insufficient heating, the soldering will turn out to be matte with low mechanical strength. When overheated, the solder will not spread over the surface of the parts to be soldered and soldering will not work at all.
After completing the above preparation, the parts are applied to each other, and soldering is performed. electric soldering iron. The soldering time, depending on the thickness and weight of the parts, is from 1 to 10 seconds. Many electronic components allow a soldering time of no more than 2 seconds. As soon as the solder spreads evenly over the surfaces of the parts, the soldering iron is retracted to the side. Displacement of parts relative to each other until the solder is completely solidified is not allowed, otherwise mechanical strength and solder tightness will be poor. If this happens by accident, then you need to redo the soldering procedure.
Solder on the tip of a hot soldering iron, while waiting for soldering, is covered with oxides and residues of burnt flux. Before soldering, the tip must be cleaned. For cleaning, it is convenient to use a moistened piece of foam rubber of any density. It is enough to quickly draw a sting over the foam rubber and all the dirt will remain on it.
Before soldering surfaces or wires that are to be soldered, without fail must be tinned. This is a guarantee of the quality of the solder joint and the enjoyment of work. If you do not have experience with a soldering iron, then before performing critical soldering work with a soldering iron, you first need to practice a little. It is easier to start with a single-core copper wire, which is how electrical wiring is made. The first step is to remove the insulation from the conductor.
How to tin copper wires
When the insulation is removed, you need to evaluate the condition of the conductor. As a rule, in new wires, copper conductors are not covered with oxides and can be tinned without stripping. It is enough to take a little solder on the tip of the soldering iron, touch it with rosin and move the tip along the surface of the conductor. If the conductor surface is clean, then solder thin layer spread over it.
If there is not enough solder, then an additional portion is taken with a touch of rosin. And so on, until the entire conductor is completely tinned. It is more convenient to tin wires by putting them on wooden platform, which I use as a stand for a soldering iron. Usually, in the place where I always puddle, rosin accumulates and the process goes faster, you can grab more solder without touching it, once again with a rosin sting.

Sometimes, contrary to expectations, although the conductor seems to be without oxides, it does not want to be tinned. Then I put it on an aspirin tablet and warm it up for a couple of seconds, and then I puddle on the site. Luditsya immediately without problems. Even a copper wire with obvious oxidation, without preliminary mechanical stripping, with aspirin immediately breaks with a thin layer of solder.

If you managed to tin the conductors with a soldering iron, as in the photo, then congratulations on the first successful work by soldering.

It is difficult to get good soldering with a soldering iron the first time. There may be several reasons for this. The soldering iron is too hot for this type of solder, this can be determined by the rapidly forming dark film of oxides on the solder, which is located on the tip of the soldering iron. With excessive heating of the soldering iron tip, the working blade of the tip is covered with black oxide, and the solder is not retained on the tip. The temperature of the soldering iron tip is not sufficient. In this case, the soldering is loose and looks matte.
Only the use of a temperature controller can help here. Insufficient heating of the wire during tinning occurs with a small amount of solder on the working part of the tip. The contact area is small, and the heat is poorly transferred to the conductor. You need to practice until you can tin the wires as in the photo above.
After tinning the wire with a soldering iron, excess solder often remains on it in the form of sagging. In order to get a thin and even layer, you need to place the wire vertically, end down, the soldering iron vertically with the tip up, and draw the tip along the wire. The solder is heavy and all will go to the tip of the soldering iron. Just before this operation, you need to remove all the solder from the tip by hitting it lightly on the stand. In this way, you can remove excess from the place of soldering and on printed circuit boards.
The next stage of training is to solder a stranded copper wire with a soldering iron, the task is somewhat more difficult, especially if the wire is covered with oxide. Remove oxide film mechanically difficult, you need to unwind the conductors and clean each one separately. When I removed the insulation from the wires thermally, then found that the upper conductor was all covered with oxide, and the lower one was unraveled. This is perhaps the most difficult case for tinning. But they are tinned with the same ease as single-core ones.

The first thing you need to do is put the conductor on an aspirin tablet and move it with a soldering iron so that all the conductors of the wire are wetted with the aspirin composition (when heated, aspirin melts).

Next, tin on the site with rosin, as described above, with the only difference being that you need to press the wire with the tip of the soldering iron to the site and, during the tinning process, rotate the wire in one direction so that the conductors intertwine into a single whole.

These are the copper wires after tinning.

From such an end of a tinned wire, it is possible to form a ring with the help of round-nose pliers, for example, for threaded connection to the contacts of a socket, switch or chandelier cartridge, or solder to a brass contact or a printed circuit board. Try to make such soldering with a soldering iron.

The main thing when connecting parts by soldering is not to move them relative to each other until the solder has hardened.
Soldering any parts with a soldering iron is not much different from soldering wires. If you managed to tin and solder a stranded wire with high quality, then you can perform any soldering.
How to tin a very thin enameled copper conductor
Tin with a soldering iron thin wire nick, with a lived diameter of less than 0.2 mm, insulated with enamel, easily if you use PVC. Insulating tubes and the insulation of many wires are made from this plastic. You need to put the wire on the insulation and lightly press it with the tip of the soldering iron, then drag the wire through, turning each time. From the heating of vinyl chloride, chlorine is released, which destroys the enamel and the wire is easily tinned.

This technology is indispensable when soldering with a soldering iron a wire of the licendrat type, which is a lot of thin wires coated with enamel and twisted into one conductor.

With the help of an aspirin tablet, it is also easy to tin an enameled thin wire with a soldering iron, in the same way the wire is pulled between the aspirin tablet and the soldering iron tip. There should be a sufficient amount of solder and rosin on the tip.
Soldering radio components with a soldering iron
When repairing electrical appliances, it is often necessary to solder radio elements from the printed circuit board and solder them back. Although this operation is not difficult, it still requires compliance with a certain soldering technology.
Soldering with a soldering iron resistors, diodes, capacitors
In order to solder two output radioelement from the printed circuit board, for example, a resistor or a diode, it is necessary to heat up the place of its soldering with a soldering iron until the solder melts and pull the radioelement output out of the board. Usually, the output of the resistor is removed from the printed circuit board by prying it over the output with tweezers, but the tweezers often slip off, especially if the output of the radio element on the solder side is bent.

For the convenience of work, the tweezer sponges need to be sharpened a little, the resulting grip will prevent the tweezers lips from slipping.

When dismantling radio elements, one more hand is always missing, you need to work with a soldering iron, tweezers and still hold the printed circuit board.

As a third hand, I use desktop tesks, with the help of which a section of the printed circuit board free from details can be clamped, and by placing a vise on any side face, orient the printed circuit board in three dimensions. Soldering with a soldering iron will be convenient.

After soldering the part from the board, the mounting holes are filled with solder. It is convenient to free the hole from the solder with a toothpick, a sharply sharpened match or a wooden stick.

The tip of the soldering iron melts the solder, the toothpick is inserted into the hole and rotates, the soldering iron is removed, after the solder has solidified, the toothpick is removed from the hole.
Before installing a new radio element for soldering, it is imperative to make sure that its conclusions are solderable, especially if the release date is not known. It is best to simply tin the leads with a soldering iron and then solder the element. Then the soldering will turn out to be reliable and the work will be a pleasure, not a torment.
How to solder SMD LEDs and other leadless components
Currently in production radio electronic devices Leadless SMD components are widely used. SMD components do not have traditional copper wire leads. Such radio elements are connected to the tracks of the printed circuit board by soldering contact pads to them, located directly on the component case. Soldering such a component is not difficult, since it is possible to solder each contact individually with a low-power soldering iron (10-12 W).

But when repairing, it becomes necessary to desolder the SMD component to check or replace them, or desolder from an unnecessary printed circuit board for use as spare parts. In this case, in order not to overheat and break the component, it is necessary to simultaneously warm up all its outputs.

If you often have to solder SMD components, then it makes sense for the soldering iron to make a set of special tips, branching at the end into two or three small ones. With these tips, desoldering SMD components will be easy without damaging them, even if they are glued to the PCB.

But there are situations when there is no low-power soldering iron at hand, and in the existing powerful soldering iron, the tip has become attached and it is impossible to remove it. There is also a simple way out of this situation. You can wind a copper wire with a diameter of one millimeter around the soldering iron tip, as in the photo. Make a kind of nozzle and use it to successfully solder SMD components. The photo shows how I soldered SMD LEDs when repairing LED lamps. LED housings are very delicate and practically do not allow even small mechanical impacts.

If necessary, the nozzle can be easily removed and you can use the soldering iron for its intended purpose. The width between the ends of the nozzle can be easily changed, thereby adjusting for soldering SMD components different sizes. The nozzle can be used instead of a low-power soldering iron, soldering small parts and soldering thin conductors to LED strips.
How to solder an LED strip with a soldering iron
Soldering technology LED strips not much different from soldering other parts. But due to the fact that the PCB substrate is a thin and flexible tape, soldering time should be kept to a minimum to avoid delamination of the printed tracks.

Repair of the iron car body by soldering
In the old days, when I drove a Soviet car, the technology of soldering iron with a soldering iron helped out when eliminating corrosion of the car body. If you just clean the place covered with rust and apply paintwork, then after a while the rust will appear again. Having covered the cleaned place with a soldering iron with a thin layer of solder, rust will never appear again.
I had to solder with a soldering iron and through corrosion holes in the sills and the zone of the wheel arches of the car body. To do this, you need to clean the surface around the hole with a strip of one centimeter and tin with solder with a soldering iron. From thick paper, cut out a pattern for a future patch. Next, along the pattern of brass 0.2-0.3 mm thick, cut out a patch and the area that will be soldered, tin with a soldering iron with a thick layer of solder. If necessary, the patch is given the desired shape. You can simply tap the patch by placing it on a thick, dense rubber. File the edges of the outer side of the patch to nothing. It remains to attach a patch to the hole in the body and warm it well with a hundred-watt soldering iron along the seam. Puttying, priming, painting, and the body will be like new, while rusting in the repaired place will never happen again.