New Year's decoration of champagne decoupage with napkins. Master class on decoupage of wedding bottles of champagne (a photo selection of various styles is attached)
Registration holiday table- The occupation is as interesting as it is responsible. But if this table is wedding, then the responsibility doubles. I want it to be decorated with something unusual, special. A bottle or two of champagne can serve as such exclusive decorations. And about how to independently make decoupage of bottles for a wedding, we will describe in detail in our article.
It all depends on which method of decoration (decoupage) with your own hands will be chosen. And one more important point: you need to decide how many of these bottles will be displayed on the festive table.
If there are a lot of them, then you need to decorate champagne in one stylistic decision. But if they stand only with the bride and groom, then the decoupage of bottles for the wedding, more precisely, on the wedding table, may differ in the originality of the performance made specifically for the young couple.
There are not so many options for decorating champagne bottles on the wedding table. You can decorate a bottle of champagne with postcards or napkins with drawings that match the wedding theme.
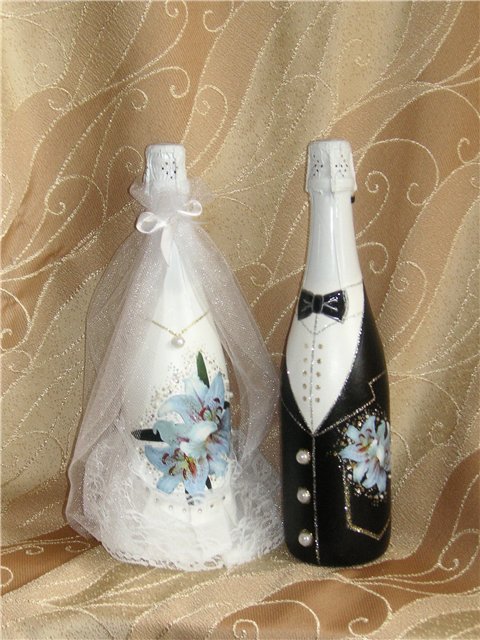
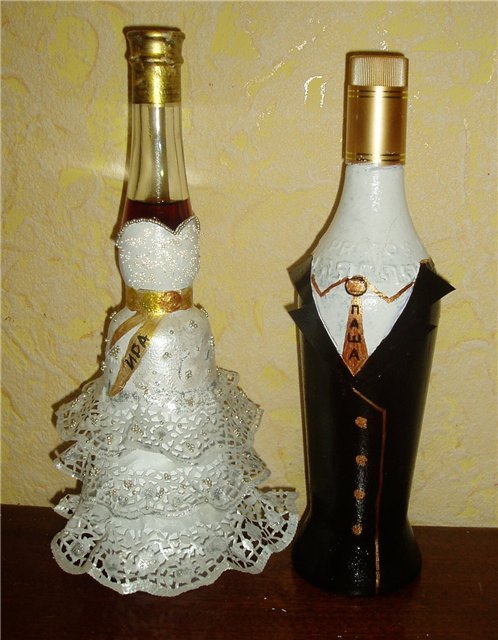
If there are a lot of decorated bottles on the tables, then decorate them better with ribbons. original on wedding table will look like bottles of champagne, "dressed" in a wedding tuxedo and White dress. Such decoration will be a worthy decoration of the table of the bride and groom.
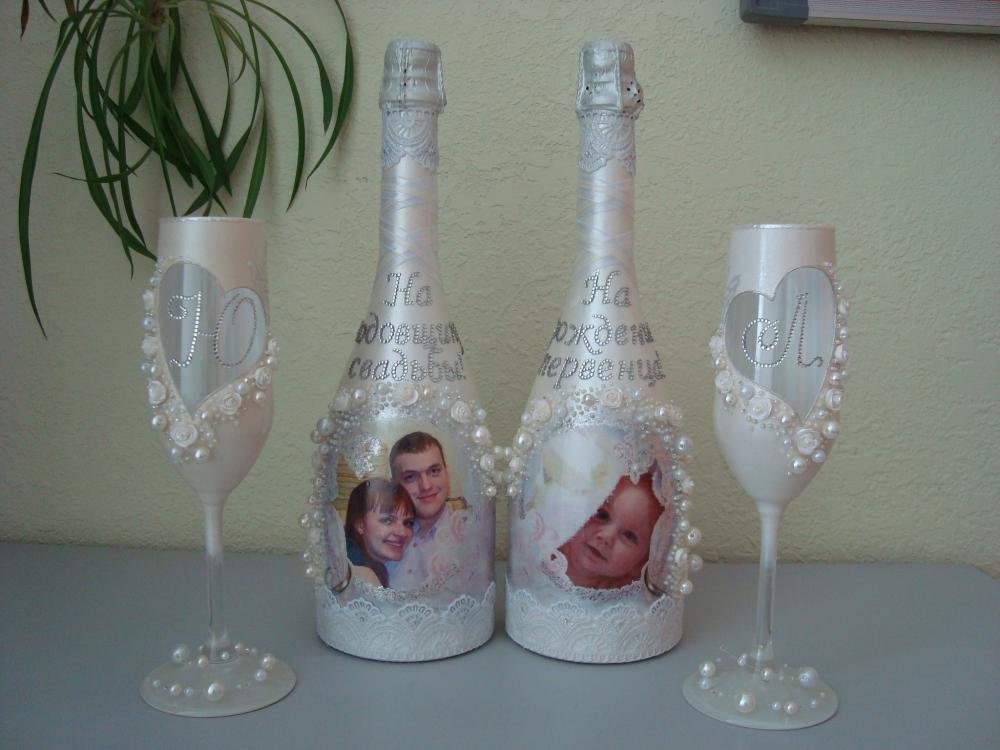
AT last years it became fashionable to give bottles of champagne with a photo of a young couple on the label. It's pretty too original way bottle decor.
Today on the Internet you can find sites that contain photos of wedding, festively decorated bottles of champagne. Some graphic designers or just amateurs give a master class by posting videos with the main points of working in this technique. After the choice is made, it is worth getting to know them better.

For example, let's take a master class on decorating champagne bottles in the form of a bride and groom. The first thing to do is to prepare everything you need for work:
Champagne bottles;
Scissors;
Acrylic paint in black;
PVA glue;
White and black tape;
White and black braid;
Organza, fabric flowers, beads, beads, pearls to decorate the bride's dress;
Piece of cardboard.
First you need to prepare the surface of the bottles for work: remove the labels and degrease with acetone. Then cover the “groom” bottle with black acrylic paint, and the “bride” bottle with white. When the paint dries, cover with glue and wrap black tape on top of the “groom”. Carry out the same procedure with the "bride".

When the base of the bottles is ready, you can start decorating them. And here you can do as your fantasy tells you. With the help of white and black braid, the outfit of the “groom” is decorated with a collar and a “butterfly”. From cardboard, you can cut and glue the cylinder, then cover with black acrylic paint.
While the "groom" dries out, you need to bring beauty to the "bride". Also, with the help of ribbons, pieces of organza, her dress is made, planted on glue applied to the surface of the bottle. Most different variants decorations can be used for the dress and bottle veil of the "bride". A couple more strokes - and the "sweet couple", the bride and groom, are ready to go out, that is, on the table. She will become a real decoration.
Of course, decorating champagne bottles with a cloth is more difficult than decoupage with napkins or postcards. But on the other hand, bottles decorated in this technique allow you to use them on tables for guests.
You can, for example, take napkins with a wedding theme: cooing doves, intertwined wedding rings, hearts. If you approach work with love and imagination, then from simple bottles with pictures pasted on them, you can also make real masterpieces.
What improvised means and materials will be needed to work in the decoupage technique? As in the previous work with decoration, you need to prepare:
Scissors;
Degreasers;
Acrylic paints;
Decoupage cards (if any), postcards or napkins;
foam sponge;
Acrylic lacquer.
According to the previous scheme, we prepare the surface of the bottles. Then we cut out a picture on a wedding theme from a pre-prepared decoupage card, napkin or postcard.
More about what a "decoupage card" is: the name has roots in both Italian and French. Without going into details of etymology, we can briefly characterize it: paper for cutting. Currently, the manufacturers of this product produce two types of decoupage cards: on plain and rice paper.
But regardless of the material from which it is made (although the advantages of rice paper are obvious - strength, plasticity, elasticity), these decorative types decorations have many advantages for their use in this technique.

After the required number of glued pictures is ready, it is necessary, in the same way as in the example with decor using a fabric, to cover the surface of the bottles with acrylic paint, allow time to dry. After that, cover the paint with two layers of acrylic varnish and glue the cut-out motif on it, spreading it from the center to the edges.
Once again coat with varnish and with a sponge lightly retouch the edges of the picture and again cover with a layer of varnish.
Video on the topic of the article
Preparing for the upcoming celebration, the newlyweds with special attention relate to details and decor items. Decoupage wedding bottles champagne will be a great gift for the bride and groom. This is a great way to inexpensively decorate a table at a banquet. Products handmade are especially valuable when they decorate the hall for a solemn event. This article is devoted to how to independently master the decoupage of wedding items and surprise guests.
Materials already familiar to you are suitable for making original decor bottles of champagne with their own hands. This is PVA glue, napkins or decoupage cards, brushes, background acrylic paint, varnish. Additions that will make the product interesting are beads, ribbons, glass contours, etc. All this and many others. important tips and nuances in the performance technique you can learn from the video lesson, which will be given at the end of the article!
In order not to waste time, let's do it right away and - beautiful and original gift for newlyweds!
Necessary materials for work
- decoupage card or motif;
- ocher acrylic paint;
- a bottle of champagne;
- acrylic lacquer;
- sponge;
- degreaser (alcohol, acetone);
- satin ribbon;
- contours on glass in gold and white;
- white acrylic paint;
- decorative pearls;
- contour on glass with pearl effect.
Step by step photo tutorial
In exactly the same way it is done and - easily, quickly and beautifully!
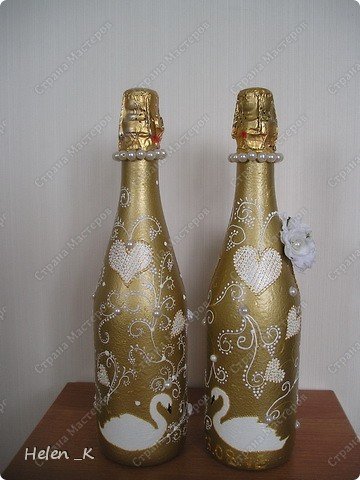
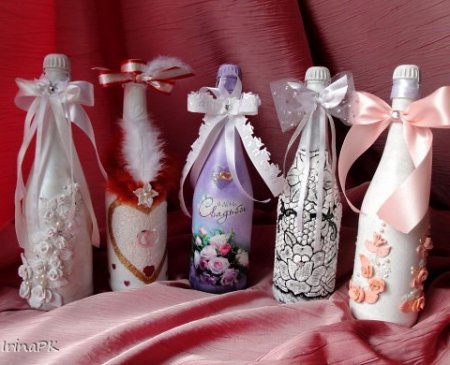
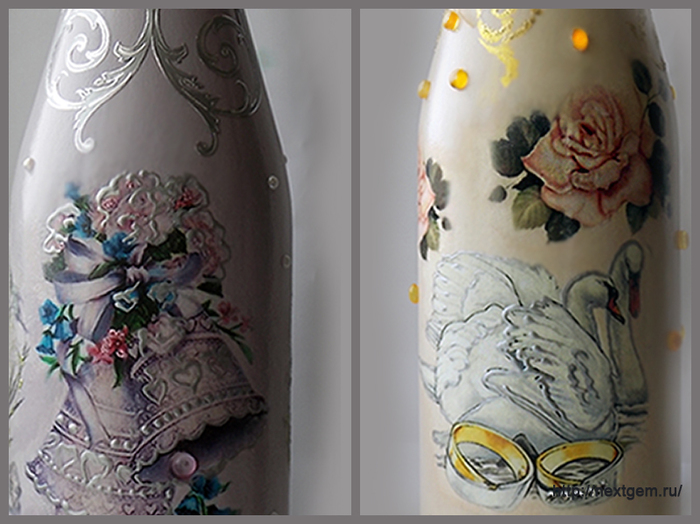
Photo selection of various decoration techniques
Allowed use various techniques in order to make an interesting and original decoupage, the photo below illustrates this perfectly.
For example, ribbons, beads, roses and rice paper. Roses can be made from ribbons or other suitable materials.

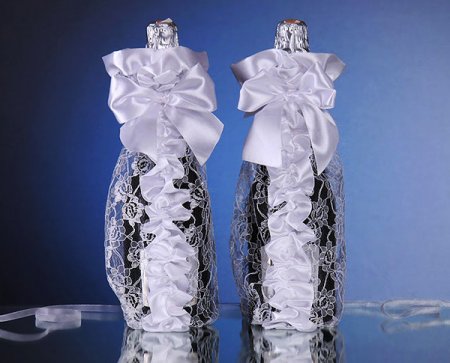
Here, the basic coating of the bottle is done with paint and drapery is made with fabric. Satin ribbons and guipure decorate the product nobly.
The following image illustrates how beads can be used in jewelry. The photo below shows the bulk of the texture.

And this is an example when the decor is a confirmation of stylistic unity with glasses.
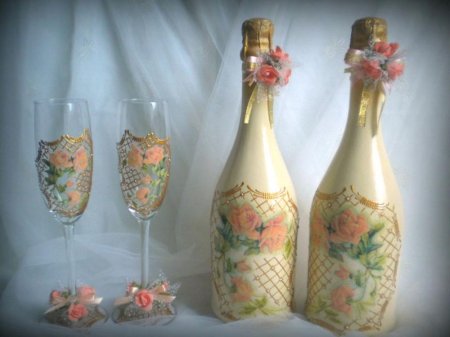
A single style in decorating glasses and bottles of champagne is considered an essential attribute of a festive celebration. Starting the design of wedding bottles, it is worth considering their stylistic unity with glasses. Will the image on the bottle and on the wedding glass also look spectacular? Will these decor items fit into the overall design? banquet hall newlyweds? What color scheme prevails in the clothes of future spouses? The answers to these and other questions will help you create a general image of wedding accessories decoration that will really fit into the framework of the celebration.
It is worth noting that it would be nice to get acquainted with, which will differ from the banal store albums in its originality and beauty!
Video tutorial for beginners
Wedding salons offer wide range of decorative elements in order to make an important day in the life of the newlyweds fabulous and enchanting. But products made in a factory cannot replace the warmth of the hands stored by products created at home.
So let's watch a video lesson to consolidate the knowledge gained:
One of the most happy days in the life of every person is a wedding. And, of course, everyone wants her to be beautiful and memorable. Therefore, with such love and care, accessories are chosen that should make the wedding unique. Now any accessories for the wedding can be bought, but every bride wants her wedding to be unique and fully consistent with her tastes and wishes. Handmade accessories that are made for a particular couple can best help with this. When making them, not only all the wishes of the newlyweds are taken into account, but a piece of the soul of the one who made them also remains in them.
There are many master classes on this topic, so this is more likely not a master class, but just tips from me. I will try to focus on precisely those points that often raise questions among beginner decoupage makers.


Wedding champagne.
At a rare wedding, you can now see ordinary bottles of champagne. Decorating champagne has already firmly entered the wedding fashion. Bottles decorated simply with flowers and ribbons look amazing. But my advice is for those who decorate champagne with decoupage.
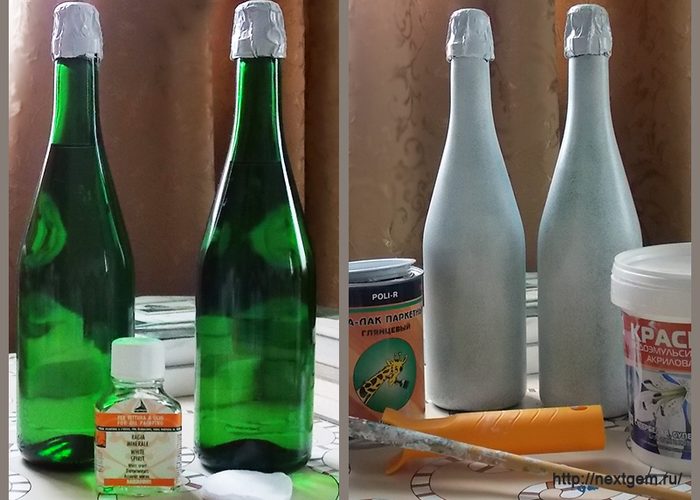
1.Before starting work with the bottle, thoroughly wash off all stickers and labels. Usually it is enough to soak the bottle for several hours in water. The water temperature should not be higher than 20 degrees. AT warm water bottle may explode. Which is not only unpleasant, but life-threatening. But ordinary soaking is often not enough to remove traces of glue used to stick excise stamps. These traces can be easily removed with white spirit or vegetable oil. Next, you should decide how the neck of the bottle will be decorated. I advise you to always ask customers if they want to keep the factory packaging of the neck or decorate it as a whole with the whole bottle. I have decoupage a huge number of bottles of champagne and not once did the customers want to leave the factory packaging. But if you need to save such packaging, be sure to carefully mask the border between the decoupage surface and the foil. For these purposes, you can use ribbons, rhinestones, stickers, etc.
I will talk about a more complex, but more interesting, in my opinion, option, when the cork is also decorated. So - carefully cut the foil along the border of the cork and carefully wipe the bottle with any degreasing agent.
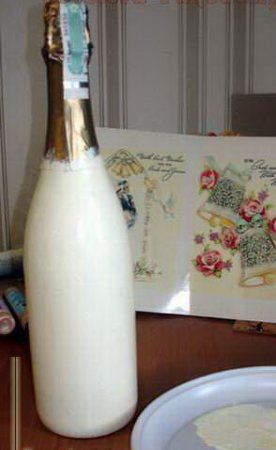
Next, we begin to prime the bottle. This is a very important stage, since the quality of the work largely depends on the quality of the primer. You can use special primers to prime glass, but I use a primer that I came up with myself, and then I found out that this method of priming glass, metal and plastic is often used and professional designers. The most important thing is that it is not only the cheapest and very reliable way primers, but everything you need for such a primer is always at hand.
We take white acrylic paint and acrylic varnish. I always use construction acrylic paint produced by Livny No. 100. and acrylic Aqua-lacquer Poly-R of German production.
We cover the bottle with a very thin layer of white acrylic paint. For these purposes, it is very convenient to use a construction foam roller. The layer should be as thin as possible, but uniform. As soon as the paint stops sticking, we put it on top of the paint, too. thin layer acrylic varnish. We repeat the successive application of paint and varnish a couple more times. The time between applying layers should be no more than necessary for the paint and varnish to set. But after the last layer, it is advisable to let the varnish dry for at least 12 hours. Then it is necessary to grind the surface with a sponge or the finest sandpaper so that it becomes absolutely smooth.

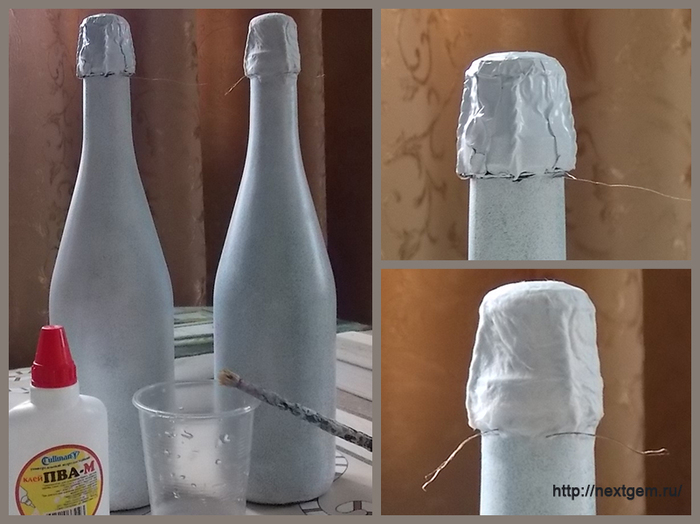
2. Many people have a question, how to open a bottle when the cork is decorated? This problem is solved quite simply. We pass a thin wire onto the neck under the cork itself. We make only one turn and cross the ends of the wire so that it holds. Then we glue the foil with one layer of a white napkin, grabbing the wire. When the glue dries completely, paint over the pasted napkin with white paint. The glue must be allowed to dry completely. Otherwise, the paint may crack. We return the ends of the wire to a position where they are not crossed. The wire is fixed with a napkin and will not fall anywhere. When opening the bottle, it will be enough to pull one of the ends and the wire will cut through the layer of paint and napkins. The wire can be hidden under a ribbon or strip of stickers. On the same wire, if desired, it is convenient to attach an ornament. If you do not want to decorate the neck of the bottle with anything, you can do without wire. Because one layer of a napkin is glued on the foil and only two layers of paint and one layer of varnish will be applied, under which the foil is located, it will not be difficult to release the cork. But since they often want to keep already empty bottles as a memory, it is better to do it with a wire. When opening, with the help of a wire, the edge will turn out to be more accurate.

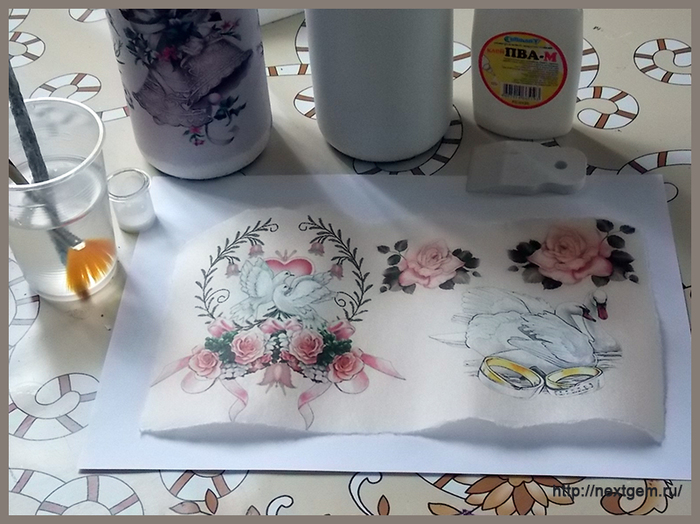
3. Next, you can start gluing the picture. If you are printing on plain paper, then it must be thinned. If the printout is made on paper no thicker than 60 den, you can simply thin the edges of the printout to translucency with sandpaper. In this case, the printout must be soaked for ten minutes before gluing. If you stick a napkin or, like mine, a printout on rice paper for calligraphy, you don’t need to soak it. The edges and printouts and napkins should not be cut off, but cut off. Moreover, it is desirable to tear out the upper edge not in a straight line. This will help minimize wrinkles.
4. After the picture is pasted, with a fine sandpaper, carefully go through the folds that have formed in areas free from the pattern. If there are folds in the figure, then we do not touch them yet. We cover the picture with one layer of varnish. This must be done, because it will not only greatly facilitate the work, but also allow you to choose the right paint for drawing the background. It is almost impossible to get the color you need for painting with just one paint. For example, to get the right color for this bottle, I used burnt umber, orange, dark pink and of course white paint. There should be enough paint so that it would be enough to apply two or three layers, because the process of obtaining the desired color is quite long, it is not worth repeating everything from the very beginning for each layer. Therefore, to mix the paint, use a container that can be closed. When get on your mind desired color try to paint on small plot, going a little into the picture. You should look at how close the color is right away, while the paint is wet - this is how it will look after applying the varnish. If the color does not quite fit, immediately wipe off the paint and continue to experiment with color further. Never save time at this stage. A well-chosen paint will even mask some flaws in the work, but if it does not match the background of the picture, then the work will be hopelessly damaged.
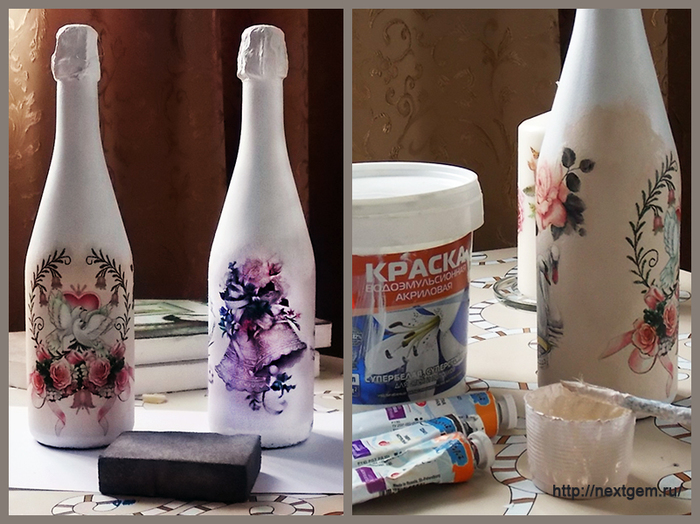
5. When the color is chosen, it is necessary to cover the background and cork with paint. Do not forget to cover the bottom of the bottle with the same paint. It looks very ugly and untidy when the glass peeps out from the bottom of the bottle. It is advisable to apply two coats of paint with intermediate drying. Where possible, it is better to use a foam roller. Then the whole bottle is covered with two layers of varnish. One layer is sufficient on the cork. After that, with a fine sandpaper, you need to sand the entire bottle. If there are wrinkles somewhere or the border of the printout is noticeable, you need to apply a few more layers of varnish with intermediate sanding until the wrinkles become invisible. And then you can proceed to further decorating the bottle.
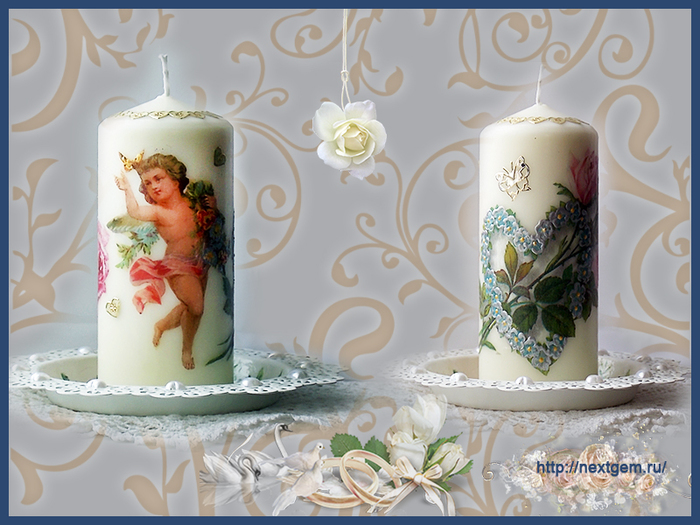
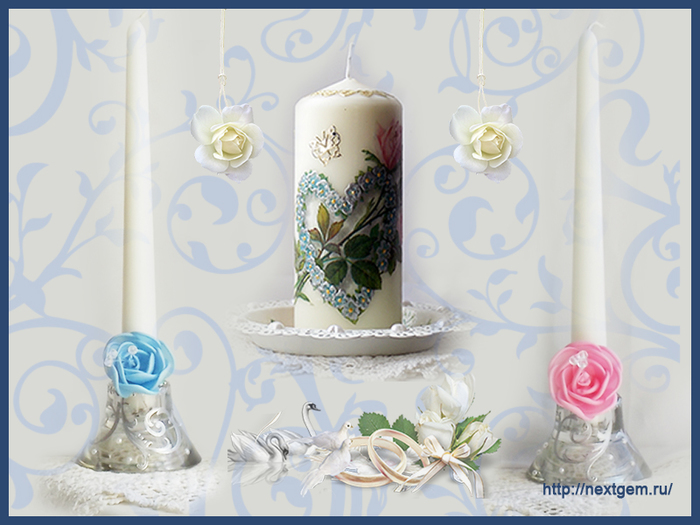
wedding candles.
With the birth new family it is necessary to “ignite” the hearth so that warmth, comfort, and well-being always reign in the house. Happy symbol family life is the fire to be conveyed from parental family newlyweds.
Lighting a home from a parental candle is a guarantee of mutual understanding and happiness in the family. After the wedding, the newlyweds must keep their candle.
A candle is a talisman of a newborn family, which is kept in the family all their lives. It must be lit on the anniversary of the wedding, as well as at the birth of children and on memorable dates.
This talisman helps bring harmony and happiness back to the family. Ignited for a couple of minutes in difficult moments, when there are disagreements in the family, or an illness has come to the house, it will definitely help.
Usually three candles are made - a home and two candles for parents. Candles, like champagne, of course, can be decorated very beautifully simply with flowers and ribbons. But when making such a decor, be sure to remember that candles are an open fire. Ribbons and flowers placed close to the wick can spoil the most joyful event. If making candles for parents, in addition to beauty, it is enough to remember about their safety and ease of use, I mean candlesticks, then when making a home, do not forget that this candle should be kept in the family for life. And since she should become a guardian talisman, then she will stand in a conspicuous place. Therefore, I always try to make a candle-home so that it does not lose its appearance even after many years, and of course I definitely make a candlestick for it. Even those who do not know decoupage can decorate a candle with napkins. This requires the candle itself, a three-layer napkin and a spoon or palette knife.

The desired fragment is cut out of the napkin and two white layers are removed. The cut out drawing is applied in the right place to the candle. A spoon or palette knife heated over a candle should be carefully drawn over the napkin fragment. As it heats up, the wax will seep through the tissue. The drawing will be drowned in wax and will be reliably protected. After the work is finished, take a flannel cloth and polish the candle.
Wedding glasses.
As for wine glasses, I will probably only have one recommendation. If possible, leave undecorated the upper edge of the glass and the area that will directly come into contact with the lips. Overwhelmingly, we all use paints that are purely for decorative purposes. Acrylic can cause an allergic reaction in some people. And of course, do not forget that no matter how well the wine glasses are rubbed, they will definitely be rinsed before use. Therefore, bows, ribbons and stickers top edge also not desirable.
Well, perhaps that's all. I hope some of my tips can be useful for beginner decoupage artists. And the work done to such joyful event like a wedding, they will bring joy to the newlyweds and satisfaction to you.
Creative success to all and more beautiful works.
Decoupage of bottles for a wedding is a guarantee that everything on your table will be decorated in the same style. Champagne is the most requested drink at a wedding.
However, there are two inviolable bottles. These bottles are meant to be opened by young people on their first wedding anniversary. It is quite logical if these bottles are decorated in a special way. More and more often, people who want real, not stereotyped originality turn to handmade craftsmen. Someone orders bottles stylized as the image of the bride and groom, someone tends to decorate with ribbons. And someone comes to a rather popular method of decorating champagne - decoupage.
Decoupage is a method of transferring an image to an object using special decoupage cards or napkins. You can even decorate the surface with a photo of the bride and groom using this technique. So, a small master class: do-it-yourself decoupage of bottles for a wedding. step by step photos help guide you through this exciting process.
For work you will need:
- Two bottles of champagne;
- Napkin with a thematic pattern;
- Nail polish remover, or alcohol, or window cleaner;
- Sponge, brushes and tweezers
- Primer (a mixture of PVA and white acrylic paint, or a ceiling emulsion is suitable)
- PVA glue
- Sandpaper 0, the finest
- thin wire
- Acrylic lacquer
- Acrylic paints
Step one
Surface preparation for work. Remove all paper stickers and upper part foil. The easiest way to do this is to soak the bottles in water. Be careful, the water should be barely warm, no more than 20 degrees Celsius, otherwise the bottle may explode.
After all the labels have peeled off, wipe the bottles dry and look carefully for any traces of glue. It can be removed with acetone-based nail polish remover. The entire surface must be degreased, for this we wipe the glass with alcohol, or the same nail polish remover.
Remove the foil from the top of the bottle, leave the cork and iron wire. If you are not yet very experienced in decoupage, it is better to leave the top of the foil package. The remaining space is quite enough to place the fragment you like.
step two
Primer. A primer is the preparation of a plain surface, which will be the background for the entire composition. If the glass is well degreased, the primer will lay down without gaps - it will not flow around any place.
It is most convenient to prime with a foam rubber sponge, and a special primer for glass. Clamp a piece of sponge with tweezers or a clothespin. If there is no special primer - it does not matter, a mixture of acrylic paint and PVA glue will do. The mixture should have a consistency similar to condensed milk - not too thick and not too liquid.
Gently and evenly with patting movements cover the entire surface with a primer. Don't forget about the bottom, it also needs to be primed, otherwise this transition from white to green will kill the whole look.
The first layer must dry before the second layer of primer can be applied. It should dry for at least half a day.
After the surface is completely dry, you need to carefully walk on it. sandpaper so that the glass is completely smooth. Carefully glue the cork with two layers of napkins, lower the edges along the neck and also primed so that the transition is invisible.
Step Three
If you do not have special decoupage cards, but napkins, you need to separate two white layers from them. The remaining layer with the image is needed for further work.
Ideal if the napkin White background. Cut out the pattern that you like very carefully, stepping back a few centimeters from the edge, three will be more than enough. Then carefully cut off the edges to the contour, leaving no more than half a centimeter. This is necessary so that the transition from the image to the background is less noticeable.

Step Four
Attach the picture to the selected area and cover with glue, on top.
Use a brush to work carefully, smooth out wrinkles and air bubbles. Start from the center to the edges.
As it dries a little, you can walk along the edges of the picture with sandpaper - this will remove the remaining wrinkles. After that, you need to cover the picture with varnish, one layer will be enough.
If the background of the napkin was not white, you need to pick up the paint and make the entire surface plain. Choosing a color is not easy, so it is better to choose pictures with a white background.

Step five
After the varnish has completely dried, you can do additional decor. Stick on rhinestones, or semi-pearls, ribbons. The contours of the image, if there are doves, or rings, or hearts, it is quite possible to highlight with glitter with sparkles or contour paints of the corresponding color.

Video compilation