How to install an LED strip in a plasterboard ceiling on your own
LED lighting for a false ceiling is a decorative element, the advantage of which is ease of installation. The installation of such lamps with a ready-made structure for drywall takes half an hour.
LEDs are not prone to heating drywall sheets. Even after a long time, yellow spots do not appear on the surface, and the finishing layer of decorative finish under the illumination of such lamps remains attractive. LED backlight allows you to:
- emphasize the volume of the ceiling;
- divide the room into zones;
- select interior items;
- use the minimum amount of wiring, terminals, adapters;
- save energy costs.
Knowledge of the technology of the device provides for a detailed study of how to arrange the frame, fix the backlight and what materials are best used for this. So, the work can be done by hand.
Frame assembly
More often drywall occurs in the living room. This is due to the parameters of the room, because in most residential buildings it is the living room that is the largest and allows you to effectively place light points.
To assemble the base frame, follow these steps:
- at the corners, stepping back 10 cm from the ceiling, make marks, connect them together in a horizontal line, check the correct markings using the building level;
- along the drawn line, a UD profile is mounted with a shelf width of 40 mm, fixed to the wall with dowels;
- perpendicular to the guide at a distance of 40-50 cm, CW profiles with a shelf width of 50 mm are fixed with self-tapping screws, fixed to the ceiling with hangers;
For stiffness between the starting profiles in a step of 50 cm, it is recommended to install stiffeners (jumpers) and connect them to the starting profile with a “crab”.
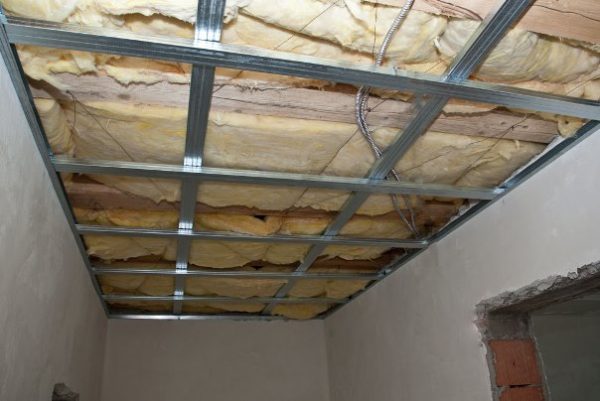 Basic frame
 Then the frame is sheathed with sheets of drywall with a thickness of 6.5 or 9.5 mm, so as not to burden the structure. The brand of plates is better to choose moisture resistant. As a result of fulfilling the above requirements for the material and arrangement of the frame, a ceiling in the living room is obtained with an optimal bearing capacity, the service life of which is unlimited.
Box formation
The box for the hidden LED lighting device is the most important component: a tape is mounted in it, which will reflect the light rays from the ceiling surface and distribute them throughout the room.
Box assembly steps:
- draw the boundaries of the future box on the base ceiling;
- attach a carrier profile along the border of the drawn line;
- stepping back 10-15 cm from the wall, fix another supporting profile, forming the inner perimeter of the box;
- every 40 cm, attach trimmings of the starting bar to the profile, the length should go beyond the base drawn line by 10 cm;
- connect the carrier and starting profiles with suspensions;
- sheathe the GKL frame;
- install corner profiles at the joints of drywall sheets, seal the seams with putty, sand, treat with a primer.
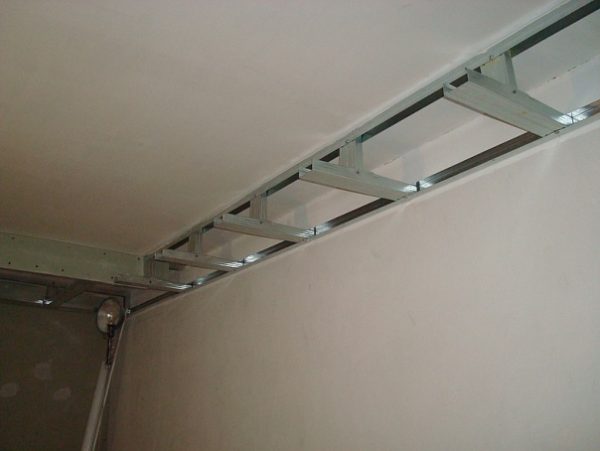 box frame
 Backlight connection
After the base level ceiling frame and the living room box trim are completed, the tape is installed. This can easily be done by the distance of 10 cm left during the formation of the cornice. You can attach a side from a strip of the starting profile and gypsum plaster 50 mm wide to this cornice.
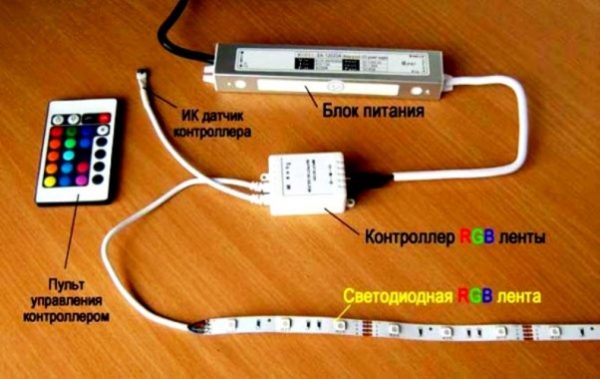
Tape connection:
- in a special place for making a cut, the tape is adjusted in size;
- using a special connector or by soldering, segments of various lengths are connected into one LED line;
- observing the polarity, the lamps are connected to the power supply;
- if the LEDs are connected in different colors, a controller is installed between the power supply and the tape to adjust them;
- the tape is connected to the network, and if everything is in order, it is glued on the inside of the gypsum board.
To illuminate the plasterboard ceiling in the living room, you can choose three types of LED strip: SMD 5050, SMD 3028 and RGB. The brightness of the first two drops by 20-40% after several years of operation, but if they are used as additional (temporary) illumination, this figure drops to 10%. RGB tape is considered optimal for the ceiling: it is durable, does not lose the intensity of illumination, and diffuses a soft light flux with a power of about 12 lumens.
 RGB strip device
 The number of lamps in one meter of such a tape varies from 30 to 120 pieces. The more of them, the brighter the light source, but the installation is more expensive. It depends on the power source, which should not only be powerful (20-30% more than the total power of the connected lamps), but also compact so as not to hang from a plasterboard false ceiling in the form of an ugly pile of wires. Therefore, as the main living room lighting, it is better to choose RGB or SMD 5050 with the number of lamps within 60 pieces per meter.
Such a backlight will save your eyes from overexertion, will fill the room with bright and natural light. Furniture can also be emphasized with less powerful SMD 3028 diodes - they will serve to create an ideal backlight with moderate brightness. As a color tint, it is better to pay attention to pure white colors or use an RGB tape with a built-in base color change mode. How the installation of such a tape to the plasterboard ceiling can be seen in the video.
Do I need additional protection for LED strips after connection
An important factor for choosing LED backlight is its tightness. If it is supposed to fix the LED strip to the plasterboard ceiling in the living room, it is allowed to use the backlight without sealing and additional processing of LED lamps. It will be necessary to take care of the cleanliness of such unprotected tapes very carefully so as not to catch the joints and conductive veins.
 Schematic arrangement of tapes in a niche made of plasterboard
 If you need false ceiling lighting in the kitchen or bathroom, choose tape models with IP 65, 67 or 68 protection levels. They are completely sealed, do not let dust and moisture in, and protect the soldering points of the LEDs. Taking care of them is much easier. Additional protection allows you to extend the life of the lamps, eliminate the risk of short circuits.
It looks beautiful and creates a calm, intimate atmosphere in the room.
In contact with