How to sew the very sides for a baby bed
The birth of a child is always an exciting event for new parents. At the birth of a baby, adults will have much less free time. There is a perfectly reasonable explanation for this. All personal time will be given to a small miracle. Therefore, almost all future parents try to prepare everything necessary for the crumbs in advance.
Crib bumpers are very important for a newborn baby. They will help protect your child from bruises and bruises when your baby learns to get up and walk in his bed. As a rule, in every children's store you can buy a set with bumpers in the crib. However, this purchase will result in a pretty penny for the young family. Such a kit is a rather expensive pleasure for the budget of a young family.
The way out of this situation can be bumpers sewn independently. The process is quite simple, and besides, it will not take you much time. Another plus is that you choose the colors yourself.
If desired, in a similar way, you can, a pillowcase and a duvet cover. Thus, you will have a whole crib kit (you can see how to sew a sheet with an elastic band) of your little miracle.
The first thing to start with is to measure the bed. To find out the required amount of material for the manufacture of bumpers, you need to multiply the perimeter of the crib (the length of all sides) by the desired height of the bumpers.
We acquire the necessary materials for tailoring the sides
Knowing what footage you need, you can go to the store for a choice of fabric. If the gender of your baby has not yet been determined, we advise you to buy neutral shades (yellow, green, lilac). The fabric for the sides is better to choose natural: cotton or linen.
When buying material, do not forget about the filler for the sides. It can be foam rubber 1 cm thick, holofiber or synthetic winterizer. You will also need ruffles, bows, ribbons for ties and other decorations of your work.
cutting
After everything you need is purchased, you can start cutting. The number of details of the pattern of the sides may be different, depending on the model chosen, the height of the crib and the amount of fabric. You can sew sides from 4, 3, 2 and even 1 parts.
Usually, the sides are sewn from 4 separate parts and, if necessary, each part is attached to the sides of the crib using ribbons, ties, Velcro, etc.
Consider cutting and sewing sides of 4 parts.
Since the crib is a rectangle, we need to build two parts of the pattern:
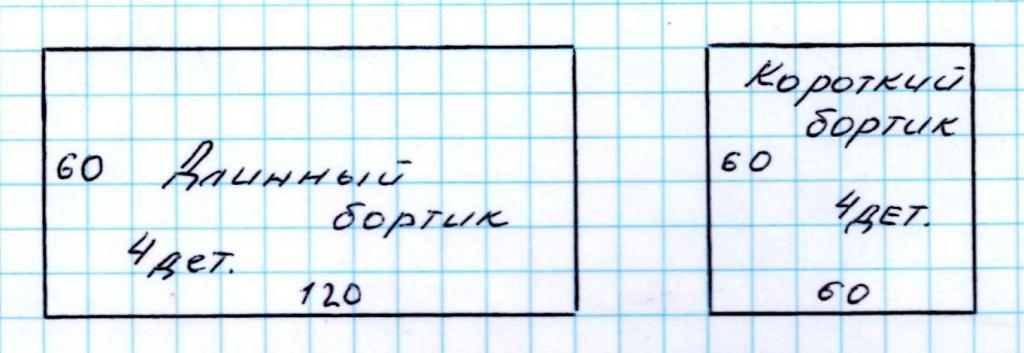
A long edge that looks like a rectangle, where one side is equal to the length of the crib and the other side is equal to the height of the side of the bed minus 15-20 cm (for example, 120 x 60 cm).
Short side, where one side is equal to the width of the crib, and the second is equal to the height of the side of the bed minus 15-20 cm (for example, 60 x 60 cm).
The number of cut parts in this case should be 8 or 4 (4 - if the parts are cut with a fold).
The fabric must first be decaged - that is, washed in hot water, and then ironed with a hot iron from the wrong side. This is done so that the sides do not deform during operation.
With soap or a pencil, we circle the patterns of details on the fabric, adding 1 cm allowances for seams on each side. Cut out.
We also cut out 4 parts from foam rubber, 1 cm less on each side of the main parts. Many experts do not recommend using foam rubber and synthetic winterizer for children's products, arguing that such materials contain toxic substances. It is up to you to decide which filler to choose. As an alternative, we suggest usinginstead of synthetic winterizer and foam rubber - cut out details from an old blanket or coat.
Then start sewing. Fold the two pieces of each side in pairs together with the right sides inward and sew on three sides. Leave one side unstitched. The filler of your choice will be inserted through it. Be very careful about the quality of the seams. Cut the threads and turn the hem right side out. Now insert the piece of foam rubber (or other filler). Sew or topstitch the open seam. Do the same with the rest of the details.
Try on the sides to the bed, mark the places for sewing the ribbons-strings. Sew on or sew on ties.
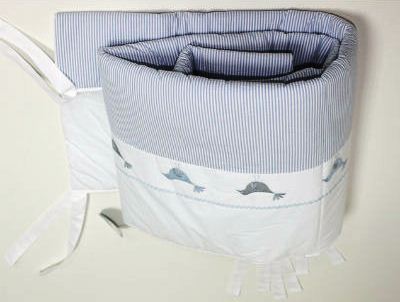
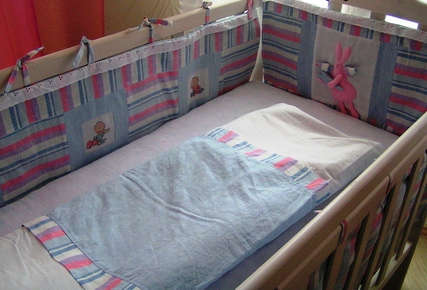
After all the sides are sewn, you can start decorating the product. Sheathe the edges of the sides with ruffles, and make bows from ribbons.
Remember that the beauty of the work depends on your imagination and perseverance. The products you made will delight you and your baby for a long time.