Making a sliding wardrobe yourself: material, device, design, installation
The built-in closet is not in vain very popular. A sliding wardrobe not only has a large capacity, taking away a minimum of usable living space. It is able to perform other useful functions in the interior, and making it with your own hands is not so difficult.
What does coupe mean?
In the common parts of ancient European cities, the streets were very cramped, and the sidewalks were so narrow that it was sometimes impossible to open the carriage door. Because of this, somewhere in the XVII century. carriages appeared with sliding doors. The legend ascribes the invention of the coupe to the court coachmaker of France Janto. But, most likely, this is only a legend - Janto is famous for inventing the steering linkage, which made it possible to make sharp turns without the risk of tipping over.
A carriage-coupe is a rather playful concept: parts of the city remote from comfortable quarters were visited mainly for secret dates. The very word "coupe" some linguists deduce from "couple" - a couple, an extramarital affair; marriage - "marriage", hence - known to gamblers mariage, a lady with a king of the same suit.
Then the sliding doors fit the railroad workers for 1st class and sleeping cars. And in the furniture business, any wardrobe with sliding doors is considered. So the wardrobe is not necessarily built-in. A built-in wardrobe may not be a compartment.
What is the use of a closet?
The main types of direct wardrobes are shown in the figure. It should be noted right away that radius wardrobes, in which the front surface is curved, require high furniture professionalism, and it’s better not to take it on your own. Therefore, we will leave the radius cabinets aside for now.
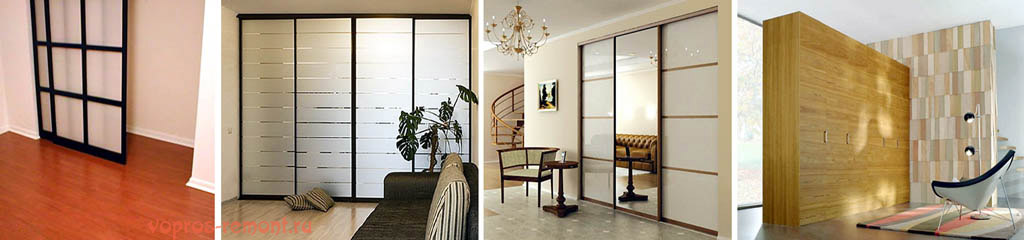
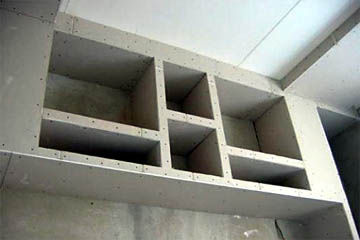
First of all, a wardrobe can be arranged in a niche, first pos. left. Making a cabinet of this type on your own is not much more difficult than a stool. Expenses are at a minimum; after all, there are already three walls, a bottom and a tire. An inconvenient place turns into a useful one.
Second from left- in fact, the same closet in a niche, but a niche in the entire width of a blank wall. Thus, it is possible in a small apartment, practically without reducing the living space. The visible volume of the room can even be expanded by trimming or decorating the doors accordingly.
next in order- in the opening of the interior partition. A common technique in the arrangement of open-plan apartments in modern monolithic houses. It gives convenience and allows you to save a lot on expensive construction and plastering and finishing works. By the way, the ones described above are also economical - the inside of the cabinet can be made of chipboard, and the doors too; After all, they most often go for decoration and decoration.
Cabinet on the far right- already hull, so the material for it is needed more expensive. These are mainly used for zoning budget odnushki or, conversely, expensive penthouses without interior doors.
And, finally, a closet, like a regular one, can be straight and angular, leaning against a wall or placed across it. The latter, as said, are used for zoning. They have two faces, but no rear at all. Often made double-sided, with doors back and forth, for easy access to content. The closet can also be turned into a closet by replacing the swing door with a sliding one.
We will take a closer look at the cabinet built into the niche; the rest will be touched upon in passing. It is easiest to make it yourself, and the money savings are the greatest. In addition, most likely you will not need a special tool and sawing work that requires a solid skill. Why? Let's get to that.
In general, the procedure for manufacturing a wardrobe is as follows:
- Choice of material;
- Determination of the degree, nature and method of placement of filling;
- Door design, with a choice of suspension method;
- The choice of the method of hanging the shelves;
- Niche preparation;
- Measurements and drawing;
- Purchase of accessories, materials and sawing of blanks;
- Assembly of the cabinet and installation of internal lighting;
- External finishing.
materials
Cabinet design must begin with the choice of material. The entire manufacturing process depends on it, and depending on the choice, it can fundamentally change.
Wood and lining
Wood is a traditional, and in our time, prestigious furniture material. But for a built-in wardrobe, wood is far from the most suitable. The humidity in the niche will certainly be higher than in the room, and the tree will warp; its decorative role in this case is minimal. If you still need a wooden cabinet, the wood for it should be straight-layered, without streaks, knots, cracks, seasoned and thoroughly impregnated with hot drying oil or a water-polymer emulsion.
Note: it is not at all necessary that the niche be damp. For warping of wood, the difference in humidity from a blank wall to the doors and its sharp jumps when opened are important. Because of this, it is not recommended to put cabinet wooden cabinets in niches.
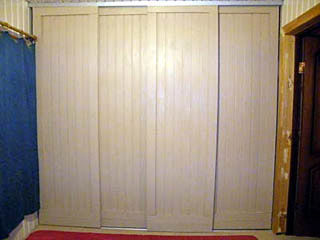
Lining for a cabinet in a niche, plastic or MDF, can be used without its preliminary preparation, but another limitation appears - the frame of the door leaves. They have to be made of wood, with the same conditions and requirements as indicated above, plus - the care of manufacturing. You also need to glue the lining boards together, but this is not a problem: there is a tongue, there is a groove for it, and it holds perfectly on PVA. In general, a lining wardrobe can be recommended only for those cases when a closet in a niche should organically fit into the interior, as in fig.
Drywall
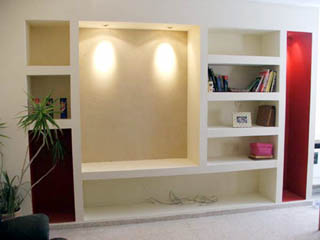
Drywall is an excellent, easy-to-work finishing material with ample opportunities. Designers and home-made amateurs create real masterpieces from it. But as a basis for a cabinet of any design, the GKL is completely unsuitable. You can make a drywall cabinet, see pic, but it's difficult. Let's see why.
Drywall is a rather heavy, fragile and at the same time not very durable material. It is intended exclusively for decoration and cannot be part of the supporting structure, even lightly loaded. Simply put, drywall cannot hold anything on itself; on the contrary, it must be attached to something and something must hold it. A piece of drywall 400x400 mm, laid flat on the frame, sags noticeably by itself within six months. GKL sheets according to TU are not allowed to be placed vertically or leaned against the wall during storage.
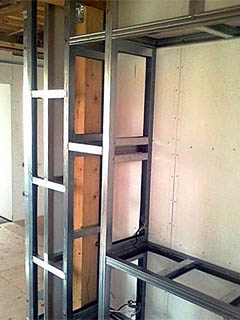
That is, it is impossible to simply cut the GKL and fasten it together, like, say, a laminate (see next). Each shelf must be a box-shaped space structure, which requires a complex frame (see the figure on the right). But the structure obtained as a result of assembly (see the next figure on the left), with the correct geometry and proper strength, will be far from aesthetic; need more putty and decorative trim.
Note: wood is doubly unsuitable for a cabinet frame made of plasterboard - the cavities of the finished structure will pull moisture into themselves. Only standard C- and U profiles with standard fasteners are suitable for the frame.
Then the doors. You can’t make them from GKL in any way - the fasteners will break off simply under the weight of the sash. And in the doors is just the essence of the closet. To make cabinet shelves with doors out of drywall is a monkey's work and a decrease in usable volume. There are no sliding wardrobes from GKL, and a wardrobe with shelves from GKL does not make sense.
In fact, a plasterboard cabinet is not furniture, but a building structure, and is carried out according to construction, not furniture technology. But at the same time, it can have outstanding aesthetic merits and be the most significant object of interior design.
Laminate, MDF, fiberboard
These are the best materials. Making a cabinet from them can be elementary simple at minimal cost, see sawing. These materials have all the useful properties of wood and at the same time are insensitive to moisture gradients and fluctuations. in the process of their manufacture, the microstructure of the tree is transformed into another. Just one note: fiberboard should be taken in medium or high density. The back wall of inexpensive cabinet cabinets is often made of low-density fiberboard, similar to thick cardboard corrugated on one side, but it will soon lead in a niche.
Filling
The internal filling of the cabinet determines its internal layout. There are four rules here:
- Raw - aside separately.
- Necessary and small - before your eyes.
- Dry - higher.
- Valuable - in boxes.
For example, it is wrong to place a section for outerwear in the middle - dampness will go to the sides from it. If you place it on the side, the moisture from the clothes will go where it is easier - out. In the bedroom, drawers or shelves for bed linen do not need to be arranged immediately above the floor - dust and moisture are concentrated about 40 cm above its flooring. Well, and that a wallet or a smartphone in plain sight near the entrance should not be lying around, and so it is clear.
The ultimate goal of content layout is to get a minimum shelf width; this will be needed to calculate the doors. The placement procedure is quite responsible, the convenience and durability of the cabinet largely depends on the successful layout.
Video: wardrobe interior layout
doors
Doors are the salt of the closet, its most complex and critical element. Three significant points:
- Number and width of doors.
- Suspension structure.
- Sash stoppers.
sashes
At this stage, the task is to find the number of doors for a given width of the opening under the cabinet. The smaller the doors, the more convenient the cabinet, but the likelihood of skew and jamming is higher. The maximum allowable width is 600-700 mm; with a larger sash, they can walk tight simply because they turn out to be very heavy.
The overlap of wardrobe doors should be within 50-70 mm. If the overlap is too small, you will either have to open and close the doors carefully, or put up with gaps. If the overlap is too large, the internal layout of the cabinet is difficult, especially if it is intended for a hallway or other cramped room.
At the same time, the width of the door should not exceed the width of the narrowest of the shelves, otherwise it may not be accessible. We also take into account the allowable overlap and subtract 40-50 mm to the side profiles; without them, the doors will beat the wall. In general, the procedure is as follows: based on the maximum for the width of the door, we first determine the number of overlaps (one less than the doors) and check the resulting door width. It does not fit into the maximum - you need to make one more door, and so on, until everything converges.
Calculation example:
Opening width - 1.75 m; the narrowest shelf is 0.45 m. A double-leaf cabinet will no longer work, it does not come out both in terms of convenience and the maximum allowable width of the door. Then we put two overlaps, this will give 100-140 mm minus to the opening, and put another 50 mm on the sidewalls. Total - 150-190 mm, 0.15-0.19 m. 1.75 remains on the doors - (0.15-0.19) \u003d 1.6-1.56 m. Divide by 3, the door width comes out 0 ,53-0.52 m. A lot, what to do? Let's figure it out with 3 overlaps (4 doors). It comes out 37-39 cm per door. But making 4 doors is more difficult and expensive (an extra set of fittings), so it makes sense to go back to the placement sketch and re-arrange the inside so that the narrowest shelf comes out at 55 cm.
suspension
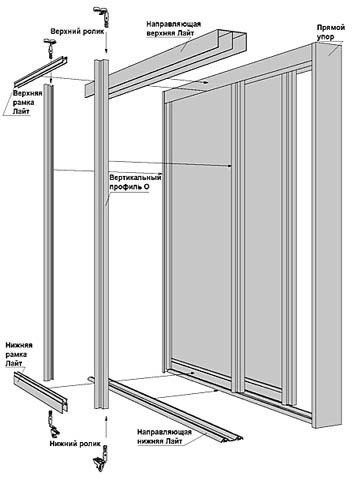
There are three well-known door suspension systems for wardrobes: two-rail with a lower support, two-rail with an upper support and a monorail. Each of them has its own advantages and disadvantages. The choice is ultimately determined by the size, purpose of the cabinet and the financial capabilities of the customer/master.
bottom rail
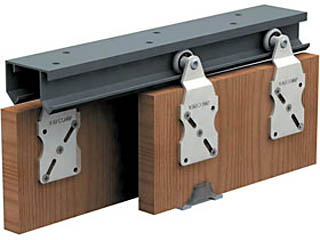
The most common system; schematically its device is shown in fig. on the right, and the design of the upper and lower rails is shown in Fig. left. Support - lower rollers, upper - prevent the sash from falling out. This system is also the most reliable: the doors almost never jam or touch each other.
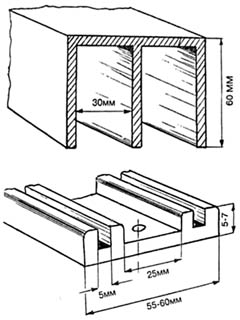
The lower rollers are heavily loaded, therefore, when self-assembling, certain rules must be observed, which is illustrated in Fig. below. The rollers are made of plastic, and when buying, you need to look to take polypropylene ones; there are a lot of cheap plastic ones on sale in a low-quality metal carriage. If the rollers are propylene, then you don’t have to look too closely at the metal; both steel and aluminum are equally reliable.
The installation of the sashes is simple: insert the top into the groove of the rail, lift it up to the stop, insert the bottom into the groove - you're done. However, the bottom support system has disadvantages:
- Sensitivity to subsidence of the floor, and the weight of the cabinet itself enhances it. On an old wooden floor, after a while, the doors can start to ride on their own, or even fall out.
- Sensitivity to dust and dirt. The loaded surface of the rail is in the most dusty layer of air, the rollers roll and compact the dust, tubercles form in the groove of the lower rail, after a while the doors begin to rumble unpleasantly, and the rail with the rollers needs to be cleaned.
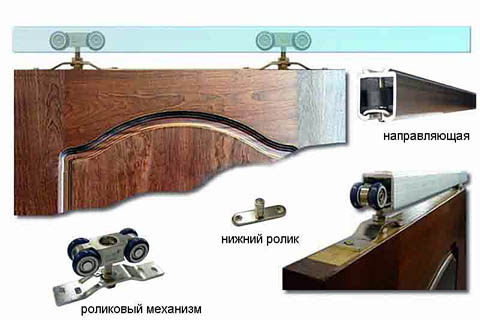
top rail
Here the support has been moved to the upper rail, see fig. on right. The concrete ceiling does not sag, and properly finished and does not generate dust, so the doors move quietly and smoothly. Fittings of this type are not complicated and not expensive, and the installation differs from the previous one only in that the sash must be tilted during installation. There are three disadvantages, but two of them are significant, so the suspension with the top rail is not widely used:
- You definitely need a lower guide, without it the sashes will inevitably beat and rub each other.
- With an accidental push or pressure on the sash, its rollers come out of the groove and the sash falls into the cabinet.
- The top rail is not very rigid, so in some cases it is necessary to level the ceiling at the place where the suspension is installed.
Monorail
The peculiarity of the system is that in each carriage there are 2 pairs of rollers (see the following figure), and the suspension of each sash runs in a separate guide. Paired rollers, together with the profile of the guide, to some extent fend off the reeling of the doors. Thanks to this, with careful handling, you can do without the bottom rail and not touch the floor. But it is still impossible to push the sashes inward, while they will touch each other. Therefore, lower guide rollers with a rail under them are also sold for the monorail.
A wardrobe with such a suspension is suitable, first of all, in the bedroom, where adults use it, and neatly. A strong and precisely adjustable suspension allows you to make wide doors, and this, in turn, can be placed against a blank wall and a closet and dressing room. Rigid box rails allow in most cases to do without leveling the ceiling. There are four main disadvantages of a monorail:
- Complicated and expensive hardware.
- The need for a decorative overlay at the top, because. a wide gap remains between the sash and the rail.
- Difficult installation: you must first insert carriages with rollers into the rail, then attach the rail to the ceiling, and only then hang the door. An assistant is needed to hang the sashes into the monorail.
- After hanging the sashes, adjustment is required.
Stoppers
It is desirable that the cabinet doors do not roll back and forth on their own, and that they do not need to be carefully pushed into place. In a double-wing cabinet, the problem is solved by magnetic latches on the sides. But there is nowhere to put the latches on the middle doors: the magnet does not hold casually. Therefore, the main type of sliding wardrobe latches is mechanical.
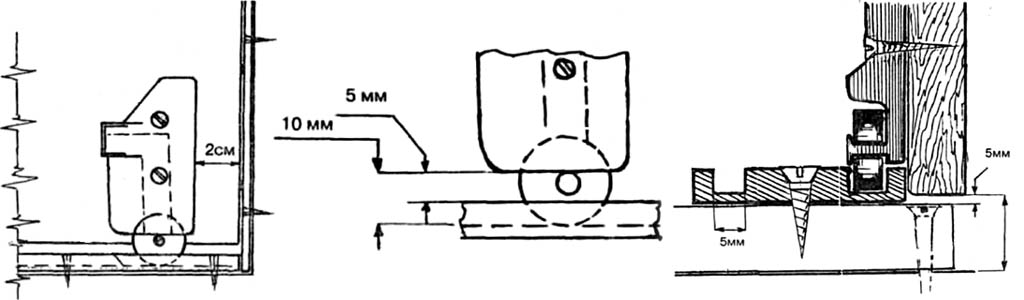
Two varieties are mainly used: a recess in the support rail and a flat curly spring. If you make a cabinet yourself, then the recess is not suitable: such rails are factory-made in a standard size for standard cabinets.

The spring retainer shown in the figure is easy to make yourself and install in place in the cut-to-size guide. The principle of its operation is simple: the antennae protrude slightly and the roller sinks between them. And when the roller rolls on the edge of the spring, the edges of the antenna rest against the sides of the groove, which prevents the latch from moving. To push the latch into place, you need to press both antennae at once.
But all latches for wardrobes have a common drawback. When opening / closing the door, the force already acts skewed, and the resistance of the latch further strengthens it. Most of the breakdowns of wardrobes occur just because of the latches.
Therefore, the best stopper for sliding wardrobe doors is a carefully aligned support rail, high-quality fittings and careful use.
Shelf fixing
For a cabinet built into a niche, the methods of hanging shelves in cabinet furniture are poorly suited or not suitable at all - you can’t get to the sidewalls from the outside. In a niche, either a rigid frame is built, which is difficult and expensive, or special adjustable suspension systems are used, like the one shown in the figure. It's easier, but also expensive.
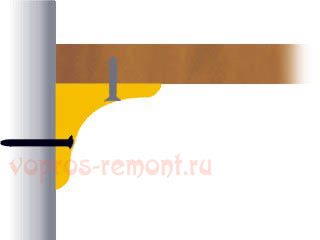
Meanwhile, the simplest and cheapest way to mount the shelves is on segments of an ordinary plinth, floor or ceiling, see fig. on right. MDF skirting, as you know, comes in a huge range of sizes, textures and profiles. So that the fasteners of the shelf are not conspicuous, a segment of the plinth can be taken shorter than the depth of the shelf by a third, and its end can also be cut obliquely. In this case, the self-tapping screw farthest from the edge of the shelf must be screwed in from above through the shelf board.
Note: the upper and lower partitions in the closet can be fixed to the floor and ceiling in the same way, without shortening the plinth pieces for reliability. Their ends, if you take a small ceiling plinth, completely cover the upper and lower rails, and together with the shelves fixed in a similar way, a very strong and rigid structure is formed. Which, in addition, will support the plank floor from sagging under the weight of the doors.
Niche
Professional furniture makers rarely and reluctantly undertake to make built-in furniture on site - the work is tedious, unprofitable. Custom-made built-in furniture is most often the same cabinet furniture that is brought and assembled in a niche. And here the do-it-yourselfer has a great opportunity to simplify and reduce the cost of his closet, making it stronger and more spacious at the same time.
Diagonals
A necessary condition for the success of such an undertaking is that the niche opening must be rectangular, and the floor and ceiling at the place where the doors are installed must be horizontal. Here, you may have to devote a little time to construction work, but their volume is small, and the complexity is low.
Note: under a monorail suspension, the usual building horizontality of the ceiling is sufficient. The rail is aligned with gaskets. But not by adjusting the sashes after! In an inclined guide and vertically hanging sashes will move out to the side.
The floor and ceiling are checked by level, but what about squareness? The usual method in construction - diagonal cord - does not fit well. The fact is that furniture accuracy is higher than construction accuracy. In finishing work, 3 mm / 1 m is permissible. In furniture, if a seam 2 m long diverges in length from a millimeter to two, this is already noticeable to the eye. And any cord is stretchable, and it is inconvenient to use it in a vertical opening; here without a lot of experience and construction accuracy will not work.
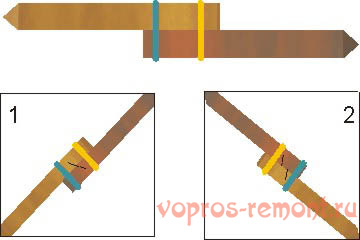
There is a way to measure the diagonals of the opening, not only with furniture - with machine-building accuracy, see fig. Everything is very simple: two slats with pointed ends. The angle at the top is less than 45 degrees, and preferably 20-30, if only the material of the rails is strong enough. The slats are fastened with rings of "money" rubber bands, which are sold in any stationery store.
The measurement procedure is elementary simple:
- We insert the device into the diagonal until the ends of the rails stop at the corners.
- We make a risk with a pencil or a nail, as in pos. one.
- We insert it into another diagonal, push it apart / move it all the way.
By the divergence of the halves of the risk, the magnitude of the inequality of the diagonals is immediately visible. Limiting accuracy - half the thickness of the risks, i.e. 0.15-0.2 mm can be achieved. And in order to assemble the cabinet without problems, you need up to 3 mm in an opening of 2x2.5 m.
Note: if a place is being prepared for a closet - a zoning partition, standing perpendicular to the wall, you will have to measure and fit 8 diagonals - under a pair in on the face and rear, and two pairs inside between the upper and lower opposite corners. Two perpendiculars are beaten off the wall along the width of the cabinet, and instead of the missing sidewall, two slats or a piece of plywood are placed.
And now, what prevents you from using the walls of a niche, its floor and ceiling as the same for a closet? It just needs to be dust free. And to achieve this is not at all difficult and not expensive:
- We remove old wallpaper or paint with a gel surface-active (surfactant) remover. It is non-toxic, odorless, and the old coating can be removed with a spatula after 10-40 minutes.
- We impregnate the walls 2-3 times, with an interval of a day, using a foam roller with a PVA water-polymer emulsion.
- We paint with acrylic enamel.
A niche prepared in this way does not dust for 10 years for sure, and there is no need to remove the old plinth from the floor. Damage to durable acrylic enamel is not easy. And the costs are less than for a sheet of simple, non-laminated fiberboard for the back wall.
Note: small irregularities of the walls visible to the eye can be removed with an abrasive mesh on a wooden block. It is better to do this after the first impregnation of PVA - there will be less dust.
Dimensions and drawing
![]()
Shelves and partitions with this method of manufacture, of course, will have to be cut in place. To do this, you will have to draw a view of the cabinet from the facade, approximately as shown in the figure. Then on the ceiling, for any method of suspension, beat off the line at the installation site of the guide. Then, from its ends along the plumb lines, beat off the verticals on the walls, and from this imaginary plane, measure out the configuration of each shelf and partition in place. From the resulting depth of the shelves / partitions, you need to subtract the width of the support profile + 20 mm FROM THE FRONT.
What's the point? The peculiarity of the finishing work is that the layer of plaster / primer to the inner corners is thicker. This happens because in the middle of the wall or at the outer corner there is more freedom of movement with the tool. The difference in the width of the room in the middle and between the corners rarely exceeds 10 mm and is not noticeable to the eye, but even 2 mm is too much for furniture.
The niche configuration is, in general, a low truncated rectangular pyramid, overturned on its side. Accordingly, the shape of the shelves with partitions in the plan will be close to a trapezoid. But is it possible to cut them with the required precision? In our time, it is quite possible, and you don’t have to arrange carpentry at home. And a jigsaw with a circular saw is not needed. Templates and patterns - too.
Sawing and fittings
The fact is that now sawing blanks is easier and cheaper just to order. In almost every town there is a furniture workshop with a computer and an ACAD specialist, if the drawings were accurate. Many furniture makers also acquire computer-controlled sawing robots - the cost of sawing by such a hard worker almost does not depend on the size and complexity of the part, and it pays off well on non-standard small things that are always in demand.
Furniture makers buy material at wholesale prices, therefore, considering the total area, the cost of blanks is 20% or more less than when purchasing material independently at retail. Many also give a discount on scraps (almost all robotic ones); after all, they will not wallow in the trash, but will go to work.
Note: the thickness of the laminate or MDF for the cabinet is at least 16 mm. For doors on a monorail - at least 25 mm.
Also, a standard sawing service is edging, i.e. sealing the ends of PVC boards to match. For a built-in cabinet, edging, of course, you only need the front ends - it will come out cheaper. The thickness of the PVC edge can be from 0.2 to 2 mm. If you want a thick edge, in the drawing, its thickness must be subtracted from the width of the board.
Assembly, lighting, finishing
Techniques for assembling the cabinet, in fact, have already been described. It is necessary to add only about the suspension of the doors. The suspension systems described are not the only ones on the market. Technique is developing, existing ones are being improved, new ones are appearing. But for each more or less decent quality, a specification is necessarily given indicating installation dimensions and tolerances, technical specifications for rails, etc.
Therefore, before ordering sawing doors, take a closer look - what is sold around, what suits you best. The final size of the sashes depends on the suspension method, and the necessary clearances are specified in the specification for the suspension.
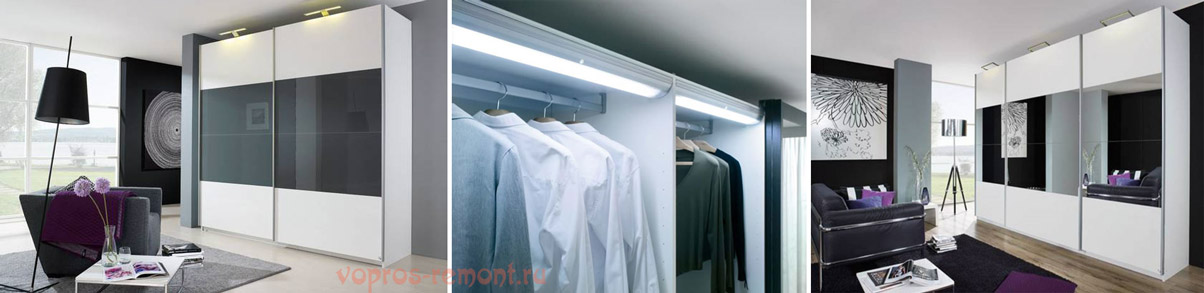
About interior lighting. Cabinets are made of combustible materials, so indoor lighting is best done on low-power 12V halogens. The cabinet lights are powered by a plug-in AC/DC adapter with double-insulated wires. Running 220 V wiring into the cabinet, and even permanent wiring, is completely unacceptable!
As for the decoration - mirrors, decorations, paintings and drawings - this is a matter of taste. One remark: it is undesirable to hang glass mirrors on doors made of wood materials, they are painfully fragile and heavy. Acrylic mirror is better. Or one-piece mirrored doors, but this is a separate conversation, and very expensive.
How much can you win?
And now let's figure out whether a home-made closet in a niche is really inexpensive. Will the savings be worth the time and effort?
If you make a closet in the niche of the hallway as described above, the materials will cost 5-8 thousand rubles, including the payment for sawing. Well, 10,000, if, as they say, from the belly. Time - 2-3 pairs of weekends for a medium-sized home master. And ordering a wardrobe in the same niche - less than 12,000 is hardly possible. Most likely, from 20,000. Deadline - 2 weeks.
Savings on a wardrobe-wardrobe in the entire bedroom wall is even more. Here, the ratio of home-made / custom-made value, typical for the regions, is 13,000/32,000. But for the manufacture of this, more serious skills are required.
But making a partition wall yourself is no longer so profitable: the advantages of well-established technology also affect the pros. And the work is difficult - a skilled craftsman will have to tinker with a month, if he does not have to redo it. It will turn out to win no more than 2000 on a closet in a medium-sized odnushka.
(No ratings yet)