We make economy cardboard furniture: a table, shelves for books and shoes
Cardboard furniture is a great alternative if you can't afford regular furniture! Tables, chairs and sofas can be made from cardboard with your own hands!
Such an ordinary thing as cardboard, which we often throw away without hesitation with the rest of the garbage, can be an excellent material for building good furniture. Of course, you can assume that such interior items will be fragile and easily bend under the weight of objects placed on it, but this can and should be avoided by properly processing the cardboard.
There are a lot of positive advantages in such furniture:
- Stylish design. You can design any thing for your home, based only on your taste or the preferences of your relatives;
- frugality. Spend quite a bit of hard-earned money to buy the necessary tools, and you won’t have to spend money on delivery / installation;
- Mobility. With light, at the moment folding furniture, moving will not become your nightmare - you will only be happy to pack things for a new life;
- Ergonomics. No need to walk around the endless store in search of “the very thing” that will appeal to you at the same time, fit into the interior and be comfortable - from now on you can combine these three qualities;
- Security. There are absolutely no harmful and dangerous elements in cardboard furniture - after all, you make furniture out of boxes with your own hands, which means you check and see all the components;
- Environmental friendliness. Furniture has lost its former appearance and attractiveness, or you decide to change the design - just disassemble it and put it in a bag. You can throw it away without worry, or you can use it to light a barbecue fire - cardboard does not harm the environment in any way!
- Strength. With proper processing of cardboard furniture from it will last a very long time.
Despite the large number of advantages, cardboard furniture has one extremely unpleasant feature - when it is in a humid environment, the furniture deteriorates and becomes unusable.
Keep this fact in mind and always remove cardboard furniture from the street, otherwise a sudden rain can ruin it.
Tools and materials for manufacturing
What is needed to make cardboard furniture with your own hands? The invariable materials will be:
- Packing cardboard / cardboard boxes - you can ask for boxes in the store or look at home from purchased equipment;
- Plain and colored tape, paper tape, double-sided tape;
- Stationery knife for cutting cardboard (watch the sharpness of the blades and change as they become dull);
- Sharp scissors;
- Dull knife;
- Roulette / iron ruler;
- Pencil and eraser;
- Glue (PVA, hot glue, wallpaper glue, liquid "moment" - depending on the situation, but sometimes you can get by with only adhesive tape);
- Sandpaper (you will grind cardboard sections with it);
- Kraft paper (white and dark) and tracing paper.
Types of cardboard
To make cardboard furniture with your own hands, you will need different cardboard, depending on the situation.
Cardboard is one-, two- and three-layer, depending on the number of layers, which, in turn, consist of small waves that can be seen on the cut of the cardboard. The more wave layers the cardboard has, the thicker the cardboard. Also, do not forget to determine the sides of the cardboard before starting work:
- smooth (sometimes with drawings) side - front,
- rough - purl.
To strengthen the edges of cardboard furniture, use dark-colored kraft paper, gluing all the seams with it, using wallpaper glue. Stick white paper (or tracing paper) on all furniture - it makes it easier to decorate furniture.
Remember: kraft paper and tracing paper must be torn by hand before gluing, not cut!
How to make cardboard furniture more durable
Depending on the purpose of the item (it will be a chest for children's toys or a TV stand), the cardboard is strengthened in different ways. For a more reliable and durable fastening, remember the following:
- For the strength of the cardboard and its protection from moisture, use parquet varnish, applying it to already finished and decorated pieces of furniture;
- Try to make furniture symmetrical - it is more stable than irregularly shaped furniture;
- If you are making asymmetrical furniture, then add more supports to it for a fortress;
- The more transverse parts your furniture has, the more stable it is;
- To give more strength to your design, use the trick - make two layers of cardboard on all furniture elements. But, attention, the layers must be different: one layer must have horizontal waves, the other must have vertical waves;
- Light cardboard is less durable than dark;
- The thicker the cardboard, the stronger it is.
How to use cardboard furniture
How to use handmade cardboard furniture
In order for your cardboard new thing to serve faithfully for a long time, do not forget that:
- Cardboard furniture is afraid of moisture (lacquer will not save you from a downpour);
- Use it for its intended purpose: if you made a table for letters / keys / small change, do not put a bulky flower pot on it;
- Make sure that there is no open fire near the cardboard furniture (be it a fireplace, a fire or even a cigarette) - you can lose not only the interior if you allow a fire hazard.
How to make cardboard furniture with your own hands, if only a box comes to mind? ? We are in a hurry to surprise you - you can make a lot of amazing gizmos from cardboard that harmoniously fit the interior, from a nursery to a hallway, and if inspiration completely overwhelms you, then there are many ideas for an office and a country house.
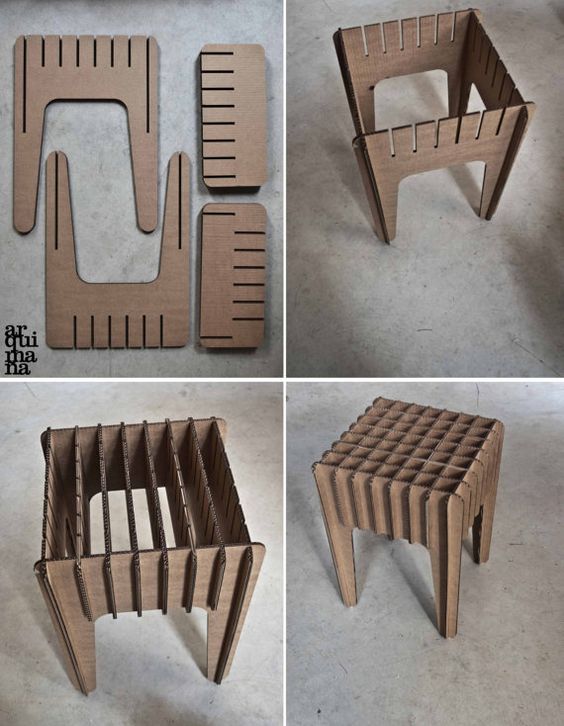
Below you will see how to make cardboard furniture with your own hands using patterns and diagrams. Choose for the first time something not too difficult to get used to the manufacturing technique.
![]()
Important! When designing furniture, remember that 0.6 cm will take furniture decoration, and always add these centimeters when counting measurements.

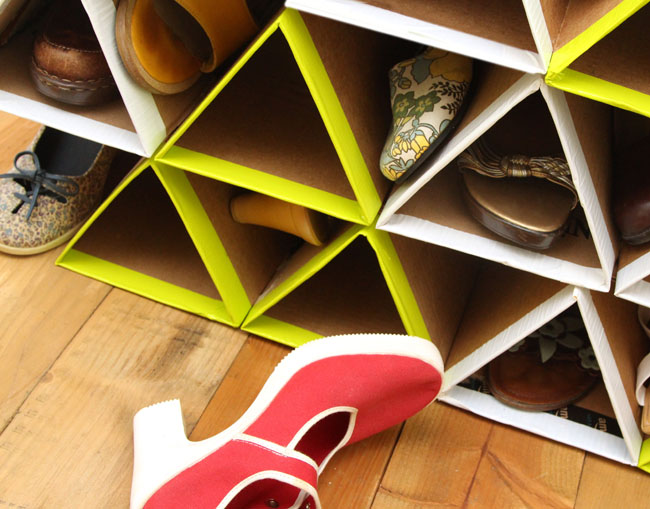
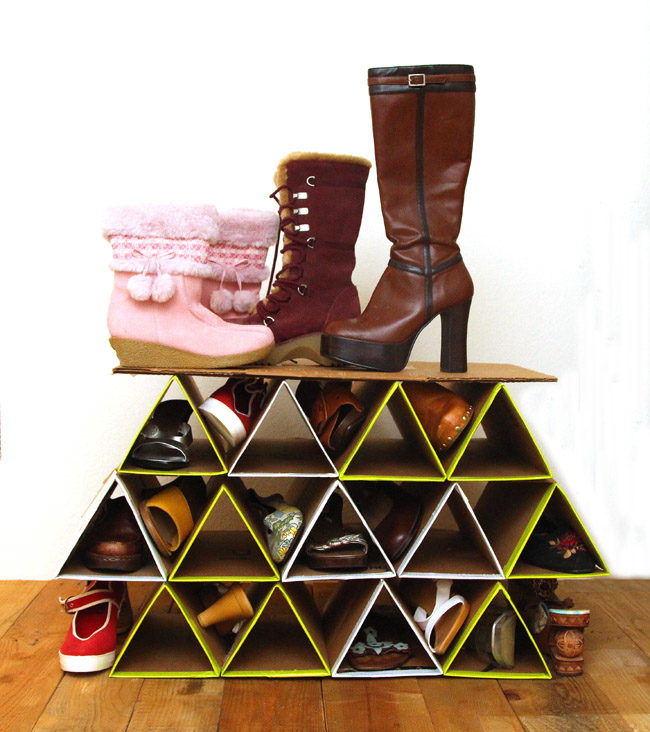
Master class number 1: Cardboard shoe rack
We decided to simplify your task - we put the first master class that anyone can assemble. So, armed with all the necessary items, let's start.
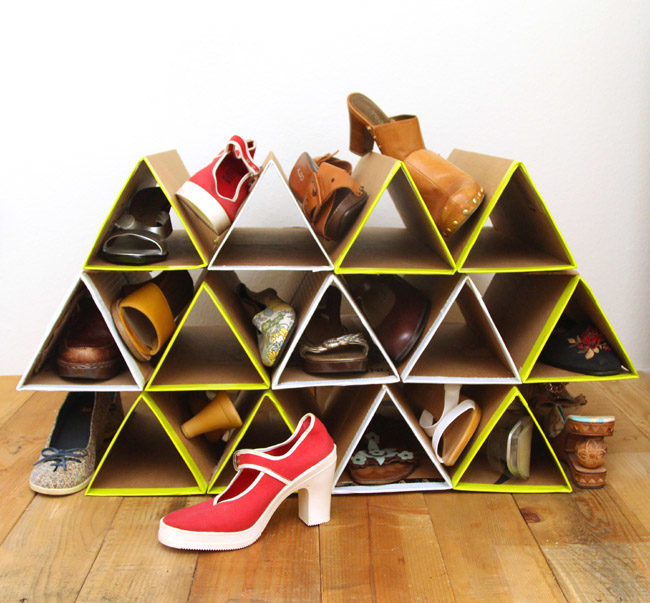
Step 1
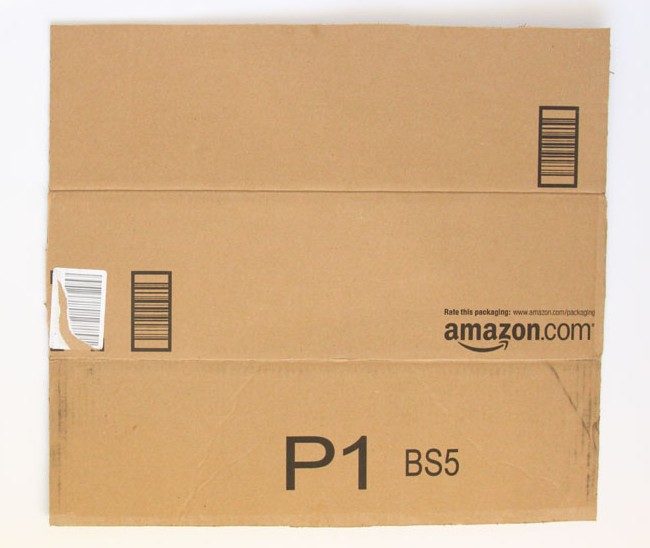
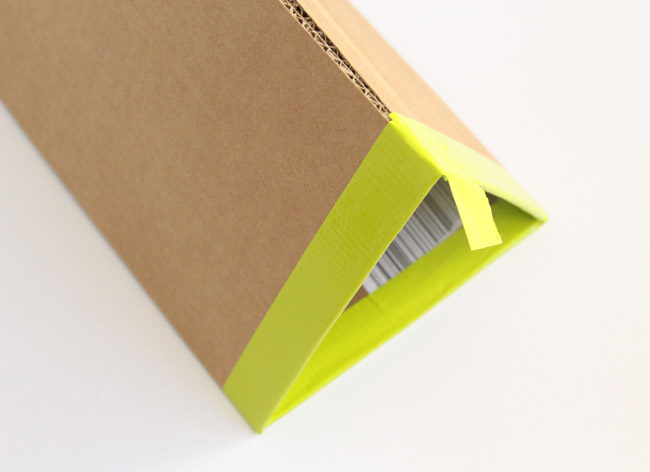
- Take sheets of cardboard - approximately 21x24cm - and divide them into three equal strips; Using a dull knife, press the strips well so that they bend.
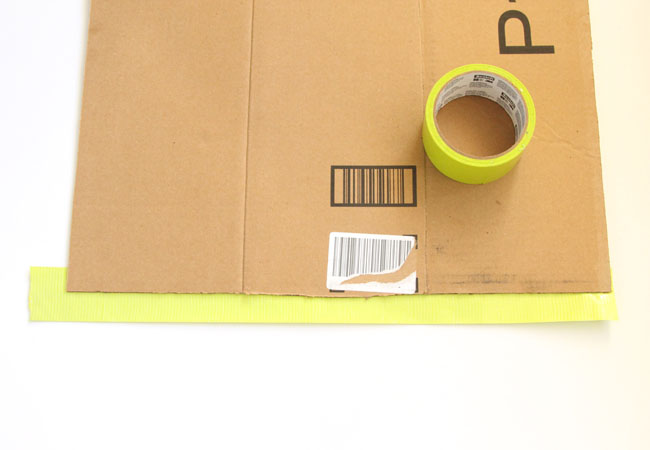
- Glue the long sides of the sheet with any colored tape.
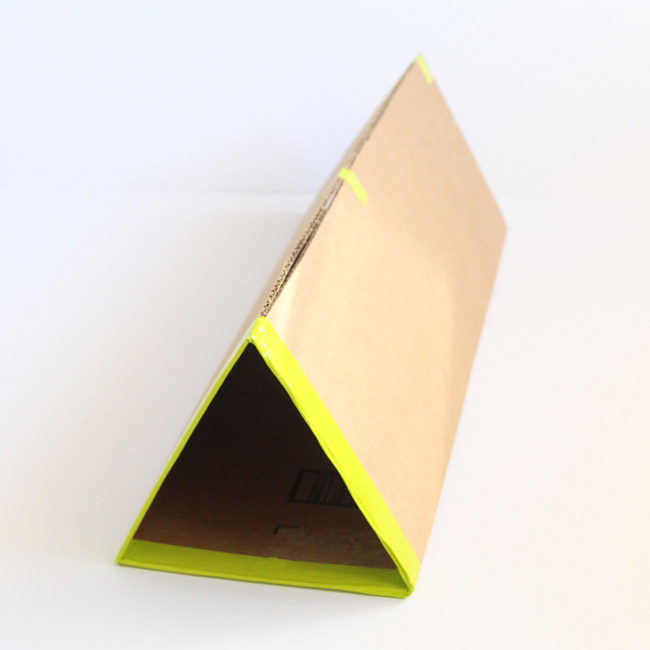
- Then fold triangular oblong shapes from the sheets and secure with the same adhesive tape.
Step 2
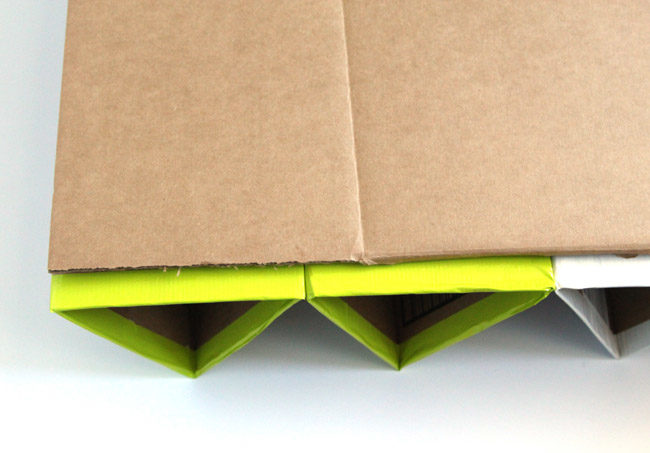
You can make any number of triangles. To fix the shelves, take whole sheets of cardboard and glue triangles to them double-sided tape or PVA. You can put a sheet of cardboard on the very top and put high boots on it.
Master class number 2: Cardboard bookshelf
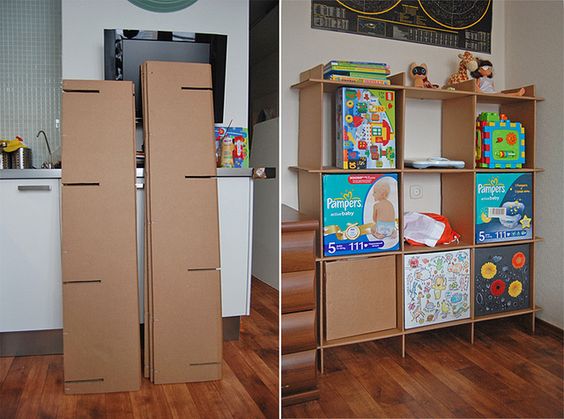
Step 1
Take long, not wide sheets of cardboard - some of the sheets will go to the vertical bases, so they should be a little longer, in general, the size of the sheets can be any, at your discretion. You can look for such sheets in hardware stores - it happens that they throw it out with just such cuts.
If not found, take solid (without bends!) Sheets and measure for the cut line so that on all sheets they coincide when threaded into each other.
Step 2
If you take thick cardboard sheets, then when you connect them together, they will hold tight and without additional funds. Thin sheets can be fixed together with hot-melt adhesive; it dries quickly, so you will have to act quickly when joining the sheets. After connecting the sheets, you can already use the shelf.
Master class number 3: Hanging shelf for shoes
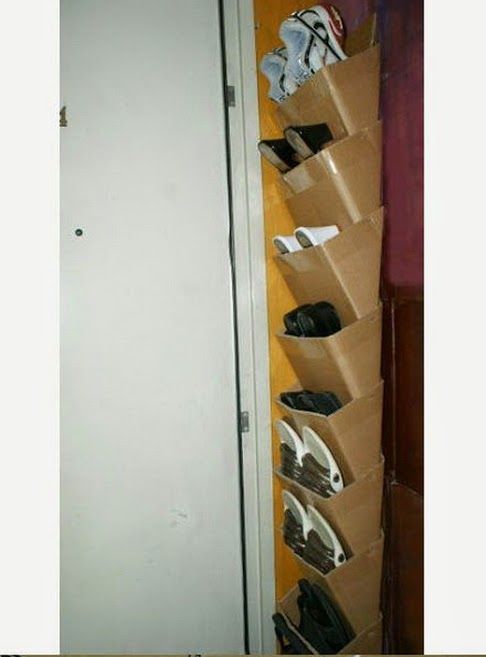
- Take a couple of large sheets of cardboard and mark them into identical rectangles based on the size of your shoes. Then cut them out.
- Fold each rectangle as shown in the photo, fasten the resulting pockets with tape.
- Insert the pockets into each other so that it is easy to secure them with double-sided tape, but there is still room for shoes.
- You can fix the shelf on the door - it will not interfere with you at all and take up a lot of space.
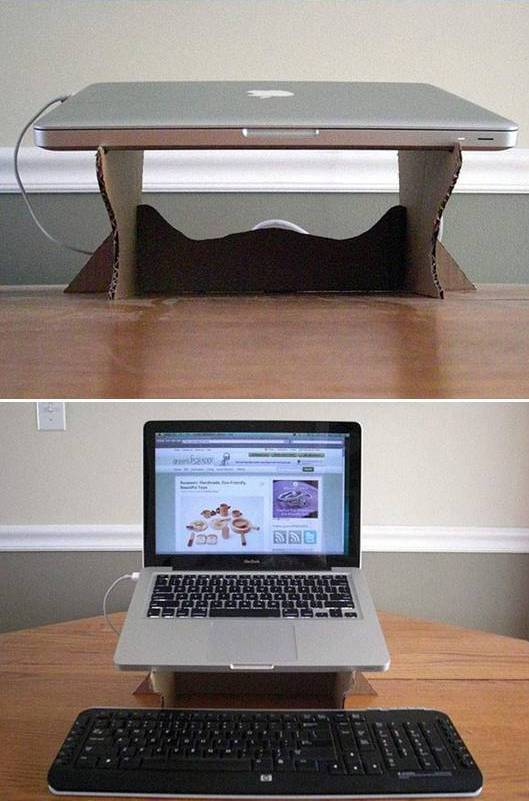
Master class number 4: Do-it-yourself laptop stand
Almost every one of us has an indispensable tool for work and communication - a laptop. And we have to buy all sorts of peripherals for it (mouse, flash drives, removable hard drives, etc.). And so, when there is a desire to put it on a stand for the convenience of work, we are forced to go to the store and spend extra money. For those who want to avoid unnecessary expenses, but do not want to give up the stand, there is a great way out - do it yourself. And how to do it - you will read in this article.
Materials and tools:
- Notebook for measuring the size of the stand;
- yardstick;
- several sheets of paper or newspaper for a stencil;
- thick cardboard for the stand itself (you can use an unnecessary box);
- long line;
- marker or pencil;
- large scissors or utility knife.
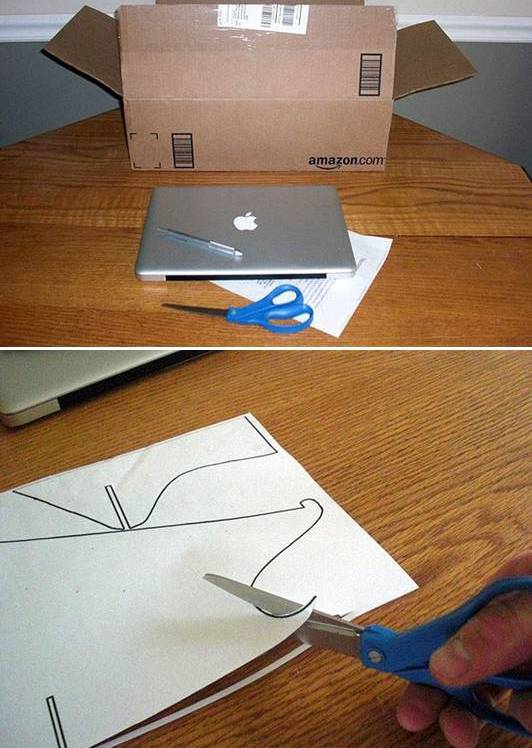
You have already understood that we will not need any special materials - all of the above is probably in any home. Let's start manufacturing.
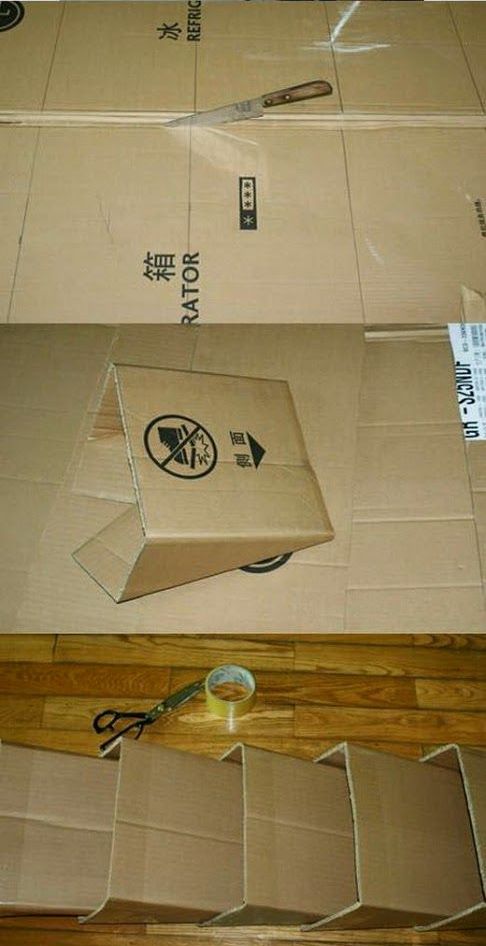
Step 1.
We take paper or newspaper and spread it on a flat surface. It is better to perform all actions for measuring the dimensions of the stand and making a stencil according to the principle “measure seven times, cut once”, because at best the stand will be crooked, and at worst it will not hold the laptop.
- First, we will make a proleg (this is a crossbar between the legs to make the stand more rigid). We take a tape measure and measure the length of the laptop along the keyboard, from corner to corner.
- We mark with a marker on paper exactly half of this length.
- We draw a line - this will be half the base of the proleg. It is better not to draw this detail entirely. Make a slight inaccuracy - and the laptop will stand crooked.
- We measure up from the edges of the segment 4 cm and 7 cm. Draw a rectangle.
- We mentally divide the rectangle into 3 parts: the first third is an almost straight line at a height of 4 cm, the second third - with a pattern or hand we make a bend at an angle of 45 degrees to a line of 7 cm, the last third - from the right end of the segment we draw a line to a line of 7 cm at an angle 45 degrees.
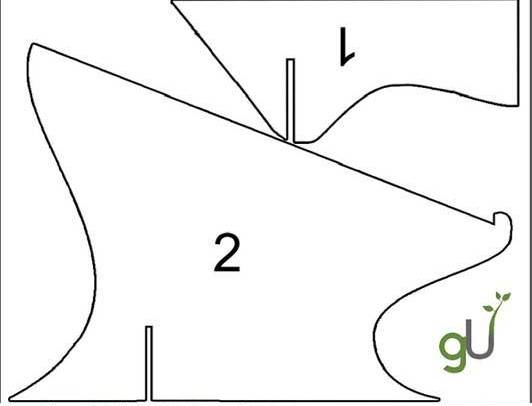
- All this is simply and clearly shown in the photo (det.1). At the point of contact of two curved lines, a narrow sleeve is made - in this place there will be a cutout to match the parts.
Step 2
The same photo shows the template of the legs of the stand (det.2).
The angle of inclination of the stand you select based on personal preferences. This will add up the height of the right and left sides of the leg. When drawing a template for the leg, pay attention to the clove, which will subsequently keep the laptop from falling.
In height, it should be at least a third of the thickness of the laptop. The slot in the leg for engagement with the proleg should not be in the middle, but at a distance of about 1/3 from the far edge. This also affects the stability of the structure. Curves are up to you.
Slots in the legs and proleg can be no more than 3-4 cm in height. In width, they can be 3-5 mm, depending on the thickness of the cardboard, but in both parts they can be the same.

Step 3
Cut out paper templates. We apply the template of 1 part with the lower cut to the even edge of the box chosen as the future stand. It is desirable that the stable parts of the stand are perfectly flat (the stand will not swing on the table).
- Carefully trace the template on one side, then flip it over to the other side and continue to trace. We get one inseparable symmetrical part (prong). Attach parts only to smooth parts of the box (pieces of cardboard) where there are no folds.
- On another cardboard (for example, the bottom of the box) we put a paper template of part 2, i.e. leg. Circle and repeat the same a second time. The legs must be exactly the same.
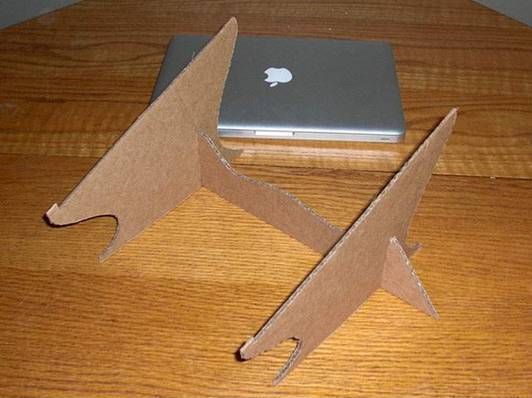
Step 4
Cut out all the details with scissors or a clerical knife. We shift them along the slots, as shown in the photo.
If everything is combined correctly, then you can be glad that a simple (like everything ingenious), functional, strong stand for your digital friend is ready! Install a laptop on it and attach additional keyboards to it, watch movies at a comfortable height, sweep cookie crumbs under the stand - you are now the proud owner of a laptop stand of your own making!
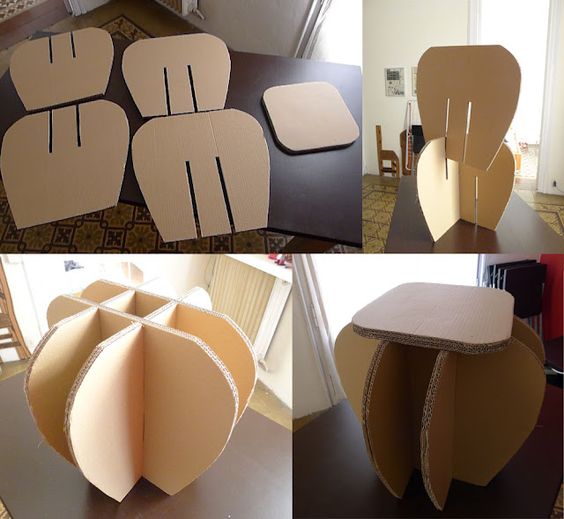
Cardboard table layout
We also offer a simple photo-master class of a cardboard desktop