Artificial reservoir in the country with their own hands. Do-it-yourself pond in the country (51 photos): choosing a style, place, size and suitable building materials
Vacation in the country is a favorite pastime for many people. Only a trip to the shore of a reservoir can argue with him. Having arranged an artificial pond in your country house, you can get a great place to get rid of fatigue and relaxation. Moreover, it will not be difficult to arrange an artificial reservoir with your own hands, you only need a little perseverance and imagination.
Types of reservoirs
Depending on what functionality you plan to endow the pond you have built, artificial reservoirs can be divided into several categories.

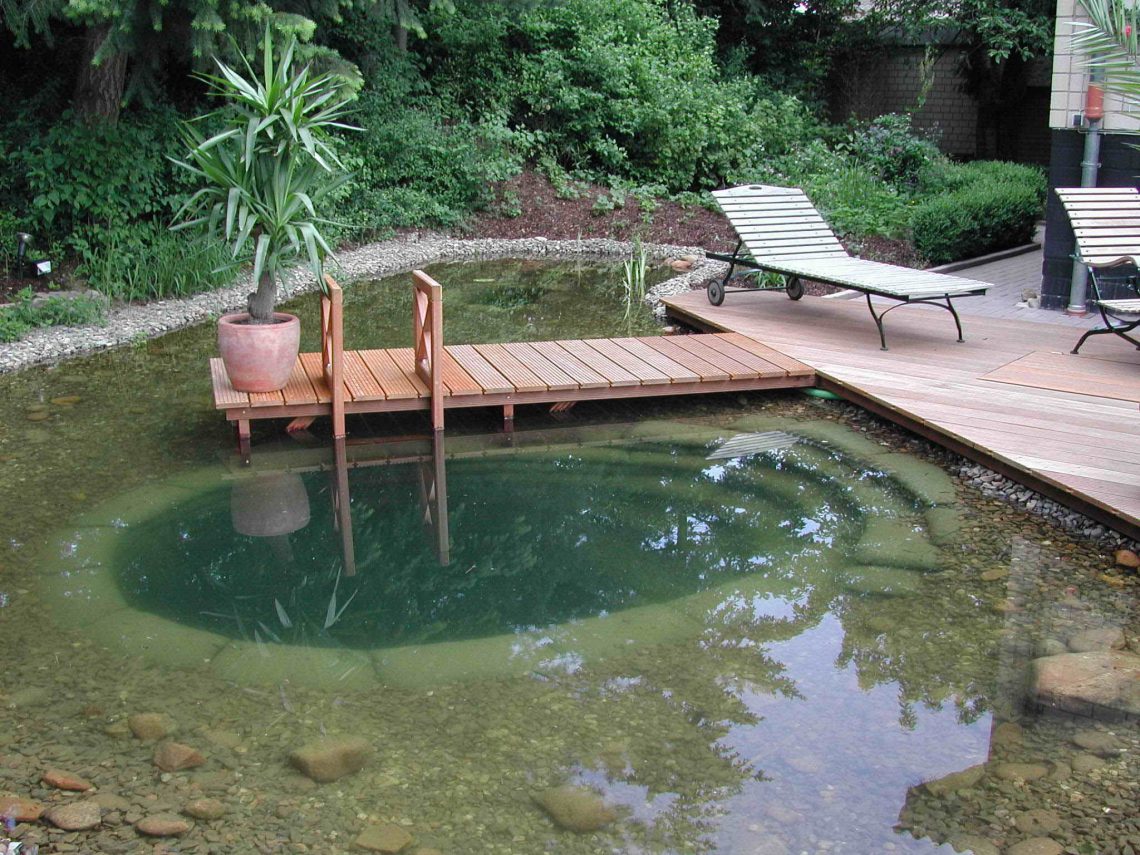
Swimming pool
This category includes artificial reservoirs of considerable size. Such a pond, built in the country with your own hands, as in the photo, has not only decorative properties, but also allows you to freshen up, or even swim, without leaving the site.

Pond with fish
The pond for breeding fish is suitable not only for lovers of fishing. Your family members, especially children, will enjoy spending time by the lake, watching bright and beautiful fish.

Mini pond in the country
A small reservoir, which is an element of landscape composition. It performs exclusively decorative functions and does not imply the placement of a recreation area around it.

Decorative pond in the garden
Garden pond, built by hand, which is the central place of the recreation area. The combination of sufficient size and beautiful design will not only please the eyes, but also give a pleasant coolness on a hot day.

Style
Having decided on the functionality of the reservoir, it is worth moving on to choosing the style in which the decorative pond in the country will be executed. There are two main options.
- Formal (regular) pond. Artificial reservoir of strict geometric shape. Ideal if there is a desire to emphasize the geometric shapes of the building or the site itself. It creates a sense of order, looks appropriate next to geometrically regular flower beds, lawns and other decorative elements on the site.
- Landscape pond in the country. It is carried out in any form and fits very easily into the surrounding landscape. This option is suitable for any style and looks as natural as possible. Its construction requires much less effort than the equipment of a geometric reservoir.
 Location selection
Of great importance when organizing a pond in the country with your own hands, as in the photo in the article, is the terrain. On flat areas, you can place a pond in a garden of any style and size. Areas with irregularities create more difficulties when deciding how to make an artificial pond, but at the same time they can serve as natural cascades and elevations for waterfalls.
It is necessary to arrange a pond with a fountain in the country house with your own hands in an open area so that the reservoir is clearly visible from every corner of the country house. The depth of groundwater, the qualitative composition of the soil can affect the allowable depth of the reservoir, as well as the complexity of the work and the use of additional materials. When thinking about how to build a pond in the country with your own hands, in addition to the terrain, it is worth considering a number of other important points.

- Compatibility with the environment. Visible from all sides, a mini pond in the country should be combined with buildings and green spaces on the site.
- Illumination of the site. It is preferable to choose the most shaded place on the site for the location of the reservoir. This will prevent increased water evaporation. In addition, with prolonged exposure to direct sunlight, there is a high probability of active development of microorganisms in the water, which will negatively affect the aesthetic component.
- Environment. Do not abuse the vegetation next to an artificial reservoir. The long and thick roots of large trees can lead to damage to the insulation layer over time, which in turn will require repair and putting the reservoir in order. Leaves falling into the water from tree branches located too close to the reservoir can lead to silting and will require regular cleaning. On clear days, nearby trees or buildings will be reflected on the surface of the water. Therefore, you should take care of a beautiful exterior in advance so that your eyes do not fall on a rickety shed or a dry, fallen tree.
- Expansion of the reservoir. In the future, you may come up with the idea of the need to increase the area of \u200b\u200bthe reservoir, additional functional and decorative elements. Therefore, it is worthwhile to provide a place in advance for the possible expansion of the reservoir in the country with your own hands.
- Electrification. If you plan to install lighting near or directly in a pond, or place an electric fountain or other movable structures, you should worry about laying all the necessary electrical wiring in advance. It is best to place the wires underground, protecting them with strong boxes or corrugation.

Size selection
Having chosen a place on the site that the pond will occupy in the garden, you should decide on the size of the future reservoir. Landscape designers do not give clear recommendations on this matter. However, a do-it-yourself decorative pond built on a summer cottage should not occupy more than 8-10% of the area of \u200b\u200bthe site, because. a larger structure will look bulky and alien.

The depth of the pond in the garden depends on the purpose for which it is created, as well as on the capabilities of the owner, who equips the pond with his own hands on the site. The photos below will help you make your choice.

Material selection
When arranging ponds in a summer cottage with your own hands, you should approach the choice of material with all care. There are many options for what material is better to use in order to equip a small pond in the country with your own hands.

The photos in the article and the following list highlight the following main categories.
Concrete reservoir
Capital construction, which is the most expensive option for arranging a pond in a country house. The advantages of using this material include increased strength and durability of use.

plastic container
An industrially made form of high-strength plastic allows you to solve the question as soon as possible: how to make a pond in the country with your own hands. Various shapes and sizes allow you to choose the option suitable for the most demanding owner.

PVC film or polyethylene film
The use of these materials makes it possible to create a garden pond with your own hands of absolutely any shape. The disadvantages of such a material include low resistance to external influences, and how short the service life

Butyl rubber membrane
A do-it-yourself garden pond made of such a film will please the eye longer than a decorative pond in the photo below made of polyethylene or PVC. When planning how to make a reservoir on the site with your own hands, it should be borne in mind that the life of the membrane reaches 50 years, and the increased resistance of butyl rubber to severe frosts makes it a very profitable material.

In order to save money, you can use various improvised materials. An old bathtub, a basin or a car tire for a mini pond - these and other "folk" remedies are used to create ponds in the country. Our photo gallery will suggest other original ideas.

Necessary equipment
Depending on the functionality of the reservoir and the material from which it will be made, the following tools may be required during the creation process: a shovel, a cart for transporting excess soil, a level, pegs and a strong cord for marking, as well as a hose for irrigation. Such a set of tools will be enough to place mini ponds in the country with your own hands, as in the above photo. If the planned pond in the garden is of considerable size, it is worth evaluating the feasibility of using construction equipment. For a pond intended for fish breeding or designed for a particularly long service life, the installation of additional equipment may be justified:
- An aerator that saturates the water with oxygen necessary for fish.
- Pump for filling or draining water.
- Cleaning filter.
- A device for sterilizing water and removing dead algae.
Details of creating a pond from a film
PVC film, due to its performance and relatively low cost, is one of the most popular materials for arranging a pond. In addition, in order to make a pond with your own hands from PVC film, you do not need special skills and special knowledge.
For the arrangement of reservoirs, it is not necessary to use films with a thickness of less than 0.5 mm., And if it is planned to create a particularly deep reservoir, it is better to take a film with the maximum available thickness.
The use of a multi-colored film allows you to achieve different optical effects: a black one will make the bottom of the reservoir mirror, and it will clearly reflect the trees and buildings standing nearby, a brown film is perfect for simulating a ground bottom, and a film of light blue or cream tones will make the reservoir as transparent as possible, which will allow you to easily observe the movement of fish.
The selected film should be cut in such a way that it covers the bottom and walls of the reservoir, leaving a margin of up to one meter. The cut pieces must be connected with specialized glue or adhesive tape for such work.

Before digging a pit, it is necessary to carefully consider the size, shape of the bottom and walls of the reservoir. If you plan to create a complex multi-stage structure, it is better to first draw a detailed diagram on a piece of paper indicating all dimensions.
Having marked the selected area, we proceed to digging a recess. It is better to remove the soil in the direction from the edges of the future reservoir to the center, gradually deepening to the required limits. The bottom and walls of the finished pit should be carefully examined for the detection of foreign objects, sharp roots, etc. Any debris found must be removed to avoid damage to the film. We lay out the prepared film on the rammed bottom of the pit, fixing it with stones and sprinkling soil around the edges.
Next, you need to strengthen the banks of the pond. To do this, you can use various materials. For gently sloping shores, a geogrid or a polymer grid is suitable; you can also use a regular chain-link mesh. For vertical banks, the use of piles or props will be required.
You can complete the design of the pond by adding various decorative elements, planting plants and installing underwater or outdoor lighting.

Plant decoration
When decorating a pond in the garden with plants, it is worth understanding that they are divided into those that are planted on the shore along the edges of the pond, and plants that live directly in the water. The root system of coastal plants will additionally strengthen the walls of the pond. When planting plants in a pond in the garden, it is important to keep in mind the speed of their growth, otherwise, after a long absence, there is a risk of finding a pond completely covered with a thick carpet of vegetation.

Decor
In order to decorate the pond in the yard with your own hands, in addition to various plants, beautiful stones and other decorative elements, the use of lighting gives a good effect. The colored glow spreading from under the water will create a beautiful decoration for your pond at night. Additional lighting can be placed above the water.

As a decor for decorating a pond in a country house with your own hands, as in the photo in the article, you can use various fountains. The functioning of the fountains is ensured by the operation of pumps that can be hidden at the bottom of the pond under the stones. Surface devices are also used. Pumps come in different capacities, which affects the height and intensity of the water jets.

fish
Ornamental fish can be launched into the pond in the country, when choosing which it is important to fully understand the conditions for their maintenance. It is worth buying such types of fish that get along well with each other and do not quarrel.

Pond Care
Decorative pond in the country requires some care. Planted plants must be sheltered from the cold or transferred to a warm room. During a long absence, the surface of an artificial reservoir in the country should be covered with a special net to protect it from debris. Leaves and other debris that have fallen into the country pond are caught with a net, and in the event of the formation of a large amount of silt, it is necessary to clean the reservoir. Water must be periodically renewed using a garden hose or a regular bucket for topping up (if specialized equipment is not available).
Photo gallery
In our photo gallery you will see more than 33 examples of beautiful ponds in the country.
Are you constantly haunted by the feeling that something is missing in your dacha? Take a look around you! Yes, there are flower beds, a gazebo, a playground too. Do you have a small pond in which lilies float or a fountain gurgles on your site? If not, then building a decorative pond with your own hands is completely easy.
Key points for arranging a pond
If you have made such a decision, do not immediately grab a shovel. First of all, decide on the following questions:
- the location of the pond on the site;
- the size of the pond and its shape;
- materials for the arrangement of the pond;
- vegetation for the pond, its decoration.
Don't let difficulties scare you, they are all easily overcome. A small financial outlay, a few days of work, and the “crystal” dream of any summer resident will appear on your site - the quiet expanse of a pond or a babbling fountain sparkling in the sun with a multi-colored rainbow.
Choosing a place for an ornamental pond: it is important not to make a mistake
When choosing a place for a pond, keep in mind that the pond will not be a place for breeding fish or swimming, it will only serve as a decorative function. However, it is very important that a natural ecological system be built for it, otherwise, instead of decoration, after a while, a “charming” swamp may turn out.

Carefully choose a place for an artificial reservoir so that over time it does not turn into a “charming” swamp
The illumination of the site is very important for the placement of the pond. On the one hand, coastal and aquatic plants need the sun, on the other hand, its excess is detrimental to the entire ecosystem.
When the summer is hot, in small ponds the water heats up so much that it becomes impossible to control the reproduction of algae, as a result, the inhabitants of such reservoirs die.
The ideal option is considered to be when the sun's rays warm up the pond only in the first or second half of the day. It is desirable that in the afternoon it was in the shade.

It is advisable to arrange the pond so that the sun's rays warm it up only in the first or second half of the day.
It is not difficult to determine the illumination of a future reservoir. It is enough to mark the contours of the future pond with a rope or white sand and follow during the day which part of it will be illuminated by the sun.

Determine the level of illumination of the place allotted for the pond
If there is no house or garden structures near the place allotted for the pond, a tree or bush can shade it. Trees with a weeping crown shape look very beautiful near the pond, but in this case, you will have to regularly clean the water from fallen leaves.

Building a pond with your own hands is easiest if you fit it into the existing landscape, using the lowest and wettest places in the garden. It can drain water from the site through the drainage system.
If the summer cottage is flat, you can choose a place for a pond on the border of the garden, marked by trees or bushes. You can allocate a place next to the livestock. But then it is necessary to make a smooth transition between the water reach of the pond and the plantations - a strip of perennials or ornamental grasses.

Do not surround the pond with a solid wall. Plant plants of different heights on the shore
The pond among the lawn does not look the best. If there are no other options, plant plants of different heights on the shore, but not in a solid wall - your gaze should slide over the mirror of the water.
A decorative pond next to an alpine slide or rockery looks spectacular and stylish. By decorating a hill and a pond with the same forms of stones, you can link them into a single compositional whole.

A decorative pond will look especially impressive next to an alpine slide or rockery
The use of height differences and natural hills makes it possible to enter a stream into such a composition, which will flow over the stones into the pond. In the future, such a composition can be supplemented with a decorative bridge.
The shape and style of the reservoir
A pond, as an element of landscape design, must correspond to a certain style. Round ponds are a favorite form of the English landscape.

Round ponds are widely used in English landscapes.
Precise geometric shapes are best for a regular style. Irregularly shaped ponds that follow the shape of natural water bodies are popular in classical Chinese and Japanese gardens.

An irregularly shaped pond is an ideal addition to a Chinese or Japanese style garden.
Today, it is not at all necessary to strive for a do-it-yourself constructed pond in the country house to have a natural or strict geometric shape. The main thing is that it should fit perfectly into the landscape of the garden.

The main thing is not form and decor, but harmonious unity with the surrounding landscape

With special care, materials are selected for the design of the coast and the coastal zone.
Materials for the design of the shores of the reservoir are selected very carefully. Clinker, natural stone, wood or concrete must be in harmony with the facade of the house, path or retaining walls.
Materials for an artificial reservoir
To equip the pond in the country with their own hands, they use different waterproofing materials. Their choice depends on the shape and size of the pond. If the area of \u200b\u200bthe reservoir does not exceed 5 sq.m, ready-made plastic bowls are mainly used.

It is convenient to use ready-made plastic bowls for arranging reservoirs with an area of \u200b\u200bno more than 5 sq.m.
They are very easy to install, and they will serve for decades. The disadvantage of plastic molds is that they have a strictly defined shape and small volume.
Those who wish to create a reservoir on an individual project should use a waterproofing film. It is very elastic and easily deformed to the desired shape. There are three types of this material.
The most commonly used black PVC film (polyvinyl chloride). It lends itself perfectly to repair with glue. Therefore, if the need arises, it can be repaired.
Polyethylene film is cheaper than PVC, but it does not have the same elasticity and durability. If the polyethylene leaks, you can “treat” it with a self-adhesive tape.
Butyl rubber is considered the best film. The thickness of this film is chosen depending on the depth of the pond and the water pressure. For a reservoir whose depth does not exceed 80 cm, a film 0.8 mm thick is sufficient. If the depth is greater, the film thickness should be 1.2 - 1.5 mm.

The best option for an artificial pond is butyl rubber film. The free ends of the film can be masked with stones
On the shore of a reservoir, the bottom of which is made of film, the stones should hang slightly above the water. This way you can mask the free ends of the film.
Another option for arranging a reservoir is a monolithic concrete pit. For ponds with regular geometric shapes, this is the most convenient manufacturing method. Although, in order to build such a pond, one must have the skills to work with concrete, be able to install formwork and reinforcement. In addition, it is necessary to plan the location of the reservoir very accurately, all its parameters, since then it is almost impossible to fix anything.

The optimal solution for ponds with regular geometric shapes will be a monolithic concrete pit
The most difficult thing in the construction of a concrete pit is the pouring of beveled walls with smooth transitions between terraces of different heights. In addition to concrete, in the construction of a monolithic pond bowl, a reinforcing steel mesh is used, and the inner surfaces of the pit are also covered with a protective layer of fine-grained sand, which must be renewed at least once every two years.
Master class: creating a pond based on a rigid container
Rigid containers are good because they are easy and quick to install. You can easily install such a container yourself, spending only 1-2 days.

Installing a rigid container is not difficult. By choosing a bowl with natural stone edges, you do not have to be puzzled by disguise
If you manage to purchase a plastic bowl with edges designed to look like natural stone, the process will go even faster, because the problem of giving the coast a natural look will disappear.
Operating procedure
1. Install the finished container in the place reserved for the pond. So that she does not bend over, put her on the bricks. Circle the edges of the container with light sand or lime. In order for the pit to correspond to the relief of the tank, it is necessary to accurately mark out zones of different heights.

2. It is necessary to dig a pit very carefully according to the markings, expanding and deepening them by 10 cm.

3. Install the bowl of the reservoir in the pit, using the level, make sure that the bowl is horizontal. Adjust the depth of the pit if necessary.

4. Fill the container with water a third and start filling the cracks with sand, periodically pouring water over it.

Master class: creating a reservoir on a film basis
Using a waterproofing film, you can create a reservoir of any, even the most bizarre shape. Having decided on a place for a reservoir, we proceed to its construction.
1. Mark the contours of the pond banks with light sand or dry lime. Dig a ditch around the perimeter on a spade bayonet. Collect the removed sod and fertile soil separately.

2. Again with sand or lime, draw contours for different depths. The deepest place should be in the center of the reservoir. Gradually remove the soil from a less deep zone, and only then from the deepest.
3. Using a tape measure and string, calculate the required film size. To strengthen the banks, add another 50 cm to each side.
4. A layer of sand should be poured at the bottom of the pit, geotextiles or interlining should be placed on top. This will protect the film from contact with sharp stones and roots. Now you can cover the film.

5. Fill the reservoir with water gradually, pressing down the bottom and terraces with stones. The film should settle gradually.

6. After a few days, proceed to the design of the coastal zone. The edges of the film are well seasoned and laid stones and slabs. The gaps between them are covered with pebbles and sand.

A quick way to create a pond mine from improvised means
I will not talk about old bathtubs, buckets, barrels and basins, adapted and converted into garden ponds. It's very simple and primitive.
But I’ll still introduce you to one interesting way to create a pond out of uselessness. I stumbled upon these photos while surfing the endless expanses of the Internet.

We make a decorative pond from an old car tire
The form for the pond is an ordinary car tire. You can get hold of this "good" at a landfill, at a tire fitting, or at your husband's garage.
The larger the diameter of the tire, the larger the pond will turn out. Tires from the wheels of KAMAZ, BELAZ or the Belarus tractor will allow you to build a decent-sized pond. Cut off the top part of the tire.
Having folded the film in two layers, we line the bottom and sides of the tire. We bend the edges of the film under the sides.
We fill the pond with water and decorate the banks with stones and plants.
Choosing plants for the pond and coastal zone
In the balance of the ecosystem of a reservoir, even a very small one, a special role is given to plants - those that grow on the shore and those that live in the water. Therefore, they must be selected very carefully.
Decoration of the coastal zone
Lovers of natural style, as a rule, prefer large bodies of water. Their shores impress with lush vegetation, which belongs to the local flora: willow loosestrife, monetized loosestrife, marsh iris. There are also such tall plants as reeds and darmer.

Artificial pond in natural style impresses with lush vegetation
For reservoirs in a regular style, strict symmetry is characteristic. Plants on the shore are planted in a certain order. Large rectangular slabs are laid around the pond. Wooden flooring and "embankments" look stylish.

A special atmosphere of tranquility and unique charm is created by Japanese-style ponds. This is facilitated by the harmony of stone with skillfully selected plants, decorative bridges and other accessories.

Japanese-style ponds give the beholder a sense of harmony and tranquility

If there is enough space on the shore, tall perennials can be planted.
For ornamental ponds, which are most often found in our dachas, the main thing is a spectacular appearance. If there is enough space on the shore, tall perennials are planted: gunner, rogers, host, bergenia, marsh iris, astilba. Between the stones, closer to the water, you can plant tenacity, stonecrops, forget-me-nots.


Aquatic plants for ponds

Particular attention should be paid to the selection of aquatic plants for a small pond.
For small ponds, it is very important to choose the right plants that will float on the surface of the water. There shouldn't be many of them. Dwarf water lilies, water hyacinth, water ranunculus, duckweed not only decorate a small pond, they saturate it with oxygen, thereby supporting its vital activity.

When choosing aquatic plants, be sure to find out how quickly they grow. Otherwise, it may happen that over the summer your decorative pond will be covered with wild thickets, due to which the water will not be visible at all.

To control the development of fast-growing plants, it is better to plant them not in the ground, but in special containers or "pockets" made of jute, which are attached to coastal stones. In containers, heat-loving specimens will find their place, which, with the onset of cold weather, are moved to a trough with water and transferred to the cellar.

It is very important to know how deep to plant aquatic plants. In garden ponds, five zones of different depths are conditionally distinguished.
The coastal zone is considered to be up to 10 cm deep; it forms a swamp or a wet meadow. Here marsh iris, plakun and marigold feel great.

Shallow water (depth from 10 to 40 cm). Plants with tubular stems feel good here - reeds, calamus, whorled urt.

The deep-water zone starts at 40 cm. This is the habitat of plants with floating leaves - nymphaeum, as well as aponogeton bicuspid, arrowhead, elodea - plants that hide under water.

So that in winter the reservoir does not freeze and the plants in it are preserved, its depth must be at least 80 cm.
Filters and pumps for ornamental pond
In order for the pond to be always clean and the water fresh, experts recommend equipping it with a filter and a pump for pumping water. Small pumps look like containers. They can easily be hidden under rocks. The right choice of pump for the pond will help a specialist. After all, the power of the pump is determined by the volume of water.

Having chosen a place for the pump, and placing it on a concrete slab or brick, it is necessary to mark the line for laying the water pipe and the electrical cable. The cable is placed in a special reinforced tube and, together with the water pipe, is masked with small stones and pebbles. The pump is connected to the electrical circuit through a circuit breaker. The water filter must be changed regularly.

On the shore of a self-created reservoir, you can organize a cozy recreation area
All these simple tips that you have read will allow you to complete the creative task perfectly, and the place by the reservoir will become not only a habitat for dragonflies and butterflies, but also a favorite vacation spot for the whole family.
There are many real benefits to this building. Firstly, it is the cheapest, since the construction of a reservoir with a capacity of 5 cubic meters will take you only 400-500 rubles and a few days of time. Even this amount can be significantly reduced if used film is used. The main thing is that it is whole, does not let water through, however, it can be folded in half even if there are visible damage.
It will take a lot of time to make it, however, no more than the construction of any other type of reservoir. A pit of the required shape breaks out, and you can set a variety of geometric shapes - the film will acquire the required shape in a matter of seconds. Next, steps are made, if such are provided, control measurements are made by the level (unless, of course, you want a perfectly flat reservoir without any bottom bends). It is necessary to ensure that all forms are smooth, without right angles, as well as any depressions, otherwise, when a lot of water is collected, it can tear the film, filling the spaces formed.
After you “plan” the entire relief, you need to lay the film, it must be done evenly so that the material is not overly stretched anywhere. In order to evenly distribute the load, to give shape to your future pool, you need to press down the material with stones in a circle, and on each tier. Only in this way it will be possible to correctly stretch the polyethylene. Pour water evenly. The edges of the black film (you can also take blue or white material - they look good) you just need to wrap and sprinkle with earth so that it does not slip when filled. Further, sandstone, a wooden path or a tile can be laid out on it - at the request of the owner.


Finished plastic molds
This type of artificial reservoirs has become very popular. The cost will be a little more expensive than the first option, since instead of polyethylene you use high-quality anti-corrosion plastic. The shelf life of such products is unlimited, since the polymer does not rot, does not crack, and has high strength. Before you build an artificial pond with your own hands, you need to dig a large pit, 15-20% larger than the garden pond, in order to compact it well on all sides with bulk materials.
The bottom is concreted without fail, since any “sagging” of the sole will cause the vessel to crack. As a result, there will be water losses, you will have to constantly replenish the missing level. It is very difficult to get to zero on the top line. This is one of the most common problems that arise when installing this type of artificial reservoir. Therefore, if you do not know how to make a pond out of a plastic mold with your own hands, then it is better to hire a team that will do everything to the level, level the plastic, and concrete the base correctly. If you fill it without measuring the level along the top line, then you will have a crooked pond on the site, you won’t level it with your own hands without deep excavations. We'll have to completely remove the mold from the ground, fill it in a new way.
Proper compaction is done as follows: 15-20 centimeters of sand wake up around the container, fill it with water, then again fill 20 centimeters and fill it with water, up to the very top. Be sure to monitor the water level in the pool, add it to the level at which the sealing material is poured. If this is not done, the pool may flatten inward or be lifted by water, since the material has a high buoyancy.


Laying out a reservoir of tiles
One of the most expensive ways, so if you have not yet decided how to build a pond in your area, it is better to weigh the pros and cons. The disadvantage is the high cost. On average, 1 cubic meter of a finished reservoir will cost you 1000-1600 rubles, depending on the class of materials used. Of course, there are many advantages, because such a cost must be justified by something.
The first "plus" is a great appearance. You get exactly the same pool as you saw in the movies on TV - blue icing, clear transparent water, in which the bottom is perfectly visible. This effect is achieved thanks to a special tile that is laid on the floor, has a bluish tint, sets off the water.
Before digging a pond, it must be taken into account that its depth should be 30-40 centimeters more, than you need, since you will need to fill the foundation, after pouring a lot of rubble and sand. The weight of the water will be large, so the tile under it should not be allowed to deform. This is not only the aesthetic appearance of your pool, but also its tightness.
Construction takes a long time. Let's take a closer look at how to make a pond out of tiles, what are the main mistakes made in the course of work.
- Foundation concreting. The most common mistake made by beginners is the insufficient thickness of the concrete screed. It must be made at least 10 centimeters thick with a water column of 150 centimeters. With a depth of an artificial reservoir of 2-2.3 meters, you need a coupler of 15 centimeters, and laid on a solid base.
- Laying tiles. The material is not attached to cement, but to glue, which is highly resistant to moisture. Then the tile will not "bounce" off the floor over time.
- It is necessary to use only certified products that are not exposed to moisture and do not begin to exfoliate over time. Many people are trying to save on materials, thus buying cheap products for outdoor or even indoor use. They will not be able to serve in the pond for a long time, after a few years they will have to be changed.
- Lack of quality stitching. Even if the tiles are laid on concrete 15 centimeters thick in a large pond, it is not a fact that the water will not run away somewhere. To prevent this from happening, all seams between tiles must be carefully sealed. To do this, use a special silicone adhesive or ordinary mounting sealant. If the pool is small, you can use a special glue that is used for gluing aquariums - an absolutely ecological product. The only negative is the very high cost of the material.
If everything is done correctly, take into account these points when making an artificial reservoir at home, it will last a very long time. Do not rush anywhere, let the foundation, the glue harden well, stand for several weeks. Only then will it be possible to fill in a little water or pour soil if it is a pond for fish with algae.


Care and accessories
If you think that having built a pond, you can already begin to have fun - you are deeply mistaken. You will need to take care of the "infrastructure" of the artificial lake. This is a very complex complex of various technical means that are aimed at purification, air supply, chemical treatment, water filtration, and improvement of its chemical composition. Let us consider in more detail what the fish need and how much the owner of the long-awaited miraculous source of water will “get”.
- Filter. They may be different. Most often, a mechanical washcloth filter is used, which is taken at 2-3 cubic meters per hour for a reservoir of 5 cubic meters. The full volume should pass in 2-3 hours, then we can assume that the filter is selected correctly. If you want perfectly clean water, then you need a special carbon filter, which often costs the price of a pond. But the cleaning quality is also excellent. It will not contain green algae, microorganisms.
- Ultraviolet lamp. What is it for? This is perhaps the main element that should be present in any freshwater environment. The lamp kills microorganisms that infect fish, algae. You can adjust its power to kill different types of bacteria. It can kill single-celled green algae, which are very often a big problem in any aquarium, and will just as much cause you unnecessary inconvenience in the pond.
- oxygen system. If you have an increased density of fish, you will need to think about the correct supply of oxygen so that it develops faster, grows more. To do this, it is necessary to install one compressor and 2-3 outlets of air hoses. This is not only useful, necessary for the outdoor "aquarium", but also beautiful. As a substitute for a compressor, it will be possible to use a waterfall that will flow down the sandstone. The water will be saturated with air, and when it falls, the bubbles will saturate the pond itself.
Arrangement can be up to 70% of the total cost of the project, so it is better to calculate financial resources immediately so that an unfinished structure does not turn out. Just a container of water will bring very little joy, it must be comprehensively equipped.


Almost every garden has a pond. And he definitely gets into the frame: the owners love their pond (or even the smallest pond), are proud of it and consider it perhaps their main garden achievement. And this is understandable. But the strict eye of a professional often notes the unfortunate blunders in the creation of reservoirs, which are repeated in many gardens with offensive constancy.

We asked landscape designer Valeria Ilyina to analyze some common amateur mistakes and talk about what you need to know in order to make a decorative pond, stream or waterfall in your garden with your own hands.
Are you building a reservoir? Make no mistake!
Perhaps it makes no sense to convince someone that a pond in the garden is good. Water like a magnet attracts everyone's attention and even in photographs it always looks mysterious and alluring. Is it any wonder that today the reservoir has become an indispensable attribute of the "gentleman's set" of any design project for the development of a new land plot or the reconstruction of an old one.
Unfortunately, as a result of a formal approach to business, one garden becomes similar to another. Gardens are churned out by professional designers like cakes are baked, and they actually turn out to be cloned. To be honest, the gardens of amateurs are closer to me, which, although they sin with some dilettantism, still attract more with their ingenuous sincerity. All actions of an amateur come from the heart, and therefore the path is often tortuous, but in the end the truth is found, and not least thanks to intuition.
To make the path to beauty shorter, let's try together to analyze the characteristic mistakes that miraculously repeat in many reservoirs, and analyze their nature. And after that, we will gradually analyze all the subtleties and secrets of a quick, easy and economical creation of a reservoir that is ideal for your garden. So, the most typical misses.
Wrong size
This is the most common mistake: the pond does not match the size of the garden and its surrounding plants. A small puddle located somewhere at the fence or at the entrance to the garden and squeezed on all sides by lush and beautiful garden plants, no matter how hard you try, will always look miserable.
Wrong place
In no case do not place a reservoir against the backdrop of unsightly buildings, a sloppy garden, a pile of garbage, a rickety fence, and who knows what else.
old fence- not the best background for a pond
Water always attracts the eye, so placing your pond in an unsightly place, you thereby focus on the shortcomings of the garden.
Mistakes in the selection of material
Purchasing garden supplies follow the law of similarity. If the house is made of brick or stone, then their color, texture, shape and size must be repeated in the material of the fence, paving, finishing of other buildings. The same applies to a wooden house or a house sheathed with siding.
Often you can see a picture when individual corners of the garden are very good: beautiful plants are logically grouped, the reservoir is carefully and with fantasy decorated - and the overall impression of the garden is negative. You start to analyze, and it turns out: a brutal-looking house is made of red brick with white trim of plastic windows, a powerful fence is assembled from ready-made concrete blocks painted with bright pink paint with white scallops on top, a carved gazebo is gilded with turned beams, an asphalt tape of the path leads to it, over which the yokes of openwork white arches for roses are thrown, the presence here and there of colored plastic, various-sized borders, flowerpots, and to top it off - like a gold medal for bad taste - a plastic water lily on a living leaf of a nymphaeum completes the picture. As they say, comments are superfluous.
Conclusion: while arranging the garden, introducing new elements into it, try to predict the final result, predict how the garden as a whole will look like. The body of water should always match the garden, buildings and surrounding plants in size and style, and be positioned in the most advantageous position depending on the image you choose.

Defeat in the fight against the plastic mold
A common misconception: a ready-made plastic mold is the best choice if you decide to create a pond, as they say, with little money. Yes, indeed, manufacturers offer a wide range of such "baths", and it seems that you can choose a shape for every taste. But everything is not so simple. Even the largest of them (and they are very expensive) will not be big enough in the garden, and the small ones just look like a misunderstanding. At the same time, all of them, although obviously small in size, have an overly intricate shape that will never turn out to be natural in place.The edges of such forms have a rounded profile, on which it is impossible to fix neither soil for coastal plants, nor stone, much less gravel. Some of the more expensive forms have quartz sprinkling glued with a wide tape along the upper edge, but most often it is so strikingly different from our local materials that it still cannot be decorated.
Plastic molds are made by stamping, and cheap products often have an annoying defect - the edges are skewed along the periphery, due to which, no matter how hard you try, you will not be able to dig such a shape neatly and evenly in principle. Needless to say, a piece of black plastic sticking out above the water will nullify all your efforts. For clarity, such a reservoir can be compared with a luxurious suit, in which a carelessly sewn lining is bristling in the most visible place. The sight of such a suit is at least regrettable.

Protruding black plastic of the finished form sticking out above the water- poor decoration of the reservoir
It is worth adding that it is not easy and expensive to transport a finished form, especially a large one, and as a result, the final cost of the structure increases significantly. I once had a chance to work with a plastic mold of small size and at the same time intricate design. She was hopelessly skewed. I spent a lot of time, effort and nerves to somehow neutralize this innate flaw, but, unfortunately, there are things that cannot be fixed.
However, rigid forms have a future. In Europe, plastic molds of regular geometric shapes have been produced for several years now: round, rectangular, trapezoidal. They have a wide, flat, horizontal edge, making them easy to mount under all sorts of flooring. It is advisable to use them for raised formal reservoirs, which are effectively decorated with stone, wood, plastic, metal; they can be located at different levels and combined with fountains and waterfalls.
Unfortunately, our trade so far offers only round shapes, but we must not forget: if there is a demand, there will also be a supply. The breadth of the horizons of consumers shapes the market.

Conclusion: before choosing one or another method of waterproofing, you need to comprehensively familiarize yourself with the positive and negative sides of each and conduct a comparative analysis. The lack of information about the qualities of waterproofing materials in the presence of a large supply on the market leads to the wrong decision.
Underwater fountain lamp HQ 2512
2 200 rub
RosPrud
Tape for Quick Seam 3" (76 mm) Splice tape
425 rub
RosPrud
Tetra AlgoRem 250ml 600 rub
RosPrud
Fountain pump WP 2000 F Jebao capacity 2000 liters per hour
2 950 rub
RosPrud
Trying to repurpose an old bath
Speaking of ready-made forms, it should be mentioned that amateurs often try to recycle enameled cast-iron bathtubs. Once upon a time, in times of chronic scarcity and lack of available materials, this simple way to create a garden pond was welcomed by many. However, few people managed to decorate a white bath so that the enameled pond looked more or less attractive.
More often, such a structure looks miserable: greenish white walls, mounds of garbage at the bottom (after all, you can see everything against a light background!), round cobblestones are artlessly laid out along the edge, and a collectible beauty hosta is planted nearby. An unattractive spectacle…

But there are ways to embellish such a reservoir, you just need to move your imagination. The easiest way is to paint the bath with any dark or black paint. Visually, the container will look deeper, the reflectivity of the water will increase, and the edges will almost merge with the ground. In the presence of all kinds of plasticizers and modern mixtures (for example, Eunice-plus cement glue), the inside of the bath can be coated with a layer of 1–3 cm, give it texture, tint by adding mineral powder or liquid colored pigments or finely crushed brown peat to the solution. If desired, if such an image fits into the overall picture, a mosaic of colored pebbles or glass, pieces of a mirror, or simply glued pieces of crushed stone of different sizes can be laid on top of the cement.
If you have a whole arsenal of used household bathtubs, you can dig them close to each other in a chain or square-nested way, depending on the quantity, finish the inner surfaces as mentioned above, and mount a decorative flanging made of tiles, clinker, wood over the joined edges etc. You will get a channel or a pool with separate cells, each of which can be decorated in a special way: somewhere there are plants, somewhere a spring or a small fountain, somewhere there are fish or lights - an unplowed field for fantasy.
Such a structure can be made partially raised over the entire area, or you can place the cells at different levels, and even arrange the flow of water from one block to another. So an old primitive idea can be applied in a completely new way and achieve a wonderful result.

Conclusion: old, used containers can be successfully used to create reservoirs, you just need to be creative and never leave the wrong side in sight.
stone beads
The most common mistake in decorating a garden pond is a rounded cobblestone laid out around the edge like beads. More often such beads lie in one row, but some manage to lay two rows on top of each other.
Such a way of laying a stone will never look natural, not to mention the fact that it is absolutely impossible to decorate a film or a board of a rigid structure. So the multi-colored “monists” lie on the monstrous black shores, and no matter what beauty you arrange around, such an aqua garden will serve as a mute reproach to the owner.
When relaxing on the banks of rivers and lakes, try to pay attention to how nature "lays out" the stones, and what you like and remember the most. Usually, small fractions serve as a background, while larger ones are textured by contrasting groups.

The stone for decorating the reservoir must be carefully selected. Photo by Valeria Ilyina
Conclusion: stone for decorating a reservoir must be carefully selected. It is desirable to use a stone that is uniform in rock and color, but varied in size. This does not mean that the pellets are completely unsuitable, just that they “play”, you need to work with them even more carefully.
Toys around the pond
Another typical drawback that can spoil the most beautiful, carefully thought-out design: the simultaneous presence of a large number of decorative figures and various garden accessories in a small area.
An abundance of accessories and decor elements– a sure way to ruin any body of water
Nobody argues, some bright gnomes and funny lafs can really decorate some corners of the garden, bring a smile. But if plastic frogs, papier-mâché ducks and clay mermaids are already enough, and you were also presented with an “overturned” jug with Maya painting for a fountain, white bent furniture in the rococo style and black lanterns a la Montmartre, it is inevitable there will be overkill. Any of these items can be quite attractive on their own, but put together within line of sight, they will most likely do you a disservice by turning the garden into a haberdashery.

Do not abuse accessories and decor. Photo by Valeria Ilyina
Conclusion: The thoughtless use of decorations will break the garden harmony. Try to look at the garden as if from the outside, and if you tend to get carried away with "decoration", at least spread the decorative "gadgets" in space and time.
Next time we will finish the analysis of the most common mistakes that gardeners make when creating ponds and think about what kind of body of water - a pond, stream or fountain - will suit your garden. Read the article. ,
Water has always attracted people. That is why many people are thinking about how to make a mini-pond in the country with their own hands, because then landscape design will have its own zest. Being near water is natural for a person. You can relax on the shore, run fish into the water, or a waterfall.
What are the ponds
The tradition of decorating areas near the house with ponds came to us from the East. But let's not consider simple stone bowls in the yard. After all, we are interested in the integration of the pond into the design of the site. So East. There are 2 design options: Chinese and Japanese. In China, a mini-pond was a pond richly decorated with lush plants. It looked like a piece of wilderness. In Japan, ponds were decorated differently - in the style of minimalism. Having adopted this tradition, European designers began to make ponds in their own way. Often they were of the correct geometric shape. Which style to choose is a matter of taste for each owner.

There are no fundamental differences in the construction of reservoirs, so this material will be useful, no matter what style you choose for your structure. It can be a traditional Chinese or Japanese mini-pond or a high-tech creation. Creating a pond is fun and you can get all your family members involved in it. This is especially true for the design. Well, if you start the fish, then the children will be happy to feed them. The only thing not recommended to do in the pond is to swim. This is what the pool is for.
Pond construction
Just like in any other construction, you need to choose the right place. Do not build a reservoir where the water will be under the sun all day. Plants will wither from excess sunlight, and algae in the water will multiply intensively, and the pond will overgrow. At the same time, if you make a pond on the shady side of the site, this will adversely affect plant growth. The best option is when the sun's rays illuminate the pond for at least 5 hours a day. A mini-pond should not be located near trees. When making a pond in the garden with your own hands, keep in mind that in the fall all the fallen leaves will be in the water and rot. In addition, overgrown tree roots can damage the bowl, even if you make it out of concrete. Such a garden pond should be located at some distance from the trees. As a last resort, choose a place where old trees grow, cut them down, remove the stumps and use this place for a pond in the garden.
You should be able to admire your creation. What good will be in the reservoir if it is located in the depth of the site and it will not be visible? It is good to have a pond near the garden gazebo or terrace of the house. Or set up a comfortable bench on the shore so that you can sit and enjoy the beauty.

You need to choose the size of the reservoir. There are also recommendations here, according to which the pond occupies 3% of the site. This is the best option. However, not all people who want to decorate their site in this way follow it. Often they make mini-ponds from old bathtubs or even basins. They also construct a pond from a tire. Well, lovers of large reservoirs spend a lot of effort to dig the appropriate pit. Or they make two ponds and a small river channel connecting two reservoirs. This is a personal matter for everyone. In any case, no matter what reservoir you are planning to make, look at the different options for how you can make a pond in the country with your own hands, the photo will help you with this.
After choosing a place, start digging a pit. Marking can be done with a regular rope. If the volume of work is large, it will be more rational to use the labor of hired workers or an excavator. Well, you can dig a small pond yourself. But before you take out the ground, you need to decide how you will make a reservoir. There are different options. You can install formwork and fill the walls and bottom of the pit with concrete with the addition of liquid glass for waterproofing. Or buy an annual and dig a hole for it. And you can use the most budget option - PVC film, which will cover the bottom and walls of the pit.
The pit is dug in ledges (usually 2-3). Plants are then planted on them. It is not recommended to make the deepest place of the pit deeper than 1.5-1.8 m. The pond should not be made too shallow, as in this case the water will be very warm by the sun. Some owners drain it for the winter, while others do not. Usually water is left if fish are released into the pond. If the depth of the pit is normal, then they hibernate in the deepest place. Well, if the bowl is too shallow, then the water freezes in winter and the fish die.

So, a pit for a small pond was dug. What's next? It is necessary to seal the walls and bottom. Consider the option with PVC film as the most budgetary.
It is recommended to work with the film in the warm season, when it is most elastic. A thick layer of sand is poured on the bottom of the pit and on the terraces and compacted. A film is placed on it. Sand is needed in order not to accidentally damage the material with sharp stones or plant roots in the ground. The film will serve as an excellent waterproofing that does not allow water to go into the soil. On the surface of the earth, around the pit, the film is folded and pressed down with large stones. By decorating this garden pond, you will arrange the stones more beautifully, but for now, you need to finish with the bowl. When the film is laid, it is recommended to pour a layer of sand on it. If the plants on the terraces will be planted in the ground, then you need to fill in the ground, but it is much easier to plant plants in pots.
Another point that must be taken into account when building a mini-pond is that the water must be flowing. So you have to spend much less effort on cleaning the bowl and replacing the water. Making water circulate is easy enough. It is necessary to install a submersible pump in the pond. The water supplied through the hose will pass through the filter and drain back into the bowl. When making a pond in the country, you can choose any design for the drain. It can be a stream flowing down from a nearby alpine hill (this is where you can put the earth from a pit), or you can make a fountain, which is also easy to build. It is only necessary to beautifully arrange the pipe connected to the pump and towering above the surface of the water. Having built such a pond in the country with your own hands, take enough time to design it. You can use natural stones, paving slabs, decking and other materials. Your imagination is not limited by anything. You can also provide a multi-colored backlight, which will light up in the evening. Various design options for ponds in the country will help you choose.

When making a pond with your own hands, you must strictly observe safety measures if lighting is planned, since water and electricity are a dangerous combination. Use only factory sealed fixtures that are specifically designed for installation underwater. If you do everything right, then such a pond for giving with a fountain and lighting will become a real gem of your summer cottage.
DIY mini pond (video)
mini ponds
As already mentioned, in addition to a large bowl, you can also make a pond from a tire. It will be very small, but beautiful in its own way. It is much easier to make it than a large body of water. You need to pick up an old large tire from KamAZ or a tractor and dig it into the ground. The tire pond from the inside is also laid out with a PVC film. There is 1 small terrace for planting plants. Small tires are not recommended. After all, the reservoir will be tiny. But car tires can be used when you want to make a cascade of small ponds, in which water will flow from one to another. Such a structure also looks great, especially if it is well decorated. For this purpose, you can use basins or old bathtubs. Tires can also be used to build flower beds around a large pond. In this case, they can be painted with bright colors.

Conclusion
As you can see, making a pond with your own hands is quite simple. You only need to fulfill the following requirements:
- choose the right place;
- make good waterproofing;
- provide for water circulation;
- beautifully arrange the space around the pond.
And then, having created a pond with your own hands, you can rightfully be proud of it. Creating a beautiful artificial reservoir is creativity, where you can fully use all your imagination. Please note that it should harmonize well with the rest of the landscape design elements. Although construction options for a summer cottage were considered here, a pond can also be built in the courtyard of a private house in the city. Beautifully designed small ponds can decorate any courtyard.
Mini pond on the balcony (video)