The white cabbage diet is the perfect food for weight loss. How to grow seedlings in peat tablets? Cabbage seedlings in peat tablets
Cabbage is a tasty and healthy vegetable loved by many, which is very popular with gardeners. Cabbage occupies an important place in our diet and is successfully used in traditional medicine. Everyone dreams of growing powerful green heads of cabbage on their land. Experienced gardeners know how to sow cabbage for seedlings at home in order to get a rich harvest.
Each variety of cabbage has its own characteristics. To make the final choice will help familiarization with the varietal characteristics. Before buying seeds, it is important to decide what kind of cabbage you need: for long-term winter storage, pickling, or just for salads.
Among the varieties of white cabbage, early-ripening, mid-ripening and late-ripening are distinguished. Early varieties (Iyunskaya, Skorospelaya, Podarok, Ditmarskaya, Zolotoy hectare, Kazachok F1) have a low yield, medium density, small heads of cabbage weighing up to 1.5 kg.
Already in the middle of summer, you can enjoy fresh tender salads from early cabbage. For summer consumption and salting, mid-ripening varieties of cabbage are suitable: Amager, Slava, Belorusskaya, Nadezhda, Menza F1. Late ones (Geneva, Turkis, Kolobok, Amager, Zimovka 1474, Aros F1) are well kept fresh for a long time.
Buying quality seeds
The quality of seedlings and the yield of cabbage primarily depend on seeds. Therefore, it is worth purchasing only high-quality seed. Experienced gardeners recommend approaching the process of buying seeds wisely. Having made at least an approximate list of what you are going to sow, you can go to the store.
It is worth buying seeds only at trusted specialized points of sale. Only in this case, one can be sure of the quality of the seed, which was stored in proper conditions and did not lose its germination.
Soil preparation

Growing strong seedlings of cabbage requires proper preparation of the soil mixture. Experienced gardeners have been preparing the soil for cabbage seedlings since autumn, but this can also be done in early spring.
To prepare a nutritious soil mixture, it is recommended to mix 1 part of humus and soddy soil and add 10 tablespoons of ash for every 10 kg of soil. Ash will serve not only as a source of macro- and microelements, but also as an excellent antiseptic that prevents the appearance of black leg cabbage on seedlings.
A nutritious soil mixture can also be prepared on the basis of peat, mixing it in equal parts with humus and soddy soil and adding a small amount of sand.
Before sowing, any substrate must be disinfected. To do this, it is calcined in an oven at a temperature of 200 ° C for 15 minutes or heated for 5 minutes in a microwave oven turned on at full power. After cooling, the soil is placed in a container treated with a 1% solution of potassium permanganate, and a couple of days it is allowed to stand in a warm place so that bacteria useful for plants multiply in the substrate.
To prepare the soil mixture for cabbage seedlings, you cannot use garden soil on which cruciferous crops previously grew: the likelihood of seedling disease in it increases many times due to the presence of cabbage-specific infections.
How to choose the optimal time for sowing cabbage for seedlings?
 It can be difficult to determine a specific date for sowing cabbage seeds for seedlings, but approximate dates are known. Early varieties can be sown from the beginning until March 25-28.
For sowing medium varieties, the period from March 25 to April 25 is suitable. Cabbage of late varieties is sown for seedlings from the beginning to the 20th of April.
Experienced gardeners give another clue: to determine the time for sowing cabbage for seedlings, it is important to know that about 10 days from the time of sowing passes before germination and another 50-55 days after that - until the time of planting. 60-65 days before the desired planting of seedlings in the ground, it is recommended to sow cabbage for seedlings.
Pre-sowing preparation of seeds
Before sowing, cabbage seeds are sorted, selecting smaller than 1.5 mm. Wrapped with a triple layer of gauze, they are placed in a thermos with water (45-50 ° C) for 15 minutes, and immediately after that they are dipped in cold water for 2 minutes.
The seeds that have passed the water procedures in wet gauze are placed on a saucer and kept at room temperature for a day. Then the inoculum is stratified at a temperature of 1-2°C in a refrigerator. After that, the cabbage seeds are dried and sown. Thanks to such simple manipulations, it is possible to increase the resistance of cabbage to fungal and other diseases.
You should carefully study the instructions on the packaging of seeds purchased in the store: often they are completely ready for sowing. Dried and encrusted seeds, painted in different colors, are sown dry without any preparation.
How to sow seeds for seedlings?

Sowing seeds is an important step that must be approached correctly. Trays or boxes with a depth of 7-10 cm are suitable for cabbage. Cabbage seeds require a lot of water to germinate, so the soil must be well watered a couple of days before sowing with a specially prepared solution: dissolve 2 tablets of Apirin-B and Gamaira in 10 liters of water.
On the day of sowing, grooves are made in a box or tray at a distance of 3 cm from each other and the seeds are laid out in them at a distance of 1-1.5 cm, sprinkling the grooves with soil. Then the surface is slightly compacted, crops are placed on the windowsill and kept at a temperature of 18-20 ° C. After 4-5 days shoots usually appear.
The emerging seedlings need to be thinned out, leaving each plant an area of approximately 2x2 cm to feed. Seedlings dive after 2 weeks, when they grow up a little.
Plants are planted in cassettes according to the scheme 3x3 cm. When picking, the stem of the seedlings is deepened to the cotyledons. After 2 weeks, the plants from the cassette are transplanted into 5x5 cm pots (plastic, paper or peat). To prevent fungal diseases, cups are treated with a weak solution of light blue copper sulphate before picking.
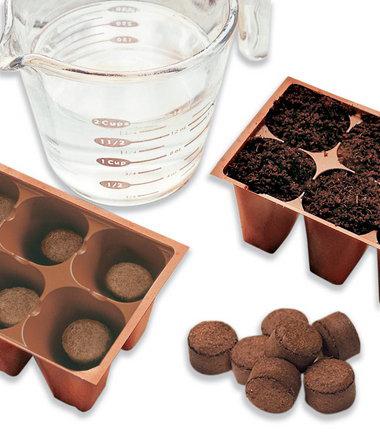
Growing cabbage in peat tablets

In order not to injure the roots of cabbage seedlings with a pick, they are grown in peat tablets, which contain all the nutrients and minerals. Until the very landing in the garden, the cabbage in them does not require top dressing. The fungicide-impregnated mesh provides seedling protection from fungal diseases.
Cabbage is planted on seedlings in tablets with a diameter of at least 4 cm. They are first placed in a deep container, poured with warm water and left to swell.
When the tablets increase in size by 7-8 times, the excess water is drained, seeds are laid out in 2 pieces in the recesses on the surface of the tablets and the pits are covered with peat. Placed in a bright place, the container with tablets is kept at a temperature of 18-20 ° C until shoots appear.
After seed germination, a weak seedling in each tablet is cut at the root, but not pulled out so as not to damage the roots of a stronger one. If the roots of the plant begin to grow through the grid of the tablet, it is recommended to transplant the seedlings together with the tablet into a pot.
How to get seedlings without picking?
To avoid picking, cabbage seeds are planted in cassettes with a depth of at least 7-8 cm, the cells of which should have the following dimensions:
- from 6x6 to 7x8 cm for early varieties;
- 5x6 cm for mid-season varieties;
- 5x5 cm - for later.
After filling the cells with a substrate, 2 seeds are sown in each of them. You can first sow the seeds in tablets, then placing them in the cells. If roots begin to grow through the grid of the tablet in the cell of the cassette, a substrate is simply added to it, filling the space.
It is better to initially sow cabbage in separate pots, if there is no desire to swoop down on it. The root system of plants growing in separate pots has a large volume, they are planted in a permanent place in a more gentle way.
Growing seedlings of cabbage in a greenhouse

Good seedlings of cabbage can be grown in a greenhouse. The sun's rays penetrate the transparent coating and do not harm the seedlings. In a greenhouse, moisture does not evaporate as quickly as in an apartment with working heating devices. Another advantage of growing seedlings in a greenhouse is that it creates a microclimate that is optimal for seedlings.
For sowing in a greenhouse, the seeds must be dry. Starting from the end of March and until mid-April, the time for sowing early varieties begins, late and mid-ripening varieties are sown throughout April. In the garden, several grooves are made at a distance of 15-20 cm and watered abundantly. Seeds are scattered into the grooves at the rate of no more than 3 pieces per 1 sq. cm. The depth of seeding is 1-2 cm.
To protect against cruciferous fleas, after the first true leaves appear on seedlings, it is advisable to treat them with an insecticide. To ensure the formation of an even stem in seedlings, at the stage of development of 4 leaves, it is recommended to pour a layer of soil 3-4 cm thick on the bed. It is recommended to thin out seedlings that have grown very densely by cutting at the root or pulling out weaker seedlings. After that, the bed must be watered.
How to care?

Proper care is a necessary condition for growing cabbage seedlings. This plant cannot be called capricious, but care errors can cause growth retardation, disease, and even death of seedlings.
Lighting
At home, ordinary daylight is not enough for cabbage. In order for the seedlings to grow stocky and strong, it is necessary to illuminate it. At a height of 20-25 cm above the seedlings, a fluorescent or LED lamp or phytolamp is installed. They have to work 12-15 hours a day. Incandescent lamps are not suitable for artificial lighting, as they heat the air, and the light coming from them is not suitable for plants.
Watering
At home, cabbage seedlings are watered when the top layer of soil dries. Both insufficient and excessive moisture are dangerous for seedlings. So that the seedlings do not have to be watered too often, do not neglect loosening the soil. Moisten the soil with settled water at room temperature. After each watering, it is recommended to ventilate the room.
Temperature regime
When growing cabbage seedlings, it is important to control the air temperature in the room. Before germination, the optimum temperature is 18-20°C. When shoots appear, the temperature is reduced to 15-17°C during the day and 8-10°C at night. Such differences in day and night temperatures help to strengthen the seedlings and prevent them from stretching. For seedlings of cauliflower, you need to maintain a temperature of 5-7 ° C higher.
After a week, increase the temperature to 15-17°C. After 3-4 days, the seedlings dive into separate pots or cups. Seedlings that have taken root after picking are recommended to set the following temperature regime: 13-14 ° C during the day and 10-12 ° C at night. Cabbage seedlings grow very slowly at first, but over time they pick up pace and 3 weeks after picking they already form 3 leaves.
top dressing
When growing cabbage seedlings, do not forget that young plants in the seedling period require a balanced set of nutrients that come in the most easily accessible form. Approximately 7-9 days after picking, the first top dressing should be carried out.
To prepare fertilizer in 1 liter of water, it is recommended to dissolve 4 g of superphosphate and 2 g of ammonium nitrate and potassium fertilizers. To feed 5-6 dozen plants, 1 liter of nutrient solution will be enough. First, young seedlings need to be watered so as not to burn the roots, and only then fed.
After 2 weeks after the first feeding, a second one is carried out. To prepare the nutrient solution, use the same fertilizer, doubling their amount per liter of water. If the cabbage seedlings have turned a little yellow, they are fed with fermented slurry.
A few days before planting cabbage in the ground, a third (hardening) top dressing is carried out. 5 g of superphosphate, 3 g of ammonium nitrate, 8 g of potassium fertilizers are added to 1 liter of water. An increased dose of potash fertilizers helps seedlings to take root better in open ground. For top dressing, you can use ready-made complex liquid fertilizer "Kemira Lux".
hardening
Hardening seedlings promotes the development of the root system and ensures a high survival rate. They begin to harden seedlings of cabbage 10 days before planting in the ground. In the first few days in a room with seedlings, it is enough to open the window for a couple of hours.
In the next few days, seedlings are taken out for 2-3 hours on a balcony, loggia or veranda under direct sunlight. To prevent young plants from being burned by the bright spring sun, shade them lightly with gauze.
On the sixth day of hardening, they begin to reduce watering, preventing the soil from drying out, and take the seedlings out to the balcony, where they will be until planted in the ground. Before planting, the seedlings are well watered.
Planting seedlings of cabbage in the garden

By the time of planting in the garden, the seedlings should be strong, stocky, have 4-5 leaves and a well-developed root. Planting early cabbage is carried out in late April and early May, mid-ripening varieties are planted in late May or early July, late ones - throughout May.
The soil in the area allotted for cabbage is prepared in advance: it is cleaned of plant residues and weeds, dug up and a mixture of 6-8 kg of rotted manure and 100-200 g of wood ash is applied to each square meter.
For varieties and hybrids of white and red cabbage, the following planting scheme is recommended:
- early - 30-35 cm (distance between plants in a row) x 40-45 cm (row spacing);
- mid-season - 50-60x60;
- late - 60-70x70.
For the maturation of the main heads, broccoli is planted according to the scheme 20-30x50-60, and for the development of side shoots - 40-45x60. For seedlings of Brussels sprouts, a planting scheme of 60-70x70 is used. Cauliflower can be planted according to the scheme 20-30x50x60 or in a checkerboard pattern 30-40 cm apart.
It is recommended to plant cabbage on a cloudy day. Holes are dug in the garden and at least 1 liter of water is poured into each. Seedlings taken out of a container with an earthen clod are laid out in the holes, they are deepened by the first real pair of leaves and watered. For the first few days, seedlings will need to be protected from direct sunlight and sprayed with water after 17 hours.
Coach Nutritionist, Sports Nutritionist, Honored Author of Evehealth
20-11-2014
48 776
Verified Information
This article is based on scientific data written by experts and verified by experts. Our team of licensed nutritionists and estheticians strives to be objective, open-minded, honest and present both sides of an argument.
For a long time, experts in proper and healthy nutrition agreed that cabbage has a beneficial effect on the body, burns fat and promotes rapid and effective weight loss.
White cabbage- one of the representatives of the cruciferous family, its distant ancestor is wild cabbage, known in all European countries. This is one of the most nutritious foods of our time, a storehouse of vitamins and minerals. These are fiber, carotene, fats, lactose, amino acids, glucose, lactic and acetic acid. In the people, cabbage is called the orderly of the stomach.
So let's make soup.
We need: 600 g of white cabbage, half a cup of brown rice, green onions, a few celery stalks, two tomatoes, 3 onions, 4 carrots and 2 pcs. bell pepper.
Next, you need to wash the vegetables well, chop the cabbage, cut the carrots into strips, make the hands into rings, and slice the pepper and celery. Scald the tomatoes with boiling water and remove the skin, chop or grind to satiety. Put all the ingredients in a saucepan and add water, bring to a boil over low heat and cook for another 10 seconds. with open lid.
Boil rice separately, cool and then simply combine with green onions and vegetables. Takes the soup off the heat. You can start eating.
The diet will be
- First day: Cabbage soup and fruits except banana and grapes. Plentiful drink and vitamin complex.
- Second day: cabbage broth and any vegetables except potatoes. You can skimmed kefir and coffee.
- Third day like the first one.
- On the fourth cabbage soup again, two bananas are allowed.
- On the fifth day in addition to soup, you can eat a piece of boiled low-fat fish, tomatoes.
- Sixth day as the fifth.
- Seventh: cabbage soup, vegetables and fruit juices.
Soup during the diet can be consumed in unlimited quantities, only without salt, seasonings and spices. During the day, you can distribute a portion of 7-8 times and eat as you feel hungry. Do not forget about drinking plenty of water and vitamin complex.

Cauliflower is a very tasty vegetable. And useful at the same time. In order to get an early harvest, it is grown in seedlings. This technology is simple, but it is necessary to follow some recommendations. Further in the article, we will consider how to properly grow cauliflower seedlings at home.
Basic techniques
Good seedlings can be obtained in two ways: regular and potted. In the first case, the seeds are planted in boxes or in a greenhouse. The second uses special peat pots. A rather weak and tender root system is what distinguishes cauliflower. Seedlings, the cultivation of which is not too complicated, will rise well and be strong only when using very loose soil. Therefore, it is best to use the second method. You can also use mixed technology. That is, plant the seeds in boxes or a greenhouse, and make a pick in peat pots.
Timing
45 days is the period for which cauliflower seedlings, large enough and strong enough to be transferred to the beds, can be obtained. Growing it usually begins in late March - early April. This is the case if they want to get an early harvest. More exact dates depend on the region in which the plot with the garden is located. In the southern regions of Russia, they will be earlier. In the middle lane and in Siberia, sowing starts later.
Subtracting 45 days from the period of possible transfer to open ground, you can accurately calculate the time when cauliflower seedlings should be planted. Growing (it is better to use early varieties) in a greenhouse or in pots in this case will allow you to get a crop at the end of summer. Of course, only subject to compliance with all technologies. The most popular varieties of early ripening are Movir 74, Gribovskaya 1355, Otechestvennaya, etc.
Late ones are often planted at the end of April - in May in a greenhouse. In this case, the harvest can be obtained in September - October.
Land preparation in boxes

Seedlings, which should be done correctly, react very painfully to a lack of nutrients in the soil. Therefore, the soil under it should be prepared very carefully. Just fine for growing strong healthy plants, a mixture consisting of equal parts of soddy soil, humus and peat is suitable. It would be very good to add a little phosphate fertilizer to the soil for cabbage (for example, 20 g / m 2 granular
Be sure to also disinfect the soil by spilling it weak. To prevent the disease of seedlings with a black leg, calcined sand should be prepared. They cover the surface of the soil in boxes after planting the seeds. Sand can be replaced with high-quality wood ash.
Seed preparation
Planting material should first be calibrated, warmed up and pickled. For growing seedlings, large seeds should be taken. The use of such planting material can improve the yield by about 30%. When sowing large seeds, stronger seedlings of cauliflower are also obtained. Growing at home will be even more successful if you preheat the planting material. To do this, it is placed in a gauze bag and the latter is immersed for 20 minutes in very warm water (50 gr.). Next, the seeds are dried and proceed to dressing. Disinfection can be carried out with formalin solution (1:300) or garlic juice (1 tsp per 3 tsp of water) for an hour.
Transplanting
The soil in the boxes is carefully leveled. Next, the actual seeds of such a crop as cauliflower are planted. Seedlings, which are grown at home on window sills, will germinate well and quickly when the seeds are buried in the ground by about 1 cm. After embedding, the surface is sprinkled with calcined sand or ash. Next, the soil in the boxes should be thoroughly shed using a spray gun.
Caring for small seedlings consists in periodically moistening the soil and weeding if necessary. About the same way, cauliflower is planted in a greenhouse. It is best to cover it with a special film, for example, "Svetlitsa". Such material transmits sunlight well and is hygroscopic (does not collect condensate).

Cauliflower seedlings: how to grow
Before shoots appear in the boxes, the air in the room must be warmed up to at least 18-20 degrees. The same temperature should be maintained in the greenhouse. In order for the air under the film not to cool down at night, you should cover the structure with some improvised material: straw mats, old blankets, etc.
After the cabbage rises, the ambient air temperature can be reduced during the day to 6-8 degrees, at night - up to 5-6 degrees. This will help strengthen and harden the plants. After a week, the temperature should be raised to 10-12 gr. and maintain at this level for about 10 more days, until picking. This mode will allow you to grow healthy, strong, not pampered seedlings.
picking
This procedure is carried out a week and a half after the cauliflower seedlings sprout. Growing and caring for it also involves the correct transplant. It is impossible to delay the timing of the pick. In older plants, when transferred to other containers, the root system suffers greatly. As a result, they take root much worse and develop in the future.
Picking is best done in peat pots. In this case, when transplanting plants into open ground, their root system will not be damaged, and they will take root much faster and better. Picking is carried out in such a way that the plants are immersed in the ground to the cotyledon leaves. At the end of this procedure, the cabbage should be mulched with wood ash.
It is better not to dive all the plants at once. A few bushes should be left in boxes just in case. Peat pots themselves are easiest to purchase at a specialized store. But you can make them yourself.

How to make peat pots
By following the above technique, very good seedlings of cauliflower can be grown. How to plant it, we found out. Now let's see how to make peat pots for seedlings. For manufacturing, you will need to prepare:
- Lowland peat with pH not higher than 6.5. More acidic can be limed. This procedure is carried out no earlier than two weeks before planting seedlings.
- Wood sawdust. The day before the pots are made, they need to add a little ammonium nitrate (1 kg per 1 m 3). It is introduced in order to prevent depletion of the soil mixture. The fact is that the bacteria that process sawdust absorb a lot of nitrogen from the environment (in this case, the peat mixture).
- Sand.
- Fresh mullein diluted with water 1x1.
Three parts of peat take 1 part of sawdust and 0.2 parts of sand. You need very little mullein (5% of the total amount) - only for gluing the mixture. Otherwise, the walls of the pots will turn out to be very dense and rigid, and the roots will not be able to break through them. To a mixture of sawdust, peat and sand, you need to add some mineral fertilizers (superphosphate and potassium chloride) and lime. It is best to make pots on the same day when the picking will be carried out.
How to grow cauliflower seedlings in peat tablets
This is a fairly new technology that allows you to get very strong plants. Purchased, you just need to put in plastic cups and pour warm water. After a while, they will swell and transform into a nutrient mixture. One or two seeds are placed in each cup.
Growing without a pick
This method has recently become more and more popular among domestic gardeners. With its use, very good seedlings of cauliflower can also be obtained. Cultivation in this case is carried out from the first day in peat pots. However, this method is best used for late seedlings. That is, when the transfer to the ground is supposed to be carried out in the summer.
Without a pick, you can grow late seedlings right in the garden. Seeds in this case are sown quite rarely (according to the scheme 10x56 cm). Care for plants in the same way as when growing in boxes, pots and greenhouses. To protect seedlings from frost, arcs are installed and a film is pulled over them. Usually a small cabbage takes up only a small part of the garden space. After four leaves grow on it, it is distributed over the entire area.
How to fertilize
In order for the seedlings to grow healthy and strong, it is worth feeding them at least twice with mineral preparations. For the first time, plants are fertilized about 10 days after picking. The second - in 10 days. For top dressing, you can use a solution of ammonium nitrate.
Seedling hardening
Preparation of this genus allows you to get the most frost-resistant plants. Start hardening about 12 days before planting in open ground. To do this, during the daytime, the seedlings are taken out to the balcony or placed in a greenhouse at an air temperature of about 5 g. At night, the pots must be returned back to a warm room. Five days before planting, seedlings can be rearranged from the room to the greenhouse. In warm weather, the film is periodically removed from it, gradually increasing the interval for the plants to be in the open air.
How to transfer to open ground
Using the techniques described above, actually very good cauliflower seedlings can be obtained. Growing it in open ground is also carried out according to certain methods.

Small holes are made under the seedlings with a depth slightly greater than the height of the pots. Cabbage is placed in rows at a sufficiently large distance. The free space between the bushes should be at least 25 cm. The rows are placed at a distance of 70 cm from each other. This planting pattern is suitable for early varieties of cabbage. For later, both distances should be increased by about 10 cm.
The pots are lowered into the ground and dug in such a way that the plant is buried to the first leaves. At the final stage, the grown seedlings should be carefully watered.

Well, now you know how good cauliflower seedlings can be obtained. Growing it at home, as well as carrying it into open ground, are simple procedures, but require strict adherence to certain technologies. The main thing is to observe the planting dates, prepare a good soil mixture and do not forget to water the plants.
Growing seedlings with peat tablets is by far not only the most common, but also the most effective way. Such a device is excellent for breeding a variety of crops, creating all the conditions for optimal seed germination and ideal rooting of cuttings. And now more about
Peat tablets - how to use for planting seeds
Varieties of peat tablets
There are many types of seedling tablets on sale. Each contains the main component - compacted fine-fiber peat, to which manufacturers add various necessary components.
The most common are humus and peat tablets, to which are added:
- mixture to stimulate growth;
- antibacterial drugs;
- solutions to reduce stress during transplantation.
Such an environment promotes maximum seed germination and rooting of cuttings of various plants. The mesh coating of the finished tablet allows it to be transported without any damage.
Improving the characteristics of the material for seedlings, manufacturers use peat of various qualities, adding a variety of impurities. Produced tablets also differ in shape and volume. In most cases, the height of the product does not reach eight millimeters, and the dimensions in diameter are from two to seven centimeters.
Peat tablets with a special paper or mesh coating, additionally treated with fungicides to protect the first shoots from fungal infections, became the best.
When buying a product, you should always pay attention to the acidity level indicated on the label, which is selected according to the needs of a particular plant.
For the best germination of crops, it is best to choose proven expensive brands of tablets, the structure of which includes high-quality peat and all impurities appropriate for favorable conditions.
Preparing for landing
Having decided on the size of the mixture of peat, you should choose the appropriate container. It can be, like a separate container for each tablet, or a capacious pallet.
When laying out peat tablets, it is necessary to leave gaps for the free growth of the root system of an individual plant.
Special recesses for seeds, provided by the manufacturer, must be on top.
The prepared material is poured with warm water, which should completely cover the tablet. After fifteen minutes, the peat mixture will swell and become much higher, while maintaining the original diameter dimensions. 
Excess liquid should be drained from the already completely formed substrate.
Planting seeds in peat tablets
Seeds are planted both dry and pre-sprouted. Landing takes place in a few simple steps:
- A couple of seeds are placed in the prepared recesses and sprinkled with prepared humus or a composition taken a little from the tablet itself.
- The planting container is covered with a transparent coating, which is usually polyethylene or glass.
- The sown container is placed in a warm place.
- A prepared small greenhouse is often ventilated.
- Periodic watering is carried out by spraying on the surface of the water.
Before the first shoots, it is imperative to monitor the temperature and humidity. After wetting, it is advisable to leave the soil to dry a little. 
When sprouts appear, the cover is removed, and the container is placed in a sufficiently lit place, but slightly cooler than the previous one. Watering is done by the capillary method - adding liquid from the bottom of the pan, because water, if it gets on the stems, can cause plant disease.
For planting in the ground, the roots do not open, but are transplanted along with the tablet. The peat composition, enriched with the necessary components, is further used as a fertilizer in the already open soil.
If several seeds were sown in one place, then before moving to the ground, the sprouts are carefully separated, and the peat is evenly distributed.
Various plants can be planted in peat tablets. The material is well suited for sprouts with delicate thin shoots and for crops that are difficult to dive.
The peat product has proven itself perfectly for the ideal development of the root system of deciduous and stem seedlings. 
In ready-made tablets, gardeners have the opportunity to grow all types of vegetables, and flower growers can breed even the most difficult and rare plants.
The benefits of peat tablets
With the advent of peat preparations, cassettes and various plastic pots filled with soil have been pushed into the background. The predominant advantages of seedling tablets are:

Disadvantages of using peat tablets
With a lot of advantages, peat material still has some negative aspects:
- the price of a quality product is quite high, which is especially noticeable with quantitative plantings;
- constant moisture control, since peat tends to dry out;
- the need to use additional containers and other suitable containers.
When purchasing peat tablets, it should be noted not only reliable manufacturers, but also the expiration date and storage conditions of products, which is important for effective subsequent use. 
For the correct use of peat soil, several points should be noted:
- Peat tablets are used only once.
- Some seeds are left without sprinkling - otherwise delicate thin plants may not germinate.
- The seeded substrate should not be placed near a heater or radiator.
- Cells for tablets are selected with a slightly larger diameter.
- Several seeds of only those plants are laid out in one recess, the roots of which tolerate separation well.
- It is important not to miss the moment of seed germination and remove the transparent cover in time to avoid deformation of the seedlings.
- To grow seedlings, it is necessary to increase the volume of the recess intended for seeds.
- It is advisable to cut and carefully remove the interlocking mesh before planting the sprouted crop, since it does not always dissolve in the soil.
Peat tablets are the most suitable material for various vegetable and flower crops. Their rich composition provides the seeds with all the necessary components for growing strong and resistant seedlings with a powerful root system.
For the best result, you only need to choose the right peat tablet for a particular plant and follow the instructions.
I wish you a rich and healthy harvest.
Picking, or transplanting seedlings from boxes into open ground, is a real stress for any plant. There is a high probability of damage to the root system, or that a fungus lurks in the black soil. In order to get a strong and healthy shoot from the grain, which will give a rich harvest, modern summer residents use peat tablets.
The benefits of peat tablets
In specialized stores, you can find brown washers of various diameters with a recess for seeds. Outside - a fine-mesh mesh that holds compressed high-moor peat with antibacterial additives and mineral components that nourish the plant.
There are several advantages of tablets:
- The base is breathable, so the root system is constantly supplied with oxygen.
- Such alternative pots are compact and do not take up much space. Tablets of small diameter can easily fit in a cake box.
- Seedlings during transplantation are not removed from the peat base, but placed in the ground along with it.
- The outer shell dissolves gradually, and at the initial stage protects immature plants from the fungus.
- Thanks to mineral additives and growth stimulants, the seeds do not need additional fertilizer, and the shoots are strong and give a rich harvest.
- Capricious and tender plants perfectly take root in peat tablets. Such devices are often used for growing expensive crops, and seedlings that do not tolerate picking.
How to choose peat tablets
It is better to buy tablets with a loose structure, because in coarse and tightly pressed varieties, the root system does not develop well and becomes weak. Coniferous plants and flowers love acidic soil. Vegetable crops and strawberries should be grown in a neutral environment. It is worth buying tablets in boxes where the acidity level is indicated.
Size matters
Tablets with a diameter of 24 to 36 mm are suitable for small seeds of strawberries or petunias. Variants ranging in size from 41 to 70 mm are used for growing eggplant, cucumbers, tomatoes and cabbage, which need a lot of room for root development.
Saving is bad
Some summer residents choose cheap tablets without a paper shell, but it is better not to spare money and buy copies in cardboard cups. First, they are impregnated with fungicides that will protect plants from fungus. Secondly, it is thanks to the shell that the peat keeps its shape during swelling, otherwise it will crumble and fall apart in the hands.
Before use, tablets must be soaked in water so that they swell and increase in size by 6 times, and sometimes all 8.

- You can put the peat base on a tray, plastic or iron, in a plastic box from a cake or bowls from rolls and other products that do not leak and have a lid.
- The recess for the seeds should be on top, because it is better not to turn over the swollen tablets.
- Spacing between alternative pots must be maintained, otherwise, during growth, the seedlings may become intertwined with roots, and it will be difficult to carefully separate them.
- It is better to take warm water, then the peat swells faster. Pour the liquid onto the tray so that it covers the tablets with the top. After 2-3 minutes, they will begin to absorb moisture and rise up.
- If necessary, add a little water until the peat stops absorbing it. Drain any remaining liquid so that it does not stagnate in the tray.
- If necessary, you can break the grid at the top to expand the crop area. Bend the edges inward so that they do not interfere and do not catch on each other.
- In cases where only one grain is placed in a tablet, it is not necessary to tear the mesh.
Tip: Peat tablets can be put on a pallet, in a cassette with special cells, or in a box filled with coarse river sand, which will take away excess water, preventing the appearance of rot and fungus.
Planting material is carefully checked and sorted out, empty and damaged specimens are discarded. Large seeds, like those of cucumbers or tomatoes, are stuck into peat and pushed inside with a finger. The grain should be at a depth, which is calculated by the formula: 2 * length of the workpiece. From above it is sprinkled with a layer of humus, or peat is carefully raked from the edges to the center of the tablet.

Small seeds, like those of strawberries or some garden flowers, are pryed with a damp toothpick or match. Put the workpiece in the recess, and lightly sprinkle with soil, or leave it open if the culture likes a lot of light.
How much to plant
To grow ordinary seedlings, for example, cucumbers or cabbage, you need to stick 2-3 seeds. Usually everyone takes root, but only the strongest and strongest sprout should be left. Pull out the rest carefully.
Expensive specimens are spent more economically: for 1 tablet of peat, only 1 seed, a maximum of 2, to be sure that the culture will germinate.
Optimal conditions for growing seedlings
Containers with future seedlings are covered with a plastic lid or a piece of a plastic bag. You can use glass. Place the drawers on a bedside table or bookcase, the room should be warm, because in cold conditions the seedlings do not germinate, freeze, and die.
Do not place tablets near batteries or other heating objects. The soil will dry out, and the plants will become weak, in need of additional feeding.
During the day, you can put containers with seeds on the windowsill so that sunlight falls on them. It is useful to open the lid for 1-2 hours daily to prevent condensation inside the box.
Tip: Peat tablets with capricious plants can be placed in plastic cups, which are covered with plastic bags. Thanks to the effect of a miniature greenhouse, seedlings hatch faster.
You can not keep the seeds on the windowsill around the clock, especially at night. They freeze, and make their way outside later than specimens that were in warm conditions. When pots with plants are on the windowsill, you can not open the window for ventilation.
Rules for watering peat tablets
Until the seedlings hatch, you can spray peat tablets from the sprayer so that they do not dry out, but do not get wet either. If a white fluff appears on them, you need to reduce the amount of liquid.
Water must be defended for at least a day, so that harmful impurities settle to the bottom. White plaque on the tablets indicates an excess of salt and heavy metals. In this case, it is better to pass water through the filter.
The peat should dry out a bit between waterings. If the soil remains wet, it is better not to add liquid, so as not to create conditions for the development of the fungus.
First achievements
After the appearance of sprouts, it is advised to lift one edge of the lid by placing a matchbox. It is better to ventilate the seedlings for 2-3 hours a day, but avoid drafts. When green stems hatch, spraying is stopped. Now water is poured onto a pallet so that the peat absorbs it and waters the roots of the plants.

2 weeks after germination, components that stimulate growth can be added to the irrigation liquid. It is advised to try "Fitosporin", which disinfects the soil with water, preventing the appearance of mold and fungi.
Tip: It is not necessary to remove the outer shell from the tablets, which does not allow the peat to disintegrate. The roots develop well under such conditions, and become strong enough to break through a thin frame. Seedlings are planted in the ground along with a paper cup.
Secrets of experienced gardeners
- It is useful to take grown and strengthened shoots to the balcony when the air outside warms up. 2 hours a day is enough for the plants to quickly adapt to new conditions after planting in open ground.
- If the seed did not take root in one of the tablets, you can plant a ready-made sprout in its place, which remained after thinning the seedlings.
- Sprouts can be moved to open ground after 3-4 weeks. If the culture belongs to the category of heat-loving and whimsical, it is better to wait until 10-12 weeks, when the roots begin to break through the outer shell.
- Seedlings are placed in the ground without removing from the tablet. Cardboard or mesh eventually dissolves in the ground, turning into additional fertilizer for plants.
Peat tablets are a godsend for summer residents and gardeners who want to receive strong and stable seedlings every year that can give a rich harvest. They are compact and easy to use, containing all the necessary components for the rapid growth of garden flowers and vegetables.
Video: how to use peat tablets