How to make a corner cabinet. Do-it-yourself corner shelf
Instead of struggling with the selection of furniture in a small apartment, it is better to learn how to make a do-it-yourself corner wardrobe. After all, no matter how small the space, the corners in the hallway, in the kitchen, in the rooms, remain empty. A self-made wardrobe will not only solve the problem of placing things, it will elegantly decorate the interior.
Design
There is no exemplary standard design that a corner wardrobe must comply with. It can be built-in (when only doors need to be installed) or cabinet, have different sizes, a different number of sides (triangular, trapezoidal, L- or U-shaped).
In recent years, a radius wardrobe has become popular, which is a furniture structure devoid of sharp corners. Admirers of beauty will certainly appreciate the curved doors sliding on the corresponding profiles. Such a layout allows, by saving space, to gracefully solve the problem of storing a large number of things.

In Fig.2. corner schemes are No. 1 (concave), No. 2 (convex), No. 5 (a convex column of a massive furniture structure or a free-standing small wardrobe). All other options for radius wardrobes can be obtained by combining the above 6 original types.
Radius is beautiful and functional

Radius cabinet doors move smoothly, almost silently. Similar characteristics are provided by the profile included in the sliding mechanism. Manufacturers offer it from steel or aluminum. We recommend choosing the second option for the following reasons:
- increased resistance to damage;
- minimizing noise when the door slides.
The cost of an aluminum profile is higher than a steel one. However, during long-term operation, you will appreciate your choice.
The wall thickness must be at least 0.12 cm. A thicker profile increases the reliability of fastening. High-quality components are produced by Komandor, Absolut, Raumplus, Aristo, and others. If the height of the radius cabinet is higher than 3 m, we recommend using the Raumplus profile.
The doors of the radius wardrobe can be with an upper sliding system or with a lower one. In the first case, the sashes hang on rollers. The movement is carried out along the upper guide. The initial impression of the suspension system is excellent. However, a large load on the upper horizon causes its gradual sagging. The suspension system wears out quickly, without regular maintenance it can unexpectedly lock the door at the most inopportune moment.
The second sliding system looks preferable for daily household use. The sliding of the sash occurs along the lower guide, the door is attached and fixed along the upper one. The load distribution is even, the assembled structure will last longer.
Door elements
Do-it-yourself assembly of corner wardrobes without a diagram reflecting the exact dimensions is impossible. Particular attention must be paid to the moving part of the structure - the doors. You can’t miss anything or take the wrong size, in which case the sashes cannot be used normally.
Before assembling your cabinet, let's take a closer look at the elements of doors with a bottom sliding system:
- Vertical side profiles can be symmetrical or asymmetrical. During operation, they are used as handles. Symmetrical profiles look the same on both sides, asymmetric profiles create a difference between the outer and outer sides.
- Asymmetric rollers located at the top are designed to fix the leaves in the opening.
- The upper door frame is necessary for attaching the wheels to it, as well as the subsequent fixation of the structure.
- The lower door frame serves to install the lower wheels, ensuring the correct sliding of the leaves.
- The internal door filler (wood, glass, mirror) performs a decorative function, gives the entire interior a personality trait.
- The seal attached to the vertical side profiles, in addition to softening the impact of the door on the cabinet wall, protects the moving structure from dust.
- The door cap is used to secure the side vertical profiles.
- Assembly and adjustment screws allow you to change the sliding speed of the wings.
- The stopper makes it possible to fix the door, to avoid unintended opening of the wings.
Calculation of cabinet capacity
Any step-by-step instruction gives confidence in the work begun, however, without a preliminary assessment of the spaciousness, the result will be disappointing. Before drawing the blueprints and reading the assembly instructions, decide what you will put on the shelves or hang. Then it will be difficult to move the functional sections, a beautiful outwardly cabinet can become a source of bad mood.
- to arrange things according to the season, provide at least 2 sections for outerwear;
- when installing recessed fixtures, the upper horizon of the cabinet is brought forward by 12-17 cm;
- not only convenient, but also functional when the depth of the shelves is not less than 60 cm;
- the width of the shelves more than 65 cm increases the risk of their deflection;
- the intershelf distance should be no more than 35 cm;
- take the width of the doors from 50 cm, with smaller sizes, the guides fall out;
- the number of functional compartments should be proportional to the number of doors;
- when designing the dimensions of drawers, pay special attention to the location of the door frames, it will be impossible to get too wide;
- doors must be the same width;
- the appearance and strength of the cabinet depends on the thickness of the chipboard;
- the material for the roof, side walls, doors will be chipboard, the back wall can be made of fiberboard 3 mm thick.

The most practical option is to make a built-in radius wardrobe. Such a design will easily merge with the walls, hide possible defects, and require less material and time consumption. Housewives will appreciate the absence of gaps between the wall and the cabinet, in which dust constantly accumulates.
Assembling the closet
To install the designed cabinet, you will definitely need:
- screwdriver;
- hammer;
- square;
- drill;
- pencil.
Before proceeding with the assembly of the structure, also make sure that you have:
- drawings;
- furniture board 18 mm;
- doors and guides;
- "insides" of the cabinet (drawers, hangers, handles);
- door fittings, screws, dowels;
- side, bottom and top bezels.

Assembly step by step:
- Taking measurements and drawing “on the ground” the installation location of the cabinet (you will need a pencil and a level). Vertical racks are marked on the wall, profiles on the floor and ceiling.
- Determination of a place for shelves, drilling holes for dowels, hammering them.
- Fastening profiles for shelves to the wall, installing their lower holders.
- Marking the mezzanine shelf, its fasteners on self-tapping screws.
- Fitting the side wall to the dimensions, its installation.
- Installation of the internal "stuffing" (shelves, drawers, etc.).
- Installation of pre-prepared false panels, attaching them with a screwdriver to the floor, ceiling, side wall.
- Cutting and bending the upper and lower profiles (do not forget to insert the stopper 1 piece per door), attaching them to the false panel with screws.
- Assembly of the assembled door. The description of the actions is as follows:
- decoration with self-adhesive film (if necessary),
- installation of vertical profiles on screws,
- door seal installation
- fixing the upper and lower door frames,
- attaching top and bottom rollers,
- inserting the top guide, then the bottom one,
- checking the correct sliding, its adjustment (if required) with a hexagon.
The problem of space is relevant for small and large apartments. It is very difficult to fit everything you need into the limited square meters.It is almost impossible to imagine a house, office or apartment without comfortable shelves. The element performs an aesthetic, decorative role.
Shelves help free up space and diversify the familiar interior of the room.
Shelves are used in absolutely any room and for completely different purposes. Looks great in bathrooms, kitchens and living rooms.

Consider the features and benefits of building corner shelves on your own.
Previously, the handicraft production of any furniture was considered the lot of the poor. Wealthy people preferred to purchase interior items in stores. But everything there had almost the same design, so thirty years ago the interiors in different houses were almost identical.

Today, original home-made furniture is a source of real pride.
In modern stores there are dozens of different models of furniture, but even among such a variety it is difficult to choose one option that can meet all the preferences of the owner of the house. In this case, there are only two options: order furniture directly from the manufacturer, or build it yourself.

Making shelves on the wall with your own hands is not at all difficult, and you can use a wide variety of materials.
The first option may seem ideal. However, not every master will be able to make furniture with high quality, inexpensively and take into account all your wishes. Finding such a specialist is not easy, and it makes no sense to search if you need a simple wall shelf.

This design element is easier to build on your own.
Self-manufacturing shelves has a lot of advantages.

We make a shelf on our own: how to decide on the design and materials?
Any wall shelf can have a different shape and design. They can be complex (with additional elements) or simple. Simple shelves can be used in the kitchen.

They are used to store condiments or kitchen utensils, so there is no point in coming up with a complex design.
Shelves in a semicircle are very easy to make. This option is ideal if there is no time and desire to do something more complicated. Also, simple shelves can be used in apartments and houses decorated in minimalist directions.

Such styles do not welcome complex shapes and intricate designs.
Shelves with additional elements can be used in living rooms. They can consist of several sections, or have an unusual shape, for example, in the form of the letter "G".

Often, such furniture occupies not only a corner, but also some part of the wall.
You can also decorate such furniture in an original way of cutting, if you have experience in this matter. Shelves placed in the corner also differ in the presence of a back wall. It may be present or replaced by a wall. If there is a desire to preserve the decoration of the walls, then it is still better to build a furniture wall.

It doesn't take much effort.
In this article, we will look at the process of building a classic-shaped corner shelf. This form is very simple and versatile. Its production will not even take two hours.

To get started, you should decide not only on the shape of the product, but also on the material.
Consider the types of materials and their advantages.

To quickly determine the raw materials, be sure to consider the comparative characteristics presented in the table.
| Characteristics | materials | |||
| Wood | Plastic | Glass | Metal | |
| Aesthetics | + | + | + | +/- |
| Durability | + | – | + | + |
| Ease of processing | + | + | – | – |
| Price | high | low | high | low |
| Moisture resistance | + | +/- | + | – |
| High temperature resistance | + | – | + | + |
| Strength | + | – | +/- | + |
After analyzing all the characteristics, you can see that it is easier and easier to create a corner shelf from wood.

In this article we will consider detailed instructions for the manufacture of such furniture.
Instruments
To make a shelf out of wood, you need to properly prepare the raw materials and tools. Start by preparing the tools. To build a corner shelf out of wood, you need to find:
- Electric jigsaw;
- Regular ruler 50 cm;
- Hacksaw;
- Glue;
- Drill;
- Building level;
- Sandpaper;
- Shelf fixing.

Tools for making shelves.
materials
In the role of the main raw material for creating a shelf, the most ordinary board, which was lying around on the balcony after repair, is suitable. You can also use the remnants of old furniture, or purchase a board in a store. When choosing the main raw material, consider several criteria:
- Design. The board should have a suitable color and a beautiful ornament;
- Quality. It is better not to use rotten and old boards;
- Integrity. Sheet for making furniture should not have scratches and potholes.

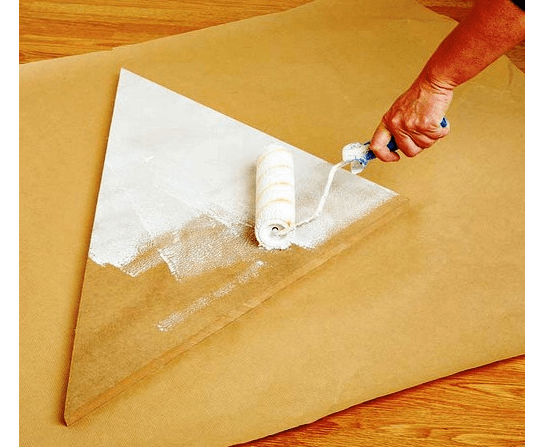
From the prepared board you need to cut blanks.
Cut pieces of plywood diagonally, clean the edges with sandpaper. Four racks can be cut out of the remnants of wood. They must be the same size.
Manufacturing process: step by step instructions
As you can see, the process of making a shelf does not require special costs and tools that are difficult to find at home. Almost all materials and equipment are available from any owner. In this section, we will take a closer look at how to make a corner shelf
VIDEO: Workshop on making a corner shelf.
Corner shelves in the interior - 50 photo ideas:


Sometimes creating some kind of furniture with your own hands is much easier and cheaper than buying ready-made headsets in salons. For example, to create a corner cabinet with your own hands, it is not at all necessary to be seven spans in the forehead and have a whole set of skills. In fact, the design of such a piece of furniture is simple, and there should not be any problems in its implementation.
Making a corner cabinet
We will create a wardrobe that will have a sliding system of two facades. At the base of the box there will be a square, one corner of which we will cut off. Before we make a corner cabinet with our own hands, we need to measure two quantities: the depth of the sides and the distance between them (the sliding system will be built into it). The height of the cabinet also matters. Let's say our design will have the following parameters: 600 mm by 1500 mm by 2300 mm.
We draw up a project, first we draw a diagram of the upper part, two sides and a corner support. The latter will be two parts that are connected to each other at right angles. The same parts will partially be the back wall of our cabinet - shelves will be attached to it. On the right side we will have shelves, on the left - a pipe on which outerwear is hung. Thus, this will be the foundation for the cabinet.
Box preparation
Our corner cabinet will consist of two boxes. The first one will be represented by a module with shelves (you may have a different number of them). The second module will consist of two elements - straight and angular, which will allow access to the pipe for outerwear. The first module is assembled simply: a chest of drawers and shelves are built into it. At this stage, it is very important to correctly calculate the depth, because otherwise the sliding system will not close completely and will rest against the facades. With the second module, there is even less work, since only the installation of the bar is required here.
How to choose a configuration?
Before you make a corner cabinet with your own hands, it's a good idea to understand its dimensions. So, the standard height is 2200 mm and above, which means that the opening for the facades must be at least 900 mm. If the doors are hinged, then the sashes should be as small as possible in width. In addition, the load on the hinges will be moderate, and therefore the cabinet will last longer.

The second important point is taking into account the parameters of the room and the expected load of the cabinet. For each specific room, you can choose a specific design. For example, cabinets in the form of a trapezoid and a triangle are too complicated in terms of calculations, besides, they will have to take into account both special fittings and certain details. Fitting the facade correctly without a professional measurer in this case is almost impossible.
Or maybe a classic?
The classic version of the corner cabinet has five walls: it is inserted between the sections in the furniture set. The system seems complicated, but in fact it is the most common and easy to manufacture. But if you put such a design as an independent element, it is too difficult, and a lot of materials will be required to create it. The closet will turn out to be overall, it will take up a lot of space, but it simply will not work to put a lot of things into it. So if possible, it is best to create a built-in corner cabinet with your own hands: there will be more working space in it, and much less materials will be required.

Kitchen Options
Of course, creating a huge one with your own hands is not easy. And therefore, most often this piece of furniture is bought in the bedroom or dressing room. But what to do when a constructive solution for the kitchen is required and it is impossible to buy a free-standing cabinet? The answer is simple: "Make it yourself!" For example, for a kitchen, an L-shaped design, consisting of two modules that are installed in a corner, could be an ideal configuration.

It is very easy to create such a corner kitchen cabinet with your own hands. Its design will be compact and ergonomic, and therefore even in the smallest kitchenette it will look harmonious. As for the number of shelves and the opening-closing system, the preferences of the owners play the main role in this matter. At the same time, it is worth remembering the mandatory nuances.
- You should not try to cut chipboard at home on your own, since the peculiarity of the corner structures is that they need to be precisely adjusted to each other and the geometry must be carefully observed.
- Creating a corner kitchen cabinet with your own hands, you should not save on fittings. For example, using a sliding door mechanism, buy full fittings for openings, and the savings can lead to the fact that in a year your locker will die.
- You should carefully consider the alignment of the floor and ceiling so that your design fits perfectly into the opening allotted to it.
How to assemble?

Assembling a corner cabinet is not the easiest process, and therefore you can spend a lot of time on it. To do this, you will need to stock up on a screwdriver, hammer, nail puller, hex keys, puncher or drill, hacksaw. It is worth remembering that all modules of this design are attached with the help of which they are inserted and fixed immediately. Be sure to make sure that the holes match each other. Before mounting the doors, it is worthwhile to install the mounting strips and plastic linings for the corner hinge - it is fastened with self-tapping screws.
If you need to attach the corner module to the cabinet, then you need to fasten it in several places. This will make the structure stronger and more reliable, and it will last much longer. As you can see, creating the simplest corner wardrobe with your own hands is not very easy, but it is quite possible. This is a universal element of furniture, since it allows you to more rationally and competently use free space. If you create it yourself, you can give the system any design and stylistic features, so that it fits perfectly into a room or kitchen. Well, do not forget about the timely drawing up of drawings - they will definitely be useful if you want the corner cabinet, created by yourself, to be solid and of high quality.
You can assemble a corner sofa with your own hands without much effort at home. Ready-made drawings and diagrams will help in this. In the future, it will also be possible to repair the corner sofa yourself.
Corner sofas are very comfortable. They are distinguished by the fact that they occupy a small area, look good, create the necessary coziness and comfort in the room.
There are corner sofas made of fabric, velvet, leather, leather substitutes. Matting is widely used as a beautiful, original and rich upholstery.
Fabric corner sofa Velvet fabric Genuine leather
From eco-leather From matting
Corner sofas fit perfectly into any interior. Such furniture can be freely placed both in the living room and in the kitchen. In addition, it will also serve as a bed.
If you want, but don’t know how to make a corner sofa with your own hands, you need to read the full description first. , how it is assembled. Step-by-step instructions will explain everything in detail and in an accessible way.

Corner sofa assembly instructions
Additionally, you can see photos and videos with a detailed description of the work. It is more reliable to be guided by the recommendations and master classes of those who have already made similar products on their own.
Do-it-yourself corner sofa
In order to make a sofa at home, you will need the following materials and tools:
- Fiberboard (chipboard, 1.6, 0.3 cm);
- timber (preferably pine, section 3 by 5 cm.)
- plywood (1.5, 0.5 cm);
- foam rubber;
- synthetic winterizer;
- upholstery fabric;
- legs for furniture;
- lifting mechanism;
- a set of tools (saw, jigsaw, self-tapping screws, nails, bolts, carpentry glue, screwdriver).
Do not use hardwood blanks (oak, etc.) as materials for a corner sofa with your own hands, as they are quite difficult to process. It is better to take birch as a basis. And the function of nails is better performed by self-tapping screws. They loosen less and better hold structural details.
Frame manufacturing
The first step in making a sofa at home is preparing the frame. In order not to be mistaken with the dimensions, it is better to look at the ready-made diagrams and drawings of the corner sofa, photo. Having studied everything in detail, it is worth getting to work.
Sawing fiberboard (chipboard), bars can be done by yourself, but it is easier to order where building materials were bought.
From the very beginning of the assembly, the armrests are prepared. To do this, a pair of rectangular parts are cut out, which are interconnected by bars. They are placed between the sheets, fastened. Then proceed to the assembly of the frame.
To do this, two identical sidewalls are interconnected using horizontal bars and vertical racks. It turns out the left half of the sofa. The seat frame is inserted into the frame, it is covered with plywood on top. The back is closed with fiberboard (chipboard). If desired, you can change the corner of the sofa by directing it in the other direction.
The right side of the sofa is designed in the same way as they did with the left. Here you only need to remember that there should be a box for linen at the bottom of the sofa.
The bottom of the frame must be covered with plywood, then screw the back, put a lifting mechanism that will unfold and fold the sofa.
foam padding
Having made the frame, you can start stuffing with foam rubber. It should be remembered that the foam for the seat and back should be thicker than for other parts (100 mm.).
In order to properly make the stuffing, you need to take accurate measurements from all the details. Then the foam rubber is cut according to the measurements taken and glued. This is where PVA glue comes in handy. And so that the sofas with your own hands are original and beautiful, you can give the upholstery a certain shape by cutting off its thickness in certain areas.
upholstery fabric
When the do-it-yourself sofa frame is ready, you can move on to its upholstery. The fabric on the corner sofa should be dense, so it will retain its appearance longer and protect the furniture from damage. To protect the sofa, it can be covered with agrotextile. The material is placed on the foam rubber, then it should be covered with sheathing.
We first cut out the fabric according to pre-prepared patterns.
You can simply cover sections of the sofa with material and cut out the details according to their size. Then, using a sewing machine, a cover is made. It is pulled over the product and fixed.
In order for the upholstery fabric to keep its shape better, and for the corner sofa to look more interesting with your own hands, you can make a tightening.
To do this, holes are made under the fabric in fiberboard (chipboard), and the tightening itself is made using nylon loops, originally sewn to the upholstery.
Upholstery options
A wide variety of materials are taken as a cover for a sofa. Often use matting , genuine leather, cotton, flock.
- Gunny is one of the most durable types of fabric. It is actively used for the manufacture of upholstered furniture. It is undemanding to personal care, gives the product originality. This is a durable material that can function for a long time without losing its appearance. Unlike other materials, matting does not wrinkle and holds its shape well.
- Genuine leather will give the sofa an expensive look, the material looks good, durable, does not require special care.
- Cotton is a natural material. It is harmless to health, passes moisture and air. Furniture with such upholstery is perfect for a children's room.
- Flock is another popular option. It looks like velvet, it contains nylon and nylon pile. This upholstery is very practical, resistant to dirt. Flock is not exposed to sunlight, you should not worry that the coating will fade or burn out in the sun. It is also distinguished by an abundance of colors, you can choose according to your taste.
To choose the upholstery to your taste, you can see a photo of all its options.
Sliding wardrobes today - one of the most popular elements of a modern interior. And this is not surprising, because with the help of them you can save space as much as possible, decorate the room and organize things. Well, for owners of small apartments, this is just a godsend!
My house is undergoing renovations, and now it's time to pick up a new one. wardrobe for bedroom. I always wanted to have a large dressing room that would fit everything that an active girl needs. To find dresses, shoes, jackets, bedding, and if you also find places for a sleeping bag and skis, then this is generally a dream!
However, in modern apartments, living space is not at all intended for such female expanse. However, there is an optimal solution, and this is - corner wardrobe.
Corner wardrobe in the bedroom
Wardrobe in the bedroom. How many spicy stories about unfortunate boyfriends and short-sighted young housewives are stored in its capacious insides! And if you look at the subjects of such stories from a different angle, then such a closet should really have a fairly roomy size, even if the bedroom does not “shine” with its dimensions.
- The bedroom is a zone of rest, tranquility and bliss, where an excess of things can bring disharmony. The arrangement of the bedroom with a wardrobe will unload the space and provide an opportunity to restore order, conducive to perfect relaxation.
- A corner radius wardrobe is simply an amazing solution for a small but very cozy bedroom.

- And such a closet will be a good option for both the parents' bedroom and the teenager's room.

- This white handsome man took his place of honor in the living room. However, by moving it to the bedroom, it can adequately replace all the storage places in the bedroom.

- Simple and tasteful!

- Here it is - almost perfect for me.

- The original placement of the backlight plays a role and is considered the main aspect in creating the effect of visual expansion of space.

- And this is practically full dressing room. There is even a chandelier!

- In design, the most important role is played not by financial possibilities, but by the correct proportions and accents to obtain a lively and harmonious interior.

- Well, this solution is applicable to any of the rooms. It takes up a lot of space, but it looks very impressive!

- I suggest you familiarize yourself with the drawing of a small corner cabinet.

- And such a closet can decorate the bedroom of a little princess or a young knight.

- Just a chic drawing of a radius corner wardrobe.

- And this is a drawing of a large and spacious wardrobe corner.

- I'm thinking of showing my husband this pattern. This is exactly what we need for our bedroom!

- Another good closet drawing.

- Spacious and light!

- Not big at all, but roomy enough.

- Mirrors installed in the doors of the wardrobe contribute to the increase in space and better illumination. These can be either solid mirror panels or inlaid with sandblasted printing with various images.

- And such a closet is just a paradise for any woman.

- An excellent solution for lovers of rounded and wavy shapes.

- This option will appeal to all those in love with Eastern culture and their art.

- I just love this decision. Fits everything to the max!

- Stylish idea. I'll probably take it on board!

- The trapezoidal design of the corner wardrobe has various configurations and the most spectacular appearance. As a rule, these are installed in large spacious bedrooms.

- Very nice, isn't it?

- How about this option. Interesting and very functional!