What you need to install interior doors. Do-it-yourself installation of interior doors: how to do everything correctly and efficiently
Do-it-yourself installation of interior doors
Today, do-it-yourself installation of interior doors is done in most cases. Manufacturers strive to simplify the installation of their products as much as possible, so almost anyone can handle this. Next, we will consider this procedure in detail.
We study the varieties and their features
Before you install an interior door yourself, you will need to choose the right model. According to the method of opening, they are divided into the following categories:
- Folding. Such models consist of several wings at once, which move along the guide. They are divided into two subgroups: books (they consist of 2 sections and are durable) and accordions (an alternative to screens).
- Coupe (sliding). They have the largest number of modifications: 1 and 2 wing, opening inwards or along the wall, left- and right-handed, etc. The main advantage of such structures is space saving. When installed correctly, they also provide a high level of sound insulation.
- Swing. The last variety is the most popular. Installation of this type of door is much easier, and people without carpentry skills can handle it (which cannot be said about other categories). In addition, their cost is much lower. The main disadvantage of such structures is that they take up a lot of usable space.
Installation of the first two varieties is carried out according to various methods, which have significant differences. At the same time, the skills of a carpenter will be required from the master, otherwise it will not be possible to achieve a positive result. Therefore, our step-by-step instructions will consider the installation of swing doors.
A few words about the choice of canvas and calculations
Technical characteristics must be selected based on the conditions of the room. First, we determine the dimensions of the canvas, so we measure the opening. Don't forget to leave a gap. Between the uprights and the original surface 10-12 mm, between the canvas and the timber 3-5 mm. This is necessary in order to avoid jamming the door. It may appear due to the swelling of the canvas (from temperature fluctuations and high humidity). The standard width ranges from 60-100 cm, height 180-220 cm.
Remember: the finished canvas cannot be corrected, and expanding (narrowing) the opening is a labor-intensive business. Therefore, select the dimensions as accurately as possible - the complexity of installation will depend on this.
Technical gaps (12-15mm), the width of the box are subtracted from the size of the opening and multiplied by 2. The resulting number is subtracted from the width of the opening. Calculation example:
The standard door length is 200 cm, so you have to adjust the opening for it. To calculate the required height, to two meters (or another figure, if we are dealing with a non-standard model), we add the thickness of the box, the size of the technical gap and 1 cm (the distance between the canvas and the floor). If a threshold is to be set, then add its thickness.

In addition to size, it is necessary to take into account the characteristics of the material from which the canvas is made. This is not so important, but you should not ignore this aspect. Remember a few simple guidelines:
- In rooms with high humidity, it is not recommended to use models made of materials that are unstable to moisture (chipboard, pressed sawdust, etc.). In a few years they will swell and lose their original appearance. In such cases, the installation of laminated doors is recommended.
Tip: if it became necessary to install such a variety, leave a technological gap 2 times larger, because such a canvas will swell much faster and stronger.
- If there are small children or large animals in the house, it is better to refuse models with glass inserts.
Another important point - for newly built wooden houses, when installing the box, it is recommended not to completely screw in the screws. This will allow her to easily survive the shrinkage.
Where to start - preparatory manipulations
First, you will need to perform several laborious and important operations.
What we need - we study the toolkit
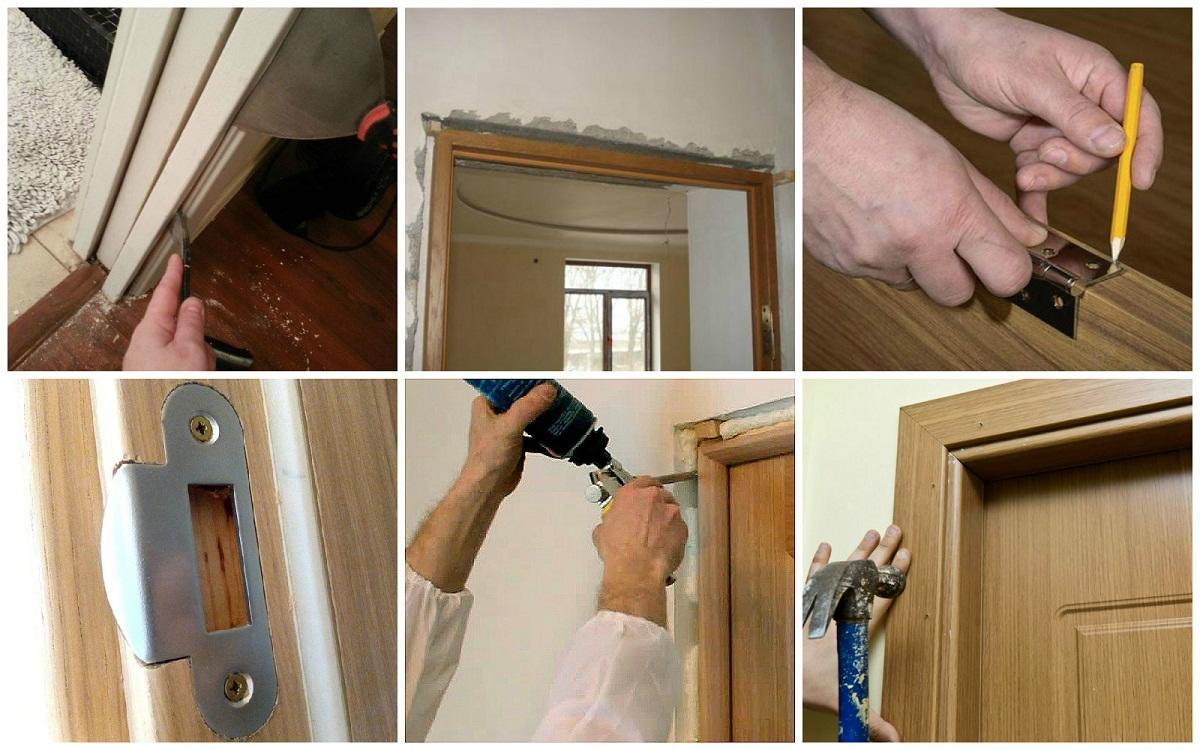
Tools for installing interior doors do not differ in high cost and complexity. To perform all the manipulations you will need the following:
- A hacksaw with a miter box (it must be of the right size - so that the box fits completely into its grooves, otherwise it will be very inconvenient to cut). You can use a circular saw.
- Building level. Ideally, laser - it bestows maximum accuracy. However, for a one-time job, it makes no sense to purchase it - it is quite expensive.
- Drill with cutter.
- Pencil (or marker), tape measure.
- Hammer.
- Screwdriver or furniture screwdriver.
- Mounting foam with a gun.
- Fastening materials: finishing nails (usually they are included in the kit), self-tapping screws, dowels, screws (80 × 5), wedges.
- Two spirit levels (180 and 50 cm).

The first procedure - dismantling
This is the most difficult, and most importantly, the dirty stage of work. Self-installation of interior doors begins with the dismantling of the old ones. Let's consider everything in stages:
- During operations, an unthinkable amount of dirt and dust will appear. Therefore, immediately remove all furniture, carpets and other items from the room. What cannot be moved is covered with something. Do not forget about PPE (goggles, gloves, respirator).
- Take the old door off its hinges. To do this, unscrew the screws that hold them. If the hinges are of the “father-mother” type (that is, when one part is inserted into the other), then we simply open the door and pull it up at a right angle. If the loops were not lubricated, you will have to make a lot of effort, so we do the work with a partner.
Tip: If you no longer plan to use the old canvas, you can simply tear it off with sufficient force. This is the most radical and fastest way.
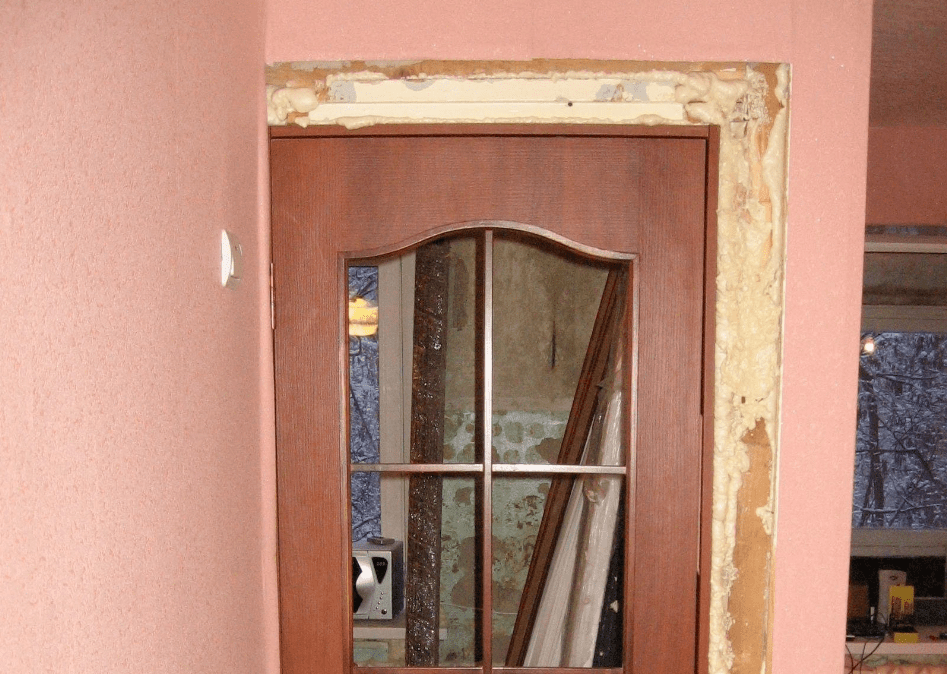
- Next, you need to dismantle the box. First of all, remove the solution that holds the frame.
- Then cuts are made in the upper parts of both racks. This will facilitate the extraction process: insert the mount into the holes made and simply pull strongly in different directions.
- As a result, they loosen up, and they can be easily removed from the opening.

Preparing the original surface
The next step is to bring the opening into proper shape. The work is done in the following sequence:
- We dismantle the insulation (if any). We do this with gloves, because this group of materials irritates the skin.
- We remove construction debris, after which we conduct a thorough audit.
- If there are materials that peel off easily, remove them. We also remove all fasteners (hinges, nails, etc.).
- As a result, we should get bare concrete (brick, timber - depending on what the walls are made of).
After such procedures, most likely the evenness and integrity of the surface will be violated. Therefore, it will need to be aligned. There are several ways, but the simplest is plastering.
If, after cleaning manipulations, the width of the opening has increased (for example, the surface layer of plaster has opal), then the installation of extensions will help. These are wooden (in most cases) planks 6-30 mm wide. They are installed in the case when you need to "increase" the size of the opening. A more durable option is cement mortar.

Main front of work
The installation procedure for interior doors must be strictly observed, so all further manipulations are presented in the correct sequence.
We collect the box correctly
Once again, making sure that the original surface is even, we proceed to collect the box. It is sold in the form of bars of various lengths. Of these, it is necessary to make a U-shaped structure (if a threshold is to be installed, then a rectangular one). The second option is used mainly for toilets and bathrooms.
If you ordered a box along with a door, then most likely it will be ready - you only need to assemble it (using long screws or nails). When purchased separately, it will have to be adjusted in size. This is the most complex process that will require maximum accuracy, because in the event of the slightest inaccuracy, the door will receive a slope, which will affect its performance.
Consider the assembly of the U-shaped structure:
- We lay two vertical racks on the floor, it is necessary that it be perfectly flat.
- We mark on them the height of the opening from the inside.
- From these points down we make a cut at an angle of 45 degrees, a miter box will help you with this.
- On the third rack (horizontal) we mark the width of the opening on the inside. From these points we make a cut of 45 degrees in different directions. Do not confuse the direction, these three elements must be assembled into a single structure, so do a fitting with each new cut.
- Then we mark the places for the hinges and the lock. This can be done later.
- We assemble the resulting structure and connect it with large self-tapping screws. For each joint we use at least 3 fasteners.
Attention! Watch for the vertical position of the self-tapping screw during twisting, because at the slightest deviation it will pierce the rack.
For a rectangular design, the assembly will be identical, only with the addition of a second horizontal post.

How to set the hinges correctly
The canopies will determine how comfortable the closing and opening will be, so perfect accuracy is required. Most people think that two loops are enough for normal use. We recommend using three (one is placed exactly in the middle). In this case, even with prolonged use, you will avoid distortions. So, you need to do the following:
- We apply loops to the applied markup and circle them with a pencil (marker).
- We make two grooves along the drawn lines (on the door and on the canopy) - to the depth of the canopy. A chisel will help us with this. The hinge should be "flush" with the main surface.
- Having made the adjustment, we fasten the canopies on self-tapping screws of medium length (at least 3.5 cm) first to the canvas, and then to the racks.
- If necessary, we make an adjustment: we put the structure on the floor and begin to open (close) - if the movement is not smooth, we tighten the screws.

Insert the box into the opening
The next step is to install the door frame. We do everything in the following sequence:
- If the hinges are of the “father-mother” type, then we take out the door - this will facilitate the work. Otherwise, leave it as is.
- We level all three racks with a level. We achieve perfect verticality!
- We burst the upper crossbar with wooden wedges.
- We level again and, if necessary, use linings.
- We drill through the side racks with a drill.
- We insert dowels into the holes in the wall.
- We fix the box with the help of long self-tapping screws.
- We carry out the final revision and alignment.
Final chords - handles, platbands
After making sure of the perfect evenness, we make the final manipulations. First, the handle is installed on the door. To do this, a through hole of the appropriate diameter is drilled in the canvas (If you purchased a complete set, then this will not be necessary). Then the two parts of the handle are connected. In most cases, this is not difficult.
At the end, platbands are exposed - decorative elements that hide all the irregularities and form the integrity of the structure. They are glued around the entire perimeter on special liquid nails. Joints are also made using a miter box.
Any business in which you are poorly versed requires special knowledge, as well as accuracy, attentiveness and concentration. This also applies to the installation of interior doors. Of course, you can always turn to professionals. However, having studied a number of technological nuances, you can completely cope with this task on your own.
The procedure for installing interior doors with your own hands
Instructions for installing interior doors include several items:
- unpacking the purchased set of door frame and leaf;
- box assembly;
- installation of a door frame;
- installation of platbands;
- door installation.
Now let's look at each step in turn.
The subtleties of unpacking the goods
At first glance, the simplest thing, as unpacking the purchased goods has its own characteristics. This should be done very carefully. Indeed, when opening the package with a knife, there is a high probability of causing a visible effect to the door leaf, which is subsequently difficult to eliminate. First of all, experts recommend unpacking only the door frame. The container with the door leaf must be opened immediately before the start of operation.

Since it is possible to spoil the “presentation”, this is especially true for laminated or varnished coatings.
Box assembly
Assembling the door frame is the most complex and painstaking process. After all, the most innocent errors can entail, at best, difficulties in operation, at worst - to a complete replacement of the material.

To assemble the box you will need:
Owners who want to find out how to install interior doors with their own hands can make a base without a threshold, in the form of the letter "P".
In this case, you need:
- a bar, in other words, a feigned stand;
- hinged timber;
- ceiling plate.
If you want to create a door with a threshold, you should add a lower beam-bar of the appropriate thickness to the listed list. Ultimately, the assembled box will look like a rectangle.
Initially, you should take the hinged beam and attach it to the door leaf, if necessary, adjust it along the length of the door. At the same time, a small gap should be left above and below, a couple of millimeters. We perform such a manipulation with a feigned stance. This is done with the aim of free movement of the future door.
Next, we apply a lintel to the hinge bar attached to the door leaf. We make appropriate marks on it, which we then, if necessary, transfer to the lower bar-bar. After you need to cut down the protruding strips, which play the role of door latches.
We make an incision with a saw until the end of the protrusion of the ceiling strip, which is subsequently knocked off with a hammer and chisel. Do the same with the bottom bar.
The completed algorithm of actions allows you to fasten all the bars into a single structure - a door frame using self-tapping screws. In this case, you should first drill holes for the screws with a thin drill in order to preserve the integrity of the box.
If you buy timber yourself, its thickness should fluctuate within the thickness of the door leaf.
Door frame installation
Installing a door frame often begins with the dismantling of the old one. After that, you should prepare the surface for the installation of the structure folded by you. To create a rigid base, narrow wooden planks are nailed along the edges of its corners.
The installation of the door frame has been recently carried out by blowing the mounting foam. But before that, the box should be fixed with anchor bolts. This manipulation will extend the life of the door, as well as ensure its reliability. However, you should take care of some of the nuances of using foam.
First of all, you need to cover the work surface with molar tape to prevent material from getting on it. It is also necessary to provide for the fact that the foam increases its volume by 50% when it solidifies. If you do not correctly calculate the amount of this material, you may encounter deformation of the door frame. After the foam has hardened, its excess is removed and all necessary fittings are mounted.
You can fix the box structure with a special glue, which builders call liquid nails. They make it possible to avoid drilling holes (as would be the case with dowels). At the same time, the aesthetic appearance of the door will be preserved. In addition, using special glue is much easier.
Mounting foam is poisonous, so it is necessary to work with it with gloves.
Hardware installation
Before you attach the door leaf to its frame, you need to cut the lock into it, install the handles and hinges.
The location of the lock is determined using a special measuring tool. Then we remove a layer of wood, based on the shape of the shutter hardware. In this case, the front part of the lock should be flush with the surface of the door leaf. We remove wood with a milling saw.
The hole for the working part of the lock should be deeper. Therefore, a drill with a drill of the appropriate diameter is suitable for its formation.

A core is laid in the installed lock, after which handles are attached to it. Finally, we clamp all the appropriate fasteners and clamps. In most cases, screws, bolts, which are fixed with a hexagon, serve as their role.
After the done algorithm, you should proceed with the installation of the loops. Similarly with the installation of the lock, first of all, the marking of their location is done. After that, loops are attached to the ends. With a milling saw, as in the previous case, a layer of wood is removed to fasten the hinges at an identical level with the door leaf.
Pre-final stage
After all operations on the door leaf are completed, we return to the box. On it we also mark the areas of location and fastening of the loops. A milling saw also comes in handy in this case.
The next step is to mark the area of the door frame, which will include the core of the door lock. To do this, use a chisel, which allows you to make a hole of the required depth. And finally we fix the cap.
Adjustment, alignment, completion
Hang the door leaf on one screw in the hinge and see how it closes. If the lock and strap are rubbing against the jamb, deepen both or one groove. Do not fasten the door with all the screws until it closes and opens satisfactorily. Convinced of the reliability of the work done, feel free to fasten the canvas.
In the end, I would like to draw attention to the fact that the procedure for installing your own interior doors with your own hands should include the processing of drilled, sawn and cut wood with plain paint. Thus, you will protect the surface of the door and keep its “presentation”.
How to install an interior door
We install interior doors with our own hands
We begin to install an interior door
How to properly install an interior door
How to install an interior door video
If you have a need installation of interior doors, then do not rush to call an expensive master, because if you wish, this can be done with your own hands. Few things, understanding in the construction business, you can use our advice and independently install interior a door .
How to choose a laminate
How to choose wall and ceiling paint
How to lay laminate
Types of wallpaper: advantages and disadvantages
How to paint walls correctly
We install interior doors with our own hands
The process of installing interior doors is quite complicated, so a positive result depends on clear implementation every action.
If you decide to do this kind of work on one's own, then be patient. You should carefully study all the instructions and tips for installing interior doors with your own hands, and then scrupulously carry out all actions.
Observing all the rules that are given below, you and your loved ones will be satisfied with brand new interior doors.
We install interior doors ourselves. Training
To get started, you need straighten the walls cover them with putty and plaster. After that, the wall in which the door will stand should be well dried, otherwise there is a risk of displacement of the door frame.
The floor must also be prepared for flooring. When installing an interior door consider the final height of the future flooring, to correctly calculate the height of the door frame. If you are replacing an existing door, then the last conditions are not so important.
The next step will be selection and purchase of interior doors. which we will talk about in the next article.
You can purchase the box and doors separately, or as a complete set. The door frame can be made on one's own. This U-shaped design, consisting of box timber. In essence, these are two racks, as well as a horizontal rail, called a lintel.
Note! The best option for a door frame is without a horizontal bar at the bottom (sill). If you do not hide this bar, then it will only interfere with walking.
When you choose a timber, carefully make sure that there are no bumps and black (dead) knots on it.
Important! The thickness of the door frame must be equal to the thickness of the door, otherwise the interior door cannot be installed.
To see the qualitative result of our work, it is necessary professional tool. However, it is expensive. At the same time, if you do the work with simple tools, then there is a risk of not maintaining the required accuracy.
- Hacksaw
- Level meter
- miter box
- Tape measure for measuring distance
- Screwdriwer set
- Hammer
- A set of chisels.
- Electric milling machine
- Perforator
- Miter saw
- screwdriver
- Circular.
We begin to install an interior door
To begin with, you need to decide How will the interior door open?. This largely depends on the layout of the house.
For example, in the bathroom it is recommended to make doors that open outward, because there is not enough space. And if the door is a transition from a small corridor to a large room, then you can install doors that will open into the room.
Let's move on to door frame installation. This is the most crucial moment and the basis of all work on the installation of interior doors, since the entire success of the work depends on the installation of racks.
1. With a miter saw, we saw off the upper parts of the racks at an angle of 45 °. If you do not have a miter saw, then this operation can be done with a small hacksaw and a miter box.
2. We measure the stands. It is better to measure and mark the desired length of the two racks from the inside.
3. Now let's prepare the lintel. Similarly, we measure it from the inside.
4. With a miter saw or a small hacksaw, we saw off the lintel from both sides at an angle of 45 °.
How to properly install an interior door
Installation of door hinges
Installation of door hinges is also a responsible undertaking. Dimensions must be accurate regarding the door leaf and door frame. It is also necessary to accurately calculate the dimensions of the recesses of the loops.
1. On the rack on the inside, you need to step back 20 cm. A loop will be fixed at this place.
2. The hinge installation distance will be 0.4 cm (the distance from the door leaf to the pillar) + directly the recess in which the hinge will be located.
3. We put the loop in the right place and circle it with a pencil.
4. It is better to make a platform for a loop using a milling cutter, and if there is none, then this work is done with chisels.
5. By the same principle, we make the seat of the lower hinge, which should be located at a distance of 20 cm from the lower edge of the door leaf.
6. We make recesses for hinges both on the rack and on the door.
Door frame installation
Door frame installation should happen like this:
1. We fix the racks perpendicularly to the lintel with self-tapping screws. But first you need to make holes with a drill of a smaller diameter than the diameter of the self-tapping screws.
Then we screw the self-tapping screws into the holes obtained, otherwise the structure at the screwing points may burst. It will be enough to screw in only 4 screws, 2 per side. The whole procedure must be done on a soft substrate (for example, on cardboard) so as not to scratch the door leaf.
2. We place the resulting box in the wall opening, while fixing it with spacers and wedges.
Do not forget! There must be a gap of 2-3 cm between the box and the wall for mounting foam.
3. Align the door frame horizontally and vertically using a level.
4. We finally fix the entire box with self-tapping screws, but before that we drill holes in the box and in the wall.
Before drilling the wall, we mark with a drill through our door frame. If the opening is made of brick, then you should hit the whole brick with a self-tapping screw, and not in the gap between the bricks, otherwise the dowels will not hold well.
5. After the holes are ready, which can be made 6-8 per side, dowels can be installed.
6. Now we screw the screws (it is better to use wood screws) into the dowels through the door frame. It will be more convenient to screw in the screws with an electric drill with an appropriate nozzle or a screwdriver. Do not tighten the screws to the limit, otherwise the box may bend. When screwing in, periodically check the level of the structure.
7. Installing hinges.
Be careful! The hinges must be installed so that the door leaf can be hung onto the hinges from above.
8. We put the doors, hanging it on the hinges, and check whether the door closes and opens correctly. The door should not open or close on its own - this will indicate that the interior door is not installed correctly. If there are any defects, we eliminate them.
9. Now you need to close the door and insert small spacers of appropriate sizes between the door and the uprights (you can use cardboard) so that in the future the foam does not deform the door frame.
10. And finally, we apply foam between the wall and the box. Start filling the vertical seam from the bottom. Do not overdo it, fill in about a third of the total volume of the joints, as the foam increases in size as it dries.
In addition, excessive application of foam leads to its overspending. Also, excess foam can get on the front of the door. The foam should dry for about a day at a temperature of 20 ° C.
11. After the foam dries, you can remove all spacers.
Platband installation
After the door frame is installed, there is still install platbands.
1. To do this, we cut the required length at an angle of 45 °.
Advice! So that when cutting the casing, there are no chips left, and the cut is “clean”, saw from the outside.
It is better to cut the slats for platbands, leaving a margin of a few millimeters to insure in case of an error.
2. We fix the resulting platbands with screws, nails or glue.
3. If you used nails, then their hats need to be rubbed.
And if these are self-tapping screws, then you can simply put decorative plugs on them. It is enough to screw 6-8 self-tapping screws on each side of the trim.
There are times when the width of the platband is too large, because of which it cannot be installed to a wall perpendicular to it. Then you just need to reduce the width of the casing by cutting it. You should end up with a platband that fits right butt against the wall.
If the platbands do not fit well in the corners, then such angles can be adjusted with sandpaper, but it is better to use a belt grinder.
We also consider the case when the walls in the room are not straight, and arranged in a trapezoid shape. This usually happens in the toilets and bathrooms of the old "Khrushchev". In such cases, it makes no sense to cut the architraves at an angle of 45 °, because they will not converge. Therefore, you can take our advice and cut the platbands as in the photo.
However, such methods of installing platbands can be applied if the thickness of the box matches the thickness of the wall. And if the wall thickness is greater, then apply the installation additional allowances.
Installation of extensions
So, in order to prepare the extensions and make the installation, you first need cut rebounds according to your size. It can be done with your own hands from a flat board.
Perfect for wet and thick walls waterproof plywood(BS), which can be additionally pasted over with a decorative film. But it is often easier and cheaper to put ready-made extensions from MDF with decorative design.
Let's consider one more nuance: if the design of the interior door has a significant skew, then the installation of extensions is highly discouraged.
Skews are evidence that the door frame has been installed not right, and if rebounds are still adjusted to such an incorrect design, then later they will split and warp.
Maybe, walls in a room with a slight slope. If we are talking about small irregularities (about 5 mm), then this can be corrected with a layer of plaster. With a much greater curvature of the walls, there will be no choice - you will have to file rebounds under the walls.
After installing the extensions, and before applying the plaster gaps must be filled with mounting foam.
As you know, the foam tends to expand during solidification, creating a lot of pressure, and so that the design of interior doors does not lead, take advantage of our tips:
- Do not remove the wedges and leveling bars until the foam is completely dry.
- Apply foam in 3-4 layers: apply the next layer after the previous one has dried.
- Leave within 1 cm of unfilled foam between the rebounds and the wall. This space is better to plaster.
We hope that our advice will bring you benefit and joy from new doors.
How to install an interior door video
A necessary attribute of each room is a heating radiator, and we are all accustomed to these cast-iron ribbed…
Interior doors must be installed after leveling the walls and laying out the flooring in order to hide the gaps with a box and a casing. If you are sure about the plane of your walls, you can wallpaper them before installing the doors. In another case, it is better to level and putty the wall adjacent to the door frame after the door is installed, having previously covered the door with a film so that the irregularities are not conspicuous.
The doorway is usually larger than a standard door. It should be sufficient for both the door leaf and the frame about 6 cm wide.
Door installation procedure
Before installing the door
- We put the door in a vertical position, carefully unpack.
- We determine which side the door looks into the room, and which side into the corridor. Usually the drawings are located on the side of the corridor, and the glass is placed with the glossy side in the room, matte in the corridor. However, it is more convenient for someone on the contrary, so that the room does not have a sharp shine of glass.
.jpg)
Hanging hinges on the door
- Determine the side of hanging loops
- We hang loops:
Mortise hinges
- We apply a loop and draw around with a pencil along the contour. The hinge should protrude half a millimeter both on the frame and on the door for free movement and also in case the hinges have to be adjusted.
- We cut the contour of the loop marked with a pencil with a wallpaper knife.
- We remove with a chisel the top covering of the door under the hinge - laminate or veneer.
- We deepen the recess under the loop to the required depth, equal to the depth of the loop itself.
- We outline with an awl the place of future drilling for self-tapping screws.
- We drill holes in the door leaf for self-tapping screws.
- We fasten the loop to the screws.
- We measure the distance to the hinges and transfer the marks for installing the hinges on the door frame.
- In this de way we attach the hinge to the door frame

Overhead hinges
- We mark on the door leaf 20 centimeters from above and the same from below.
- We transfer the marks for installing the hinges on the door frame. The loop should also protrude half a millimeter.
- We attach the hinge to the door frame and mark with a pencil the places for the screws.
- We drill holes in the box for self-tapping screws.
- We measure the distance to the hinges and transfer the marks for installing the hinges on the door leaf.
- We drill holes in the canvas for self-tapping screws.
- We fasten the loop first to the canvas, then to the door frame
.jpg)
We assemble the door frame and hang door hinges on it
- First, the upper and vertical are assembled, on which the loops and slats will be attached.
There are two ways to assemble the perpendicular parts of the door frame:
- The parts are laid on the floor and cut with a miter saw at the place of the future connection at an angle of 45 degrees. The sticks are then connected with two self-tapping screws at a 45 degree angle at each corner.
- The parts are applied to each other by selecting the inside of the door frame with a chisel and a hammer. Here you can already fasten the screws at an angle of 90 degrees. The main thing is that the parts are aligned in the front plane, so that the box is in the same plane with the wall and there are no gaps between the box and the casing.
- On the floor, a door is connected and a structure assembled by us from two parts - a "semi-box". A gap of 3-4 millimeters is left and the location of the loop is marked with a pencil on the box.
- The two parts of the "half-box" are temporarily separated by unscrewing the screws. Hinges are installed on the vertical part of the door frame. "Half-box" is connected again.
- The door leaf is hung on the frame and the place of sawing off the excess ends of the door frame is marked.
- Again, the door frame is sawn with a miter saw in the place of the second upper corner. The door frame is connected completely, forming the letter "P".
- From the bottom of the door, 12-15 mm is left from the door to the floor covering. In accordance with this size, the vertical parts of the door frame are cut from below.
.jpg)
The door frame is hung on the wall together with the door.
- Next, you need to attach the structure to the doorway. If the distance between the box and the opening is more than one centimeter, it is worth attaching a "goose" to the wall - a wooden beam. We fasten suspensions from a metal profile to the door frame, with which the walls were sheathed with drywall, two on each side, which we then bend and fasten to the wall with self-tapping screws. We start attaching from the front wall, that is, from the one with which the box and then the door should be on the same level.
.jpg)
The door frame is fixed with mounting foam
- The gap between the door frame and the doorway is filled with mounting foam. Before this, the surface of the wall must be dust-free and lightly moistened with a spray bottle.
Mounting foam is better to take with a small percentage of expansion and quick setting. Foaming is carried out from the side of the addition from below. It does not foam for the entire width of the extension, a minimum layer is given so that the foam does not put pressure on the door frame. When the entire opening is foamed, on the other side of the door, corners and strikers are foamed at a distance of 20 centimeters in both directions. After that, it is necessary to insert spacers into the door frame so that the mounting foam does not spread it inside the doorway.
.jpg)
The first sign that it is foamed correctly is that there is an even gap between the door frame and the door leaf, that is, the box has not been opened. After the foam dries, cut off the excess. However, if there is practically nothing to cut off - this is the second sign that it is foamed correctly - there is not too much mounting foam and, as a result, it does not exert extra pressure on the box.
Dobors are installed
- Dobors are placed after after installing the door frame and foaming it. First, in the additional strips, 4-5 holes are drilled through the side at an arbitrary distance from each other. Self-tapping screws are inserted there and the dobor is screwed to the door frame. It is fixed with mounting foam - a little so that the dobor does not bend towards the doorway.
.jpg)
Ready! Now you can glue the wallpaper and attach the trim.
Interior design as part of the interior
Without beautiful and high-quality doors, there is no modern interior. But how to supply the products yourself, without overpaying the workers extra money?
In this article, we will deal with this issue. So, how to properly install interior products? We need a set of tools, skillful hands and a plan of action.
List of required materials and tools:
- building level;
- anchor bolts, self-tapping screws for assembling the box;
- plastic (wooden) wedges and spacers;
- screwdriver (drill), screwdriver;
- miter box, chisel;
- wood saw;
- polyurethane foam in cylinders (based on one cylinder for two or three doors)
What will we do:
- We dismantle the old
- We measure the opening, check the level of the floor
- Let's cut the loops
- Let's install
- Fill voids with foam
We start by removing the unnecessary box. If we are dealing with brick walls, you will need to remove the nails connecting the box and the wooden inserts.
You need to find the heads of the fastening nails on the vertical side (usually 2-3 pieces), file the timber on both sides. Then cut the tip of the nail out of the timber, using a chisel, pull out the elements with tongs.
After removing the nails, it is necessary to cut the vertical beam into two parts and dismantle the old box. If the element to be removed is made of metal, you need to cut off the pins with which it is attached to the reinforcement in the wall. And finally, the box must be dismantled using scrap.
We measure the opening
Correct installation implies accurate measurements (see). Installation is allowed only if there are finished floors.

We measure
Standard opening dimensions:
- Standard height - 2000 millimeters;
- Estimated width can vary from 600 to 900 millimeters.
Before placing the box in the opening, you need to estimate the dimensions according to the formula: width + twice the thickness of the beam under the box + 20-30 mm for the gap and adjustment. According to this principle, the required opening height is also calculated.
If the box is larger than the existing opening, you need to reduce the width of the vertical beam. This is much easier than chiseling a concrete wall. When reducing the thickness of the side surface of the box, one should not get carried away too much: 10-15 mm is the maximum that can be cut from the beam.
It is better to remove most of it from the beam where it is planned to place the striker of the lock, because. during operation, this part of the structure will have less load. When installing the box, you need to make a gap (from 10 to 20 mm) with an opening for subsequent filling with sealant.
Checking the floor level
Before placing the products correctly, it is necessary to check the horizontalness of the floor using the building level. According to the level obtained, two points are marked on both sides of the opening.
Then we measure the distance from the indicated points to the floor. Next, the racks need to be cut in height, taking into account the measurement results. However, it must be borne in mind that the difference in level should not exceed three mm.
We complete
Assembly must be carried out on as flat a surface as possible. Since the process of correctly delivering the product is more routine, it is also necessary to mark and insert detachable loops.
Installation rules provide for adjustment.

Assembly
So:
- Place the door leaf on the floor, lifting it above the floor to a level equal to the width of the beam. In this case, the beam should move easily without excess clearance. When assembling the box, it is necessary to maintain gaps on all sides (3-4 mm). If the gaps in the purchased finished box are smaller, you need to remove the fastening nails.
- We put two beams on the sides of the canvas maintaining the gap between the timber and the box.
- Next step: preparing the top bar. We mark the length, cut out a groove for fastening for the side beam, mark the loops (most often at a distance of 200 mm from the edges of the canvas).
In any country house or apartment, the question of replacing or installing interior doors may arise. A wide range of doors offered on the market allows you to choose a product according to your taste, design of the room and the state of your wallet. You can trust installers to install doors for a fee, or you can save money and install the door panels yourself.
Mounting the canvas is not an extremely difficult task, but requires some knowledge and skills. Before installing any structure, you need to know what it consists of. The door block consists of the following parts - a frame, a door leaf, fittings, platbands.
If the width of the wall is greater than the inserted door block, then an additional element, an extension, can be used.

The most common materials from which interior doors are made are MDF, laminated chipboard and wood. There are various designs, but swing doors are more popular.
The order of assembly and installation of the door:
- Assemble the door frame;
- Fix the hinges on the door leaf and box beam;
- Insert the door frame or block into the opening;
- Install fittings (handle, latching mechanism);
- Install platbands.
You can install the fittings yourself, but if there is no self-confidence, then in order not to spoil the doors, it is better to trust the professionals. The installation sequence may vary.
Proper installation of interior doors
To put interior doors from scratch, in addition to desires and skills, you will need some tools and fixtures. In addition, you will need mounting foam and a gun. To cope with the installation of a heavy structure, for moral and real support, an assistant is needed.
What tools are needed to perform the work:
- Screwdriver or screwdriver;
- Level;
- Hacksaw, electric jigsaw or circular saw;
- Chisel;
- Drill;
- Fasteners: self-tapping screws, finishing nails, anchors and others.
Door frame elements and architraves are often cut at an angle of 45ᵒ. To perform this operation accurately and accurately, a miter box is used. Before installing new interior doors, you need to check the condition of all elements, their coatings, and the availability of components. If defects are detected after the installation of the door block, then it will be almost impossible to prove something.
Instructions: how to install an interior door
Before installing an interior door, it’s a good idea to read the instructions with pictures and use some professional advice in your work. First of all, you need to assemble the door frame. It can consist of 4 parts or be U-shaped. It depends on the availability of flooring. The boxes are produced with universal dimensions for doors from 600 to 900 mm, so the elements of the box have to be cut. Doing the job requires care and attention.
Door frame assembly instructions:
- Cut off long pieces. Take into account the size of the gap between the door leaf and the floor covering (for residential premises 10 mm) and the thickness of the floor covering.
- Cut off the top piece. From the side of the door leaf, the size is equal to the width of the leaf itself plus 7 mm. Using a miter box, cut the elements at an angle of 45ᵒ.
- If a threshold is provided, then the elements are sawn off perpendicularly from below. It is also possible to wash down the upper elements in 90ᵒ.
- To connect elements, especially for MDF doors, it is necessary to drill holes at an angle of 45ᵒ using a drill with a diameter of 2.5 mm, separately in a long element, holes of 4.5 mm must be drilled. Connect the elements with screws.
Next, you should attach the door leaf to the assembled frame, observing the gap between the box and the door of 2.8 mm. To establish the gap, packing cardboard can be used. If the door is double-leaf, then the distance between the two halves must be at least 4 mm.
Only having determined the side and direction of opening the door, it is necessary to mark the place where the hinges are attached.
Usually they are placed at a distance of 20 cm, retreating from the top and bottom of the door leaf. The third loop is attached at intervals of 46 cm from the top. Hinges have their own characteristics that must be considered during installation. If necessary, a place for fastening the “flag” of the loop is prepared with a chisel. Depending on the design of the hinges, the methods of their fastening may be different.
Installation options for interior doors
The next step is to insert the door frame into the opening. Technology may vary. If the opening is too wide, you can reduce it by attaching a wooden beam to the wall with anchors from the hinge side.
You can insert a whole block, together with the canvas or a separate box, then spacers will be required. The size of the spacer must take into account the technological distance between the bottom of the door and the frame, 6 mm must be added to the width of the door leaf. If the frame is installed separately, after hanging the door, the gap must be checked. It must be the same everywhere. If necessary, adjustments are made.

The box is fixed in the opening with wedges. First, the upper wedges are clogged, and then, after checking the level of the box, the lower ones. The distance between the box and the wall is filled with foam. In order not to stain the surface, masking tape is used. When the foam dries, the wedges are removed and the protruding part of the foam is cut off.
Door frame mounting methods:
- The box is fixed with 6-8 self-tapping screws of the required length through the through method (wooden spacers can be used).
- For fastening, 3-4 points are used in the places where the fittings are inserted, which hides the screws.
- Dowels, long bolts with nuts are used as fasteners, mounting strips are attached to the box. The whole process is regulated by level. In this case wedges are not used.
The stage of installing platbands is no less responsible than the previous ones and requires accuracy. To put the trim, it is necessary to measure the length of the trim, cut the trim using a miter box at an angle of 45ᵒ, attach the trim with nails, having previously drilled holes in the attachment points 1/2 or 2/3 of the diameter of the nail.
Installation of fittings can be performed at different stages.
In some cases, all fittings crash after installing the door block. The door fittings include: 2 or 3 hinges, handles with latches and a locking mechanism. The location of the handle is determined individually, the standard requirements are 0.8-1.3 m from the floor.
We figure out how to install the door correctly
You need to install the door yourself in compliance with building codes. When properly installed, there should be no distortion. The canvas should not open on its own if it is not held by a lock, or close. A correctly installed door with a slight push in the open state should close smoothly.
The quality of the door installation depends on the following reasons:
- Properly made measurements, according to which the door block is made. To perform measurements of room openings, it is better to invite a specialist.
- Working conditions (temperature, humidity). It is desirable to install canvases at the end of all work and complete drying of the floor and walls.
- All required clearances must be observed.
- All structural details must be level, even if the walls are not even.
To keep interior doors in good condition, you need to use furniture care products, avoid exposure to aggressive substances. To process a wooden door, mastic can be used.
Proper installation of interior doors with your own hands (video)
Installing interior canvases with your own hands seems like a daunting task. But, if you do the work, observing all the necessary rules and regulations, this task is feasible. Approaching the matter with due diligence, you can save the budget and gain valuable work experience. The result will definitely justify all efforts. Beautiful doors to the room will decorate the interior.
The interior door serves to divide the space in the room, and also provides sound insulation in a private house or apartment. In addition, the door leaf is an important interior detail, so it must match the design style. Since installation work is quite expensive, the question arises of how to properly install interior doors with your own hands. The answer is in the detailed step-by-step instructions on this page.
Dimensions and equipment
According to the method of opening the doors are folding, sliding and hinged. The latter are the most popular, since they are structurally the simplest and fairly easy to install. They are presented in a large number of modifications. According to the method of opening, the following are distinguished:
- double-sided and single-sided;
- left and right sided.
Step 3: Installing the box and hanging the canvas
The box must be installed in a pre-prepared opening. The hinge post must be leveled first with a plumb or level. It is necessary to check it from all sides. Then the upper crossbar and the rack must be spread with wedges. The rack will only be exposed when it is in a vertical position.
Next, wedged the second rack. Be sure to check the horizontal part of the box.
The old way - the side racks must be drilled through. To do this, holes for dowels are initially made in the wall. The box must be attached to the wall with self-tapping screws at least 150 mm long.
 Old way fasteners
 In order to fix the box in the opening in a hidden way, you can use metal plates, which are usually used to install drywall structures. Most often, such plates are used together with anchors. In this case, it is worth choosing the number of fasteners in accordance with the expected load.

 This is what the mount looks like
 The use of such plates is a non-standard method and is possible only in the absence of a fine finish. It is recommended to gouge a section of the wall in order to subsequently putty the fasteners.
It remains to hang the door on the frame. After that, you need to carry out the final adjustment of the box. The lock post must then be fitted under the door so that it does not protrude beyond the wall. It is worth remembering that in order to preserve the integrity of the box and canvas, you must first drill several holes for the screws.
Step 4: Foaming
After fixing the canvas, you need to foam the gaps between the box and the edges of the opening. The foam should be fed carefully, in layers, while the feed is from above so that it does not come out. Then the door will have to be closed and not touched for a certain time so that the foam dries. Estimated drying time is 1 day.

If the composition accidentally gets on the canvas, immediately remove it with a clean, dry cloth, dried fragments are cleaned with effective ones.
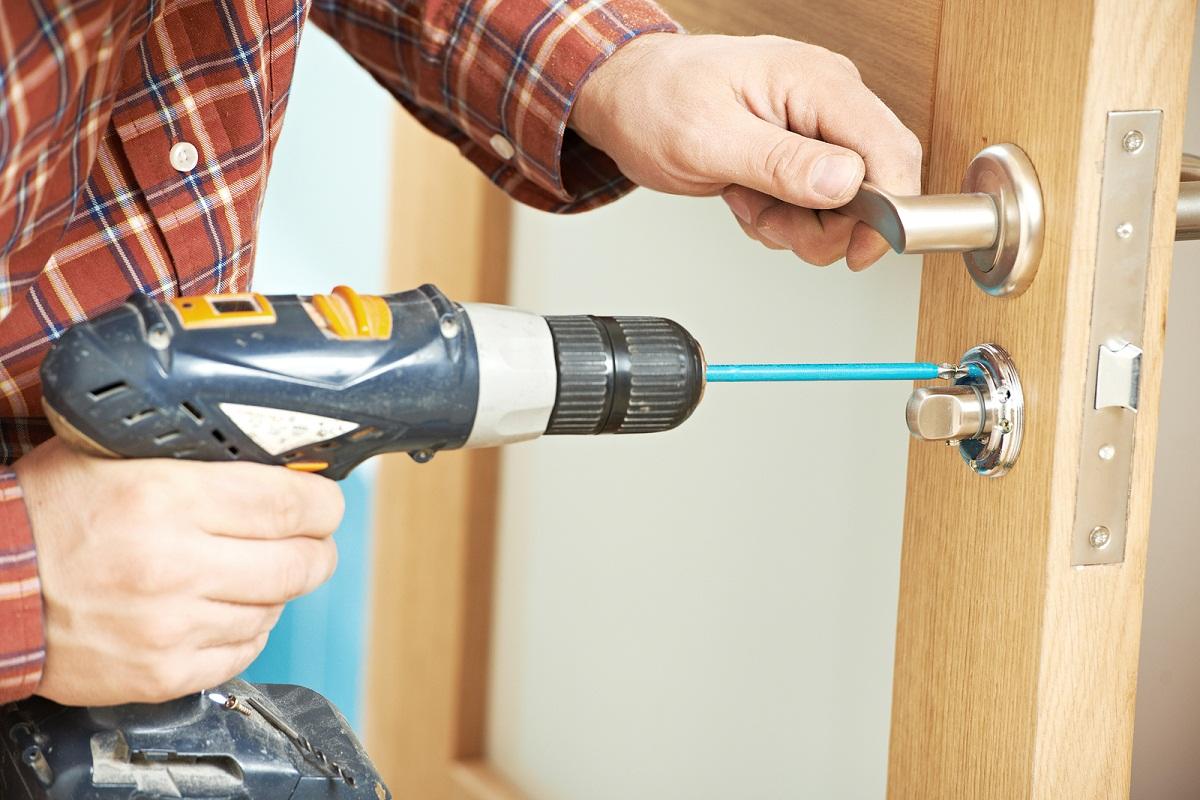
Step 5: Installing the lock and handles in the door leaf
The most popular today are handles with a built-in lock. The order of work is as follows:
- Make a mark one meter from the floor. The handle mechanism must be applied so that the mark is visible in the hole from above.
- Drill holes in the canvas from the end. After that, the edges of the holes should be cut with a chisel to align the hole.
- Insert the mechanism into the hole. In this case, the lock must be aligned, and then fixed with self-tapping screws. The bar on the lock should be outlined with a pencil to cut the veneer, then the mechanism should be removed. According to the outlined contour, you need to select a site to determine the thickness of the locking bar. This is done using a chisel.
- Drill holes for the latch and handles. It is necessary to attach the lock to the canvas from different sides, align it and mark it. Holes must be made on both sides and they must not be through.
- Remove the formed chips and install the handles.
Step 6: Installing the trim strips
An extension is a plank about 2 meters long, 250 mm wide, and no more than 3 cm thick. The plank should be used during the installation of interior doors if the wall is thicker than the door frame.
The bar for the box is made in a standard width - approximately 70 mm. It can be expanded according to the thickness of the opening with an extension. This will allow you to more clearly combine the box and walls. On the bar there is a groove for the strap. First you need to measure the distance to the edge of the wall, starting from the depth of the groove.

The add-on can be installed in different ways:
- into the groove in the box;
- with cutting a groove in the absence of finished;
- attaching the extension from the inside of the timber in the absence of a groove, the box is installed at the same time together with the extension;
- fastening dobor in the form of "P";
- if the extension is not too wide and there is no groove in the box, the bar should be drilled and screwed to the box.

The plank is sawn into several parts with a circular saw to get several extensions of the required dimensions. You need to prepare one short bar and two vertical ones. Check out our simple step by step guide to .
Step 7: Trim fasteners
During the installation of platbands, the box must be located at the level with the opening on the front side. To connect the platbands, you must first attach a vertical bar to the box and put a mark 0.5 cm higher, stepping back from the crossbar of the box. This mark will act as the cut edge. In the same way, you need to mark the cut on the other side.
