Drawing for a roll-out bunk bed. Bunk bed - do-it-yourself guide
3765 0 0
DIY bunk bed: assembly diagram and step-by-step instructions
Beds in two tiers are increasingly in demand in the arrangement of small rooms. And this is not surprising, because such furniture allows you to rationally use the living space. We offer simple instructions for self-assembly of high-quality children's furniture. Following the suggested recommendations, you can make a bed that will be reliable and safe.
Some types and models of bunk beds
| Illustrations | Bunk structures and their description |
 |
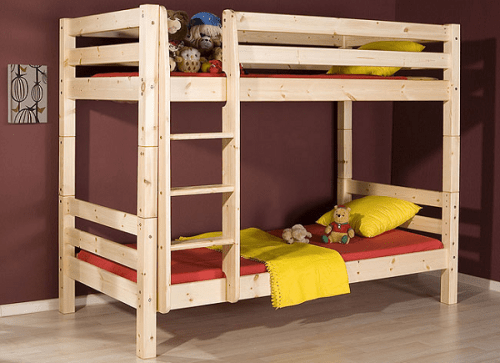
traditional model. This is the simplest design, which consists of four vertical supports with single beds attached to them. The design is completed with an attached or fixed ladder to the second tier. For safety of use, the upper bed is equipped with a barrier along the perimeter. |
 |
Bed option with sofa. This is a good option if you need to accommodate three children or a child and a teenager in one room. To do this, the upper tier on two vertical supports is installed on top of a double or one and a half sofa - a transformer. |
 |
Bed model with drawers. The design used an ordinary bed, in the lower part of which there is a drawer on roll-out rollers. The box is an excellent solution for storing bed linen and other bedding. |
 |
Model with a double bed on the first tier. This option is optimal for those families where the child and parents are accommodated in the same bedroom. That is, adults are located on the lower tier, and the child on the upper. In fact, the second tier and vertical supports on the sides are an independent structure, under which an ordinary double bed is rolled. |
 |
Bed for a large family. Such designs are a combination of several bunk beds in one room. If there are many children, each tier can be made double. |
 |
Children's loft bed. In fact, this is a single-tier structure in which the sleeping bed is located at the height of the second tier. In the lower tier there may be a play area or a study if the room is intended for a teenager. |
The principles of high-quality assembly of a wooden bed

What should be paid special attention to when assembling the bed, so that the finished result is of high quality?
- Choosing the right drawing. The drawing of the bed in the nursery should correspond to the number of children and their size, adjusted for growth.
- Choosing the right materials. If we are going to assemble furniture for a children's room, we use environmentally friendly and safe materials.
- Choosing the right tools. Literally from the very beginning, you need to pick up all those tools that will be enough to work with the selected material.
- We follow the assembly sequence. When starting to make a bed, read the instructions provided in this article and follow the sequence of assembly steps.
Material and tools for the bed
| Illustrations | Materials and their description |
 |
Wood (lumber). This category includes boards, bars, slats, furniture panels, plywood and other materials that are obtained by sawing wood. The advantage of wooden furniture is its environmental friendliness, since wood is a completely natural product. Lack of wooden lumber is their high price in comparison with particle boards. |
 |
Particle boards (chipboard, chipboard, OSB, MDF). This category of material includes boards pressed from chips or sawdust with the addition of an adhesive binder. By choosing the right thickness of particle boards, these materials can be used both for the manufacture of supports and the supporting frame, and for the manufacture of roll-out boxes and other related elements. The only drawback of the material is the content of formaldehydes in the adhesive binder. |
 |
Metal. A bed in two tiers can be assembled from a profile pipe, a corner and other rolled metal. With the right approach to assembly, the finished product will be reliable, beautiful and safe. The only problem is that working with metal will require the appropriate experience and the right tool. |
Which of the following materials should you choose? Each material has its own advantages and disadvantages. But for assembly, you can use more than one type of material, but combined options, for example, a combination of wood and particle boards or a combination of metal structures and wood.

To work with wood and particle boards, you will need the same set of tools:
- Circular saw - for cutting materials.
- Electric jigsaw for making curved cuts.
- Drill or screwdriver with drills and bits for self-tapping screws.
- Manual or stationary milling cutter for chamfering and cutting grooves (relevant for wood).
- Measuring tool including tape measure, ruler and square.
- Sander and a set of sandpaper with different grits for sanding (relevant for wood).
- Painting tool for painting the finished bed.

To work with metal, you will need welding equipment and related accessories. In addition, you will need an angle grinder "Bulgarian" with cutting discs and clamps.
Dimensional drawings
I offer an overview of simple drawings of bunk beds. The structures shown in the drawings can be assembled from wood and particle boards. However, a classic bed from the first drawing can also be made from a profile pipe.


Production of beds with two tiers
During the assembly of a wooden bunk bed, you will have to face a number of tasks.
| Illustrations | Working with wood and its description |
 |
Longitudinal sawing. Cutting boards to length is performed using a stationary circular saw. To perform this work efficiently, using a jigsaw or a hacksaw will not work. |
 |
Cross cutting. For cross cutting, it is preferable to use a miter saw as in the photo. If there is no miter saw, we work with a hand saw, placing the lumber in the miter box. |
 |
Jointer processing. Since the bed will be for children, the wood should not have protruding chips and should not leave a splinter. Therefore, we drive the sawn blanks through a jointer, removing roughness from all sides, up to a smooth surface. |
 |
Chamfering. Bedroom furniture for use in a nursery should not have sharp corners, therefore we remove a longitudinal chamfer from all parts with a milling cutter. |
 |
Corner connections. In order for the furniture to be reliable, we assemble the corner joints using L-shaped hardware and self-tapping screws. |
 |
tongue-and-groove connection. For reliable fastening of the barrier sides, we use a thorn-groove connection. The advantage of such a connection is not only that it is reliable, but also that it is collapsible. |
Sizing
The dimensions of the bed are determined in accordance with the dimensions of the mattress. The standard dimensions of the mattress are 800 × 1900 mm, respectively, the perimeter of the bed is made in such a way that the mattress fits tightly there.
Another important dimension is the distance between the top of the bottom tier and the bottom of the top tier. The optimal distance for a baby bed is 700-800 mm.
Approximate calculation of materials

Consider the calculation of materials using the example of assembling an all-wood structure. To assemble the supporting frame, you will need a board with a thickness of 20 mm or more. For vertical supports, it is preferable to use a solid beam with a section of 50 × 50 mm or more. If there is no solid timber available, the supports are made by folding several boards flat to get the required section in total.
The calculation of materials is carried out in accordance with the selected drawing. Namely, according to the drawing, we determine the number of structural elements with their design dimensions. Knowing the number of parts and their exact dimensions, it is easy to calculate the amount of materials needed.
Suitable ladder and railings

When designing and assembling stairs and ledges, we remember that the most important two parameters are the strength of structural elements and the reliability of their fastening. The strength of stairs and ledges is achieved by the correct selection of the thickness of materials, and the reliability of fastening is ensured by the use of properly selected fasteners.
Making a frame according to the drawing

In the design of a classic bunk bed, two load-bearing frames of the same size are used. An important point when assembling frames is a right angle at the corner joints.
To maintain a right angle during assembly, we check the assembled connections with a square. Again, we strengthen the joints of the sidewalls, headboards and footboards with L-shaped plates with reinforced scarves.
Stairs to bunk beds


Making a bunk bed
| Illustrations | Description of assembly steps |
 |
Backrest and headboard. Cross bars are attached to the vertical supports, which are selected to the width of the mattress. One piece will be the headboard, the other the footboard. |
 |
Side walls. The sidewalls together with the transverse crossbars of the backs form a load-bearing frame. Therefore, it is so important to securely fix these boards on vertical supports. |
 |
Ladder. The sides of the stairs are assembled from boards, in which holes are drilled from the inside for the cylindrical steps of the crossbar. We cut the cylinders of steps to the width of the stairs. The steps in the side boards are fixed with glue. |
 |
We strengthen the frame with safety bumpers. On top of the supporting frames of the upper and lower tiers, additional sidewalls are attached, which will strengthen the structure and serve as safety bumpers. |
 |
Legs or how to protect the floor from scratches. So that the furniture on the floor does not leave scratches, we glue special rubber or felt pads along the lower edge of the supports, as shown in the photo. |
Summing up
Now you know how to make a bunk wooden bed for children on your own. If you have any questions about assembling the bed, ask them in the comments to the article.
Quite simply: the bunk bed, the drawing of which you have to make, will require concentration. The dimensions of any product depend on the size of the room, the height of the ceilings, the availability of free space, blank walls. Yes, and the stairs to the second tier also require space, so you have to add 5-7 centimeters in width to the place where the stairs adjoin.
However, look at the drawings: there are several of them, it is possible that some option will be ideal. Otherwise, resize.
Do-it-yourself bunk bed: drawings in the studio!
For children, there are certain furniture standards: a bed - one and a half meters plus 8 cm, width - 70 cm plus 10 cm, the width of the place under the stairs adds an additional 5 centimeters.
I just want to shout: “Drawings to the studio!” But here just with height it is necessary to understand. The higher - the warmer: the law of physics, so the second bed or the upper tier of the loft bed should not be done right under the ceiling. Children love to play at heights, so make sure they don't get life-threatening injuries if they fall to the floor. And even better, so that only bruises and a couple of bumps remain or without them at all: here the railing will come to the rescue.

It is forbidden to make a low bed!
But you shouldn’t make a low bed either: the height of the child is such that his head is not at all obliged to touch the upper bed, besides, adults also like to sit down on the lower floor with their child. So the drawing must also meet such requirements, so measure the height of the child with the condition that he will still grow. And do not forget about the ceiling: in Khrushchev it is 2500 cm. Immediately take away the thickness of the mattress? This is about 20 centimeters, and only now begin competent calculations. The standard version is 180x80 cm.

Choosing a material
Pine is quite acceptable for one's own hands, besides it is soft and cheap. To build the frame, you will need a bar: 140x18 and 140x30. Plywood is thick - on the bed, and it is better to buy a metal ladder. If there is no plywood, then you can buy chipboard, only laminated. It is harder to work with it, but it is also possible if a power tool is at hand.
DIY bunk bed + drawings and wallet
The base for a children's mattress is 185 by 90 cm, but these dimensions do not have to be taken into account: it depends on how much your child weighs and how tall he is. It is better to buy risers: the market offers steel pipes coated with plastic. Buy fasteners in the same place as plugs so that curious children do not try to unscrew the washers and not ruin the structure.
How to make a bunk bed yourself. Video

- Manufacturing Process Algorithm
- What to Consider
- How to build a solid framework
- Mounting technology
- Option with laminated chipboard
If a second child has appeared in the family, then in order to save space in the bedroom and money in the wallet, a do-it-yourself children's bunk bed is perfect. The process itself implies the presence of the necessary tools:
- Pliers, hammer and screwdriver
- Electric drill or screwdriver
- Level, tape measure, square
- Saws, a hacksaw will do
- Clamps
- Electric jigsaw
Making a bunk bed with your own hands is not difficult if you have certain skills in such work. It is also important to have a good idea of the end result, which is a significant incentive. Knowing where the bed will be located, you can make sure that it fits perfectly into the interior of the children's room. It is necessary to take into account the dimensions of the bed and correlate them with the prepared materials. During the work you will need:
- Four wooden beams two and a half meters long
- Four wooden beams three meters long
- Four boards three meters long
- Reiki or two plywood sheets about twelve millimeters thick (you can use chipboard instead of plywood)
- Screws seventy-five millimeters long
- Eight 6mm hex head screws
- Ten bolts 6mm, seventy-five millimeters long with washers and nuts
- Wood putty
- self-tapping screws
- Two bolts one hundred and fifty millimeters long with washers and nuts
- Sandpaper
- Polyurethane
Manufacturing Process Algorithm
You need to carefully assemble a children's bunk bed with your own hands: it will serve the children well, it will become for them, in a certain sense, another home.
Here it is better to cut off once, but you need to measure it seven times, so that the product matches the interior, is reliable in all respects. The process is simple, but everything requires precision and accuracy.
- You must first mark on the supporting structures of a simple product a location for fixing wooden boxes for laying mattresses
- Then you need to drill through holes for mounting screws, which are needed for rigid fastening of wooden boxes, which are intended for mattresses
- Similarly, it is necessary to make a hole for each screw on both sides of the longitudinal bars
- Then it is necessary, pressing the lower longitudinal bar to the first wall, fasten them with a screw, and do the same with the second wall of the support
- Similarly, install the upper longitudinal bars, which serve as the basis for the mattresses - as a result, the supporting structure of the product will be obtained.
- It is necessary to fix the transverse bars under the future bed for the child.
This operation applies to both the lower and upper tiers. We fix them rigidly with screws to the bars at a distance of thirty centimeters from each other.
- Now it's time to sheathe the frame of the box with boards on the side. Countersunk head screws work best for this sheathing.
- It is necessary to attach the sides-shields, which will prevent the child from falling asleep accidentally
- Rigidly fasten the stairs to the upper floor with screws
Things to Consider Before Getting Started
You need a firm confidence in what the size of the sleeping place will be and on which side to install the vertical ladder. The size of the bed is about eight centimeters longer than the sleeping place, and ten centimeters in width. The ladder increases the size of the product by about 4.5 centimeters.
To choose the optimal bed height, you need to take into account the height of the ceiling in the children's room. Of great importance is the distance between the second and first tiers. There should be enough space for the mother to sit down with the child if necessary.
For racks and stairs, you need bars and a board made of solid wood. The end panels are the same for the entire product, which simplifies their preparation. The side panels are equal in width to the end panels, which gives the bed an aesthetic completeness. The unevenness of their connection with each other ensures the originality of the composition.
Based on the size of the mattresses that will need to be laid on the bed, then you need to increase the size on each side by two centimeters. This will make it easier to fill the linen for the bed. The convenience of the product is the most important guideline in this work.
As for the first tier, its lowest position as a new sleeping place can be set by taking the height overcome by the baby almost without effort on his part as the foundation for calculations. Usually it is up to thirty-five centimeters for a child who is not yet three years old. Accordingly, the frame for laying the mattress will be lower by its thickness. But for the second tier, its maximum upper position is set taking into account the fact that an older child, whose bedroom is upstairs, can, if desired, sit down on the lower floor and at the same time not touch the second floor with his head.
How to build a solid framework
At the frame of a children's bunk bed, its reliability comes first, and the aesthetic side remains in the background. The bars must be firmly connected with screws. As a result, two approximately identical frames come out. They complement each other aesthetically.
A board must be screwed to the end and one side, while taking into account the importance of this fastening. It is better to screw in the screws from the inside and make sure that they do not go through the board. For short self-tapping screws, it is permissible to drill large holes using a depth gauge on the drill.
Also, the side is placed on the second frame. Mounting holes are best hidden with putty, after it dries, process it with sandpaper. The length of the leg should be in harmony with the height of the fence. The main thing is that the leg can withstand the expected load.
In the leg, you need to make a hole where the second tier will be attached, and about the same hole in the frame with a side. In the leg, such recesses are still needed that would make it possible to easily hide both the hex head of the screw and the washer. The hole should be of such depth that the screw, having pierced the side and leg, is securely fixed in the beam.
The children's bunk bed has another discreet specificity. Under the first floor, you can arrange a small but rather cozy bed box and put many necessary things there, including sheets and pillowcases for the bed. In this drawer, the child can store his favorite toys. The front panel of the drawer is not as long as that of the bed. Height - fully corresponds to the front panel of the first floor, which aesthetically looks very good, complementing the design of the children's room.
Mounting technology
Whenever we deal with construction, even if it is a miniature construction, the choice of manufacturing technology and material comes first.
The basis of the design is best to put a wooden board. Of course, its quality preparation requires some effort. It is necessary to align using a planer, sand with sandpaper, and then also pull with varnish to extend the life of the product.
It costs nothing to set the location of the racks in the event that the walls are made of drywall. It is important to accurately determine the place where the hole is needed. Here you will need an assistant in order to support the frame from below, firmly pressing it against the walls.
Guide holes must be made by drilling a rack profile, drywall, and also a frame beam. It is necessary to prepare places for screwing in screws with hex heads. Here you can not do without a long drill. The screws must be screwed in so that they connect the necessary elements and fix in the racks. The lower tier is also installed in a similar manner, that is, a frame with a side.
The fence is of great importance in the overall design, since it creates certain safety guarantees for children.
DIY bunk bed
The fence can be made of durable boards that are fixed on vertical posts. Self-tapping screws and here we must try to screw in from the inside. Moreover, it must be borne in mind that there should be an opening in the fence for the stairs leading to the second tier.
A vertical ladder is easier to make and takes up less space than an inclined ladder. First of all, it is necessary to properly fix two beams that will guide the movement of the child during the ascent and descent. The steps for it are securely fixed with 6 mm bolts. Bolts, which have a longer length, must be used when attaching the upper step with synchronous fixation of the ladder to the bed.
Option with laminated chipboard
Of course, the tree needs a lot of pre-treatment. If, instead of wood, in the manufacture of a children's bunk bed, laminated chipboard is used, then in this case, part of the technological operations will remain on the sidelines of the process. Instead, you will only need to process and stick the edge on the chipboard cuts. In practice, you will get a gain in time, the appearance will also win a little.
Laminated chipboard has a good characteristic in terms of wear resistance and strength.
It is necessary to saw laminated chipboard on the street, but the final work, with minimal dust and smell, can be comfortably carried out in an apartment. It is necessary to take into account the difference in the quality and specifics of the material and make some refinements in the manufacturing technology. In fact, they are not very significant. A children's bed from a laminated board will come out several times heavier than from a board, but the product will acquire additional stability.
When using chipboard, you will need completely different tools than in the case of wood:
- Portable hand circular
- For gluing the safety edge - iron
- Screwdriver with bits and drills
- Work gloves and knife
- Ruler, tape measure, pencil
In order to make a children's bunk bed with good quality, you will need not only laminated chipboard as a material, but also an edge, glue, sandpaper, wood is needed only for a ladder leading to the second tier.
A big plus in this case is the limited number of technological operations in the process. They should only include
- Having a good project with the subsequent transfer of data to a laminated board
- Edge bonding on chipboard
- Careful and even cutting
- Fixing chipboard with self-tapping screws
Fixture and finishing of the bed
Connecting the parts of a baby bunk bed is crucial. It is best to properly connect the racks and side panels at the beginning of the process, then firmly fix the end panels with the side panels. Get a strong and reliable support structure. The frame designed for the mattress just rests on the bars attached from the inside to the side panels.
The upper tier has two boxes as a result: with narrow panels and wide end ones. Meanwhile, at the lower tier, narrow panels from the end will already be outside the box. This is not in vain, because they have a special role. They are fixed with spikes and bolts in the lower part to the bed posts, blocking the junction of two levels, being a spacer, which completely eliminates the displacement of the posts of the lower tier in relation to the upper one. As for the displacement in the direction of the longitudinal axis, plug-in spikes protect against it in the joint area.
In addition, all panels have additional fasteners, they are fixed to each other with plug-in spikes with glue. They can be fixed to the racks using special furniture bolts with decorative heads. Similarly, you need to consider the fasteners of the stairs leading up. The stability of the entire product also depends on it.
Finishing a children's bunk bed has both aesthetic and practical significance. Meticulously polishing the blanks before they are assembled into a kind of two-story complex helps the new furniture fit into the existing design and increases the service life. The same can be said about painting with enamel with several layers applied. Beautiful, but also useful for wood, which makes the product look even more attractive.


Making a bed from chipboard with your own hands is very simple.
Beds are used in very different ways and every adult understands this. Hedonists prefer to recline on eight-seater negadromes in the company of beautiful odalisques, while a private in the Red Army dreams of a trestle bed closer to the stove. The middle option is a bed without frills, but multi-purpose. A do-it-yourself chipboard bed can satisfy the needs of people of different classes and inclinations, if you think about its design.

We will make such a bed from chipboard
Chipboard bed design
Nature teaches us: The best solution is always the simplest. Minimum parts - maximum efficiency and durability. An example of this is amoeba, ciliates and other small rubbish. They are able to survive anyone, and did not care about changes in the situation. The base of our bed must be durable and indifferent, so we choose a box-like structure without legs.
If we take an average model with the dimensions of parts adjusted to a standard chipboard sheet, then we will make it for a spring mattress 2000x1400x200 millimeters. Such a bed can be considered a double bed if your belly does not prevent you from tying your shoelaces, and your wife's dress fits into her cosmetic bag.
The bottom of the bed in the photo is plywood - but this option is for mass production. In a single case, it is easier to purchase one sheet of laminated chipboard and one sheet of cheaper - polished. The bottom will turn out to be one-piece, not composite, which is structurally much more profitable.
Chipboard bed details
If you make a bed from laminated chipboard with your own hands, you will have to order sawing from companies equipped with a professional cutting machine. It makes no sense to spoil the materials yourself at home, when there is an opportunity to shift the blame for the failure to specialists and force them to redo the defective fragments.
List of parts made of laminated chipboard 16 mm thick:
- 1432x700 mm - blank headboard. You can give it roundness with an electric jigsaw, or immediately puzzle the sawmillers with this question and overpay for a curly cut.
- 1432x350 mm - footboard.
- 2000x350 mm - 2 pcs. Sidewalls.
From the chipboard sheet, you will still have a bunch of scraps on which it makes sense to practice in subsequent operations, such as gluing edges and drilling.
Details from polished chipboard (no one will see them):
- 2000x1400 - the bottom of the bed.
- 1400x300 - 2 pcs. Partitions, one of which can be ordered in laminate if the sanding is smaller than the standard size (it happens).
Do-it-yourself children's bunk bed: drawings, diagrams, photos
Draw to scale the location of the parts on each sheet and give the drawing to the sawmill - it will be more reliable.
Fasteners and accessories for the bed
Before you make a bed from chipboard, you need to clearly understand its design and determine the degree of reliability of the fasteners. The second picture shows the bed "in section" with partitions. All ties are carried out by means of confirmations and are additionally duplicated with metal corners 30x30 millimeters. The corners must be “sharpened” for 4x16 mm self-tapping screws.

Bed Assembly Diagram
Exactly such corners will serve as an additional support for the bottom of the bed. As you can see in the drawing, they need to be screwed around the entire perimeter of the box - that is, to the backs and sides. Naturally, the level of the upper "shoulder" of the corners must match the height of the partitions = 300 mm.
From below, to the backs and sidewalls, you can (but not necessarily) attach the so-called "hooves" - plastic legs that protect the floor from scratches when moving the bed. They will also allow you to adjust the level of the structure, standing on an uneven floor.
Important! This bed must be placed in such a way that none of its corners "hangs in the air." Under the weight of the spring mattress and the people themselves, of course, it will stand on all supports, but at the same time, the stress in the material will create a threat of destruction.
An insufficiently even or bumpy floor is the main enemy of all chipboard products.
Bed assembly
Our regular friends have already read about the method of edging parts at home. The rest we voice additionally.
An ordinary 16 mm thick melamine edge with an adhesive base is perfectly glued to the end of the parts using an iron heated to three-quarters of the power. Gently iron it a few times and wipe the top with a dry cloth so that the edges stick better.
The edge is somewhat wider than the chipboard and the edges of the glued parts must be sanded with fine-grained sandpaper, after cutting off the excess plastic with a blunt knife. Sharp you can easily damage the laminate, which will not add beauty to the bed.
Confirmates do not fundamentally differ from standard self-tapping screws - the difference is only in size. We drill the plane through, with a diameter of 8 mm, and the end of the fastened part with a 5 mm drill and to a depth of about 60 mm.
The dimensions are indicated for confirmations 5x70 mm, which are easy to buy in furniture fittings stores.
At what distance from each other to fix the partitions - it does not matter. The main thing is that they are parallel to each other and perpendicular to the sidewalls. About a third of the length from the backs - and without a micrometer.
Separately, neither the confirmation screed nor the corners will give you the desired structural strength, so duplicate and do not be lazy. The bottom can simply be put on top, but it is better to put the bed “on the butt” and fix it with self-tapping screws, screwing it to the corners.
Actually, by this moment it is already clear how to make a bed from chipboard with your own hands ... It remains only to put a mattress on the bottom, and something attractive on top of the mattress, like a beloved wife or a teddy bear. But it's up to your taste.
Here we have tried to illustrate the simplicity of making any furniture from laminated chipboard for a person who is not afraid of a drill and a hammer. There is no need to overpay exorbitant amounts when shopping in stores: having understood the basic principle, you can build even the most exotic furniture options with your own hands.
Good luck to you.
Bunk bed for children: types and instructions on how to do it yourself
DIY children's bunk bed
A bunk bed is not just a rest and sleep area for a child, this is the place where children will play, grow and develop. Because of her, children will not rarely have disputes about who sleeps on the lower, who sleeps on the upper bunk of the bed. For parents, such a bed is also very beneficial. It takes up little space in the room, compared to two beds facing each other.
Children's bunk bed made by hand
There are a lot of different models of beds. You can always choose an option that you and your baby will like. But such a purchase has one significant drawback - it will punch a serious hole in the family budget. Therefore, it is worth thinking about the possibility of making such a bed yourself at home.
How to make a bunk bed. Bunk bed drawings, detailing, assembly order
This method also has a lot of advantages: the furniture will be made according to individual sizes and sketches, and you can also save a lot on components and the work of the master. And who does not dream of earning the glory of a folk craftsman and craftsman?
Beginning of work

Children's bunk bed
So, before you start making a children's bunk bed with your own hands, you will need to determine the place in the room where it will be installed, as well as purchase a ready-made mattress and measure all the necessary dimensions of the future piece of furniture. But it is worth remembering that the bed is not made for one year, and therefore it is worth buying a mattress and making the bed itself for growth.
After the mattress is purchased, you can begin to draw a plan for the future bed, indicating all the parameters. And do not think that you can do without a drawing and do everything by eye. Such a complicated thing as a do-it-yourself children's bunk bed in autumn is difficult to do without drawings.
Start preparing lumber for the bed should be based on the following dimensions:
- the height of the bed will be approximately 1500 mm;
- optimal width - 900 mm;
- standard length - 2100 mm;
- height from the floor to the lower tier - 230 mm.
Bunk beds are popular for many reasons. They help save space in small apartments, are easy to use, and children really like them. You can buy such a bed in a store, but it is better and cheaper to make it yourself.
Types of bunk beds
The type and size of beds depends on the purpose, the age of the children, their preferences and other factors. Beds may vary in width. It does not depend on the age of the child, since usually the baby sleeps below, and his older brother or sister is on the upper tier.
A bunk bed with one place to sleep is used if one child lives in the room, but there is not much space in it. In this case, the baby sleeps upstairs, and below there is a space for games, a wardrobe or a desk with shelves.
If the lower tier is double, two same-sex children can sleep on it. Toddlers are placed on the lower tier, and an older child is placed on the upper tier.
At what age can a child be placed upstairs
A child of 1–1.5 years old can be placed on the lower berth, but it must be protected by a high side so that the baby does not fall in a dream and is not afraid.
In order for the child not to fall during the ascent or descent to the second tier, it is necessary to provide the stairs with railings, and stick anti-slip stickers on the steps. The berth should also be protected by high sides.
Bunk beds come in a variety of designs.
- Two-section with two tiers. If you remove the upper berth, the design turns into a regular bed.
- Whole bunk. In terms of cost, such structures are practically no different from collapsible ones.
- Loft bed with built-in wardrobe, table or shelves. Usually on the top tier there is a sleeping place, and below all the necessary details.
- Loft-type bed, which has a free access zone below. To the side is a staircase.
- Bed with pull-out bunk. This design has a height of 60 to 120 cm. The lower tier with a berth is extended only if necessary.
Some models of children's bunk beds are made in lengths of 150-170 cm. Sometimes this is not very convenient, as parents often put the kids down and lie down next to them. For greater savings, it is better to make a bed about 180 cm long.
The loft bed cannot be called a full-fledged bunk model, it has only one bed. At the same time, this design is very popular with children, it gives scope for their imagination and additional space for games.
Unusual options for bunk beds in the photo
What to make a bed from: the pros and cons of different materials
Metal is the most durable material for making beds. Finished products have a light and aesthetic appearance, withstand a lot of weight. The disadvantages of metal structures are the high cost and the need to work with a welding machine.
Solid wood is an expensive and difficult material to process, but beds made from it are beautiful, durable and reliable.
The most common beds are made of edged or planed boards. For manufacturing, it is necessary to purchase well-dried material, otherwise the structure may “lead” and it will deform. With the correct creation of the drawing, such a bed can withstand an adult.
MDF beds are an inexpensive option. The product is durable and beautiful. During processing, the MDF board does not generate dust and does not form chips. This design is best used only in children's rooms, since it can break under heavy loads.
Chipboard contains formaldehyde, so it is not recommended to use it to make a bed without a sealed coating. This material is not suitable for the main structure, as it will not be able to withstand a lot of weight. It is better to make backs, decorative panels or drawers for things and toys from chipboard.
The furniture board is a reliable and durable material. This is a slab that is glued together from various bars of natural wood. It is great for making a bunk bed. In this case, it must be borne in mind that the plate has internal stress, which must be taken into account during operation.
The choice of material depends on the type of bed, how many kilograms it can withstand and how long it will last.
Suitable ladder and railings
It is equally important when making a bunk bed to pay attention to the stairs and sides, because they ensure the safety of the child.
- Flat vertical stairs. Usually it is mounted on the Swedish wall and serves as a narrow protective board for the lower tier. The design does not have a railing, so it is not entirely safe for the baby. This option is suitable for children from 5-6 years old.
- A flat sloping or curved forward staircase. It can be in front of the front wall or on the side of the bed. This design, equipped with a safe railing, is very convenient for children.
- Staircase with steps in the form of drawers. The design is comfortable and roomy, but the minimum length of such a bed is 240 cm, so it can take up almost the entire wall in a small room.
The main advantage of the bumpers is to ensure the safety of the baby. Their optimal height is from 30 to 60 cm. Even if your child has grown, such fences will still serve as protection against falling during sleep.
Bumpers in bunk beds can be high or low depending on the preferences of the children, their age and other interior features.
How to assemble a ladder and drawers for a crib - video
Making a bed with your own hands: step by step instructions
There are a huge number of beds of various modifications. The choice of self-production option depends on the capabilities of the master and the preferences of small owners.
Loft bed: drawings and manufacturing process
A bunk bed can consist not only of sleeping places, but also serve as a play or study area for a child.
For the manufacture you will need tools:
- electric screwdriver;
- joiner's glue;
- dowels;
- grinder or sandpaper;
- wood primer, varnish or paint;
- metal corners.
From materials, make bed elements in advance:
- vertical racks - 4 pcs. size 50x100x1650 mm;
- side boards for the supporting frame - 2 pcs. 50x150x950 mm;
- transverse boards for the ends of the bed - 4 pcs. 50x100x950 mm;
- fencing elements - 4 pcs. 50x100x1900 mm;
- tsargi (side bearing frames) - 2 pcs. 50x150x1900 mm;
- bars that will be attached to the sides inside the bed for mounting slats - 2 pcs. 50x50x1900 mm;
- bars for steps with cut and rounded edges at 45 ° - 6 pcs. 25x50x200 mm;
- boards for steps - 6 pcs. 50x100x450 mm;
- element of the vertical rack, which is located near the stairs - 1 pc. 50x100x1050 mm;
- side ladder boards (cut at both ends at an angle of 45 °) - 2 pcs. 50x150x1000 mm;
- boards for facing the landing - 12 pcs. 50x100x550 mm;
- end boards for the site - 2 pcs. 50x100x500 mm;
- boards for installation under the platform - 2 pcs. 50x100x950 mm;
- horizontal boards for supporting the platform - 2 pcs. 50x100x800 mm;
- slats for laying the mattress - 13 pcs. 120x25x1000 mm.
Assembly steps.
- We assemble the left end side of the bed. We connect the transverse boards with the racks with dowels, which we fasten with glue in pre-made holes. For strength, we also fix with self-tapping screws, deepening them a few mm into the tree. To this side we will mount the stairs.
- We assemble the right side of the bed in the same way. It will also serve as a protective fence.
- We glue bars with separating parts on the tsargi, fix them with self-tapping screws. Then we connect the end elements with drawers and boards for fencing. We assemble all the elements with the help of bolts (you can use self-tapping screws and dowels), which we must fix with carpentry glue. As a result, the sleeping place is 1.9x1.0 m. Then we lay the lamellas on the beam.
- We assemble the support frame for the platform. It must be very strong in order to withstand a lot of weight.
- We attach the landing frame to the frame, then we mount the entire system to the main frame. To do this, we use iron corners, which we fasten from the inner invisible side of the structure.
- We sheathe the stairs with boards. First, we attach them to the glue, then additionally fix them with self-tapping screws. Hats are sunk a few mm into the tree. All recesses can then be sealed with sawdust mixed with glue, or with special wood putty.
- We collect the ladder for the bed. We mark all the places where the bars are attached, using the building level, we mark the installation points. Steps should be strictly parallel to the floor. We fasten the bars opposite each other without distortions.
- We lay the boards of steps on the screwed bars and fasten them with self-tapping screws. For convenience, you must first screw one board on top of the span, and one on the bottom. So the design will gain greater strength. We fasten the finished staircase to the podium using metal corners. We check the strength of the bed and stairs.
- We close up all the recesses and grind the structure. We cover all the elements with a primer on wood, then apply varnish or paint. After they are completely dry, lay the mattress. Below you can make a play area or put a desk.
DIY bed with wardrobe - video
Retractable (roll-out) structure made of laminated chipboard
In small children's rooms, it is better to install a retractable bunk bed. This is an easy-to-make design that does not require special skills and experience.
To assemble it you will need:
- a sheet of chipboard (19 mm), from which we will make the main parts of the structure;
- furniture board (22 mm). From it we will cut out the cover and the lower side of the podium.
Making a frame according to the drawing
In order to independently assemble such a bed, it is necessary to cut the sheets into separate parts, and then assemble the structure using corners and screws with bolts.
We equip the lower tier with wheels so that the bed can move freely if necessary. For the crate we use wooden boards 10-15 cm thick. For a bed 1.8-2 m long, a minimum of 5-7 strips must be used.
Solid wood duplex bed
Wooden bunk bed - the most comfortable classic model that is suitable for children and adults.
| Name of parts | Size (mm) | Quantity (piece) |
| Racks (bars) vertical | 38x76x1730 | 4 |
| External pads for racks | 38x76x1730 | 4 |
| Side frame boards (tsargi) | 38x140x2030 | 4 |
| Planks for laying frame boards, which are mounted on the sides inside | 32x44x1850 | 4 |
| Panels for assembling the ends of the structure (headboards and footboards) | 20x140x914 | 4 |
| Central boards for assembling the headboard and footboard | 20x90x914 | 4 |
| railing | 20x90x1510 | 1 |
| steps | 20x64x482 | 3 |
| Planks for making fences | 20x90x1800 | 2 |
| Cross slats for creating a berth | 20x76x1000 | 24 |
| Side boards for supporting frame | 20x140x914 | 4 |
Tools you will need:
- electric drill;
- plane;
- level;
- roulette;
- chisel;
- screwdriver;
- hacksaw;
- electric jigsaw;
- Sander;
- hammer;
- glue for wooden parts;
- special impregnation for wood;
- waterproof varnish;
- hardware (screws, self-tapping screws);
- mattresses of the required size - 2 pcs.
Stages of bed assembly.
- We make 4 side parts (sides) to create the upper and lower floors of the structure. They will hold the slats.
- We assemble the ends of the bed (headboard and footboard) using racks and crossbars. We make supports from a bar and parts that will close the fastener holes of the structural parts and create a groove for laying the drawer side into it.
- We collect the head and foot of the structure. At the top of the headboard, we attach 3 pads to the beam, between which we will mount the elements of the protective fence. In the legs we attach one solid overlay.
- According to the indicated dimensions, we assemble the details of the bed.
- We collect the elements of the fence and the bed on the second tier. The rack shows how the steps are arranged. There are three of them in total. When we attach the bottom step to the footboard post, we need to make sure that the screws do not rest against the frame fastening screws.
- We connect the side parts of the structure with drawers. To do this, we install them in the gaps that we left between the linings. Fasten with four self-tapping screws on each side.
- We put the structure on the floor and begin to mount the handrail, stairs, steps and crossbar for the fence. We twist all the elements first with each other, and then with the bed posts using self-tapping screws. After we have assembled a one-piece structure, we lay the lamellas between the bars on the sides.
- We grind the finished structure, if necessary, so that there are no hooks. We process with special impregnations and cover with varnish or stain. We give the structure to dry completely, put the mattresses.
For safety, it is necessary to fix the bed to the wall so that children do not accidentally knock over the entire structure.
The easiest option: a bed for a summer residence - video
Bunk bed made of metal corners and pipes
Metal bunk beds have long been used in everyday life. Strength and durability are the main criteria for choosing such a design. If earlier they stood only in army barracks, barracks or dormitories, now designers began to pay attention to them.
Such a bed is not just a crude iron structure with two sleeping places. If you add it with forged elements, then it can become a real decoration for a child's room.
A standard bed has dimensions of 1.9x0.9 m. The frame is made in the form of a metal frame with beds made of durable mesh. The width of the bed should be approximately 10 cm larger than the mattress, and the length 8 cm.
Required materials and tools:
- metal profile or corners 45x50 mm;
- special mesh for sleeping places of the right size;
- channels - 32x65 mm;
- pipes with a diameter of 25 mm;
- wrenches for bolts and nuts;
- grinder with circles for metal;
- hacksaw;
- welding machine;
- electric screwdriver;
- level and angle.
Assembly steps.
- We make a frame for sleeping places from the corners. We cut the metal corners with a grinder or a hacksaw into parts of the desired size.
- At the ends of the corners for reliable fastening, we cut out special sections and connect them using channels. We weld all the elements, check the evenness of the corners and the parallelism of the frame slats.
- We cut out vertical racks from pipes and weld frames to them. All actions are carried out exactly according to the drawing. The main thing is to weld all the elements correctly and evenly, the strength and reliability of the entire structure depends on this.
- We weld the sides of the bed on the second tier to the vertical posts.
- We cut off the elements of the crossbeams for sleeping places from metal pipes and weld them at the same distance from each other. The smaller it is, the stronger the whole structure.
- In the drawing, the ladder is located at two ends, so we weld the rungs in the right places. You can weld the ladder separately to the desired height, and then install it at the head or foot of the bed.
- After we have finished welding, it is necessary to sand the seams. The best way to do this is with a grinder. Then we clean the metal structure from rust, treat it with a special primer and paint it.
Bed of two tiers: from the scheme to the finished product - video
If there is not enough space in the room to install two beds, a bunk or retractable design will come to the rescue. It is not difficult to develop a project and make it according to your own drawing. A hand-made thing will look perfect in the interior, save space and provide convenience to all family members.
Making furniture at home is very popular nowadays. Everywhere, craftsmen make sofas, chairs and other pieces of furniture, including various kinds of beds. Making a bunk bed with your own hands is not a difficult task. To do this, you need to have initial skills and know what you want to get after all the work is completed.
The meaning of a bunk bed
Nowadays, the installation of bunk beds in children's rooms has become quite a fashionable and popular trend. And not only because the current bed saves space (this is also an important factor). Such an original design is of great importance, as it makes the children's room more comfortable and original. A bunk bed can be not only double, but also single. On the first tier there may be a desktop, for example, for a computer.
Photos of do-it-yourself bunk beds are very popular with children. Yes, and you can often notice that children on such a bed sleep with great pleasure, if they have ordinary beds in the kindergarten. Also, children become more friendly, because they have to agree among themselves who will sleep on the upper tier.
If you are going to buy a high-quality wooden bunk bed, then know that it will cost you quite a lot, and inexpensive beds raise great doubts about their quality. A bunk bed, the manufacture of which we will discuss later, must be very durable, and able to withstand both an adult and a child. Another important factor of such a bed is its stability.
By the way, some masters in large families even make three-tier beds, but still, experts consider this to be too much, because they are afraid to hear the characteristic knock from the fall of their child. Next, we will look at how to properly make a double bed with your own hands.
Sizing
Before making a bed design for a given room, it is important to consider the following. First you need to decide where the bed will stand. Next, you should decide where the vertical staircase to the second tier will be located. Based on this information, you can understand what sizes you need to make sleeping places.

It is also worth considering that the dimensions of the bed that you will make, respectively, should exceed the size of the bed in length by 80, and in width - by 100 millimeters. From the side where the vertical ladder will be located, it is also necessary to add 45 millimeters to the dimensions.
After that, it is recommended to weigh everything and think about what the height of the future bed will be. Be sure to know the height of the ceiling for a bunk bed. In the room, the higher you are, the more stuffy it becomes, and the children on the second tier are very fond of jumping. From this it becomes clear that the second tier should not be very high.

Remember that the distance between the sleeping place of the first tier and the wooden frame of the second tier, according to the drawings of the do-it-yourself bunk bed, should not be too small. In other words, when an adult sits down with a child on the lower tier, his head should not reach the frame of the upper tier.
The height of the lower tier of the bed should be such that it is comfortable to sit on it, you also need to know that you can put something under the lower tier. In the bed that you will be producing, the height of the tiers should be made for a ceiling height of 2500 millimeters and also for a mattress thickness of 200 millimeters. The size of the mattress, that is, the bed, will be about 1800 by 800 millimeters.
Material and tools for the bed
The bed is usually made of pine boards. To make it easier to find materials for the further manufacture of the bed, you need to look for a board 18 by 140, 30 by 30, 40 by 80 and 40 by 140 millimeters. It’s better not to get attached to a certain length, but simply write down what parts are needed and how many need to be made from each type of board.
On top of that, “skilled hands” are needed. Maybe some people can do it, but most people can't. But if you replace wood with laminated chipboard, then you can almost completely get rid of labor-intensive operations by replacing them with edging (edging and gluing on chipboard saw cuts).

Making a bunk bed with your own hands is easy, fast and not laborious. Furniture made in this way is not inferior in strength and appearance to products made of wood.
You will also need a base that is placed under the mattress (2 sheets of plywood measuring 900 by 1850 by 9 millimeters), accessories (3 pipes made of steel with PVC coating), fasteners - screws measuring 3.5 by 40 millimeters, decorative washers - plugs and glue.
Before making the bed, the boards you will be using should be kept indoors for a week so that the temperature and humidity are about the same as in the room where the bed will be installed. All this is done so that the boards and bars do not warp.

The wooden board will be the basis. In this case, the choice is considered correct, but it's all about artisanal production. Any piece of furniture needs high quality finishing such as leveling, sanding and painting large surfaces. And this means that you need a special workshop and good equipment.
To make a wooden bunk bed with your own hands, you will need the following tools: a screwdriver or a so-called cordless drill, a saw or a regular hacksaw, a tape measure, a level, a milling machine, with which it is very convenient to smooth the sharp edges of wood, a metal and wire detector (you can also use an ordinary magnet ).
Approximate calculation of materials
To make a sunbed (lattice) on which the mattress will lie, you need a board measuring 18 by 140 millimeters. It is customary to place nine boards on each tier. This is probably enough for as many children to jump on the mattress as they fit there. In our case, the width of the bed is 800 millimeters, now it is necessary to take away a little from it, so that later you do not clog the sunbeds with a sledgehammer and increase this number of boards by two.
The bar on which the sun loungers will be placed has dimensions of 30 by 30 millimeters. You need a board 40 by 80 millimeters for the manufacture of ladders and sides. There are also options here, because the number of parts of a given length directly depends on the place where the ladder will be located, and also the presence of a removable side on the lower tier. In our case, it is worth considering this option when the ladder is located on the side of the facade (along the length) on the right.

A massive board measuring 40 by 140 millimeters is also required to tighten around the entire perimeter of the structure. The details that you will make from this board will be called tsars in the future. One of the purposes that they perform is the role of a "soap dish" for the mattress.
Here, approximate values \u200b\u200bare given in meters so that you can roughly estimate the cost of the lumber required to produce a do-it-yourself retractable bunk bed. Remember that a bunk bed made of chipboard is 2-3 times heavier than board furniture. But with handicraft non-serial production, a bed and chipboard are cheaper every 5-10 times.
Making a bunk bed
1. The mattresses you plan to use need to be measured. To these dimensions, you must add approximately 2 centimeters on each side, so that it is convenient to fill the bed linen - this is how you will find the dimensions of the frame. When you purchase sheet material at the sawmill, ask that it be cut according to your calculated dimensions on the machine. You also need to remember that you should not throw away the trimmings, they will still be useful to you.
2. Bars measuring 50-100 millimeters must be connected with screws, resulting in two frames for a bunk bed made of wood.

3. It is necessary to screw the board 150 by 20 millimeters to one side and the end of the frame. Fastening, of course, should be quite reliable. When you screw in the screws from the inside, make sure that they do not go through the side board. If suddenly you have too short self-tapping screws, then you should drill holes in the beams of the frame of a larger diameter, using in this case the depth gauge on the drill. Also, in places of the depth limiter, you can make marks on the drill itself with electrical tape. On the second frame using the same technology, you need to install a side 200 by 20 millimeters.
4. In the mass production of do-it-yourself children's bunk beds, the legs are usually made from boards measuring 25 by 100 millimeters. Our model is designed for fairly heavy loads, so the legs are usually made of two bars, 50-100 millimeters in size. It is necessary to connect two beams along the length so that the end is L-shaped. Further, the resulting holes from the fasteners can be sealed with putty and sanded. Accordingly, the length of the leg should be equal to the height of the fence, which is located on the second tier.

5. You also need to know that you won’t be able to do it without an assistant during installation. It is necessary to drill a hole in the leg at the height at which the second tier will be attached, and in the frame with a side a hole about 200 millimeters high. Next, a recess should be drilled in the leg so that the washer and screw head are not visible, it is enough to make a deep hole so that the screw passes through the leg. Next, it is recommended to screw in the screw.
6. Next, determine the place where the rack profiles will be located (unless, of course, the walls are made of drywall), and mark their place for drilling. Remember that the assistant should help support the frame from below, pressing well against the walls. Align the frame using a level correctly. It is necessary to drill pilot holes through which the frame beam, rack profile and drywall will pass, so that later hex screws can be screwed in. For such purposes, you will need a fairly long thin drill. It is necessary to screw in the screws so that they are fixed in the rack profiles. The lower tier is installed in a similar way.

7. The guardrail is a safety feature of the DIY metal bunk bed for kids. It can be made from several boards measuring 20 by 100 millimeters, which are mounted on vertical posts made of timber measuring 50 by 100 millimeters. Self-tapping screws must be screwed in from the inside. You should leave an opening for the stairs in the fence.
8. Basically, there are two types of stairs - vertical and inclined. First, install two beams that will be guides. Attach the steps using 6mm bolts. The longest bolts are used to secure the top step and at the same time to attach the ladder to the bed.

9. Next, install plywood sheets on the frames and then lay the mattresses. As a result, you will get a fairly durable do-it-yourself folding bunk bed for children, which will last for quite some time. Due to the fact that the bed is assembled with screws and bolts, it can be disassembled and reassembled in a new place very quickly.
10. So that the bed does not give glare and thus preserves the natural color and pattern, it is recommended to cover it in two layers with matte nitro varnish. And also do not forget that the appearance of this product is improving.

11. After the varnish is completely dry, nail the ceiling made of 4 mm thick plywood and covered with a rather beautiful fabric from the bottom of the upper shelf with furniture nails. Use draped panels to cover the opening between the edging boards and the railing, as well as the openings in the headboards.
12. Next came the turn of watching a video about a do-it-yourself bunk bed and installing it. For greater safety and stability of the bed, it is worth attaching the upper ends of 3 racks to the walls of the room, for this it is customary to use steel brackets.
All children love bunk beds so much, so you should also take an interest in the method of making this piece of furniture. Pre-select the necessary material - wood or chipboard and calculate its quantity. Then it is worth boldly proceeding to the practical part of the work. Follow carefully the step-by-step instructions presented by us, and you will get the most practical bunk bed!
When choosing a mattress, do not forget to buy children's mattress covers. Children will be delighted with a beautiful and soft bed.
Need a bunk bed for a kid's room? You can go to the nearest furniture store and choose the right model at an affordable price. And you can save money by making a bed with your own hands, especially if you have the talent and skills of a carpenter.
How to make a bunk bed with your own hands?
- 4 timber 5 cm x 10 cm, 3 m long;
- 4 timber 5 cm x 10 cm, 2.5 m long;
- 2 boards 10 cm x 2 cm, 3 m long;
- 1 board 15 cm x 2 cm, 3 m long;
- 1 board 20 cm x 2 cm, 3 m long;
- 2 sheets of plywood, chipboard or MDF 2.5 m x 1.25 m for mattresses. Not less than 2.5 cm thick;
- Self-tapping screws 70-80 mm;
- Self-tapping screws for drywall 40 mm;
- 8 screws 15 cm with washers;
- 10 bolts with nuts and washers 8 cm;
- 2 bolts with nuts and washers 16 cm;
- Varnish, sandpaper, wood glue.

- Screwdriver;
- Saw;
- Level;
- Roulette;
- Construction pencil;
- Hands and head.

We measure the mattresses that you are going to use and leave a small margin of 1-2 cm. We get the size of our frame. We measure parts of the desired size from the beams, saw them and fasten them with long self-tapping screws.

We saw off wide boards according to the size of the length and width of the frame and fasten along the perimeter of the sides with self-tapping screws for drywall. For the upper bed, you can use wider ones.


For this children's bunk bed, we use one leg, as it will be mounted in the corner on two adjacent walls.
Measure the desired height distance at 10 cm of the bars and fasten them with screws to each other, as shown in the image.


Pre-drill a hole in the top frame assembly for attaching to the leg. Then drill a hole in the leg at bed height.
Drill holes in the assembled frames for wall mounting.
Screw the leg to the top frame and have someone hold the frame against the wall. Level the frame and mark the holes in the wall.
Drill holes in the wall and fix the top. Fasten the bottom one in the same way.


We saw off from the beam 4 pieces high under the upper fence. We saw off boards for fencing to size 10 cm. Attached to the bed.

Don't forget to leave room for the stairs.


Depending on the height of your bunk bed, the ladder may be different sizes. For my case, the dimensions are indicated in the figure. I attached the steps with bolts.

We connect the ladder to the bed and install the base under the mattresses. Your bed is ready!

A do-it-yourself bunk bed should be not only durable and comfortable, but also beautiful. Therefore, sand the visible parts and varnish, and it will retain its appearance for a long time.
Video: how to make a children's bunk bed.