Do-it-yourself universal workbench drawings dimensions. How to make a carpentry workbench for a workshop
For the convenience of processing wood, stone, plastic and metal, for finishing and assembly manipulations, a working carpentry workbench is often needed. To make it yourself, drawings are not required - they are needed for desktops of complex design, which are also described in this article.
Purpose and typical device of the workbench
Any workbench is a massive and necessarily stable desktop for processing products of various sizes. The larger its dimensions, the larger and heavier parts can be processed on it. Moreover, the work itself is performed both with a hand tool (hacksaw, brace, etc.) and mechanized - for example, using an electric drill or an electric planer. A carpenter's workbench has the following typical layout:
- The working surface is made of solid board, at least 60 mm thick. For the cover of the workbench, it is advisable to use hardwood - beech, hornbeam or oak, otherwise it will have to be changed periodically due to rapid wear. The lid can be put together from separate dry boards and treated with drying oil before installation;
- A vice is “hung” on the front (front) part of the top cover for fixing workpieces. If the linear size of the workbench exceeds 1 meter, you can install two vices - separately for large and small parts. Large vices must be wooden, small ones are acceptable in the "steel version";
- Bench supports are made of soft wood - pine or linden. The supports of the workbench made of wood are necessarily interconnected by longitudinal strips for the overall stability of the structure;
- On supports in the underbench space, retractable or tightly fixed shelves for tools can be located.
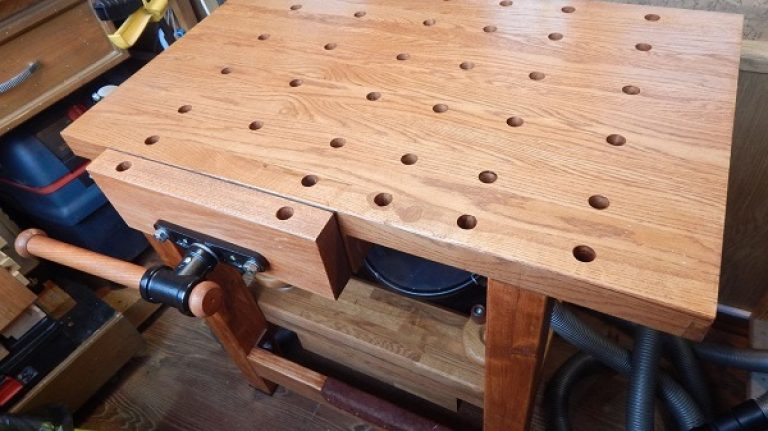
A series of holes are drilled in the front of the top cover for installing clamps, wedges and other parts for fastening large parts. A recess is provided in the back of the working surface - it is intended for small parts and accessories. You can replace a difficult-to-make recess with a perimeter of wooden slats.
Homemade workbench can have three types of design:
- Mobile. A small table measuring approximately 70 by 80 cm in length and width, with one vice and weighing up to 30 kg. The lower parts of the supports are made of metal for extra stability. Designed for minor repairs and work with light wood products;
- Stationary workbench of simple design - easy to manufacture, but firmly "tied" to one place. It is used for processing heavy boards and massive wooden blanks;
- Composite on bolted connections. It is convenient for its “collapsibility” and ease of replacing individual parts, but it is more difficult to manufacture than others.
Photo gallery: drawings with dimensions and symbols
We will consider the methodology for the independent manufacture of stationary and adjustable workbenches in more detail. Stationary digs into the ground on its own plot, in the country or in the yard. If it is installed inside a garage or other workroom, it is recommended to attach it well to the floor so that the workbench does not swing during operation.
The assembly sequence is as follows:
- The base is a frame made of wooden beams, which is fastened so that the structure as a result is as reliable as possible. To do this, you need to place a jumper between the legs, and install the drawer in the middle. They are best placed at a distance of about 40 cm from the floor level. By the way, they are also useful for creating additional shelves. The bars are combined with building glue. Where it is impossible to carry out such work, self-tapping screws must be used. If you are going to make a disassembled tool, it is best to connect the supports with metal corners. In any case, all the grooves are first prepared, then the structure is assembled, the joints are treated with glue, and we fix them with clamps. The best option for a stationary workbench is the ability to attach part of the tool to the wall for reliability.
The base is a frame of bars
- If you build a countertop from several boards, then it is important to bring them down as high as possible so that debris and sawdust do not get into the gaps. Dimensions should exceed the width and length of the base by 3-5 cm - this will allow you to clean the tool with all conveniences.
- The tabletop is screwed and nailed to several boards that are on the other side of the work surface, and at the base it is necessary to place grooves for mounting the bars.
Boards are attached to a stable frame
- The desktop needs to be put in order with a grinder, covered with drying oil to reduce the risk of injury from chips, and metal corners are bolted to its base.
- We attach a vise to the already made work surface, under which recesses in the work surface should be created, this will allow the vertical plate to be placed in the same plane with the tabletop. On the underside we install a plywood gasket, while it is important to make sure that the vise lips are flush with the surface. Having attached a vise, mark the area where the holes will be drilled, and attach them with nuts. We mill holes in advance so that the bolts “drown” in them. It is best to install the vise not in the corners, which will make them reliable even under heavy loads.
A vise or saw can be attached to the surface of the workbench
- In addition to the vise, you must also make stops. Of course, you can make them yourself, but it is better to purchase and ready-made. However, if you decide to create them yourself, prepare rectangular stops that can be adjusted in height. Bolts should not be used, as they can damage the workpiece during operation. On the working surface we make holes for the stops, while it is desirable to place them at a distance of up to 50% of the vice stroke - this will allow you to securely fix any workpieces.
Video: vise workbench
Video: desktop with a saw
How to make a simple carpentry workbench with your own hands
- The top cover is knocked together from thick boards, from which a massive shield with a width of 70 cm and a length of up to 2 meters should be obtained. For fasteners, long nails are used, driven into the boards from the “front” side and carefully bent on the wrong side of the wooden lintels. The working surface of the workbench is necessarily made of solid wood, fiberboard, chipboard and other materials from pressed chips are absolutely not suitable for it.
- A good constructive solution would be to cover the lid along the lower perimeter with a 5 by 5 cm beam - subsequently it is convenient to fix vertical supports to it. The increased weight of the lid will only give additional stability to the entire structure.
- The location of the vertical supports depends on the size of the top cover of our workbench. It is advisable to make them from a rectangular bar with dimensions from 120 to 120 mm. You can also take round timber as supports, but its fasteners are not as reliable as those of square (rectangular) bars. The height of the working surface is of great importance, the convenience of carpentry manipulations depends on it.
- It is optimal to set the upper cut of the supports at the level of the hand lowered down - due to the installation of the cover, the total height of the workbench will "grow" by 7-10 cm and it will become quite convenient to work on it. On the ground, we mark up holes for vertical supports and dig them to a depth of 25-30 cm. Accordingly, the total length of the dug-in bars is 1.2-1.3 meters.
- Vertical bars are installed in dug holes evenly, strictly according to the building level. The installed supports are connected in pairs using wide boards at a height of 20-40 cm. The transverse boards are attached to vertical bars using long self-tapping screws. After that, a working surface is mounted on the ends of the supports. For its installation, self-tapping screws are used, since hammer blows on nails can move the frame of our structure.
- When the top cover is securely fastened, vise, clamps and other devices can be “hung” on it for the convenience of carpentry.
If the design is more complex
When making a composite carpentry workbench with your own hands, drawings will be required, although the manufacturing procedure itself is in many ways similar to that described above. The main differences are related to the use of bolted connections instead of self-tapping screws and the installation of tool boxes in the underbench space.
When the installation of the vertical supports is completed, they are interconnected by horizontal jumpers. Previously, in each jumper, with the help of a chisel and a hammer, grooves are hollowed out for a nut with a washer (you can use special furniture bolts with C-shaped nuts). Having set the jumper bar to the required height, a through hole is drilled in the vertical support and the horizontal bar, into which a long bolt is inserted. From the side of the prepared groove, a nut with a washer is “baited” onto the bolt and carefully tightened along the thread.
Horizontal jumpers for the frame of a collapsible workbench will need two on all four sides. In addition, you need to install 1-2 jumpers in the middle of the tabletop, directly below it. Horizontal slats are attached to these additional jumpers on small self-tapping screws, along which tool drawers will slide. The boxes themselves are made "in place", that is, depending on the size of the mounting clearance between the jumpers.
The working cover of the collapsible workbench is also bolted. In the upper part of the vertical supports, a mounting recess is hollowed out with a chisel, holes for bolts are drilled in the cover. Because a flat working surface is required, the bolt heads are “sunk” in the cover due to drilling their seats with drills of the appropriate diameter.
Video: how to make your own milling table
The undeniable advantage of a collapsible workbench lies not only in the easy replacement of parts and the tabletop itself. As you know, under the load from planing, drilling, and other mechanical processing, the most durable workbench is loosened. It is much more reliable and easier to re-tighten the fixing bolts than to drive new nails or screws into the wood - so collapsible models last much longer than knocked together counterparts.
Video: folding workbench table
The design of the carpentry workbench will depend on your needs. In order to make it with your own hands, minimal knowledge and skills are enough.
Since ancient times, skilled craftsmen have sought to equip the workplace as comfortably as possible and, to put it in modern terms, ergonomically, which was considered the key not only to fast and efficient work, but also to safety. In this regard, the premises intended for repair and manual production were filled with all kinds of tables, racks and boxes, the original material for which was wood. Over time, cheaper metal gradually replaced wood from the construction arena and began to be used for the manufacture of machine tools, metal furniture and various auxiliary equipment, especially relevant in a construction workshop. Since the goods offered by stores often do not meet the specified characteristics, and sometimes they are on a par with industrial equipment, in our article we will share simple tips and tell you how to make a wooden workbench with your own hands.
The main purpose and typical characteristics of the workbench
Regardless of its design features, the workbench is a desktop, necessarily characterized by massive dimensions and stability, and designed for processing structures and products with a wide variety of dimensions. When designing a carpentry workbench, it is important to remember that the dimensions of the processed products directly depend on the dimensions of the workbench, while processing products is practiced both manually and using power tools - a drill and an electric planer. A typical layout of a standard carpentry workbench consists of the following elements:

- Work surface, for the manufacture of which a massive board is used, the thickness of which is not less than 60 mm. For the manufacture of the cover, experts advise giving preference to hardwood, such as oak or beech, using which you do not have to periodically change the working surface of the workbench, due to the high wear resistance of the material.
- A vice designed to hold workpieces. They are mounted on the front surface of the cover. Massive workbenches provide for the installation of several vices, separately designed for fastening small and large parts. Large vices are made of wood, while when choosing a vice of small dimensions, it is better to give preference to metal structures.
- Bench supports are designed to increase the stability of the overall structure, which are connected by longitudinal strips. For their manufacture, it is desirable to use soft wood, linden or pine.
- In the space under the workbench, on supports, you can install drawers designed for tools and any other work accessories.

Joiner's workbench: types of design
When developing a workbench project, it is important to take into account its design features, whether it will be installed permanently in the workshop or will be represented by a mobile structure. If you have opted for a mobile design, the best solution would be to lighten it due to the material used, which should be thinner. The mobile workbench can also be modified with a collapsible table top as well as folding legs. In connection with the listed features, there are three types of workbenches:

- Mobile workbench designed for minor repairs and manipulations with wood blanks;
- Stationary workbench used for processing solid wood blanks and heavy boards. It is easy to manufacture, but "tied" to one place;
- A collapsible or "workbench-transformer" is convenient for its collapsible design, which facilitates the process of replacing its individual parts, and also increases the mobility of the entire structure. You can learn how to make a retractable workbench in specialized manuals.

Carpentry or locksmith workbench: differences
In addition to the classification presented above, workbenches differ in their purpose. There are carpentry and locksmith workbenches. Since the creation of a metal workbench is fraught with a number of difficulties, in this guide we will tell you how to make a carpentry workbench with your own hands.

Dimensions and location of the workbench
In the process of creating a workbench, it is important to choose the right location for it. It should be in close proximity to natural light sources, if any. Local light sources will also not be superfluous. We must not forget about the electrical outlets, which should also be close to the workbench. All wires located in the working area are preferably enclosed in a corrugated pipe or box.

Before proceeding with the construction of the workbench, experts recommend determining its final height. To do this, lower your hands down, after which place your palms parallel to the floor. The distance between the floor and the palms is the same desktop height that is most convenient for you. Since home-made workbenches are often designed for a single workplace, the table is 1.5 m long and 0.8 m wide.


How to make a workbench video
How to make a workbench in the garage: selection of materials
The selection of material for the manufacture of a workbench is an important stage of the whole work, which determines the final strength and stability of the structure being constructed. Before you make a carpenter's workbench, let's talk about the rational choice of materials needed to make it. According to experts, for the construction of a workbench, planed timber will be the best material, which is suitable for the manufacture of a frame frame and legs.
Ideal dimensions of planed timber:
- for legs - 100x70 mm;
- for jumpers - 100x50 mm;
For countertops, it is better to choose boards with a thickness of 5 cm, or a solid canvas, such as an old wooden door or chipboard, characterized by a laminated surface. It is important to know that it is better to give preference to hardwoods such as oak, maple and beech.

How to make a workbench table? Sequencing
The manufacture of a workbench includes several stages, the fundamental of which are:
- Base assembly;
- Tabletop installation;
- Installation of equipment on a workbench.

Base assembly
The base, as a structural element of the workbench, is a wooden frame, the fastening of which is carried out in such a way that the structure meets all the requirements of rigidity and stability. For these purposes, it is necessary to provide for the installation of a horizontally located jumper between the legs of the workbench, and in the middle, along the entire length of the structure, it is important to install a drawer. Both the jumpers and the tsarga are fixed at a distance of 40-50 cm from the floor. Subsequently, they can be used not only to strengthen the structure, but also to install shelves and drawers for improvised tools. When constructing the base, the bars are fixed by means of a tenon-groove connection, and in those places where this is not possible, self-tapping screws are used. It is preferable to first prepare the grooves and spikes, according to the existing drawing, and only then glue the joints of the beams with wood glue.

If you're building a stationary workbench, one or more of the frame pieces can be attached to the wall, further strengthening the final structure.
Countertop fabrication and installation
- Thinking through the stages of manufacturing a countertop, we must not forget that it should be slightly larger than the base. From the previously prepared thick boards, a massive shield of the previously indicated dimensions is knocked together, for the fastening of which long nails are used, driven in from the inside of the boards. Used boards are pre-fitted to each other to prevent debris from entering the existing slots. For the installation of the tabletop, the use of materials for the manufacture of which pressed chips were used is excluded, since they do not meet the requirements for its stability. Several transverse bars are nailed to the tabletop, for which it is necessary to provide grooves in the base. To these jumpers, with the help of self-tapping screws, horizontally oriented rails are attached, which are needed to slide the drawers.

- The tabletop is bolted to the base. To do this, a recess is made in the upper part of the base bars, using a chisel, and holes are drilled in the table top for bolts, the heads of which are recessed in the lid by drilling recesses of the appropriate diameter in the table top. In order to avoid injuries from falling chips in the process of subsequent work, the countertop is polished several times and covered with drying oil.

Equipment installation
- A vise is attached to the installed tabletop, for the installation of which recesses in the end face of the tabletop should be provided. In the place where the vise is installed, plywood is attached to the underside of the countertop. When installing a vice, they are first applied, the place of their fastening is marked, and then fixed with nuts and bolts. Remember that the vise should not be located on the edge, which contributes to the displacement of gravity during operation.

- In addition to the vise, the classic workbench equipment is wooden clamps, a high-power stationary drill, certain types of turning equipment, and a milling element. In the conditions of a summer residence, it will also be useful to install a grinder and a circular. When installing equipment on a workbench, it is important to consider all the details of convenience and safety, as well as to check the strength of all fasteners. If the equipment is powered by an electrical network, it is important to correctly calculate the power of the equipment connected at the same time, as well as to correctly connect the connection itself.

How to design and make a universal workbench?
This article did not consider in detail the process of manufacturing a metal workbench, and also does not explain how to make an iron workbench in view of the complexity of this process, however, we consider it necessary to consider the option of combining the metalwork and carpentry workbenches, which is especially important in the conditions of country houses and plots.

For this, the same workbench is made, as given in the instructions, however, the area of \u200b\u200bthe working surface is slightly increased. Sometimes this may require strengthening the base through the use of additional frame elements. When the countertop is installed, one half is covered with a sheet of thin stainless steel, which is fixed with self-tapping screws. Ideally, they cover not only the top of the countertop, but also its end elements.
The workbench is an excellent "platform" for working with wood, metal, stone and other materials. Often a workbench is used to place tools and materials, which is especially convenient during construction and installation work. You can talk about the advantages of a workbench for a long time, but not everyone has the opportunity to purchase it.
The design of the workbench is quite simple, so it is quite possible to make it yourself. In order for a home-made workbench to meet all the requirements, namely, to be durable, stable, multifunctional, etc. Before proceeding with its manufacture, it is necessary to carefully study the instructions.
Detailed instructions for making a workbench with your own hands, or where to start

If you decide to make a workbench with your own hands, start by choosing the material, since the quality of the work will depend on this. In the event that you decide to make the entire structure yourself, you will need lumber. Many masters for such purposes take a ready-made table as a basis, which saves not only time, but often a significant amount of money.
If the second option interested you more, it’s worth noting right away that you still have to make an effort here, since a home-made workbench, if it is imperfect, may not meet your expectations and last for a very short time. You can make a workbench at minimal cost from a regular desk. At the same time, it is desirable that it be made from an array of boards, since if you take a chipboard table as a basis, a home-made workbench can turn out to be flimsy and short-lived. The best option is a desk with crossbars (or cabinets), which, by the way, are perfect for storing tools and various materials.
In the event that you have not found a suitable option for making a work surface, you can use another suitable item instead of a countertop, for example, you can replace it with small planed bars. The main thing is that there are enough of them. The bars should be knocked down or glued together so that the result is a strong shield. But before assembling the shield, each bar must be sanded so as to give it a complete look.
Back to index
Surface work

At the next stage, the working surface undergoes thorough preparation, it is re-cut off and carefully sanded. The lower part is fixed with the help of crossbars, you can also use wooden bars already familiar to you, which are screwed to each of the elements of the resulting shield.
Screws should be used for this purpose. It is not necessary to stick the veneer at all, it is quite enough to lay it on the surface of the table and fix it with the help of corners. As you understand, the manufacture of a carpentry workbench with your own hands is not over. The completed design is just a blank. Next, you have to make additional fixtures that will make a homemade carpentry workbench durable, stable and multifunctional.
Back to index
How to make a desktop with your own hands, without a base?

Taking into account the average human height (170-180 cm), the height of the future carpentry workbench should be approximately 90 cm.
One of the advantages is a great opportunity to completely “customize” it for yourself, so that later you will be as comfortable as possible to use it during work. The legs can be made from wooden bars connected with two-tiered crossbars. Thus, you will get the basis of the future carpentry workbench.
Back to index
Tabletop and other elements of a do-it-yourself carpentry workbench
You already know the method of making the countertop, the main thing is to make sure that the finished shield is durable. In general, working with a countertop will not take much time and effort, especially if you have all the necessary materials and tools at hand. If you started making a workbench from the very beginning (without using a ready-made desk as a base), add a few drawers to the already made design.
For this purpose, you can use runners similar to those that ordinary computer tables have. The drawer is convenient for storing items such as screws, nails, drills and other small items.
Back to index
A little about the folding workbench
There are workbenches that can be folded if necessary. For those who do not want to take up extra space in their premises, this option is the most optimal, because when folded, the workbench takes up very little space.
It should be noted right away that it is rather difficult to make this type of carpentry workbench, since its design has a large number of small elements. In addition, the assembly process itself is different.
Back to index
Layout of the future design of the carpentry table

As you understand, drawing up a drawing is one of the most important stages in creating a carpentry workbench. With the right layout, you can calculate the amount of material needed and avoid unnecessary costs. In addition, a pre-drawn plan of the workbench will allow you to avoid mistakes during work, the correction of which can take not only a lot of time, but also nerves. In particular, those who first decided to make a carpentry workbench with their own hands cannot do without a drawing.
By looking at the layout of the workbench during the manufacturing process, you will be able to position the vise in the most optimal location. It should be noted that there are subtleties here - for people who do work with their right hand, it will be more convenient if the vise is placed on the side opposite from the workplace. The distance at which they will be is determined based on the fact that they do not interfere with you in the process of work. In addition to installing a vice, do not forget about the placement of special cutouts (wedges), so a home-made carpentry workbench will be distinguished by its absolute safety, and the result of working with blanks will be of the highest quality.
When planning a future carpentry workbench, you need to take into account the tools you have to work with. So, for example, to work with a tool such as a jigsaw, it is advisable to think about a saw table, you can make it small so that it does not take up much space. As you understand, this should be done even in the process of manufacturing the workbench itself. The saw table should extend approximately 20 cm beyond the edge of the work surface.
Thus, the process of cutting plywood will be as convenient as possible. To make such a table, you will need a small board, in which several cuts must first be made, as well as a small hole about 1 cm. The hole is necessary in order to attach the board to a homemade desktop. The plank is attached with screws, but if you want it to be removable, connect it to the clamp. As for the stops for the boards on the table top of the carpentry workbench, they are made according to the principle already familiar to you.
Work with drawing up the layout of the worktop is the most important stage. The fact is that the functionality of a home-made workbench will depend on this, because it is at this stage that it is necessary to consider where the devices necessary for work will be placed.
Most of the home craftsmen, who are the bulk of subscribers and visitors to our site, have already solved the problem of organizing their workplace to one degree or another by setting up comfortable workbenches in their workshops and on the balcony.
But there are also those who look closely at home needlework, try this universal profession, which includes many specialties, which becomes a very useful hobby for the family.
First of all, this article is for them, but perhaps it will also be useful to those who have already found themselves in the role of homemade and, having decided on the main types of work, can competently do the arrangement of a home workbench for the workshop with their own hands.
Workshop Workbench Types
A workbench is a table for carrying out various specialized work on the processing of different materials. Accordingly, depending on what material you have to work with and what operations to carry out, workbenches differ from each other in size, configuration and material of manufacture. According to the type of materials processed, workbenches are divided into:
- carpentry;
- plumbing;
- combined.
Based on the design features, the following types are added to them:
- universal;
- folding.
Folding universal workbenches are produced by different companies with a different list of functions, and a distinctive feature, first of all, is their mobility. Therefore, if you convert your experience of a home craftsman into banknotes outside your apartment or courtyard of your house, you can either pick up a factory-made universal folding workbench, or, after analyzing a number of design features of a particular model, make it yourself.
But for a home workshop, more massive workbenches are suitable, and here three options are possible:
- carpentry workbench with the ability to perform a number of locksmith operations;
- locksmith workbench with the ability to perform a number of carpentry operations;
- combined workbench.
We note right away that the latter option is not the best solution, since it does not allow to fully perform both carpentry and metalwork types of work, but is only relatively adapted for their production, therefore the first 2 options, in our opinion, are preferable. It is these options that we will consider in examples for self-production.
Making a simple DIY garage workbench
The simplest workbench for a home workshop will be a fairly powerful table with a small set of additional functions: drawers, shelves, etc. for storing tools and remanent.

Well, if there is a possibility of its slight transformation to perform metal or woodwork, but more on that below.
To create such a workbench, we will take wooden blocks 40x80 and cut out 4 legs: 2 pcs. length 700 mm, 2 pcs. 750 mm long and 2 lower jumpers 500 mm long. For 2 upper jumpers of the same length, we used a 40x100 bar available on the farm.

It will also go for the top rail of the base of our workbench at the front, with a length of 1400 mm on the bottom and 1600 mm on the top. And at the back we use a 40x150x1600 edged board, but we will need all the long blanks later.
If you have a tool for making spiked joints, use it, as we did.

If not, then make them manually or you can join the parts end-to-end using overhead metal fasteners.
Assemble the side racks as shown in the photo below.

After that, you can begin to assemble the entire frame.
The central jumper inside the frame, made of the same 40x80 bar, fixed on small wooden brackets 40x40x180, in addition to strengthening the structure, acts as a stop for two bedside tables with drawers from old desks that we decided to use in our workbench.

For the working surface of the workbench, we also used our existing laminated surface made of fiberboard. We screwed a board on metal plates to the leading edge, which will protect its edge from peeling during operation. It will also serve as the basis for fastening a small metalwork vice with a clamp.

We fixed the working surface to the frame on metal corners and got a fairly powerful general-purpose workbench for our home workshop.
Making a carpentry workbench with modifications for performing locksmith work
If you mainly work with wood, then it would be logical to make a carpentry workbench and do some design modifications for locksmith operations.
The traditional carpentry workbench for the workshop has a design that has been worked out for centuries, which has practically not undergone significant changes up to the present day. It is based on a massive bed on spiked joints, using wedges for tightening in case of drying out, a powerful (often type-setting) tabletop with a recessed tray for collecting chips and tools, and two vise-clamps for fixing workpieces.

The dimensions of such a workbench are selected depending on the maximum length of the workpieces that will be processed on it. If you are going to make wooden doors on your own, then the length of the workbench must be at least 2.5 m and a width of at least 0.8 m, otherwise your work on it will turn into hard labor. The workbench of my grandfather - the best carpenter in the area for at least 50 km in all directions - was 3000x1000 and he said that he lacked 20 centimeters in width to make large frames for verandas.
The dimensions of the school carpentry workbench are 1200 x 500 x 750. If the dimensions in the plan suit you and you are ready to spend about 13 thousand rubles on it, then the height can be adjusted by screwing bars of the appropriate size to the legs. But you can also consider alternative options.
As a matter of fact, these are variations on the theme of the same carpentry workbench for the workshop with different materials for the table top, the presence or absence of drawers, shelves and different vise mechanisms. Now in order:
1. We make the bed from dry pine lumber 40-50 x 80-100 mm, calculating the height for your height. If your workbench is installed in a room where there will be no sudden changes in humidity, then its elements can be connected in any convenient way, albeit end-to-end using fixing metal plates and corners.
2. The table top can be made from ready-made glued wooden panels sold in most building supermarkets, or glued from planed bars with a thickness of at least 50 mm yourself using PVA glue, having built a simple clamping device. It is important to remember that the top side of the future workbench should be as flat as possible. You can also use thick-layer plywood for the countertop, but it is still advisable to paste over its ends with wooden slats made of oak, beech or ash.
3. To fasten the clamping mechanisms, the bottom of the table top of the workbench is built up with bars of the appropriate sizes. The most popular clamps are:
- carpenter's lead screw with two Czech-made guides Tr 24 * 5, 390/205 at a price of approx. 3 thousand rubles.

Spanish carpenter's vice Piher, 150 mm, approx. 2 thousand rubles;

You can also make some kind of their own by using a pin with a diameter of 14 - 16 mm, which, of course, will not transmit such efforts as a vise, but it will make your clamp extremely economical and maintainable, due to its cheapness;

Or make an even simpler clamping device from the same studs, but due to the lack of guides, put 2 such clamps on one vice.

4. Make holes for the stop pegs in two directions opposite the vise lead screw. It is also useful to make them parallel to each other over the entire surface of the countertop for confident fastening of overall products.

5. Fasten the workbench tabletop to the base on powerful metal corners and, if you do not plan to move it, use them to fasten it to the floor.
And you have successfully completed the first task of the workbench option described in this section of the article.
Now, several options for fixtures for performing plumbing work on such a workbench.
- The simplest of these is to make an overlay of steel 3 - 5 mm thick with a steel angle frame, kept separate from the workbench or attached to it on hinges and lowered to the table top if necessary.
- The main attribute of a locksmith's workbench is a bench vise. In this case, we recommend using a vise with fasteners that do not require passing through the workbench top.
Of course, you can fit the holes for the stops under the fasteners of the vice, but with a thick overlay, you can do without it. Also of interest is the option of attaching a bench vise directly to the tabletop of a carpentry workbench using a transition bar-stand and a powerful clamp.

And at the same time, the overlay should not be done on the entire area of the workbench. There are many options, the choice is yours.
Refinement of a locksmith's workbench for carpentry work
Often, especially if the farm has a car and a garage, the main workbench is a locksmith.

We will not consider the process of its manufacture in this article, but we will tell about simple ways to adapt it for carpentry, especially since it is not at all difficult. To fully use your locksmith's workbench as a carpenter's bench, you will need to dismantle the locksmith's vise and make several simple fixtures.
Let's consider them in more detail.
1. From the first figure below, when finalizing the locksmith's workbench, we will be interested primarily in the side stop (1), which is not difficult to make removable. And together with the holes for the pins (14) along the front end of the workbench (and this can be a one-piece removable structure) and a suitable wedge, we get a simple and reliable device for attaching the board to the workbench. You can simply make a wooden pad fixed with recessed clamps, with all the set of blank fasteners shown, and understand that the level of the working surface will rise by its thickness, which can be compensated for by a ladder at the workbench of the appropriate height.

There is nothing to say about the back stop, it simply performs a supporting function for long workpieces.
2. You can make an overlay planer board with a universal stop, shown in the second picture. By increasing the height of the stop (or changing it depending on the height of the processed bar) and screwing the beam on the underside to stop on the right edge of the workbench, we get the simplest device that turns the locksmith workbench into a carpentry workbench.

3. A slightly more complex overlay with a fairly powerful option for fixing the workpiece also allows us to solve this problem. The only thing we would recommend in this case is to also screw the stop on the right side and choose a thickness of at least 50-70 mm for a more reliable fastening of the front pegs and sufficient depth of the lock and clamp.

The way to install the last two planing devices on the workbench is shown in the diagram:

Dear readers, if you still have questions, ask them using the form below. We will be glad to communicate with you;)
The workbench is an indispensable attribute of any carpentry workshop. It is a desktop used for tooling workpieces, storing tools, materials, drawings and accessories.
In this article, we will look at the design and dimensions of workbenches, offer an overview of the most popular factory models and present step-by-step instructions, following which you can make a homemade carpentry workbench.
1 Arrangement and design of carpentry workbenches
As for a blacksmith, the main working tool is the anvil, so in the carpentry workshop, the main working element is the workbench. Such a desktop is universal, it simultaneously acts as a place for cutting, processing and assembling wood parts, storing working tools and fixtures.
The basic part of the design of any workbench, no matter how many operations will be performed on it, is a regular hardwood countertop (beech and oak are best). The thickness of the tabletop should be 60-70 mm, while a longitudinal groove is cut in the back along its entire length for storing small tools. Large fixtures are stored in the workbench - a shelf under the table top.

On the carpentry workbench, there must be a vise that is used to fix the workpieces being processed. The functionality of the table is greatly expanded by the holes for installing clamps, which are drilled along the edge of the inner contour of the tabletop.
The total height of the structure must be selected based on the height of the master, usually it varies between 70-80 cm. The width and length of the countertop directly depend on the size of the workshop or garage, for a single desktop, the optimal length is 2 meters, the width is around 90 cm.
A stationary table can weigh up to 100 kilograms. If you plan to make a folding workbench, then you will need to take care of facilitating it by using less thick wood. The folding design implies the possibility of unscrewing the tabletop from the legs, while the legs themselves can be collapsible or telescopic.

In the workshop, it is best to place the workbench near the window, which will give the workplace natural light during the daytime. The presence of artificial lighting is mandatory, and several sockets must be placed near the countertop to connect power tools.
1.1 Material selection and assembly
For the manufacture of the frame and legs, a planed beam 100 * 70 mm in size is well suited, for a tabletop it is best to take planed oak or beech boards 4-5 cm thick. A cheaper option is a chipboard sheet tabletop, but it will last less. Remember that the thicker the boards are used, the heavier and more stable the carpentry workbench will be, which will positively affect the convenience of work.
Fasteners are selected based on whether the table is stationary (nails and screws are used) or prefabricated (bolts and nuts). From a power tool for installation work, you will need a drill, a grinder and a screwdriver, a grinder will also not be superfluous, but you can get by with an ordinary planer .
A do-it-yourself carpentry workbench is done in two stages - assembling the frame and mounting the table top. When assembling the base, you need to try to get the most rigid frame possible, this can be achieved by placing horizontal jumpers between the legs (at a height of 50-60 cm from the floor), which will later serve as a supporting element for mounting shelves.

You can connect the frame bars to each other by gluing into the “thorn-groove” system, but it is most convenient to use metal corners and self-tapping screws. You can increase the reliability of the structure by rigidly screwing one of the horizontal jumpers to the wall, however, this solution is applicable only in the manufacture of a stationary workbench.
Having finished with the base, you can proceed to the assembly of the second part - the countertops. If the work surface consists of several boards, they should be joined together as carefully as possible so that moisture and dust do not accumulate in the cracks. The boards are connected on 3 bars (side and central) located under the table top. The dimensions of the countertop should be such that its contours extend beyond the base by 5-10 cm. Upon completion of the assembly, the countertop is polished and covered with drying oil, it is easiest to fix it on the base with steel corners.
You need to fix the vise on the workbench using M12 bolts and nuts, while it is first necessary to cut holes for the bolt heads into the tabletops. You can place the vise in any place convenient for you, but not in the corner, as it can break off under heavy load.
The device of the carpentry workbench also implies the presence of stops, which can be purchased ready-made and fastened with bolts, or you can do it yourself. Holes are cut out under the stops in the front of the tabletop, in which wooden blocks, machined to size, are placed. For a more secure fixation, they can be made in the form of pegs expanding towards the top.
1.2 Homemade workbench (video)
2 Choosing a factory-made workbench
If there is no opportunity to make a homemade desktop workbench, it makes sense to pay attention to factory-made products. In the budget price category, the best choice would be the Unipro 16900u desktop, which can be bought for less than 3 thousand rubles.
Unipro 16900u is an excellent metal workbench that is well suited for home amateur use. The working table has dimensions of 520 * 300 mm, which allows processing workpieces up to 265 mm wide. On the surface of the table top there is a protractor, an inch and a metric scale, and sliding holders for workpieces are also provided.

The Unipro 16900u model is designed for a total load of up to 100 kg, while the weight of the structure itself is 8 kg. With its compactness, the table is quite stable, its only drawback is the complete bolts, which are made of soft metal. Owner reviews indicate that it is very easy to break the bolt cap with a bat, so immediately after purchase it makes sense to replace the bolts with better ones.
If you need a professional workbench, we recommend that you pay attention to the Master Cut series from Wolfcraft (Germany). The line includes metal tables, for which the manufacturer gives a guarantee for a period of 10 years, which indicates their highest quality.
Wolfcraft offers the following models of carpentry workbenches:
- Wolfcraft Master Cut 1500 - working area 78 * 50 cm, height 86 cm, can withstand a load of 200 kg. The price is 24 thousand rubles.
- Wolfcraft Master 700 - differs in height adjustable within 78-95 cm and a smaller table (68 * 39 cm). Designed for a load of up to 150 kg, the cost is 17 thousand.
- Wolfcraft Master Cut 200 is the most affordable model in the line of professional equipment (price is 7 thousand). The tabletop for the workbench has dimensions of 30 * 44 cm, height - 80 cm. This is an excellent student table, which can be considered as a universal workbench for household use.

Also in the assortment of the German company are carpentry workbenches with tool storage boxes - Wolfcraft Workshop. Their working surface is made of solid beech 30 mm thick and covered with a sheet of galvanized steel. A characteristic feature of the Workshop series is modularity - the client gets the opportunity to independently choose the configuration of the storage compartment by combining the shelves and drawers of different sizes offered in the catalog at his discretion.
The total load that the Workshop system can withstand is 600 kg, while the maximum weight per box should not exceed 600 kg. The cost of such equipment directly depends on its configuration, prices start at 40 thousand rubles.