Paper space layout. Homemade mock-ups made of paper, plywood and foam
Paper modeling can be classified as an occupation that will never cease to interest a person. Many orphanages of creativity necessarily organize design circles, because paper models not only provide an opportunity to get a new interesting figure or toy, but with their help you can improve your knowledge of physics and mathematics.
Tools for the job
To learn how to fold basic paper models, you will need simple tools like scissors, a utility knife, PVA glue, and a brush to apply it. Give preference to PVA construction glue - of all the varieties, it has the thickest consistency, it does not spoil the paper, making it wet and viscous, like a regular one.
Different models are folded from different types of paper - from cigarette to thick cardboard. Beginners are advised to start with 200g/m2 watercolor paper for large pieces and 140-160g/m2 drawing paper for smaller pieces.
Separate details, such as masts, railings, small finishing elements, are created by craftsmen from polymer clay, gypsum, plasticine and self-hardening plastic. If you also supplement your work with stucco parts, stock up on various stacks, molds - like those used in ceramic floristry.
How to make a paper model
The workflow for creating a paper model follows a few simple steps. Before starting the process, the master determines which figure he wants to design. In fact, almost any product can be made from paper, but paper modeling often involves the following options:
- geometric figures, polyhedra with convex and concave corners;
- scaled copies of famous buildings;
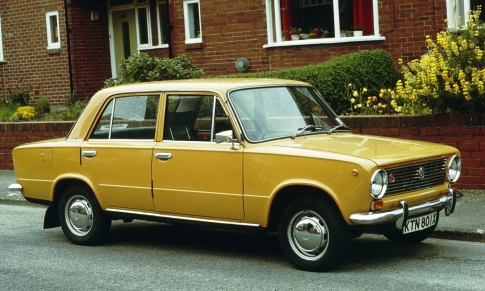
- models of luxury cars;
- models of military equipment: tanks, armored vehicles, heavy guns;
- vehicles: planes, ships and submarines, trains.
Figurines of a person, animals, plants are constructed much less often than others. Once the product category is defined, the main part of the workflow begins.
Creating a Layout
Three-dimensional models of paper are made up of several large and small details - the schemes of elements must first be drawn on paper sheets of the desired color. Here a person cannot cope without understanding certain knowledge of geometry and the possibility of representing a three-dimensional image.
To make it easier for beginners to learn, many specialized magazines began to issue drawings of finished scans for a paper model, by gluing which you can get a figure.
You also need to cut the layout according to the rules. For example, a solid line along the contour indicates the place of the incision, the dotted line indicates the fold. But in each scheme, the designations are individual, so before cutting out, you need to read the explanations for the figure.
Assembly
After the drawings of the paper model are ready, the layout is glued and finishing work is done, if necessary.
To make the surface of the product realistic, craftsmen use different coatings: glossy varnishes, matting sprays, craquelure liquids, stains, etc.
Paper car models
A beginner in paper modeling will enjoy this master class, which contains information on how to construct a famous VAZ 21011 sedan car model in just half an hour.
Stock up on heavy drawing paper or coated sheet if the figurine is being made as a gift to a friend.
- On an A4 sheet using a color printer, print the finished scan of the paper model with your own hands. If you want to enlarge the scheme, make sure that the proportions of the length and width are preserved - changing the parameters may prevent the parts from joining correctly.

- Put a picture of a real car of this brand in front of you to use the picture as a guide when assembling. Bend the reamer in the right places.
- Give the blank the shape of a car to mark the gluing points for yourself. Only after that you can successively glue the white valves with glue and glue them to the necessary parts from the inside, fastening the parts of the machine to each other.
Please note that the tread strips need to be glued together, forming rings that will be attached to the wheels in order to get the most voluminous paper models.
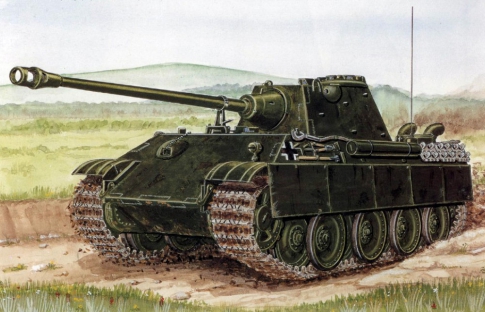
paper tank models
The construction of military equipment out of paper is somewhat more difficult than the creation of civilian vehicles because the guns are made up of many small parts that form the body.
To see this, try to form a difficult, but very interesting model of the German Panther tank.
- On a thick A4 sheet, print out the drawings of the components of the tank using a color printer. Small details are best cut out of thin cardboard so as not to bend narrow curled elements.
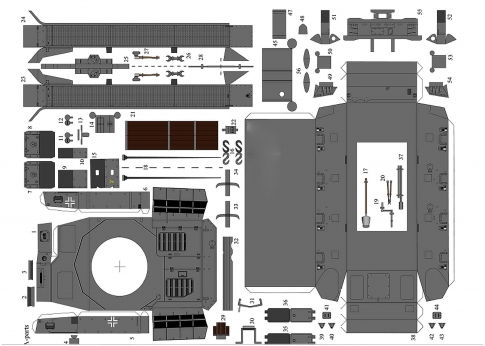
- Cut out the pieces with sharp scissors to make the job easier.

- It is better to carry out gluing in blocks - separately connect the parts of the hull, propulsion system and turret, and then fasten large elements to each other.
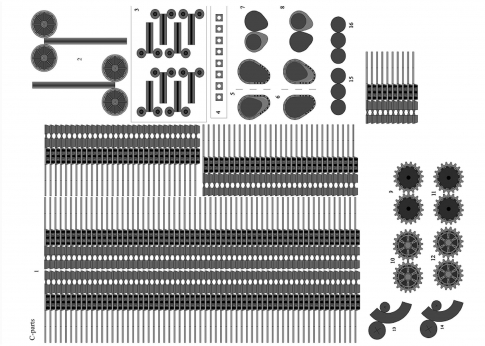
To glue the parts of the tank in the correct order, follow this video tutorial when assembling.
Sometimes the joints are connected with small errors, due to which white paper stripes appear on the model. You can get rid of them with felt-tip pens or pencils similar to the color of the armor.
paper airplane models
If you already have some skills in building paper figures, you will surely enjoy building a paper and cardboard model of the Tu-104 passenger aircraft.

- Print out the aircraft drawings on thick paper.

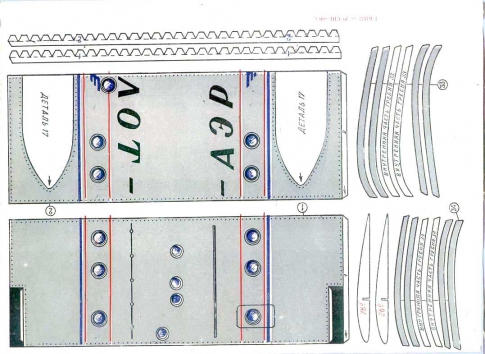
- Stick the elements of the inner frame of the product on thin cardboard - they are marked with red numbers.

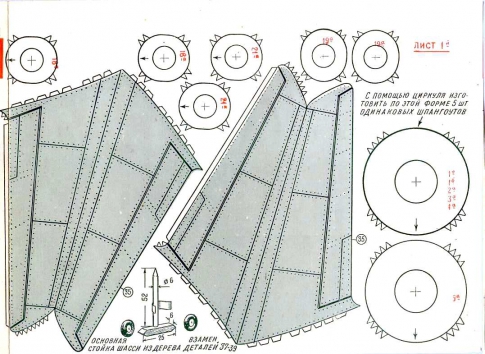
- Details marked with a cross - frames or frame - are transferred to cardboard using a compass. In this case, you can calculate the radius of the circle by placing the compass needle in the middle of the cross, and the pencil on the circle. Patterns of paper frames must be glued to these cardboard blanks.

- After developing the frame, start creating the fuselage, or body of the aircraft. Note that, unlike previous products, fuselage sections #1-8 do not have white fixing flaps. They are interconnected by special ribbons, represented on the patterns by the corresponding numbers in blue.

- The frames are glued into the joints between the fuselage sections.
- While the glue in the aircraft body dries, glue the tail parts together.
- The engines of the apparatus are assembled like a fuselage.
- Next, wings are formed using cardboard and paper.

- Connect the parts of the hull, wings, bow and cockpit together.

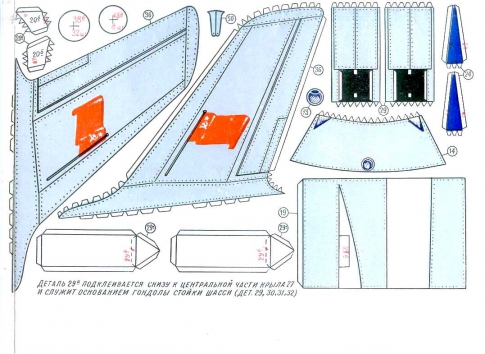
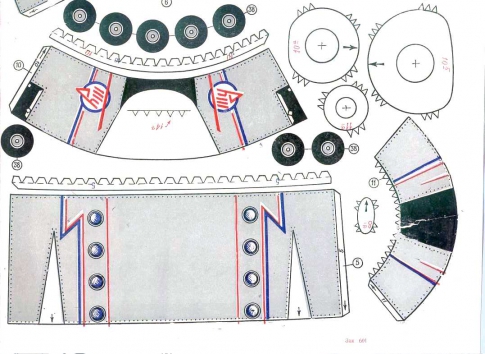
- The chassis assembly takes place in several stages - the wheels and their components are initially formed, after which the chassis is glued to the wings in a specially designated place.

- You can also use the pattern to cut out a wooden chassis - it will be stronger and last longer than paper and cardboard.
In order to avoid bends and creases on the body and tail, stuff the parts with cotton during the assembly process. Decorate the plane as desired with decoupage sprays and paints.
You can make a simpler model of an airplane out of paper with your own hands, focusing on this video.
Take it, tell your friends!
Read also on our website:
show more

Have you ever noticed, driving through the outskirts of your city, how much unfinished and already seemingly abandoned brick boxes of houses, cottages with gaping window failures cost? Apparently, a lot of money has been invested in so much brick, concrete, digging pits and other construction. In fact, most of this money is buried in the ground, thrown to the wind. After all, these unfinished houses and cottages are then sold at a price much lower than that invested in their construction. And if you look at some of the houses or cottages built in the recent past, you are unlikely to find among them not only an architectural masterpiece, but simply a house with its architecture that inspires at least respect, not regret. Probably Russia is still the richest country in the world, since we allow ourselves to spend money so unreasonably.
Where does such extravagance come from? Why are we used to investing in the construction of ruins or in some clumsy buildings?
Firstly, from the fact that a private developer often cannot calculate his real possibilities and, as a rule, threatens to build a house or a cottage larger than he can handle, bring to mind and subsequently serve.
It also happens that a person who has built a four-story house or cottage for himself, as a rule, lives on one floor, and goes on an excursion to the rest, but on these floors of the cottage you need to clean, wash the windows, and finally heat them. The cost of building, operating such a house or cottage is very high. So that money does not fly to the wind, it is necessary to act on the principle of reasonable sufficiency.
Starting to build a house, a cottage, private customers often console themselves with the thought that they will be able to find some wonderful, almost gratuitous builders, cheap but talented architects. As a rule, all these dreams in the process of building a cottage turn out to be nothing more than an illusion. And the savings begin. But saving is not on what would be necessary. As a result, it turns out that fixing the work of these miracle builders will cost even more than initially finding normal designers and listening to their recommendations on choosing a contractor for building a house.
I would like to warn potential customers against architects who swear to design the house of your dreams in a couple of weeks. Already when building a house or a cottage, such an approach to business can go sideways, not to mention whether you can live in this dream. After all, if you want to start building a house in the summer, it is better to contact an architect in the fall.
The practice of building houses, cottages shows that the more attention is paid to the project, the lower financial costs await you at the construction stage. It is better to design a house once than to rebuild it seven times, experience tells.
To make your idea of the future house as complete as possible, you should order a model of the house with the surrounding area to the architect. Many customers believe that the layout of the cottage is needed to extract more money from it (the customer). This is fundamentally wrong. The layout of the cottage will help save you money and nerves, because you will imagine your future home, and the result will no longer be unexpected for you. A model of a cottage made on a scale of 1:100 gives a fairly complete concept of the object, but on a scale of 1:50 it will be possible to show all the architectural features of the house and various types of finishes so that it will allow you to literally get used to your still unbuilt house. Photos of house layouts you can see on our page.
It is imperative to carry out geological surveys on the site and geodetic survey of the relief of the site - they are necessary as initial data for designing the foundation of the cottage. The foundation is the basis of the house and problems with the foundation can lead to the disrepair of the entire structure. Most of the houses abandoned at the construction stage are abandoned because they have problems with the foundation. Either because of the uneven subsidence of the foundation, or because of the force of frost heaving of the soil that warped the foundation. Cracks can go along the walls of the house, so it will be easier to order geological surveys than to grieve later over your warped and cracked house.

Also, in order to save money, it is better not to dig the basement into the ground - you will save on earthworks, foundation material and waterproofing. Another thing is if you want to get the maximum usable area with a minimum building area - here you can’t do without a basement floor, usually pools, gyms, storage rooms are placed there - everything that does not fit on other floors.
In order to achieve tangible savings during construction, considerable attention must be paid to the selection of building materials. The most progressive wall material for a country house is aerated concrete, laid on a special adhesive solution. A modern aerated concrete block produced according to German technology, with a thickness of 375 mm, fully meets the standards for heat engineering. The wall turns out to be very even, because the seams between the blocks are no more than 2 mm, and does not shrink. Therefore, after a slight preparation of the wall surface, you can proceed to its final finishing. In general, in terms of the cost of material and installation, an aerated concrete wall is two times cheaper than a brick wall and at the same time three times warmer. One of the advantages of aerated concrete walls is that it is vapor permeable, which allows such walls to breathe, getting rid of excess water vapor inside the house.
But it should be remembered that the bearing capacity of aerated concrete is low, although it is quite enough to carry reinforced concrete floors of two or three floors. Also, aerated concrete absorbs moisture well, so its surface should be protected from its effects.
Vinyl siding is the most economical material for facade finishing. It is attached to the crate, leaving an air gap, which allows you to ventilate the outer surface of aerated concrete, removing excess moisture from it.
Siding does not need to be painted, it is not subject to decay, it is enough to wash it from time to time to maintain its appearance. Siding finishing can be combined with other, more expensive types of finishing, for example, decorative synthetic plasters with various fillers: quartz, marble, granite chips of various fractions, it is important that the plaster is moisture resistant and vapor permeable.
Brick cladding will undoubtedly add solidity to your home; to save money, you can use the products of domestic factories. The use of these materials in harmonious proportions will give the facades of your house a unique, individual look.
A fairly inexpensive roofing that can be used is bituminous shingles, but to give the house a more representative look, you can use domestic polymer sand shingles. It has the same dimensions as the Finnish ceramic or cement-sand tiles, but at the same time it has half the weight at a much lower price, it does not splinter when it falls. The disadvantage of ceramic, cement-sand, polymer-sand tiles in relation to bituminous tiles is a relatively large weight, which leads to an increased consumption of material for truss structures. But bituminous tiles will quickly become unusable, while traditional tiles have been tested for centuries and are undoubtedly more durable.
Metal-plastic windows are the best option for a person who knows how to count money. Metal-plastic windows have the same advantages as vinyl siding - they do not need to be repainted over time and they do not rot. In our climate, it is imperative to install double-glazed windows. It is better if the windows have a triple seal along the contour and high-quality shut-off valves that tightly press the window sashes to the frame. At the same time, it must be remembered that it is better to contact a company that gives a long-term guarantee for its windows, because some problems with windows can appear after a year of operation and after two years. Excessive savings on windows can lead to unnecessary expenses later.

A well-thought-out planning and constructive solution plays an important role in saving money. By simplifying the construction of the house as much as possible, we will reduce the number of necessary operations during installation, the amount of material required - and labor costs and costs will accordingly decrease.
As you know, a plane that flies well and looks beautiful too. Beauty is derived from its functionality. So a good house does not require anything extra. After all, a house can have a spectacular appearance not due to architectural excesses such as turrets and columns, but due to well-thought-out proportions, a combination of different types of finishes, an interesting color scheme, and at the same time be simple from a constructive point of view. Moreover, we are already living in the twenty-first century and classical columns and stucco details on the facades look at least strange on new buildings. Modern architecture does not get hung up on details, but operates with color, plane, volume, texture….
An important role in saving money is also played by which heating system you choose. Either it will be a traditional radiator system, which will undoubtedly cost less at the initial stage, or a heating system through the floor. The advantage of the heating system through the floor is that the water here does not need to be heated to high temperatures, because the heat transfer area in this case is larger, as a result, 15-20% of the funds are saved compared to the radiator system. In addition, when heating through the floor, the air rises to a lower height and there will be much less dust in the house. Also, the rejection of radiators will make it possible to arrange furniture more freely, which is important if the area of \u200b\u200bthe premises is small and every square centimeter counts.
What is the recipe for building a good house? First, measure your capabilities with your needs, find a reasonable proportion in their ratio. Secondly, take a balanced approach to the choice of builders, be sure to look at the houses they have built, which have been in operation for several seasons. Thirdly, do not contact designers who will draw everything on a computer in a week, it’s not the computer that thinks! When the architect offers you planning options, try to imagine them in reality, think about whether everything is convenient in planning. (The same applies to the case when you order a finished project from the catalog). Fourthly, if you have already decided on the designers, negotiate with them both for the manufacture of a house model and for interior design work, listen to the architect's recommendations for choosing builders. Fifthly, decide on the materials from which the house will be built, either it will be expensive, durable materials, or less expensive and less durable - the choice of materials depends on what perspective the house is being built for, how soon you want to settle in it. Simply put, if you want to build a beautiful, comfortable house for yourself and your family and not fly out of the pipe, you need to approach this matter seriously and carefully.
Based on the foregoing, we can formulate a collective image of a solid, economical house, which, in our opinion, will be affordable for a fairly wide range of families who want to live in their own house.
In terms of area, such a house corresponds to a decent city apartment - 150 m2. On the ground floor: living room - 28 m2, kitchen - 12 m2, entrance hall, bathroom, pantry, boiler room, on the attic floor: 3 bedrooms - 20, 16 and 11 m2, as well as two bathrooms. All this is, as it were, a residential module, to which it will then be possible to attach a garage, a terrace, a veranda, and additional living quarters. The cost of such a residential building will be lower than the cost of a similar city apartment and at the same time have the opportunity for development. In plan, the house is a square with sides of 9.4 m. This feature of the project makes it possible to save a little on wall material and on heating, since the square has a smaller perimeter than a rectangle of the same area.
The walls are made of aerated concrete. The absence of a middle load-bearing wall saves on the foundation for this wall and on the wall itself, and also makes it easier to carry out redevelopment if necessary. Wall decoration outside - siding and decorative plaster. Roof - shingles. This project can be suitable for a second guest house on your site and for a typical development of the village.
Do-it-yourself foam house model
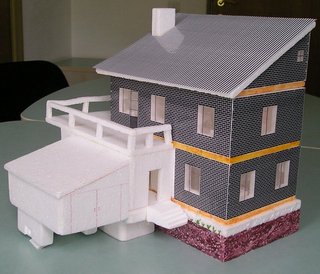
How it all began
I wanted to visualize what the future house will look like. For this reason, this general drawing was born.

The result was not at all impressive, moreover, I really wanted to examine the house from all sides. That's when the search for ideas for creating a layout began. I remember in the old childhood days I made soldiers out of cardboard and paper, but when I tried to build at least part of the foundation from these materials, it became clear that it was much easier to build a real house than its model. Without hesitation, I bought polystyrene foam, which is used to glue the ceiling to give it a divine look. (Unfortunately, it was not possible to find a polystyrene that was even on both sides, so I took it, which is more even - without any flowers, petals, but with a texture like “loose plaster”.) This material came in handy. Firstly, it has a thickness of 0.5 cm, which is almost proportional to the thickness of a real wall, and secondly, the foam is very easy and fast to process - it can be cut into even pieces with an ordinary knife. I used PVA as glue.
Now let's start
To make a model of a house, you need to know exactly what you are doing. That is, you need to have a drawing of the house, a sketch or plan with basic dimensions.

A rough sketch of the architect was enough for me, which, by a lucky chance, turned out to be at hand. Having estimated the dimensions, I decided to take the scale of 1 m = 2 cm as a proportion. This proportion is easy to calculate, and the dimensions of the layout are good - the layout of the house is not large and not small, the thickness of the walls is almost proportional. And then a lot of routine work - marking the foam, cutting out the foundation, walls, roof, gluing the pieces together.
The front door to the house is visible on a white background. Ask why there are no steps?! How to get up to the house? There will be stairs! And there will be a corridor, just in the place where the wall is white. See below. I needed a model of the house that was necessarily collapsible so that you could see the internal arrangement of rooms, stairs and furniture. For this reason, I did not glue the second floor, but made it removable. This is what the interior of the house looks like.
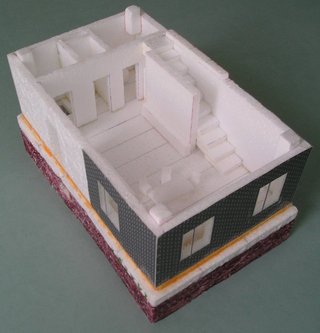
To be honest, I was too lazy to make a completely proportional staircase - one step of the layout is equal to two real ones. As they say, next time :-). But everything else is correct - slope, size, width. The staircase is closed by a load-bearing brick wall, which is needed in order for the floor slabs of the second floor to rest on it.
The layout can be used to visually assess the propagation of light during daylight hours. You just need to know in which direction to the north the house will stand.

On the layout of the first floor, you can see how the stairs go to the second floor. Seen down to the basement. Radiators are marked with yellow stripes under the windows. Bath and toilet are visible to the "naked eye". The heating boiler is marked in green. The ventilation niche goes behind the toilet. And also see the descent into the basement. In principle, it would be more logical to place the descent to the basement under the stairs, but these are questions for the architects. Entrance door to the house near the sofa. Entering the house, on the one hand there is a bathroom, a toilet and a closet. On the other side is the kitchen. The room on the ground floor is quite spacious, so any redevelopment is possible - you can separate, for example, the kitchen with a partition, or hide the entrances to the bathroom and toilet from view. The sofa can be placed by the stairs, and the kitchen can be separated by a bar counter. The option without partitions or with sliding partitions is preferable if you are going to host parties and crowded gatherings - then you need a lot of space.
Floor slabs are marked in orange. Naturally, they will be hidden under the brickwork, but for the sake of clarity of the layout, I brought them out.
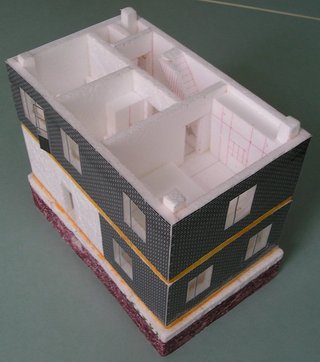
On the second floor there is one large bedroom and two small children's rooms. As well as a shower and toilet. Also visible are the stairs to the attic and the exit to the balcony in one of the children's rooms.

In this picture, two children's rooms are better seen, as well as the entrances to the rooms. There are heating radiators under the windows. Unfortunately, the picture does not show the stairs leading from the first floor to the second - it is closed by a staircase to the attic. You need to see the layout of the house live!
Now we make the roof of the house and place it above the second floor.
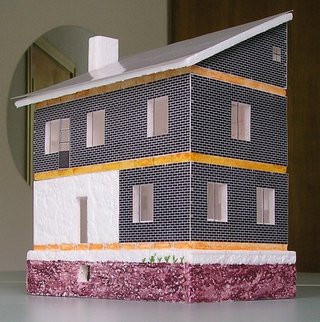
I made the roof of the house single-sided, since the house will border on the neighbors with a blank wall, although a double-sided one would look much more beautiful.
The layout of the house is almost ready! The only thing left is to build a corridor. The corridor can be built not immediately, but as finances for construction appear

The corridor can be made of any size - it all depends on your taste. The roof of the corridor is also a balcony where you can hang clothes to dry or install a hammock. If desired, the balcony can be glazed or simply install a plastic transparent rain visor.
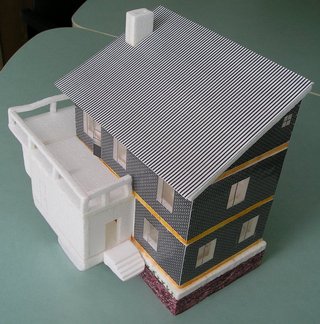
Part of the balcony goes behind a blank wall. Tired parents can hide there and smoke so that the children do not see.

The final touch is the garage. Attached as funds become available. From the garage, you can immediately enter the corridor through the inner door. If someone finds the balcony too small, then it can be made above the roof of the garage. The garage and the corridor are built on a light foundation, since the weight of these buildings is negligible.
What did I need
From the materials you need the following: polystyrene 0.5 cm thick, PVA glue, paper, adhesive tape. Tools: a blade or sharp knife for cutting foam, scissors, a pen for marking foam, pencils, a ruler.
I made the “exterior finish” in the form of a brick on a printer, followed by “lamination” - I pasted adhesive tape. This is not a thankful thing, because just a little, the adhesive tape sticks crookedly and the workpiece needs to be thrown away. In the future, I want to try on a real laminate. Without lamination, it will not be possible to stick the texture on the house, as the paper swells from the glue. But if you still manage to stick it, then the paper will wipe off very quickly and the layout of the house will lose its beautiful shiny appearance.
I have a black brick - there was no color printer at hand. Now this is not a problem and you can make a "finish" for any material. And special fans can stick wallpaper and make parquet. But I am a pass. This is a thankless job.
That, in fact, is all!
How to make a paper house layout with your own hands?
How to make an architectural model out of paper with your own hands.
This lesson shows in sufficient detail how you can make an architectural model from simple materials at home. We decided to show you how to work with paper and how to transform it into three-dimensional forms using the example of an architectural layout of a business center with many complex elements and cuts.
Materials: thick tinted paper, self-adhesive film, double-sided tape, PVA glue, children's colored paper, brush handle (for the spire).
Instruments: Scissors, metal rulers of different sizes, a paper knife, compasses and a few tools that I forgot about :-).
Step by step building layout.
Part 01. Sequential execution of the structural elements of the walls.
1. Ground floor.
In order to show the thickness of the wall up to the window frame, it is necessary to install ribs.
The glass of the outer part of the window is simulated using auto-tinting. Toning is glued on double-sided tape, a little larger.
2. First floor.
The first and subsequent floors of all walls of the building are carried out in a similar way, like the basement.
All decorative elements are made by gluing parts end-to-end, which reduces the error in size.
3. Floors from the second to the fourth.
4. Fifth floor.
Part 02. Connection of structural elements of walls in a block.
1. Wall number 1.
2. Wall number 2.
3. Wall number 3.
This wall is a little more difficult than the previous ones.
4. Wall number 4.
Part 0 3. Sequential execution of the frontal cuts of the layout.
1. Section No. 1.
Because the layout of the building is partially executed, it is necessary to make cuts. One of them will be worked out in detail, and the other will indicate only the main structural elements at the cut site.
2. Section No. 2.
In contrast to the drawing, the internal elements of the structure (windows, doors, walls and partitions hidden from the cut area) are also visible on the layout section, which makes it more accessible for perception.
Actually, for simplicity, gray color indicates what falls into the cut area in the drawing.
Part 04. Connection of frontal cuts with the walls of the building.
1. Section No. 2 with walls No. 1 and No. 2.
2. Section No. 1 with walls No. 3 and No. 4.
Part 05. Sequential execution of collapsible layout elements.
1. Dynamic building block No. 1.
A dynamic structural block is a moving part of the layout, which is essentially a complex section.
2. Dynamic structural block No. 2.
Both dynamic elements are fixed in the layout by means of magnets.
Part 06. Installing layout blocks on a stand.
The stand is made of plywood.
Part 07. Phased execution of the central entrance.
Part 08. Phased execution of the facade part of the building model (tower).
Part 09. Sequential execution of a horizontal section (fifth floor).
Part 10 Sequential execution of a dynamic building block (roof).
Part 11 General view of the layout with the exterior.
How to make a model of a plywood house with your own hands
Many people, seeing beautiful and neat models of buildings made by architects, dream of learning how to create the same small copies of beautiful houses. Learning how to make real complex models is not easy, but it is in your power and ability to assemble a decorative model of a house on a scale of 1:50, having previously drawn on paper the contours of the details and facades of the house, as well as the roof and frame.
Instruction
1To create a layout, you will need plywood 6-8 mm thick, as well as materials for facades, partitions and roofs. Make a house frame from plywood and place it on a flat surface.
2 Separately prepare the facades cut out according to the drawings and cut door and window openings into them. Then sand the cuts and joints.
3 Make the foundation of the house from wide slats by gluing them to the finished box of the house, and also separately make a porch with stairs from solid wood bars.
4 From thin plywood, cut out the doors and window casings separately, sand them with sandpaper, glue them along the contour with thin slats and glue them tightly to the frame of the house in the openings. Instead of glass, insert plexiglass of millimeter thickness into the windows with plastic or wood frames glued on the outside.
5 Take a separate sheet of plywood and saw out a gable roof for the house, and then roofs for individual buildings if you want to complement the house with a yard. Solder downspouts and gutters from thin tin, and then fix them to the roof slopes. Chimneys are made from small pieces of wood.
6After the small details are ready, start assembling the house. First, assemble the box of the house, then place the roof on it, and then fix the porches at the outer doors.
7Cut individual beautiful posts or slats with which you will close the joints of plywood sheets to make the house look more beautiful. Sand the surface of the building, cover it with stain and varnish or paint it with paint.
8Start building layouts with simple models, such as small huts or barns. Then you can improve your skills and move on to building more complex layouts.
For staining sawdust, ultramarine blue is taken, diluted in hot water, where wood powder is immersed, stained before the eyes to the degree of the desired color. Removed from the paint, it is wrung out and placed in a thin layer on a baking sheet to dry.
Wood powder can be used to cover models instead of paint, but for this it is harvested in a wide variety of colors, dried and folded into jars. The best dye for this is aniline, sold in bags for dyeing cotton fabrics. The powder is applied in a thin layer to hot carpentry glue and pressed down. After drying, its excess is poured into a jar and stored for the next work.
The snow surface is made as follows: the desired part is smeared with glue and sprinkled with borax with an admixture of boric acid to give shine. You can also make a surface of cotton wool (hygroscopic), which spreads evenly and thinly over white paper. Cotton wool is sprinkled on top with boric acid.
When the glued parts dry, they are covered with a putty made from chalk (tooth powder) and glue. Depending on the color that the soil should have, various paints are added to the chalk. Putty is applied in a thin layer, and in those places where required, it takes the form of the necessary bulges, relief, ledges, banks, etc.

Putty coating aims to fasten the layout, smooth out irregularities or create them, make it dense and monolithic. Pebbles, roots imitating one or another object can be interspersed in the putty when it is applied.
The background of the layout can be painted with brown paint or sprinkled with wood powder over glue, or pasted over with dark paper. The whole layout after finishing, while it is damp, sprinkled with diamond mounds, from which it comes to life, especially in the evening light.
The inscriptions are made on drawing paper with ink and placed under glass, like labels, and the layout is ready.
Let's turn to the manufacture of some details of the layouts.
The forest and bushes conditionally depict green deciduous mosses. They are going ahead. You need to choose the greenest, brightest and not very juicy, dry them in a draft, but not in the sun. Very dense bouquets are tied from mosses, which are inserted into the holes made in the layout with an awl.

Grass layout
The grassy surface on the models can also be depicted with moss. The surface is pasted over with matte green paper or painted with green paint. The green background is smeared with glue and sprinkled with finely trimmed moss. You can replace the moss with green-colored small sawdust. If it is necessary to present a part of the vegetation in its natural form, then one has to take real plants or parts of them dried in the sand.
Surface irregularities, pits, small elevations, etc. do this: moisten a lump of thin paper in liquid carpentry glue of the desired size and stick it on the surface of the stand. Wet another piece of colored paper in glue. When it becomes soft, put it on a lump and press the edges around the lump to the surface of the stand. Coat the irregularities made with glue and sprinkle with sheared moss or earth.
Simulation of the earth's surface. The easiest way is to arrange a flat surface of the soil. It is enough to grease a piece of cardboard and sprinkle it with earth or sand. The cardboard must be painted in the color that the prepared soil has.

"Earth" is done like this. Take thin cardboard and black matte paper. Cut out a piece of cardboard of the desired size, paste over it with matte black paper, paste over the back of the cardboard immediately with paper, otherwise it will warp. In the absence of paper, cardboard can be successfully painted with soot on glue. Apply carpenter's glue to the black side of the cardboard, cover it with earth in an even layer, let it dry for half an hour and only then shake off excess earth.
Dry earth is not black, but gray, and therefore, in order for it to remain black, it must be colored. This is done before the sticker. Take black mineral paint, dilute it on a saucer and pour earth into it. Dry the soil soaked with paint in the sun or in an oven.
The sandy surface is made with exactly the same methods, it is only necessary to take yellow instead of black paper, best of all ordinary wrapping paper. Occasionally it is necessary to paint the background with watercolors if the prepared “breed” has a shade of a different color.
For sandy landscapes, artificial sand is prepared. It is made up of 20% natural sand and 80% ocher. The mixture is thoroughly mixed.
From natural pebbles, it is best to use pebbles extracted from a stream, as well as fine gravel. In order to attach pebbles, sticks or any objects to the cardboard, they are smeared with very thick wood glue and lowered to their intended places. When cooking lei, a little sugar is added for strength.
Creek layout
The brook is decorated with paints, and its bed is covered with a specially applied blue putty with a blue embankment powder, which emits a shine, and the shore is covered with earth and pebbles.
Animals to enliven the landscape can be sawn out of plywood, painted and attached to the appropriate places on the layout. Also foreground plants. Stones must be prepared from paper pulp, and then painted. You can also use the corresponding drawings for this purpose by cutting and pasting them on cardboard, and then attaching them to the layout.

High slopes and cliffs. A box of the desired size is bent and glued from cardboard. Bottom up, it is glued to a piece of cardboard. This will be the skeleton of the mountain. On all or some sides, you can stick a sheet of thick paper so that with one edge it is attached to the edge of the bottom of the box, and with the other to the cardboard, you get a slope of the desired steepness. The paper is taken in the appropriate color, depending on whether it is an earthen, sandy or grassy slope. When the model is completed, this slope is smeared with glue and sprinkled with sand, earth or sheared moss.

For a break, thin gray wrapping paper is taken. Cut off the desired piece, soak it in liquid wood glue and apply in the same way as the “slope”, but, of course, lower it much steeper. The glue will dry soon, and you can easily collect the paper into any folds and folds. When the glue dries and the paper hardens, coat again with glue and, holding the "cliff" up, sprinkle with sand. Then the assemblies and folds will resemble potholes washed with water on the slope of a ravine. You can sprinkle the "cliff" not only with sand. Having collected multi-colored clays, pour them on the glue in horizontal stripes and visualize the layering of the earth's crust.
Such models of mountains, cliffs, coasts and even ravines can be easily made from nature if you have drawings and maps of the area.
If you are assembling a rock collection from a cliff, then an accurate, proportionate model of the cliff, made (sprinkled with glue) from authentic, locally sourced materials, will greatly enhance the value of your collection.
The construction of models of dwellings or villages develops in students resourcefulness and creative initiative. And the made such models will serve as valuable aids for the geographical office. You can use pictures, drawings, etc., as well as descriptions in magazines and books for guidance. Let's take a description of one layout as an example.

A man sits by a fire in front of the entrance to the cave. All the inhabitants of the cave went hunting. The rest must protect the dwelling and maintain the "eternal fire".

A well-executed model of a primitive man's cave will help you imagine the life of our ancient ancestors. The size of the mock-up is 40 X 40 cm. The height of the back wall is 40 cm. Model a model of a mountain with a cave from clay. Paste the model with layers of paper. Pre-tear the paper into pieces 150 × 150 mm. You will get a cast of the mountain from papier-mâché. Sew the mountain to the underlay and to the back wall of the layout.
Cover the area around the mountain with earth and green sawdust. Color the mountain so that it looks like it is made of stone. Animal skins are well obtained from pieces of an old shaggy towel. Color the "skins" and glue them inside the cave. There are stone tools in the cave. Model the stone parts of the ax and spear from plasticine or other material. Make a fire out of tissue paper dyed red and yellow. For the figure of a primitive man, make a frame of soft thin wire, then apply plasticine to it. Dress the person in a piece of animal skin.

Thin plywood or cardboard.
Painting knife.
Awl.
Pencil.
Sandpaper.
Paper glue or PVA.
Ruler.
Organic glass.
Main job
If wood is used as a building material, then the cut edges must be sanded with fine sandpaper.
DIY paper layout, how to make a layout at home
Using glue, you need to fix all parts of the facade together.
The foundation of the house is best made of wooden slats for stability. Organic glass is suitable as windows. After the house is glued, it needs to be covered with paint, you can use acrylic.
Once it was necessary to make a model of a very complex and beautiful house.
Do-it-yourself paper house model: we disassemble the assembly steps step by step
On a scale of 1:50.


This work, amazing in its thoroughness and accuracy, was carried out by our ... lawyer Victor! Since childhood, he loved to collect models, he is still fond of it, but he has not yet solved such a complex and huge task with several thousand components ...


All the same, but closer.


How to make a do-it-yourself building layout
In order to make buildings out of paper yourself, you will need some attention and patience. Paper for work will need thick, newsprint or packaging will not work.
The first thing to do is to order a layout of the future building. To follow it, in the future to glue the house. The project scale should be 1:100. With the help of a small copy of the building, it will be possible to calculate how much paper will go to build a house.
Tool you will need:
Thin plywood or cardboard.
Painting knife.
Awl.
Pencil.
Sandpaper.
Paper glue or PVA.
Ruler.
Organic glass.
Main job
First you need to make a sketch of the future building. For this, landscape paper is suitable. The drawing must be made in three forms: face, profile and section. After the drawing has been made, you need to transfer all parts of the house from paper to plywood or cardboard. To do this, you need a sharp knife, with which all parts of the sketch will be cut out.
If wood is used as a building material, then the cut edges must be sanded with fine sandpaper. Using glue, you need to fix all parts of the facade together.
The foundation of the house is best made of wooden slats for stability.
How to make a house layout out of paper
Organic glass is suitable as windows. After the house is glued, it needs to be covered with paint, you can use acrylic.
You can create a relief facade and roof of a building using a cutter. Models for buildings, most often designed for presentations. They are very convenient and economical to make, all you need is patience and desire.
- How to create a labyrinth layout yourself It is very interesting to watch a child who drives a ball through a maze or tries to take some fairy-tale character out of it. Thus, the baby develops motor skills of hands, thinking, and
- DIY scrapbooking box Scrapbooking is a kind of creativity that allows you to make a stylish little thing with a small amount of materials and with the help of a simple technique. It can be a postcard, an album or a box. Exactly
- How to arrange LED lighting for facades yourself As a rule, facade lighting includes lighting the outside of buildings, while using street lamps, spotlights that can give light of various directions, brightness and, of course,
- How to make a foundation for a bath with your own hands Absolutely any building structure requires a reliable foundation. The service life of the building, its waterproofing and strength depend on this. The construction of a bath is no exception and
- What is a Foundation Examination? Construction work or major repairs of the building must begin with a check of its condition. Particular attention in this regard is paid to the foundation, because the structural strength depends on its strength.
3D house design software
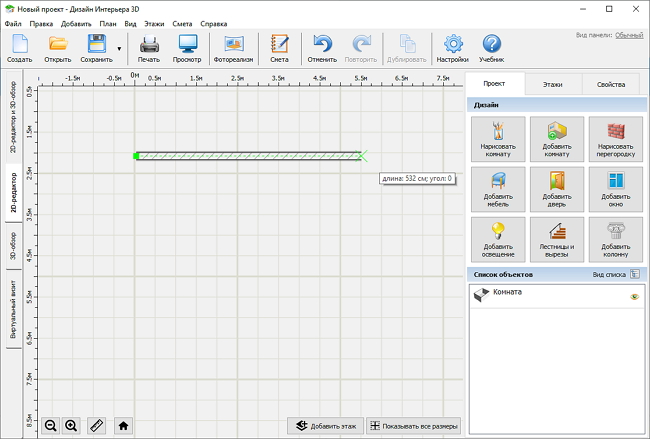
Are you planning a move? The program for designing houses "Interior Design 3D" will help save time, effort and money. Where to place the living room, and where - the nursery, how to arrange the furniture in the room and how to equip the kitchen - the editor will solve any issue. Read the article and find out what is special about the program and what features will allow you to create a professional three-dimensional model of a house in a couple of minutes.
Program "Interior Design 3D"
With the help of the "Interior Design" program, you can work out in detail the appearance of each square meter in your home. The project of even a multi-storey building will not cause difficulties - thanks to pop-up hints, you will definitely not get confused in the sequence of actions.

Proper planning of a private house is not a problem if you have special software.
paper architecture
The algorithm of work is simple - create a layout of the room, mark the location of doors and windows, select materials for finishing and arrange the furniture to your liking. For convenience, the working field is divided into a two-dimensional diagram and a 3D model, which reflects the changes made in real time. You can freely move all objects on the layout, zooming in and out of the viewpoint. You indicate the size of both the room itself and the fittings with an accuracy of up to a millimeter, which will allow you to avoid errors in the calculations.
The 3D design program will help not only with the design of the home, but also with the calculation of financial costs. You will only need to enter the price of a particular product - and the software will automatically determine the amount of required materials and their total cost depending on the area of the room.
Watch a video tutorial on how to use the home design software:
Program Benefits
"Interior Design 3D" is a simple home design software that is suitable for advanced users and beginners alike. The software provides the following benefits:
- 1. High speed. You can create a house plan in just 5 minutes!
- 2. The editor's interface is intuitive and is made entirely in Russian.
- 3. Choose how to view the building: it can be shown as a 2D plan or a 3D model.
- 4. A wide range of tools: the program has catalogs of doors and windows, room blanks, a collection of furniture, a rich selection of finishing materials.
- 5. Export the result in a convenient form: print, save to a PC, create a working draft to continue editing in the future.
- 6. You can download the free version of the editor and draw a house right now!
Saving the design result
In the "Interior Design 3D" program, you can easily design frame houses and any others in a short period of time. Additionally, the software will provide you with a detailed estimate, which will come in handy before construction.
You can print the finished visualization or save it to your PC in graphic or PDF format. You can also create a project with a DIP extension. In this case, you can later at any time re-open it in the program and make any corrections.
Ready templates
Creating a layout takes only a few minutes - with the help of shapes and segments, you draw rooms and interior partitions on the grid, increasing or decreasing the area of \u200b\u200bthe site if necessary. If your home has a typical layout, whether it's "stalinka", "brezhnevka" or "khrushchev", the creation of the project will be even faster. The program offers a collection of ready-made apartment plans that you can apply in just one click. The downloaded template will no longer require the drawing of rooms, you will only have to decorate the rooms and furnish them with furniture.

However, if the apartment and house are slightly different from typical buildings, to simplify the task, you can take one of the ready-made schemes as a basis and simply adjust the size and shape of the rooms.
If you have a house layout drawing on hand, scan it and upload the resulting image to the editor. Next, you just need to circle each room - and the layout is ready!
Stylish design for every taste and budget
The choice of interior items for the future home should be approached with intelligence and practicality. Will the furniture look harmonious or, conversely, “clutter up” the space, will wallpaper with an active print fit, or is it better to limit yourself to discreet monochromatic models. In these matters, the house design program is indispensable.
Many turn to the services of professionals, investing serious amounts of money, but often the result does not meet expectations at all. By downloading "Interior Design 3D", you will have the opportunity to equip a virtual apartment with your own hands, exactly following your own vision.
At your disposal is a convenient catalog of furniture and finishing materials. For convenience, the objects are sorted into categories - a set of basic pieces of furniture has been pre-assembled for each type of room. Bed, wardrobe, dressing table - in the bedroom, table, armchair, sofa - in the living room, and refrigerator, stove and dining table - in the kitchen. You just need to go to the appropriate tab, select the desired element and place it on the diagram.

For each piece of furniture you can choose the material and color. Determine the type of wood for cabinets and tables, the type of upholstery for sofas, armchairs and chairs. The customization is so detailed that you decide how even the smallest element, like a doorknob, will look.
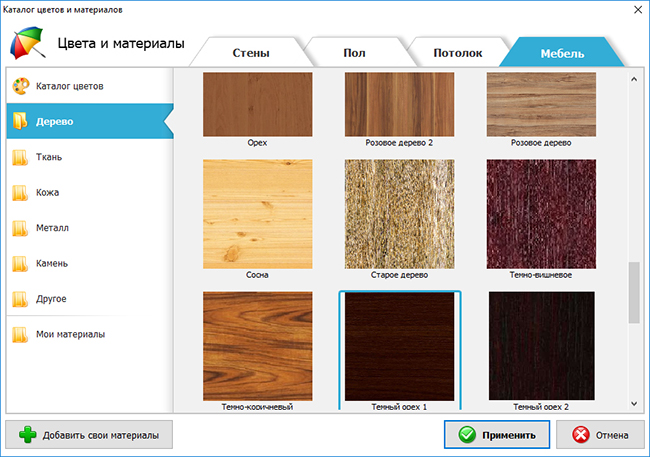
The possibilities of the program do not end with the design of furniture. You can also design walls, floors and ceilings according to your taste and budget. Each room has its own settings. For the walls of the bedroom and living room, you can choose stylish wallpaper from the catalog, for the kitchen and bathroom - tiles or bricks.

Convenient document saving and printing
By default, the program exports all data to a project, which you can later reopen and edit. You can save the resulting cottage interior design as a picture or print it out if you have a printer. On the page, you can simultaneously place a two-dimensional layout and a 3D model, or print each scene separately. The display of dimensions on the diagrams, the type and size of paper, the position of the scene on the sheet, you adjust manually.

As you can see, with a convenient program, 3D house design is no longer difficult. Download "Interior Design 3D" and save on expensive professional services.
home comfort
Do-it-yourself house model: scheme, manufacturing. How to make a house layout with your own hands?
The layout of the house and its architectural model - how do they differ? The first can be made from available materials: paper, cardboard or wood. It does not have to repeat the forms of a particular structure. The architecture of the building can be anything, as long as you and others like the result of your creativity.
An architectural model is an exact copy of a building with the repetition of all the main and secondary features. It is built with expensive materials and can take months of hard work to complete. Therefore, we propose to start building a model of a house from improvised materials. Don't know how? In this article you will find recommendations and detailed instructions on how to make a DIY house layout from paper, cardboard and wood.

Miniature paper house
The paper house layout, the diagram of which is attached in this article, is a simple construction, although the work on its creation can be an interesting creative process that requires attention and perseverance. You will need thick paper, newsprint or packaging will not work.
It is better to take a standard A4 sheet measuring 29x21 cm. If the contours of your future home do not fit into the size of the sheet, you can glue two together using the "butt-to-butt" method with an overlay of a strip 2 centimeters wide. After the workpiece of the desired size is obtained, it is necessary to make markings. We propose to build a model of a house made of paper, which will be rectangular in plan, two-story, with three doors, windows and a gable roof.
Drawing
First of all, we recommend copying our diagram, which you see in the photo, in order to indicate the dimensions of the future building. Then you need to decide what the layout will have the length and width. Write these numbers on the diagram. Next, determine the height of the first and second floors, as well as the roof. Now you can transfer the resulting drawing to the base sheet using a ruler and a pencil, measuring all the parameters of the future home. The next step is to draw windows and doors. Their location can be changed as you like, relying on your taste. A paper house model allows you to make structural changes at any stage of construction.
Related videos
Layout assembly
The next step is to draw all the "wings" that you see in the diagram. They will act as mounting brackets when assembling the layout, support the roof and connect the walls. This is followed by the most critical part of the work, requiring accuracy and attention. Go through all the lines of the drawing with a ballpoint pen along the ruler and with pressure. This is done so that you can bend the paper in the right place.
A paper house layout requires precise fold lines. After all the boundaries are drawn, you can cut out windows and doors with scissors, as well as "wings". The next crucial moment: it is necessary to correctly bend the entire structure and glue it in the right places. For this we recommend PVA glue. When the layout is dry, you can start coloring.
Cardboard house layout
Such buildings are made not only from paper. A do-it-yourself house model can also be made from cardboard, a material strong enough to make the building look “real”, with opening doors, windows, floors and ceilings, interior decoration, and even inhabitants sitting inside on miniature sofas and chairs.
It all depends on how much the "builder" is interested in the end result. He can build any layout of the house with his own hands. However, its implementation is a complex creative process that requires accuracy and perseverance. You will need the usual tool: scissors, a clerical retractable knife, an awl, a ruler (preferably metal) and PVA glue.
Corrugation as the main material
It is better to take two types of cardboard for making a layout: smooth and corrugated three-layer. The second will go to the load-bearing walls, floor and ceiling, and the first - to make a corner for connecting individual parts of the structure, small details of the exterior and interior design. A cardboard house layout needs a base. This can be a plate glued from two layers of corrugation or cut from plywood. The base or sole of the layout is drawn according to the size of the future home and can be filled with decorative miniature flower beds, garden vases, and benches.
Next, you need to draw on the basis of the layout of the walls, porch and outbuildings. After that, you can begin to manufacture the main details: walls with carved door and window openings, the ceiling and floor of the second floor (if the house is two-story). To assemble the structure, it is necessary to prepare corners from thin smooth cardboard. The longer the corner, the stronger the connection. Optimally, its length should be at least 70% of the length of the connection. The width of the cardboard corner is 1.5-2.0 cm.
wooden house model
A do-it-yourself model of a house made of wood can only be made with the participation of adults, since the work is related to woodworking machines for home use. They are quite dangerous if there are no working skills. Hand tools for woodworking also require caution when working with them. The blades of knives, planers, nail files and engravers have sharply sharpened cutting edges.
blanks
Do-it-yourself models of wooden houses require accuracy in the process of work. Their creation is an exciting creative activity, during which the master can show ingenuity and ingenuity. First you need to make a drawing of the future house. Then make the base for the layout. After that, you can start creating details.
Walls and floors are best made from thin boards 1.5-2.0 centimeters wide and 5.0-7.0 mm thick. The workpieces are located on a flat surface close to each other and are fastened with the same rails, which are superimposed perpendicularly from above and pressed by some kind of load. Previously, all parts are coated with PVA glue. After the manufactured block dries, it can be customized according to the drawing and joined with other parts.
Finishing
The assembled layout must be sanded and sanded. This is done manually with a 25-N glass cloth on a fabric basis. Then the surfaces are sanded clean with 8-H sandpaper until completely smooth. After processing, the layout can be painted, doors installed, windows inserted and finishing work done.
A do-it-yourself model of a house, as a rule, has a removable roof. This is necessary in order to have free access to the interior, since in a miniature building you will have to install toy furniture and other interior items. The surface of the walls is pasted over with "wallpaper", that is, with painted strips of paper. The floor must be painted brown or covered with linoleum - it can be made from oilcloth.
home comfort
DIY wooden beds: diagrams, drawings. How to make a wooden bed with your own hands
In furniture stores, the range of furniture presented is huge. However, its cost is quite high, a bed made of high-quality wood is especially expensive. In some cases, it is not necessary to spend large ...
home comfort
Do-it-yourself wooden doors: diagrams, drawings. How to make a wooden door with your own hands
Often people cannot choose the right door from the available range. Some buy what they have, while others decide to do everything themselves. To make wooden doors with your own hands, you will need some special ...
home comfort
Homemade motorcycle: tips for making. How to make a motorcycle with your own hands?
Many people very often think about how great it would be to at least try to create their own motorcycle with their own hands, without resorting to the services of salons, craftsmen, etc. However, often such a desire remains ...
home and family
How to make a house for a doll with your own hands? Big house with furniture for Barbie dolls
A dollhouse is the dream of most little girls. At such a young age, every baby visualizes real life and tries in every possible way to make her dreams come true. Therefore, it is important for parents to know how to…
home comfort
Do-it-yourself power bank: scheme. How to make a power bank with your own hands?
Most modern multifunctional gadgets have one annoying drawback - they run out quickly, especially when multitasking. Therefore, many smartphone owners have already acquired a "wand-rescued ...
home comfort
How to make liquid plastic with your own hands? Manufacturing technology and scope of the product
Plastic is a universal material. It has found wide application in the manufacture of various components and parts in both industrial and household appliances. Products from it are used in the design of interiors of residential …
home comfort
Do-it-yourself stun gun: diagram, assembly and operation instructions. How to make a stun gun at home
Ensuring human safety plays an important role, it is for this reason that many choose various means of protection. Pneumatic or, for example, firearms are not always available, besides, they are not safe ...
home comfort
How to make a canvas stretcher with your own hands? Construction technology
The subframe is a structure assembled from wooden slats or planks. It can be of various sizes and purposes. Making a canvas stretcher with your own hands is not difficult. For this, well…
home comfort
How to make a flow-through water heater with your own hands: materials, tools, diagram
The main difference between instantaneous water heaters and boilers lies in the fact that they heat the flow of water passing through them.
DIY paper house layout: two simple manufacturing methods with detailed instructions
Therefore, the units have a higher power. Do-it-yourself production…
home comfort
How to make a magnetostrictive emitter with your own hands: description, diagram and recommendations
To generate ultrasound, special emitters of a magnetostrictive type are used. The main parameters of devices include resistance and conductivity. The allowable frequency value is also taken into account. By design...
Once it was necessary to make a model of a very complex and beautiful house. On a scale of 1:50.
And so, what if modelers from the UAE accidentally arrive in Chelyabinsk (whose work was admired by our customer). and see our work, so that they immediately die of envy.
We looked at the sketch of the future handsome house, and realized that we would make sure that our colleagues from the Emirates did not return home ...
And we suddenly made an ambitious decision - to achieve such a degree of detail so as not to make in a real layout only those elements that, if the house was reduced by 50 times, would look less than one millimeter.
ONE MILLIMETER - you heard right! Everything that is 2 mm in size and more - we decided to do it.
So… Meet the layout of the house Fenix De LUX!
First, it was a month of work for our engineer Kostya, building a building in AutoCAD, breaking down the elements of the house into more than 4000 elements, translating files into a language understandable to our laser and milling cutter, and then ...
… and then Beauty began to be born. That's right - with a capital "K".
By the way, only the bindings here are made with film, everything else is plastic. Coloring - airbrush.
This work, amazing in its thoroughness and accuracy, was carried out by our ... lawyer Victor!
Do-it-yourself cardboard house layout
Since childhood, he loved to collect models, he is still fond of it, but he has not yet solved such a complex and huge task with several thousand components ...
Pay attention - all the elements are of different colors, they were all painted separately by hand, only the wall of the house is a print of the “bricks” pattern.
Cornices (!) Began to appear on the balconies.
We put together two walls, we admire. The imagination completes everything that should appear in two months ...
The balconies have railings, and the windows are getting lattices (there are 300 of them in the house) made of plastic!
Slowly, the facades of the house are taking shape.
The house acquires a supporting part - a stillabat, and a two-story penthouse slowly began to emerge.
In the meantime, stillabate wall blanks are being made with might and main.
The walls acquire their brothers - and the house becomes voluminous. The degree of detailing silences the most chatty guests of our assembly area, looking at the masterpiece.
All the same, but closer.
And here is the stillabate, located on a site that embodies the boundaries of the red line of the building.
Notice the balustrade on the base, the columns in the penthouse.
Another angle, it is impossible to stop when photographing this man-made miracle!
Here is the final assembly step.
There is a bicycle near the sandbox, there are benches, and all the lights really shine!
We haven't seen the penthouse yet.
I wonder who will live in it? After all, this two-story penthouse is only for two owners (as in Soviet-era houses - to the left and right of the house along the porch :))!
Please note that the residents of the first floors also receive at their disposal a part of the stillabat - the plots are delimited by fences.
It is clear that it is impossible to resist the temptation to touch the beauty - we put protective glasses around the perimeter of our creation. Yes, please note that the foundation on which the house is built has an uneven landscape in the context - everything is as it will be in life.
The windows of several apartments, overlooking all four sides, a penthouse and a playground near the house are lit in the house.
And we say goodbye to the result of our painstaking three-month work.
Well, what can I say ... Now our colleagues from the UAE are better off not coming to Chelyabinsk!
We did it with the little one!
Since our family has a deep-rooted tradition of remembering everything at the last moment, this case was no exception. My son Vadik told me about the assignment exactly one day before the deadline. There was nowhere to go - I had to get to work!
Tools and materials
For the model of the city, no supernatural materials are required, and a normal student should have everything available:
- Ruler
- Color paper + color cardboard
- Colour pencils
- Scissors
- Brushes + paints (we used gouache)
- Glue
- A4 paper
How to make a layout of a city
We thought a little and decided that since time was running out, we would make a road + a couple of buildings + some kind of transport. Decided to do it.

They took a piece of thick cardboard, cut out a rectangle 40 by 30 cm from it. Then, on one side, they glued it with A4 office paper.

Carefully cutting off the edges, we got the base for the layout, which is ready for painting.

Draw an impromptu road


The next step was the building of high-rise buildings. I don’t give explicit dimensions, since everything was done by eye ...

Before gluing the building I decorated it

Here's what happened after gluing

The back of the building was cut to size, then glued and also painted.
Children's layout of the city
Sorry friends.
Due to the fact that time was really running out - the shooting had to be postponed. The building alone took almost 2 hours.
The next step was the bus. They did it according to the same principle as the building - glued and painted. Balconies were added to the building and an inscription was attached to the bottom - a store.
We made a stop with a sign and made several trees.
The final step was gluing all the products to the base. To keep it better in some places I had to use adhesive tape :)
And here is the result!

And further…

The layout of the city with your own hands is ready!
Thank you for watching!