Cut out a picture frame from wood. Making a photo frame from wood
A universal selection of gift ideas for every occasion and occasion. Surprise your friends and loved ones! ;)
Greetings to all gathered on the blog! Many of us love to give gifts (I think you, too). But ordinary gifts quickly get bored and you want something warmer, sincere, attractive. One of these gifts are do-it-yourself photo frames, which we will make in large quantities today.
I decided to write this post because I made my first soft photo frame a long time ago, and just recently I repeated the experiment and I was more than pleased with the result. Today I will share with you the secrets of creating it, and also show you what other types of photo frames you can make yourself using improvised materials.
How to make photo frames with your own hands: master classes
Children's photo frame "Totoro" ("Photo Frame")
Let's start with a cute children's photo frame inspired by the wonderful anime "My Neighbor Totoro" (if you haven't watched it, be sure to check it out, you won't regret it).

You will need:
- soft stretchy fabric (fleece (example - green fabric in the photo), minky fleece, velsoft, tight knitwear, etc.)
- thin fabric for the heel (cotton, fleece, etc.)
- synthetic winterizer (cloth)
- plastic base (from under equipment, sweets, etc.)
- threads, needles, scissors, accessories for decoration.
There should be enough plastic base to make three parts the size of the desired photo frame.
First of all, you will need to cut out the plastic base (round, square, triangular - whichever you like best) similarly to that shown in the photo. In this case, it's a flat donut. Cut out several details from the synthetic winterizer of the same shape. I will show a master class on the example of a circle.
You will also need 1 more piece of soft, stretchy fabric, but with large seam allowances.
Attention! Do not save fabric on allowances, they should be about 2/3 from the width of the ring so that the fabric is evenly distributed at the back.

We immediately proceed to the most important part - stitching the front. To do this, make small cuts on the inside of the circle (near the allowances) and sew the edges, pulling them with threads to each other as close as possible. (Specially chose a contrasting thread color to make it noticeable).
Advice. If you have chosen a rectangular shape, then you are unlikely to need incisions, you can try to make them without them.

This is what the ring looks like from the front. If desired, you can hide the seams at the back with a thin fabric overlay (I'll show you how to do this a little further).

Set the ring aside. Cut out two circles from thin fabric and plastic (one is not needed yet). Make fabric circles a millimeter or two larger than plastic ones.
Sew the fabric circles, leaving room to turn inside out and insert the plastic base.

After sewing, turn the fabric part inside out, insert a plastic circle there and sew the remaining hole.

We received the back of the photo frame.

If desired, sew a loop of thread or ribbon into it so that you can hang the photo frame on the wall.

This is how I camouflaged the back of the fluffy bagel. To do this, I cut out the same element from a thin fabric as from a stretch one, but now I made the seam allowance smaller and hid it inside, sewing the masking with a blind seam. Sew the back with the same seam.
Sew the back so that in the future you can insert the last circle of plastic and a photo from above.

Try to make small stitches so that they are not noticeable after stitching the parts.

Attached heel:

Front view:

Now insert the plastic circle into the photo frame.

Ready! It remains only to insert a beautiful photo and add decor)

In my case, this is a themed nigella made of wool, with felt leaves sewn on. Photo corresponding You can see the work in more detail in this section (in the "Souvenirs" tab).

Great minky fleece you can buy in this store. In our woven stores, I have not seen this, and if you want to make a thing no worse than a purchased one, then this particular material will be very useful to you (the seller is verified, I ordered from him more than once).
DIY photo frames made of cardboard and paper
The method described above is far from the easiest of the possible methods for creating a photo frame. Now you will be convinced of this
Photo frame made of... box lids
In fact, regular cardboard can also be used if it is folded into the shape of such a lid. As you can see, the creation process is simple: just take the lid and cover it with pretty scrapbooking paper.
It is convenient to fasten such frames together, as a result of which a whole set is formed. They can be glued together to get a panel. It turns out a great option for both children and adults.

Cardboard and clothespins
It is these two elements that will be needed for the next type of photo frame. Cut out a circle similar to what we did in the first master class and glue clothespins around it. We get a simple frame for several photos.

Using fabric and thread
In continuation of the first master class. Here I have included all those frames that can be knitted or sewn (in a pinch, use ideas for decoration).
knitted
A cute idea for a photo frame in the form of a flower, and it’s convenient to make such frames for several photos at once. The photo can simply be glued on the back, covering it with some dense material.

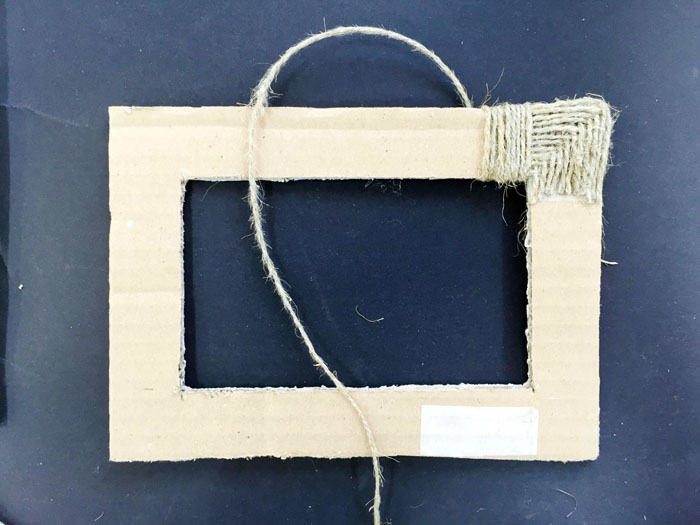
From threads
Everything is simpler here: take a frame, threads and glue and wrap the first one, fixing it along the way. Thus, it is easy to turn even very large frames into a work of art.

Shabby chic style
It is very similar in the way of creation to the very first one, with the exception of a couple of differences: here pressed cardboard is taken as the basis (I think you can also take a ready-made frame of a simple shape) and this souvenir has a leg, not a loop mount.

Felt
Take a simple wooden frame as a base and decorate it with felt flowers. By the way, about creating flowers (including from ribbons and paper), you can read other articles on my blog.

From improvised materials or how to decorate a photo frame
walnut
An interesting idea is to use a pecan (if I call it correctly) for finishing. In our area, it is quite possible to replace ordinary walnuts.

Traffic jam!
For the next two types, you will need a lot of wine bottle caps. In the first case, it is proposed to prime a simple wooden photo frame, and then cut floral patterns from corks.

But in the torus, everything is much simpler - you just need to glue the corks around the edge. A great option for a present, say, to dad on February 23.

Polymer clay and little things
Are you good at sculpting with polymer clay? Or just a lot of beads, buttons, etc. accumulated at home? Then feel free to use them - stick to a frame of a simple shape.


The same applies to stones, shells, etc.

nature style
Roughly speaking, to make this beautiful frame, you will need one long log. It is quite possible to build one at home if you dry the piece of wood properly beforehand.

Ice cream sticks
The hardest part is keeping them together. You can do this with glue, thread, or a dense base.

Gypsum castings
Find a suitable mold and plaster. Somehow, my brother experimented with a plaster panel - it turned out quite well, but it stood for a long time.

From thermobeads
I don’t know exactly their scientific name, but if you put them on a special surface and then iron them, you get a dense canvas. You can see an example of a funny frame made in this way below.

On this, dear friends, I finish this great review of various kinds of photo frames. I think you found what you were looking for, if not, write in the comments. And share with your friends not only cool handmade gifts, but also useful information using the social network buttons. Goodbye!
Sincerely, Anastasia Skoreva
It is difficult to find such a house or office where there would be no place for paintings and photographs. But just attaching a picture or a masterpiece of art to the wall will be ugly, and ridiculous. It was in order to arrange photographs and paintings that frames were invented. With their help, you can ennoble the interior and add comfort to the premises. Now there are millions of options for frames in stores, but it is not always possible to find one that suits your home. That is why we will tell you how to make a frame with your own hands, while spending a minimum of money and effort. You need to start by choosing a design for future crafts.
Deciding on a design choice
What you need to pay attention to when choosing a frame design:
- will it fit the overall interior of the room;
- the frame should be in the same color scheme with the image, and not with the walls;
- the frame should complement the image.

To achieve the desired result, you need to carefully consider the material from which the frame will be made.
Material selection

There are no special restrictions on the material. The only thing that is unchanged is the base on which the decorations will be glued. It should be dense, strong and not soak from the glue. Thick cardboard and, of course, wood are well suited for the frame. Moreover, the wooden frame itself is already a complete craft. It can be opened with varnish and it will be appropriate for any interior.You can decorate the product with any improvised means. It can be pasta, pebbles, clothespins, buttons, beads. But do not forget that the selected material should complement the picture. So, for example, shells are suitable for the seascape, and a pasta frame with the addition of cereals is perfect for the kitchen.


Let's focus on the two main materials from which frames are most often made - wood and polyurethane foam.
wood frame
Wood is a classic material used to make picture frames. Such designs are durable, suitable for almost any picture and room design.

To make a wooden frame, it is not necessary to go to the forest for wood, then process it and cut out the planks. You can go to a hardware store and buy wooden skirting boards there. They are perfect for a product like this.
What you need:
- Wooden plinth. Its length and width should correspond to the size of the picture. Therefore, be sure to measure the picture before buying a skirting board and do not forget that the frame will be longer than the canvas.
- Well sharpened knife.
- Scissors.
- Sandpaper.
- Glue for furniture. PVA will do.
- Hacksaw.
- Little nails.
- A hammer.
- Ruler. Better if it is angular.
- Cardboard or plywood.
What to do:

For a richer look, carved wooden skirting boards can be used. Their price matches the look, so for such material for the frame you will have to pay a decent amount, but at the end of the work it will be worth it.

PU foam frame

For women, "polyurethane foam" sounds threatening, but do not be afraid, because it is ordinary foam, only stronger. Ceiling plinths are made from it, which are now used to renovate apartments. Their price is low, but the variety of patterns is impressive. There is no difference in manufacturing with a wooden plinth. But do not forget that this is not a tree, so polyurethane foam should be handled with care. Any blow can lead to dents, or even completely break the entire structure.
What you need:
- Ceiling plinth.
- Hacksaw or sharp knife.
- Glue.
- Ruler.
- Plywood or cardboard (depending on the size and strength of the katrina).
We will send the material to you by e-mail
The picture looks complete and concise only in the frame design. Like it or not, but an unformed piece of canvas or just art on a sheet will not make the proper impression without a frame. The editors of the online magazine site believe that it is not necessary to buy a baguette, since making a frame for a picture with your own hands is not only interesting, but also easy!
It doesn't take long to become a frame maker
What determines product design? The surrounding interior. It’s not enough to simply wish to see a blue artsy frame in a picture in a room with a classic interior - that’s why we focus strictly on the style of the room.


The size of the canvas and the image itself will tell you which size is preferable. Agree, if the canvas is small, and the frame occupies half the wall - this indicates problems with the taste of a person.
How to make a stretcher for a picture with your own hands
The stretcher serves to stretch the canvas and is of two types: modular and deaf. Being engaged in the manufacture of picture frames, people themselves determine which stretcher is more convenient - each model has its own characteristics. A blind stretcher is a solid structure, the corners of which are fixed together with glue and wooden triangles. If the canvas sags, you have to deal with dragging it.


We will tell you how to make a blank stretcher with dimensions of 100 × 180 cm.
To do this, we will prepare two-meter wooden slats, Moment wood glue, measuring tape, sandpaper for processing the product, a hammer, a furniture stapler with staples, corners and screws.
Moment-Joiner
- We apply the rails perpendicularly to the length rail (180 cm) and measure 100 cm.
- For stability, they make a couple more vertical sticks-supports.
- We cut the rails at an angle of 45 °. We pass with sandpaper and remove chips and sawdust.
- To connect the vertical and horizontal rails, we need carpentry glue: we apply it to the saw cuts, press it and immediately fasten it with a stapler on each side. If the house has special vise, it's time to use them.
- We knock on the staples with a hammer, excluding their bulging.
On the reverse side of the structure, metal corners must be screwed to the corners.
Related article:
Photo frames on the wall: varieties, how to choose the right one, rules for making collages, selection of plots for different rooms, examples of photo placement, original ideas for compositions - read in the publication.
How to make a baguette for a picture with your own hands
Painting on canvas or paper can be framed in a beautiful wooden or polyurethane foam baguette, simple or carved - as your soul tells you. A baguette is made from a wooden or polyurethane foam profile with a jigsaw, a stapler and with a clamp. We will show you how to make a frame for a picture from a baguette.
Making your own frame for a picture of wood
Wooden picture frames look exquisite and fit into almost any style.


What do you need to work
As already mentioned, we get a finished wooden profile, fine sandpaper, prepare a jigsaw, wood glue and tape measure.

If the profile is completely finished, then no additional actions are required, although, if desired, the baguette is decorated with gilding, craquelure varnish, and patina.
Instructions for making a frame for a picture from a wooden plinth
We take measurements of the picture and correlate them on the profile. The task is to make cuts at an angle of 45 ° and perfectly clean each with sandpaper.

We apply glue to each saw cut and connect them together. This is where a clamp comes in handy, which will help make the fastening points very strong.

From the wrong side, the picture must be covered with a sheet of plywood or durable cardboard.
Making your own frame for a picture from a polyurethane ceiling plinth
If you want to see a white frame for a picture on the wall, you can make a baguette from a ceiling plinth.


What do you need to work
Ceiling plinths are now sold in every hardware store, and the choice of products is great. For the first time, we suggest trying to make the simplest option from a medium-width profile without any special decorations.
For gluing, we take Titan glue for ceiling tiles and skirting boards, we also need a clerical knife, a ruler and a protractor to measure the angle. If you want to paint over the whiteness of the plinth, we prepare the desired color of acrylic paints.
Glue Titanium

Instructions for making a frame for a picture from a polyurethane plinth
Having taken measurements horizontally and vertically, we prepare the base of the picture from thick cardboard or ceiling tiles (if the size of the canvas allows). The base either coincides with the picture, or slightly exceeds it.
Let's start creating the frame:
- We measure all the measurements taken on the baseboards and mark them with a protractor (remember that we need an angle of 45 °).
- We make cuts with a clerical knife according to the markings made, or with the help of a miter box we immediately cut off the finished elements.
- Before starting the gluing process, all sides are aligned with each other to make sure that all edges match exactly.
- You can glue all the parts together and leave them alone for a while.


How to make a cardboard frame with your own hands
A do-it-yourself picture frame made of cardboard can be made by people with no experience in applied arts: it's cheap, beautiful and not difficult at all. In order for everything to work out the first time, you need to immediately prepare all the elements necessary for creativity.


What do you need to work
In the work you will need thick cardboard for the base and for the frame itself. Both simple cardboard and corrugated cardboard are suitable here: it all depends on the desired thickness and strength of the product.

In addition to the main material, we prepare scissors, a clerical knife, a glue gun with glue sticks (or, in the absence of such, we purchase carpentry glue or Titan glue for ceiling tiles). It remains to pick up everything for the external decor.


Cardboard products allow you to widely use your own imagination: there are no boundaries for either form or decoration. You can decorate the product with textiles, and beads, and shells, and scrap paper.
Instructions for making a passe-partout
Let's start with the instructions on how to make a cardboard frame for a picture.
| Illustration | Action Description |
|---|---|
 | We cut out a frame from cardboard, taking into account the size of the photo. We lay the scrap paper face down on the table and put a cardboard blank on it. As long as we don't glue anything. |
 | We cut off the outer corners with scissors, and inside we make diagonal cuts with a clerical knife. |
 | We bend the outer borders. |
 | Carefully cut off the excess inside the product and bend the inner borders. We are not in a hurry: everything should be smooth. Now glue the inner borders to the frame, and then the outer ones. |
 | This is what the frame will look like. You can leave it simple without any decoration, but a couple of decorations will not be superfluous. |
Video: do-it-yourself cardboard photo frame
How to make a frame for a picture from improvised materials with your own hands
Making picture frames with your own hands is your own fantasy, embodied in practical application. It has become fashionable to decorate walls or tables with your own products, because this is the most direct inclusion in the design of your favorite home. Why is it worth trying to make frames with your own hands if there are a great many of them for sale? Well, who knows your preferences better than yourself? Who cares more for the warmth of the hearth, except for the owner of the apartment?


If we describe all the ways of creating picture frames, all the pages of our magazine will not be enough, so we will focus on the two most accessible materials: newspapers and buttons.
How to make a picture frame from buttons
Beautiful picture frames are made from buttons! Many left button deposits from grandmothers and mothers, but not everyone knows where to put them. For creativity, we do not need tons of new buttons, any will do!


What do you need to work
Here we will use the previous paragraph of the content and take up the manufacture of a cardboard base: we cut out the desired shape of the frame from cardboard.
Advice! Don't limit your imagination! Let the shape be unexpected, catchy, angular, streamlined.
We prepare the frame base, acrylic paints or spray paint, glue moment or thermal gun. If the buttons themselves are very beautiful, selected in a harmonious combination with each other, then you only need to paint the base.
Now turn on the right music and get creative!
Manufacturing instructions
We select the largest buttons and with the help of glue we fasten them one by one to the frame base. Do not rush with the next layer - let the first one seize properly.
Then we begin to glue medium-sized buttons, trying to cover all the holes. Small buttons close the remaining gaps and are located over the entire surface of the frame.


A spray can will paint the entire frame at once, and acrylic paints can create interesting color variations.
Picture frame from old newspapers
As soon as newspapers that have been read and become unnecessary are not used in everyday life! If earlier they washed glass and mirrors, today it is a fertile material for weaving baskets and various kinds of decor. Fans of making frames were also attracted by the newspaper as a decorating material.


What do you need to work
We will not explain the basics of weaving here, but we will show you how to easily and quickly make a wonderful frame for a picture or photograph from. We take a pile of newspapers, PVA glue, a thermal gun, acrylic paints or gouache of the color in which you want to see the frame and the actual frame base (you can use cardboard).
Nuance! Magazine pages are too bright for pictures in color, but perfect for black and white. Newspaper tubes are best either painted or simply varnished.
Manufacturing instructions
We cut newspaper sheets in this way:

- Each strip is placed on a thin knitting needle (in its absence, an electrode is also suitable, which must first be tapped, or a strong thin long wire equal in length to the knitting needle) at an angle of 45 ° and begin to wind almost to the end of the strip. Lubricate the tip of the strip with PVA glue and wind it to the end. The tube is removed from the knitting needle and coated with PVA as a whole. In this way, several dozen tubes are made (if the volume of the frame is large). As soon as the products are dry from the glue, you can paint them in any color.
All photos from the article
If you have a lot of photos or any paintings and other compositions that you would like to hang on the wall, then you can’t do without frames, any of the above options will look much better with them. The cost of ready-made options is quite high, but if you wish, you can make frames on your own, this is what this article will be devoted to.

What do you need to work
Let's figure out what materials and fixtures will be needed during the work:
| wooden elements | It can be a wide variety of options: from slats and the remains of a plinth or trim to any other similar materials. If you want to create a very skillful product, then you can purchase ready-made wooden baguettes and use them |
| Saw and miter box | With this simple kit, you can cut joints perfectly at an angle of 45 degrees, thanks to which the joints will be of the highest quality, which has a very positive effect not only on the reliability of products, but also on their appearance. |
| Carnations and glue | Connections can be made in two ways: either using finishing nails and reduced caps, or by using wood glue, which can also provide good reliability. If very high strength is needed, then the options can be used together. |
| Special clamp | If you are going to make frames more than once or ideal quality is important to you, then we recommend purchasing this type of equipment, since with its help you can press the parts very well when gluing, while maintaining the ideal geometry of the structure |
Important! And do not forget about paintwork materials, a wide variety of options can be used - from varnishes and impregnations to stains, and special compounds to give products an old look with gilding and patina.

The working process
Even those who have never engaged in such activities can deal with the question of how to make a wooden frame with their own hands. We will consider the sequence of work to further simplify your work.
Preparing everything you need and cutting blanks
First of all, you need to select photographs, paintings, collages, embroidery and other compositions that you want to place within the frames, this is necessary in order to take the actual dimensions and make exactly the configuration that you need, and not adjust the elements to the finished version , this is a huge advantage of homemade frames.
As for the process, it goes like this:
- If there are passe-partout (cardboard frames) in the photo, then they need to be made in advance and the dimensions of the frames should be taken from them, with the exact parameters you can proceed to the choice of material for manufacturing, both and other options are suitable, you can find many blanks on sale, price which is low, they are perfect in our case;

- Next, you need to take measurements, it is important to do this carefully so as not to be mistaken, otherwise the finished product will come out crooked. Control that the paired elements are the same size;
- Cutting blanks at an exact angle used to be considered difficult and painstaking work, but nowadays you can buy a miter box with a saw for little money and cut wooden elements very accurately and very quickly. The most important thing here is to use a saw with a fine tooth so that it provides the best cutting quality, the more ideal the edges, the better the elements will connect and the more attractive the finished product will be;

- Lastly, from the back side of the blanks, you need to select a groove for glass, its depth should be 3-4 mm more than the thickness of the glass so that it can be fixed with small carnations.
Product assembly
The instructions for this step are very simple and clear:
- First you need to connect the two elements and securely fix them, as noted above, the best method of fixing is to use a special corner clamp, with it you will securely fix the parts in the desired position, and they will not move when dry, the connection geometry will be perfect;

- After gluing, you can proceed to further work, first of all, this is the decor of a wooden frame, here your imagination is not limited by anything, so the design style and the chosen color scheme depend only on you;
Important! You can achieve the effect of antiquity by painting the frame first with dark paint, and then with light paint, after which the top layer is rubbed with fine sandpaper in some places.
- Then you need to insert the glass, behind it there is a passe-partout, if available, or immediately a photo, then you need to put in thick cardboard for rigidity and fix this whole system with carnations or attach special small swivel clamps;

- For wall mounting, you can attach special eyelets from the back (they can be purchased at furniture fittings stores) or drill a hole according to the diameter of the fastener to simply put the frame on the head of a protruding nail or self-tapping screw.
Conclusion
Making frames is a simple process, and you can get a unique result, because you can realize any ideas, the main thing is to choose the appropriate materials. The video in this article will tell you more information on the topic, if you have any questions or important comments, leave them in the comments below.