Types and stages of construction of greenhouses. How to make a polycarbonate greenhouse The most budgetary greenhouses
- The protective layer on which the inscriptions are applied must be located on the outside of the greenhouse.
- To obtain the most durable structure, be sure (!) Pay attention to the location of the "honeycombs" of polycarbonate - they should only go vertically, in inclined structures - parallel to the slope.
- When creating arches, keep in mind that polycarbonate sheets bend only in one direction - in length, that is, along the line of stiffeners.
- The joints of the sheets should fall on the center of the frame rack, connect the sheets only in this way.
- They cut this type of plastic with a construction knife, electric jigsaw, grinder. You can also use a hacksaw or a circular saw.
- For strong connection of sheets among themselves special plastic profiles are used. Manufacturers do not recommend overlapping polycarbonate. In practice, when making a polycarbonate greenhouse with your own hands, it is not always possible to cut and fit sheets perfectly. Some craftsmen generally manage to do without connecting profiles, placing overlapping polycarbonate. The most important thing is that the junction must necessarily fall on the center of the rack, and not sag in the air. Moreover, even with perfect installation under the pressure of snow, the sheet can be squeezed out of the profile. In the case of overlap, this does not happen.
- It is undesirable to use a powerful drill for screwing in self-tapping screws - it will overtighten fasteners and often slip off during operation. It is better to work with a conventional screwdriver. Polycarbonate is drilled at low speed with little effort. Next, turn off the tool, insert the screws and continue to work.
- The distance between the screwed screws is 25-70 cm. It all depends on the type of frame and the expected snow and wind load.
- When assembling polycarbonate structures, riveting is sometimes used instead of self-tapping screws. However, it will be more difficult to dismantle the greenhouse or replace the damaged sheet in this case.
- When the temperature changes, the plastic is able to change dimensions. When butt-joining between sheets, a small space of a couple of millimeters in size is necessarily left - a technological gap. Otherwise, cracks will form at the junction. For the same reason, the size of the holes for the fasteners is made a little larger. To prevent the plastic from cracking, do not twist them all the way.
- To compensate for expansion and protect against cold bridges, it is recommended to use special thermal washers for polycarbonate (self-tapping screws are purchased separately). It is allowed to use EPDM roofing screws equipped with a gasket or standard for metal with a rubber thermal washer, in which the thread has a small pitch.
Vegetables from your own garden are an order of magnitude healthier and tastier than purchased ones, every summer resident will confirm this. But although in theory such products should also be cheap, in practice, maintaining a greenhouse costs a pretty penny. Therefore, if you are planning to start growing cucumbers, tomatoes and greens only for yourself, you should consider greenhouse options from improvised materials. And we will tell you how to build them yourself.
Greenhouse from improvised materials: what can be used for construction
A diligent owner never gets rid of what else may be needed. Therefore, in the country, a lot of things are inevitably going to be put into action and equipped with a greenhouse on the site. Of course, only a summer greenhouse without heating and a capital foundation can be almost free, but even it will help you get the first harvest a few months earlier than when grown outdoors.
Greenhouse from old windows can be impressive
Before building a greenhouse, you should decide what you plan to save: time, money, or your own efforts. For example, a greenhouse made of old windows will cost almost nothing, but you will have to work hard to clean the old paint from the wooden frames. A greenhouse made of PVC pipes is mounted very easily and quickly, but you will need to buy the pipes and fittings themselves, it is unlikely that you have enough residues lying around in your country house for a full-fledged greenhouse. On the other hand, if the appearance is not particularly important, you can try to “dance from the stove” and combine several materials at once that remained after construction and repair.
Material options for an inexpensive frame
The frame of the greenhouse must be strong enough to support its own weight and the weight of the cladding. In addition, it is desirable that it does not collapse from elevated temperature and humidity, but this problem is easily solved with special impregnations or protective paints.
So, to build a greenhouse, you can use:
- Willow rods are the cheapest and most environmentally friendly material. You can cut thin branches of willow or hazel in a nearby forest or planting along the road. It is best to harvest in late February-early March, until the sap begins to flow from the trees. When choosing, it is worth giving preference to long flexible branches with a uniform length; young trees have many of them. The only preparation of the material is to clean the branches from the bark and, possibly, thorns. Impregnation with bug and rot agents is desirable, but not required. Without protective equipment, the greenhouse will turn out to be more environmentally friendly and cheaper, and if necessary, a damaged branch will be easy to replace. A branch frame can be installed alone in just a day, but it can last up to 3 years. Willow core is only suitable for low greenhouses and regions without strong winds. Otherwise, due to the high flexibility of the frame and the windage of the skin, the greenhouse can be blown away by a strong gust of wind.
Birch branches - a flexible base for a high arched greenhouse
- Pallets or shipping pallets are a good source of planks. If desired, you can build walls from solid pallets, but you can also disassemble the pallets into components. The boards will serve to fasten the wooden frame of the greenhouse, and for the base you will need to buy bars. If you do not plan to make the greenhouse high, you can get by with some boards and further strengthen the frame with a metal mesh. Keep in mind that this option is suitable for warm regions and places where strong winds rarely blow.
By this principle, you can build not only a similar small greenhouse, but also a full-fledged greenhouse
- Netting or reinforcing mesh are excellent materials to support sheathing. When there is a large distance between the frame elements, the film or non-woven membrane may sag. To prevent this from happening, first stretch the mesh and only after it cover the greenhouse with the selected material. The mesh will perfectly strengthen the frame of the structure and will not allow the sheathing to flap in the wind. You can attach the mesh to the frame with wire or plastic wire ties (they are inexpensive and are sold in every hardware store). Just remember to make sure that the sharp ends of the mesh do not tear the skin. If you cannot arrange the material so that the cut edges rest on the ground, you should protect them. A fine-mesh mesh can be framed with a thin water pipe by cutting the pipe on one side and hiding the tips in it. In a coarse mesh, it is easier to isolate each tail separately, for example, by putting a piece of heat shrink tubing on it.
If there is a large amount of unnecessary wire, you can build a grid yourself
- A metal profile for drywall will also go into business. If after the repair you still have scraps of a durable galvanized profile, you can use it to strengthen the frame of the greenhouse. If this material is not enough to construct load-bearing elements, it will serve perfectly as a spacer between wooden poles or support the base of a gable roof.
It is easy to build a greenhouse roof from a drywall profile even without special fasteners
- Polyethylene water pipes or rubber hoses are excellent protection for the frame. The bearing capacity of this material is only enough for a small greenhouse, but if there are thin reinforcing bars or at least branches inside, you can build a good arched greenhouse. For the lower strapping, you will definitely need to build a box, since soft pipes simply stuck into the ground will not hold. The finished frame looks neat and aesthetically pleasing, resistant to moisture and high temperatures. But rubber can crack from frost, so this option is better suited for collapsible summer greenhouses.
In a small greenhouse, pipe clips can be used to fasten the skin
- PVC pipes - a reliable and durable basis. Craftsmen even make stairs and chairs from PVC water pipes, and it will be much easier to build a greenhouse frame from them. This material is completely immune to moisture, high and low temperatures, is not particularly afraid of animal claws and mechanical stress. To connect the pipes to each other, self-tapping screws are not needed, they are fastened due to the temperature melting of the ends of the pipes and fittings. But making a tall greenhouse with a lot of cross connections can be too expensive. To save money, it is worth building arches from the remains, and fasten them at the top with the same pipe or wooden plank using plastic ties. The ends of the pipes will need to be stuck deep into the ground or into prepared holes in the wooden piping. To strengthen the frame, the first and last arch can be made from thicker pipes.
If you make a greenhouse made of PVC pipes arched, you will need fewer fittings
- Glass fittings - a replacement for metal rods. You may have left unused fragments after pouring the foundation, laying glass blocks or creating monolithic walls. These trimmings can be interconnected and strengthen the spans of the arched greenhouse with them, or placed in strips above the sheathing material so that a strong wind does not tear it from the frame of the greenhouse. Glass fittings are resistant to mechanical, chemical and atmospheric influences, do not rust, and are easily bent. Therefore, when it is necessary to replace the skin film, the reinforcement can be temporarily removed and then reused. If at home there were 5–6 long rods or a bay of glass fittings, you can make an arched greenhouse frame out of them without additional materials. Only the height of the greenhouse is limited - a maximum of 2 m, for higher greenhouses it is required to make support pillars under the highest point of each arch.
The strength of the glass fittings allows you to build high arches into which an adult can easily pass.
- Metal fittings - a durable option, but expensive. Buying it specifically for a greenhouse will turn out to be too expensive. But if after construction you still have scraps, it is worth making a semblance of a foundation out of such reinforcement. Stick the rods around the perimeter of the greenhouse at an equal distance from each other so that a third or a quarter of the length sticks out above the ground. It will be possible to tie vine branches or plastic pipes to them so that the frame is more reliable and moisture-sensitive materials do not come into contact with the ground.
The reinforcement cage of the greenhouse looks very neat
- Old logs with defects can still come in handy. Perhaps, during the construction of a dacha or a bathhouse, you rejected logs with cracks or pockets of rot and there was no use for them. Wood of this quality is great for the foundation of the greenhouse, since the load on it is very small. It is only necessary to build a rectangle of logs and deepen it into the ground by 7–10 cm, and a reliable foundation for the future greenhouse is ready. A wooden, metal and even plastic frame is easily attached to the logs and they are compatible with all types of sheathing, so such a foundation is suitable for any non-capital greenhouse.
In order for the square of logs to keep its shape well, a recess should be cut in the upper ones as in the photo
- Bags of earth - a well-forgotten old. At the peak of the green building craze in America, the technique of creating earthen walls was revived. The essence of the method is that plastic bags (woven, as for sugar or flour) are filled with slightly damp soil and stacked on top of each other. The volume of earth in the bags decreases from the bottom row to the top, so the wall gradually becomes thinner. The foundation is a series of the same bags, but filled with crushed stone of small or medium fraction. In an earthen greenhouse, you can equip windows and doors, the easiest way is to install wooden boxes under them at the stage of folding the wall. After the earth dries out, the walls will need to be plastered with cement or clay mortar. And the roof is best made light and transparent, for example, from polycarbonate and wooden beams. In terms of thermal insulation, such a structure is comparable to a thermos greenhouse buried in the ground. The cost of a greenhouse is the cost of bags and a roof, and its durability is calculated in tens and even hundreds of years. The only disadvantage of an earth greenhouse is high labor costs, you will have to assemble a team of assistants and dig a lot of soil.
Bags make interesting structures with curvilinear shapes.
- Straw blocks are another option for an eco-friendly greenhouse. If you have the opportunity to take on the field for free or buy cheap straw briquettes, they will be an excellent basis for a warm and safe greenhouse. It is best to prefer rye straw, as rodents and insects are almost not interested in it. The blocks are simply stacked on top of each other without fasteners, but for better adhesion they can be pierced with rebar. The roof and, if possible, one of the walls of the greenhouse should be made transparent so that the plants do not suffer from a lack of light. If you want such a greenhouse to last more than one season, it is worth laying blocks on a foundation or strapping made of wooden beams with protective impregnation.
Straw walls of the greenhouse - a great heat insulator
Whatever material you decide to use, try to make the frame smooth, especially if it will be sheathed with film material. Otherwise, knots and notches will easily tear the film or non-woven membrane.
Sheathing for the greenhouse: what can be found in the pantry
The cladding material of the greenhouse should provide good access to direct sunlight to the plants. It is especially important not to filter out one part of the spectrum, because the absence of red is bad for growth, and without blue, fruit does not appear. It is because of this that only transparent or white material is used as greenhouse cladding, but not colored.
Despite the variety of shades of cellular polycarbonate, greenhouses are sheathed only in white and light gray
For covering the greenhouse, you can use the remnants of building materials, the remaining unnecessary fragments of the old finish, and even the contents of the pantry, which no one has looked into for a long time.
- Window frames with glass - a standard and unjustifiably forgotten option. The process of replacing old windows with metal-plastic or energy-efficient wooden ones is still ongoing. Therefore, even if you don’t have them lying around, unnecessary windows may well be at the neighbors or near the house where the reconstruction is being carried out. As a rule, the owners of these useful materials do not require any payment for them, so you will spend money on gasoline in the worst case. If the aesthetics of the design are important to you, you will have to remove the glass, clean the frames of old paint, impregnate them with protective agents and re-decorate. It is also important to choose windows of approximately equal size so that the finished structure looks harmonious. But when only functionality is important, it is enough just to scrape off pieces of paint that are ready to fall off with a small metal spatula, and apply impregnation to the bare areas of wood. The size of the transoms is also not too important, they can be combined as you wish. But glass greenhouses are distinguished by the best environmental friendliness and light transmission. Unfortunately, glass can be broken by hail or a large amount of snow, so it is better to make only walls out of it, and choose another option for the roof or further strengthen it.
Window blocks with vents are best placed at the ends
- Plastic bottles are a free and durable material. In nature, the bottle decomposes for more than 300 years, therefore, as a greenhouse lining, plastic containers will last for decades. The weak point of the greenhouse can be the frame and the string on which the bottles were assembled. Bottle plastic is absolutely not afraid of moisture, frost, putrefactive bacteria and fungi, so the greenhouse does not need to be dismantled for the winter. Bottles for wall cladding are used in two versions: columns from containers with a cut bottom and sheets of sewn or glued plastics that were cut from the middle parts of the containers. Hollow bottles create the effect of a thermos, perfectly retain heat in the room and do not let light frosts inside. Inside the greenhouse, the temperature is so stable that tomatoes and cucumbers can often be harvested in early December. But with loose laying between the columns, the wind can penetrate and they will need to be additionally glued. A greenhouse made of plates turns out to be more airtight, but it is more difficult to make it and more material will be needed. It will be necessary to cut even parts of the bottles, align them with an iron and sew them together on long winter evenings, so that in the spring the prepared transparent sheets can be immediately mounted on the frame. When using plastic containers, you save not only on sheathing material, but also on the skeleton of the greenhouse. Since the bottles are very light, thinner beams can be taken to build the skeleton than for polycarbonate sheathing. It is necessary to prepare for the arrangement of a greenhouse from plastic containers in advance, because it will take almost a year to collect the necessary 600–700 bottles.
Different options for using plastic bottles for greenhouse sheathing
- Agrofibre or non-woven membrane is a good choice for a greenhouse. This material is often bought for arranging lazy beds, but it also shows itself no worse on the frame of a high three-meter greenhouse. Agrofibre protects crops from low temperatures (down to -5 ° C), perfectly passes moisture (unlike film and polycarbonate), provides air exchange (windows for ventilation are simply not needed), and is easily repaired (the patch is glued for 1.5 minutes). Even a novice in gardening can make an effective agrofibre greenhouse. After all, the low weight and excellent permeability of the material fully compensate for errors in frame calculations (it can be very light), lack of ventilation and other possible errors. The only drawback of agrofibre is that it is afraid of claws, so if cats or dogs walk around the territory, the sheathing will have to be protected with a fine-mesh metal mesh.
The width of the agrofibre allows you to cover a small greenhouse without joints
- The film is the most popular option, it is chosen by 70% of beginners and at least 50% of experienced summer residents. Manufacturers offer many types of specialized film for greenhouses, which is capable of letting rain through, does not tear due to additional reinforcement, and can remain on the frame in winter. But if you're looking to save money, it's entirely possible to use the leftover film from the closet or buy a cheap one. It will last no more than a season, but it will provide the plants with the necessary microclimate and will not require a very reliable frame.
For reliability, the film is always fixed through a gasket (bar, rubber strip, plastic molding, etc.)
- Cellular polycarbonate - the second most popular sheathing material. It’s not worth buying it especially for novice summer residents, but if after building a visor at the front door, a carport or a gazebo, you still have trimmings, they can be put into action. If there is little residue, use polycarbonate for the roof of the greenhouse, since it is she who bears the shock loads from hail and mechanical from snow. It is polycarbonate that can protect the roof from old windows to prevent glass from breaking. This material is compatible with frames made of metal, wood, PVC pipes.
Polycarbonate cladding is suitable for both arched and pitched greenhouses
In accordance with the selected material, select a convenient way to seal the joints. For example, the film is additionally glued with adhesive tape, polycarbonate is assembled on special clamps or sealed with foamed polymer adhesive tape, and the non-woven membrane is simply overlapped and fastened along the entire length of the joint. If you ignore this stage of work, drafts will begin to walk in the greenhouse and tender plants will die.
Improvised cladding fasteners
When finishing the greenhouse with rolled materials (film, non-woven membrane), they must not only be attached to the frame with a construction stapler, but also additionally strengthen the fixation. The net or slats outside the greenhouse will not allow the wind to fray the material in the spans between the ribs of the frame.
A clip for attaching a film from the neck of a plastic bottle is an excellent example of a useful device made from improvised materials
Use as a fixer:
- plastic net for cucumbers: weather resistant, cheap, but only suitable for small greenhouses;
- fishing net made of durable synthetic threads: strong and reliable, can serve for several years, but eventually collapses due to ultraviolet radiation;
- linen cord: it is inexpensive, weather-resistant, with the right tension, it insures the sheathing of roll materials well;
- wooden planks: require impregnation and sanding, do not always look aesthetically pleasing, but do not require costs;
- clips for PVC pipes: easy to install and hold securely, help to fasten the pipe and the wooden plank together but are only suitable for structures with a tube frame.
Now it's time to look into the pantry / utility room / shed and select materials from old stocks that will be useful for arranging the greenhouse.
Photo gallery: greenhouses from the remains
 After construction, triangular polycarbonate scraps remained - make a hemisphere greenhouse
  If you carefully combine the painted profile for drywall and old glass, you get a very beautiful greenhouse.
  Different plants require different growing conditions, so the greenhouses on your site do not have to be the same.
  A hemispherical greenhouse made of PVC pipes and ordinary film is very stable
  The remains of a wooden lining - a great option for sheathing a wooden greenhouse on the bottom
  When a brick remains after construction, you can build a side for a greenhouse from it
  An analogue of an industrial polycarbonate greenhouse can be made with your own hands
Getting ready for construction work
To begin with, it is worth determining which version of the greenhouse design suits you best.
Perhaps the non-standard design of the greenhouse will be more convenient for you than the usual house with a gable roof.
When choosing, consider the size and shape of the area allotted for the greenhouse, the number and type of building materials available, the number of beds, etc. When free space remains only near the house itself, it is worth saving on materials and organizing a wall-mounted greenhouse. And for those who prefer not to spend a lot of time on garden work, a small rounded greenhouse is quite suitable.
According to this drawing, it is supposed to build a greenhouse from wood, but if you remove the extra braces, you can assemble a metal or tube frame from it
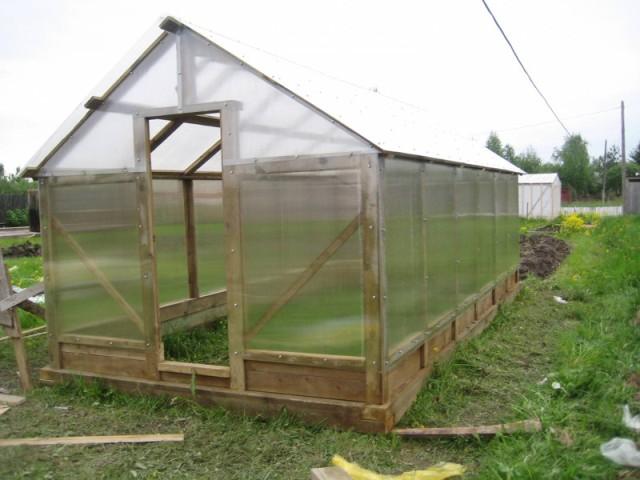
Among gardeners and gardeners, the most popular are medium-sized greenhouses in the form of a house with straight walls and a gable roof. For the construction of the 3x4 m option presented in the drawing, about 150 m of beams, boards or metal pipes will be needed. They will need to be cut into fragments of 1.5 m (vertical racks) - 30 pieces and 1 m (horizontal lintels) - 110 pieces. The rest will be useful for braces and the frame of the door leaf.
For wall cladding, you need 35.5 m 2 of a film or membrane, which is almost 24 linear meters from a roll 1.5 m high. This roll width is optimal, since it allows you to close the walls with a minimum number of joints. To finish the roof, you need 24 m 2 of material, which corresponds to 16 linear meters from a 1.5 m roll of film or 4 sheets of cellular polycarbonate measuring 1.2x5 m. .5 m of running film 1.5 m wide or 2 polycarbonate sheets 1.3x3 m in size.
How to make a cheap greenhouse from leftovers with your own hands
We will consider step-by-step construction using the example of the given drawing, but we will implement the project with the help of thick branches and ordinary packaging film. Branches left after cleaning the garden or cut in the nearest forest are the cheapest and most environmentally friendly material for the frame. So that you do not doubt the strength of the structure, choose branches with a thickness of at least 5 cm (in section) without visible defects. For this purpose, the trunks of young acacia trees are excellent, which accumulate after cleaning forest belts along roads or forest areas. You can negotiate with the forester, who will tell you what material can be taken for your purposes.
Thanks to this manual holder, winding the film on the frame is simplified by an order of magnitude.
Wrap film does not seem suitable for our purposes at first, but it is just as durable and transmits light as well as specialized greenhouse materials. It will have to be wound in several layers and due to this it turns out to be stronger than a conventional thin film, less prone to windage and sagging in the spans between the frame ribs. It is as simple as possible to work with the material; you don’t even need to call an assistant to cover the greenhouse. At the same time, the stretch film provides excellent protection against low temperatures, so the plants in the greenhouse will bear fruit even with light frosts. The brand of the material does not matter, you can buy any packaging film in the store or order it online. You need 2 large rolls.
Since the casing of the greenhouse will turn out to be very light, the frame can also be made lightweight by reducing the number of vertical racks and struts. In this economical option, you will need 6 posts of 2.5 m, 3 of 3 m and 2 of 6 m for a horizontal connection.
Sheathing with boards around the perimeter will significantly increase the life of the film
So that the film below does not suffer from mechanical damage, beaks of chickens and cat's claws, it is better to finish the frame with boards. It is desirable to impregnate them with a protective agent, as they will constantly be in contact with wet soil. It will take about 40 m of boards.
Of the consumables you will need:
- butterfly loops for hanging doors and vents (the easiest to install);
- door handle;
- latch or latch for fixing the door and vents in the closed state;
- wood screws (the simplest stainless ones with a black coating, 76–90 mm long);
- spare files for a jigsaw;
- long reinforced staples for a construction stapler;
- thin rubber hose or drip tube - about 40 m;
- stationery or packing tape;
- metal corners for attaching vertical racks (you can cut wooden ones, or make additional braces from boards).
The length of the screw should be almost twice the diameter of the cross section of the fastened part.
Required tools:
- jigsaw for cutting bars;
- a screwdriver for fastening wood (if you have a construction gun, you can use it and fasten the frame with nails);
- construction stapler for fastening the sheathing.
Let's get to work.
- Prepare the required number of thick branches, free them from branches and cut them to size. If desired, you can completely remove the bark, sand the posts and impregnate them with protective agents. The bottom can also be dipped in used machine oil or creosote.
It will be great if you can pick up even stems of uniform thickness
- Dig 9 recesses around the perimeter of the greenhouse, pour some gravel inside and place vertical posts in the holes, carefully compacting the ground. In front of the greenhouse, there should be 4 posts at the end, so that two of them protect the doorway. Fasten horizontal jumpers from branches along the top of the posts and at a height of 1 m from ground level. Sheathe the lower part of the frame with boards.
Sheathing with boards gives the frame additional rigidity
- Connect the highest poles with a branch so that a ridge is formed. Make a roof frame from six long branches, resting one end of the branch on a vertical pole, and the other on a ridge.
With a height of the central pillars of 3 m and side pillars of 2 m, an optimal slope of the gable roof is obtained.
- If you haven't spent time cleaning and sanding the posts, wrap the frame with tape. If this is not done, the stretch film will tear already in the process of wrapping the greenhouse and will last very little later.
When wrapping, do not pull the tape too tight so that the notches on the branch become invisible
- Wrap the frame with a film in a circle, trying to make an even layer over the entire area of \u200b\u200bthe walls. You do not need to leave a hole for the door, it will be cut out in the next step.
You will need to wind at least three layers of film
- Cover the roof of the greenhouse with a thicker film and carefully seal the joint with tape. On the outer contour of the building, fill the fixing bar over the film. It should be fastened with nails, since the self-tapping screw will crumple the material a little when screwing, and this can subsequently lead to a rupture. But if the film for the roof is reinforced, you can not be afraid of such consequences.
The film must hang just below the slopes so that it can be fixed with a bar
- Fix the film on the frame elements with construction brackets. To ensure that the fastening is strong and the film does not tear, use a thin rubber tube as a gasket.
Fasten the staples along the width of the tape at a distance of 20 cm from each other
- Cut a hole in the film for the door and window (at the opposite end) and further strengthen the film at the cutout, especially carefully processing the impromptu threshold. Knock down the rectangle of the door and window leaf from the remaining branches and sheathe it with a film according to the described technology. Butterfly loops can be attached to the frame directly through the film.
The edge of the door frame should be insulated with foam tape
The greenhouse is ready for the first tests. Leave it closed overnight and the next day check how big the temperature difference is between inside and outside. If it is less than 10 ° C, then you should look for the remaining gaps and additionally strengthen all joints of materials.
If you fence off the beds with boards and fill the path with rubble, the shoes will remain clean after working in the greenhouse.
Additional finishing of such a greenhouse is not required. You can start arranging the beds and building a path for easy access to all plants.
As you can see, a home greenhouse is not always very expensive. Perhaps a greenhouse from the remnants will not become the main decoration of your dacha, but it is definitely able to please you with excellent homemade vegetables when the season has not yet begun or has already ended.
The greenhouse is a special zone, the internal climate of which is not affected by any vagaries of the weather and negative environmental factors. Crops growing inside the greenhouse are not afraid of cold or heat, wind, snow or hail. Thanks to the microclimate created there, the plants receive everything they need in sufficient quantities for them.
Everything that is done with one's own hands is much cheaper than alternative options.
Creating a greenhouse with your own hands is not as difficult as it might seem. The main thing is to know about the main elements of its design, the general rules for normal functioning and to have a desire.

What to consider at the outset
First you need to choose a place for placement and decide on the crops grown in it. - an extremely important stage, because in one place the soil may be too wet, and in another the plants will not have enough sunlight.
Choosing a soil
The building should have the highest quality soil, which is located on the site - with a flat surface and moderate humidity. A hole should be dug in the marked area to check the quality of the soil. If clay appears in the recess, the place does not suit us. For a greenhouse, you need to choose soil in which there is a layer of sand.
If there is no suitable plantation on the site, then you can dig a pit yourself, fill its bottom with gravel and make a layer of sand. Fertilized and disinfected soil is already laid on this drainage.

Choose a place
The place must be sunny. Most often, greenhouses are used in the spring and summer, where there is no heating system, and the greenhouse is heated by the sun's rays. It is necessary to choose such a place on a site where the sun shines all day and the shadow of trees or nearby outbuildings does not fall on it.
wall greenhouse
Drafts are a big enemy of greenhouses. Incorrectly or loosely installed cover entails the ingress of wind inside the greenhouse. But even if everything is done correctly, a breath of wind will cool the coating, and cooling walls, as you know, absorb some of the heat in the room.
The best option for the steppe regions, which are characterized by the presence of a constant gusty wind, will be a wall greenhouse, the design of which is attached to any non-residential building on the south side.
Once you have decided on the location of the building and its area, it's time to think about its configuration.

What are greenhouses
Steel
The steel frame will be strong and wear-resistant, withstanding any load. Often, instead of a steel corner for construction, it is used. If your choice fell on a steel frame, you should remember that the metal is subject to corrosion, so the material requires pre-treatment.
PVC
The degree of strength of the PVC frame directly depends on the strength and thickness of the profile used. The main advantage of polyvinyl chloride is its flexibility, which allows you to create structures of any shape completely sealed, allowing the owner to regulate the microclimate inside the greenhouse with his own hands.
Greenhouse cover
To protect the crops grown from the negative impact of external environmental factors, care should be taken to ensure a durable coating for the greenhouse under construction. Today's construction market is filled with a variety of related products, so finding a coating that best suits the given selection criteria will not be difficult. Most commonly used for:
Glass
To cover a durable greenhouse, the operation of which is planned for many years, glass of increased strength is used. Many choose tempered glass for their greenhouse or triplex. If it is not possible to use durable glass to cover the greenhouse with your own hands, you can install ordinary glass in several layers. To protect the glass from wind loads and the possible impact of precipitation, such as hail, for example, you can install an unbreakable protective coating on top of the glass.
Glass perfectly transmits the sun's rays, and with them the ultraviolet.
Penka
For covering seasonal greenhouses, film is the most inexpensive and popular material.
It perfectly transmits the sun's rays, scattering them, and prevents the plants from burning. At the end of the season, the film is carefully dismantled by hand and, if there are no obvious flaws on it, it can be left for reuse.
Polycarbonate
This flexible high-strength rolled material looks aesthetically pleasing, protects crops from ultraviolet radiation, passing them the maximum amount of sunlight. The material is durable, so it is not affected by precipitation and wind loads. The polycarbonate coating is designed for long-term use, its transparent color remains unchanged for many years.

Some tips from professionals will help you build a quality greenhouse on your own:
- The construction of a permanent greenhouse begins in the fall, so the selected area should be properly prepared: we remove the soil on the bayonet of a shovel, removing the plants from the top layer, and put it in a separate place for storage until next summer. Using any sheet material, we make boards to protect the soil from weeds.
- with a collapsible frame made of pipes are easy to transport, but difficult to install. Fast assembly will be provided only by a frame made of ready-made welded modules. The fewer connections in the frame system of the greenhouse, the less backlash and other defects that reduce the strength of the building.
- If you are installing a polycarbonate greenhouse, you should not dismantle the cover for the winter. Polycarbonate is not afraid of loads. You can remove only the irrigation system and vents.
- The reliability of fastening directly depends on the choice of fasteners, a good option is a design with a frame with welded loops that allow you to fasten it both to the ground and to the foundation.
- If the greenhouse is fixed with pipe piles, they should not be completely driven in, as the soil floats and settles over time, and the fastening may weaken.
- From two longitudinal sides, the greenhouse should be equipped with transoms for ventilation. In addition, you can install plastic partitions that eliminate cross-pollination, a system and automatic vents.
Knowing the structure of the greenhouse structure, relying on the advice of experts and following the rules for choosing a place and soil for a future greenhouse, you can easily make a greenhouse yourself and grow plants in a microclimate that is favorable for them.
In order not to lose the material, be sure to save it to your social network Vkontakte, Odnoklassniki, Facebook by simply clicking on the button below.
The design of polypropylene pipes is different the availability and reasonable cost of the material, which, moreover, has light weight and strength, does not rot like wood and does not corrode like metal.
To these figures one can add another a number of features inherent in plastic construction:
- simple installation;
- the ability to move to another location if necessary;
- a greenhouse can be built in almost any shape and size;
- the material is not affected by high and low temperatures and high humidity;
- polypropylene is environmentally friendly to soil and plants;
- PVC pipes are distinguished by a long service life, due to which the greenhouse frame made of this material will last for more than one year.
How to make a simple greenhouse for a summer residence yourself from improvised means?
Types of frame made of plastic pipes
According to the shape of the structure, the frames can be gable and arched. Each option has both positive and negative sides.
Arched frame
To benefits This building includes the following indicators:
- the quality of lighting is better than in other types of buildings;
- resistance to strong winds, snowstorms and other atmospheric phenomena. Reliably reinforced construction confidently withstands snow loads and gusts of wind;
- the ability to increase the length of the greenhouse by adding additional sections;
- ease of installation of the coating, which can be used as a film or polycarbonate. The coating can be continuous or be separate fragments in the form of large sheets;
- the presence of a minimum number of seams that require high-quality sealing.
Here is the simplest greenhouse with an arched frame you can build with your own hands in the country and in the garden (photo above).
disadvantages:
- if it is necessary to equip the greenhouse with multi-tiered beds, it will be very difficult to install racks and shelves in it;
- difficulties with the arrangement of the ventilation system. For high-quality ventilation of the greenhouse, it is often necessary to have side transoms in it, the installation of which entails some difficulties, due to the peculiarities of the arched structure;
- limited choice of covering material. Only soft and flexible products are suitable as a coating.
gable frame
pros:
- in heavy rains, water flows freely along the pitched roof;
- the room can easily be equipped with high-quality ventilation by installing the required number of vents that will ensure the exit of hot air accumulating under the roof;
- the ability to grow tall crops, planting them even along the side walls;
- the gable roof prevents the accumulation of snow, and when sliding down, the snow cover does not press on the frame and coating.
Minuses:
- the assembly of a gable structure is a more complex option compared to an arched structure;
- installation requires more building materials, which, accordingly, entails more significant costs.
Covering material
There are many coverage options available today. But, in order to meet the budget project, it is worth considering the most suitable materials for this purpose, namely - polyethylene and small thickness cellular polycarbonate.
Film coating
 Do you want the simplest greenhouse with your own hands? This material is characterized by high elasticity and tensile strength.
It stretches well in width and length and has good transparency, allowing up to 80-90% of sunlight to pass through.
The film must have sufficient to resist natural phenomena density, so it is desirable to use a high-density material.
The film coating has its own limitations:
- simple unstabilized polyethylene is subject to aging and destruction under the influence of high temperatures and ultraviolet rays;
- with an increase in humidity in the room, the film becomes covered with condensate, which creates a reflective screen, as a result of which the light transmission of the material deteriorates;
- falling drops of condensate cause damage to plants, and the wet surface of the film is covered with dust, which also causes a deterioration in the transparency of polyethylene.
Cellular polycarbonate up to 4 mm thick
In a greenhouse covered with a material 4 mm thick, it is only possible seasonal plant growing. The service life of the structure is limited in this case in late spring and summer. However, it is the most transparent and inexpensive polycarbonate. In such a room it is good to grow early vegetables, but it is not suitable for forcing seedlings.
The thin polycarbonate construction is a great option for those who don't plan on planting crops during the cold season.
You should not use the "four" to shelter the winter greenhouse, as it is not able to protect the room from the cold.
As for the thinner polycarbonate (3.5-3.8 mm), it is not classified as a structural material, so it is only suitable for vertical mounting.
Preparation for construction
It all starts with choosing a site for construction, which should be well lit and protected from drafts. In this case, it should be borne in mind that it is better to arrange the buildings in such a way that so that its ends look north and south. This will provide better lighting and natural heating of the room.
- type of foundation;
- type of construction (portable or stationary);
- step size between bearing elements.
If planned building a winter greenhouse, then for such a design it is important to have a solid foundation, which will provide the structure with reliable stability during heavy snowfalls.
For temporary construction a wooden base is quite suitable as a foundation. Below are more details about each type.
Types of foundations for a greenhouse
 Beam base. As a material for the construction of such a foundation, a bar with a section of 120x120 mm is used.
Before laying the timber, shallow grooves (5-10 cm) should be dug under it, into which the roofing material is laid. It will protect the wood from ground moisture.
The advantage of such a foundation is the possibility of dismantling the structure with the onset of the winter season. The disadvantage is that after a few seasons, the timber will become unusable as a result of decay.
block foundation. It is a reinforced version, which is quite suitable for non-separable winter structures. The construction of this structure includes the following steps:
A pillow of gravel about 10 cm thick is laid on the leveled soil.
The stacked block is set exactly with the help of a level.
All other blocks are placed in the same way.
Upon completion of the installation, the joints between the blocks are sealed with mortar.
For a greenhouse foundation, hollow blocks are quite suitable, which, after installation, are filled with cement mortar.
Whatever goals the owner of the summer cottage pursues, whether it be seasonal or year-round cultivation of crops, the use of PVC pipes will allow significantly reduce construction time and save money.
Standard greenhouses offered by manufacturers are not always suitable for the conditions of a particular site. Engineer Vladimir Blagodatskikh told how he built a capital “house for plants” according to an individual project:
Not so long ago I had a chance to build a greenhouse for good friends. The "Green House" on their site had to fit strictly in the gap between the garage and the barn. True, such a combination implied a convenient passage to the plants from two sides in the complete absence of the end walls of the greenhouse. But I had to think about the design myself.
Having designed the frame, I purchased metal pipes of rectangular and square sections (60 × 30 and 20 × 20 mm), as well as corners and strips of different widths. To make all the arches the same, I made a special template for assembling them. The parts were connected by electric arc welding. I installed the finished arches vertically on a pre-poured concrete foundation, and then welded longitudinal pipes to them - runs. The size of the foundation turned out to be 5.3 × 9.5 m (area - 50 m²), and the height of the greenhouse in the ridge was approximately 3.6 m. .05 m
I made a transparent cover of the greenhouse from different materials (photo 1). Basically, these are polycarbonate sheets with a thickness of 10 mm, but glazed wooden window frames go along one wall (this step was taken for reasons of economy). So that the plastic does not overheat on dark metal and last longer, I did not attach it directly to the frame. First, I welded additional corners and strips to the racks, screwed wooden slats to them, and already fixed the polycarbonate on them with self-tapping screws through plastic washers.
Photo 1.
The ventilation system turned out to be interesting (photo 2). It consists of two independent parts: lateral (in one of the vertical walls of the greenhouse) and tent (in the roof along the entire length of the greenhouse on both sides of the ridge). The transoms are opened manually, but all together with the help of a cunningly designed system of cables and rails. The levers for opening the frames are located on the wall at the entrance to the greenhouse.

Photo 2.
In conclusion, I equipped the greenhouse with reliable trellises for tying plants (photo 3). They are made of a steel cable in a plastic sheath, stretched between the end walls of the greenhouse using a tensioning device (lanyard). To prevent the cable from sagging, it rests on horizontal frame ties located at a height of approximately 2.2 m from the ground.

6 signs of a good greenhouse
Many summer residents do not build greenhouses themselves, but purchase ready-made ones. The most popular products are arched, with a metal frame and a polycarbonate coating. And they only look the same at first glance.
1. Dimensions
The larger (and taller) the greenhouse, the better! It will be easier to maintain the desired temperature and humidity without sudden changes. On the other hand, low-cost greenhouses are usually limited in size by material standards (eg, length and width of polycarbonate sheet, length of rolled metal products, etc.). A compromise, quite a working option is a greenhouse 3 × 4 or 3 × 6 m. “Tunnels” of greater length will require additional vents in the roof or walls, and not just at the ends.
2. Coating
Polycarbonate with a thickness of at least 6 mm significantly enhances the strength of the greenhouse, and its thermal insulation properties are much better. Thin, 4 mm, will have to be changed more often. Saving immediately on both the frame and the coating is not the best idea: the greenhouse will be flimsy. Good plastic necessarily has protection from ultraviolet radiation - it will help the greenhouse coating not become cloudy and not lose strength over time. Information about the presence of a protective layer is printed on the packaging of polycarbonate. In addition, the side of the sheet that will be facing outward on the finished greenhouse is necessarily marked.
And of course, a reliable manufacturer does not save on trifles - self-tapping screws and sealing washers, with which the coating is attached to the frame.
3. Frame
Professionals agree that a frame made of a square or rectangular metal pipe is stronger and more durable than a frame made of a profile or a corner. It is even better if the supporting arcs of the greenhouse are made double. But if a double frame is too expensive, you can put supports in the greenhouse every autumn, and after heavy snowfalls, come and throw off the snow from it. In any case, the thickness of the metal must be at least 1 mm, and elements reinforcing the structure must be provided in the greenhouse.
A galvanized frame is more durable than a painted one, but more expensive, and, unfortunately, the most durable versions of “galvanized” metal structures are rare on sale.
4. Doors
Convenient greenhouse entry and tight closing doors are something the greenhouse owner will have to deal with all season long. On the contrary, an ill-fitting door with sharp corners and metal burrs can not only spoil the whole impression, but also become a source of drafts.
5. Air vents
For high-quality ventilation of plants, there should be at least two vents in the greenhouse, and according to the rules, their area should be at least 15% of the area of the entire coverage (for growing tomatoes). Simply put, a good greenhouse has a lot of them and they are big!
6. Automation
Greenhouse ventilation systems without human intervention are an excellent solution: they are quite inexpensive, and they save time and labor noticeably. It is better to take them immediately complete with a greenhouse: the manufacturer usually knows which system is more convenient to put on the doors and vents of his brainchild.
Automatic drip irrigation allows you to leave your favorite plants unattended for a week or more. The thing is necessary, but its acquisition and installation can be postponed until spring.