Wooden hanger. Floor clothes hanger (47 photos): everything for your favorite things
We come home and take off our coats. So that she does not lie, we hang her on a hanger. So clothes do not interfere with us, do not create a mess in the apartment. You can always quickly find a jacket or coat by looking where all the clothes are hanging. If you have a small hallway and nowhere to put a closet, then a hanger will solve all problems. This attribute comes in different sizes. Therefore, you can pick up a hanger, despite the dimensions of the hallway. Their design is varied, but you have the opportunity to make a hanger according to your own sketch.
A hanger is a necessary thing if you often have guests. Guests can hang their things on it when entering your corridor. Hangers are usually located near the front door, so as not to walk in shoes all over the hallway. Now their diversity is great. Finding a suitable hanger that will fit into the interior is easy. You can make it with your own hands according to an individual design.
In order for the hanger to fulfill its functions, it must be:
- Convenient;
- Easy;
- Reliable.
You have decided to make a hanger with your own hands. Then you need to know in advance what it should be. You need to remember what the hallway walls are made of.
If the walls are made of drywall, you should think about a floor hanger. Then it does not have to be mounted on the walls. It is difficult to mount a hanger on drywall walls.
Mounting on such walls involves the use of special equipment, tools and dowels. Such a wall may not withstand the load from a large number of things, then the hanger will fall.

Floor models have several hooks. If you evenly hang things on it, it will not fall. Such an attribute has a small weight and can be moved to a new location if necessary.
You can make a hanger with your own hands from simple materials: wood, fiberboard or chipboard. Then decorate it beautifully - paint or apply a suitable pattern / ornament.
The most common hanger material is wood. It is easy to make a certain shape from it.
Birch is not the best material for making hangers. Wood has a fragile structure, therefore, screwing fasteners, there is a high probability of damaging the finished product.
Almost everyone in the house has the materials you will need. A set of tools and materials for work: a jigsaw, a hacksaw, sandpaper, hooks, a screwdriver, boards.
Get boards of the right size. You process wood: you grind it. Then go over the entire surface with sandpaper to make it perfectly smooth.
Decorate to your liking. You can cover the boards with varnish or paint. Fasten the hooks to the board with a screwdriver.
To mount the finished product on the wall, there are two types of mounting:
First: You can attach the hanger to the wall by drilling through it.
Second: make loops on the back of the hanger, and then hang it on nails.
The hanger is ready and can be used for its intended purpose.
We make original hangers in the hallway with our own hands
The entrance hall is the first room in the apartment. Therefore, guests pay special attention to it. You can add an original hanger to the interior of the corridor and make it yourself. This will attract the attention of people who decide to come to visit you. And you will place all their things on the original hanger: clothes, umbrellas, bags and various accessories. Transform your hallway and make it beautiful - easy, fast and inexpensive.

Any person in the house will find unnecessary things that can be used to make a hanger. Boards, skis, boxes, old furniture - all this can be used as the basis for the original hanger.
You should attach hooks to the skis, screw the entire structure to the wall - the hanger is ready for use.
Clothes hanger can be:
- standing;
- wall;
- Consist of individual hooks.
For a classic hallway design, a wooden or metal hanger in discreet (natural) colors is suitable.
The original solution is a hanger consisting of individual hooks. They are hung on the wall itself. Hooks can have an interesting shape, color and design. For example, in the form of raindrops arranged in a chaotic manner. You can attach the hooks yourself without using additional tools.
What are hangers and hooks attached to?
Hangers and hooks have several types of attachment to the wall. You can attach them to the wall yourself without using special equipment or using it. Metal hooks are suitable for wooden hangers. They are fastened with additional fasteners - screws.

Hanger hooks can have the following type of fastening:
- suction cups;
- Special adhesive strip;
- Magnets.
All three types of fastening, which are endowed with hooks, do not require much effort and time to install.
It is worth remembering that these types of fasteners may not withstand large clothes (fur coats, down jackets). These hooks are used to hang hats.
How to choose the right hanger for the hallway
Before buying or making a clothes hanger, there are many things you need to keep in mind. It is necessary to take into account the free area and the design of the hallway of the room, where to put the hanger or at what height to hang it.

Tips for choosing a hanger:
- It should be in harmony with the design of the room;
- For lovers of minimalism, floor suit models are suitable;
- For a classic style, wall models are suitable;
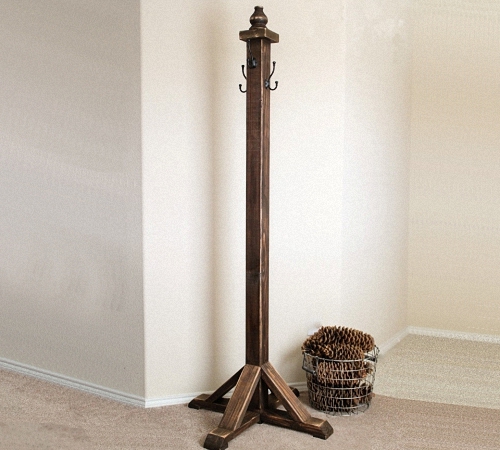
The floor hanger is light weight. It can be quickly moved or removed. Many choose this type of hanger for their hallway.
How to make a hanger in the hallway with your own hands (video)
Each apartment should have a hanger in the hallway. It is a practical attribute in the interior. Takes up less space than cabinets. Can hold a lot of clothes. Each thing hangs on a certain hook, and you spend less time looking for it. Everything you need to take with you to the street - a bag, an umbrella, a hat, a scarf and a coat can be in one specific place near the front door. Therefore, it is worth thinking about purchasing or making such a wonderful device for your hallway.
Do-it-yourself hanger design in the hallway (photo examples)


The hallway is a place where things are usually stored for going out, so it cannot do without a hanger. Some people attach a board with nails to the wall, but it doesn't look very nice. Therefore, it is best to use a floor or wall hanger that you can build yourself. A product created by oneself will not only save the budget, but also add uniqueness to the home.


Preparation of tools and materials
If you are going to start work, you need to prepare all the necessary tools: a drill, a screwdriver, self-tapping screws, a hacksaw, a centimeter tape. It is important to have the skills to handle them so as not to make a lot of mistakes and not harm yourself. To give the product a neat and aesthetic appearance, you will need varnish or paint.

As for materials, you will need:
- Wooden blocks or metal elements that will create a strong and reliable base that can withstand heavy jackets. You can use the base from an unnecessary artificial spruce or from a sturdy floor lamp.
- A column that is suitable in size, which is easy to purchase ready-made. The cheapest option is a dry and bare trunk of a young tree (without knots and bends), treated with sandpaper. Its height should be 15-20 cm.
- Hooks, the number of which should be sufficient to freely position on the base.

- Glue designed for reliable fixation of all elements, including self-tapping screws.
- In order for the hanger to stand firmly on the floor and not slip, thin rubber must be glued to its base.
- To strengthen the center of gravity, it is necessary to make a shelf for storing accessories, which will need to be fixed above the cross mount.

Manufacturing process
First you need to create the bottom part of the hanger. To do this, pre-prepared bars need to be cut in half, sanded and connected at a right angle. In order for the joints to be strong and not to stagger, you need to make recesses along the width of the bar and connect all the parts. Then you need to cut out four bars and attach them with self-tapping screws to the legs and trunk, which will become a reliable support for the hanger.


You can unscrew the screws only after the holes made by the drill are ready. This will help protect the future product from the appearance of cracks that can render the piece of furniture unusable. The diameter of the self-tapping screw must be larger than that of the drill.

For reliable fixation, you must first lubricate the holes with glue, and only then - screw in the screws.
To make the upper part of the structure, you need to attach a pre-prepared square with hooks. You can also attach four bars to the trunk, which will be aligned with each other with corners. It is necessary to fasten not to the very top, but a little lower. Holes are drilled with a drill, which are filled with sealant, and only then self-tapping screws are screwed in. This will help the product hold heavy items.

Having finished creating the hanger, you need to start designing it. First, the entire structure must be processed with sandpaper. Then it should be treated with a paint and varnish agent. You can paint the surface with different colors or draw patterns to get an original product.


original solutions
The following interesting options can be distinguished:
- Making a hanger in the hallway can be much easier if there is an old (rather heavy) floor lamp at home. It needs to be freed from unnecessary elements (wires), cleaned and painted. Metallic paint will look spectacular. Iron hooks are inserted into pre-drilled holes. You can weave hooks bent from strong wire.


- It will look very unusual hanger made from real wood. To do this, it will need to be thoroughly dried, the bark removed from it, it should also be sanded. In this case, you do not have to make a stand, since the roots of the tree will securely hold the structure. But it is necessary to file and bring the roots into the proper form so that they do not interfere and look beautiful. Tree branches can be used as hooks, shortening the strongest to the desired size in advance. Such a hanger will become a decoration of the house, and it will simply be impossible not to notice it. However, finding a suitable tree is not an easy task, which makes it very difficult to translate this idea into reality.


- Save space while maintaining functionality a wall hanger will help. To create it, you will need bars, two boards for making a frame, one board for creating a shelf, metal corners, slats and hooks. To speed up the process, it is better to use processed materials. To build a structure, you need to mark the place of attachment on the wall and mount two boards to it, located vertically to the floor. The length of the fasteners depends on the length of the product. It should fit the length of the shelves.


At a short distance, slats are attached to vertical boards. From the bars below you need to build a shelf for shoes. The height of the shelf should be sufficient to allow sitting on it. All joints are fixed with corners to increase the reliability of the structure. Sheathing with slats will help to make the product beautiful and neat. Installation of the top shelf begins with the attachment points. Using a drill, holes are made into which self-tapping screws will then be screwed.


For beauty, you can use forged corners and hooks, and the finished product can be treated with stain or paint.
- You can combine a hanger with a small cabinet by making deep shelves and hooks. To do this, prepare some durable top quality boards that have been pre-treated. You can use boards from an old bed or sofa, because wood remains strong for decades. It is well processed. Before work, it is worth making a drawing, which will display the dimensions and number of shelves. Following the drawing, you need to cut the boards, then you should attach them to the bottom shelf. Boards are attached to the back of the side boards, the height of which depends on the number of shelves.

It must be remembered that the hanger will contain not only outerwear, but also various accessories, so it must be especially well attached to the wall. You can use iron corners and self-tapping screws, or you can screw them onto dowels.
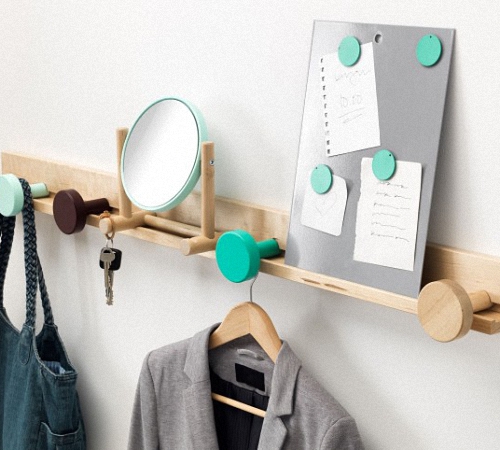
You can decorate the finished structure with a small mirror, which will be located on the side. If it is frameless, then you need to attach it to a solid plywood shield. It needs to be fixed. The mirror itself is glued to a special glue, and a shelf is closely installed under it, which will serve as an additional support. If this design does not seem safe, then you can build a frame for the mirror. You need to make it from a textured board, pre-processing it with sandpaper and covering it with stain.


A little imagination - and the simplest hanger will become an interior decoration. It can not only be painted in one color, but also pasted over with a cloth or wallpaper. Well for this case, the decoupage technique is suitable, which will give the product an extraordinary look.
- You can decorate the corridor with a non-standard product, which (in addition to storing things) will also perform other functions. A chair-shaped hanger will be designed to store outerwear and seating. There will be a shelf for shoes under the seat, and hooks for clothes and a shelf for hats and gloves will be located on the high back.


A strong branch found in the forest or in the park can become the highlight of the hallway. It is worth covering it with varnish and screwing in the hooks, and it will become a worthy element of the apartment.
- Hangers made of water pipes will look very unusual. In this case, you can hang clothes on valves or taps.
- It is very economical and original to use wooden hangers that can be built into the wall at different levels. Already in the products themselves, you can make holes for hooks or use store options that have a self-adhesive surface.
- Old skis are another interesting corridor design idea. By painting them in a fresh shade and attaching hooks to them, you can organize a storage system in a few minutes.

You can do without a hanger in the hallway or corridor only if there is a large closet, and then not always. In private houses, it is more convenient to have "duty" clothes at hand - to jump out into the yard. Those that are mounted on the wall are more convenient: they take up less space. One thing does not please: the prices for worthy specimens are considerable. Therefore, we will tell you how a wall hanger is made with your own hands. The models are different, different techniques are used, but one thing unites them: they are easy to make, especially with detailed photos of the process and explanations. There are also diagrams and video tutorials.
From boards in the form of a tree
We need a hanger in our small hallway. I don’t want to buy the usual one in the form of a bar with hooks - I don’t really like them, and my little daughter won’t get it. Other options with a set of parallel boards are also not inspiring. There is a switch on this wall, so it won’t work without fitting, and it’s not clear what kind of look it will be. Therefore, it was decided: I make a wall hanger with my own hands in the form of a tree - a trunk, branches. It fits into the interior. I will treat the wood with stain and water-based varnish, the color should be close to the color of the front door.
So, two unedged boards 25 mm thick were bought at the sawmill. They are marked - on one trunk, on the other - branches.
We take an electric jigsaw and cut out blanks along the applied contours. Next is the turn of very dusty work - we grind the wood, at the same time adjusting the thickness of the joints with the "branches". Used a drill with a rubber nozzle and sandpaper. First large grain, then medium and small.

Sanding is a dirty business
After the result was satisfactory - it became smooth and the wood pattern showed through well - it was the turn of the stain. This is mahogany color, applied in four layers. After drying, they covered everything with a water-based varnish. Three coats were applied with breaks of three hours.

Nails 200 mm were used as hooks. They were cut to the desired length (different ones - longer for the upper part of the hanger, shorter for the bottom). The caps and the rod were polished for smoothness, and a thread was cut into the thickness of the board (25 mm) on the lower part. Holes were preliminarily made in the “branches”, “hooks” were screwed into them.

Now it remains to fix all the details on the wall. The walls are concrete, so we fix them with dowels. First we put the barrel, we drill holes through it. We set aside the wood for now, insert plastic plugs for dowels into the holes. Having put the "barrel" in place, we fasten it. Using the same technology, we fasten the "branches".

It turned out well, and the color almost exactly matches the door. The plans are to build a small shelf for shoes and bags. All costs for the manufacture of this hanger - about $ 6 for boards and $ 2 for nails, about the same amount was spent on dowels. Stain and varnish were, and consumption is small.
Simple wall hanger made of chipboard
The task is to make a cheap clothes hanger on the wall (for a rented apartment). Two boards made of laminated chipboard () called "furniture board" were bought in a hardware store. Two, because the price turned out to be low, and in the accessories department, where they were looking for hooks, they found good brackets for very little money. We use them for the second board - we will make a shelf for small things.

From the tool you will need a screwdriver or screwdriver, a drill, a set of drills. Still - a tape measure and a pencil - mark the attachment points of hooks and brackets.
After the boards were unpacked, there were spots of glue on them, some other, incomprehensible stains. All this can be eliminated with a solvent. We take a soft white (not colored) rag and wipe everything well.


Next, mark with a pencil the places for the screws. Remove hooks, drill holes. Drill - 1-2 mm smaller in diameter than the diameter of the self-tapping screw. The hole is necessary so that the work goes easier, and also so that the surface does not crack when twisting. We put the hooks in place.
It's time for the shelves. I set aside the same distances on one side and the other, attached the brackets, marked the holes for the fasteners. Drilled holes, installed brackets. All.

Now we mount it on the wall. The technique is the same, but with dowels: we apply, mark the attachment points, drill. Drill - according to the size of the dowel. We insert the plug of the dowel into the hole, put the hanger / shelf on the wall, fasten it.

This do-it-yourself wall hanger was made in two hours (together with a shelf).
Hanger with shelf
You can take the idea as a basis, use any other "hooks" and stops. This DIY wall hanger is made from two 25mm thick planed boards, two carpenter's squares and five hammers.

Wood needs to be dry, otherwise cracks may occur. Instead of squares, even triangular pieces of a similar board can be used. An important condition is the presence of a right angle. And instead of hammers, you can even fix knots or, for example, cut wooden hangers, and any hooks. This one is just a gift.


Spare parts - hammers and squares
The two boards must be the same length. An exact match is important. Having adjusted the length, we process the edges with sandpaper. There is a drill - we take a nozzle, fasten the emery and grind first with a large grain, then with a medium one. Then we start marking. First, mark where the stops will be attached. Divide the remaining distance by six, put marks - there are five of them. Just by the number of "hooks".

Ruthlessly cut off the handles on the hammers. We cut it slightly obliquely to get a slight slope.

Using a drill, make holes in the center. The drill diameter is 1-2 mm less than the fasteners used, the hole depth is not less than the length of the self-tapping screw.

Two boards must be connected at right angles. The installation step of the screws is 10-15 cm. We mark the places on the sidewall, transfer them to the end. High accuracy is required. We apply one to the other and transfer the marks with a finely sharpened pencil. We make holes according to the markup.

Drilling holes
We fold the boards at an angle of 90 °, connect them with self-tapping screws. First we twist the two extreme ones, then one in the middle, and then all the rest. The length of the self-tapping screws is at least 75 mm (triple the thickness of the board).

According to the marking, we drill holes for the hooks.

Installing the corner brackets. Since joiner's squares were used, there were no holes in them. They were drilled - two on the top and bottom on each bar. On one stop, 8 screws are obtained. We take them small - more than 20 mm, so as not to pierce the wood. Therefore, a large number of them are required.

The wooden wall hanger is ready. It remains only to paint and hang on the wall.

Based on this homemade hanger, other options were made.


With larger shelves
Video lessons
A few simple homemade hangers for "handy" in video format.
Drawings and ideas for DIY


Easy DIY hanger

In a cozy house it is impossible to do without a hanger - floor, wall or ordinary hangers in the closet. But besides its utilitarian function, storing clothes in a straightened form is also a way to show your creativity, an opportunity to do something with your own hands for household use. An original do-it-yourself outdoor clothes hanger or originally nailed hooks in the hallway - how can you do without them? You don't have to be a jack-of-all-trades to make simple jacket tremples or hat horns, all you need is a tool and some creative ideas.
Hanger as an art object or decorative element
To quickly clean up the house by organizing things in the closet, it is important to have enough space to easily fit:
- dresses and jackets;
- hats and caps;
- bags and belts;
- scarves and neckerchiefs;
- blouses and sweaters;
- business suits;
- outerwear for the off-season;
- skirts and trousers.
But for each such thing, a special device is needed:
- wall hanger;
- hangers (trempel);
- panel or shelf with hooks;
- clothes hanger in the hallway;
- rings and hooks for wardrobe for scarves and accessories.
It is easy to build many types of clothes hangers - with your own hands, photo:

If you look at old things from your grandmother's closet or chest, there are probably some pretty interesting clothes hangers. Vintage trempels and homemade hangers, if they don’t qualify for the “antiques” rank, may well be the basis for renovation or even become a unique art object. No matter how hard they try to transform the old hanger, craftsmen, needlewomen and just lovers of something “creative”! For example, a clothes hanger photo.

Hangers from grandmother's use were made in an era when plastic or plastic products were not produced. An old wooden base can be used as an original decor object, especially if there is no wardrobe in the room. They can be transformed in any way or use any suitable technique:
- decoupage;
- original painting;
- application for varnishing;
- pasting with posters, magazines, geographical maps, etc.
It does not hurt to make soft “shoulders” for knitwear on the old basis so that it does not slip or stretch. These simple devices are also easy to make from scratch from improvised materials. But if you need a wall-mounted base for hooks made of wood or an original floor-standing clothes hanger, then you need materials, tools and woodworking skills.
Wall wooden hanger
Although a wall hanger is the simplest device that is suitable for DIY, you should not make it rough and primitive. Even if it is planned to be used temporarily, for example, in the country, it is still better to make it beautiful so that the wall-mounted clothes hanger decorates the house for many years.
For a quality product, you will need good wood, a board or a cut of a bar, of the required length - the width of 2-3 freely hanging trempels with jackets. The board for the base must be strong and dry, without cracks, treated with antiseptics. On this basis, you will need to fill a few hooks:
- in line;
- in 2 rows;
- in 3 rows - in a checkerboard pattern.
The simplest single-row hanger is useful in any room:
- on the back of the door in the bedroom - under bathrobes;
- in the bathroom or bathroom - for linen during bathing;
- in the pantry - for working or seasonal outerwear;
- in the pool or sauna - under towels and bathrobes.
A simple wall hanger is also needed in a nursery or a teenager's room - accustoming schoolchildren to order, hang casual clothes on hangers so that they do not wrinkle.
Tip: The simplest hanger is a board with hooks and hanging loops for hanging on the wall. But do not forget that it cannot be nailed to a non-plastered wall or whitewash. From an unprepared surface, clothes will get dirty. Therefore, a wooden shield, plastic wrap or drawing paper must be hung on the wall in an unfinished room under a hanger. And wet outerwear will stain the wallpaper or painted wall on the prepared wall.

If you have some original idea regarding the design of the product, it is not necessary to make it in the form of an oblong rectangular disc. A wooden base for a wall-mounted clothes hanger with your own hands can be made in the form of:
- oval;
- wavy panel;
- musical staff;
- heart;
- spirals, etc.
After making the base, the wood must be sanded and varnished or processed in another way. It is important that the wood does not give the prerequisites for splinters when using a homemade hanger. It is desirable to make hooks or “carnations” of the hanger in any original way, suitable:
- old wooden spools for thread;
- handles of broken screwdrivers, scissors and other household items;
- specially cut hooks.
Hooks, “carnations” or “holders” for a hanger do not have to be made of wood or metal, they can also be bought at a hardware or building supermarket. Natural material is also suitable - dry branches, knots, cuttings or cuttings of roots. They must be cleaned of bark, cut off or sawed off the excess, polished and varnished.
Another standard hanger option is made from wooden planks nailed in parallel. They will become not only the basis for hooks, but also a decorative shield for clothes on a whitewashed wall or just a beautiful piece of furniture. It will take a little more time to make it, but such a design looks more solid than just a board for hooks. And if you attach a visor to the hats, it will already be a full-fledged clothes hanger in the hallway with your own hands.

Homemade clothes hanger in the hallway
Hallway hanger should be enough:
- strong and strong;
- aesthetic;
- capacious;
- multifunctional.
Ideally, a small gap in the wall in a narrow hallway should fit:
- outerwear of all family members or guests;
- hats;
- umbrellas and bags;
- shoes under clothes.
It is this versatility that is important to consider when building a homemade hanger for the hallway. Therefore, it is reasonable not just to make a board with hooks, but to decorate it beautifully:
- shield with hooks for clothes;
- visor for caps and hats;
- shoe rack;
- stand for bags and umbrellas.
Tip: The dimensions of such a hanger should not be arbitrary, they are measured with that part of the wall where the hanger should be located.

Usually there is enough space about 1m wide, the height of the clothes hanger in the hallway with your own hands should be more than head level. 2-3 rows of hooks are placed under the trempels and outerwear, plus a visor (shelf) for hats. Reliable connection of the side panel shelves can be connected with planks at an angle of 45°C. The hanger must be attached to the wall with brackets or dowels.
Floor hanger rack
Another type of fixture for placing clothes at the entrance to the building is a do-it-yourself outdoor clothes hanger. You can often see them:
- in the office of the clinic;
- at the reception;
- in the lobby or lobby;
- Internet cafes, etc.
They are commonly referred to as "standing" or "horn" hangers and are made from tubular metal. They are notable for the fact that it is convenient to hang on them not only outerwear, but also hats, bags and umbrellas. And although they are not as stable as hangers nailed to the wall, they are more compact and mobile. They can be rearranged to any place or put away in the pantry for the summer.
In houses and apartments, this type of hanger is used less frequently than in public places, but it is also easy to make it yourself. There are some good ideas, for example to use:
- a cross for Christmas trees as a base and a long shovel handle as a stand, where ready-made long hooks are nailed;
- cuttings of plastic pipes and couplings for the base of the hanger;
- the base of a dried garden tree in the form of a multi-track structure, process and install on a cross or other base;
- cutting pipes of different sections as a telescopic rack;
- the remains of old chairs and stools and build a hanger on a rotating swivel mechanism (buy ready-made);
- as a basis - a tripod from an old camera, a floor lamp and other household items.

Attention: Whatever the design, it is important to observe the main condition - the stability of the floor hanger. And this depends not only on its design, but also on the support. It can be a rotating disk, 3-6 legs or a cross.
Do-it-yourself coat hanger or trempel
It is not difficult to make a clothes hanger on your own, while using any material at hand as a basis:
- thick wire;
- fragment of a thick branch in the form of shoulders;
- small plastic bottles strung on a metal base in the form of a large "paper clip";
- bent metal plate or corner.
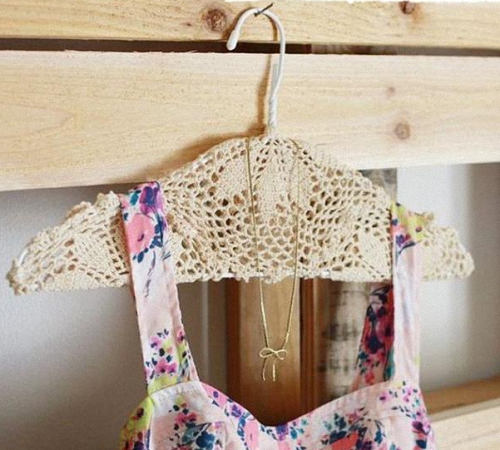
The base for the hanger "shoulders" remains to be wrapped with synthetic winterizer (another filler) and sheathed with any beautiful fabric. This is the best option for knitwear. A beautiful satin bow or an attractive face from a small soft toy will help to add originality. Children will love these hangers. The main thing is to find the right metal for the hanger hook.

Do-it-yourself original hangers from improvised materials
Interesting ideas for the independent manufacture of hangers of any type can be implemented using a variety of improvised materials.
1. Metal. Pieces of steel wire, tubing or angle are suitable for a metal coat hanger. Depending on the flexibility and thickness of the metal, the structure can be bent or joined by welding. The shape and design of the product is optional, see photo:
2. The remains of a bar, board, veneer and other wood are suitable for a wall hanger or a universal product in the hallway. A detailed video is useful for those who love woodwork;
3. Parts of old furniture are also easy to transform into a hanger, for example, by building a multifunctional model based on a chair. This design is convenient in that a jacket and trousers from a suit, a shirt and a tie are conveniently located on one module.
4. The original base for hangers will become an original fixture in a room where there is temporarily no wardrobe. Any wooden handle that is suspended from the ceiling parallel to the floor at a level slightly above the height will do.
5. The old "hunting" idea is to use deer antlers instead of hanger hooks. They can be attached to any base - for a wall hanger or a vertical stand with antlers. Moose antlers will do.
6. The construction of plastic pipes will appeal to lovers of technical crafts.
7. Small wardrobe hangers are also needed, for example, in the form of connected rings made of cardboard or plastic. They are suitable for hanging scarves and neckerchiefs, belts and belts.
8. The simplest wire hanger "hand-rolled" with clothespins around the edges is an excellent tool for storing trousers or skirts. The shape of such simple hangers can be classic, in the form of a curved paper clip or in the form of an intricate labyrinth - as fantasy suggests.
Hangers as a stylistic decor
When choosing the material, shape and design of hangers, you should consider what style your interior is decorated in:
- a wooden hanger with chiseled decorations is suitable for an English office or a discreet classic hallway;
- soft hangers covered with bright fabric will decorate the bedroom in country style, shabby chic, romanticism or boho;
- metal-plastic structures will emphasize the originality of loft apartments, decorate the shelter of a lonely wanderer in the power of techno or high-tech;
- old restored coat hangers fit vintage, retro, Biedermeier or Victorian style;
- hangers of the simplest form and design - an ascetic attribute in the style of minimalism or functionalism;
- original hangers with a "girlish" design are suitable for a Barbie-style children's room;
- a chic and spectacularly decorated hanger - for a boudoir in a palace style;
- satin ribbons, sequins, beads and pebbles are attributes of a glamorous bedroom.
For more information on making your own hanger, see the video:
It is always nice to use useful items for the home, but it will be doubly pleasant if you create the right detail for the interior with your own hands. Wooden clothes hangers have always looked presentable. You can make such an item for an apartment or house yourself, and you won’t need experience in collecting furniture.
You can build a wooden hanger from any material. For example, a wall hanger made of wooden boards will look good in the interior. A wall or table hanger made from a dry log with knots looks very original. When choosing a material, you must be guided by the following principles:
For a wooden hanger, you need to choose a board that is not very thick and not thin. The optimal thickness is 3 cm. To protect the tree from decay, treat the surface with a special antiseptic. Remember that if the finished product is in a humid room, then the life of the wooden hanger will be halved. DIY hanger made of woodTo make a beautiful wooden hanger, you need to approach this process responsibly and prepare everything you need in advance. You will need the following materials and tools:
Let's start creating a template. Draw a model on a blank sheet of paper. It can have a different shape: rectangular, square, oval and even in the form of a circle. In this case, your imagination has no limits - do as you want, and make this dream come true. The main condition is that the drawing must match the dimensions of the board. After the template is ready, attach it to the board and circle it with a simple pencil. And now it's time to get to work:
You get such a nice wooden hanger:
The hanger is ready, it can be nailed in the hallway in a convenient place, and if you attach thick hooks, then garden tools or tools can be hung on such a hanger. Options for wooden hangers can be seen in the photo:
How to make a hanger out of woodYou can make not only a wall hanger out of wood, vertical hangers complement and decorate the interior of the hallway. It is very convenient to come from the street, take off your coat, hat and hang things on a hanger hook. You can also free your hands and find a place for an umbrella and handbag. Depending on the material used, you can make a modest, classic model of a vertical hanger, or show your imagination and make an interesting specimen out of ordinary driftwood. Look at this image - everyone can make such a hanger:
And to create such an original hanger, you will have to make every effort:
We offer to make a wooden hanger yourself:
The hanger looks good in the bath, but it does not need to be placed in the living room. When a person cherishes every item and does not want to part even with broken things, it is just possible to build a wooden clothes hanger from old “hangers”. To work, you need a board, several broken coat hangers, glue for gluing wood, varnish and a brush. You don’t even have to buy hooks, because they are already available. It is necessary to prepare the board, pre-drill holes for fastening on the back side, glue the hangers and wait until the glue dries. That's all! Now you can be proud of your invention!
And this version of a vertical hanger, although considered creative, will have to be silent about practicality, especially since no more than 1-2 items can be placed on such an impromptu hanger.
We considered several options for hallway hangers. And now it's time to start creating a coat hanger made of wood. To do this, you can use old items that many people are in no hurry to throw away. Every year, a lot of unnecessary things accumulate in pantries and garages, from which you can make a very practical and necessary thing. Using a hook from an old coat hanger, you can attach the back of an old wooden chair as a base and cover it with multi-colored paints or simply open the old chair back with varnish. To make such a clothes hanger, you need to pre-sand all the edges and bumps. If you skip this preparatory stage, then later, when using the hanger, you can damage almost your entire wardrobe and “plant” ugly hooks on the fabric. When choosing the back of a chair, it is necessary to take into account its shape, since the functionality of the finished product will depend on this. For example, for coats and other outerwear, a back with horizontal slats is more suitable, and for scarves and ties - with vertical slats. These beautiful wooden clothes hangers can be made in just 3 hours:
How to make a wooden hanger yourself, watch the video: |


