Ventilation in the bathroom and toilet: how to do it, forced and natural ventilation. All about ventilation in the bathroom and toilet Ventilation options in the bathroom and toilet
Anton Tsugunov
Reading time: 3 minutes
Proper air exchange in a room plays no less a role in ensuring comfort than temperature and light. If the air stagnates, an unfavorable microclimate will be created in the room: the person will feel stuffy, dampness and odors will accumulate, and the oxygen content will decrease. These shortcomings are especially noticeable in small and damp rooms, so ventilation in the bathroom must be good. How to achieve this?
Different countries have their own SNiPs. They also specify the requirements for room ventilation. In accordance with these documents, an air flow of 25 cubic meters is considered the norm for a separate bathroom. m/h, for a combined bathroom with toilet - 2 times more. However, ventilation ducts in houses do not always cope with this task. If the room is constantly damp and there is no air exchange, then most likely you will need to install forced ventilation.
Types of ventilation
There are 2 main types of ventilation: natural and artificial. In the first case, air exchange occurs due to the difference in pressure indoors and outdoors. Natural ventilation is provided by windows, vents, doors, and various cracks. That is, no devices are used for air circulation.
Forced (or artificial) ventilation in the bathroom is provided through the operation of a special device that sets air flows in motion. The principle of its operation is simple: the fan draws air outside, and air enters the room from the street or from other rooms.
The following types are distinguished by purpose:
- exhaust ventilation, i.e. removing polluted air;
- supply, aimed at supplying additional volumes of air from outside;
- mixed, i.e., performing the functions of both types mentioned above.
How to check if ventilation is working
In old houses, the operation of ventilation shafts is often disrupted: over time, they become clogged and cease to perform their functions. Therefore, first you need. If it is clogged with something, the effectiveness of not only natural, but also forced ventilation will decrease.
You can conduct another test, it is also very simple and indicative:
- also open the windows and doors;
- light a candle and bring it to the mine exit;
- if the light tilts towards the hole, then there is a draft; if it burns without moving, then the air stands still.
Then the experiments should be repeated with closed windows and doors. If in this case the light deviates or the leaf sticks to the hole, then the draft is good and strong. In this case, there is unlikely to be a need to install forced ventilation. If there is no draft, it will not hurt to install an additional fan.
The main reason for the lack of traction is a clogged channel. In this case, it is necessary, if necessary, to contact the management company. It happens that residents of the upper floors brick up the ventilation, which also interferes with air circulation. This issue will also have to be resolved through the Criminal Code.
Fan selection
The fan must meet a number of requirements:
- Safety. The device will be connected to electricity and installed in a damp room, so moisture protection must be provided, and the fan must also be resistant to steam.
- Low noise level. This parameter should not exceed 35 dB during device operation. Otherwise, the constant hum will irritate residents, and in some cases, neighbors. You will have to spend money on sound insulation.
- Fan capacity. It should be enough to change the air in the room 5–8 times per hour.
Fan power calculation
The fan power level should ensure optimal air circulation, at least at the level of SNiPs. If it cannot drive a sufficient volume through itself, then there is no point in installing it. Therefore, it is important to correctly calculate the required minimum. There are different calculation formulas.
- By room area. The area of the room is multiplied by 5 and added 20%. This is the required minimum fan power that will be needed to provide fresh air to a room of given dimensions. However, it is recommended to buy a more powerful device.
- Taking into account the number of people - 6V or 8V. In this case, the volume of the bathroom (V) is calculated and multiplied by a coefficient. If the premises are used by 2 or fewer people, then a coefficient of 6 is taken, if 3 or more - a coefficient of 8.
Fan installation
In most cases there is no problem with . There are several general rules for placing a hood indoors:
- It should be at the highest possible height, as close to the ceiling as possible, this will increase the volume of purified air.
- As far as possible from water and plumbing fixtures, as moisture can cause a short circuit.
- At the maximum distance from windows, doors and other natural sources of fresh air, otherwise ventilation will not cover the entire volume of the room. Air masses that have just entered the room will immediately be removed through the shaft, while the rest of the air will stagnate.
In most cases, the bathroom does not require additional complex air duct designs: the cooler is mounted directly into the opening of the ventilation shaft.
You can connect the device to electricity in different ways:
- make a separate switch, i.e. the device will work only when someone presses the button (the switch can be either outside or inside the room);
- connect to the bathroom switch, in this case the fan will work when the light in the room is on.
HELPFUL INFORMATION: Do-it-yourself bathroom renovation: sequence of work
Here everyone is free to choose the option that they consider more convenient for themselves.
Improperly installed ventilation in the bathroom leads to the formation of fungus and mold in the room. As a result, bathroom owners receive damaged finishing materials and an aesthetically unattractive appearance of the room. Therefore, special attention should be paid to the correct organization of the ventilation system in the bathroom; we will consider how to make ventilation in the bathroom further.
Ventilation in the bathroom: requirements and functions
The process of installing ventilation in the bathroom, first of all, involves checking the existing ventilation system for operability. Proper air exchange in the room is very important not only for decorating walls and maintaining their attractiveness, but also, above all, for human health. Since a properly organized microclimate helps to improve the general condition and well-being of the people living in it.

The bathroom is an enclosed space that is periodically exposed to moisture, which requires constant removal. To check an existing system for proper operation, light a regular match and bring it to the ventilation duct grille. If the flame goes out, then the system is working properly, otherwise it needs to be adjusted. The same should be done with a small piece of paper. If the paper near the grate sticks to it, then the system is in good working order. If problems are detected in the operation of the ventilation system, first of all you need to clean the existing fans and ventilation ducts.
To properly organize ventilation in the bathroom, you should ensure that you install an exhaust fan of the required power. Before installing an exhaust fan, we recommend taking the following steps to improve the existing ventilation system:
1. Install the fan into the ventilation duct.
2. Install the fan on the surface of the exhaust shaft located on the roof.
3. It is possible to install a ventilation valve in a window.
4. To improve heating in the bathroom and to remove excess moisture, heated towel rails, warm water floor systems or conventional radiators are installed.

Types of ventilation in the bathroom
In relation to air exchange, ventilation in the bathroom is:
- natural;
- forced.
The first option involves removing and circulating air naturally. Doors and open windows are used for this. Air moves from the bathroom to the street due to the difference in pressure. Improved double-glazed windows, which have high tightness, contribute to the disruption of natural ventilation. To solve this problem, it is recommended to purchase windows and doors that have parts for microcirculation.
The second option is artificial ventilation, which is created by installing a fan in the bathroom to promote air circulation. The main function of this system is to discharge the air, that is, to draw it out into the street, and new air enters the bathroom from the adjacent room. With the help of a forced ventilation system, it is possible to get rid of not only high humidity in the bathroom, but also the unpleasant odor in the room.
In relation to the purpose of ventilation, it can be:
- exhaust;
- supply;
- combined.

The first option involves removing air through ventilation ducts. The second type of ventilation is based on ensuring the entry of new air into the room, with the help of which high pressure is created in the air, removing old air through the ventilation ducts.
The combined option involves the use of the first two types of ventilation in one room.
Depending on the design features, ventilation in the bathroom can be:
- channel;
- ductless.
Using duct-type ventilation, rooms that need intensive air purification from high moisture, steam or foreign odors are cleaned.
The ductless ventilation option involves supplying it through wall openings that have already been installed in the room.
How to check the ventilation system for functionality
We suggest that you familiarize yourself with the instructions for checking ventilation in the bathroom:
1. Open the window and doors in the bathroom.
2. Take a thin sheet of paper, in the form of a napkin.
3. Install it on an existing vent.
4. If the sheet adheres tightly to its surface, then the system is working properly.
If not, remove the fan and check the vent duct for debris or other objects.
Instead of a napkin, use matches, lighters or candles. They must angle toward the shaft. It is not recommended to check on a very hot day, since the air at this time is quite heavy, and even a working system will not show the correct result.
In order to find out about the need to make micro-ventilation niches in doors or windows, you should repeat the above steps with closed windows and vents.
If there is no air flow, small grilles are installed on the window or doors.
Tip: Even if natural ventilation works flawlessly, it is recommended to install forced ventilation in the bathroom, which will speed up the procedure for removing moisture from the room and help maintain the integrity of the renovation.

DIY bathroom ventilation: choosing a fan
Depending on the installation method, fans are:
- duct - installed in air duct systems;
- radial - mounted on the outlet part of air systems, distinguished by an aesthetically attractive body.
Depending on the design features, fans are:
- axial;
- diametrical;
- centrifugal;
- axial-centrifugal.
The first version of the fan involves pumping an axial flow using blades, thus creating a pressure of more than 40 Pa. This type of fan is suitable for installation in a ductless system.
Among the advantages of axial fans it should be noted:
- affordable price;
- ease of installation;
- high efficiency.

Disadvantages include high noise production and low pressure.
The second version of the fan is distinguished by the presence of an impeller in the form of a drum. However, such fans do not have high efficiency.
The centrifugal fan features a spiral casing, which helps achieve high performance, but at the same time produces fairly little noise.
Among the advantages we note:
- high cost;
- installation in channels longer than 500 cm;
- high power;
- low noise level.
Centrifugal axial fan types are characterized by their small size, low noise and excellent performance.
Buying a fan is a rather complicated process, during which you first need to pay attention to its power. The optimal power indicator for a standard bathroom is one hundred cubic meters per 60 minutes.
However, this figure is average. When choosing power, you should be guided by the following factors:
- the number of people living in the house;
- room size;
- the number of windows and doors in the bathroom and their size;
- the presence of additional natural ventilation;
- frequency of use of the bathroom.

In addition, an important factor is the noise level that the fan produces. The most comfortable indicator is forty decibels.
There are fans with additional functions such as a timer, automatic on and off. If you have additional funds, it is possible to purchase them, since using such a fan brings maximum comfort.
A hydrostat is a device that is responsible for turning the fan on and off when there is a high level of humidity in the room.
Some types of fans are equipped with special protection against moisture, which is designated IP; the moisture resistance of the device depends on the value of the number after the marking.
If you plan to install the fan near a shower or bathtub, it is recommended to choose a device with the highest protection class. The housing of such a fan provides reliable protection of the engine from moisture, thus improving the service life of the fan.

Ventilation diagram in the bathroom, its arrangement
Most often, ventilation ducts are installed on the walls or ceiling. If there are no air ducts, you should first build them in order to install the fan.
- install the hood so that it is located opposite the door, this will increase air circulation in the room, otherwise the air flow will move very slowly;
- further actions should be aimed at cleaning the existing air duct from debris;
- if there is a hole that is too narrow, take care to widen it with a hammer drill; if the hole, on the contrary, is large enough, then for its equipment you should install a plastic fan pipe, which is fixed in it with cement mortar;
- to close cavities in the pipe, it is enough to use polyurethane foam;
- Please note that the hood is completely recessed into the hole; only the grille behind which it is hidden remains on the wall;
- To install the hood, self-tapping screws, dowels or sealant-based materials are used; the latter option is the most successful, as it is able to dampen vibrations that occur during operation of the device;
- the hood must be connected to the electrical network, so a special cable of the energy supply direction is connected to it;
- It is possible to install an automatic hood that operates only when the lights are turned on.

Ventilation in a bathroom in a private house: working in the space under the ceiling
If the ceiling in the bathroom is suspended or false panels, suspended ceilings and other types of materials were used to decorate it, as a result of which the under-ceiling space increased, then it is recommended to install ventilation during the renovation of the room.
If the ventilation hole is located below the suspended ceiling, a small hole should be arranged in the under-ceiling space with a grille attached to it, with the help of which moisture from this area will be removed into the room.
If there is ventilation in the under-ceiling space, in order to organize air circulation between the main ceiling and the suspended or tension material, care should be taken to install several grilles that will remove excess moisture.
In addition, it is welcome to create a small gap directly above the surface of the door; it will help improve natural ventilation and extend the life of the ceiling.
Tip: Some bathroom owners remove thresholds to improve ventilation. It is strictly not recommended to do this, since it is the threshold that protects other rooms from water if malfunctions occur that lead to a flood.

Please note that any ventilation system needs careful care; the fan and its grille require frequent washing, as a large amount of dust accumulates on their surface. If the fan malfunctions, you should check it for corrosion caused by high humidity.
Ventilation in an apartment in the bathroom and ways to arrange it
To install ventilation in a bathroom in an apartment, it is not necessary to construct air ducts, since they are necessarily present in it.
Installing a fan, in this case, simply involves mounting the device itself on the surface of the air duct.
If there is a channel in the toilet, between which and the bathroom there is a wall, one or two holes should be made in it, which will help the air circulate evenly.
Please note that some ventilation systems are characterized by the presence of special passages that provide both natural and forced ventilation. This option is the most appropriate, as it has good performance.
If there is no ventilation duct in the room, care should be taken to connect it to a special box in which the hood will be installed.

Depending on the design features, ventilation ducts are:
- made of plastic - have a round or rectangular cross-section, are characterized by low noise production, transport air well and are easy to install;
- Corrugated boxes come in two types: hard or soft, they are used when there is a small distance between the ventilation duct or the bathroom.
After installing the box, a fan is installed in it and checked for functionality.
Ventilation in the bathroom and toilet is an indispensable condition, since it is in these rooms that the general humidity of the air is increased and unpleasant odors are usually present. If the ventilation system is not installed or does not work efficiently enough, then not only will a persistent smell persist in the bathroom rooms, but also a favorable microclimate will quickly be created for the development of mold and mildew, which are very difficult to combat.
Everyone knows that steam and heated air rise upward, and if they do not find a way out, then most of the evaporation will sit on the surface of the ceiling and the top of the walls, where black spots of microflora colonies can most often be seen. We must not forget that any fungus reproduces by spores that are released into the air. Together with the air, they are then inhaled by household members, and this can lead to allergic reactions, diseases of the respiratory system, asthma and other serious ailments.
Basically, the question of how to carry out an effective one arises before the owners of private houses, since in high-rise buildings this is laid out in advance in the building design, and the ventilation ducts are routed to the bathroom and kitchen areas. However, the information can also be useful for apartment owners - the “standard” ventilation system does not always fully cope with its responsibilities, and certain adjustments need to be made to its operation.
Types of ventilation systems
First of all, you should familiarize yourself with the existing ventilation systems.
Ventilation systems are divided into two main types - natural and forced.
- Natural ventilation works only due to the free movement of air from an area of high pressure to a lower one, that is, without the use of special instruments and devices. This type of ventilation is designed in the apartments of most multi-storey buildings. The size of ventilation windows (vents) in the bathroom and toilet (separate or combined) and in the kitchen, the configuration and throughput of the ventilation risers are designed in such a way as to create a natural movement of air from the living spaces with the required volume of air exchange.

- Forced ventilation involves the installation of fans. Very often, just such a system is installed in bathrooms and kitchens of private houses. However, some homeowners in high-rise buildings, wanting to improve the ventilation of the premises, install a fan in the apartment.
In addition, forced ventilation systems are divided, depending on their main functions, into the following types:
- Exhaust ventilation. In this system, the air rising to the ceiling is drawn in with the help of a fan and discharged through special channels to the street. Typically, this scheme is used in conjunction with a natural ventilation system. This is the most common option for private construction conditions.

For example, this illustration shows an option that is carried out through the intake of air from the street, with its further forced removal through the kitchen and sanitary premises.
- – in this system, the fan works to supply air, and its output for a full ventilation cycle is done naturally through the ventilation ducts. In practice, in residential construction, such a scheme is rarely used - here it is more important to create conditions for the effective release of air to the outside in the required volume.
- The supply and exhaust system involves both the injection of air into the premises and its forced removal from them. It is typical for volumetric structures, for large-area houses in which the natural inflow and outflow of air is clearly insufficient.
Fan types
Since the exhaust ventilation system is the most effective for a residential building, with a natural flow of air through “clean” living spaces and forced air exhaust through the kitchen and bathroom, it is worth saying a few words about exhaust fans. They are divided into types according to their installation locations - axial, channel, roof and radial.
- Axial wall-mounted (overhead) fans.
An axial fan consists of a housing in the form of a cylinder, inside of which there is a wheel with cantilever blades mounted on the axis of an electric motor. When rotating, the blades capture air and activate its removal from the room.

This type of device is mounted in a ventilation duct window on the wall (or ceiling) of the bathroom or toilet. It is very easy to install due to its well-thought-out design, and looks quite aesthetically pleasing, so it can be called the most popular for installation both in a private home and in apartment conditions.
- Duct fans.
Duct axial fans have been used in household practice not so long ago and not as widely as overhead axial fans, since their independent installation is quite complicated. However, sometimes it is impossible to do without them, for example, in cases where the area of the ventilated room is more than 15 m².

Duct fans are also installed in cases where they want to reduce the noise level from the operation of the device in a bathroom or other rooms of a private house.
This type of fan can be installed in various areas of the ventilation duct. It is placed in a special box-shaped housing, or it can itself be a connecting element for two parts of the ventilation pipe. It is very important that free access to the device is provided, since it must be cleaned and lubricated periodically.

There are three types of air ducts in which duct fans are installed: flexible, semi-rigid and rigid.
Flexible channels are quite easy to install, which is why they are chosen most often. However, they are less reliable and have a much shorter service life than rigid or semi-rigid ducts. A thrifty owner will certainly choose reliability.
- Radial fans.
A radial fan consists of a motor located on the axis of rotation of a wheel with blades, which is placed in a closed metal box with a characteristic spiral shape.

During operation, the fan blades begin to rotate, capturing air from the room, which flows from the fan through the outlet of the casing into the air duct.
For installation in residential buildings, it is recommended to choose radial fans with backward-curved blades. Although they have slightly lower indicators of the generated pressure, such devices are distinguished by better “linearity” in adjustments, a larger operating range and, most importantly, are not so noisy compared to fans with forward-curved blades.

Radial fans tolerate increased loads well and are quite economical to operate.
- Roof fans.
As can be understood from the name of these devices, they are installed on the roofs of apartment buildings and private residential buildings.
The design of a roof fan includes such elements as an engine, a wheel with blades on the axis of rotation, vibration-isolating (damper) pads, and a device for automatic adjustment.

A roof fan can have an axial, multi-blade or radial design. The latter is most in demand, as it is the least demanding and provides high performance with minimal energy costs.

Forced ventilation systems can operate in both automatic and manual modes, have one pumping level or several speeds.
- Unregulated ventilation has only two mode positions: “on” and “off”.
- A system with several speeds that are selected by a switch will become more flexible.
- The most economical to operate are fans with adjustable speed, in which the blade wheel is given a rotation speed corresponding to the required current load on the system. The speed change occurs quite smoothly, with the help of special automatic monitoring and control units.
Basic standards and requirements for the organization of ventilation
It's time to move on to the issue of choosing what you need and choosing a toilet. But the main question immediately arises about its most important characteristic - productivity, that is, the ability to pump a certain volume of air per unit of time.
It will be difficult to understand this aspect if you first do not familiarize yourself with the basic standards for organizing ventilation in a residential building or apartment.
In this matter, it is necessary to rely on the main governing documents - the relevant sections and annexes of SNiP 41-01-2003 (“Heating, ventilation and air conditioning”) and SNiP 2.08.01-89* (“Residential buildings”).
According to the requirements of this document, a forced artificial ventilation system must be installed in those rooms where it is required by sanitary standards, but natural ventilation, that is, a window or vent, is absent or ordinary ventilation is not enough.
In order not to refer the reader to the SNiP tables, below is generalized information that will be required to calculate ventilation.
| Room type | Ventilation standards | Notes | |
|---|---|---|---|
| Air flow from outside | Exhaust air outside | ||
| Residential premises | The air exchange rate is not less than 0.35 times/hour, but the intake is not less than 30 m³ per person. | - | The calculation is based on the total volume of the entire apartment (house) or on the number of people actually living |
| 3 m³ for every 1 m² of residential area | - | The calculation is based on the area of living quarters of the house | |
| Kitchen | |||
| · with electric stove | - | Not less than 60 m³/hour | |
| · with 2-burner gas stove | - | Not less than 60 m³/hour | |
| · with 3-burner gas stove | - | Not less than 75 m³/hour | |
| · with 4-burner gas stove | - | Not less than 90 m³/hour | |
| Bathroom | Inflow from residential premises | Not less than 25 m³/hour | |
| Separate restroom | Inflow from residential premises | Not less than 25 m³/hour | |
| Combined bathroom (bathtub + toilet) individual | Inflow from residential premises | Not less than 50 m³/hour | |
There are, of course, standards in SNiP for more specific visits: dryers, ironing rooms, dedicated laundries and others. But in the context of this article, they are not particularly interesting to us - we will talk about average apartments or houses. You can completely limit yourself to the above values.
But why do we need to know the indicators of forced natural ventilation in residential areas? But the fact is that an apartment or house should be considered as a single balanced “organism”. In order to be effective, and the bathroom, toilet and kitchen areas are constantly ventilated with air coming from the living area, the exhaust devices installed in them must be able to cope with this task. Simply put, the volume of extracted air cannot be less than that of incoming air. There is such a thing as the air balance equation, and when selecting ventilation units it is necessary to strive for maximum compliance with it.
∑Qin. = ∑Qout.
∑Qin.– the required total volume of air supplied with supply ventilation.
∑Qout– required exhaust ventilation performance.
Failure to comply with this equality in one direction or another can cause undesirable consequences - stagnation of air, penetration of odors from the kitchen, and even worse - from the restroom, into living rooms, accumulation of dampness in corners or on window slopes, unpleasant drafts and other negative phenomena.
Constantly foggy windows are a sign of poor ventilation.
An always-damp surface of the glass on the windows is half the trouble, it’s just an external sign of a fairly serious problem. , and what needs to be done in this case - read in the special publication of our portal.
To determine the right side of our equation, we will have to carry out calculations for the required air flow.
The most correct approach would be to calculate according to three parameters - according to sanitary standards for each resident, according to the air exchange rate for the volume of the entire house or apartment, and according to standards for each meter of living space. Then all that remains is to compare the results obtained and select the maximum indicator - this will become the required air flow value for high-quality ventilation.
Well, then, based on the obtained value, it will be possible to move on to the distribution of forced exhaust ventilation volumes in order to achieve the desired equality.
For example, calculation for a house with a total area of 120 square meters.
Having problems calculating the area of premises?
It is usually easiest to take the area from an existing house plan. If for some reason it is not there, you will have to calculate it yourself. A special publication on the portal examines various examples - from the simplest rectangular rooms to rooms with an unusual complex configuration, and contains convenient online calculators for quick and accurate calculations.
To make the calculations easier, you can make a small table:
| House premises | Air flow from outside | Outdoor hood | |||
|---|---|---|---|---|---|
| Other data and calculation progress | According to sanitary standards for residents | According to the frequency of air exchange from the total volume of the premises | According to the standards per 1 m² of usable area | Minimum established | Necessary in real conditions |
| Number of residents | 5 people | - | - | - | - |
| Living room | - | 21 m² | 21 m² | - | - |
| Bedroom 1 | - | 16 m² | 16 m² | - | - |
| Bedroom 2 | - | 14 m² | 14 m² | - | - |
| Children's | - | 17 m² | 17 m² | - | - |
| Dining room | - | 15 m² | 15 m² | - | - |
| Kitchen (gas stove 4 burners) | - | 12 m² | - | 90 m³/hour | 150 m³/hour |
| Hallway | - | 5 m² | - | - | - |
| Hall | - | 9 m² | - | - | |
| Corridor | - | 3 m² | - | - | - |
| Bathroom | - | 6 m² | - | 25 m³/hour | 50 m³/hour |
| Bathroom | - | 2 m² | - | 25 m³/hour | 50 m³/hour |
| Total area | - | 120 m² | 83 m² | - | - |
| Ceiling height | - | 3.1 m | - | - | - |
| Total volume | - | 120 × 3.1 = 372 m³ | - | - | - |
| Established norm | 30 m³/hour | 0.35 times/hour | 3 m³/1 m² | - | - |
| Calculation | 5 × 30 = 150 | 372 × 0.35 = 130.2 | 83 × 3 = 249 | 90 + 25 + 25 = 140 | 150 + 50 + 50 = 250 |
| Need according to standards | 150 m³/hour | 130.2 m³/hour | 140 m³/hour | ||
So, of the three calculated values, we accept the maximum – 249 m³/hour, since it fully meets all the conditions. We round it up to 250 m³/hour, and bring to this value the total performance of exhaust ventilation in the kitchen, bathroom and toilet.
The kitchen should be given more space - it has a larger area and the ventilation standards in this room are stricter. In our case, it can be allocated 150 m³/hour. This can be a total of ventilation + kitchen, but only if the hood works with air exhaust to the outside, and not on the principle of recirculation.
The remaining 100 m³/hour can be evenly distributed between the bathroom and toilet (if you plan to install individual axial fans for each room). Or, in the case where these rooms are united by one exhaust system, you can install a common duct or radial fan of appropriate capacity. Obviously, such volumes of exhaust ventilation are quite sufficient in comparison with the minimum standards, even with a good margin.
So, all conditions are fully met, and the required performance of the ventilation unit has also already been determined.
Other criteria for choosing a fan for the bathroom and toilet
It is very important to know what else you need to pay attention to when choosing an exhaust fan for bathroom rooms, in addition to its performance. These criteria include the following technical and operational parameters:
- The level of noise generated during operation. The operation of any ventilation device is accompanied by mechanical and aerodynamic noise. These sound vibrations propagate through the air, through air ducts and the surfaces of the walls within which they are laid.
Mechanical noise arises from vibration of the wheel with blades, the electric motor and the casing in which the entire structure is installed.
Aerodynamic noise appears as a result of vortex formation inside the casing at the blade wheel, at the inlet and outlet of air, as it moves through air ducts, as well as during pulsations that occur.
Increased vibration and noise of a ventilation unit can negatively affect the well-being of the residents of an apartment or house.
Therefore, for fans installed in residential premises, there are certain restrictions on the noise pressure created, and this parameter itself must be indicated in the product data sheet (often even within a certain range of distance from the device).
If you purchase a fan with the ability to adjust the engine speed and, accordingly, performance, then you should give preference to a device that will cope with the necessary task of extracting the required volume of air not at its maximum, but by about 0.5 ÷ 0.7 of its intended capabilities. This way, the equipment will last longer, and the noise level will be significantly reduced - high speeds are most often the main cause of noise.

It should be noted that manufacturers install special silencers of one design or another on many fans - be sure to take this into account when choosing.
Another important point in reducing noise levels is the installation of a fan with provided straight sections to stabilize the air flow, reducing turbulent phenomena. For a duct or radial fan, it is advisable to leave such areas on both sides (for an axial fan, of course, this is impossible to fully observe). The length of each such section must be at least 1.5 times the outer diameter of the impeller (turbine).
- Fan functionality. Exhaust ventilation systems can be automatic or standard.
Conventional axial fans can be operated by manual activation, or they can be built into the overall lighting system of the room, that is, when the lights are turned on, the exhaust fan also turns on.

The latter option is more convenient and economical, but some caution is required here so that when the device is turned off, the entire ventilation system of the house as a whole does not suffer. The outflow of air from the living area in the minimum required volume must be ensured at all times.

The automatic design of the device assumes the presence of an electronic unit with a timer on which the on time, operating modes and turn off time of the fan are set.
- Device safety. Since the fan is powered by electricity, devices that are protected from moisture are selected for bathrooms, the packaging of which must have a corresponding label.
When choosing a fan, it is worth checking for a quality certificate for the product. It is necessary to purchase such devices in specialized stores, preferably models from well-known manufacturers, whose brand itself provides a certain guarantee for the product. Do not hesitate to request that the necessary sales marks be placed in the product passport to ensure further warranty and service.
TOP 9 best bathroom fans
| Photo | Name | Rating | Price | |||
|---|---|---|---|---|---|---|
| The best overhead fans | ||||||
| #1 |
|
Vents VNV-1 80 KV | ⭐ 99 / 100 | |||
| #2 |
|
Cata E-120 GTH | ⭐ 98 / 100 | |||
| #3 |
|
Electrolux EAFR | ⭐ 97 / 100 1 - vote | |||
| #4 |
|
Soler & Palau Silent-100 CZ Design | ⭐ 96 / 100 | |||
| The best duct fans | ||||||
| #1 |
|
Blauberg Turbo 315 | ⭐ 99 / 100 1 - vote | |||
| #2 | Vents Quietline 100 | ⭐ 98 / 100 | ||||
| #3 |
|
Era Profit 5 | ⭐ 97 / 100 | |||
| Best LED Fans | ||||||
| #1 |
|
Cata E-100 GLT | ⭐ 99 / 100 | |||
| #2 |
|
Blauberg Lux 125 | ⭐ 98 / 100 | |||


Self-installation of ventilation
Installing a fan in the bathroom or toilet of an apartment is quite simple, since the ventilation system in multi-storey buildings is already installed, and the device will only increase the exhaust air exhaust along with unpleasant odors and humidity.

It is more difficult to install a ventilation system in a private house. But doing it yourself is also quite possible. Of course, it is best to install all the elements of the system during the construction stage, but it is often necessary to carry out these installation works in an already finished building.
Ventilation system elements
If the type of ventilation system is determined, then you need to prepare all the elements necessary for it according to pre-determined dimensions.

- The fan is the main component of the system and can be built into the wall or ceiling, as well as into the air duct. The device is usually built into the air duct in case of planned installation of a complex ventilation system. For example, if the bathroom and toilet are separated (or even separated) from each other, then each room can have its own ventilation hole, from which ducts or pipes are diverted, then connected to a single air duct equipped with a duct or radial roof fan.
- Air ducts can be made of plastic or metal and have a round or rectangular cross-section. Each of them has its own advantages, for example, the rectangular version is more convenient to attach to the ceiling or wall; it can be ideally located above a suspended or suspended ceiling. The round cross-section provides more efficient air removal, since it does not have internal corners that delay its smooth movement or cause turbulence.
 Rectangular ducts are easier to attach to walls and flow, but round ducts are less noisy.
 - Swivel elbows are used when using rigid boxes. They are installed in complex structures, when changing the direction of air ducts, when exiting through a wall or ceiling, and in other cases, in accordance with the installation plan.
- Couplings are used to connect individual sections of the air duct.
- A check valve is installed to avoid reverse air flow when the fan is turned off, or, for example, when there is strong wind outside.
- Elements for securing air ducts. To do this, you can use homemade or ready-made brackets (clamps), which are usually installed every 500÷700 mm, depending on the location.
- Ventilation grilles installed at the inlet and outlet openings of the system will be required in cases where a duct fan installed between two parts of the air duct is selected. One ventilation grille will be needed to mount it on the outlet of the system when installing a surface-mounted axial fan.
Ventilation system installation
Installation of the ventilation system is carried out differently, depending on the chosen design, and whether it is being updated or installed anew. Therefore, before proceeding with installation, you should draw up a detailed diagram that will make it easier to work with.
- If you decide to update an already installed ventilation system, then it is best, if possible, to replace the air duct with a new one. If this cannot be done, it will be necessary to thoroughly clean the old air duct of debris and deposits on the stacks.
- Before laying the ventilation duct, you need to determine in advance the installation location of the fan. The optimal location for installing the device will be the wall opposite the doorway. In this case, the ventilation system will work more efficiently due to the natural flow of air in the form of a draft.
- The next step is to cut a new one in the wall or, if necessary, expand an existing ventilation window to the required size.
- The ventilation duct is led out into a hole, then gradually installed, laid in accordance with the diagram and fixed in the attic of the building, or passed through the attic floor and roof.
- If the duct is led outside through an external wall, then it is recommended to install a pipe into the ventilation hole on the street side, which is raised vertically by at least 500÷1000 mm. If you install only a protective grille on the through hole, then the room will not have time to heat up when the heating system is operating - all the heat will quickly escape through the ventilation in a draft.

- A ventilation pipe exiting through the roof of a building requires reliable waterproofing. For this purpose, you can use special waterproofing cuffs that are put on the pipe and secured to the roof.

- Another option for installing the system would be to mount the fan in the ceiling and connect it to a flexible ventilation duct (corrugated pipe), which connects to an outlet covered by a protective grille installed under the roof soffit. This installation method is possible both in combination with a suspended ceiling and without it, since the box can easily pass through the attic.

- In the case of installing a complex ventilation system, when the bathroom rooms are separated and the ventilation needs to be connected to one common air duct, you can proceed as shown in this diagram. Inserts with pipes are installed in the common ventilation duct, which will go into the rooms through the suspended ceiling, and the air duct itself can be led outside through the wall. In this case, two fans can be installed, one for each room or one, ducted or installed on the street side and covered with a special casing.

- After installing and securing the air ducts, you need to carefully install the axial overhead fan itself, which is inserted into the box and secured to the wall in a convenient and, of course, reliable way for each specific case. The presence of vibration loads should be taken into account so that the fastening elements do not become loose over time.
- Before finally fixing the overhead axial fan in the window, you need to connect the device to the power supply. It is recommended to enclose the wire connecting the fan to the switch in a special plastic cable channel fixed to the wall, which can be placed along the ceiling or hidden above a suspended structure.
The fan is connected to the power supply through connecting terminals, which must be hidden under a special cover or casing to prevent them from being actively exposed to high humidity.

Depending on the design, the terminal block is located differently, but the fan is always accompanied by a connection diagram that will help you navigate this issue.
If you decide to connect the fan to the light switch, then this connection should be made approximately as shown in this diagram:

Connection in this way is carried out in a distribution box specially installed for this purpose, where the “neutral” and “phase” wires of the fan and lighting are connected, respectively, using a terminal. The “phase” is interrupted at the switch, and from it there is already a connection to both devices.
By the way, if you think about it carefully, such a scheme is very irrational. Let's simulate a situation - a person took a bath or shower, dried himself, got dressed, left the bathroom and turned off the light behind him. During this time, excess moisture can hardly be completely removed by the fan, and a “pillar of steam” remains in the room. The situation is similar with using the restroom. With such a connection, it would be wiser to provide a time delay of at least 5 ÷ 10 minutes by installing a simple time relay in the fan circuit.
By the way, if you wish, you can find on sale electronic timer light and ventilation control devices designed specifically for these purposes.

- When installing a duct fan, you need to carefully consider connecting it to the power supply, especially if the ventilation duct is planned to be routed through the attic. An electrical cable will need to be laid through the ceiling, and along its entire length, all its possible connections, as well as the passage through the ceiling, must be reliably insulated.

- If the system is mounted under the ceiling of the premises, then the air duct along with the fan can be hidden above the suspended ceiling. In this case, a ventilation hole can be arranged in the ceiling, where the air duct is brought out and fixed, and then this window can be covered with a decorative and functional grille.
Video: how to install an exhaust fan in a bathroom or toilet yourself
Checking the installed system
After completing the installation of the ventilation system, it is necessary to check it. In order to carry out such control, you do not need any tools - just bring a piece of paper or a lit candle to the grille of the switched on fan. If the paper sheet is attracted to the grate and the candle flame leans towards it, then we can say that the fan is working quite efficiently.

If it is necessary to increase draft, then a small artificial draft can be stimulated. To do this, a narrow slit-like window is cut out at the bottom of the bathroom door or a series of holes are drilled. These cutouts are then covered on both sides with a specially designed ventilation grille. It, depending on the design and type of holes made, is inserted into the through opening, can be glued to the door or screwed with self-tapping screws.
The bathroom in an apartment or house is always a “wet place”. Even if you don't make puddles on the floor. Cold and hot water, steam, wet towels - everything evaporates moisture. It’s also hot in the bathroom and it creates a greenhouse effect.
Excess dampness and heat, ideally, should “go” into ventilation, but as you know, its effectiveness in city houses is far from normal. And both in the old building and in new buildings. The reason is that ventilation is natural throughout, that is, without additional exhaust.
In America, high-rise buildings have huge fans, but here the air is removed by gravity due to the difference in pressure and temperature. As a result, it moves only moderately, or even barely at all, if the houses are old and the canals are clogged.
And our “wet place”, the bathroom, is slowly acquiring all sorts of less useful flora and fauna in the form of fungus, mold and even woodlice. To get rid of such proximity or stop it in advance, you need to install an exhaust fan in the bathroom. It will draw out all the dampness where it should, and the attack in the form of unhelpful settlers will happily pass you by.
How to choose a fan for the bathroom and toilet
It seems that everything is simple, we decided that we need a fan, we go to the store and buy it. But only cats will be born quickly. A big surprise awaits you in the store from a bunch of types and models. Where there are several dozen, and where there are a couple of hundred. And you will be stuck over the question, “which fan to put in the bathroom?”
No wonder. Different types, power, models, installation methods, characteristics - the devil will break his leg in this variety of technical progress in the field of ventilation. Sellers even have a hard time sorting things out if the assortment is huge.
That's why we've put together a "guide to bathroom fans." To make your task easier and help you quickly purchase the necessary equipment. First, let's look at the general characteristics of bathroom fans.
So, let's go!
1. Axial, centrifugal - what does it mean?
This is a type or type of fan. He talks about the design of the equipment and its operation.
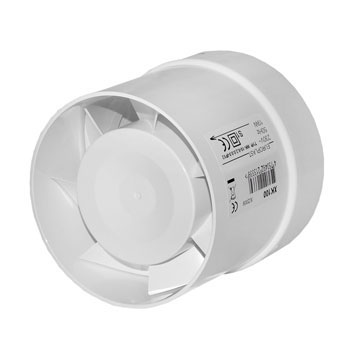
Axial fan- This is a bladed impeller in a housing. The impeller is rotated by a motor on the rotor of which it is mounted. The blades are inclined inward relative to the plane of placement; they draw in air well and move it along a straight axis. Therefore, this type is called an axial fan. It has good performance, moderate noise, and is most often used for installation in the bathroom.
Centrifugal fan arranged differently. The air is sucked in by a turbine with blades. Inside the housing, the flow twists into a spiral and receives additional acceleration due to centrifugal force. The flow does not exit along a straight axis, but at an angle of 90 degrees into a special device - a snail. A centrifugal fan is also called a radial fan.
It has lower productivity compared to the axial one, but can “drive the flow” under pressure of varying strengths. The noise level is low or medium, depending on the direction of bending of the rotor blades. With the front bend it makes less noise, with the rear bend it makes more noise, but it saves energy.
2. Overhead or channel
Ventilation equipment is available for external and internal installation. The external type of installation is mounting on a wall or ceiling at the outlet of the ventilation hole into a shaft or into a pipe system. A duct fan is a built-in equipment that is placed inside a ventilation duct (air duct). Ventilation duct systems are made of metal or plastic. For the bathroom, plastic channel systems are more often used, for example, from the Vents company.
Often the exit to the ventilation shaft is located in the toilet. For exhaust from the bathroom, an air duct with an intake grille is installed. The ventilation hose is pulled to the mine window. A duct fan with an additional grille is installed in the toilet. The hood simultaneously takes air from the entire bathroom and directs it into the ventilation shaft of the house. By design, external and duct fans are made both axial and centrifugal.
3. Choosing a bathroom fan based on power
The power level or performance of the fan is one of the main characteristics. In fact, the hood is chosen based on it, paired with the design (axial/centrifugal). The performance “tells” how many cubic meters of air the fan pumps per hour - 100, 200, 300.
To choose the right power, you need to calculate the volume of the bathroom and multiply it by 8. “Eight” indicates the sanitary requirement for the frequency of air changes in the room per hour. Simply put, the fan needs to pump the volume of eight of your bathrooms. Then there will be cleanliness, beauty and no mold.
Example! For an urban standard bathroom with dimensions of 1.7x1.5x2.5m with an exchange ratio of 8, a productivity of 51 cubic meters per hour is needed. Axial fans are produced with a power of 80 cubic meters. This hood will cope with the task even with a reserve. The centrifugal model usually “drives” from 42 to 100 cubic meters per hour.
4. Choosing a fan for the bathroom based on noise level
It is clear that the hoods make noise, but not very much. If you want something completely quiet, take the axial model from the Silent line. Their design includes mounting the engine on silent blocks, which “dampen” noise and vibration. Among the “quiet” ones, you can choose a model with a noise level of even 22 dB.
Centrifugal engines are louder because the turbine pumps air under pressure. But they also make moderate noise, about the same as a cooler in a computer. It doesn’t stop you from watching movies, listening to music or playing games. Likewise, the fan will just be in the background if you are in the bathroom when it is on.
Attention! Noise is a secondary characteristic. The most important thing is that the hood “drives” the required volume of air for a good microclimate and fits the ventilation design.
5. Which fan is better for a bathroom or toilet - reviews of additional functions
Modern technology can do a lot, and fans are produced with various additional functions. Their list includes:
- Additional sensors. They measure humidity or react to movement.
- Sleep timer. It sets the shutdown delay time, minimum 2 minutes - maximum 30.
- Indicator light. Lights up while the fan is running.
- Pull cord switch. You can turn the hood on and off at the right time. For example, when you take a shower or bath. That is, when the light in the bathroom comes on, the fan does not automatically start.
- Automatic blinds. They are used to close the ventilation grille after the duct fan is turned off.
- Check valve. Its main task is to prevent the penetration of foreign odors from the ventilation shaft.
According to reviews from our customers, most often they buy models with humidity sensors and a shutdown timer. The check valve, which blocks the flow of air from the shaft or duct back to the fan, has already become part of the structure. Very rarely it is sold separately and is considered an additional option.
6. Degree of moisture protection
All bathroom fans have increased moisture protection within 4-5, dust protection can be either zero or 3-4. The equipment passport will indicate IP X4, 34, 44, 45.
We've sorted out the characteristics, now let's talk about the range.
Fans for bathrooms and toilets in the catalog website
Our store offers well-known and popular brands of household bathroom fans:
| Soler & Palau | Blauberg | Fresh | Era | Vents | MMotors JSC |
Let's divide them into groups and get to know each other better.
1. For a city bathroom or standard-sized bathroom, the most popular type of exhaust fan is a model with a power of up to 100 m3/hour
The catalog contains:
Surface-mounted axial fans
Soler & Palau
| SILENT-100 CZ SILVER DESIGN-3C | SILENT-100 CZ GOLD | SILENT-100 CHZ | SILENT-100 CMZ |
| ECOAIR DESIGN 100 H (with humidity sensor) | ECOAIR DESIGN 100 M (with lanyard) | ECOAIR DESIGN 100 S (base model) | EDM 80L |
| SILENT-100 CZ | |||
Power 65-95 m3, noise 26.5-33 dB, the basic Silent model has a check valve and quiet running bearings (CZ), other models can optionally be added - timer (R), humidity sensor (H), cord switch (M ). |
|||
Blauberg
MMotors JSC
Power 60 cubic meters, noise 25 dB, ultra-thin models with a thickness of 4 cm.
Duct axial fans
For installation in a round air duct, duct models are used. Among low-power ones we offer Bulgarian MMotors JSC
| BO 90 | BO 90T |
Power 50 m3, noise 36 dB, operating temperature +100-150°C.
Centrifugal fans
Due to the design and the creation of additional traction, such hoods, even at low power, are more efficient than axial ones. They cost more, so they are taken less often. Although the “usefulness” of a centrifugal fan quickly pays for its cost.
The main operating mode is minimum speed and minimum energy consumption. The hood works great for a long time in the background for routine cleaning. When humidity rises, the maximum mode is switched on and the air in the bathroom is quickly replaced.
Among the centrifugal ones we offer a fan from the company Era
| SOLO 4C era |
Three-speed, capacity 42/64/100 m3, noise level 25.8-30 dB, equipped with a check valve and filter. Suitable for wall/ceiling installation and vent mounting.
2. In new houses, with large apartments, townhouses and cottages, the bathrooms are more spacious and for cleaning they are equipped with hoods with a capacity of 100 to 400 m3 per hour
The website catalog contains models:
Axial fans for wall or ceiling
Blauberg
| Aero Chrome 100 | Aero Still Vintage 125 | Aero Still Vintage 150 | Aero Still 125 |
| Aero Still 150 | Deco 100 (ceiling) |
Power 102, 154, 254 m3, noise level 31-33-38 dB, all models have a check valve, additional options are indicated by letter markings, T - with a timer, ST - with a cord and a timer. Ceiling ones have a power of 105 cubic meters and a noise level of 37 dB.
Soler & Polau
Capacity 175, 180, 280, 320 m3, noise level in the SILENT series 35-36 dB, in other models 42-47 dB.
Capacity 140-183, 250-290 m3, noise level 30-33, 36-38 dB.
Capacity 110-132m3, noise 17-22dB. New generation fans. Equipped with a smart control system, speed switching mode, and sensors. They can work automatically using a built-in program or run in the selected mode via a smartphone or computer.
Duct hoods
Blauberg
| Tubo 100 | Tubo 125 | Tubo 150 | Turbo 100 |
| power 137, 245, 361 m3, noise level 38-39-40 dB. | two-speed, power 170/220 m3 per hour, noise level - 27/32 dB, wall or ceiling mounting. | ||
Soler & Palau
intelligent, maximum power 106 m3, in quiet mode - 72. noise level 31 dB (22 in quiet). Basic humidity control, timer, additional speed control - motion sensor operation. Suitable for non-stop ventilation at a capacity of up to 40 m3/hour.
Exhaust fan for the bathroom - the best option
If we talk about choice and answer the question, “which bathroom exhaust fan is best?” then there will be several optimal options:
- for a regular bathroom with a separate ventilation hole;
- for general ventilation of the bathroom;
- for a large bathroom.
The bathroom has direct access to the shaft
The best option is a wall-mounted axial fan with a power of up to 100 cubic meters per hour. Take Blauberg or Soler & Palau. Most models have a check valve; it will protect against backflow of air from the shaft when the hood is turned off. And during operation, it will quickly clean the air and do it very quietly (background sound within 25-33 dB).
Models with classic design from Blauberg
German hoods are quite a budget option; there are Spanish ones, both budget and expensive. Although their “expensiveness” is very relative. You take equipment that will work for ten years, or even more. So, let’s divide the price by the service life of the fan, and we get the cost of 10 lunches in a cafe, even for a hood for 6,300 rubles.
If the apartment is rented, or you just bought it in an old building and for now you plan to do without major repairs, take an inexpensive fan from Era:
| FAVORITE 4 | OPTIMA 4 |
The price is in the range of 400-500 rubles, they pull perfectly, they are of course louder than imported ones, but they will work like clockwork for 2-3 years.
General ventilation in the bathroom
If the exit to the shaft is in the toilet, you need to install an air duct and a duct fan for exhaust from the bathroom. The best option would be
| Tubo 100 from Blauberg | Silentub 100 from Soler&Palau | Silentub 200 from Soler&Palau |
They will quickly clean the bathroom of moisture and steam. Air intake from the bathroom and toilet will go through the ceiling grilles.
If you want to split the ventilation:
- Install a Deco 100 ceiling fan in your bathroom. Its productivity is higher (105m3) than that calculated for a standard bathroom (51m3), but that’s how it should be. The hood will have to “drive” air through curved pipes, so you need a power reserve for quick air exchange.
- In pairs and for separate ventilation of the toilet, install a duct fan. The optimal model would be Vents iFan D100/125. It can operate in turbo mode with a capacity of 106 m3 and 72 cubic meters. In addition, there is a mode for constant ventilation, at a minimum power of up to 40 cubic meters per hour.
| Deco 100 | Vents iFan D100/125 |
Ventilation for a large bathroom
If the bathroom is large, choose a powerful fan. The best options would be:
Axial external
| Aero Still Vintage 125 | INTELLIGENT White | SILENT-300 CHZ |
Duct
| Tubo 100 | TDM100 | PRO 4 | iFan D100/125 |
Centrifugal
| SOLO 4C |
Take external and duct axial fans with a power reserve, this way they clean the air faster both directly into the exhaust shaft and through the hose. Centrifugal creates increased pressure and a large capacity reserve is not needed.
To install a hood in the bathroom you will have to complete three stages of work.
1. Lay the cable from the switch
A three-core cable is needed, for example, VVG 3X1.5 mm2. It is best to “throw it” in the corrugation under the tiles and in the wall if the finishing of the bathroom is not yet finished. If the bathroom is finished, then we lay the corrugated cable along the main ceiling, you can additionally take a cable channel. We will hide all this “goodness” behind a suspended or suspended ceiling after installing and connecting the hood.
2. Secure the fan
Once the cable is laid, you need to install the fan in place. The outer one is fixed on top of the wall, the duct inside the ventilation hole. Please note that the standard hole width is 10 cm, just for the insertion of fans with a size marking of 100 mm (diameter of the flange or the device itself). This clearance is designed for the passage of air with a volume of up to 100 cubic meters per hour. The power of hoods connected to the hundredth pipe “fits” into this requirement or slightly exceeds it, by 10-15 m3.
Fans with higher performance are connected to air ducts with a diameter of 125 mm or 150-160 mm, and the hole will have to be expanded. Otherwise, the hood or flange simply will not fit into the gap.
Food for thought! Is it possible to install an adapter from larger to smaller diameter for an outdoor fan? It's possible, but it's not necessary. You will get a decent gap between the hood body and the wall. The gap will prevent the fan from being properly secured. In addition, moisture will settle on the back panel, which is not pressed against the wall, and dust will collect. And by “cutting” the width of the lumen, you are also “cutting” the channel capacity. The relationship between channel diameter and fan performance was not chosen by chance. Your unfortunate hood will try to cram 150-200 cubes where only a hundred can “fit.”
Installing a fan in the bathroom - installation methods
The hood can be installed in different ways. Attach the overhead to the wall with self-tapping screws or glue it, insert the duct directly into the hole and secure it, or first install the pipe into the gap, and “fix” the fan already in it.
To install an overhead hood, remove the front panel, which is secured with a screw at the end or plastic latches. To install with self-tapping screws, mark the holes on the wall with a pencil, then drill and insert dowels. Attach the fan and tighten the screws.
For fastening with glue or liquid nails, apply it along the edge of the housing on the fan and on the wall. In order not to miss on the wall, trace the contour of the hood and coat it with glue inside the rectangle, slightly stepping back from the edge. Press and secure with masking (mounting) tape so that the glue sets.
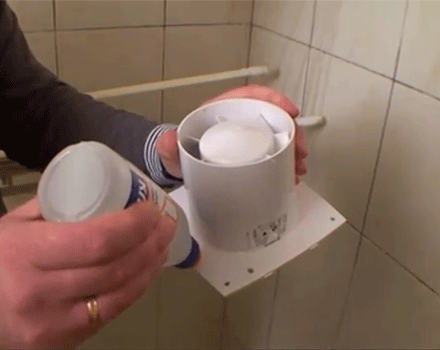
Note! We do not recommend using regular tape because it may leave marks on the wall and the fan itself.
Lead the power cable out into a special hole before fastening it. If it is located inconveniently, you can drill your own in the right place. The front panel is put in place after connecting the power cable.
To install a ducted hood, use a piece of air duct of equal diameter, into which a fan with a protrusion is placed. The hood body “fits” tightly into the round channel and is fixed without additional fasteners.
If the body has no protrusions, then it is secured in the pipe with self-tapping screws through special grooves. For such fans, it is more convenient to first insert the hood into a piece of the air duct, secure it, remove the cable, and then install the entire assembly into the ventilation hole and secure it with foam.
For models with fasteners on the body, the insert is not needed. The fan is simply screwed to the wall of the hole.

3. Connect the bathroom fan to the switch
Connecting power to the hood is the most critical step. A damp room requires mandatory installation of a grounded cable. Therefore, use a three-core VVG for one and a half squares (3x1.5 mm2), as for lighting in the bathroom. The electric power of the fans is not high, as a rule, within 14 watts, and a cross-section of 1.5 square is enough to operate the hood without overheating the cable.
A grounding wire is required to separate the working zero into the N bus and the grounding zero into PE. Even if you have an apartment in an old house and there is no grounding loop, a PE bus is installed in the panel to connect the “ground”. This increases the safety of your electrical wiring and prevents you from getting electrocuted.
How to connect a fan in the bathroom is up to you. If you want to ventilate longer, place the switch on two keys and separate the lighting and ventilation.
The connection diagram via a two-key switch will look like this:

The circuit with a single-key switch is suitable for infrequent use of the bathroom, for example, in a one-room apartment with one tenant. The hood turns on with the light and turns off the same way. For additional ventilation, you will have to leave the light on. It won’t generate many kilowatt-hours because of this, unless you fall asleep. But even there, the “lion’s share” will be behind the fan, and not the light bulbs in the bathroom.
The connection diagram with a single-key switch looks like this:

Both schemes are suitable for hoods without additional functions.
Connecting a fan with a timer and other sensors
We will tell you in more detail how to connect a fan with a timer and other sensors to a switch in the bathroom. The main difference in the circuit is that the timer receives separate power to start the hood based on a signal from a triggered humidity sensor, motion, or the signal from the timer itself in models with delayed start. Simply put, the fan goes to separate phase/neutral wires to the motor and to the timer. The motor circuit is connected to the fan switch button, and the timer circuit is connected to the light switch, and is “activated” as soon as the bathroom lights come on. If a two-key switch is used. You can turn on this hood yourself with a key, or it will work automatically using the built-in timer.

If the switch is common, then the circuit will be different. When the light is turned on, only the hood timer will receive power, and when it fires, the fan motor circuit will close.

In models without a timer with a humidity sensor, the power is “turned on” to it.
As you can see, the connection diagrams are quite simple, but do not forget about the installation rules - we connect the wires at the terminals, without twists or protruding ends. We make connections in the distribution box or in recessed socket boxes. We put the front panel and insect screen in the overhead fans in place correctly, without distortions.
Let's sum it up
What to do if the “guide” helped, but you still have doubts? Contact us!
All houses and apartments are equipped with special ventilation holes, the main purpose of which is to maintain normal air composition. Purpose of ventilation in the bathroom:
- maintaining normal air humidity in a room with constantly used hot water;
- removal of unpleasant odors;
- elimination of water vapor.
With insufficient ventilation, the air becomes excessively humid, which leads to the appearance of mold and the development of pathogenic bacteria harmful to humans. Therefore, when moving into a new house or apartment, special attention should be paid to organizing high-quality ventilation in the bathroom, which is characterized by high air humidity, since comfortable living in the apartment as a whole depends on this.
Types of ventilation systems
There are two types of ventilation systems:

A ventilation system is developed during the construction of any house. In apartment buildings, as a rule, it is used, which provides for the removal of air to the outside due to atmospheric pressure and different temperatures inside the house and outside.
It happens that the existing ventilation system does not cope well with its task, then you need to think about upgrading it.
How to determine whether additional ventilation is needed in the bathroom?
Bring a burning match or lighter to the ventilation grille. Ventilation is normal if the flame reaches the grill or goes out. If it fluctuates slightly or does not fluctuate at all, you need to install forced ventilation.

There is another way: after taking a hot shower or bath, look at the tiles and mirrors - if a lot of condensation has formed on the tiles, and the mirror is very foggy, the exhaust power is insufficient. If this problem is not solved, the appearance of fungus and mold, a musty smell, damage to furniture and the formation of corrosion on plumbing equipment are inevitable.
Options for solving the problem of insufficient ventilation
The problem of insufficient ventilation in the bathroom can be solved in the following ways:
- calling engineers who will calculate the aerodynamics of the apartment and recommend repair options;
- installation of a unified ventilation system;
- installing the fan on .
The first two methods are quite expensive, complex, but highly effective. If you are not ready to spend a large amount, it is possible to upgrade the ventilation in the bathroom yourself.
Strengthening ventilation in the bathroom
In a small bathroom in small apartments, you can solve the problem of poor air circulation by installing an exhaust fan in the opening for natural ventilation. The most important thing is to choose the right device. There are several types of fans on sale:
- combined with a switch that starts working as soon as the light is turned on in the bathroom and turns off when it is turned off. Disadvantage - it only works when the light is on in the bathroom. This time is not always enough to completely clean the air;
- equipped with a timer - will work for a specified time after turning off the lights (from 2 to 30 minutes);
- independent - require the installation of a separate switch and can work at any time independently of other electrical appliances. You can set a mode in which the fan will turn on and off after a set period of time.

Which option to choose is up to you. A device with a timer will provide the most effective air purification. There are fans equipped with a humidity sensor (hygrostat) - this is especially true for the bathroom. This device will turn on when the humidity level exceeds the set value. When installing such a fan, take care to protect the wiring and the fan from splashes.
When choosing a device, also consider the size of the ventilation hole. The purchased fan along with the motor must be inserted into the hole for ventilation, then close the grille and route the wiring from the bathroom to the outside. When connecting directly to the relay, wedge the fan wiring into the circuit before the transformer that changes the voltage for low-voltage devices.

A fan equipped with a timer is connected using a four-wire cable. Connect it parallel to the lighting lamp. Run a separate wire for the phase to the timer.
Important! The wire for the phase must not be interrupted by the switch, otherwise the device will not function.
The fan will start running as soon as the light turns on. When the light is turned off, the device is powered by electricity from a separate phase. After the set time has elapsed, the fan will turn off automatically. To connect to the network of contact terminals, use a two-core cable with a diameter of 0.2 mm. Pass the phase wire through the fan, and lead the neutral wire directly to it.

Scheme for turning on a fan with light in the bathroom
This option is suitable for those who have experience connecting electrical devices. If there is no such experience, it is better to install forced ventilation.
Installation of a forced ventilation system in the bathroom
To build a complex branched one you will need:


The installation diagram is as follows: a main air duct is laid under the ceiling, to which branches are connected using tees to take in exhaust air from all rooms.
Installation procedure:
- We install a fan close to a special exhaust hole cut into the street or an vent;
- To prevent air from entering the house from the street or from a centralized exhaust hood, we install a check valve in front of the fan;
- We install and fasten air ducts. We connect all elements of the system, including individual sections of pipes, using silicone sealant. First, we assemble the main channel, install all the tees on it, and secure the channel.
- After assembling the channel, we install check valves on the side tees to prevent air from getting from one room to another.
- We extend the air duct to the location of the air intakes.
- We fix the suspended ceiling.
- We install air intakes.

Take a few tips into account:
- Before installing the suspended ceiling, check the operation of the ventilation system. If an exhaust fan is found to be inoperative after the ceiling has been installed, replacing it will be problematic.
- To replace the exhaust fan in the future, organize access to it, for example, an inspection hatch.
- Carefully seal the outlet hole with foam, otherwise drafts cannot be avoided.
- Keep the length of the air duct as short as possible: the longer it is, the longer the exhaust air is drawn in, the more intense the fan operation.
Attention! Exhaust ventilation should not be led out through a window, into the attic, or into the house, but outside, preferably through the roof.
Install a grate or mesh at the outlet to prevent rodents and birds from entering the system, as well as a protective canopy.
To design a high-quality ventilation system at the stage of building a house, you should turn to professionals. In addition, choose a room for the bathroom that has.