Insulation of the corners of the house from the inside and outside. How to insulate a corner apartment from the inside of the room How to insulate the corners of the house from freezing
When building houses made of wood, it was always necessary to take into account many technological features, but the main one - the variability in the size of wooden building elements - creates problems not only at the stage of building a house, but also during its operation. One of the consequences of shrinkage - distortions between the logs of the log house - leads to the fact that already two or three years after the completion of construction, it is necessary to think about how to insulate the corners of the house from a bar.
If earlier this problem belonged to the category of “additional”, today its relevance has increased significantly, since the use of new types of lumber is often accompanied by errors in the assembly of corner joints.
This review discusses several basic methods for sealing corners, the knowledge of which will protect the new house from premature destruction.
What is the shrinkage of a wooden frame, what causes it, and what are its consequences, we considered in our other articles. Here we recall that any wooden structure in its life cycle goes through several key “time marks”, after which its internal geometry changes significantly.
These labels are:
- primary shrinkage (1-1.5 years after the assembly of the frame);
- shrinkage of the residential period (after 1-2 heating seasons);
- seal wear (10-15 years after the last caulking).
After each of these periods, the sealing of the interventional seams in the wooden house is broken and the “environmentally friendly” dwelling turns into a draft-blown structure.
In addition, the warm air inside the room has a higher pressure, so if the insulation joints are broken, the effect of barometric exfiltration occurs, as a result of which a stable effect of cold floors is created in the house, even when the heating system is operating at full capacity.
In addition to natural causes, the integrity of the interventional joints is greatly influenced by the assembly scheme of the log house.
There are usually three assembly options:
- laying in a bowl, associated with the Russian style of wooden architecture;
- paw assembly, popular in European and American countries.

Differences between chopping in the paw and in the bowl
Separately, we note that the design of the internal corners of the log house is not the only difference between the technologies for building houses from logs and timber. One of the ways to increase the reliability of wooden structures was the so-called "Scandinavian felling", in which a more efficient closing of the crowns occurs due to the wedge lock between the crowns.

The difference between Russian and Scandinavian felling
It is noteworthy that attempts to automate construction work only exacerbate this problem. The figure below clearly shows how the machine-formed bowls were deformed to such an extent that centimeter gaps appeared in the log house.

Gaps in a log house with machine-cut bowls
Considering all of the above, we can conclude that the construction of a wooden house is a continuous process and requires periodic correction of the basic power structures and renovation of the insulation.
Sealing problem

Angle thermogram
We emphasize right away that the problem of thermal insulation of interventional seams is by no means new and has been successfully solved by builders over the past millennia. All modern techniques are simply the replacement of archaic building materials with their modern counterparts.
Despite the fact that the entire frame is deformed during shrinkage, the main channel of heat loss is still the corner joints, so finishing the corners of the frame is often considered as a separately paid operation.
Let's consider what methods of insulation of corners exist, and how intervention joints can be sewn up.
Re-caulking
The oldest way to restore the heat-shielding properties of a house is to re-caulk all joints both outside and inside the building. As a heater, the same material is used that was laid during the construction of the log house. Despite the enormous laboriousness, this method is the cheapest option for restoring the heat-shielding properties of a house.
A more modern version of caulking involves the use of jute ropes and ropes, which greatly speeds up the process, but reduces the reliability of keeping the insulation in the gap.
Create wedge joints
This method is applicable only at the construction stage. It consists in a more thorough implementation of the joints between the crowns, the locks of which have a wedge-shaped configuration.
Scandinavian-Canadian wedge
The recess inside the log is filled with a sealant with a maximum service life (for example, mineral wool), and the edges are sheathed with a closing sealant.
Polymer sealing
Scheme of polymer sealing
The most effective and fastest way to insulate houses made of profiled timber and logs is polymer sealing.
The peculiarity of this technology is that with its proper implementation, you can forever forget about the consequences of shrinkage, since the seam is filled with an elastic sealant with a high adhesion coefficient.
With shrinkage displacement of logs, the new seal is deformed, but not destroyed.
The only problem with this method is the high price of a sealant that is resistant to climatic factors.
Alternatively, a combined approach is used, when the main volume of the insulated gap is filled with a conventional (that is, inexpensive) acrylic sealant, and the outer protective layer is formed from a stable special compound.
We emphasize once again that shrinkage deformations are primarily manifested in corner joints, so re-insulation is often performed only for corners. This is much cheaper, but does not fit well with the design of a log or log house.
In such cases, the repaired log house can be covered with plank sheathing, the fixing of which must be carried out taking into account shrinkage displacements.
Facade wind protection
Sometimes the deformation of the log house is at such a stage that sealing the joints alone is not enough to normalize the heat balance of the house. In such cases, external wind protection is installed in the form of additional facade cladding.
This design is installed using the “ventilated facade” technology, and a block house or lining is used for exterior decoration.
Internal thermal insulation
Any sealant that can be used to seal the seams in a wooden house is very critical to large changes in humidity and temperature. Therefore, in baths and saunas, in addition to all the methods listed above, an internal thermal and vapor barrier is installed, which can be made both in a standard multilayer method and using a simplified technology - from penofol.
This approach not only prolongs the overall period of normal operation of the log house, but also increases the energy efficiency of the house.
The company "Master Srubov" will perform decorative and protective finishing of log and timber houses, including the arrangement of additional thermal insulation. You can clarify the details of cooperation and calculate the cost of the necessary work by any means of communication published on the "Contacts" page.
The thermal insulation characteristics of a beam with a section of 150x150 are insufficient to ensure comfortable living in the house during the cold winter period. In this regard, the owners of such a building inevitably ask themselves the question: how and with what to insulate the house? According to the rules of heat engineering, external insulation is much more efficient than internal insulation. Therefore, first of all, you need to take care of choosing the best heat-insulating material for specific conditions, suitable for use outside the house, and find out all the nuances of installation.
Insulation of a house from a bar outside
Preparing the walls of the house
At the stage of preparation for the external insulation of a wooden building, several issues must be resolved:
- which insulation is better;
- how to lay it correctly;
- how to prepare the walls of the house.
Regardless of which thermal insulation material is chosen, the walls of the 150x150 timber must be prepared. First of all, it is necessary to conduct a visual inspection and make sure that there are no signs of rotting wood, insects harmful to the tree, the need for additional fastening of the timber and finishing elements of window and door openings.
In the photo, a house from a bar before insulation
At the same time, they decide whether the walls need caulking. If empty slots are noticed, then before laying the insulation they must be filled with the appropriate material. Caulking walls is a simple, but time-consuming process. Knowing the rules and tricks of this business will greatly simplify its implementation.
What is wall caulking
To eliminate the gaps between the bars, three materials are traditionally used:
- tow;
- jute;
- lnovatin, etc.
Overview of materials for caulking
In the process of work, the craftsmen use special wooden devices in the form of blades with a thin blade. But for an independent task, an ordinary narrow spatula is also suitable.
- stretching insulation;
- insulation kit.
The first is optimal if the gaps are not wide, the second is suitable for deep and long gaps. When caulking, the tow fibers are distributed along the gap in an even thin layer, while driving it into the gap with a spatula. The work must be done slowly and carefully, trying to seal the insulation as efficiently as possible. Tow is driven in in layers until the gap is filled.
Laying in a set is done as follows: bunches or balls are formed from tow, corresponding to the size of the gap, and they are driven into it with a spatula and a hammer. Regardless of the chosen method of caulking, work begins from the bottom of the wall.
Methods for caulking a wooden house
Video - How to caulk a house from a bar
Video - Caulking at home from a bar
The choice of material for external insulation of a house from a bar 150x150
The modern market offers many solutions for warming a wooden house. The choice largely depends on the climatic conditions of the region of residence. For southern latitudes, one insulation will be optimal, for northern latitudes, another. Therefore, when choosing a material, they are guided by its main characteristics:
- coefficient of thermal conductivity;
- compressive strength index;
- frost resistance;
- lifetime guaranteed by the manufacturer.
The main characteristics of thermal insulation materials
For external insulation of a house made of timber 150x150, the following heat-insulating materials are suitable:
- fibrous (glass wool, mineral wool, stone wool, basalt wool);
- sheet foam;
- foamed polyethylene;
- sprayed polyurethane foam;
- windproof plates Izoplat.
Comparison of heaters
Materials for home insulation
Mineral wool and its analogues
Mineral wool has excellent thermal insulation characteristics, but has one significant drawback: hygroscopicity. Since wet insulation is not able to retain heat in a quality manner, the use of mineral wool in rolls or slabs requires vapor and waterproofing of the walls and foundation of the house. This significantly increases the cost of its external insulation.
Mineral wool, roll
When choosing fiber materials, the following points should be considered:
- the level of air humidity in the region of residence;
- cladding of the outer walls of the building.
Mineral wool boards
The second requirement is due to the fact that the laying of mineral wool and its analogues requires wall cladding according to the ventilated facade technology. Therefore, saving on finishing work will not work. If there is any doubt that the mineral wool under the cladding will remain dry, it is better not to use this material.
Minvata. Technical characteristics of the insulation
Styrofoam
There are many myths about this heater. One of them convinces that polystyrene releases styrene, harmful to humans, into the environment. All these claims have long been debunked by laboratory studies. The safety of foam plastic is confirmed by the sanitary and epidemiological conclusion 63.01.06.224.P.001216.04.03 dated April 7, 2003, Conclusion 01-188 dated 04.25.00 Research Institute of Hygiene and Health Protection of Children and Adolescents of the Russian Academy of Medical Sciences, Conclusion No. 03 / PM8 of the Moscow Research Institute of Hygiene named after . F.F. Erisman. Therefore, this insulation can be fearlessly used not only for external, but also for internal insulation.
Styrofoam
When choosing foam, it is important to pay attention to its density. The higher it is, the lower its thermal conductivity. There is an opinion that the density of the foam corresponds to the digital indicator of its brand. But this is only partly correct. For example, the density of C-25 foam varies between 15.1-25 kg/m3. In choosing a material, a table of its characteristics will provide significant assistance.
Polyfoam PSB-S-25
For external insulation of a house from a bar 150x150, you can use foam of any brand. Manufacturers offer canvases of different thicknesses: 5 cm and 10 cm. When choosing a material, you need to take into account that for facade insulation it is better to buy PSB-S-35 foam plastic with a thickness of 5 cm than PSB-S-25 foam plastic with a thickness of 10 cm. The cost of these materials almost the same, but the thermal insulation effect will be more significant.
Comparative characteristics of foam and extruded polystyrene foam
Extruded polystyrene foam (EPS)
XPS has almost the same chemical composition as Styrofoam, but has lower thermal conductivity, higher flexural strength, and lower water absorption. A significant difference in characteristics is due to the methods of production of these materials.
EPS can be operated at a temperature range of -50°С to +75°С
EPPS is ideal for external insulation of a house made of timber 150x150. The only disadvantage of this material is its relatively high price. A 2 cm thick extruded polystyrene slab is comparable in thermal conductivity to a 3 cm thick foam sheet and a 4 cm thick mineral wool layer.
Expanded polystyrene "Technoplex"
Extruded polystyrene foam
XPS can be glued to the walls of the building, but you need to choose the right glue. For materials based on styrene (EPS and foam), the following compounds cannot be used:
- based on acetone and any solvents;
- petroleum toluene;
- based on water;
- ethyl acetate.
- glue-foam "TechnoNIKOL";
Glue-foam "TechnoNIKOL"
- Ceresit CT 85;
- facade adhesive ALLFIX;
- BITUMAST;
- polyurethane adhesive Illbruck PU 010;
- "Insta-Stick universal-145345".
Foamed polyethylene
This material has long proved in practice its suitability for thermal insulation.
Foamed polyethylene
Foamed polyethylene has a lot of advantages. Among them:
- low coefficient of thermal conductivity;
- elasticity;
- a light weight;
- low cost.
When choosing this material, you should be aware that it can be of the spirit of the types: PVD (high pressure) and HDPE (low pressure). Foamed polyethylene products come with one-sided and two-sided foiling.
Foamed polyethylene mats duplicated, laminated with foil
The following are the most popular:
- "Vilaterm" - heat-insulating bundle;
- "Termopol" (available in the form of mats 1.5-4 cm thick);
- "Penofol" with one-sided and two-sided foiling.
Penofol types
Foamed polyethylene materials are advantageous in that they do not require a vapor and waterproofing layer. This is due to their absolute non-hygroscopicity. Therefore, when sheathing the outer walls of a building with foamed polyethylene, you can save a lot.
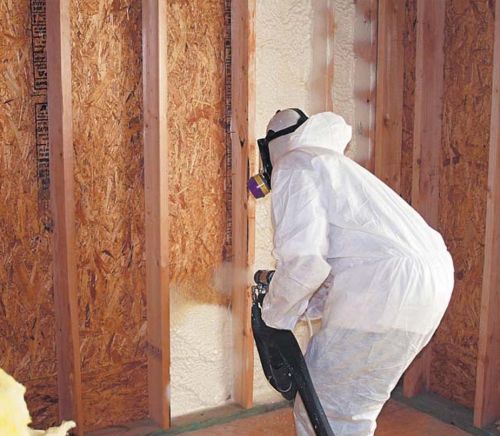
Sprayed polyurethane foam
Sprayed polyurethane foam differs from the above materials not only in the way of laying.
Sprayed thermal insulation
It has many other benefits:
- extremely low thermal conductivity: 0.023 - 0.03 W / m * K (this is significantly lower than that of mineral wool and polystyrene);
- environmentally friendly;
- does not require a vapor and waterproofing device;
- there is no need for additional fastening of the heat insulator, as the foam adheres firmly to the wall when applied;
- when applied, it forms a continuous layer, excluding the possibility of the appearance of cold bridges.
Heat insulator spraying
All this makes sprayed polyurethane foam the best material for external insulation of a house made of 150x150 timber. The only drawback of this method is its high cost. Spraying PPU requires not only special equipment, but skills to work with it. Therefore, you will have to pay not only for the material, but also for the services of specialists.
Insulation of the walls of a wooden house from the outside with polyurethane foam
Windproof boards Isoplat based on wood fiber
Scandinavian wind protection boards are made from softwood fibers and are 100% natural heat-insulating material. In their production, no chemical binders, no glue, no resins are used. At the same time, a 12 mm thick slab is equal in terms of thermal insulation to 44 mm of wood.
Windproof plate Izoplat
The main advantages of Izoplat windproof plates:
- Tightness. Due to their elasticity, the plates fit snugly against the walls, and breaks in the windproof layer are excluded.
- Thermal insulation. It will not shrink during the entire service life and guarantees reliable insulation of the house during the entire service life. Coefficient. thermal conductivity of the material λ10 ≤ 0.045 W/mK
- Vapor permeability. The plate is a "breathable" material, due to which excess moisture leaves the house and mold and fungus do not form in the walls.
- Resistant to atmospheric moisture. The plate is impregnated with paraffin, due to which no precipitation, dampness and temperature changes are terrible for it.
- Soundproofing. A windproof slab of even minimal thickness will provide sound insulation of about -23 dB.
- Simple and fast installation. The size of the plates is 2700x1200x12 mm, the weight is only 9 kg.
- Guaranteed service life of more than 50 years. Actual use over 70 years.
- Eco-friendly and 100% natural like wood itself.
House sheathed with Isoplat slabs with partial installation of the facade.
Izoplat nailed plate
Rules for external insulation of a wooden house
The walls of a wooden house are built of a very hygroscopic material. The tree is able to absorb moisture and deform at the same time. Despite the fact that the construction timber has a low moisture coefficient, the impact of the environment inevitably changes this indicator. Therefore, in wooden houses, deformation of the walls can be observed. It is insignificant, but inevitably affects the geometric shape of window and door openings.
When externally insulating a house from a 150x150 timber, it must be taken into account that a ventilation gap is required through which moisture will exit the wood. Thus, no damage will be done to the walls. Above the insulation, laid on the outside of the building, it is necessary to build a facing layer. Therefore, the best technology for insulating a house from a bar is a ventilated facade.
Its schematic diagram includes the installation of several layers of materials (the direction from the wall to the street):
- wall;
- crate (frame);
- heat insulator;
- vapor barrier membrane;
- ventilation gap;
- facing material.
Approximate diagram of the ventilation facade
Ventilated facade
Ventilated facade for a log or log house
Regardless of which insulation will be used, it is necessary to observe the sequence of laying materials and do not forget that there must be a gap of at least 1 cm wide between the heat insulator and the cladding.
Installation of a ventilated facade, installation of lathing and insulation
We make a ventilation facade with our own hands
Step 1: Mounting the spacers
For the installation of spacers, use bars with a section of 20/20 mm or an edged board with a thickness of 20-25 mm. For fixing wood, nails or wood screws are used. The optimal step is 60-80 cm.
Scheme of the insulated facade
Step 2: Installation of the vapor barrier membrane
The vapor barrier film is sold in rolls. The laying of the canvases starts from the bottom of the wall and gradually moves up. The vapor barrier is fixed with a construction stapler with an overlap of 10-15 cm.
Step 3: framing installation
The same material is used as in the construction of the 1st tier: bars or boards, but the thickness of the lumber should be different: 5-10 cm and correspond to the thickness of the selected insulation. Boards (bars) are not fixed horizontally, but vertically. It is important to consider that the distance between the racks of the crate must correspond to the width of the insulation.
Installation of the ventilated facade frame
An example of fastening a wooden frame with corners
Step 4: laying the heat insulator
In the space between the racks of the 2nd tier of the crate, mineral wool sheets or foam sheets are laid. They are attached to the wall of the house with plastic dowels with a wide dish-shaped hat.
Fixed insulation
Step 5: Installing the Windproof Membrane
The windproof film is laid in the same way as the vapor barrier. It is attached to the crate with the help of counter-rails.
The diagram shows a windproof membrane and siding mounted on top of it.
Installation of a ventilated facade with plastic siding
Step 6: installation of facing material
As a finishing material can be used:
- metal or vinyl siding;
- front cement-shaving panels;
- lining.
Facade panels under brick
High-quality external insulation of a house made of timber 150x150 will provide a comfortable microclimate in residential premises and will reduce the cost of heating the building.
Video - How to insulate a house from a bar outside
Video - House insulation with mineral wool
Timber houses, due to their environmental friendliness, are a popular option for private construction. But although they heat up quickly enough and have good thermal insulation properties, insulating a log house is an urgent need for most households.
Installation of insulation on the walls of a house from a bar
Differences between old and new technologies
Wooden construction in Russia is a centuries-old tradition. For centuries, houses were built exclusively from log houses, from massive round and semicircular logs, the thickness of which was enough for good thermal insulation. Like today, the wood shrank over time, and gaps appeared between the logs. But earlier there were other ideas about the beauty of the facade, so ordinary tree moss was used to seal the cracks. He landed in the cracks between the logs and over time reliably filled the entire space between them.
In modern construction, issues of economy come to the fore and force the use of timber, the thickness of which does not always meet the requirements of the developed standards. With insufficient cross-section, complete freezing occurs in winter, which means that the walls of the house are not able to retain heat. In addition, over time, the tree begins to dry out, which is why heat loss grows even more.
It looks like a wall of timber after drying wood
Advantages and disadvantages of wall insulation in a timber house
Prudent owners are looking for ways to properly insulate a house from a bar in order to spend less money on heating in winter. This can be done in two main ways: from the inside and from the outside, and external insulation is preferable for a number of reasons.
Features of insulation from the inside
With internal insulation, the positive effect of saving heat is offset by the disadvantages:
Part of the usable area is inevitably lost due to the installation of the frame under the insulation.
The heat-insulating layer hides the "living" wooden walls and the rooms lose their unique charm.
Due to the external winter cooling of an unprotected wooden wall, the dew point shifts to the internal insulation. Condensation occurs, mold appears, and it is difficult to control the condition of the wood.
What happens to the wall with improper insulation from the inside - in the video:
Wall insulation from the outside: advantages and disadvantages of the method
Most often, they resort to it, bearing in mind the obvious advantages compared to internal insulation:
The usable area of the internal space is saved;
Outside work does not change the daily routine of the family.
The facade of the house is reliably protected from sudden changes in temperature, which prolongs the life of the building.
The correct selection of materials does not violate the microclimate of the rooms (the house "breathes").
You can decorate the facade to your liking or improve the appearance if the wood has darkened over time.
If the technology is followed, the wood will be additionally protected from damage.
Easy to control the work of the construction team.
The main disadvantage of external insulation is the need to carry it out in good weather - it makes no sense to do this in cold and damp conditions.
Three main methods of insulation
Any wall insulation involves attaching a layer of insulation to it and structures holding it. For this, several methods have been developed, and each of them has its own advantages and features of execution.
The principle of wall insulation is the creation of an additional protective "pie"
Hinged ventilated facade
By itself, this technology was developed as a decoration of the facade of the house, but since the installation procedure involves attaching a layer of mineral wool or similar material to the wall, this method can be considered as insulation.
Advantages of using ventilated facades:
Long service life (up to 50 years), excellent heat and sound insulation.
Ease of installation.
A wide choice of facing material of various flowers.
The dew point moves outward.
Mounting technology:
The lumber is pre-treated with compounds that prevent rotting and make the tree unattractive to insects.
Outside, a crate is attached to the house, on which a sheet of hydro and wind protection is stuffed. In the space between the slats of the crate, air circulates freely, due to which condensate or moisture that has appeared in another way will be removed from the insulation.
The crate is leveled with a plumb line.
Next, slats are stuffed onto the crate, the distance between which should correspond to the width of the heat insulator. Accordingly, the height of the rails is also selected - for central Russia it is recommended to use a heater with a thickness of at least 70 mm.
A feature of the ventilated facade is that a gap is left between the insulation and the cladding
Insulation mats are laid between the slats, fixing with dowels.
Then, bars with a thickness of at least 5 cm are additionally stuffed onto the slats, so that there is a gap between the insulation and the cladding.
Facing (siding) is mounted.
Insulation under siding.
There are practically no fundamental differences from the previous technology - insulation is also used here and a decorative coating is also used on the outside. But if the very name of the ventilated facade indicates the place of its use, then the whole house is covered with siding in any case.
The nuances of installation, taking into account the selected material:
The distance between the slats is set equal to the width of the mat if foam or extruded polystyrene foam is selected.
The distance between the slats is set 10–15 mm less than the width of the mat if mineral wool is used. This must be taken into account when calculating the amount of mineral wool.
According to the technology, cotton wool slabs are mounted at a distance; polymer plates are placed in cells, the joints are treated with mounting foam.
When using mineral wool, a waterproofing layer (diffuse membrane) is additionally mounted on top. It is not needed when using fiberglass or polystyrene.
Sheathing a log house with siding
Polyurethane foam spraying method
The principle of this technology is clear to anyone who has seen how they work with mounting foam. The difference here is that the amount of material needed to create a thermal insulation pad is much larger, so a spray gun using compressed air from a compressor is used to process polyurethane foam. Technology advantages:
Easy to use and high speed of application of the heat-insulating mixture on large surfaces.
Excellent adhesion (adhesion) with most building materials, long-term preservation of properties.
Environmentally friendly, fire resistant and anti-rot of the treated surface.
Insulation spraying can be carried out on any prepared surface
Types of heaters
The choice of insulation for outdoor work is quite wide and each of them has distinctive features that must be considered when choosing:
Mineral wool
It is produced in three varieties - stone (basalt), glass and slag. All have similar properties: fire-resistant, non-combustible, have chemical and biological resistance. Another advantage of the material is vapor permeability, environmental friendliness and high sound insulation.
By cons - cotton wool attracts rodents and does not dry out completely when wet.
It all depends on the skills of the builders, but usually it is easier to insulate a house from the outside with mineral wool using mats than rolls - the latter are not always convenient to deploy on vertical walls.
Laying mineral wool slabs in the crate
Styrene boards (polystyrene, polyurethane foam)
Styrofoam is the cheapest option, lightweight and porous, with low hygroscopicity and excellent thermal insulation. The main disadvantages are combustibility (releases toxins during combustion), fragility and instability when exposed to ultraviolet radiation.
Extruded polystyrene foam
It has a special porous structure, tolerates low temperatures well and is unsuitable for microorganisms. The material is durable, easy to install (plates), does not absorb water. Disadvantages: highly flammable and at the same time releases harmful toxins.
Styrofoam and polystyrene foam are similar in appearance
Environmentally sprayable styrenes (ecowool and polyurethane foam)
Such heaters are expensive due to the method of application; large surfaces require special installation and experience. For small areas of complex shape (crevices near pipes, windows, between plates), polyurethane heaters in cylinders are offered.
"Warm" plaster
A mixture of light granules of complex composition (glass, cement and hydrophobic additives), which does not ignite, is not afraid of ultraviolet radiation, well protects the facade from moisture and is easily repaired.
Preparing a wooden structure for plastering on video:
Subtleties of wall insulation from timber
Insulation of a log house outside under the siding cannot be started whenever you want - before that, the following conditions must be met:
Work on the installation of insulation can begin only after the complete shrinkage of the log house - often this period can be one and a half to two years.
It is forbidden to carry out work if the facade has not been treated with an antiseptic. Ignoring this rule will lead to the appearance of fungus and rot.
Before insulating a house from a bar from the outside, it is necessary to prepare the facade: close up not only wide cracks, but also small cracks. To do this, you can use putty, mounting foam or similar materials.
Good thermal insulation of a log house requires careful selection of material and calculation of its quantity. It should be taken into account how the heat-insulating material will be combined with the wood of the beam itself.
To choose a suitable insulation, it is necessary to take into account the size of the building, the quality of the log house and the seams.
Some heaters are installed without crates
Tools and materials for building thermal insulation
To insulate a house without being distracted by the search for tools and materials, builders need to prepare the following:
bubble or laser building level, you can still use a plumb line;
tape measure, square or ruler made of metal;
hammer, construction knife or hacksaw, screwdriver;
facade dowels, adhesive tape, chalk, polyurethane foam, antiseptic;
dry slats, insulation;
vapor and waterproofing film;
finishing material.
wood preservative sprayer
Treatment of a wooden wall with an antiseptic
The general course of the installation of thermal insulation
All steps for warming a house from a bar by any of the methods described are always schematically the same and are performed in the following sequence:
for ventilation of the first layer of insulation, a crate of wooden planks is mounted on the wall;
a frame is stuffed onto the crate for fixing the insulating material
installation of a heater;
installation of additional battens and frame (if double insulation is used);
laying an additional layer of heat insulator;
fastening of a diffusion membrane, which will provide hydro and wind protection.
installation of facade finishes (lining, siding) with an air gap.
In general, the insulation of a house made of timber according to the rules will make it possible to save on heating in the future. Despite the apparent simplicity of the whole process, there are a fairly large number of pitfalls that will definitely come out during installation. As a result, if there is no proper qualification, then it is better to order the work to professionals, because it is much more pleasant to control the construction site than to climb walls on your own.
The standard cross-section of a timber for a frame house is 150 x 150 mm or 200 x 150 mm, and this is often not enough to maintain a comfortable temperature in the house in winter due to the thickness of the walls of the building. Therefore, it is required to insulate a log house from the outside, and there are a lot of such technologies, as well as modern heat-insulating materials. It is considered an axiom that external insulation is much more effective than internal insulation, and this is true - the dew point shifts to a safe place, the amount of condensate decreases, the walls continue to "breathe", but continue to retain and retain heat in the premises of the house.
Scheme of standard external insulation of working external surfaces of the house
Preparatory work on the outer walls
Before you start insulating a house from a bar from the outside, you should choose from the range of materials for thermal insulation the one that is best suited for a house of a particular design, select the technology for its installation and prepare the wall surfaces.
The preparation of wooden lumber walls is reduced to a visual inspection in order to detect cracks, mold and decay, detachment of islands of bark, defects in the installation and fastening of doors and windows, etc. Then the walls are caulked or gaps (if they are found) are sealed in another way, for example, putty with a special compound, the walls are treated with an antiseptic and fire retardant substances. The caulking of the outer wall is carried out by one of the three well-known special heat insulators that have proven themselves better than others - these are tow, flax (lnovatin) and jute.
The insulation is pushed into the slots with a special wooden spatula with a narrow and thin blade. If there is no such blade, a metal construction spatula with a blade length of 60, 80 or 120 mm is suitable.
Caulking of timber walls
There are two ways to caulk walls: insulating the walls of a timber house from the outside, stretching, and laying in a set.
Stretched thermal insulation of surfaces is done in the presence of narrow slots, in a set - wide. In the first case, the ventilation façade insulation is stretched across the gap with a thin layer and driven in with a caulk and a hammer until the space is completely filled. Laying in a set is carried out by forming balls from the insulation of a wooden house in the size of the gap, then in the same way tow or jute is driven into the gap. The thermal insulation of a wooden house always starts from the bottom row.
When choosing a heat-insulating material, they start from its performance characteristics:
- Thermal conductivity coefficient;
- Compressive strength factor;
- Frost resistance;
- The service life indicated by the manufacturer on the packaging.
You can choose from the following list:
- Fibrous inorganic heaters - glass wool, mineral wool, stone or basalt wool;
- Styrofoam in plates and sheets of different density;
- Expanded polystyrene extruded (EPP);
- Polyethylene foam (EPE);
- Sprayed polyurethane foam (PPU);
- Plates "Isoplat" windproof.
Types of heat-insulating materials for external insulation of a house from a bar
Mineral wool and substitutes
Mineral wool is an excellent thermal insulator, but it is hygroscopic, and this disadvantage makes it a highly specialized material. Or, when insulating a timber house with mineral wool, it is necessary to create additional layers of vapor and waterproofing materials, so the use of mineral wool is not a cheap pleasure. When choosing the insulation of a log house from the outside with your own hands from mineral wool, you should take into account the average annual air humidity in the region and the building materials with which the house is lined outside. Another requirement for mineral wool is that a ventilated facade must be equipped on the house.
The table will help you choose the best material:
| Styrofoam | polyurethane foam | Mineral wool | XPS plate |
| Cellular | Cellular and porous | Fibrous structure | Sealed honeycomb material |
| High moisture resistance | High moisture resistance | High moisture resistance | High moisture resistance |
| light weight | light weight | light weight | light weight |
| Density - medium | Density - low | Density - medium | Density - high |
| Compressive strength - low | Compressive strength - medium | Compressive strength - high | |
| Eco-friendly material | Eco-friendly material, but at a temperature ≥ 500С it evaporates CO2 and CO3 | Eco-friendly material | Eco-friendly material |
| Partially suitable for mechanical stress | |||
| Disintegrates quickly in time | Long breaks down in time | durable material | durable material |
| Shattered under the sun | Doesn't break down under the sun | Doesn't break down under the sun | Doesn't break down under the sun |
Comparison of materials for thermal conductivity
Insulation foam
Styrofoam is chosen based on its density - high density means low thermal conductivity. The table below will help you correctly navigate the characteristics of the foam when insulating a house made of wood:
A log house can be insulated with any foam plastic with a standard sheet or plate thickness of 5 or 10 cm.
Insulation of a timber house with foam plastic
Insulation with extruded (EPS) polystyrene foam
Before you insulate the EPPS house from a bar, think about exceeding the estimate - this heat-insulating material costs much more than polystyrene foam and mineral wool.
XPS is attached to the walls with glue, which should not contain acetone, toluene, water, ethyl acetate and all derivatives of these substances. Therefore, when using this insulation, it is recommended to buy such glue:
- Adhesive foam brand "TechnoNIKOL";
- Glue "Ceresit" CT-85;
- Adhesive facade composition "Allfix";
- Glue "Bitumast";
- Glue "Illbruck PU-010" based on polyurethane;
- Adhesive composition "Insta-Stick Universal-145345".
Attaching XPS to wood with glue
Polyethylene foam NPE
The advantages of NPE over other thermal insulation materials are as follows:
- Small coefficient of thermal conductivity;
- The elasticity and elasticity of the material allows it to be laid on uneven surfaces;
- Light weight and low cost.
Foamed polyethylene is produced as a high-pressure (PVD) and low-pressure (HDPE) insulation, the material is foiled with an aluminum layer on one or both sides. In individual construction, the following NPE brands are most often practiced:
- Harness insulation "Vilaterm";
- Roll heat insulator in the form of Thermopol mats. Mat thickness - 1.5-4 cm;
- Roll insulation "Penofol". Has a foil layer on one or both sides.
Polyethylene foam for log house
When insulating a house with a layer of foamed polyethylene, it is not necessary to equip additional layers of vapor and waterproofing, and this is also a distinctive feature of the material - NPE is non-hygroscopic. And the low cost of polyethylene foam rolls provides a good opportunity to save the family budget without losing the quality of work on warming the house from the outside.
Isoplat - windproof plates
The manufacturer is Finland, and everyone knows about frost there. "Isoplat" is made from the fibers of coniferous trees, without synthetic and harmful additives and additives. The standard product dimensions are 12 mm thick, 2700 mm long and 1200 mm wide, in terms of heat retention properties, such a 12 mm thick board equals 44 mm of pure wood.
The positive qualities of the insulation "Isoplat" ":
- Sealed surface and elasticity, due to which the windproof plates cover the walls of the house very tightly;
- The coefficient of thermal conductivity of the insulation "Isoplat" ": λ10 ≤ 0.045 W / m K;
- Good vapor permeability allows the wall of the building to breathe, so the possibility of mold and other fungal diseases is minimized;
- High moisture resistance due to the impregnation of the boards with paraffin;
- Noise isolation - 23 dB. For comparison: a three-chamber PVC window has a sound insulation of 47 dB;
- With dimensions of 2700 x 1200 x 12 mm and a weight of one plate of 9 kg, quick and easy installation on walls is ensured;
- Guaranteed operating time - ≥ 50-70 years;
- Absolute environmental friendliness, as the material is natural.
Insulation of the outer walls of a wooden house Izoplatom
The basics of warming a house from a bar
Wood is a hygroscopic material, so the surface of the walls can be deformed to a sufficiently large depth. Although the profiled glued laminated timber is impregnated with water-repellent substances, the material absorbs moisture, albeit in small quantities, but sufficient to cause wall deformations. First of all, deformations are manifested in the distortions of windows and doors, which have to be additionally insulated or remounted.
When insulating the house with Isoplatom, it is necessary to create a ventilation gap so that excess moisture comes out of the wood and does not deform it. Then a heat-insulating layer of slabs with decorative cladding made of siding, lining and other similar materials. Therefore, a ventilated facade for a timber building is required.
Scheme of insulation of a lumber house "Izoplatom" Methods of fastening plates "Isoplat" to a wooden surface
The ventilation facade scheme consists of the following layers:
- wall surface;
- Wooden or metal crate;
- insulation layer;
- Vapor barrier;
- ventilation gap;
- Decorative protective lining.
Regardless of the material of the insulation, be sure to observe the correct layer-by-layer fastening of building materials. And the last thing: between the layer of any insulation and the layer of decorative cladding, it is necessary to leave an air gap of ≈ 10 mm.
Do-it-yourself decorative plaster from ordinary brick-like putty How to make an artificial stone on the wall with your own hands?
Freezing of the corners of the house is a nuisance that residents of both a panel Khrushchev or a brick new building and a country house, whether it be wooden or stone, may encounter. Fortunately, this serious problem can be solved on your own. Let's talk about how to properly get rid of the freezing of the corners of the house.
Why do corners freeze?
Due to cold bridges, corners are the most vulnerable part of almost any home. These sections of the building structure have increased thermal conductivity. Any vertical or horizontal angle is a geometric cold bridge. If a construction defect is allowed - poorly sealed seams, through voids in concrete, an insufficient layer of mortar between the bricks, the absence of the necessary insulation - problems cannot be avoided. Where there are cold bridges, the temperature of the wall surface in winter can drop below the dew point (up to about 9 ° C and 50% humidity) while maintaining room temperature indoors. It is in such places that, due to the temperature difference, condensation forms, which leads to the formation of mold, and when it freezes, it turns into ice crystals.
The most logical solution in this case seems to be laying insulation from the inside along the walls. But any such material is essentially a heat insulator, which equally insulates the wall from both heat and cold. The use of insulation can even worsen the situation, as it will shift the dew point (the place where cold and warm air touch) to the inner surface of the wall. As a result, cold air from the street will freeze the wall through and through, since the heat from the apartment will not be able to penetrate through the heat insulator layer. Wetting and freezing will continue, the insulation will become unusable and cease to perform its functions. In addition, the ice crystals will continue to break down the wall material, further increasing the thermal bridges.

When buying a country house or an expensive apartment, you can use the services of companies offering thermal imaging. Specialists will help to detect all heat leaks and conclude whether it is possible to correct builders' mistakes. This can save owners from many troubles associated with the operation of the house, and will save considerable money.
Getting rid of freezing corners
The ideal way to solve the problem is to insulate the entire facade from the outside and securely seal the seams. It is quite possible to repair your own country house, but in an apartment building you will have to turn to the management company for help. But do not despair. And in a single apartment you can get a good result.
First of all, you need to remove the wallpaper. If there are no visible cracks, then the walls are tapped with a hammer - where there are voids, the sound will be deaf. Next, remove the plaster over the discovered cavities and dry the corner thoroughly. If there is mold, be sure to treat with special antifungal agents. Sometimes the mold infestation is so extensive that the use of acid, blowtorch fire, or surface milling is necessary. All cracks and voids are filled with mounting foam or liquid foam. This will prevent moisture from entering the room even if there are cracks in the outer wall. And finally, the remaining foam is cleaned and the corner is plastered. Work is best done in the warm season to completely get rid of dampness and mold indoors.
In the event that very large voids are found, they should not be filled with mineral wool or tow, as these materials contribute to the accumulation of moisture. It's better to use the same . It is resistant to moisture, is not subject to rotting and mold, has high adhesive properties, does not lose its qualities when frozen.

Insulation of the entire facade from the outside
Today, manufacturers offer a variety of materials that greatly facilitate the repair process and bring it to a whole new level. For example, special heat-insulating ("warm") - light mixtures, in which microscopic polystyrene foam granules or light natural aggregates are used instead of sand. Such plaster is several times lighter than usual, it is well applied and sets. Due to the presence of air pores, warm mixtures have high vapor permeability, regulate condensation and ensure a healthy indoor climate. A layer of warm plaster of 50 mm in terms of heat-insulating effect is equivalent to laying one and a half to two bricks or a two-centimeter layer of polystyrene foam.
Not so long ago, new materials appeared on the market, produced by different manufacturers under different trademarks, but united by the common name "liquid thermal insulation". It is indispensable for such problem areas as freezing corners. The paint-like insulation suspension consists of hollow microspheres (ceramic, glass, silicone or polyurethane) that effectively reflect heat radiation. The microspheres are suspended in a binder composition of synthetic rubber or acrylic polymers, antifungal and anti-corrosion additives and coloring pigments. Such a composition gives liquid thermal insulation the properties of water resistance, flexibility, lightness and strength. The thermal conductivity of liquid heat insulators is much lower than that of conventional heaters. Several layers of such paint can replace 5 - 10 cm of polyurethane foam or mineral wool.
True, all this is only from the words of manufacturers and sellers, many practical tests have proven the ineffectiveness of such paint as a heater. Its main task is to reduce heat losses on pipes of hot water mains and boilers.
Application of liquid insulation
The problem of freezing corners can be prevented even at the stage of building a house or repairing a new building. In accordance with the laws of physics, the temperature of the inner surface of the corner is always lower than the temperature of the walls that form this corner. Experienced designers say that ideally, the corners of the walls, both external and internal, should be rounded or beveled. Rounding or chamfering only the inner corner (with wall material or heat-insulating plaster) can reduce the temperature difference between the walls and the corner by 25-30%. The same role is played by pilasters on the outer corners of the building. This is not only a well-known architectural technique, but also a way of additional insulation.
You can use interesting design solutions. For example, in the corner of the ceiling, mount a plasterboard box with illumination from ordinary incandescent lamps. Working lamps will heat the air inside the structure, thereby pushing the dew point inside the wall.
Freezing corners is a nuisance that residents of both a panel Khrushchev or a brick new building, and a country house, whether it be wooden or stone, may encounter.
Fortunately, this serious problem can be solved on your own. Let's talk about how to fight with cold corners.
Thermal insulation in practice and in theory
Due to cold bridges, corners are the most vulnerable part of almost any home. These sections of the building structure have increased thermal conductivity.
Any vertical or horizontal angle is a geometric cold bridge. If a construction defect is allowed - poorly sealed seams, through voids in concrete, insufficient layer of mortar between bricks, lack of necessary insulation - problems cannot be avoided.
Where there are cold bridges, the wall surface temperature in winter can drop below the dew point while maintaining room temperature indoors.
It is in such places that, due to the temperature difference, condensation forms, which leads to the formation of mold, and when it freezes, it turns into ice crystals.
The most logical solution in this case seems to be laying insulation from the inside along the walls. But any such thermal insulation essentially insulates the wall equally from both heat and cold.
The use of insulation can even worsen the situation, as it will shift the dew point to the inner surface of the wall. For example, if you warm.
As a result, cold air from the street will freeze the wall through and through, since the heat from the apartment will not be able to penetrate through the thermal insulation.
Wetting and freezing will continue, become unusable and cease to perform their functions. In addition, the ice crystals will continue to break down the wall material, further increasing the thermal bridges.
How to insulate the corners of the house?
The ideal way to solve the problem is thermal insulation of the entire facade from the outside and reliably sealed seams. It is quite possible to repair your own country house, but in an apartment building you will have to turn to the management company for help.
But do not despair. And in a single apartment you can get a good result. First of all, you need to remove the wallpaper. If there are no visible cracks, then the walls are tapped with a hammer - where there are voids, the sound will be deaf. Next, remove the plaster over the discovered cavities and dry the corner thoroughly.
If there is mold, be sure to treat with special antifungal agents. Sometimes the mold infestation is so extensive that the use of acid, blowtorch fire, or surface milling is necessary.
All cracks and voids are filled with mounting foam or liquid foam. This will prevent moisture from entering the room even if there are cracks in the outer wall. And finally, the remaining foam is cleaned and the corner is plastered.
Work is best done in the warm season to completely get rid of dampness and mold indoors. In the event that very large voids are found, they should not be filled with mineral wool or tow, as these materials contribute to the accumulation of moisture.
It is better to use the same mounting foam. It is resistant to moisture, is not subject to rotting and mold, has high adhesive properties, does not lose its qualities when frozen.
Modern thermal insulation
Today, manufacturers offer a variety of materials that greatly facilitate the repair process and bring it to a whole new level.
For example, special heat-insulating plasters are light mixtures in which microscopic polystyrene foam granules or light natural aggregates are used instead of sand.
This one is several times lighter than the usual one, it is well applied and seized. Due to the presence of air pores, warm mixtures have high vapor permeability, regulate condensation and ensure a healthy indoor climate.
A layer of warm plaster of 50 mm in terms of heat-insulating effect is equivalent to laying one and a half to two bricks or a two-centimeter layer of polystyrene foam, but this is not enough.
Not so long ago, new materials appeared on the market, produced by different manufacturers under different trademarks, but united by the common name "liquid thermal insulation".
It is indispensable for such problem areas as freezing corners. The insulating suspension, resembling paint, consists of hollow microspheres that effectively reflect thermal radiation.
The microspheres are suspended in a binder composition of synthetic rubber or acrylic polymers, antifungal and anti-corrosion additives and coloring pigments.
Such a composition gives liquid thermal insulation properties of water resistance, flexibility, lightness and strength, but this is all a publicity stunt. But do not be fooled by liquid thermal insulation, trust basalt.
The thermal conductivity of liquid heat insulators is much lower than that of conventional heaters. Several layers of such paint can replace 5-10 cm or 10 cm thick, according to manufacturers, but it often turns out that this is nonsense.
It is used on almost any surface - concrete, brick, wood, as the composition has excellent adhesion, is non-toxic, does not contain harmful compounds and is tinted in any color (it's just paint). At home, liquid thermal insulation is applied in any convenient way and subsequently, after drying, covered with any finishing material.
Other solutions for corner insulation
The problem of freezing corners can be prevented even at the stage of building a house or repairing a new building. In accordance with the laws of physics, the temperature of the inner surface of the corner is always lower than the temperature of the walls that form this corner.
Experienced designers say that ideally, the corners of the walls, both external and internal, should be rounded or beveled. Rounding or chamfering only the inner corner can reduce the temperature difference between the walls and the corner by 25-30%.
The same role is played by pilasters on the outer corners of the building. This is not only a well-known architectural technique, but also a way of additional insulation.
You can use interesting design solutions. For example, in the corner of the ceiling, mount a plasterboard box with illumination from ordinary incandescent lamps. Working lamps will heat the air inside the structure, thereby pushing the dew point inside the wall.
When buying a country house or an expensive apartment, you can use the services of companies offering thermal imaging. Specialists will help to detect all heat leaks and conclude whether it is possible to correct builders' mistakes.
This can save owners from many troubles associated with the operation of the house, and will save significant funds.
According to the technology of building wooden houses, logs - crowns at the corners were fastened with special cut-out "locks" with additionally enclosed natural insulation. This reliably protected the structure from freezing.
One of the frequently asked questions by most of us, especially the owners of an apartment in a panel house, is how to insulate a corner room in a panel house.
Warming a panel house from the outside is a necessary measure, since living in a cold apartment does not add comfort and is fraught with health problems. And, most of all, this applies to end (corner) apartments in panel high-rise buildings. At the interfloor joints, cracks are formed over time, through which water easily penetrates into the wall and is absorbed. In winter, the water accumulated in the walls freezes and begins to hit the wall from the inside, making the living space both cold and, moreover, damp.
Getting rid of freezing corners
You can positively solve this problem if you know how to insulate a panel house from the outside and, in particular, an apartment. 
Consider how and with what panel houses are insulated. There are several schemes and methods of insulation using various materials.
Particularly acute is the question of how to insulate the corners in a panel house. The corner room, due to its structural specifics, has not one in common with the street, but two, which significantly increases heat loss. In addition, such rooms contain two windows, one for each of the existing external walls. This fact is remarkable only in terms of illumination, but in terms of heat preservation - so-so.
Living in such apartments are trying to solve the problem by increasing the number of heating devices in the room. But, as everyday experience shows, often there are problems with freezing of the corners between the outer walls and, as a result, condensation appears on the wall and the consequences are not long in coming:
- wallpaper goes away;
- walls previously painted with water-based paint are covered with stains, and the enamel peels off in patches;
- the destruction of the plaster occurs, which will cause damage to the main wall;
- a fungus appears, which looks unaesthetic and is harmful to health.
The conclusion suggests itself - you need high-quality insulation of the corner room and it is better not to limit yourself to just improving the corners.

You can insulate a corner room:
- outside;
- from within.
If insulation is not available from the outside, consider the issue of internal thermal insulation. Condensation is a clear “bottleneck” of internal insulation, therefore, it is necessary to protect the main wall from water vapor.
There are currently two known solutions:
- the use of a heater characterized by low vapor permeability;
- protection of the insulation directly with a vapor barrier film;
Who can carry out thermal insulation outside
Insulation of panel walls is best left in the hands of highly professional specialists who have sufficient experience, perform work in accordance with SNiP and following the sequence of technological operations
.Coordination with the relevant authorities that allow the insulation of the external walls of a panel house is not required if the building is not of historical value.
At the same time, no matter what kind of insulation you use, the material must meet certain requirements, including:
- high degree of thermal conductivity;
- moisture absorption;
- air tightness;
- Fire safety;
- environmental friendliness;
- long service life.
Important: insulation for a temperate climate should be of sufficient thickness - from 8 cm.
Seam insulation
The need for thermal insulation of joints in accordance with the technology will eliminate the appearance of drafts, fungus, and heat losses. 
The main prerequisite for the work is a sufficiently long service life of the house - twenty years or more, as a result of which shrinkage and shift of structural elements occurred.
As a result:
- joint filler peeled off or cracked;
- there is a decrease in the temperature in the room during severe frosts;
- there is damage to the plaster layer, peeling of wallpaper and other finishing materials;
- constant humidity is fixed at the junction;
- the occurrence of mold;
- visual signs of the destruction of the seam from the outside.
The design of the interpanel seam
A panel seam is a junction of external enclosing structures, classified into a seam formed at the junction of two or three slabs.
The last type of seam needs an enhanced technological procedure, since it is the most vulnerable.
Today, the insulation of joints directly in houses from panels is made with polymeric materials, which significantly increased the life of the coating.
The following factors influence the choice of insulation:
- climatic zone;
- number of storeys;
- year of construction of the building and its purpose;
- a major overhaul.
Among the widely used heaters:
- polyurethane foam (sealant based on polyurethane);
- filler Vilaterm;
- mineral wool and other soft insulating fibers.
Also, complete sealing of the seam is a common method of thermal insulation. As a filler, plastic solutions are used that penetrate deeply into the structural cavities, and as a filler they are considered: sand, expanded clay, fine gravel. 
All work is carried out on a leveled and thoroughly cleaned surface, while the used plate-type insulation materials with a very high coefficient of strength.
How specialists carry out thermal insulation of a panel house from the outside
Insulation of facades is usually carried out by builders-alpinists, it is advisable to contact trusted specialists, the cost varies depending on the number of storeys, it is really coordinated with neighbors. 
The technological process, according to which the external walls of a panel house are insulated, affects the following points:
- cleaning the surface of the panels from dirt and falling facing materials;
- sealing visually visible cracks;
- applying a layer of adhesive substance;
- installation of foam sheets;
- fastening them to the wall surface with dowels.
After the glue has hardened, protective profiles and elements are mounted, after which they begin to form an external decorative layer. It takes at least a week for thermal insulation in a panel house of a 2-3-room apartment.
As you can see, if you approach thoughtfully and consistently to the question of how to insulate the walls in a panel house, then there will be no problems.
Often users are interested in: how to insulate a corner apartment in a panel house yourself? If the insulation outside the panel house will be carried out on the ground floor and you are confident in your abilities, then everything is quite possible.
Painting the walls of a panel house
The insulation of the walls of a panel house will not be complete and incomplete if the walls are not painted, as a result, your house or apartment will stand out in an original way from others. At the same time, painting the walls is the final stage in wall insulation, and acrylic paint is used for this procedure. 
The painting procedure is as follows:
- the paint is mixed to a homogeneous mass and tinted in a spacious container for better capture of a portion of the paint;
- paint with a roller, which is dipped into a tray with paint, movements are made in one direction;
- the paint is applied in a thin layer to avoid smudges and sagging;
- in hard-to-reach places use a narrow paint brush-flute;
- the paint is applied in 2-3 layers, each subsequent - only after the previous one has dried.
How much will it cost to insulate a corner apartment
Insulation of panel houses is not a cheap pleasure, the number of storeys directly affects the total cost. For residents of the 1st and 2nd floors, this procedure will cost less, somewhere around 200–220 UAH/sq. m of the cultivated area of the facade, already from the 3rd floor - the price is 220-270 UAH (including materials). Not the entire facade is allowed to be insulated, but only one room, at the discretion. In general, to insulate a 2-room apartment S - 48 sq. m (S facade - 28 sq. m) will cost 6.5-7.5 thousand UAH, and three-room 56 sq. m. m (S of the facade - 37 sq. m) - 8.6-10 thousand UAH.
Conclusion
Wall insulation in a panel house from the outside is the best thing that can be done in such a situation for further comfortable living. The successful combination of conventional building materials with innovative technologies will provide a reliable result.
External insulation is more effective than internal insulation, in addition, the original useful area of \u200b\u200bthe apartment will be preserved. Also, there is no need to remount heating, engineering systems, electrical wiring for external thermal insulation. It should be noted that thermal insulation from the outside significantly increases the value of the apartment, a kind of investment in the future.
Wooden housing construction has not lost its relevance for many hundreds of years of human life. This is due to the benefits that it contains. But in order for housing from this wonderful environmentally friendly material to be warm, comfortable and cozy for living, it is necessary to observe all the canons of technology during the construction process.
The most vulnerable place in a building made of wood, and in particular of timber, are the corners of the house. If they are not performed correctly, then such a house loses a significant amount of heat due to cracks and blowing in the corners, as evidenced by the frequent complaints of the owners.
Warm corner technology
Consider how to insulate the corners of a house from a bar. To prevent blowing through the corners of the house in wooden housing construction, a technological solution called a "warm corner" is used. It is a corner connection of two bars, when a groove is cut in one, and a spike corresponding to the size of the groove in the other. The tight entry of the spike into the groove ensures the tightness of the connection. The spike and groove are located closer to the inner edge of the timber. In the process of erecting walls, builders observe the alternation of joints of corner logs with dressing. On even crowns, a beam with a spike is laid, on odd - with a groove. Additionally, such a connection is sealed with jute fiber, which is the most preferable for sealing the corners of a wooden house compared to moss, linen tow or linen batting.
There are other varieties of cutting a warm corner. They were called "half-dovetail" and "dovetail". In this case, the spike is shaped like a half or a whole (for partitions inside the house) swallow's tail, and the groove is a recess corresponding in shape and size. Moreover, the groove and recess correspond to each other as much as possible in size.
Advantages of the "warm corner" technology
- Reliability and high structural strength
- Savings on the absence of additional fasteners
- Quick house assembly
- No drafts or drafts in the room
Additional methods of warming corners
The question of how to insulate the corners of a house made of timber, which has been in operation for some time, is very often asked by specialists in wooden housing construction. In this regard, in addition to the “warm corner” device technology, it is advised to use methods such as filling joints with interventional sealant, such as elastomeric foam or other silicone and acrylic sealants.
In addition, it makes additional sense to arrange decorative corner architraves from sheathing boards, having previously provided a nest in the ceiling, in order to avoid damage in case of shrinkage of the house during operation. Tow, treated with an antiseptic, is placed under the platbands.
Finnish builders have developed a technology for the corner connection of walls made of timber, called the "labyrinth cup", which also provides good protection of the corners from blowing. In such a connection, the beam is sawn from all four sides, which leads to a tighter connection due to the displacement of the edges of the beam relative to each other and forms a labyrinth for air flow. To prevent the formation of cracks during operation, the bars are fastened with metal brackets.