The device of the truss system of a multi-gable roof. Multi-gable roof truss system: basic principles for mounting a multi-gable truss system, diagrams
A multi-gable roof, with all the complexity of calculation and installation, is especially popular in our country. Its complex, geometrically perfect appearance evokes persistent associations with wooden architecture: high towers, carved platbands and shutters. Although simple roof shapes are cheaper and more convenient to maintain, a well-designed gable roof opens up a wide range of creative architectural solutions and uses of interior space.
Pros and cons of a multi-gable roof
The advantages of a multi-pitched roof are numerous and obvious:
- the possibility of rational use of the internal volume;
- overlapping of buildings complex in terms of;
- attractive appearance;
- variety of architectural solutions;
- a large angle of inclination allows you to effectively drain water;
- a thick layer of snow does not accumulate;
- equally well suited for houses made of stone and wood.
The multi-gable roof features a wide variety of options
At the same time, the complexity of the design determines its disadvantages:
- the need for competent design, great sensitivity to the correct installation;
- not every type of roofing is suitable;
- high material consumption due to the large area of \u200b\u200bthe slopes;
- the need for an extensive drainage system;
- high cost due to the use of numerous additional elements.
Features of the design and device of a multi-gable roof
Gable is an architectural term for the top of a building bounded by two slopes. The simplest gable roof option is a gable roof. More complex forms of multi-gable structures are formed as a result of intersections of slopes.
Bearing elements of a pitched roof - rafters that transfer weight and operational loads to the walls of the building
Gable roof
Historically, the gable roof is the most popular final construction of individual residential buildings. Her virtues:
- a significant angle of inclination, which allows organizing effective water drainage;
- ease of installation, rational load distribution scheme;
- well-developed schemes of nodes for connecting elements;
- ease of maintenance due to the optimal device;
- service life is limited only by the durability of the roofing;
- ease of repair and reconstruction;
- a significant internal volume allows you to arrange attics and exploited attic spaces;
- the highest ventilation efficiency through the end walls.
The use of a gable roof allows you to arrange terraces and balconies at the ends of the building, as well as provide significant overhangs to protect the walls of the building from precipitation.
The load-bearing frame of a gable roof can be made using two types of load-bearing elements: rafters and roof trusses. The first option is more common, the second is used for large areas of the base of the roof, significant spans and operational loads.
Rafters can be designed:
- Hanging. This means that at the point of connection they do not have a support that transfers the load to the supporting structures of the building.
- Layered. Such rafters have additional support in the form of a run, which, in turn, is mounted on vertical racks.
In order for the rafter system to correctly perceive horizontal rapier loads, the hanging rafters are connected with a puff or a crossbar, and the layered rafters with a scramble
Laminated truss systems are more reliable, designed for heavy roofs and significant snow loads. Hanging rafters are used to organize an attic room or an exploited attic.
Types of gable roof trusses
A truss (from Latin firmus - strong) is a building structure that allows, through the use of straight elements connected by hinge joints, to eliminate bending loads.
The device of trusses reduces the weight of the supporting frame of the roof, increases the allowable spans, and reduces the consumption of materials. In addition, roof trusses can be assembled on the ground and then lifted up, which increases the assembly accuracy and simplifies installation.
Farms are used to cover a large unsupported span
Ready-to-install truss trusses can be ordered from the factory, which guarantees the quality of workmanship and the stability of the geometry. Structures made of premium wood can be successfully used for buildings without a top floor, insulating only the upper plane of the roof, since the exposed elements of truss trusses are very decorative and popular in loft or rustic styles.
In order to organize an additional floor - an attic - in the internal volume of the roof, it is necessary to use trusses with direct views of the lattice, leaving a gap in the middle of the structure. The angle of inclination of such a roof should be increased accordingly.
For the construction of the attic floor, special attic types of trusses are used.
One of the most common forms of a multi-gable roof is a hipped roof.
Four slopes diversify the architectural design of buildings and increase the under-roof space
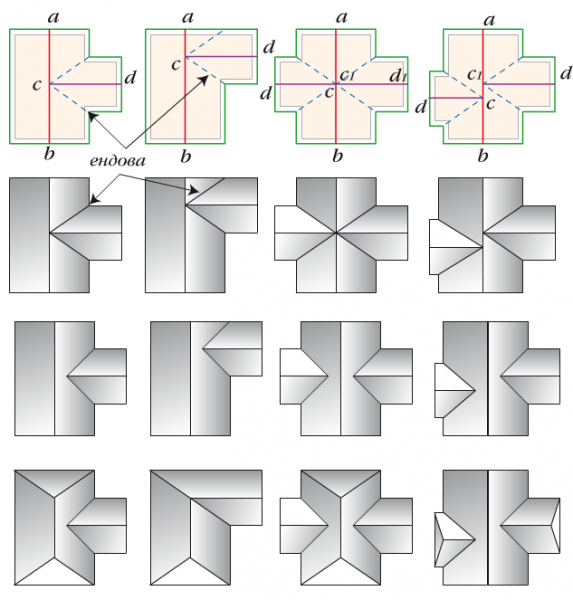
This option is formed as a result of the intersection of two gable roofs. The spatial layout of this design includes a valley (groove) - an inner corner.
It is this element of the truss system that is the reason for the technological complexity of a multi-gable roof, complicates the calculation and installation of roofing parts. Providing the main drainage from the roof surface, the valley must be made at a high level, since construction errors can result in leaks and violations of the integrity of the coating.
Simple types of roof truss systems can be implemented with little or no additional metal parts.
A special case of a hipped roof is the variant with dormer windows. In this case, the building can be square or rectangular in plan, only the shape of the roof changes.
Dormer windows help to organize the attic more rationally or improve the lighting and ventilation of the attic.
Other types of multi-gable roofs
In addition to the simplest symmetrical options, multi-gable roofs allow you to combine types, for example, use hip and hip endings, form various types of slope intersections, each of which may include dormer windows.
The non-standard design of the dormer windows and the change in the angle of the slopes form the original architectural forms
Especially often, various combinations of a hip multi-gable roof are used for single-storey buildings of a large area, since the rational organization of space requires a complex angular layout, and drainage from a long roof is easier to organize using valleys.
The angular layout of a one-story building can be the basis for the use of a multi-gable hip roof with dormer windows
Buildings with a plan view of the letter P, G or T can only be designed using a multi-gable roof. Hip slopes are a popular solution, as they allow you to get rid of gables.
A hip multi-gable roof is used for buildings of complex shape with an unused attic
For wooden multi-storey buildings, mansard multi-gable roofs of complex shape with dormer windows are often used.
Multi-pitched roofs with a large angle of inclination allow you to arrange several levels of the attic inside the under-roof space
Multi-gable roof truss system
The main feature of the truss structure of a multi-pitched roof is the internal ribs of the intersection of slopes, valleys. Depending on the angle at which the slopes adjoin each other, the nodes for connecting the elements of the truss structure are designed.
The rafter systems of symmetrical multi-gable roofs are easier to manufacture with layered rafters
The installation of the valley and the adjoining of the rafters to it are not very difficult, provided that modern woodworking tools are used and a preliminary calculation of the roof is used.
Video: installation of a truss structure with a valley
The junctions of the two parts of the roof can in the simplest case be implemented using only wooden elements and precise adjustment of the corners.
In the truss system of a multi-gable roof, to form an internal angle of junction of the slopes, valley rafters and shortened truss beams are used
For more complex roof options that cover large areas and carry significant operational loads, metal corners and plates are used. It is imperative to carry out calculations of the bearing capacity of such structures and develop detailed layout plans for rafters, girders and other load-bearing elements.
A well-executed project of a multi-gable roof is a guarantee of structural strength and a long service life.
The choice of roofing for a multi-gable roof
Since the construction of a multi-gable roof has internal ribs, numerous junctions and intersections of slopes with each other, the roofing must meet the following requirements:
- be easy to install and process, cut without problems at arbitrary angles;
- be completed with a large number of additional elements;
- allow to arrange a complex drainage system;
- be designed for installation on roofs with a large angle of inclination.
Proper roof construction requires the use of a variety of additional elements.
Based on these criteria, we can conclude that slate, ondulin, corrugated board are of little use as a coating for multi-gable roofs. The dimensions of common slate sheets are 0.98x1.5 and 1.13x1.5 m, ondulin - 0.95x2 m, corrugated board 1.15x6 m. Their advantage is a significant coverage area, which is most evident in the roof with a slight slope and simple geometry . In the case of a complex structure with intersections of slopes, there is a need for trimming, and here the advantages turn into a disadvantage: a lot of waste occurs, the fit becomes more complicated. Also, these roofing materials are characterized by a large profile height and an increased value of sheet overlap, which in some cases makes it impossible to properly install extensions and drains.
The exception is a simple gable roof, in which there are no internal corners and dormer windows. Of the additional elements, you only need a ridge, a ventilation frame and gutters. Trimming in this case will be minimal, material consumption will not increase.
In the case of a complex multi-pitched roof, preference should be given to piece materials: ceramic, cement-sand and slate tiles. The small size allows you to rationally fill the most complex forms with minimal trimming waste. A large number of additional elements makes it possible to connect and intersect roof elements with reliable waterproofing and drainage.
Ceramic tiles allow the most rational and technologically efficient roofing for complex variants of multi-gable roofs
Metal tiles and soft bituminous tiles can also be considered as roofing material, subject to all technological nuances. For a metal tile, the correct implementation of the valley node is critical. For this are required:
- reinforcement of the lathing at the place of installation of the valley, it is optimal to make it continuous;
- the use of several layers of waterproofing over the crate;
- installation of the inside of the valley;
- sealing the joints of the roofing material with silicone;
- installation of the outer part of the valley.
Bituminous soft tiles require a continuous sheathing of sheet material over the entire area of the roof and under-roof ventilation. In the inner corners, additional waterproofing is necessarily used - a valley carpet.
Features of roofing roofing materials
The complexity of the geometry of multi-gable roofs requires careful fitting and trimming of the roofing material and additional elements for precise connection between them. However, if you have a detailed project, you can mount the roofing with your own hands. Of course, this work requires accuracy, accuracy and adherence to the laying technology recommended by the manufacturer.
The metal tile is mounted using special self-tapping screws coated to protect against corrosion. It is easier to calculate the amount of base material and additional elements in a specialized program, since the complex geometry of the roof requires numerous trimmings.
The layout of sheets of metal tiles on slopes of complex shape generates a significant amount of waste due to trimming
Particular attention should be paid to the correct installation of the valley elements, ridges and junctions with vertical structures, since the reliability of the roof waterproofing depends on this.
Video: installation of a valley as part of a metal roof
For houses with more than two storeys, especially with complex roof geometry, it is highly desirable to install a drainage system from the roof.
Piece ceramic, cement-sand and polymer coatings were originally designed for installation on roofs of complex geometry. They are easy to use due to their small size. Their only drawback is their rather large weight. Therefore, the roof sheathing must be reinforced, and during direct installation it is necessary to evenly distribute the prepared stacks of tiles over the entire surface of the slope so as not to overload the structure.
When installing ceramic tiles, it is important to calculate the required amount of material and prepare it for laying, evenly distributing it over the roof surface.
Laying soft bituminous shingles on a complex roof is the easiest because of its light weight, flexibility and ease of processing. However, it requires mandatory preparation of the roof: the installation of a solid base made of OSB or moisture-resistant plywood, the installation of a lining waterproofing carpet, additionally reinforced at the bends of the slopes (skates and valleys).
Under soft tiles you need to equip a solid base
Options and methods for finishing a multi-gable roof from the inside
Depending on how it is planned to use the under-roof space, the finishing method is chosen.
If the attic is unused or technical, it is enough to simply sheathe it with OSB building board along the bottom surface of the rafters.
The roof of the dwelling must be insulated. To do this, the heat-insulating material is mounted between the rafters using a counter-beam, which is installed perpendicular to the rafters. Sometimes it is installed in parallel, with an offset to the inter-rafter gap. From the side of the room, the insulation is closed with a vapor barrier membrane. And only after it you can mount the front trim. The selected material can be attached to the counter beam or an additional rail or metal profile can be applied.
Installation of the topcoat on the rail allows you to provide an additional ventilation gap for better ventilation of the insulation
For attics or one-story houses without a loft-style attic floor, a truss system partially open from below can be used.
At the same time, the roof is insulated and sewn up, and parts of the wooden roof trusses protruding into the room are covered with decorative impregnation or paint.
Wooden trusses can be used in the interior as an independent decorative element.
A popular type of finish is wood paneling - clapboard, planed board. It is used in interiors of country and rustic styles. Wooden finishing materials are sewn onto the counter-lattice along the rafters, which allows all parts of the roof structure to be well ventilated. Twhich sheathing additionally increases the rigidity of the structure and improves its thermal insulation properties.
Wood cladding accentuates the complex broken roof shapes
Finally, the attic room can be sheathed with magnesite slab or drywall, and then painted in any color. To do this, after installing the insulation and vapor barrier, metal profiles are sewn across the rafters, onto which the selected sheet material is screwed.
Monochromatic light-colored paint visually expands the attic space
Variants of projects of houses with a multi-gable roof
Since there are a huge number of options for combinations of types of roofs as part of a multi-gable roof and the architect's imagination is limited only by the technological subtleties of the selected roofing material and the financial capabilities of the customer, building projects are diverse and numerous.
Photo gallery: projects of buildings with multi-gable roofs
 A simple four-pitched roof option is often chosen for one-story L-shaped buildings.
  A multi-gabled hip roof can be used for a house with an extension in which a garage or workshop is arranged.
  The large gable roof pitch allows for the design of an attic floor
  In the architectural solutions of country cottages, a multi-pitched roof with partial overhanging of the slopes can be used.
  The number of slope crossings is limited only by the imagination of the architect
It is better to understand what architectural possibilities a multi-pitched roof provides, building projects allow. For example, with the help of a hipped roof, you can arrange a second light in the living room of a one-story house.
The living room of this house has a large ceiling height and glass area.
The building is cruciform in plan, covered verandas are located on the short sides, and the central intersection of the slopes makes the living room twice as high as the rest of the premises and adds light. Private and public areas are rationally separated. The second part of the one-story building is occupied by a garage with technical rooms.
The original architectural solution diversifies the volumetric layout of a one-story cottage
It is convenient to use a multi-pitched roof with a large angle of inclination for the construction of attic rooms. This allows you to save materials due to the absence of an attic floor, as well as create an attractive exterior of the building.
A high multi-gable roof harmoniously looks on T-shaped buildings of a small area
The first floor is larger than the attic in area and is a public area: there is a living room, dining room, kitchen and only one bedroom. The living room has a second light.
The layout of the first floor rationally uses a small area of the house
On the attic floor there are two small bedrooms and another bathroom. The space under the slopes is used for large built-in wardrobes.
Part of the attic floor is occupied by the second light of the living room
A multi-gable roof is a great option for a private developer. It allows you to rationally use the internal volume, has many design options. With proper installation of the frame and roofing, such a roof will last for many years. At the same time, its attractive appearance both from the outside and from the inside makes it possible to develop the exteriors and interiors of buildings with high decorative and operational characteristics.
Complex roof structures today can often be found in private housing construction. And the sheer complexity of developers does not scare. After all, beauty and presentability are part of social status. Among a small number of types of complex roofs, multi-gable roofs stand out for their originality, because there are a large number of complex elements in its design. But why did this type of roof get such a name.
It's all about the rooms under the roof, which are covered with a separate element that connects to the main roofing system. This element is called a tong. The peculiarity of its design is two slopes without a cornice, resting against the walls of the building. To understand what we are talking about, look at the photo above (a house with a multi-gable roof). The slopes have one contact with other roof elements - these are valleys or ribs. That is, it turns out that this building does not have gables.
If you look at the roofing system from above (if the house is square or rectangular, and its tongs are located against each other), then this will be a cross-shaped structure. In this case, there will be two crosses: the inner one is the valleys, the outer one is the ribs or ridges of the roof. By the way, valleys are those areas in which snow accumulates in large quantities in winter, and garbage in summer.

Features of a multi-gable roof
If you are faced with the task of making a multi-gable roof with your own hands, then you should be aware that its design is a huge number of different elements, the process itself is complicated, so it is usually carried out by professionals. But if you carefully understand the construction technology, then it will be possible to build a multi-gable roof on your own.

The question of the cost of the entire structure is a little apart. It's all about the large number of building materials used. And here, as practice shows, there is no point in saving. The design and calculation carried out by specialists must be strictly observed. You should not do the project and calculations with your own hands, a small inaccuracy can lead to big problems already at the initial stage of building a multi-gable roof. The design of this type of roof must be carried out with great care, taking into account all visible and invisible loads and factors.


If you build a multi-gable roof according to all the rules, then in the end you will get:
- A stable and reliable roof structure that will perfectly withstand natural loads only due to a balanced truss system.
- Under the roof, it will be possible to organize several residential and utility rooms. The house will become more functional.
- This is an attractive appearance, residually original and rarely seen, so there is an opportunity to stand out among the neighbors.
And one unpleasant moment associated with the construction of this structure: a large amount of waste roofing material. Professional craftsmen bring it to a minimum, but if you make a roof with your own hands, then you should immediately be prepared that financial investments will increase.

Do-it-yourself construction of a multi-gable roof
The main load element of the roof is the Mauerlat. In fact, these are beams (minimum section 150x150 mm), which are attached with metal anchors to the walls of the house. To lay the anchor, it is necessary to pour a concrete reinforced belt around the entire perimeter of the building.
Attention ! The reinforcement of the concrete belt must be continuous.

Rafter legs will rest on the installed Mauerlat. They can be hanging or inclined, everything will depend on the design features of the roofing multi-gable system. Boards with a section of 150x50 mm are usually used as rafters. If the expected loads, confirmed by calculations, are large enough, then instead of boards it will be necessary to use beams with a section of 150x100 mm or double the boards described above.

A ridge beam is laid along the main bearing wall, on which the rafters will be installed with the upper edges. The beam is set exactly in place and supported by supports and jibs. After that, truss elements are installed on it and the Mauerlat. The laying step will depend on the chosen roofing material. If these are heavy types (for example, tiles), then the step between the rafters should be within 60-80 cm. If it is corrugated board or metal tiles, then the step can be increased to 1.0-1.5 m. All the same applies to crates.

The rafters are fastened with metal fasteners using self-tapping screws. By the way, experienced craftsmen make the connection between the elements of a multi-gable roof by cutting, so to speak, in the old fashioned way. The method is complex in execution, requiring significant experience. Therefore, for those who build a house and a roof with their own hands, it is recommended to use modern fastening technologies.
Attention! When attaching the rafters to the Mauerlat, it is necessary to make a recess in the timber to fit the width of the rafter. And after installation in place, fasten the elements with metal profiles.

On the ridge beam, installation is carried out by simple laying and metal fasteners, as shown in the top photo.
The most difficult stage in the construction of a multi-gable roof with your own hands is the creation of a valley between the roof slopes. By the way, in the same photo it is clearly visible. Firstly, it should be noted that the valley is loaded more than all other elements of the roof, therefore, during its construction, it is necessary to take care of the strength of the material from which it is made. Here, just like with a ridge beam, you can use either a thick beam or double boards.

Secondly, the valley is an inclined inner corner, which is formed by the rafters of two roof slopes. Therefore, the rafters will rest on it. Here it is important to strictly observe the design parameters that are laid down in the multi-gable roof project. This is especially true for the angle along which the slopes are connected to each other. If you look at it, then the valley is, in fact, part of the supporting structure, which includes the ridge and Mauerlat.
Pay attention again to the photo. It clearly shows that another element is installed in the same plane only perpendicular to the ridge beam. This is the so-called run. In fact, this is a fad for an extension, which will form a gable of the roof. The run must be made of the same material as the skate. It will also load. And although the bulk of the rafter legs will rest on the valley, the rafter legs forming the gable will rest on the extension run. By the way, these rafters are called "spiders".
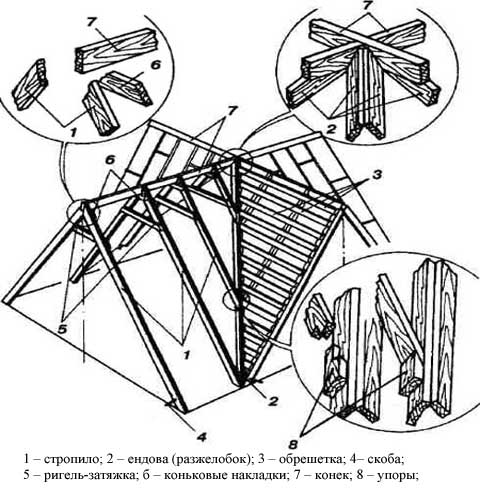
The simplest construction of a multi-gable roof is a roof mounted on a square house. Everything seems to be simple, but this form has its own difficulties in erection. Here it is important to understand how all other elements are connected at one point. There are a lot of subtleties in these knots, especially this applies to docking and fastening. To ensure that each element is firmly fixed, experts suggest using additional stops and supports. In order not to be unfounded, we suggest looking at the photo, where these nodes are shown in full analysis.

Thirdly, with regard to the valley. This is the most vulnerable part of the roofing system. That is why it is so important to carefully seal it. This is usually done in several steps.
- A metal bar is installed along the crate, covering a part of the elements in width.
- Waterproofing is laid, often in two layers.
- Another one exactly the same.
Attention! The crate under the valley should be solid.
This element of a multi-gable roof does not differ in its technological properties from the crates of other forms of roofing. That is, the installation step, the dimensions of the elements, the methods of fastening, and so on are chosen in the same way.

Conclusion on the topic
Making a multi-gable roof with your own hands is not very simple. But if you master the basics of working with carpentry tools and understand what the design scheme is, how the roof elements are installed and fastened, then you can cope with the task without big problems.

The only difference between the multi-gable roof subtypes is the shape of the house itself. That is, the house can be square and rectangular. In the first case, there may be no ridge in the roofing system. It's just that all the slopes will be connected at one top point, as shown in the top photo. So, a house covered with a multi-gable roof is the most original.
Among the variety of different roofs, the multi-gable one is considered the most difficult.
However, this does not stop those who want to decorate their home with such a roof.
In this article, we will look at what it is and how its design differs from the designs of other roofs.
Such roofs are erected on polygonal or square houses.
Often, various rooms are attached to the houses, having a different height or equipped with attics in the attic space - multi-gable coatings are erected for various reasons.
The main design feature of multi-gable roofs is the presence of a large number of valleys, grooves and ribs.
Design
The simplest gable roof is a gable roof that does not have gables at the ends.
In this design, the upper triangular part of the wall is called a tong.
If it is separated by a cornice, it will already be a pediment.
The simplest example of a multi-gable roof is the connection of two gable roofs at a right angle.
From above, such a structure is a cruciform figure.
A valley is an internal angle formed between two slopes.
In winter, they accumulate the largest amount of snow, and in summer - garbage.
Attention should be paid to their waterproofing, since leaks most often occur here.
The edge of the coating is formed by the joints of the slopes, unlike the valley, it is an outer corner, for example, a ridge or a connection of two slopes on a hipped roof.
The most complex and critical part of the entire structure is the truss system, it should be calculated and manufactured with increased accuracy and care.
As a rule, either hanging ones are found in it.
We will consider the rafter system separately.
Photo


The device and procedure for the construction of the truss system
The basis of the truss structure is the Mauerlat, which is laid along the top of the wall and is a rigid connected frame.
It is attached to the walls by means of metal studs installed in the armored belt. 
Since the roof is a rather complex structure, attention should be paid to its drawing.
To do this, it is necessary to accurately measure all dimensions, select the slope, determine the type of truss system used, calculate the rafters, mark the location of the valleys, skates, ribs, as well as system elements - puffs, stops, runs, vertical racks.
First of all, the Mauerlat is laid - it is the basis of the truss system and takes on all the efforts from the rafters, transferring them to the load-bearing walls.
Mauerlat is securely fixed on a reinforced belt, after which the rafter legs are mounted.
For larger houses, longitudinal or transverse ceiling beams are installed, which will serve as puffs.
The rafter legs look like ordinary rafters, and if the roof is hip or semi-hip, the rafters will be diagonal, they will need to be reinforced with sprigs, and they themselves can be double or paired.
The rafters are attached to the Mauerlat by means of cuts, as well as metal plates, brackets, corners - it depends on the type of rafters.
At the top point, the rafters are connected on the ridge, and then equipped with a vapor barrier, crate and counter-crate.
It depends on the roofing material that will be used in the future.
All wooden elements should be impregnated with flame retardants and antiseptics for safety and longer service life.
After the construction of the truss system, the roof is insulated and covered.
Particular attention should be paid to waterproofing, in particular, valleys and grooves - water and snow accumulate in them, and with poor-quality waterproofing, they leak first.
Some features of the roof in question
When choosing a multi-gable roof as an option for your home, keep in mind that the construction of such a roof is a rather complicated and expensive process.
It will take a sufficient amount of material, time, professional skills and so on.
If you are confident in your abilities, do-it-yourself multi-gable roofing (its diagram can be easily found) will not be a big deal.
The issue of cost stands apart - such a design is not only complicated, but also costly.
For this type of roof, as a multi-gable roof, the project must be drawn up with great care and taking into account all possible factors - then the roof will serve for a long time and with high quality.
If you build such a roof, taking into account all the rules, then you will get a roof that will be:
- Stable and reliable - due to the balanced truss system, the roof can withstand heavy loads;
- The roof will make it possible to equip the house with additional space - an attic or an attic;
- The roof will be practical, but its appearance will be very attractive - multi-gable roofs look very beautiful, and due to the steepness of the slopes, snow and other precipitation do not linger on it.
As you can see, a multi-gable roof is a somewhat peculiar design that requires more expense and effort than other types of roofs.
However, by erecting such a roof, you will greatly decorate your house, make it attractive in appearance.
It will be pleasant to be in it, and if you approach the arrangement of the roof creatively, it will look very impressive.
At the same time, such a roof will be quite practical.
Video about the roof truss system.
Among all the variety of roof structures, a multi-gable roof is the most complex, labor-intensive and economically unprofitable. However, these shortcomings are more than compensated by the unique appearance with many tongs, gables and grooves.
The construction of this structure without fail implies a process of long and careful design, during which a multi-gable roof and its truss system are built, the dimensions of all structural elements are calculated. Let's consider this process in more detail.
In this article
Advantages and disadvantages
The multi-gable roof is one of the most controversial roof structures, as its pros and cons balance each other out, and the final decision in favor of building such a roof is usually made based on the personal aesthetic preferences of the owner of the house.
Consider the main advantages that a multi-gable roof provides:
- Traditionally, such a roof was erected on square houses in such a way as to avoid cornice overhangs. But the use of this roof is possible and even necessary in the case when the shape of the house is complex due to the many rooms attached to it. It can completely transform the appearance of such a far from ideal building;
- The truss system of a multi-gable roof is characterized by increased strength and stability, of course, if a competent calculation and installation of the structure is made;
- The construction of such a roof allows you to use the room under the roof for a residential attic and, thanks to the possibility of displaying various windows on different sides, provide excellent daylight.

Let's move on to the design flaws:
- This type of roof can not boast of efficiency. The device of the truss system is complex and involves a large amount of waste wood and materials from the roofing pie;
- Due to the large number of junctions of slopes, such a roof is at risk for leaks.
Design and types
It is based on such an element as a gable - this is a triangular part of the wall, which, unlike the pediment, is not separated by a cornice. That is, a simple form of a multi-gable roof is the connection of two gable roofs at right angles over a square building. When viewed from above, such a structure will have a cruciform appearance. 
Depending on the building itself, its shape, dimensions and the desire to create living rooms under the roof, the design can differ significantly from the classical form described above. A set of roofing elements will remain common. Among them, special attention should be paid to two:
- Endova, which represents the inner corner between two slopes. The valley must be especially well insulated and strengthened, since it accumulates the largest amount of snow and debris, and the maximum amount of water flows down it during rains.
- Roof ribs represent the outer corners of the junction of the slopes, for example, the ridge and the junction of several slopes at the top of the roof.
The types of multi-gable roofs are so diverse that they do not lend themselves to any systematization. The number of elements involved in the construction of this roof allows you to give free rein to your imagination and use almost all known roof structures as elements.

Calculation of the truss system
The rafter system of a complex multi-gable roof and its scheme should ideally be carried out by professionals, since this implies a rather complicated calculation and installation with many pitfalls. But if you have initial experience in building roofs and you are not planning a roof that is too fanciful, then it is quite possible to make a drawing of such a roof on your own. 
It is impossible to give an exact algorithm for calculating a multi-gable roof, since the type of construction itself implies large differences in the rafter system, depending on the appearance of the roof. Here are the main points that are important to pay attention to when designing:
- It is necessary to carry out a plan-scheme of the desired roof, displaying the exact dimensions of the building. At this stage, it is necessary to determine such interrelated parameters as the slope of the slopes and the height of the roof. The angle of inclination of the slopes of such a roof is usually steep. Otherwise, it will be problematic to use the under-roof space to create a living room;
- The rafter system should be built on the basis of a number of data, including the snow load of the region and the weight of the roofing. Multi-gable designs produce a large amount of waste, so we recommend that you look at soft tiles;
- The type of truss system depends on the presence of support inside the building. It is important to carefully calculate the location and load on all supporting elements, such as tightening, stops, runs, etc., so as not to miscalculate with their dimensions;
- Depending on the configuration of the roof, different types of rafters will be used: regular or diagonal (for hip structures).

General view of the truss system and roofing pie
The rafters and roofing cake of a multi-gable roof, in principle, repeat the main points of these structures for other types of roofs. Therefore, we dwell on important points that must be taken into account even at the stage of planning the roof:
- Mauerlat is subject to heavy loads and it is advisable for him to choose a bar with a section of 150 * 150 mm. It is more convenient to mount it on anchors laid in the walls during their construction;
- Rafters can be attached to the Mauerlat in three main ways: washed down, staples or corners. In the upper part, the connection of the rafters is made with a ridge beam;
- The reinforcing elements for the rafters in different solutions of multi-gable roofs will be different elements. In the case of a base in the form of a hip roof, diagonal rafters will be mounted, which must be made double and strengthened with sprigs. Strengthening roof trusses is possible with struts or crossbars. In a large building, it is convenient to use ceiling beams for tightening truss trusses;
- The installation of the valley requires special attention. In these places, a continuous crate is made and two layers of waterproofing are laid. A valley plank is mounted on the waterproofing layer. If the element requires docking, then the installation is done from the bottom up so that the upper bar overlaps the lower one and water cannot flow under it;
- The device of the lathing and insulation of this roof in general terms repeats these steps for any other roof.
Summing up
A multi-gable roof is a technically complex structure, for the competent construction of which accurate calculation and knowledge of the installation nuances are especially important.
Such roofs look great both on square or rectangular buildings, allowing them to acquire a more interesting appearance, and on houses of complex shape, when it is the only possible option for arranging the roof.
It is important to remember that any complication of the roof structure does not have the best effect on the cost and strength of the roof. Any element of the roof should, first of all, be of practical use, and not be erected for the sake of taste.
If the box of the house has many outbuildings, then the roof will have a complex shape. A multi-gable roof is a combination of several gable roof structures covering individual elements of the house box and combined into a single roof. Such roofs allow you to equip dormers and balconies. The design contains several gables (more than three), which are called tongs. Gables are gable gables that are not separated from the wall of the box by a cornice. A multi-gable roof has a complex truss system, but aesthetically this design looks the most presentable, resembling the roof of a medieval castle.
Design features of a multi-gable roof
The traditional gable roof, which has two gables, is called a gable roof. If the roof structure has several elements of a gable roof, then it is called a multi-gable roof.
Multi-gable roofs are used in houses with extensions or for arranging attics, balconies, gables with windows
The design can combine conventional gable, dome, hip and semi-hip elements. The roof profile is determined by the shape of the box. The simplest form is the three-tong, which is built on boxes with one side extension.
Photo gallery: variety of types of multi-gable roofs
An additional gable element is used to decorate the dormer window Similar types of multi-gable roofs are developed when building Chinese-style houses In this design, the presence of four gables is more due to the need for dormer windows than the shape of the frame of the house Roofs, which are the intersection of two gable structures at right angles, are built over square boxes and are called an envelope On a rectangular box without extensions, you can decorate a dormer window with a small half-hip roof Multi-gable roof combines a gable and half-hip design The combination of gable, dome and spire forms allows you to create a roof similar to a medieval castle A sequence of rectangular extensions is the basis for a multi-gable roof of several hips elements
Complex shaped boxes are usually built for respectable mansions. A multi-gable roof will emphasize the appropriate architectural style. The complexity and high cost of roofing will be just right for the scale of construction and design of such projects. Often the axes of the ridges of different parts of a multi-gable roof are not located at right angles relative to each other and form complex polyhedrons. The configuration makes the design more refined and more difficult to calculate and assemble. Therefore, such work should be entrusted to experienced professionals.
In private construction, where houses with one extension predominate, three-gable roofs are built. In them, the main gable roof is combined with the gable roof of the extension located perpendicular to it. This simplified version is the most common, and all the features of a multi-gable truss structure will be considered in this example. It contains all the nodes that are used in the construction of more complex structures.
The difficulties of building a multi-gable roof lie in the difficulty of creating a drawing and making connecting nodes (valleys and ribs) between the surfaces of different roof elements. The individual elements themselves are constructed according to the same principle by which ordinary gable or hip roofs are assembled.
Advantages and disadvantages of a multi-gable roof
In addition to visual appeal, multi-gable roofs have practical advantages: frame strength and high ridge.
- Due to the large total area, the roof structure is heavy, so it requires high frame strength. The design is initially designed with increased strength characteristics.
- A high ridge allows you to equip a full-fledged living space under the roof.
The disadvantages of a multi-gable roof include the high cost and complexity of installation. Its construction will require much more materials than a gable roof of the same area. The plane of such a roof mainly consists of triangles and trapezoids, therefore, when cutting materials for roofing (plywood, tiles, metal profiles), a lot of waste will remain.
The weak point of the entire roof is the valleys. Internal obtuse corners at the joints between the surfaces of different roof elements will have a lower slope than the main slopes. Therefore, if the slope of the slopes is not made steep during the design, then snow and debris will accumulate on the valleys. This will bring a lot of inconvenience associated with the need for constant cleaning. A high ridge in multi-gable roofs is not only an aesthetic expediency, but also a solution to practical problems.
Rafter systems for multi-gable roofs
The skeleton of the frame of a multi-gable roof can be made of layered or hanging truss structures. Hanging rafters are mounted on small boxes that do not have partitions. They rest only on the Mauerlat along the perimeter of the box and are pulled together with puffs. In large-area boxes, there are internal load-bearing walls that serve as a support for vertical uprights (headstocks) installed under the ridge. Such truss systems are called layered.
 Among the distinctive external elements of a multi-gable roof, a large number of ribs (pos. 3) and valleys (pos. 6) stand out
 In the design of a multi-gable roof, the following details are distinguished:
- Roof slopes.
- Skate.
- Ribs. External corners formed at the intersection of adjacent planes.
- Pediment (tongue).
- Frontal board. Used to close the roof from the end.
- Valleys.
- Cornice overhang. At the ends, it is closed with a wind board. On the edge of the overhang, a drip is fixed to drain water.
- Apron around the chimney or ventilation pipes. It performs the function of sealing the gaps between the roof and the pipe wall.
 The most complex elements of a multi-gable roof are the valley joints.
 The following elements are present in the design of the frame of a multi-gable roof:
- Mauerlat. The beam fixed on the upper surface of the wall performs the main bearing function in the rafter system.
- Rafter. Form the plane of the ramp.
- Horizontal floor beams. Stacked over rafter puffs.
- Ridge beam of the pediment of the viewing window.
- Valleys. They are formed from two rafters located on the line of intersection of the planes of adjacent surfaces of a multi-gable roof.
- Central ridge (ridge run). It is the upper connecting part of the rafters that form the main slopes.
- Vertical support posts under the ridge run (headstock).
- Crossbars (puffs). They are used to fix the angle of joining of the rafters and prevent them from spreading under the weight of the roof.
- Additional short posts under the rafters. They are used in roofs of a large area with long rafters to increase rigidity. They can serve as a frame for the formation of internal vertical surfaces of the attic.
Calculation of a multi-gable roof
When designing complex structures in which roof elements have different slope slopes, different ridge heights, it will be difficult for an inexperienced master to determine the principle of their calculation. In fact, each plane of a multi-gable roof consists of triangles, so all calculations are performed using the Pythagorean theorem.
Algorithm for calculating the main elements of a multi-gable roof
The usual three-gable roof can be represented as follows:
 For convenient modeling and representation of the planes of a multi-gable roof, it is convenient to use CAD programs
 The base frame of the two modules is designed in the same way as a conventional gable roof. The difference from standard schemes lies in the need to calculate the length of the valley (sloping rafters) and short rafters (spiders) going from the ridge to the valley.
The key elements in the above diagram are the height from the top of the wall to the ridge beam (H), the width of the main box (D 1) and extension (D 2), the angle of the roof slope of the main box (a 1) and side extension:

For example, there is a box 6 m wide. It has an extension 3 m wide. It is necessary to calculate the dimensions of the elements of the roof frame, the slope of which will be 50 0. We get the following values:

After calculating the working length of the rafter beam, the length of the cornice overhang is added to it. You can not make the rafters longer, but nail short bars (fillies) to their ends.
Then you need to calculate the load on the roof, which is directly proportional to its area. Depending on this parameter, additional racks, puffs are added to the scheme and are determined with the cross section of the beam for the roof frame.
Making a multi-gable roof
From the calculation principle described above, it can be seen that a multi-gable roof can consist of several gable structures with different ridge heights and slope slopes. The strength of the frame depends on the correct choice of the beam section and the reliability of the connecting nodes.
Typical truss system connections
Roof installation begins with the installation of the Mauerlat. It can be attached in the following ways:

Video: how to fix the Mauerlat on studs
Fixing floor beams
Floor beams can be installed as follows:

Rafter leg attachment
For rigid fixation of rafter legs, the following methods are used:

The rafters are attached to the Mauerlat in the same way as the main ones. It is important to remember that mounting angles are always installed on both sides of the timber. It is desirable to additionally fasten the joints with through dowels.
Video: how to cut the rafters at the right angle
Fastening rafters to the ridge
The rafter connection with the ridge is performed in the following ways:

Video: installation and fastening of rafters on a ridge beam
Racks are mounted quite simply:

The rafter rack, the slope rack is fixed with nails. To prevent its displacement, a stubborn bar is nailed on the rafter above the rack.
Video: how professionals saw down the rafters to the valley
Multi-gable roof frame installation technology
An experienced master roofer has a developed spatial imagination; in the process of work, he always keeps in mind a three-dimensional picture of the frame of the roof being mounted. This makes it easy to adhere to a single strategy in work and adjust the tactics of actions depending on the circumstances.
 In order to confidently build a roof frame, it is necessary to have a good idea of \u200b\u200bits design in space.
 The construction of the roof frame can be divided into the following stages:

The assembly of the frame is completed by trimming the protruding ends of the rafters (or stuffing the filly) to form an even cornice overhang, stuffing on the ends of the strapping board, as well as the frontal board on the pediment.
 Installation of the truss frame is completed by installing a strapping and frontal board
 The binding board can be made from the crate after laying the waterproofing.
Waterproofing, installation of lathing, design of the valley and ridge
The waterproofing film is laid in horizontal strips from the eaves (from bottom to top) with an overlap of 150 mm.
 For reliable waterproofing, the film strips must be spread horizontally and overlapped.
 Then a vertical thin rail (10–15 mm) of a counter-lattice is stuffed along the rafters, which will form a ventilation gap. The slats are cut along the outer edge of the valley, as a separate waterproofing carpet will be laid in this place.
The step of the horizontal lathing depends on the material of the roof. If in the future bituminous tiles are laid, then under it it is necessary to fill a continuous crate of OSB or plywood. In this case, a sparse horizontal crate is first stuffed, and sheet material is already attached on top of it. The first two lower and upper slats of the sparse crate are fastened with a minimum gap, and the rest are already nailed with the desired step.
 Sparse lathing is used for laying plywood for soft tiles
 The thickness of the plywood should not be too large, as this will affect the mass of the roof. 10–20 mm is enough, depending on the pitch of the crate. Sheets are attached with an offset and with a gap of 3 mm. This temperature gap will prevent swelling of the material during temperature changes.
 Under the valley, separate bars are attached along the edges of the gutter
 Waterproofing and finishing of the valley
Particular attention should be paid to the waterproofing of the valley. If it is planned to mount a rigid roof, then the installation of load-bearing elements is carried out at the stage of fastening the horizontal lathing.
The hard roof valley is designed as follows:

 If the roof is covered with soft tiles, special strips are used as the upper valley, which are glued to bitumen
 Making a valley in a soft roof:
- If the roof is made with soft tiles on a continuous crate, then sheets of plywood or OSB are joined exactly in the center of the valley. As the lower valley, a waterproofing bituminous strip 40 cm wide is used, which is glued to the bituminous mastic.
- Then the soft tile is mounted. In the area of the valley, the roofing material should go onto the glued waterproofing strip by 10–15 cm on each side.
If you have experience, you can try to perform a seamless transition, but this does not always work.
 If you have certain skills, you can perform a seamless joint on the valley
 The easiest way to close the joint is to stick another strip, only of a smaller width.
Mounting the skate
Soft shingles are considered the ideal material for covering multi-gable roofs, as they allow for minimal waste and can easily bypass ribs, valleys and ridges.
When using soft tiles on the ridge, it is necessary to equip the ventilation gap. This is easy to do: for such purposes, plastic skates are produced, which, after laying the roofing material on the slopes, must be nailed to the crate and already on top of it to complete the installation of the tiles.
 To create a ventilation gap and give the upper joint the necessary shape, a plastic ridge is mounted under the soft tiles
 When using rigid tiles with a ridge design, you will have to tinker with using a special kit of a ridge element, a seal, and side plugs.
Installation of the ridge on a hard roof is carried out as follows:

Video: designing a ridge with hard tiles
Even with such a superficial overview of the installation technology of a multi-gable roof, it becomes clear why it is considered the most difficult in the roofing business. For an inexperienced craftsman, this information will help to understand what difficulties specialists face, why roofers do the work in this way and not otherwise. It will not work to organize the installation of a multi-gable roof on your own with the help of friends and acquaintances, because in a team of specialists, each employee knows all the intricacies of the process. It is due to this that fast and well-coordinated work and high-quality results are obtained.