The device of a compost heap from sheets of slate. Compost - what is it
The compost pit is designed for the disposal of organic waste and the production of compost, a natural substrate that significantly improves the quality of the soil. There are a lot of options for arranging such a pit, and one of them is making a structure with your own hands. How to independently mount a practical, convenient pit for processing and storing compost?
Compost: the subtleties of the issue
Land enrichment is an important stage in the process of creating optimal conditions for the growth of fruitful crops. Not in all areas you can find a decent, high-quality black soil. Areas that require additional feeding, experienced gardeners recommend fertilizing with compost: in comparison with chemicals, it is absolutely harmless and gives unsurpassed results.

And although there is an opinion about the dangers of compost pits, which allegedly emit unpleasant odors that permeate the air, this can be easily avoided through proper waste management and support for bacterial activity. How to do this should be told in more detail.
Choosing a place for a compost pit
The right location for the pit is the first and most important stage that determines the success of the planned business as a whole. Consider three main criteria:
- Remoteness from residential buildings - rotting organic waste has an unpleasant aesthetic appearance, has a specific smell, and therefore it is better to place them at the greatest possible distance (at least 30 m).
- Lowlands and uplands - pay attention to the plane of the site: the location of the pit on the hills should not be allowed, because during the melting of snow or rains, waste products can “spread” over the site. The pit should be built at the lowest point.
- Individual preferences - it is more convenient for someone to keep the compost “at hand”, placing a hole in the center of the site, and someone, on the contrary, wants to remove it away from view: it all depends on the characteristics of the territory and the personal criteria of the gardener.
Important! Pit can not be laid in the open sun.

Taking into account the above criteria will minimize the negative factors characteristic of compost pits, without causing discomfort to the land plot and nearby residential buildings.
Types of compost pits
There are several options for arranging places for waste processing. Most often, compost facilities are installed in the form of:
- Classic earth pit.
- Semi-submerged bunker.
- Compost box.
Each option can be designed on its own, each has unique features - it is simply impossible to say that one pit is superior in performance to other designs. What are the main differences?

Classic earth pit
It is the easiest way to keep compost, representing a recess dug in the ground with standard dimensions of 1m x 2m and a depth of 0.5m. The volume of the pit can be increased due to the large dimensions of the site.
All it takes to create an earthen hole is a sharpened shovel and a little effort. However, the long-term use of the structure requires strengthening the walls by any improvised means.

The technology for creating an ordinary earthen pit for compost involves a number of sequential actions:
- the soil is removed with a shovel, forming a hole of the required size;
- wooden bars are dug into the corners of the pit, to which boards are nailed at a distance of no more than 5 cm, forming a box without a bottom;
- thick branches, tree bark, straw, etc. are thrown to the bottom of the structure as a kind of drainage 10-15 m high: the drainage layer will remove excess moisture and help the compost to ventilate from below.
The compost in the pit contacts directly with the ground, which facilitates the access of earthworms, which actively process the soil into humus. Among the disadvantages of the pit, the frequent need to mix the contents, as well as the inconvenience of shipping operations, is noted.
Semi submerged bunker
The semi-submerged bin type recycling structure is capable of serving several seasons, and its installation does not require the application of undue force:
- a hole is dug in the ground with a depth of about 1 m, formwork is set up along its perimeter so that the concrete walls of the structure rise about 1 m above ground level;
- the formwork is poured with concrete, while the bunker can be divided into two, three or more sections - depending on agricultural needs. Partitions between sections are also laid out of concrete using formwork or made from boards treated with a protective primer;
- the formwork of the walls is removed, the bottom of the pit is poured with a concrete screed;
- in the upper part of the pit, a cover made of chain-link mesh and metal frames is installed. The main thing when installing the roof of the bunker is the presence of holes that allow air to circulate inside the pit.

The semi-submerged bunker is convenient to use, unpretentious in maintenance, and does not require costly repairs.
Important! The lack of contact of the compost with the soil requires periodic watering of the contents of the bunker and planting earthworms in it.
Ground "compost factory" can be easily made from available materials at hand - cutting boards, old barrels, unnecessary car tires. The lightest version of the compost bin is mounted using boards and pallets:
- Prepare boards of the desired length and width.
- On the intended plot of land, remove the sod, dig in 6 columns at a distance equal to the length of the prepared boards.
- Nail the boards to the posts, leaving gaps between them.
Important! Composting in a box requires careful maintenance of moisture levels and repeated watering, especially during periods of drought.

A wide range of compost bins are on the shelves of gardening stores - those who do not want to mess with tools can purchase a plastic waste storage that is in no way inferior in performance to their wooden counterparts.

Compost: Desirable and Undesirable Ingredients
What type of waste should be placed in a compost pit in order to get a solid, high-quality fertilizer that brings the maximum of useful substances to the soil? Leading positions in the list of compost raw materials are occupied by any waste of plant origin - from fallen leaves to vegetable peelings. In addition, it is necessary and important to use:
- paper (except for colored and laminated);
- bird droppings (turkey, pigeon, chicken, etc.);
- manure (cow, horse);
- fish waste (scales, tails, heads, entrails).
Important! Bookmarking compost categorically does not allow the addition of protein waste (dairy products, missing soups, etc.), as they not only exude extremely unpleasant odors, but also attract “unexpected guests” to the pit - rodents, dogs and cats.

Compost quality can be improved by:
- Phosphorus flour (2 kg per 100 kg of waste).
- Ashes.
- Earth, which is sprinkled with each subsequent layer of waste - this accelerates the process of decay.
Do not forget to water and mix the compost periodically, making sure that the water does not stagnate in it.
Waste stacking
Proper and rapid decomposition of waste is facilitated by:
- Moisture.
- Access to oxygen.
- Addition of special accelerators.
Gardeners freely provide the level of humidity themselves, abundantly watering the waste during the heat.
Access to oxygen is ensured through the proper construction of a compost pit, bin or box, as well as through competent stacking techniques, according to which dry waste should alternate with fresh, hard with soft, brown with green.
Rotting accelerators are sold in garden stores in the form of concentrates, which should only be diluted with a small amount of warm water, watered with a mixture of compost.

Among organic accelerators, fresh manure is distinguished, infused in water for several days, or finely chopped dandelions, soaked in water and left in a sunny place for 3-4 days.
Compost, prepared according to all the recommendations and requirements, has the appearance of a rich, loose soil with a characteristic smell of the earth - it can be placed under trees and shrubs, used for mulching strawberries or fertilizing the site. And most importantly - the compost pit does not require special financial costs, becoming an indispensable waste disposal unit.
DIY compost pit - video
DIY compost pit - photo


For those who have their own land, and who care about the soil, improving it, compost is constantly needed. Question one: where can I get it? The answer is simple - make your own compost. There is always a lot of organic waste in every household plot, it is more reasonable to send them to a compost box than to take them to a landfill.
Compost bin options
Question two: where to collect waste? You can just put them together. Some summer residents will be satisfied with such a simple, easy and quick option as a compost pit. It is also attractive because it does not require material investments: you need a shovel, your strength and a little time.Someone prefers to use a factory-made compost bin - plastic or metal. And my neighbor, for example, makes compost in a barrel, having drilled holes on the sides and in the bottom for air access. Finally, you can put in a little effort and build a compost bin with your own hands.
Requirements for a compost bin
What should be taken into account during production? Ripening compost needs an oxygen supply, so side vents should be provided. There must be a cover so that atmospheric precipitation does not wash away useful substances into the soil.
Otherwise, the value of compost as a biofertilizer will be zero. You can, of course, cover the box without a lid with a film, but it will have to be fixed in some way so that it does not blow away with the wind. And this is not always convenient, and it looks unaesthetic. In the lower layer, the compost matures faster, so the design should provide for easy access to it. Here is a schematic representation of a simple compost bin. 
The size can be changed as you wish.
Another option for a compost bin is a two-section one. One section also with removable front boards.

You can choose a simpler opening design; here the role of the loops will be taken by long strips of rubber (or other available elastic material), securely fixed on the boards:

And here is an economy option: a wooden compost bin. Its construction will require a minimum of funds and time.

If you decide to approach the issue thoroughly, let's step by step, with all the details, consider how to make a compost box.
Making a compost bin with your own hands
So, we make a three-section compost bin with our own hands. We set 8 columns. The lower part, which is in the ground, is pre-treated (used engine oil, tar, fuel oil are suitable - what is available).
In the photo, 4 bars are attached to the fence supports, which made it possible to simplify the process: I didn’t have to dig 4 holes for the posts.
The next step is partitions.

We nail the boards, leaving gaps between them for ventilation. Two compartments will be equipped with small doors, so we sheathe the front of the future box with a board to half the height.

A large door is provided in the third part of the box, so we nail one board from below.
It's time to install the covers. We reinforce the upper end parts of the partitions, front and rear walls with crossbars. We hang doors that simultaneously act as a cover. We also equip the front of the box with three doors - two small and one large.
Considering that compost maturation will occur in our box - that is, the decomposition of organic materials (which includes wood), precautions must be taken so that the box itself does not become an integral part of the future fertilizer. To prevent this from happening, we treat the wood with special ones (preferably deep penetration) to protect it from moisture, insects, and decay. Fortunately, now the choice of protective drugs is huge, it will not be difficult to buy them even in the outback. At the same time, remember that compost is a fertilizer, so all wood processing products must be non-toxic.
After impregnation treatments, we paint the box in any color that is pleasing to our eyes. When choosing, keep in mind that it will be constantly affected by temperature changes and precipitation. The paint must be applied in 2 layers; the second - only after the complete drying of the first.
It remains quite a bit - to hang handles and latches. All! Our DIY miracle compost bin is ready!

Summing up, we can say the following: it does not matter which compost container you choose; This article does not cover all possible options.

The main thing is that the production of compost takes place according to all the rules, only then the result will be a truly valuable organic fertilizer. We will talk in more detail about what proper compost is and how to make it. In the meantime, useful posts
If there is a dacha, then there is a garden, and the most important thing for a garden is fertilizer. Not everyone likes to use mineral complexes as a top dressing. Many prefer organics like humus and compost, which you can make yourself. In this case, composters for summer cottages will be great helpers for the gardener - special containers of various sizes in which it is convenient to prepare and store natural fertilizer.
It is a mistake to assume that these two terms have the same meaning. Common to them is only the essence of obtaining fertilizer, namely, the process of decay. The difference lies in the components used, which will lay the foundation for top dressing and its vitamin and mineral composition.
Humus
This is decomposed manure - cow, horse, rabbit and any other, depending on the farm living on the site. The whole process of debate or decomposition takes from 2 to 5 years. Ready humus should have a pleasant fresh aroma, like earth in a forest. To improve the quality of the fertilizer, manure is mixed with earth, sawdust, straw, adding water if necessary to prevent drying out.
The presence of a heavy ammonia odor indicates that the humus maturation process is not over yet.
From time immemorial, almost all crops have been fertilized with manure in Russia. It is great for sandy loam, keeping moisture in them. It makes clay soils more loose and aerated. Ready humus is the same humus that is the fertile component of any soil.
Compost
Not all summer residents have the opportunity to fertilize the site with humus. In this case, compost will come to the rescue, which you can make yourself using a pit or a special container - a composter.

For its preparation, they take vegetation and everything that can rot. Grass, sawdust, wood chips, small twigs, haulm leftovers, peelings, tea bags, ashes, and whatever is on hand are great. Some gardeners, if possible, add a little manure or chicken manure - this significantly improves the quality of the finished fertilizer.
It is not recommended to put vegetation affected by fungus and diseases, feces of dogs, cats and humans, fish, bones, meat and dairy products into the compost heap. Violation of the rules for preparing compost can lead to a deterioration in its quality and the development of harmful microorganisms.
Compost fully matures in about two years. But the market today offers various composting accelerators, as a result of which the entire process can take no more than one season. Ready fertilizer, along with humus, improves the structure and properties of the soil, thereby increasing productivity.
What conditions are necessary for composting
The simplicity of making compost only seems at first glance. In fact, compliance with the composting conditions is necessary for the fermentation process to proceed correctly. The main factors naturally affecting the course of this process are:
What is a composter and what is it for?
Traditionally, a hole is dug to make compost. However, its use is not very convenient, especially when only 4-6 acres are owned. The small area of the site, the smell emanating from the pit, the inconvenience during mixing the compost heap make us look for an alternative.

The composter is a container of a given volume, the special device of which provides for the creation of favorable conditions for the preparation of compost.

Each design must have:
- a lid where material for composting is laid;
- openings for air intake;
- holes at the bottom to remove accumulated liquid.
Additional features vary by model.
You can make a composter yourself from improvised materials - this is a good money saver. The advantage of purchased models is durability and a beautiful appearance that allows you to put the boxes anywhere.
Composters are made from different materials, such as wood. In such products, the contents are well saturated with oxygen, as a result, the fertilizer is crumbly, but sometimes a little dry. Metal containers are excellent at retaining moisture, so the finished compost is moist and denser. There are also composters made of plastic that is resistant to low temperatures and ultraviolet radiation.

What are the benefits of using a composter
A composter for a summer resident is the same as a food processor for a housewife. This is a handy thing that will help save time, effort and money. Composters, especially closed ones, have many advantages, the most significant of which are:

Modern composters have excellent performance and aesthetic characteristics, so they can be installed without harm to the design of the site. In addition, manufacturers began to produce landscape devices in the form of a small mound, decorative stone or other natural elements. Such models will not only perform their functions, but also decorate the place.
Types of composters
According to the type of their functioning, composting devices are divided into:
- open composters that operate during the warm season. This is the most economical option. It is easy to assemble and convenient to operate in large areas where there is a lot of organic material.
The disadvantage of this type of construction is the spread of an unpleasant odor and the possibility of overgrowing with vegetation. In addition, the fermentation time is increased.
- Closed composters more convenient to use. They are small, their volume is from 200 to 1000 liters. Such composters can be left outside all year round, and if necessary, they can be easily hidden in the garden. Moreover, the chemical reactions inside proceed faster, which means that the fertilizer will be ready earlier.
The only disadvantage of closed composters is the price. It is much higher than that of open type composters.
Models
Among the variety of industrial composters, the following three models are distinguished, which differ in their design features:


How to choose a composter?
Choosing a composter starts with its size. For small plots (up to 6 acres) or for the disposal of food waste, a design with a volume of 200-300 liters is suitable. For a larger area, a larger capacity will be required - up to 1000  l. Sometimes summer residents purchase two or three composters at once and put organic matter into them in turn, thereby providing themselves with a continuous supply of organic fertilizer.
When choosing a device for composting, they are guided by its structural details. For example, it is important to pay attention to the presence of a bottom mesh that protects the contents of the container from rodents. If it is not included, you should worry about a timely additional purchase. Yes, and it does not hurt to immediately decide whether it will be a summer composter or an all-season organic laying is supposed.
Before purchasing a box, you need to pay attention to the entrance and exit hatches. They should be wide enough to make it convenient to lay armfuls of grass and shovel fertilizer with a shovel. Having a large loading hatch will make it easier to turn the pile to increase oxygen access. As an alternative to the unloading hatch, a retractable pallet with ready-made fertilizer from the lower layers can become.
Hatch mounts are a fly in the ointment for many models. During operation, it is found that the doors dangle and strive to fly off from the wind. Therefore, before buying, you need to check how they rotate and how tight they fit when closed.
The mobility of the composter is important, especially if it is stored away for winter or moved regularly. If composting is planned throughout the winter, a thermal composter with a thermostat, thermal insulation and peat in the kit will be indispensable. For lovers of Californian worms, a vermicoster is suitable.
Top Producers
Kekilla Global (Finland)
Perhaps the first place can be assigned to the Finnish manufacturer Kekilla. Their composters are distinguished by excellent resistance to severe frosts, and therefore are considered universal. The most popular Globe model has no heavy or small parts. Rounded design, easy to use, safe for children.
Due to the high speed of composting, the device with a volume of 310 liters. in terms of the amount of ready-made fertilizer per season, it is comparable to 600 liters. In addition, the volume can be artificially increased by adding a pair of 160-liter rings, which are purchased separately.

The compost is reliably isolated from the environment, and after maturation it is easily removed with a shovel. To do this, simply remove the cover and body, opening access to the contents. The Finnish key-flag on the composter is a sign of the highest quality of products made from our own raw materials.
The analogue of the Finnish composter is the Russian Meridian, which has been on the market for 5 years. It has the same characteristics as the Finnish "brother", but on the outside it has a pattern in the form of parallels and a meridian. Differs in the favorable price.
graph Thermo King(Germany)
Another model of thermocomposter, which has proven itself in practice. Its body is made of UV-resistant plastic, the foam structure of which perfectly maintains the optimal temperature inside the box. There is support for selecting summer and winter operating modes.

The lid consists of two flaps and is securely fixed. Does not open even in strong winds. The loading of the material, respectively, is carried out from two sides, as well as the extraction of the finished compost. The design of the device is beautiful, ergonomic, fits easily into the landscape.
Volnusha (Russia)
 This is a cone-shaped container, the body of which has a wavy shape (hence the name). It is made of frost- and heat-resistant propylene of increased rigidity, which, due to its shape, perfectly distributes the compost mass. At the same time, it does not oxidize and does not enter into a chemical reaction with other substances.
Volume Volnushi - 1000 liters, ideal for six acres. It does not have a bottom, so excess moisture will go into the ground. However, an additional purchase of a bottom mesh to protect against rodents is required.
The body has ventilation holes and four holes for compost extraction. Easily disassembled and transported in the trunk of a car. Of the shortcomings - the opening of the lid in strong winds.
Operating rules
- Do not overload the container - the finished fertilizer should be loose and slightly damp. Material must be immersed in it no higher than the maximum mark.
- It is recommended to install the composter on the ground or grass, but not on a wooden or concrete base. This is necessary to ensure the access of worms to the inside of the structure and to remove excess moisture.
- The best place to set up a composter is in a shaded and wind-sheltered area away from open flames.
- The bottom of the composter must be protected with a metal mesh to prevent mice from entering.
- When cold weather sets in, the device must be switched to winter mode of operation or wrapped in a film to maintain the internal temperature.
- Stir the compost heap regularly 1-2 times a month to improve chemical reactions. In this case, it is better not to touch the lower, ripened layer.
DIY composter
The composter can be made from improvised materials - boards, old furniture, building residues. Most often, wooden containers are made, since working with wood easily allows you to meet all the necessary conditions. Furniture in this respect is ill-suited, it is usually only enough for one season.
For convenience, you can prepare a drawing of the box. It will be easier to navigate in the process of work, as well as calculate the amount of material needed. The optimal size of the composter is 1 m 3, that is, 1m × 1m × 1m.
For work, you will need a 5-centimeter beam and boards 2.5 cm thick. All material will need to be pre-treated with an anti-rot agent, which will prevent the hull from participating in fermentation.
First, columns are made from timber, which are dug into the ground and, if desired, fixed with cement mortar.
Next, collect the side walls, followed by the back and front. Between the boards leave 1-2 cm gap for oxygen access. A small gap is also needed from the surface of the earth. The front wall can be slightly shortened for convenience, then the hinged door will lie at a slight angle. The side door will greatly simplify the extraction of finished compost.

By the same principle, two- and three-section composters are made. While the process of debate is going on in one section, plant material is being laid in another. It is possible to make the side walls of the device not from boards, but from a fine-mesh stainless mesh enclosed in a wooden frame. Frames are attached to timber posts, creating a perfectly aerated container.

There are a lot of options for making composters. Here you can really show your imagination and your skills. It is only important to observe the basic principles of operation of the device, which are responsible for the quality of the finished fertilizer.
Video instructions for building a composter
Everyone has heard about the value of compost, even novice gardeners. However, the rules for its formation and application are not known to everyone. Many people think that in order for the compost to succeed, it is enough to dump waste and plant residues in one place during the summer, and by spring everything is ready. However, this is far from the case, and in order for your compost heap to really become a valuable material, you need to work on it.
Compost. © GGWTV Content:
What is compost?
If you look in the encyclopedia, you can find an exact description of what compost is: compost is a type of organic fertilizer obtained as a result of the decomposition of organic residues under the influence of the activity of various microorganisms. Therefore, several components are necessary for its formation: directly organic matter, microorganisms and conditions for their vital activity. Based on this, let's look at how to make compost with your own hands.
What is a compost heap made of?
The first thing to understand when forming a compost heap is that not everything can be thrown into it.
What can be put in compost?
Can: any plant residues (cut grass, chopped tree branches, weeds, leaves, tops), organic waste from the kitchen table (peeling vegetables, egg shells, tea leaves, coffee grounds), straw used for bedding for livestock, hay, manure (better horse or cow), paper.
 Organics in compost. © yvw
 What should not be composted?
It is forbidden: diseased plants, rhizomes of malicious weeds, fats, inorganic debris, synthetic fabrics. It is not recommended to get cabbage into the compost, as its decay causes an unpleasant odor, as well as meat waste, since in addition to the stench, they also attract rats.
But that's not all. When forming a compost heap, you need to remember two rules. First, the smaller the waste, the faster it rots. Secondly, the ratio of green (rich in nitrogen) and brown (poor fiber) masses should correspond to 1:5. This ratio will allow bacteria to fully develop and significantly speed up the process of compost maturation.
Since it is difficult to form a compost heap at a time and in most cases it fits gradually, it is quite difficult to understand the amount of green and brown components laid into it by eye. But there are principles that you can follow to understand what needs to be added: if the compost heap has an unpleasant odor, then it lacks a brown component, if it is cool and has no visible fumes, you need to add green mass. If the balance is maintained, the compost heap should smell like earth, give off warmth, be damp, and float a little.
Ideally, a compost heap is laid out in layers, alternating not only green and brown fillings, but also finer and coarser fractions of the components. After the final formation, it is covered with a layer of earth (5 cm), and then with old straw or a specially perforated (for ventilation) film.
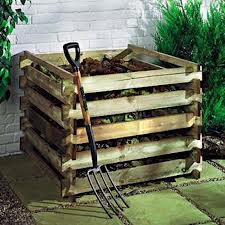
Formation of a compost heap
Collecting organic remains in one place is far from everything. For convenience and a neat appearance, the place reserved for the formation of compost must be protected. However, it is better to do this not with slate or metal, but by forming a wooden frame. This is necessary so that the heap can "breathe". The dimensions for the box should be approximately 1.5 x 1 m (the first indicator is the width, the second is the height), the length can be any.
The place chosen for the formation of the compost heap also matters. First, it must be protected from the winds and the scorching midday sun. Secondly, it is hidden from prying eyes. And if necessary, it is decorated with green plantings or climbing plants.
The best period for the formation of a conceived business is autumn, rich in plant residues, as well as spring and summer. The winter period is not suitable for laying compost due to unfavorable temperature conditions.
Before you start laying organics, it is good to lay out a film or a layer of peat 10 cm thick on the bottom of the future heap deep into the ground (by 20 cm). This will save nutrients and moisture. AND!!! You should not resort to the method of collecting residues in a pit, as excess moisture often accumulates in compost pits, which worsens and lengthens the composting process.
 composter structure. © University of Tennessee
Compost heap care
Now that we know the basic principles of the formation of a compost heap, it is necessary to recall the rules for caring for it, since it depends on their implementation whether the compost will have time to form in a year or not, whether it will be complete and of high quality. And the rules are pretty simple.
- The compost heap needs to be turned once a month. In this case, it is good to achieve the most complete mixing of the residues. This will make the organic loose, enrich it with oxygen, allow it to burn out, and not rot. If shoveling a pile is difficult for you, at least pierce it from all sides with a pitchfork.
- It is very important to monitor the moisture content of the compost heap. If it dries out, moisten it regularly. However, you can’t overdo it here, but remember that it’s wet, it doesn’t mean it’s wet! Excess moisture displaces air, which means it worsens the work of bacteria necessary for composting. Therefore, carefully water your pile with a watering can, and not with a hose, preferring not to top up than to overflow. In the time of prolonged rains and after watering - cover it with a film.
- If you want to speed up the maturation process of the compost, make sure that enough nitrogen gets into the pile - it is found in the green parts of plants and slurry. How to determine their disadvantage, we said above.
 Compost. © Fertile Fiber
 Compost readiness indicators
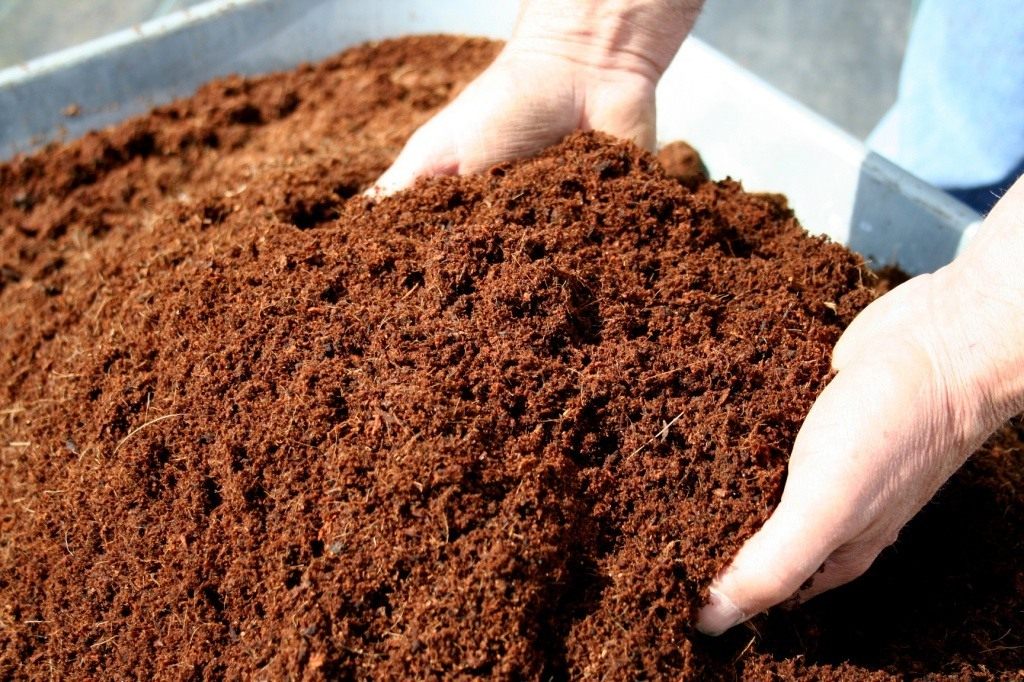
How long the compost heap will take to mature depends on the conditions provided for this. Usually, complete overheating of organic residues occurs in 1–1.5 years. The readiness of the fertilizer is determined visually and by smell - the organic matter becomes a crumbly dark brown mass with the smell of forest land.
Any land plot needs periodic fertilizer. And what could be better than high-quality compost? Buying it and then bringing it to the site is a long and expensive task. Why not produce this valuable fertilizer directly on your own land, because all conditions have been created for this? During the warm season, a lot of organic and plant waste accumulates on the site, which must be disposed of. It turns out that it is possible to combine the cleaning of the site from waste, and the production of compost from them. Let's take a look at how a compost pit can be built with your own hands, what is needed for this, and how to avoid elementary mistakes in the production of fertilizers.
The compost pit on the land plot is designed for laying all kinds of plant and organic residues, waste, and surpluses of various products. Laid in layers, these components gradually decompose, turning into a high-quality fertilizer. The question arises: how to build a compost pit with your own hands so that fertilizer is obtained in it during the season? To do this, you need to make some efforts to help the compost ripen faster.
With proper care, you can get ready-made compost in 3 months. If the pit is not given special attention, then the process of waste decomposition will continue for about two years.
Compost bin requirements
For normal and rapid maturation of compost, it needs heat, the presence of oxygen and moisture. How to make a compost pit correctly so that its contents turn into high-quality fertilizer, and the heap itself does not harm plantings and people on the site? To do this, you should familiarize yourself with some of the requirements for such structures:
- The compost heap should mostly rise above the soil level. Thanks to this, the pile warms up better, the convenience of its loosening and watering is ensured. It is recommended to deepen the pit by about 50 cm, leaving barriers above the soil surface of about 1 m. The ideal width of the structure is 1.5 m, and its length is 2 m;
- If there is a source of drinking water on the site, for example, a well, a well or a spring, then the distance from it to the pit should not be less than 25 m;
- It is advisable to place the pit in a place that will be removed from the house or gazebo. In this case, the unpleasant smell that may come from the compost heap will not annoy the site owners;
- It is desirable to have a pit in partial shade so that it is not constantly in the sun. This will help it dry out.
- How to make a compost pit so that runoff from it does not fall through the soil into a source of clean water? To do this, if the site has a slope, it is enough to place the pit below the source;
- It is impossible to place a hole under fruit trees, as this can lead to their death;
- The dimensions of the pit are selected taking into account the amount of plant debris and waste that is available in the country and will be in the pit for two years;
- Do-it-yourself options for making a compost pit should take into account that it is recommended to choose the height of the fences so that it is convenient to loosen and collect compost.
Tip: The bottom of the pit should not be covered with slate, metal, rubber or film. They will not allow moisture to rise from the soil upwards, as a result of which the compost will constantly dry out. The bottom must certainly be earthen. But the walls can be closed with any material.
What can and cannot be thrown into the compost pit
A self-made compost pit will justify its purpose if the following types of waste are laid in it:
- leaves, bark, needles, chopped branches and roots;
- weeded and mowed weeds, grass;
- bird droppings and rotted two-year manure;
- vegetables, fruits and berries, including cleaning;
- remnants of coffee, tea;
- hay, sawdust, shavings, straw;
- ash from burning wood;
- paper, paper bags, cardboard, napkins.
Tip: If a thick layer of fresh grass is laid in the pit, then the process of its decomposition can be delayed for six months or a year. In this case, cover the grass with soil.

Do not lay in the pit:
- inorganic products that do not decompose. These are rubber, plastic bags, plastic, metal, synthetic products;
- faeces of pets, as they may contain helminth eggs;
- bones;
- the tops of tomatoes and potatoes, as it is often infected with late blight;
- plants treated with chemicals;
- ripe weed seeds;
- thick branches that rot for a long time.
Possible manufacturing options
A compost heap with your own hands can be made in several ways. We list them all, indicating the features of each of them.
The usual heap in which waste is added
- Choose a place on the site where the compost heap will be located;
- As various wastes accumulate, they are laid in the selected place. In this case, it is desirable to lay organic matter in layers. Alternate food waste with grass and manure;
- When the height of the heap reaches 1 meter, make several recesses in it, into which pour special compost liquid. This will speed up the maturation of the compost;
- With regular loosening and watering, the compost will ripen after 3 months.
This is ideal for those who want to get by with minimal effort, but still get some compost. It is desirable to form several such piles, each of which will rot gradually.
simple pit
A simple device for a compost pit in the country with your own hands will be provided by an ordinary pit dug in a selected place:

- The depth of the pit should be small, which will provide easier care for its contents. It is better to make it wider;
- Branches, hay, tree bark are laid at the bottom of the pit;
- Next come layers of food and plant waste;
- Since the temperature in the pit is not very high, it is advisable to cover it with a film.
This is the least successful way to equip a compost pit. To mix its contents, more effort will be required, and the pit will warm up less. The advantages of such a pit are its small area and simplicity of the device.
Box made of wood or other material
How to make a compost pit with your own hands so that it is convenient and inexpensive? Use boards, bars, slate, sheets of metal, etc. for this.
The order of arrangement will be as follows:
- On the soil, the top layer of soil about 40 cm thick is removed;
- Pegs are driven in along the perimeter of the pit;
- A fence is installed around the pit. It can be wooden (boards, pallets, shields, bars) or some other. It is allowed to use any material: flat or corrugated slate, polycarbonate, metal sheets;
- The height of the fence should not exceed 1 m. This is necessary for the convenience of mixing the compost;
- From above, such a structure is covered with plywood or film.
This design allows the compost to warm up well, therefore it is considered optimal for use on land.

There is an original version of the wooden box. Its lower edges do not reach the soil surface by 25-30 cm. That is, boards or other material are attached at a certain distance from the ground. In the lower part of such a box, the compost matures faster, as it was laid earlier. As it matures, the compost is picked up and the pile settles down. Such a pile practically does not need to be loosened. There is always an opportunity to get some amount of ready-made compost.

concrete pit
If you decide to build a durable structure that will last for decades, then use the advice on how to make a compost heap in a concrete pit.
The building is set up like this:
- a plot is marked for future construction (approximately 2x3 meters);
- soil is selected at 60-80 cm;
- a formwork about 10 cm thick is being built along the perimeter of the future building;
- concrete mortar is mixed;
- concrete is poured into the formwork;
- after the concrete has hardened, the formwork is removed;
- waste is laid in layers in a concrete pit;
- from above, the pit is covered with wooden shields or covered with a film.
This is the most costly way to build a compost pit in terms of effort and investment. Such a structure should be placed where the heap will definitely not create any difficulties, since it will be impossible to move it to another place.
Tip: It is recommended to divide the compost facility into at least 2 sections. While you will put fresh waste collected in the current season into one of them, last year's compost will decompose in the second section.
It should also be noted that there are options for organizing a compost pit from a barrel or special plastic containers for compost, but additionally, the use of drugs that accelerate the processing of waste, or the addition of Californian worms, will be required.
How to properly operate a compost pit
We figured out how to build a compost pit with your own hands using various schemes. It remains to highlight the question of how to properly care for the compost pit during the season. It is enough to perform the following simple manipulations:
- Loosen the compost periodically with a pitchfork. In this case, access of oxygen into the heap will be ensured. In addition, the waste will be mixed with each other, which will accelerate their decomposition.
- Water the pile at least occasionally, and more often during the dry season. Thus, the contents of the pit will be moistened and rot better. Overdried compost almost completely stops decomposing.
- It is recommended to cover the top of the compost with a dark film. This will create a greenhouse effect inside the heap, raising its temperature. The film will retain moisture inside and prevent the germination of weeds. In a covered pile, the compost will mature in 3-4 months. If you do not cover it, the ripening process will stretch for a whole year.
- Periodically plant in a pile of California worms, which loosen the contents of the pile and partially process it.
- If possible, add preparations to the contents of the compost heap that speed up the decomposition process. For example, Compostin, Baikal EM-1, Embionic, Compostar, Sanex EcoCompost, Bioforce Compost and others.
A properly constructed compost pit, which is regularly maintained, is able to provide site owners with high-quality and practically free fertilizer in a very short time.
How can a compost pit be made with your own hands - the photo manufacturing options will be clearly demonstrated.


