Knee workout. The Best Exercises to Strengthen, Recover, and Reduce Knee Pain
I want to tell you in more detail about the basic exercises that you need to perform to restore your joints and which I recommend to almost all people in the form of prevention and treatment.
These exercises, of course, were created thanks to the appearance of the MTB simulator, which is used both in specialized treatment centers and at home. But not all people have such opportunities, so I recommend doing these exercises with a rubber shock absorber. To begin with, let me remind you of the basic safety rules when performing these exercises:
1) the rubber shock absorber should be fastened to the lower part of the shin with a loop, preferably on a tight toe. The other end is attached to a fixed, heavy support, such as the leg of a sofa, bed, or closet. But it is better to screw some loop-type brackets at different heights into the load-bearing wall of the house or room, for which it would be possible to fix the free end of the shock absorber for doing exercises on the floor or on a bench;
2) a rubber shock absorber, and now silicone shock absorbers have appeared, should have handles at the ends, like an expander. It should be of such length that tension is felt in the muscles of the leg and the shock absorber does not sag. Exercises must be performed taking into account 15-20 repetitions in one series. These exercises for the first two or three weeks should be performed quite easily, that is, without excessive effort when stretching the rubber shock absorber. With each cycle of training (12), the number of shock absorbers can be increased, following the increase in leg strength. You should not stomp on one effort. It is necessary to feel some discomfort during tension, that is, overcoming. But there is no need to rush to increase the number of shock absorbers;
3) each movement must be performed gently, with the same effort from start to finish. It is not necessary to pull the shock absorber with your foot and abruptly throw your foot to its original position;
4) muscles, ligaments and tendons doing these exercises for the first time can creak, crack and hurt the next day. Swelling and convulsions are not excluded. This is a normal reaction of adaptation to the new life of the body, until the muscle fibers straighten out and restore the passage of blood vessels within themselves. Think better what will happen if you stop doing these exercises. Do you want to go back to medicine and suffering again?
5) the minimum number of lessons per week is three. The duration of the lesson is at least 20 minutes and no more than 60. With each week and month, try to increase the number of exercises performed for a certain period of time;
6) immediately decide at what time of the day you will perform this treatment program, and under no circumstances refuse to perform it at the allotted time;
7) if you have concomitant diseases, such as coronary heart disease, and are taking medication, then it is not recommended to immediately stop taking them. At the same time, pay attention to your post-workout health and decide if you need to take another pill if it improves? Try to gradually squeeze pills out of your life, replacing them with exercises;
8) poor health should not be a reason for skipping classes, since it is these exercises that help get rid of it;
9) it is advisable to perform exercises to a pleasant accompaniment for you or in front of a TV screen;
10) set yourself up for recovery, because by doing these exercises, you create the conditions for restoring your own health.
The first group of exercises is strength.
Strength training is essential to restore muscle pumps. These "pumps" work only under one condition: contraction-relaxation of the muscle, that is, the power element of the movement.
Exercise number (see photo 1 a, b)
Photo 1 a

photo 1 b
Performing this exercise helps to stretch the spasmodic muscles of the popliteal zone and improve the drainage function of the thigh muscles, due to which the swelling (swelling) of the knee joint area that occurs after direct and indirect injuries disappears.
A direct injury is an injury that occurs immediately after the knee hits a hard object or the knee is struck with an object. In the book, this is the trauma of our Galina Feodosyevna. An indirect injury is an injury associated with stretching of the musculoskeletal apparatus of the leg, resulting in swelling (swelling) of the knee joint, which prevents the knee from fully bending and unbending. In our book, this is a story about the mechanics of a rally. If you do not perform drainage exercises against puffiness or swelling, that is, those in which the muscles above and below the knee begin to perform a pumping function (eliminate swelling), the swelling increases and the knee takes the form of a fluid-filled bag. Usually, in such cases, the actions of doctors to artificially drain edema using a Janet syringe can lead to severe joint pathology, up to arthrosis.
In the event that no action is taken and compresses and ointments of any composition are used, the edema can fix the knee, bringing it to contracture, that is, the impossibility of extension. In addition, prolonged failure to eliminate edema can lead to suppuration of the inflammatory fluid. Therefore, it is proposed to perform exercises with stretching the muscles of the thigh and lower leg using a rubber shock absorber, one end of which is fixed to the lower part of the lower leg, and the other is strengthened by a fixed support at different heights so that when straightening the leg is fully extended, and when bent to the maximum possible bending the leg at the knee joint towards the buttock. If the performer of this exercise lies on the floor, then it is advisable to put a thick pillow or a heating pad filled with not hot water under the knee. If he/she is kneeling, then it is desirable that the leg with which he/she performs the traction-flexion movement lies on a fixed support (a bench with a soft surface, an ottoman, a stool). In the first days of training, the tension of the shock absorber should be such that the performer of the exercise can freely bend and straighten the leg in the amount of 20-25 repetitions. In subsequent days, the tension should be increased either by increasing the distance from the fixation of the free end of the shock absorber (from the wall), or by increasing the number of shock absorbers (two, three, four). You need to know that when performing this exercise, in the first days, the student may hear crackling, crunching, clicking in the working joint. This is a normal reaction of spasmodic and poorly functioning muscles in the area of attachment to the knee joint. After doing this exercise, you can put a cold compress on your knee for a few seconds. Many patients, even young people, are initially afraid of these sounds. It seems to them that something is torn, cracked, displaced. But this is an illusion driven by fear. The exercise is completely safe if it is possible to perform at least 10 repetitions. But when performing this exercise, you can not jerk your leg and throw it sharply back. Sudden movements cannot break the integrity of the knee joint, although the muscles can be stretched, causing new pain. And one more note. Please, no fanaticism! That is, super-efforts are not needed, but at the same time, the muscles should feel that they are contracting and stretching. Just try to do this exercise 15-20 times, each time increasing the impact of the shock absorber on the working muscles. The main advantage of this exercise is the decompression of the articular surfaces of the knee joint. That is, when performing these movements, they do not touch each other.
Note. The same exercise is recommended for bursitis of the knee joint, rehabilitation after removal of the menisci or transplantation of the cruciate ligaments of the knee joint.
In gyms, for this, the MTB-1 simulator (No. 19) is used using a universal bench.
All exercises during the power phase (bending, pulling) should be done on the exhale “Ha-a”!
Exercise number (see photo 2 a, b)
Extension of the leg in the knee joint with the traction of the rubber shock absorber from a standing position or lying on the stomach (depending on the degree of damage to the knee joints). If one joint is affected, then you can perform this exercise from I.P. standing on a healthy leg. With the defeat of two joints - I.P. lying on the stomach.
At the first I.P. (standing on a healthy leg) the leg with the shock absorber is slightly retracted back and up (approximately 30 degrees), while the heel with the shock absorber rises above the floor as much as possible, but without tilting the torso forward.
If there is a high fixed support (for example, a Swedish wall), fix the free end of the rubber shock absorber to it and, when performing this exercise, rest your hands on the wall in front of your chest, keeping your back upright. The exercise is performed by extending the leg at the knee joint until it is fully extended. When performing this exercise, you can experience discomfort in the musculoskeletal apparatus of the knee. You don't need to pay much attention to this. The exercise is considered correctly performed if, when the leg is extended, the quadriceps femoris (anterior muscle) is fully tensed. The degree of tension of the rubber shock absorber is determined in exactly the same way as in exercise No. 1. When extending the leg, try not to touch the toe of the floor.

photo 2 a

photo 2 b
At the second I.P. (lying on the stomach), the leg involved in the exercise is placed on a high elastic roller or a dense blanket twisted into a roller, the height of which should be such that when the leg is extended at the knee joint, the toe also does not touch the floor.
The exercise is performed alternately with each leg the same number of repetitions. If one leg is noticeably weaker than the other, then she needs to perform this exercise twice as much.
Note. In the case of severe bursitis, that is, a large edema or swelling, it is recommended to perform this exercise on an ice compress.
If the swelling is not very pronounced, then an ice pack can be applied to the knee for a few seconds after the exercise.
In gyms, the MTB-1 simulator (No. 20) is used for this.
Exercise number (see photo 3 a, b)
Flexion of the leg at the knee joint with the thrust of the shock absorber from a standing position.
I.P. standing, the shock absorber is fixed to the lower part of the lower leg, its other end is fixed to the free arm. Bend the leg at the knee joint, trying to touch the buttocks with the heel. Keep the knee in one position, without moving it away from the vertical line of the body. When bending, blood circulation in the popliteal zone improves. When lowering the leg, the muscles of the thigh and lower leg are stretched with full unloading of the thigh and lower leg. In the hall of kinesitherapy, this exercise is codenamed "28". It is performed alternately: first with one foot, then with the other. Exercise is recommended not only for arthritis and arthrosis of the joint, but also for bursitis, tendovaginitis, after operations on the ligamentous apparatus of the joint, as well as injuries to the menisci. In addition, in the gym, strength exercises for hip flexion and extension can be used to treat pain in the knee joint, recover from injuries and surgeries.
In gyms, the MTB-1 simulator (No. 28) is used for this.

photo 3 a

photo 3 b
Exercise number 4 (see photo 4 a, b)
I.P. sitting sideways to a fixed support, for which one end of the rubber shock absorber is fixed, the other end is fixed to the lower part of the lower leg or foot from the side of the fixed support, bring the leg with the rubber shock absorber, then take it as far as possible to the side, while the leg is straight, the other can be bent.
When performing this exercise, pain is possible in the area of \u200b\u200bthe inner zone of the knee. This is a normal reaction of the muscles attached to this area and not working for a long time. If pain persists during the exercise, apply an ice pack for 10-15 seconds. Try to complete this exercise for at least 10-15 reps in one set. The same with the other leg (even in the case of a healthy knee joint). The force can be reduced or increased by changing the starting position, positioning closer or further from the shock absorber mounting point, as well as increasing or decreasing the number of rubber shock absorbers. But it must be remembered: the greater the angle of abduction of the leg to the side, the greater the effect of this exercise.
This exercise also has a great rehabilitation effect in case of destroyed menisci or in the period after the operation to remove the menisci.
One of the options for performing this exercise can be reproduced from I.P. standing on one leg, sideways to a fixed support, to which a rubber shock absorber is fixed, but at the same time it is necessary to fix the shock absorber as high as possible (above the height of a person).

photo 4 a

photo 4 b
Note: in case of pain in the lower back, both options for performing this exercise can be replaced by performing it from a supine position, sideways to a fixed support.
In gyms, the MTB-1 simulator (No. 21) is used for this.
Exercise number (see photo 5 a, b)
Another exercise, I.P., similar to the previous one, but in this version, the leg is moved to the side as much as possible. And with this exercise, you can experience pain in the outer surface of the knee in the area of attachment of the working surface of the muscles. The exercise is performed 15-20 times, while it is necessary to try to complete it with the maximum range of motion.
Explanation: These two variations of hip adductor and abductor exercises are so effective that they can replace surgery to remove the menisci if they are destroyed. In addition, it is recommended to massage the muscles in the area of the lateral surfaces of the joint through pain, after applying a cold compress.
In gyms, the MTB-1 simulator (No. 22) is used for this.

photo 5 a

photo 5 b
Exercise number 6(see photo 6 a, b)
Leg press in IP. This exercise is performed after the effect of flexion and extension of the leg in the knee joint is achieved.

photo 6 a

photo 6 b
It can be called walking in the air if performed simultaneously with two legs with two rubber shock absorbers. The bending of the leg at the knee joint with each subsequent session should be deeper, and the straightening of the leg should be complete.
In gyms, the MTB-1 simulator (No. 18) is used for this.
2nd group of exercises
Decompression exercises, that is, when they are performed, the articular surfaces do not rub against each other.
Necessary to perform the drainage function of the joints, that is, to pump out the inflammatory fluid from the joint and enhance its microcirculation. Usually performed after strength exercises or in alternation with them.
Exercise number (see photo 7 a, b, c)
From I.P. on all fours (arms and legs) a shock absorber was fixed to the diseased leg for the lower part of the lower leg. The other end of the shock absorber is fixed to a fixed support at different heights (the higher the better). The shock absorber should be as tight as possible, like a tow rope. The movement is carried out by pulling the hip forward, sharply enough, like hitting the ball. The head must not be lowered. Hip thrust should be performed according to the above rules (15-20 repetitions).
You can complicate this exercise by increasing the distance between the starting position and the fixed support or the number of shock absorbers fixed to the leg.
Explanation: the exercise helps to restore the anthropometric length of the muscles of the thigh and lower leg in order to eliminate their rigidity (shortening). Soreness during the exercise disappears on the 3-4th day after the start of classes.

photo 7 a

photo 7 b

photo 7 in
Exercises 1, 2 and 6 help strengthen the collateral and transverse ligaments of the knee, thereby restoring the possibilities of movement in the joint after the removal or injury of the meniscus. Exercise is also used for bursitis.
Exercise number (see photo 8 a, b)
I.P. lying on your back with your head to a high fixed support, such as a Swedish wall. The rubber shock absorber, as in all previous exercises, is attached to the lower part of the lower leg, and the other end is attached to the highest point of the fixed support. The meaning of the exercise is to lower the straight leg until the heel touches the floor with the rubber shock absorber stretched as much as possible. This exercise is very good (perhaps better than others) stretches the back muscle group of the thigh and lower leg. In addition, the internal ligaments of the knee joint - the cruciate - are strengthened.

photo 8 a

photo 8 b
One of the main features of this exercise is that it must be performed through a fairly pronounced soreness of the muscles that are stretched by the shock absorber. This soreness is primarily manifested in the popliteal zone. There is no need to be afraid of her. Moreover, it is necessary to go into pain, overcoming it every time, which will restore the anthropometric norm of the length of these muscles. I would like to remind you that it is rigidity, that is, shortening of these thigh muscles, that leads to the majority of functional compression syndromes of the musculoskeletal system - arthrosis, arthritis, osteochondrosis with IVD hernias. Therefore, the implementation of this exercise and overcoming soreness not only relieves pain and swelling in the knee joint, but also contributes to the prevention, and in case of acute pain - the treatment of these diseases.
The requirements for the exercise are the same as for all the others.
Exercise number (see photo 9 a, b)
Bending the leg at the knee joint from a position on the back with fixation of the leg with the hands.
I.P. the same. But the leg is bent at the knee joint. Try to touch the buttocks with your heel. Exercise is extremely useful after cruciate ligament surgery (both) and total bursitis (complete swelling of the knee). Its peculiarity is that the higher the shock absorber is attached, the more effective the exercise. In addition, this exercise is very useful for the rehabilitation of the Achilles tendon after injury or surgery.

photo 9 a

photo 9 b
Exercise number (see photo 10 a, b)
Lowering a straight leg with a rubber shock absorber rod from a lying position on its side (MTB - “side”).
I.P. as in the previous exercise, only on the side. This exercise improves the collateral ligaments of the knee, thereby strengthening the meniscus zones, protecting them from destruction and helping to restore nutrition in case of surgery.
When performing the last two exercises, you need to know that from I.P. the effectiveness of the exercise depends, that is, the lower the shock absorber is fixed to the support (Swedish wall), the better the muscles stretch and the faster they restore the muscle “pump”. The main thing in all these exercises is a smooth contraction and no less smooth stretching of the muscles, that is, it is not recommended to pull the rubber shock absorber with your foot in order to stretch it. It is advisable to combine strength and stretching exercises every other day, but the number of series of these exercises can be increased to 6.

photo 10 a

photo 10 b
Exercise number 11(see photo 11 a, b)
I.P. lying on your back, feet to a fixed support at the maximum possible distance from it. The diseased leg is connected to a fixed support through a rubber shock absorber. Either with one or the other hand, you need to hold on to a support, for example, a sofa leg. Pull the thigh to the body from the position of the outstretched leg until the thigh touches the lower abdomen. If it is impossible to perform this movement, only, for example, with the left foot, you can help yourself with your left hand, putting it on the knee area. In this exercise, we stretch the front of the thigh, through which the quadriceps femoris grasp and fix the kneecap. This is one of the best exercises for treating patellar bursitis. It is also great for leg rehabilitation after meniscus removal and cruciate ligament surgery (particularly the anterior one).

photo 11 a

photo 11 b
Exercise number (see photo 12 a, b)
I.P. the same, but lying on the side opposite from the leg fixed by the shock absorber. Pull the leg in such a way that the leg is completely twisted at the hip joint until the knee touches the floor in front of the stomach. When the leg returns to its original position, it unwinds, while the heel looks strictly at the floor.

photo 12 a

photo 12 b
Features of the exercise: when the leg is rotated in the hip joint, a crunch, crackling and even mild shooting pains are possible. Since the exercise is of a decompression nature, such sounds may indicate neglect of the ligamentous apparatus in terms of hypokinesia, which means that this is a normal phenomenon.
You need to take care of the strength and health of your knee joints so that your mobility does not decrease with age. We often take healthy knees for granted and don't notice impending problems until everyday activities like lifting weights or going downhill become painful. Try following the steps below to strengthen your knees so you can stay active for as long as possible.
Steps
Part 1
knee health- The iliotibial tract (ITT) is a band of denser muscle tissue that runs from the pelvic joint to the knee joint on the outside of the leg. PBT helps maintain knee stability during exercise. As a result of too much stress, it can become inflamed and cause pain (the so-called PBT syndrome). Runners, hikers, and physically active people often experience this type of injury.
- The anterior cruciate ligament (ACL) is often injured while running, jumping or landing badly. Other ligaments can also be damaged.
- The meniscus acts as a shock absorber that protects the knee from bumping bones and can be easily torn when turning, spinning, or braking.
-
Learn how the knee is affected by other parts of the leg. The quadriceps, hamstrings, and gluteal muscles act as stabilizers for the knee joints. It is necessary to keep these muscles in good shape in order to maintain the health of the knees and protect them from injury.
Part 2
Knee Strengthening Exercises-
Strengthen PBT. Before you start training, spend some time stretching and warming up your PBT. This will help strengthen your knees.
- Stand, place your left foot in front of your right, and raise your arms above your head. Tilt your upper body to the left as much as possible without bending your knees. Then switch legs and repeat the same: put your right foot in front of your left and lean to the right.
- Sit on the floor and stretch your legs out in front of you. Cross one leg over the other, pull the knee as close to the chest as possible and hold in this position for a few seconds. Repeat the exercise with the second leg.
- Before doing the main exercises, walk a little at a fast pace to stretch and warm up the PBT.
-
Do recovery exercises after surgery. If you have had knee surgery or knee replacement, you may need special exercises and stretches to increase your range of motion. Ask your doctor when you can start stretching after surgery. The following exercises are usually recommended:
Train your quadriceps. These muscles are located on the front of the thighs. Strong quadriceps strengthen the legs and increase their mobility. Do exercises to develop these muscles.
Strengthen the hamstrings and muscles that are located on the back of the thighs. Stretching these muscles daily and exercising them at least twice a week will help relieve knee pain and increase mobility.
Strengthen your thighs and buttocks. The hip flexors and gluteal muscles also play an important role and provide leg mobility. Strengthen these muscles to avoid putting too much strain on your knee joints. Among other things, many exercises for the thighs and buttocks also strengthen the hamstrings and muscles.
Try recovery exercises that tone your muscles throughout your body. If you have weak leg muscles, this will negatively affect the condition of your knees.
- Yoga exercises are accompanied by low loads and increase the tone of the leg muscles.
- Swimming is also a great and safe way to strengthen your legs and knees and increase their flexibility.
- Walking and cycling keep your legs and knees toned and ready for more strenuous exercise.
-
Be careful while jumping. Jumping rope, for example, helps strengthen the muscles in your legs, but if done incorrectly, you can injure your knee. If you still decide to perform such exercises, learn how to do it correctly. When landing on straight legs, the knee joints are under high pressure, which can lead to injury. To prevent injury, land on bent legs and keep your shins vertical. If you do not keep your shins vertical when landing, you can get injured - in this situation, try not to jump.
-
Learn the basic anatomy of the knee. The knee is the largest joint in the entire human body. It is formed by the lower end of the femur, the upper end of the tibia and the patella (patella). These bones are connected by ligaments and cartilage, including the meniscus, which acts as a shock-absorbing pad at the junction of the femur and tibia.
Be aware of the most common knee injuries. The knee is one of the most loaded joints in the human body, so it is prone to various injuries. The more you know, the easier it will be for you to avoid situations that can lead to new injuries or aggravate previous ones.
If you have had a knee injury or suffer from arthrosis of the knee joint, you may be afraid to give a painful joint a load. And this is the biggest mistake that a person with joint problems can make.
And after injuries, and with arthrosis, and with arthritis, and with other joint ailments, the knee must be given physical activity. Another thing is that it should be done correctly. Below are 12 safe exercises to strengthen both healthy and diseased knee joint.
This is the simplest exercise that even people with severe joint damage should perform.
- Sit on a chair. Feet are on the floor. Hands rest on the knees or lowered to the sides of the body.
- Slowly raise one leg, straightening it at the knee.
- Hold the pose for 2-3 seconds, then return to the starting position.
- Repeat 10-15 times for each leg.
Hamstring tension
- Stand up straight. You can stick to a wall or a chair. However, it will be better if you do the exercise without support. This will not only give a load on the tendon, but also improve the functioning of the vestibular apparatus.
- Slowly bend one leg at the knee, moving the foot back.
- Repeat 20 times for each leg.

If you don't have any serious problems with your knees, give them some extra work. To do this, do not lift your free leg, but pull an elastic band or expander with it. 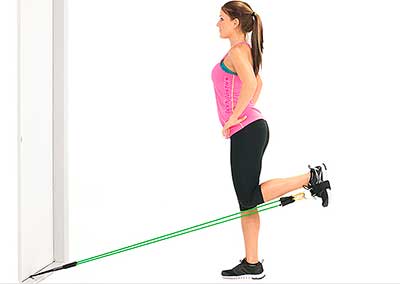
Calf stretch
- Stand facing a wall with your palms on it.
- Take your right leg back, and put your left leg forward and bend at the knee, transferring the entire body weight to it. In this case, the knee of the right leg should remain straightened, and the feet of both legs should be pressed to the floor.
- Hold the pose for 30 seconds.
- Repeat for the second leg.

Lateral hip lift
- Lie on the floor on your left side.
- Raise your body by leaning on your left forearm. Lift your left thigh off the floor, accepting.
- It is not necessary to hold the pose for a long time. You can jump right back.
- Do 30 repetitions for each side of the body.

Lateral leg lift
- Lie on the floor on your left side.
- Raise your body by leaning on your left forearm. Raise your right leg up, trying not to bend it at the knee. Raise as high as you can.
- Do 30 repetitions for each leg.

Straight leg lift
- Lie on your back. The arms are parallel to the body and pressed to the floor with the brushes.
- Bend one leg at the knee, and lift the other up. The leg should remain straight and form an angle of 90 degrees with the body. Do not tear your lower back or arms off the floor.
- Repeat 10-12 times for each leg.

Leg raise, prone
- Lie on your stomach.
- Raise one leg up, without bending it at the knee, as high as possible.
- Hold the pose for 3-5 seconds.

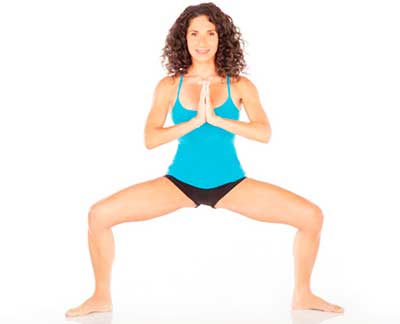
- Stand straight with your legs apart 1.2-1.4 meters.
- Place your hands in front of your chest.
- Slowly bend your knees. Ideally, your thighs should be parallel to the floor. But if this is not possible, just bend your legs to the extent that your physical fitness allows.
- Keep your back straight and your knees out to the side (you may want to bring them together, but don't give in to that urge).
- Hold the pose for 15 breaths and then slowly return to the starting position.
- Repeat 3 times.
- Stand up straight.
- Slowly sit down so that a 45-degree angle is formed (knees should not go beyond the toes).
- Fix the pose for a few seconds. In order not to fall, protect yourself from behind with a chair.
- Repeat 10-15 times.

Climbing stairs
- Stand up straight with a small bench in front of you.
- Raise your right leg on it, and then pull your left leg up.
- Return to the starting position and make a rise to the bench, starting with the left foot.
- Repeat for each leg 20 times.

To increase the load, take dumbbells.
Stretching the calf muscles on the stairs
- Stand on the step of the stairs so that the heels have no support.
- Get up on your toes.
- Return to starting position.
- Repeat three sets of 10-15 times each.

To complicate the exercise, you can perform it on one leg. To simplify, do not do it on a step, but simply on the floor.
- Sit on the floor.
- Stretch your right leg forward, placing a rolled towel under your knee. Bend the second leg at the knee, and place your hands slightly behind the body.
- Tighten your right thigh and forcefully press the roll with the inside of your knee into the floor.
- Hold the pose for 5 seconds.
- Repeat 10 times for each leg.

It is important to remember that exercises to strengthen the knee joint should not lead to increased pain in the joint. From them, like from any other fitness, muscles can hurt. But the joint should not get worse. If pain occurs or worsens in a joint, training should be stopped and a doctor should be consulted immediately.
RELATED MATERIALS
Similar content
Special exercises for the knees are part of the rehabilitation program after injuries, fractures, and arthritis to restore mobility and strength of the muscles that provide flexion and extension of the legs at the knee. In this article, we will not tell you how to pump something up, because it is dedicated specifically to rehabilitation issues.
What causes a knee injury
Usually, athletes who have damaged the meniscus and ligaments come to the traumatologist with pain in the knee. The rest turns to a specialist after complex fractures. Sometimes a fracture cannot simply be cast, especially in the knee. Ordinary gypsum can permanently immobilize the leg.
To avoid this, surgeons correctly assemble the broken bone, insert special prostheses, pins, so that everything grows together correctly and quickly.
After the plaster is removed, the leg loses its mobility. Especially after a knee fracture, it is not possible to move the leg - it hurts. The ligaments have lost their elasticity and flexibility. A person cannot bend his leg even 90 degrees. This is where a set of therapeutic exercises comes to the rescue, which will strengthen the muscular apparatus and ligaments of the recovering leg.
If recovery procedures are neglected, a knee injury can lead to complete immobility of the legs and, in severe cases, to a wheelchair. This is the justification for the need for rehabilitation measures.
All joint exercises can be done at home by laying a fitness mat. Make sure there are no drafts in the room. Knees should not be subjected to even short-term hypothermia.
Exercises and technique
As we said, you can do everything at home. We recommend purchasing a regular children's ball, as well as a fitball. If you have financial problems, a children's ball with a diameter of 15-20 cm, which can be bought at any children's store, will suffice. The ball should be light and have a medium stiffness (let's tell you a secret, you will use it during some exercises). This will be enough to restore the physical characteristics of the legs.
Rehabilitation is a multifaceted and complex process. Just like the knee joint.
Some of the elements included in the complex help strengthen all the muscles of the legs, while others develop the joint in isolation. We will divide the exercises into those that restore muscle tone, and those that increase the mobility of the joint itself. You can’t do one thing, because the movement is provided by the total qualities of the knee joint, ligaments and muscles of the leg.
Note that if you did not have injuries, but your knees began to crackle, or you experience pain in them, then you should pay special attention to warming up before training or in the morning, after waking up. Let's start with her.
Morning exercises for the knees
Below is a set of exercises to restore the mobility of the knee joint after injuries and prevent age-related changes.
Stage 1
- As soon as you wake up, raise one leg slightly up, bend it at the knee so that it is not difficult to keep it in the air. Bend your leg to the smallest possible angle, straighten it. We pull the sock towards us so that the calf muscle is tensed. Do this exercise for each leg 10 times.
- Now, from the same position, try to draw a circle with your toe. Try to keep the circle correct. Pay close attention to what your foot draws. In this case, mobility should be only in the knee. We do not touch the ankle. We pull the sock forward, as if there is an invisible sheet of paper in front of you, and you draw on it with your big toe. Draw 5 circles clockwise and 5 against. Repeat the same for the second leg.
So now you are ready to get up. Let's move on to the next part.
Stage 2
We stand near the bed, feet shoulder-width apart. We put the right foot on the toe, the center of gravity is transferred to the other foot. We tear off the sock from the floor so that it hangs freely in the air. We perform flexion and extension of the leg at the knee. We bend as much as possible, touching the heel of the buttocks or the back of the thigh. We unbend to the normal state so as not to injure the patella. For each leg, repeat the exercise 10 times (back and forth movement is considered one time). If it is difficult to do the exercise while standing, you can sit on a chair or the edge of the bed.
Next, lower your foot to the floor. Legs together, we tilt the body and take both hands on the knees in front, resting on them with our palms. Now your task is to draw a circle with the knee joint using your hands. We draw 10 circles in one direction and 10 back.
And the third exercise - draw a circle with a toe on the floor. To do this, you need to slightly raise your leg so that the toe (and it stretches down) hangs freely above the floor. Draw 5 circles clockwise and 5 against it. We do the same for the other leg.
The above complex is a preventive measure for age-related limitation of knee mobility.
For example, salt (insoluble) may be deposited in the joint or there may not be enough joint fluid. Yes, and ligaments become denser over time, lose elasticity, like tendons. Therefore, such a morning workout will allow you to keep your knees in good condition.
You can use the same exercises when restoring mobility.
We said that it is impossible to pump up the muscles of the legs with such exercises in the usual sense. But for those who have been motionless for a long time, the word “pump up” is most suitable, along with the word “strengthen”. Now consider a set of exercises to strengthen the muscles and ligaments of the knee joint.
Therapeutic complex for the restoration and strengthening of the knees
The complex contains exercises related to the rehabilitation program after arthrosis and knee injuries, and helps to strengthen them.
We lay the rug, lie down on it with our backs:
- Stretch your arms up behind your head, palms facing the ceiling, socks stretching in the opposite direction. On inhalation, we pull the socks towards ourselves and begin to alternately stretch each heel down (parallel to the floor). At this time, the pelvis moves a little - this is normal. On the exhale, lower the socks down again. Don't hold your breath, just remember when to inhale and when to exhale.
- We lower our hands down parallel to the body. Raise your right leg and stretch toes up. On the inhale, pull it towards you, on the exhale away from you. Do this 5 times for each leg, feeling the stretch in the knee.
- From the same position, we begin to make a “bicycle” - alternately with each leg 10 rotational movements.
- Then the “bike” is done with two legs at once - 20 circles. Don't forget to pull the sock away from you.
- Now lower your legs, bend them at the knees 100 degrees (more than a right angle), spread your knees to the sides. Feet together. This is . We spread our knees and bring them together - we do this 10 times.
- From a prone position, pull the knee with both hands to the stomach. We press it and stretch our face to the knee. We do 5 stretching movements in this way.
- Then we wrap our hands around both knees and do the same.
- Legs bent at an acute angle, feet shoulder-width apart. We put the right foot on the left knee and turn the knee of the right leg to the side and back. We do 5-10 stretching movements. Then we do the same for the second leg.
- Now it’s more difficult: when one leg is on the knee of the other, lift both legs with the power of the latter, touching the chest with the first knee.
- Feet shoulder-width apart, lower the right knee inward (to the left side), touching the floor with it. Repeat 10 times for each leg.
- Now we need a ball (or roller). We sit on a chair, we place the ball under the foot. We roll it back and forth, left and right due to the movement of the knee joint. With each leg, do 10 movements in all 4 directions.
- We sit on the floor, make a "butterfly" from a sitting position. We do not help with our hands, they are located between the legs and hold the feet.
The listed exercises for the knees can be done both alternately for each leg, and with a bunch, running 3-4 exercises for each leg in a row.
- Exercises for arthrosis of the knee joint are the same.
- We noted that this is a rehabilitation complex. Naturally, not only the knees are involved in it, but also all the muscles of the legs. Therefore, in addition to the above exercises, there are also different options for mixing-breeding the legs, “scissors”, etc. They do not touch the knee joint, so we deliberately omitted them.
- Instead of a ball, you can use a roller and do it rolls not on a chair, but lying down.
- Joint exercises are optional. They are needed only if there are problems with the knees. When you feel that your knees are starting to bring you trouble, it's time to remember this complex.
The term "pump up" implies a heavy load. Here, this is out of the question. It will be possible to pump up the legs when the problems with the knees pass - so try if you already have these problems.
Legs are what carries us all our lives, they experience a tremendous load. And the maximum load is experienced by the joint that flexes and extends the leg - the knee joint, which is very fragile. In order for him to be safe, it is necessary to strengthen his muscular corset.
And if discomfort and aching pains appear in the knees, then it is worthwhile to get examined by a doctor as soon as possible, since many are easily treatable at an early stage. And, of course, beware of injury. Knee injuries are among the most painful and take the longest to heal.
Types of injuries and pain in the knees and their causes
The two most common causes of knee pain are cartilage thinning due to disease and old age and injury.
Injuries are of several types:
- Injury. The easiest type of injury. It only damages soft tissues. Symptoms are similar to other knee injuries: hematoma, swelling. By itself, it is not dangerous, but sometimes it is necessary to release the accumulated blood surgically. In any case, a doctor's examination is necessary.
- Meniscus injury. A very serious type of injury, in order to get it you need to apply a lot of force, for example, make a strong jump, so this injury is peculiar only to athletes. Or very old people, as their bones are very fragile. With normal movement, it is almost impossible to damage the meniscus. It can tear, crack or tear, which is the worst thing. If your meniscus is torn, you may not be able to return to running. The symptoms are similar to a bruise, but worse and with loss of mobility.
- Sprain. Most common running injury. Most often it happens due to an unsuccessful fall and with sudden movements. Despite the fact that only soft tissues are affected, the injury can be quite serious. Symptoms: swelling and hematoma, but the pain will be so strong that it is almost impossible to move the leg, let alone walk. Treatment takes about several months.
- Ligament rupture. If you hear any clicks and crunch when moving the joint, this is not necessarily a fracture, it may be a rupture of the ligaments. The injury is pretty serious.
- Dislocation of the joint. This is a displacement of the joints, which entails stretching and even tearing of the ligaments that hold them. Accompanied by acute pain, severe swelling and hematoma. Often this shift can be seen visually through the skin. The patient may feel numbness of the limb, and there is no pulse below the knee. The dislocation must be corrected immediately by a specialist.
- Fracture. A knee fracture is a fracture of the patella, which, being a shield for the muscles, often cannot withstand the onslaught of a strong blow and cracks or breaks. The fracture can be horizontal, vertical, displaced, comminuted and osteochondral. It is manifested by acute pain, complete restriction in movement, swelling and visual deformation. You can see how the kneecap has shifted. An x-ray will confirm the final diagnosis.
First of all, in case of injury, you need to immobilize a person by laying him on a flat surface, apply ice wrapped in a cloth to his knee, and do nothing else until the doctor arrives and examines him. In addition to diseases, the causes of injuries are advanced age, wrong shoes, and wrong running technique.
Patellofemoral pain syndrome
This diagnosis is made by an orthopedist. The name of the syndrome comes from the Latin word patella - patella. It is one of the most common causes besides trauma. This is one of the varieties of osteoporosis - brittle bone syndrome.
It manifests itself in the destruction and inflammatory processes in the cartilage tissue. It most often affects the elderly and athletes, especially runners, as they often wear out the knee joint prematurely.
It is customary to subdivide into 3 degrees:
- Rare aching pain caused by overexertion
- Symptoms become more frequent, a feeling of stiffness appears. Sometimes you have to stop moving for the pain to subside.
- Quite severe pain in the knees that restrict a person in movement and sports
Pain syndrome of the muscles of the lower extremities

If a person has pain in his legs, then you need to see a doctor. And before going to him, figure out exactly where it hurts and what the nature of the pain is.
The pain may be:
- blunt;
- aching;
- sharp cutting;
- constant and fading;
- sudden;
- periodically appearing and disappearing (most often at the onset of rest);
- the heel of the hip, joint or knee can hurt.
Pain can be associated with overexertion and injury, as well as developing diseases. They can indicate a circulation problem in the legs, pinched and inflamed nerves, cartilage and bone disease, and muscle damage and inflammation.
Why is it necessary to strengthen the knee joint?

Many knee problems can be avoided by strengthening the knee joint. The knee is the largest joint in the body and its structure is very complex, the slightest displacement from the place is amplified by the weight of the whole body and pulls the muscles and ligaments along with it.
Conventionally, the knee consists of the end of the femur, the patella and the top of the tibia, which are held together by many muscles and cartilage. Strengthening these muscles will make the knee more resistant to dislocations and displacements during running. It is most important to strengthen the gluteal, quadriceps and popliteal muscles.
A set of exercises to strengthen the knee joint

Before starting exercises, in order to avoid injuries, be sure to warm up the muscles. Here are three types of exercises that will be very beneficial for the knee joint:
Racks
- Stand on one leg. This exercise comes from China. There it is called "golden rooster on one leg." It is to strengthen the muscles of the lower leg. It consists in standing up straight and bending one leg and standing without support for as long as possible. Repeat at least 5 times. If one leg is much weaker, then it is worth doing it more often on this leg to further strengthen it. When performing, it is worth making sure that the hips are strictly parallel to the floor.
- Stand on an unstable surface. You can complicate the previous exercise by standing on a wobbly surface. For this, the BOSU bump trainer is perfect. At home, it can be replaced with a thick pillow. To stand on such a surface, the muscles that support the knee are more involved.
- Blind stand. Over time, you can complicate it even more by closing your eyes. In this case, the vestibular apparatus is also involved.
jumping
In order to run without harming your knees, you need to learn how to jump correctly and land correctly after the jump. But you should be as attentive as possible to the jumping technique, because wrong jumps will only hurt. It is necessary to land on springy knees, landing on straight legs after a strong jump can cause injury.
For starters, you can just jump up:
- On one leg. Over time, it's time to start to complicate the jumps. Start jumping on one leg alternately.
- Arrow. To do this, imagine a square about 30 by 30 cm. And jump around it clockwise and back.
- Diagonally. On the same imaginary square, you can also jump diagonally.
- .With a jump rope. Some people prefer to jump with a rope, so the tension of the calf muscles increases and the jumps become higher.