Do-it-yourself greenhouse made of PVC pipes. How to build a greenhouse from PVC pipes with your own hands
Since the frame of this type of greenhouse is based on plastic pipes, the properties of the entire structure will largely depend on the characteristics of these pipes. The positive aspects include the following:
- expenses for the arrangement of a greenhouse minimal, because the cheapest pipes are suitable for these purposes;
- simplicity of design and its low weight allows you to quickly and effortlessly install the greenhouse and disassemble it for storage;
- controlling the microclimate in a homemade greenhouse is as easy as in the factory version;
- there is a possibility create greenhouses of any size and optimal configuration;
- The service life of such structures is very long, since the plastic does not corrode, rot, or be destroyed by insects.
At the same time, the light weight of the structure creates some difficulties during operation:
- there is a risk of destruction by wind;
- You cannot use ordinary glass.
ATTENTION! Therefore, even at the design stage, you should choose the most wind-protected locations and abandon heavy covering mats.
rials
For what?
The functionality largely depends on the presence of a heating system. If it is available, then the greenhouse is classified as warm, used for the following purposes:
- storage and protection of heat-loving plants. Before the onset of frost, they are dug out from open ground, transplanted into boxes and placed in a greenhouse;
- spring preparing seedlings almost any type of plant grown in open soil. Restrictions can arise only due to mutual intolerance of individual species;
- germination of cuttings;
- growing early plants from seeds.
IMPORTANT! When selecting a set of plants for planting, you should take into account not only the possibility of growing them together, but also the transmission of characteristic diseases from plants from the previous season through the soil.
A cold greenhouse allows gardeners to perform the following procedures:
- winter storage of plants sensitive to severe frosts;
- forcing bulbs;
- hardening before planting in open ground.
In winter, an unheated greenhouse should still check for soil moisture and temperature level. In addition, if ventilation is insufficiently effective, putrefactive processes can develop on the soil and plants.
Manufacturing technology
Answer to the question: How to make a greenhouse from plastic pipes with your own hands? - not that complicated.
Before you start assembling a homemade greenhouse based on polypropylene pipes, you should decide on the type of covering material. The choice of the optimal pipe diameter will depend on this point.
In gardening, the most commonly used types for indoor beds are:
- agrofibre, which protects well from UV radiation and creates an optimal balance of temperature and humidity;
- cellular polycarbonate, a very warm and durable material, the only drawback of which is the high price;
- PVC film, elastic and durable, but destroyed in severe frost;
- polyethylene film, easy to install, cheap and common material. It is P/E film that is most often used as a covering material for greenhouses. Its only drawback is its low physical strength;
- reinforced film-it can last for several years, but it costs accordingly.
The actual technology for constructing a greenhouse from plastic pipes with your own hands includes several stages, and this can be seen in the photo accompanying the text.
1. Preparation of material
The amount of materials must correspond to the expected size of the building. At the same time, it is not necessary to purchase everything new; the pieces of pipes and boards left after the repair will also work quite well for the frame. In most cases, the following set will be needed:
- boards with a cross section of approximately 20x120 mm, as well as their trimmings to strengthen the corners;
- pieces of metal reinforcement 500-800 mm long;
- self-tapping screws;
- fasteners for plastic pipes (clamps);
- scotch;
- film;
- plastic pipes.
The pipe diameter can be any. However, for structures more than one and a half meters high, it is advisable to take more durable pipes with a diameter of 20 mm.
2. Arranging the base of the greenhouse
The base will be the general fencing of the beds. It is made from boards fastened with screws into a rectangle.

Since the screws will be screwed in at angles, then get rid of their protruding hats It will be possible if you drill holes for them in advance from the outside of the boards.
IMPORTANT! There are moles and other pests in the soil on the site, so it makes sense to place a fine metal mesh under the greenhouse frame.
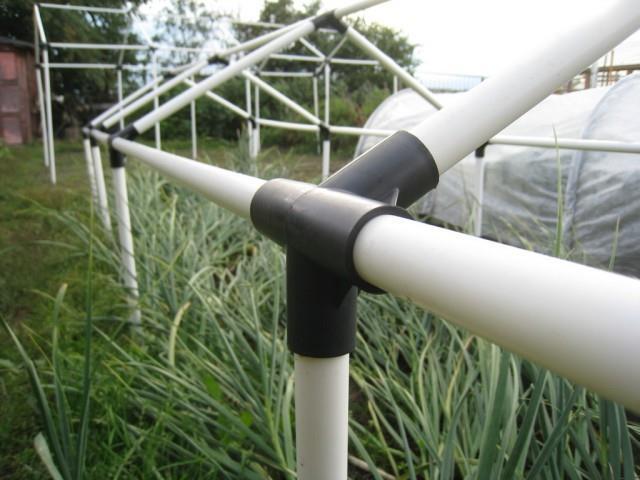
3. Along the long sides outside the base of the greenhouse, pieces of reinforcement are stuck into the ground close to the boards at a distance of 40-60 cm from each other. 300-350 mm of rod should remain above the ground. If there are fasteners for pipes (clamps), then at this moment they should be secured on the outer sides of the frame boards at the level of the pins stuck into the ground.
4. The plastic pipe is put on the pin with one hook, bent and put with the other end on the pin from the opposite side.

5. The pipes are fixed into pre-installed clamps. There is also a cheaper option for attaching pipes to the greenhouse base boards. To do this, after installing the pipe frame, it is pulled to the boards by pieces of metal mounting profile.

6. The resulting frame is covered with covering material. The simplest fixative for film can be pieces of boards laid on top of film overlaps on the ground around the perimeter of the structure. Despite the simplicity of this solution, it is quite practical, because allows you to easily open the desired side of the greenhouse for ventilation.
If desired, you can also create a doorway at the end of the greenhouse. The basis for it can be small-section wooden beams installed vertically.
You can see another, but no more complex, option for making a greenhouse with your own hands from plastic pipes in this video:
How to strengthen a greenhouse?

The need to strengthen the greenhouse structure arises before the onset of winter. The snow that settles on the surface of the film will melt and freeze into a very heavy crust. In addition to timely removal of this snow, the following activities can be carried out:
- — installation of supports made of wooden beams inside the greenhouse. Supports can be placed both longitudinally and transversely;
- - replace the covering material with a denser and more durable one;
- — add additional arcs made of plastic pipes to the frame.
In general, a greenhouse made of plastic pipes is a very easy way to expand your agricultural capabilities. At the same time, the simplicity of the design allows you to install and remove such a structure at the first need, without serious physical and material costs.
If you find an error, please highlight a piece of text and click Ctrl+Enter.
Plastics lungs, it is convenient to work with them. They are not afraid of mold and fumes, and are not damaged by caustic chemicals. Greenhouses made of polymer pipes last a very long time.
Since the price of greenhouse structures is high, gardeners can make a greenhouse on their own. You don't have to spend a large amount.
If we talk about size, then having modern materials at your disposal, you can easily make a greenhouse according to individual sizes.
How to make a greenhouse from plastic pipes with your own hands?
PVC and HDPE pipes for greenhouses
For a structure whose frame is made of pipes, there is no need for a foundation, because the structure is light. Bases required for the device boards and wooden blocks.
Choose high-quality, dry lumber. Treat all elements with an antiseptic, this will increase the service life of the structure. Instead of an antiseptic, you can use drying oil.
For work you will need a plastic or PVC pipe. The most commonly used pipes are white, but you can choose another one.
How many plastic pipes are needed for construction? Buy products with a diameter of 13 mm; for a greenhouse it is enough to purchase 19 six-meter pipes.
In addition to the items listed above, you must buy steel reinforcement or rods. You will place them inside the pipes. You will need at least 10 rods 100 cm long.
If we talk about consumables, you will need clamps made of aluminum or plastic.
Types of greenhouses
Greenhouses can have a film coating or polycarbonate coating. Most often, gardeners choose an arched structure. She can be of two types:
- with a plank box and arcs that were strung on steel rods;
- with a frame made of plastic, arches and tees made of the same material.
You can easily make a greenhouse with a gable roof. He can be two types:
- with film coating;
- with polycarbonate trim.
Some land owners who are seriously involved in gardening will appreciate double-layer greenhouses made of PFC.
Such structures are distinguished by excellent thermal insulation, because the space inside the greenhouse is reliably protected from the external environment by two sheets of cellular polycarbonate. Such a greenhouse gives off heat three times less than a conventional greenhouse.
Attaching the film to the frame
 In stores you will find polymer pipes of the required diameter. Sellers will help you choose the right ones for them. fitting, you don't have to look for them yourself.
Manufacturers include in the pipe set swivel joints. Thanks to them, the process of building a greenhouse will significantly speed up. You will find cross and tee splitters in the store.
Of course, the use of connectors will increase the construction budget. That is why you need to evaluate for yourself whether you will use fittings or not.
You can choose which greenhouse to make from plastic pipes on your site. It can be of two types: stationary and collapsible. The stationary one is erected by welding or gluing parts of the structure. Collapsible involves the use of screws.
Advantages of products made of polycarbonate and plastic pipes
Polycarbonate greenhouses have low cost. The frame is easy to make yourself. You can move the structure to another location at any time; it is very easy to adapt it to your needs.
A plastic greenhouse will be absolutely safe for soil and plants. With proper assembly, a long service life is guaranteed. Polycarbonate is a material that protects plants from ultraviolet radiation. Light passing through the material is scattered. At the same time, the sheets have a high degree of light transmission. Even with prolonged use of the greenhouse, it does not deteriorate.
Polycarbonate is not afraid of impacts from stones and even large hail. The material is 200 times stronger than glass and 6 times lighter, so no foundation is needed to install the greenhouse. Installation is carried out without special equipment.
The sheets are not afraid of temperature changes; greenhouses can withstand severe frosts and the hottest rays of the sun. Polycarbonate only burns if it is directly exposed to flame. The sheets are flexible, you can easily assemble arched and vaulted greenhouses.
Photo
Do-it-yourself greenhouse made of plastic pipes: photo examples.


Preparatory work
Place the greenhouse in a sunny location. Leave free space around; there should be a passage around the greenhouse. If you are going to install a greenhouse for one year, then it is better to choose a folding or portable structure.
Choose stationary ones if you plan to grow crops annually.
Remember that greenhouses of this type are suitable for use in winter. For such structures, it is necessary to install a high-quality foundation so that the greenhouse does not come into contact with the frozen soil, so that cold does not come in from outside.
Determine the place where will the greenhouse be located?. Clear the soil of the fertile layer, just remove a couple of centimeters. This needs to be done, because during construction, nails and construction debris will fall to the ground.
How to install a greenhouse
How to build a greenhouse from plastic pipes under film with your own hands? No matter which project you choose, installation includes a number of stages:
- Preparing the base. It will replace the foundation, since pouring a concrete strip does not make sense. The plastic is quite light, no foundation is required.
- Assemble the frame. Use pre-purchased polymer pipes; they can be rigid or flexible. Secure polycarbonate or reinforced polyethylene film. Glass cannot be used.
- Proceed to installation of end sides. Make vents in the greenhouse and install doors. Put up padlocks.
This is a brief description of the stages. In fact, the construction of a greenhouse has its own characteristics. It all depends on the type of greenhouse that you decide to build on your garden plot.
At first decide on the basis. This is the frame that will hold the frame on the ground. It is needed so that the greenhouse retains its shape. The basis does not depend on which project you choose. The choice is limited by your financial capabilities and wishes.
Ramu can be made from a rigid plastic pipe, eight-millimeter boards, or small-width bars. Most often, a thick board is used to construct the bottom trim. Buy either this or the bars. The material is joined by cutting half a tree. Metal parts are not used to connect the base.
The base is either immersed in the ground, but to do this, first dig a shallow trench. Along the perimeter you need to lay roofing felt in it, it should cover the walls of the groove and its bottom. After this, the greenhouse frame is installed in the trench.
Do not assume that a frame made of a polymer pipe can be self-tying. It is only necessary if there is a brick or concrete foundation. It is also installed when constructing a wooden foundation.
The base is fastened with brackets to the beam; anchor bolts can be used in the work. They are fixed in concrete at the moment when it begins to harden. Or the bolts are fixed in the brickwork.
You can use all options with any project. But when constructing such a foundation, you will have to forget about changing the location of the greenhouse.
If you plan to move the greenhouse from place to place, then it is better to knock down a simple plank frame. Prepare the site, remove the turf, freeing up the area.
Take it from dried wood. Treat the structure with hot bitumen before assembly. Additionally, saturate the wood with an antiseptic.
Use a PVC pipe with 3mm thick walls. Determine the number of six-meter segments yourself. Don't forget to leave one piece for the screed.
For fastening arches buy plastic clamps. You will need as many of them as there are sections of PVC pipe. To securely fix the arches and attach them to a wooden base, buy mounting brackets or aluminum drywall fasteners. For each section of pipe you need two pieces.
Take a sledgehammer and hammer in pieces of reinforcement on both sides of the base, leaving 40 cm above the surface. Place pieces of PVC pipe. Secure the arches by securing them to the frame with metal brackets.
Arrange the ends by making a doorway. For this purpose, use wooden blocks. This opening will act as a box. To increase the rigidity of the structure, reinforce the ends with wooden parts. Make an upper screed at the highest points of the arches. Attach it with polymer clamps.
Cover the greenhouse polycarbonate or film, fix the material. Make a door and windows.
Do-it-yourself greenhouse made of plastic pipes: drawings for manufacturing on a frame made of polyethylene water pipes.

Useful video
For your attention, a video about how to make a greenhouse yourself from plastic pipes.
And here is a video about a do-it-yourself greenhouse under film made from plastic pipes.
This the simplest design, which you can easily assemble on your own. Such a greenhouse will last a very long time, delighting you with its aesthetic appearance and large yields.
If you find an error, please highlight a piece of text and click Ctrl+Enter.
You can build a greenhouse with your own hands from plastic pipes with ease and without large financial expenses. However, it doesn’t hurt to learn about possible nuances.
Advantages and disadvantages of plastic pipes
Every day, polymers are increasingly replacing wood, glass and other materials from the industrial sector. The plastic is durable and lightweight and is not corroded by mold. The material is not afraid of fumes, chemicals and moisture.
Plastic structures last longer than products made from other materials, as they can easily withstand negative environmental influences.
The disadvantage is the cost of greenhouses from manufacturers, as well as the sizes, which do not in all cases meet the needs of summer residents. However, there is no need to be upset, since you can build a high-quality greenhouse yourself.
The highest quality and most affordable greenhouses are those with a frame structure made of profile pipes. However, if the budget is limited or there is no desire to overpay for the installation of such a greenhouse on the site, then you can build a structure from plastic tubes. This product has a number of advantages over more expensive analogues. The main advantages of the material include:
- Low cost. Aluminum buildings will cost much more.
- Easy to install and dismantle. This makes it possible not only to independently choose the dimensions of the structure, but also to dismantle it and store it in a garage in the winter. Without special skills, you can build a greenhouse from pipes in one day.
- Light weight. This quality is often mistaken by experts as the main drawback of the product.
- Mobility. The building can be easily moved from one place to another.
- Versatility of production. During the construction and design process, it is possible to choose any parameters and dimensions, taking into account the characteristics of the estate.
- Resistance to negative atmospheric influences.
- Long service period.
- Great looks. You can build a structure yourself, the appearance of which will not be inferior to the factory product.
- Environmental friendliness. Plastic is a safe and environmentally friendly material. Accordingly, nothing will threaten the crop and soil.
The only drawback of plastic buildings is that factory-made structures are not always suitable for the available site. If you want to build a product of complex shape, then you should know that the structure will be unstable in gusts of wind.
Design dimensions
In most cases, two beds are placed in the greenhouse, which are separated by a path.
Beds in a greenhouse made of plastic pipes
The width of the beds is on average 0.9–1.1 m - this makes it possible to plant plants in two rows with the required spacing and provide unobstructed access to them.
The width of the path should be such that it is possible to move comfortably with a bucket and other dacha equipment, including a wheelbarrow.
Correct aisle width
The optimal width of the path is 0.7–0.8 m. In this case, the width of the structure will be 2.3–3 m.
The length of the product will depend on the needs and requirements for the location of the vegetables that are planned to be grown. Planting rates per 1 m2 can be seen in the table below:
Using the table you can determine the length of the building. Typically, structures with a length of 4–6 m are made, since it is impractical to install a greenhouse of smaller dimensions, and for buildings of greater length it will be necessary to use materials of increased strength. Construction technology will also differ.
It is important to know: if you plan to use polycarbonate as the material for covering the structure, then it is recommended to choose a length that is a multiple of the width of the sheets (2 m). In this case, you can avoid unnecessary pieces.
The height of the building should allow you to comfortably move around it. It is worth knowing that there should be at least 50 cm of free space above the plantings.
Correct greenhouse height
Warm air will accumulate in this place and air exchange will occur during the ventilation process. If you plan to grow low-growing vegetables, then a height of 1.9–2 m is sufficient. For tall crops, the minimum greenhouse height is 2.3–2.4 m.
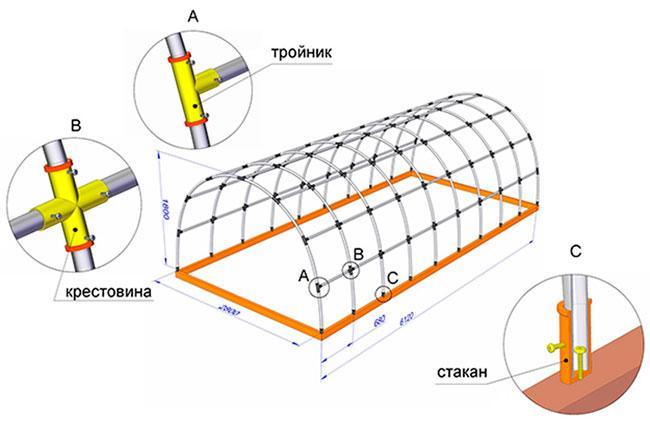
The frame of the tube structure forms half a circle. The width of the product is the diameter of this parameter. If the diameter is known, then the radius can also be determined. The values allow you to calculate the length of the district. This can be done using the following formula:
L = 2πR = πD, where L is the circumference, R is the radius, and D is the diameter. The number π is 3.14.
For example, if you plan to make a greenhouse with a height of 200 cm, then with a correct arc the width should be 400 cm. In this case, the diameter of the circle is 400 cm and the radius is 200 cm.
Accordingly, the length of the district: L = 2 x 3.14 x 2000 = 12560 mm. Only half the circle is needed, so the length of the arc is calculated as follows: 12560 / 2 = 6280 mm.
The arc consists of 2 tubes and a cross, so the resulting value must be divided again: 6280 / 2 = 3140 mm. This will be the size of the pipe.
Drawing of a greenhouse made of pipes
There are many ready-made diagrams that will help you assemble a greenhouse yourself. If you choose a simple option, you can assemble the structure in a few days. The first step is to prepare a design drawing, with which you can easily calculate the required pipe footage. The volume of materials depends on the dimensions of the building.
The greenhouse assembly diagram includes the installation of sides for fencing.
An example of a drawing of a greenhouse made of plastic pipes can be seen in the figure:
Drawing of a greenhouse made of plastic pipes
The project must indicate:
- dimensions and shape of the product;
- methods of fixing elements;
- the amount of materials and fastening parts needed.
After drawing up the drawing, you can proceed to the selection of materials.
You will need to buy large-section plastic pipes from which the frame is made. In addition to the main frame parts, smaller diameter tubes will be needed. The elements will connect the main arcs with each other. This is necessary to give rigidity to the structure.
Plastic tubes can be easily cut, bent, glued and welded. In greenhouse production, polymer elements are often fastened with self-tapping screws, since liquid will not flow through the parts. The manufacturability of plastic makes it possible to implement projects of almost any complexity: from a greenhouse or a small arched greenhouse to a huge all-season product with a gable roof. You just need to first decide on the design and buy the necessary equipment and materials.
The following pipes are suitable for the manufacture of the structure:

All types of plastic pipes are sold with fittings, including:
- cross and tee splitters;
- swivel connectors;
- adapters for joining tubes of various sizes.
The use of fittings will speed up the process of construction work several times, but at the same time will increase financial costs.
Fittings for plastic pipes
It all depends on the capabilities and preferences of the owner. He must choose whether to use fittings or not.
To fix the frame, you will need metal rods 1.2 m long. Their diameter should be such that the rod fits freely into the tube.
Sides for fencing are made from edged boards. Recommended cross-section is 150 mm. The number of parts and length will depend on the dimensions of the greenhouse.
The transverse parts of the frame are fixed using plastic tees, which are used for plumbing. Another option is to use steel wire.
At the end, the structure will need to be covered with a reinforced polyethylene or polycarbonate film.
There is one more nuance that is important to consider before the start of construction work. A greenhouse made of plastic pipes can be stationary or portable. In the first case, the parts will need to be welded or glued; in the second, the elements are fastened with screws.
Greenhouse project made from plastic pipes
The choice must be made based on needs.
Calculation of the required amount of material
To calculate materials, you will need to know exactly the dimensions of the structure. It is also important to determine the distance between the arches. If the covering of the building is planned to be dismantled in winter, then the arches can be located in increments of 0.9–1 m.
Arch installation step
For a stationary structure, the step should be reduced to 0.6–0.7 m. This will protect the product from damage after heavy snowfalls.
It is important to consider the material for the construction of screeds, end walls, doors and windows. The total length of the longitudinal ties is calculated by multiplying the length of the greenhouse by the number of ties. Most often, at least 5 pieces are installed: two bottom, two side and one ridge. To strengthen the structure, it is recommended to install additional side ties.
The end walls will require pipes with a total length of 17–20 m. One door will require at least 5 m of pipe, and a window - 2.2–2.5 m. For convenience, you can make a detailed sketch, which will indicate all the dimensions and number of parts for fixation. An example can be seen in the image:
Diagram of a greenhouse made of pipes indicating the location of parts
As an example, we will consider a greenhouse of the following dimensions:
- length - 4 m;
- width - 2.4 m;
- height - 2 m;
- arc length - 3.8 m;
- the pitch of the arches is 0.67 m.
For the frame you will need pipes 6 m long and 25 mm in diameter. Such parts can ensure the reliability and rigidity of the structure. 25 mm fittings are used to fasten the tubes. You will also need glue.
List of materials that will be needed to build a greenhouse from plastic pipes:
- reinforcing bars;
- crosspiece for 25 mm tube;
- slats 50x100 mm;
- plastic pipes 25 mm;
- oblique tees;
- nails;
- metal strip;
- self-tapping screws;
- adhesive mixture;
- tees for pipes 25 mm.
For a greenhouse of these sizes with two doors and windows, materials will be needed in the following quantities:
- steel angle 90° with a diameter of 25 mm - 16 pcs.;
- plastic pipe 6 m long and 25 mm in diameter - 16 pcs.;
- wide tape or metal profile for connection (when using polycarbonate) - 1 pc.;
- two-plane tee - 4 pcs.;
- crosspiece - 5 pcs.;
- polycarbonate - 3 sheets measuring 2x6 m;
- single-plane tee with an angle of 90° – 28 pcs.;
- two-jaw clamps - 18 pcs.;
- self-tapping screws for fixing polycarbonate with thermal washers - 100 pcs.;
- furniture bolts for fixing side ties - 36 pcs.;
- single-plane tee with an angle of 45° – 4 pcs.;
- door hinges - 8 pcs.;
- self-tapping screws 24 mm - 48 pcs.;
- self-tapping screws 55 mm - 36 pcs.
Polycarbonate or film can be used as a coating material. If the second option is chosen, then approximately 8 linear meters of polyethylene are needed. with a width of 6 m.
Tools that will be needed:
- hammer;
- device for welding plastic tubes;
- hacksaw;
- building level;
- screwdriver or screwdriver;
- construction tape;
- hacksaw for metal.
- Desktop;
- ventilation system;
- heating boiler;
- racks;
- shelves;
- design for automatic watering;
- fluorescent light bulbs;
- thermometer with hygrometer.
After preparing the materials, you can begin site planning and construction work.
How to build a greenhouse from plastic pipes with your own hands - step-by-step guide
To eliminate the possibility of the building skewing during installation and use, the area under the greenhouse must be leveled.
Leveling the area for the greenhouse
To do this, you need to mark the location of the future structure on the ground using pegs and rope.
Marking the area using pegs
After this, the area should be checked with a building level. If there is a slope of more than 1°, then the area must be leveled.
A sand cushion 6–10 cm thick should be made under the base.
Determining the location for the structure
First of all, you need to determine the location on the site for the construction of the structure. It should be:
- in flat areas so that the frame can be easily mounted;
- have direct exposure to the sun's rays, otherwise the greenhouse will not have its main property;
- in open areas.
The main condition for the correct development of plants is light. This is especially true in winter and early spring. If the greenhouse is located in a place with insufficient lighting, then it will be necessary to install additional lighting fixtures.
Lighting fixtures in a greenhouse
It is worth understanding that this can lead to high costs of grown vegetables. To make a greenhouse, you need to choose the most illuminated area, which is located at a great distance from trees and buildings. It is important to protect crops from excess shade.
The placement of the greenhouse relative to the cardinal points is an important factor when determining the location. The most preferable option is to locate the building from the west to the east.
Location of the greenhouse relative to the cardinal directions
Only in this case can crop lighting be ensured from morning to evening.
If it is not possible to place the greenhouse in such a place, then the frame must be installed so that the sun's rays enter through the covering at the beginning of the day. The morning hours are the coldest, and if the sun does not warm the air in the greenhouse, many plants may stop growing and lose their ovaries.
If there is insufficient lighting, fungal diseases can develop. This often leads to crop loss.
Another important factor affecting the effectiveness of a greenhouse is its location in relation to prevailing winds. This is of great importance in the case of using a protective structure throughout the year. In winter, the presence of cold winds can increase heating costs several times. If you plan to place the greenhouse in an open area, it is recommended to build barriers that can protect from the wind. You can use a hedge or a wooden fence mounted around the greenhouse at a distance of at least 10 m.
Hedge for protection from wind
This placement will avoid creating a shadow.
It is best to place the structure next to a private house so that there is free passage in winter during snow drifts. The path must be made of hard surface. This will protect the product from dirt during rain. The width of the track is determined based on the size of the wheelbarrow.
Making the base
A frame will be used as the basis, which will be able to hold a light frame and maintain its geometry parameters. The choice of the required base option is not associated with the design or type of construction. It depends on financial capabilities and whether the product is stationary or portable.
To make a frame, you will need to prepare the following elements:
- board 6 or 8 mm thick;
- block 6x12 or 8x12 mm;
- rigid plastic pipe for the bottom trim.
The base is made of thick boards. If financial capabilities allow, it is recommended to use timber. The elements are fastened by cutting half a tree without using fasteners. Accordingly, the frame will not contain metal elements that could rust.
The base of the bars will need to be buried in the soil. To do this, you first need to dig a pit. Only fill the trench around the perimeter so that the bottom and walls of the pit are covered. Next, the frame is installed.
Wooden greenhouse frame
A frame buried in a trench will serve as a foundation, but it is worth understanding that such a foundation is not necessary for a seasonal structure.
A frame made of tubes cannot be an independent base. It is made if there is a foundation made of wood, brick or concrete. Fixed with staples to bars or anchor bolts fixed in concrete during the curing process.
If the foundation is made, then it will not be possible to move the structure. Therefore, it makes sense to consider the process of making a plank frame as a basis. Sequencing:
- First of all, you need to prepare a site for making a greenhouse. A layer of turf should be removed from the area so that the area is longer and wider than the structure being erected by approximately 1 m. This will allow for an indentation of 0.5 m on each side.
- The surface must be measured with a building level. If necessary, the site must be leveled. A difference of 5 cm is allowed over a period of 2 m.
- A frame should be assembled from four boards. You need to decide on the sizes in advance. The structure is fixed with several self-tapping screws or nails. The length of the fastening element is determined taking into account the thickness of the attached part: it should be 2.5 times the thickness of the rail.
- The frame must be measured diagonally in both directions with a tape measure. If the values coincide, then the base is smooth. If not, the flaws should be eliminated.
- The frame is installed and fixed by driving in reinforcing bars from the inside of the corner. The length of the rod is 75–80 cm. The sections are driven flush with the frame.
Visually, the process of constructing the frame can be seen in the image:
Construction of a greenhouse base
The base will be in contact with moist soil. Therefore, the material for production must be thoroughly dried. Before assembly, the parts must be coated with hot bitumen and an antiseptic.
Manufacturing of frame structures
The first step is to do the following:
- Along the long walls on both sides of the frame, you need to hammer in the rods with a sledgehammer so that no more than 40 cm remains above the base.
- A piece of plastic tube is placed on the fittings.
To make internal arcs, you need to connect 2 pieces of tube 3000 mm each by welding so that the cross is located in the center.
Installation of frame arches
For external parts, the tubes in the center should be connected not with a cross, but with tees.
The frame is assembled as follows:

At this stage, openings for installing windows and doors are prepared. Structures are needed for ventilation.
The two pieces of reinforcement that were installed earlier are places for installing windows and doors. Installation sequence:
- From the reinforcement that is driven in across the width, you need to draw a line up and make a mark on the outer arch.
- The tools you will need are: a flat piece of wood, a marker and a building level.
- Next you need to embed the oblique tees. You will need to measure the distance from the bottom of the reinforcing bars to the mark.
- You need to cut a piece of plastic tube to size.
- A tee is welded to the part so that a structure with a tee in the upper part is obtained. The bevel should mate with the tube.
- An arc is cut at the mark. The part is under load, so work should be done carefully.
- The tee is welded into the prepared space. It is recommended to carry out the work with an assistant.
After this, a door is made from tubes. The construction process can be seen in the diagram:
Making windows from pipes
Windows should fit into prepared frames without much effort.
As canopies, you can use pieces of plastic tube, but with a larger diameter. The 25mm tube should fit into the canopy easily.
How to cover a greenhouse with polyethylene or polycarbonate?
The next step is covering the greenhouse:
Covering the greenhouse with plastic film
The process is not complicated. To do this, attach the film to a wooden frame using nails and strips. The windows will also need to be covered with polyethylene and installed in their places. The following steps should be followed:
- The supply must be distributed evenly. At the ends there should be pieces of plastic film identical in size.
- The covering should be nailed through the boards to the frame.
- First of all, you need to nail the film along the long wall.
- You need to start from the middle of the surface, heading towards the corners.
- When the covering is stretched, according to this scheme it needs to be nailed to the second wall of the frame.
- In the end parts, the film is folded and then nailed.
In the covering that is fixed to the frame, you need to cut holes for doors and windows so that there is an overlap at the extreme parts of the holes for attaching the plastic film to the slats.
Greenhouse doors made of pipes
This method allows you to quickly make a budget greenhouse from plastic tubes. The principle of its design is taken as the basis for many variations. The end parts can be made from plywood sheets, the dimensions of the door, the location and size of the windows can be changed, stiffeners can be mounted diagonally in the end parts, etc.
Fastening plastic film with a stapler
The reinforced film can be fixed using tube clamps. In the lower part it must be dug in with soil and strengthened by laying stones or slats on top.
If you plan to cover the greenhouse with polycarbonate, you will need to perform the following steps:
- Wooden slats need to be placed on the frame between the ribs.
- A solid surface is prepared. The ribs should be recessed inward.
- Holes are drilled into which fasteners will be installed.
- Polycarbonate is fixed with self-tapping screws. Be sure to install thermal washers.
Fastening polycarbonate with self-tapping screws and thermal washers
The diameter of the recesses in the polycarbonate should exceed the diameter of the screws by several mm. The gap is necessary to compensate for the expansion of the material due to atmospheric influences.
Products made from pipes are popular among summer residents. Many fans of year-round cultivation of vegetables are engaged in their production. Each owner has his own secret, which facilitates the construction process and reduces the cost of construction.
Some useful tips:

If you take these tips into account, you can make a high-quality greenhouse with your own hands.
Video: building a greenhouse
Any frame made of plastic tubes can be covered with plastic film or polycarbonate. The only material that cannot be used to cover a greenhouse of this type is glass.
With your own hands you can make a greenhouse that will delight you with fresh cucumbers, peppers, tomatoes, strawberries and herbs all year round. In order for the design to be of high quality, it is important to follow the instructions.
Having decided to install a greenhouse or greenhouse on the site, the summer resident needs to choose the type and size of the structure, as well as decide on the material. The cost and durability of the structure will depend on these points. One of the most economical options is a greenhouse or greenhouse made of plastic pipes with your own hands. Today our site will tell you about all the features of constructing such structures in the country.

Plastic pipes as a material for a greenhouse - what are the advantages?
In modern construction, plastic pipes are used quite widely. The main advantages of the material are durability and low cost. Plastic pipes are easy to work with, flexible and durable. The light weight of the material makes working with it especially comfortable and allows you to involve even a child in helping.
Due to such attractive characteristics of plastic pipes, craftsmen have developed a way to use them in the construction of greenhouses and greenhouses. Today there are several types of similar structures that any summer resident can build with his own hands.

Greenhouses made of plastic pipes have the following advantages:
Resistance to precipitation. The plastic structure does not rust like metal and does not collapse like wood.
Easy to assemble. A greenhouse of this type can easily be disassembled when not needed and then put back together.
A light weight. The structure can be moved to a new location without much effort.
Durability. If you follow all the recommendations when creating a greenhouse, it can last up to 50 years.
Fire resistance. Plastic pipes are considered a fire-resistant material.
Wear resistance. The self-made frame withstands external influences well, without changing its properties for many years.
Strength. Although the material is light in weight, it does not break or bend under gusts of wind.
Minimal care. During operation, plastic pipes do not need to be treated with any protective agents.
Availability. PP or PVC pipes with the necessary characteristics can be purchased at any hardware store at an affordable price.
Nice appearance.
 Greenhouses made of plastic pipes look very attractive
 Types of greenhouses made of plastic pipes with photos
Summer residents appreciated the flexibility of plastic pipes. The material is easy to bend, cut and fasten. In addition, pipes of various lengths and thicknesses are always available for sale. All this allows you to build a greenhouse or greenhouse of any configuration on the site.
Arched design
This is the most common form of greenhouses in summer cottages in our country. This project is easy to implement, looks great and is easy to maintain. Due to the minimal number of fasteners, the structure can be easily disassembled.
 Installation of an arched structure made of PVC pipes
 Single-slope and double-slope greenhouse
Lean greenhouses and greenhouses are often attached to the house (on the south side), which saves space on the site and creates comfortable conditions for irrigation. Buildings for plants with gable roofs are always built separately from the building. Rectangular structures are complicated by a large number of fasteners.
 Single slope greenhouse design
 Tent and dome
Such greenhouse projects made from PVC pipes are much more difficult to implement with your own hands. You will need certain skills to carry out correct calculations and construct complex structures. But these vegetable houses look amazingly beautiful.
 Greenhouse geodome made of plastic pipes
 Depending on the purpose of the structure, various coating materials are used:
Film- for using the building for growing seedlings.
Cellular polycarbonate
- for year-round operation of the greenhouse.
Choosing the type of structure must begin with determining its purpose. Depending on the crops grown, covering material is selected and the size of the structure is calculated. Small greenhouses are usually erected in small areas, keeping in mind that they additionally cast a shadow. More information about the selection and construction of greenhouses and hotbeds from plastic pipes of various options can be found using the video.
 Film greenhouse made of PVC pipes for growing seedlings
 Choosing a location for a greenhouse
To securely fasten a structure made of plastic pipes, it is necessary to provide a reliable base. Use a wooden box, a foundation made of concrete, blocks or bricks. For lightweight film construction, reinforcement bars without a base are often used.
You should not place the structure in the garden where it will be shaded by tall plants.
The place should not be low-lying or, on the contrary, elevated.
Two suitable orientation options: north-south, east-west.
It is important to consider the direction of the winds in order to retain more heat in a greenhouse made of PVC pipes.

Having decided on the place where you will assemble the greenhouse from plastic pipes with your own hands, proceed to preparing the required area. The ground must be leveled as much as possible without compacting it. Next, make clear markings, maintaining the correct angles.
Important!

Arched model of a greenhouse made of plastic pipes with photo
The construction of an arched model of a greenhouse is not particularly difficult. This is the most popular form of construction, so we will talk about it in more detail. It is very important to make all the calculations correctly to make it reliable and convenient. Windows and doors in the greenhouse are located at the ends. The photo below shows a diagram of such a structure.
 Do-it-yourself arched model of a greenhouse made of plastic pipes
 For those who do not have the desire or ability to carry out calculations and create a greenhouse diagram, there is a simpler option. A large number of specialized stores (including on the Internet) offer to buy ready-made frames from plastic pipes of arched and other models. All such kits include PVC pipes corresponding to the diagram with markings and the necessary fastenings. All that remains to be done is to assemble the structure in a suitable place.
Assembling the frame of an arched greenhouse
For the base, a concrete foundation is poured or bricks, stones or beams are used. The last option is used most actively. Suitable bars with a cross section of 10 mm. Using staples, they are connected together in the form of a box. A prerequisite is the treatment of the material with an antiseptic composition.
Step-by-step instructions for laying a timber foundation:
1. Marking using pegs and ropes.
2. Checking the correct angles: cords stretched diagonally must be equal in length.
3. Digging trenches with the expectation of deepening half the width of the beam.
4. Pouring sand and laying roofing felt at the bottom of the trench.
5. Burying the beams halfway.

The size of the greenhouse depends entirely on the number of vegetables that will be grown in it, as well as the area of the plot. The standard height of the structure is 2 m. Before starting assembly, make sure that you have all the necessary structural elements:
PVC or PP pipes + fastening element;
clips for securing film or polycarbonate;
screws, tees, adapters;
reinforcement bars.
The reinforcement bars are buried around the perimeter of the long side of the greenhouse. Immersion depth - 40 cm; the same amount remains on the surface. It is very important to place the rods in pairs strictly opposite each other. The maximum distance is 90 cm, but it is better not to take a step more than 60 cm. The smaller the gap between the arcs, the more stable and durable the greenhouse will be.

After installing all the metal rods, you can proceed to fastening the pipes. The two ends of one pipe are pulled onto two opposite rods. The structure is secured with one or two horizontal pipes running along the top along the structure. The ends of the plastic pipes are attached to the beams with metal brackets.
Covering a greenhouse with film and polycarbonate with your own hands
When film is used to cover a greenhouse made of PVC pipes, the structure in this form can be used for 1-3 years (depending on the quality). The material cannot withstand further use. Polycarbonate as a cover for a greenhouse will last much longer, but will also cost several times more. Fastening both materials has its own characteristics.
Film shelter
In order to cover arcs made of plastic pipes, no special skills are required. Every summer resident can do this with his own hands, following the recommendations. The material is placed on top and secured using special clamps.
 Film greenhouse made of PVC pipes
 In the future, if necessary, it will be possible to easily eliminate sagging using the same clamps. The edges of the film are sprinkled with earth or clamped with boards or bricks. If you use dense agrofibre instead of ordinary polyethylene, the service life increases.
Polycarbonate coating
Polycarbonate is a more durable cover for a greenhouse made of a plastic frame. Its advantages over film are obvious:
Resistance to temperature changes;
high insulating properties;
combustion resistance;
protection from excess ultraviolet radiation.
Today the market offers a huge number of greenhouse complexes: gable and arched, solid and lighter, mobile, covered with film and glazed, expensive and not so expensive. Among all this variety, of course, you can choose a suitable model, or you can build it yourself. Today we will tell you how to make a greenhouse from polypropylene pipes with your own hands.
It’s hard to imagine a modern dacha without a reliable and strong greenhouse, because we love early radishes so much, and like children we rejoice at the first tomatoes, and in the fall we want to get a rich harvest of heat-loving crops. All this is possible if you have an indoor greenhouse complex with a good construction and a durable canopy on your site.
 The frame made of plastic pipes is very light and at the same time quite durable
 There are many different greenhouses and a lot of materials for their construction, which means there are also a lot of opinions about what the best greenhouse should be. One of the most important criteria for choosing a particular greenhouse is the durability of the structure, and it is from this that one should proceed when building a greenhouse complex. The most durable and, importantly, inexpensive greenhouse is considered to be one with a frame made of a profile pipe.
But if your budget is limited or you simply don’t want to overpay for installing a greenhouse on your site, then you will definitely be interested in structures made from PVC pipes. A greenhouse made from polypropylene pipes with your own hands, compared to more expensive analogues, has a number of advantages. One of the most striking advantages is the ability to quickly assemble/disassemble the structure, which allows you not only to choose the dimensions of the greenhouse complex yourself, but also to fold it for winter storage in the garage.
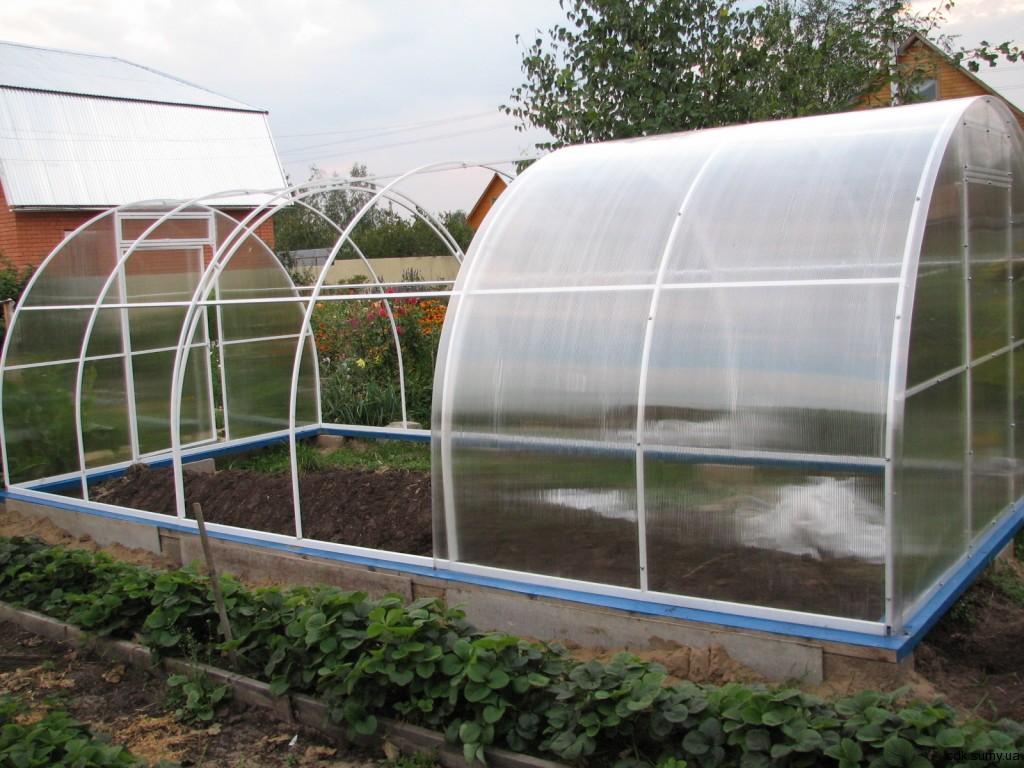
 Greenhouse made of plastic pipes covered with film
 Another advantage of a PVC greenhouse is its lightness. However, this quality is often accepted by experts as the main drawback of such structures.
Other advantages of greenhouses made of polypropylene and PVC pipes include:

Types of greenhouse complexes made of plastic pipes
There are many modifications of greenhouses, we will give only some of the most common of them:
 Lightweight greenhouse made of film and plastic pipes
 - Arched greenhouses with durable film coating (can be equipped with a wooden box and arches on steel rods, as well as arches and a plastic frame on tees).
- Models with a gable roof coated with film.
- Design arched type with polycarbonate lining.
- Products equipped with a gable roof and covering polycarbonate.
Materials for self-construction
To construct a greenhouse yourself, you will have to arm yourself with an aluminum profile, polypropylene or metal-plastic pipes, as well as PVC pipes. Products based on profile pipes have deservedly won the status of truly durable and highly reliable systems. Traditionally, pipes with a rectangular or square cross-section (40 x 20, 20 x 20, 40 x 40) are used for construction.
 Arched greenhouse frame
 The frame of the structure based on profile pipes is ideally suited for subsequent glass cladding. Many gardeners prefer greenhouse complexes made of galvanized pipes. Of course, such products have a number of advantages: the frame does not rust or deteriorate from corrosion, successfully withstands any vagaries of the weather, and the service life of such a structure is decades.
To accurately calculate the amount of materials needed, you must first design the structure. This can be done either independently, with the appropriate knowledge and training, or simply downloaded from the Internet.
Attention! Anyone can construct a greenhouse based on plastic pipes: from a professional builder to a beginner who has never held a tool in his life. The main thing is desire, patience and extreme accuracy!
Frame construction
To carry out the work, we will need fittings, PVC pipes, 4 10 x 10 timber, 10 pieces of 50 x 50 timber, plastic clamps, nails, screws, several polycarbonate sheets, components for vents and doors of a future design, as well as some free time and desire.
 Installation of the greenhouse frame
 Construction work, as usual, is preceded by an important stage of preparatory activities: the site for the construction is selected and carefully leveled. The timber must be treated with a special antiseptic, which will preserve its original quality for a long time and protect it from moisture and soil exposure. Using timber, the base frame is carefully made.
 Attaching to the base of the greenhouse
 To give the structure maximum stability, reinforcing bars are used. Special blanks no more than 80 cm long are cut from them. They are driven in around the entire perimeter of the future greenhouse at a distance of 50 cm from each other and to a depth of 40 cm. On the left side, a PVC pipe is put on the reinforcing rod and carefully bent. The second end is put on the reinforcing bar placed on the right. The result is arcs at an equidistant distance from each other (50 cm). The pipes are fixed very simply: they are screwed to the base frame with clamps. We will need 50 x 50 bars to build openings for future doors from the end of the greenhouse.
 Attaching the greenhouse frame
 In order for the finished structure to be truly strong and as durable as possible, it is recommended to install stiffeners. To do this, a pipe is attached to the central part of the end blocks and secured to all arches using clamps.
Doors are installed in the prepared doorways. The simplest greenhouse design is considered ready-made.
Selecting the skin
Film
It is impossible not to agree that film is the most common coating. Yes, at first glance it may seem that the cost of film coating will be minimal. However, looking into the near future, we note that you will have to buy new film every season, which means that costs will only increase every year. If this doesn’t scare you, then feel free to buy this inexpensive covering and carefully attach it along the bottom edge of the structure. Then the film is lifted, carefully stretched, nailed in the middle using slats, stretched again and fixed in the lower plane on the other side of the greenhouse. The whole procedure will take 1-2 hours at most. The main thing is to do everything slowly and very carefully. To install the film, choose calm weather if possible.
 Greenhouse covered with film
 Attention! To prevent drafts and cracks from appearing, slightly weight the edges of the film covering. Use stones or fragments of bricks, which can almost always be found on any personal plot.
Glass
Despite the many advantages, a glass-covered greenhouse complex is somewhat expensive. To build a high-quality and durable greenhouse, it is necessary to prepare the foundation, weld the base from profile pipes, carefully work out watering and air ventilation, and glaze. The last stage - glazing - requires special skills and abilities from the performer, because the material is quite fragile and unsafe. And there are a lot of hooligans: they can inadvertently damage not only the structure itself, but also ruin the entire greenhouse crop.
Polycarbonate
If you are interested in truly practical, reliable and durable cladding, then use polycarbonate. This universal material survives the winter well, does not need to be dismantled at low temperatures, and in the spring the soil in such a greenhouse thaws almost instantly. The coating retains heat, condensation is never visible on it, and the service life of polycarbonate reaches 10 years. It’s not for nothing that experts consider it the best coating for modern greenhouse complexes.
 Polycarbonate greenhouse with a frame made of plastic pipes
 Attaching polycarbonate to the frame is a simple procedure that does not take much time.
To cover a structure with polycarbonate, you first need to unfold it (the material is sold in rolls), remove the protective film from the bottom surface and fix the sheet at the bottom with self-tapping screws. Then the sheet is carefully lifted and simultaneously screwed to the frame every 70 cm. Having reached the opposite side of the greenhouse, the sheet is again fixed at the bottom. If the greenhouse is installed perfectly level, then the coating will be smooth and uniform over the entire surface.
In addition to the above materials for cladding, you can also use non-woven materials (spunbond, agrospan, agrotex). Bubble film coatings and reinforced ones are very common and can withstand any bad weather, including large hail and storm winds.
As you noticed, building a greenhouse from PVC pipes, plastic or polyethylene pipes is not only simple, but also affordable even within a limited budget. An inexpensive and properly constructed PVC greenhouse will last for quite a long time and will be an excellent alternative to expensive factory-made greenhouse complexes.
Building a greenhouse from polypropylene pipes: video