Scheme of connecting the hydraulic tank to the well. Types of accumulators and features of their connection to different pumps


In a country house, it is not enough just to make an autonomous water supply system. The water supply scheme should provide for the trouble-free operation of the equipment included in it, even with pressure drops in the system, because if the water supply is unstable, it is likely that household appliances will simply fail. Connecting the accumulator to the water supply system solves this problem, but in order to choose the right device, you need to know its features.

Hydraulic accumulator connected to the water supply system in a wooden house
Why do we need a hydraulic accumulator, its difference from an expansion tank
Hydraulic accumulators are often confused with expansion tanks, despite the fundamentally different problems that these devices solve. An expansion tank is needed in heating and hot water supply systems, since the coolant, moving through the system, inevitably cools and its volume changes. The expansion tank is configured with a “cold” system, and when the coolant warms up, its excess, which is formed due to expansion, has somewhere to go.
The accumulator is needed for completely different purposes: if it is not installed in the water supply system, the pump will be activated every time any tap is opened. If this happens often, then not only the pump, but the entire system wears out faster, since each time the pressure rises in jumps - a so-called water hammer occurs.
As a result, the accumulator is installed in order to get rid of water hammer and extend the life of the system as a whole. In addition, the accumulator has other functions:
Creates a certain supply of water (useful if the power is turned off).

If there are frequent interruptions in water, then the accumulator can be combined with a storage tank
Reduces pump start frequency. The tank is filled with a small amount of water. If the flow rate is small, for example, you need to wash your hands or wash your face, water starts to flow from the tank, while the pump remains off. It is activated after there is very little water left;
Maintains stable pressure in the system. In order for this function to be performed properly, an element is provided, called a water pressure switch, capable of maintaining a given pressure within strict limits;
All the advantages of hydraulic accumulators make this device an indispensable element of any autonomous water supply system in country houses.
Design and varieties
A hydraulic accumulator is a special sealed metal tank, which is divided in two by an elastic membrane inside. The membrane itself is made in the form of a diaphragm or a balloon. The first is attached across the tank, and the pear is at the inlet near the inlet pipe.

Hydraulic accumulators are equipped with two-level protection - pressure gauge and mechanical valve
On our website you can find contacts of construction companies that offer the service of design and installation of water supply and sewerage. You can directly communicate with representatives by visiting the exhibition of houses "Low-Rise Country".
Hydraulic accumulators have different purposes. First of all, devices are divided into those intended for hot and cold water supply, heating systems. The latter are painted red, and the plumbing ones are blue. Tanks used in heating, as a rule, are smaller in volume and more affordable. This is due to not such a high-quality membrane material, because drinking water is in an ordinary water supply system, and technical water is in heating.
Hydraulic accumulators are also divided according to the type of placement - devices located vertically or horizontally. At the bottom of the vertical models there are legs with which they are placed on the surface, and some models provide special plates that allow them to be fixed to the wall.

Connecting a hydraulic accumulator, as well as selecting its characteristics, is not an easy task.
Hydraulic accumulators installed in heating systems are equipped with radial membranes that look like plates. For plumbing systems, devices with a rubber pear are more often chosen.
Principle of operation
The work cycle is divided into several stages:
If there is only air inside the accumulator, then the pressure will be standard - 1.5 atm (factory or set independently, depending on the pressure in the system).
When the pump is activated, water is drawn into the pear, which causes it to become larger in volume. The air located between the membrane and the tank wall is compressed as a result of filling the tank.
When the air pressure reaches the set pressure, the pump will turn off and the system will stabilize.
If you open the valve, the pressure in the system will drop and the air will begin to push water out of the accumulator. It will flow until the air pressure drops below the specified mark. Then the pump will turn on again and the cycle will repeat.
The system is configured in such a way that at high water consumption, for example, if you need to take a bath, the pump starts pumping water in transit, that is, without pumping it into the tank. The latter will be typed when all the taps are closed. Turns the pump on and off such an element as a pressure switch.

Installing the battery
The scheme for connecting the accumulator to the pump and the water supply system may vary, since during the work they use not only a submersible, but also a surface pump. Each of the schemes has its own connection features.
Scheme with a surface pump
If water is pumped to the plumbing system through the water supply (that is, the pump does not need to be immersed), it is mounted right next to the battery. The connection scheme is not complicated, but you should familiarize yourself with the nuances.
Before installing the device, an accurate calculation of the working and minimum pressure is necessary. Different systems set different pressures, but if a standard, small system is considered, then the standard here is a pressure of 1.5 atm. It happens that a device is connected in systems that needs high pressure to operate, so the parameter increases up to 6 atm, but no more, since this can adversely affect the pipes and their connecting elements.
Scheme with a submersible pump
Scheme of installing a hydraulic accumulator in a water supply system using a submersible pump model. This case is relevant if the water for the system is drawn from a well or a pump installed underground.

The described scheme has a key feature - a check valve is mounted in the system. This device prevents back leakage of injected water. The non-return valve should be installed before the subsequent elements of the system are connected. It is mounted directly to the pump (at one end), and a pipeline leading to the accumulator is connected to the other.
The procedure for connecting the battery to the pump is as follows:
First of all, they measure the depth where the pump will be lowered (it should be located 30 cm above the surface of the bottom of the well or well). It is convenient to measure the distance with a rope to which the load is attached;
The pump, to which the valve is already connected, is lowered into the well and fixed with a safety cable;
The pipe from the pump, which comes to the surface, is brought to the water pressure switch, for which a special fitting is used;
A hydraulic accumulator is also connected to the fitting, consuming water supply and a control system. Based on this, the fitting with five connectors is the most optimal. It is important that all connections are airtight, for which FUM tape or ordinary tow is excellent, which must first be impregnated with sealant.
Video description
How the submersible pump and accumulator are connected, see the video:
If you plan to install a hydraulic accumulator, then it is important to know how to determine the critical pressure. Based on the operating value, you must first determine the minimum pressure, that is, the one at which the pump starts to work. The pressure switch is set to this value. Next, the pressure in an empty accumulator is measured. The result should be lower than the critical parameter by about 0.5 - 1 atm. Then the system is assembled. Its center, as in the previous situation, is a fitting with five connectors, where they are connected in turn: a battery, a pipe from a pump (it is connected to a water source), household plumbing, a relay and a pressure gauge.
How to set up plumbing equipment
How to install a hydraulic accumulator for water supply systems is understandable, but all equipment must be carefully adjusted in order for the resulting system to function effectively. The key element to pay attention to is the pressure switch. Externally, the device, although it looks simple, can take several hours to fix it. As a rule, a specialist copes with the task quickly, but if there is no special knowledge, then you can ruin the device.
Video description
How to adjust the accumulator, see the following video:
To set the pressure switch, first of all, the cover is removed from the device. Under it are four bolts and four springs. It is these bolts that are responsible for turning the pump on and off when a certain pressure is reached. The norms noted in the instructions for the device state that the difference between the modes is 2 atm. A couple of screws should be adjusted to set the value. This is done as follows:
The pump is in working condition, while one of the nuts is rotated until it turns off;
To effectively adjust the pressure, open the taps in the house. Here it is important to pay attention to the indicators of the pressure gauge - it is necessary to fix the mark at which the pump starts;
If necessary, the minimum pressure in the pipes is adjusted - for this, the upper nuts rotate. It is very important to rely on the readings of the pressure gauge and the norms stated in the instructions;
The bottom pair of nuts is responsible for the pressure indicator at which the pump turns off;
Adjustment should be carried out until the difference between the on and off state of the pump is 2 atm.
Setting up a pressure switch is a rather difficult task, but if it is done correctly, then the adjustment work can be considered complete.

To properly adjust the pressure switch, you need the appropriate knowledge and experience, so it is better to entrust this procedure to a specialist
In addition to the direct adjustment of the hydraulic tank, much depends on the correctly selected connection scheme. And if everything is done correctly, then in a country house there will always be a stable pressure of water.
Conclusion
A hydraulic accumulator is a special device whose task is to stabilize the pressure in the plumbing system. It is important to properly install the accumulator for water supply systems, but you should also carefully consider the choice of device. In the process of work, many different parameters are taken into account, starting with the installation site of the device and ending with the choice of the volume of the container. It is also important to understand how the unit itself is arranged. This knowledge will allow you to assemble a reliable and stable plumbing system.
Before installing a hydraulic accumulator, you need to read the recommendations of specialists A hydraulic accumulator is needed to create pressure, store water, which will be useful to guests in the house in the event of a power outage, and reduce water hammer in the networks at their summer cottage. The device looks like an ordinary tank with a mechanism for creating pressure.
- The process of connecting the accumulator
- Is it easy to install a hydraulic accumulator
- Is it possible to make a hydraulic accumulator with your own hands
- We disassemble how to connect a hydraulic accumulator to a submersible pump
- What is a hydraulic accumulator connection diagram
- How to connect a hydraulic accumulator for water supply systems (video)
If the accumulator is connected correctly, then all further maintenance can be done independently. Therefore, connect this device correctly so that you do not suffer later during its operation.
To connect the accumulator, a check valve must be used. The battery tank is connected to a submersible pump, so the valve will not allow water to flow. You can also choose a deep-well pump of the Gileks brand, which can be lowered to the bottom of a well or well. Of course, there are other types of pumps. After all, the pumping apparatus is also capable of pumping air for the pumping station. Let's analyze the usual case of mounting a hydraulic accumulator.
 When connected, the accumulator must be disconnected from the outlet
Hydraulic accumulator connection mechanism:
- We measure the dimensions of the accumulator;
- We get the scheme of pipes for water supply and heating;
- We are looking for a free place for installation according to the dimensions;
- Of the options found for installation, leave the place that is closest to the pump;
- We connect the submersible pump to the accumulator.
Thus, you will calculate the place for installing the accumulator.
Remember that the water pump must be lowered below the level of the water table by no more than 30 centimeters.
The device must be located as close as possible to the water pump. As a rule, batteries in this case are located at the entrance to the country house. In order to subsequently service the accumulator, it is necessary to calculate its integration into the cold and hot water system. This need is associated with the discharge of water from the tank. Therefore, be careful about the installation site.
Is it easy to install a hydraulic accumulator
Summer residents immediately panic when they hear that the accumulator must be connected to the water supply system. They think that pipes can suddenly burst and then the entire summer cottage, together with the house, will be filled with water. This is not true.
The installation of the accumulator takes place according to the standard and proven scheme. A lot of summer residents integrated their tanks along it. And they did an excellent job. To do this, they purchased all the necessary components in the form of nipples, pumps and fittings.
In Denmark, Germany and Italy, hydraulic accumulators are installed in basements for 50-100 liters.
 One person is enough to install the accumulator
To put it in the right place, you need to determine the water flow parameter for the whole house. Determine the power of the pump and the volume of the accumulator. It is also worth knowing the location of the main water supply units.
- hoses;
- Pipes;
- Fitting;
- Nipples;
- Cranes and so on.
Then look at the installation diagram and just do everything as indicated there.
At first glance, it seems that installing a tank is a difficult task. This is not true. Decide on a place, look at the schemes that the water supply has. Buy the connection parts and simply connect the tank to the general water supply.
Is it possible to make a hydraulic accumulator with your own hands
Many craftsmen make a hydraulic accumulator with their own hands. To make it yourself, you need to understand its device and design.
A hydraulic accumulator is a container with a certain volume. Its structure is quite simple and does not represent something complicated. The tank consists of only two main parts.
The structure of the tank is:
- membrane;
- Rubber pear.
 You can make a hydraulic accumulator yourself only if you have experience
For the tank, you can use a container made of plastic or aluminum. Inside the material of the tank must be smooth and even. If there are roughness in it, then the inner membrane or pear will simply stretch, which will lead to its destruction. There is also a membraneless accumulating tank in which there is no membrane. But such a tank is less efficient. The presence of one membrane expansion tank can solve many problems in water supply.
The tank should be chosen with a volume of more than 30 liters.
The tank will require a pressure switch and pressure gauge, which can be found at a modest price on the market. To connect, also take fittings, quarters, tees and a tap. In the store selling them, ask to pick up only high-quality models, because there are different types. As a pear or membrane, you can take a bicycle chamber - a nipple. You should also have a sheet of rubber and sealant.
In order not to buy a tank and save your money, you can make it yourself. To do this, it is enough to find a tank with a volume of more than 30 liters and components in the form of rubber sheets, fittings and tees with taps. So you will design a good tank for the water supply system.
We disassemble how to connect a hydraulic accumulator to a submersible pump
In order to properly connect the accumulator to the submersible pump, you first need to theoretically understand the connection mechanism. This will help to quickly complete the work of connecting the pump to the tank.
Connecting the accumulator to the water supply system is not difficult. To do this, it is enough to have all the necessary elements, valves, hoses and connect them sequentially according to the algorithm.
In order to connect the tank, it will be necessary to check the presence of:
- Downhole pump;
- Relay;
- Pipelines for the flow of water from the pump to the future tank and from the tank to water intake points;
- check valve;
- Stop valves;
- Filters for water purification;
- Drainage for sewerage.
 Pipes for connecting a hydraulic accumulator to a submersible pump are sold at any hardware store
Before installing the tank, check that all necessary tools and elements are present.
If you have all of the above, then you can start connecting. An adapter nipple is connected to the submersible pump. Next is the connection of the check valve and pipe. Then a fitting and a filter are placed, and a tap between them. After them, install the fiver and pressure switch. A manometer is required for control. It helps to set the pressure. Connect a drain valve and a hose to the accumulator that can withstand vibration during operation. This completes the installation. In this case, the well fades into the background, because all the main work is transferred to the home water supply system.
Summer residents sometimes install a container on the wall. To do this, put the tank on the mount.
Connecting the battery to the pump is not difficult. The main thing is to check the availability of all components for connection to a submersible or borehole pump. Otherwise, you will have to turn off the work. The connection process can only take a couple of hours if you do it in the correct sequence.
What is a hydraulic accumulator connection diagram
In order for the connection to be successful, it must be done according to the scheme. Learn what you need to connect, what elements and parts, and also, the instructions and connection diagram will help you.
To know what and where to connect, you must first familiarize yourself with the main components of the connection diagram. The whole process is built around them. The purpose of the diagram is to show how the accumulator is connected in a common circuit.
The accumulator connection diagram has three main elements:
- The accumulator itself;
- Submersible pump;
- Pressure switch;
- Five pin fitting.
 The hydraulic accumulator connection diagram can be easily found on the Internet and printed on a printer
These are the main components of the connection scheme. When assembling the hydrobox, take into account the automatics of the hydraulic tank, put a connection to the hoses and an additional fitting if necessary, the piping will also help in reliability. It is better to connect the hydraulic pump to the pressure switch in the last stages, so voltage is connected to it. The relay is connected to a five-pin fitting. A non-return valve is also attached to it.
Remember that the relay is supplied with 220 V AC power. Be careful!
A hydraulic accumulator is attached to the other end of the fitting. From it there is a pipeline to the house to the taps. A pressure gauge is used to analyze the condition. It can be installed on a five-pin fitting. Usually it already has holes for installation.
According to this scheme, you quickly and without problems connect all the main elements. Do not skimp on buying a good submersible pump and selecting a high-quality hydraulic accumulator. These are the things that are worth spending money on. In this case, they will serve you for decades.
How to connect a hydraulic accumulator for water supply systems (video)
A hydraulic accumulator for a water supply system is necessary if you want to have constant access to water in your home. It will regulate the pressure in the water supply network and give you the opportunity to enjoy clean tap water. A small container is easy to install, and there are many benefits from it for a private house. Buy a hydraulic accumulator and you will always have a constant supply of water in the house.
To organize the normal operation of water supply in a country house from a well or a similar source, it is necessary to install a number of special equipment. The package includes a pump, automation, hydraulic accumulator and other equipment. In this article, we will tell you about how the process of connecting and installing a hydraulic accumulator for water supply systems with our own hands takes place. We will offer you several working connection schemes. But first, let's find out what this equipment is.
Hydraulic accumulator - why is it
There are several main purposes that a hydraulic accumulator serves in a water supply system. First of all, its installation allows you to create the necessary pressure in the network. Also, a small amount of water is stored in the accumulator. For example, if for some reason the pump cannot pump water, then you can use it. The volume of water determines the internal volume of the accumulator. And most importantly, its presence in the water supply system of a private house prevents the formation of water hammer.
A hydraulic accumulator means a special metal tank. In order to maintain stable pressure inside it, it is equipped with special equipment. The water supply scheme for a well with a hydraulic accumulator is relatively simple, and if you follow all the instructions in this article, then you can do the connection yourself.
In most cases, the hydraulic accumulator for water supply systems uses the principle of compressed air energy. It consists of a partition, for example, it can be a rubber membrane or a rubber pear. So, the essence of the operation of the entire water supply system with a hydraulic accumulator is as follows. Pumping equipment pumps water into the tank. As the tank fills up, pressure forms inside it, as the water presses on the pear. This whole process is controlled by a pressure sensor. This is important so that the pump can turn off. As soon as a faucet is opened in a room with water, the water is pushed out by means of the energy of a rubber bulb or membrane.

As soon as the pressure in the accumulator drops, a sensor is activated that sends a signal to the pump, and it turns on. Thus, the accumulator is filled with water again. Pumping is carried out until the shutdown signal is triggered.
As you can see, in addition to connecting the accumulator itself, it is important to correctly calculate the pressure in the water supply accumulator. For this purpose, you can use the manufacturer's recommendations, which are indicated in the passport.
Today, there are two types of hydraulic accumulator:
- Open type.
- closed type.
As for the open type, it is used extremely rarely. And this is not surprising, because it has a number of negative aspects, including:
- High water evaporation rate. As a result, it is necessary to constantly pump up water.
- Moreover, installing a hydraulic accumulator for open-type water supply systems with your own hands will be much more expensive. This is due to the fact that it is necessary to take measures that will exclude the possibility of freezing water. Moreover, it is necessary to install additional automation, which will eliminate the possibility of water overflow.
- An important minus is that when water comes into contact with oxygen, its aggressiveness towards metal parts increases. As a result, this leads to the formation of corrosion on the metal, and this significantly reduces the service life.

Among other things, there are models that are placed in a vertical or horizontal position. If the area of \u200b\u200bthe caisson or other room where the installation and connection of the accumulator to the water supply system is minimal, then the vertical direction is selected. For horizontal, a special platform is required. The tank itself has special mounting feet for mounting.
Important! On sale you can find a hydraulic accumulator for a water supply system in blue and red. Blue color for cold plumbing. It differs from red in that the tank itself is capable of operating under conditions of much greater pressure. Plus, food rubber is used inside the structure.
Placement method

Before connecting, you need to understand the installation method, or rather, the location. The choice of location will depend on the power of the unit. To create the best possible pressure, it is recommended to choose the highest point in the house, for example, an insulated attic.
The selected location must be dry and free of moisture. Otherwise, condensate will appear on the surface of the accumulator for the water supply system, which can cause corrosion. And although the tank is covered with paintwork material, sooner or later rust will take its toll. Plus, the selected surface must be solid and even.
Wiring diagrams
Now let's take a closer look at how you can install a hydraulic accumulator for water supply systems with your own hands. Consider two schemes with a submersible and surface pump.
Connecting a hydraulic accumulator with a surface pump

First of all, the pressure level in the tank is checked. As a rule, it should be less than that of the pump, which is set on the relay up to 1 bar. To connect, you need a special fitting, which has 5 different outlets. Each output is intended for a specific purpose. Plus, you should buy a pressure switch.
As for the special fitting for five outlets, the following elements are connected through it:
- To connect the pump.
- Pressure switch.
- Pressure gauge.
- For plumbing connection.
To begin with, the connection can be made through a rigid hose. After that, a pressure switch and a pressure gauge are screwed to the fitting, indicating the pressure level. You should also connect the pipe that will be directed to the pump.

When connecting a pressure switch, it is extremely important to consider the following points. The device itself has a top cover. It should be carefully removed. Below it you will find four contacts. Each contact will be labeled pump and network. This greatly simplifies when connecting the device to the network of wires coming from the pump. The connection is made strictly according to the specified labels.
However, not all manufacturers sign such a plan on the relay. This is done on the assumption that the installer is fully versed in this. If you are new to this business, then be sure to consider this factor. For example, when buying, make sure that there are inscriptions. In this case, you will not need to call a specialist in this profile.
Important! Absolutely every connection on the device should be made with a sealant. Every joint must be sealed. Usually, FUM tape or tow is used for this purpose.
Upon completion of these manipulations, you just have to turn on the pump in the network and adjust the pressure level in the accumulator. Plus, you should make sure that there are no leaks at all joints.
Connecting a hydraulic accumulator with a submersible pump

In this case, the pumping equipment is lowered into the water. All water coming from the well will be pushed out through the vertical pipeline by the pump. With this design, the well water supply circuit with a hydraulic accumulator must include a check valve. As a result, water will not leave the membrane to the pump. In most cases, a check valve is installed immediately after the pump. Next comes the pressure pipeline to the surface.
Some pumps may have a female fitting. In this case, it is necessary to purchase a special adapter, which will have two external threads of the corresponding diameter. This is important, because the check valve also has an internal thread. The rest of the connection is the same as in the previous case. A special adapter for five outputs is used.
We determine and set the pressure in the accumulator

Regardless of the method and variant of the hydraulic accumulator installation scheme for the water supply system, the correct pressure adjustment in the entire system and in the tank itself plays an important role. So, in one part there is compressed air, in the second water. Upon purchase, at the factory, the pressure in the chamber with air is set to 1.5 atmospheres. It is important to note that this is a basic setting, regardless of the type of model and the cost of the accumulator.
Checking and correcting pressure
So, just before connecting, it is recommended to check the pressure level in the accumulator itself. Due to this information, you will be able to correctly configure the pressure switch. Moreover, it is extremely important to carry out future control of the pressure level. For this purpose, a manometer is intended. Some home craftsmen temporarily use a car pressure gauge. Its error is minimal, so it is quite a normal option.

If necessary, the pressure level can be reduced or added. For this purpose, there is a nipple on the top of the accumulator. A car or bicycle pump is connected to it. Due to this, the pressure rises. If the air pressure, on the contrary, needs to be lowered, then there is a special valve in the nipple. You should take a sharp and thin object and press on it.
What pressure should be
So, it is important to decide what pressure should be in the accumulator. If household appliances are used in a private house, then the pressure range should be in the region from 1.4 to 2.8 atmospheres. To eliminate the possibility of a membrane rupture, the pressure in the system should be slightly higher than in the tank itself, at least by 0.1 atmospheres. That is, if 1.8 atmospheres are installed in the accumulator for the water supply system, then the system should have about 1.9 atmospheres. To set this, a special device is used, known as a pressure switch.

When determining the pressure level, it is important to take into account the number of storeys of the building. If you have a one-story house, then the pressure will be lower than if you had to raise water to the second floor. It also takes into account the fact how many water intake points are in the house, how many people live and what is the probability that several taps will open at the same time.
If all these nuances are not taken into account, then the following picture may occur. You are showering while someone else is doing the dishes or is using the water for other purposes. As a result, the level of pressure and pressure of water in the tap will drop sharply. Agree, not a very pleasant situation. To prevent this from happening, it is important to correctly set the pressure on the accumulator and other equipment. And this will be possible if all the above details and more are taken into account.
Conclusion
So, here we have considered with you the features of using a hydraulic accumulator in a water supply system. We also gave you simple hydraulic accumulator connection diagrams. As you can see, there is nothing complicated in this matter. The most important thing is to correctly calculate the pressure level and choose the tank itself for the needs of the house. We hope that this article will help you understand this difficult matter. We are confident that you can handle this job on your own. To consolidate all the theory provided, we offer you to watch the prepared video material. It will help you visually see everything how the process of connecting the accumulator to the water supply system takes place. If you already have personal experience in this matter, then be sure to share it by leaving comments on this article.
Any water supply system, even assembled perfectly and from the highest quality equipment, may experience malfunctions.
The most common problem is a decrease in pressure in the system, due to which water cannot reach the draw-off point.
To solve this problem, a device is used that accumulates water and contains compressed air.
It is due to the latter that it works: water is drawn into the battery by a pump, after which it is pushed into the system due to air pressure. This allows the water pressure in the water supply system to always be at the same level.
In order for everything to work without problems, you need to correctly connect the unit to a water source - a well, a well or a water pipe. You can do it yourself in several ways.
Installation with submersible pump
Scheme of connecting a hydraulic accumulator to a borehole pump. (Press to enlarge) If the water in the water supply system is taken from a well, the pump that pumps water into the accumulator is located underground.
The main feature of such a connection scheme is the presence of a check valve in the system.
Thanks to this device, the pumped water will not be able to flow back into the well.
The installation of the check valve is carried out before connecting the remaining elements of the system. It is installed directly on the pump at one end, while the pipeline leading to the accumulator is connected to the other.
happens in the following order:
- The depth to which the pump is to be lowered is measured so that it does not reach the bottom of the well or well by about 30 cm. A rope with a load is used for measurement.
- The pump with the connected valve is lowered into the well and fixed with a safety cable.
- The pipe from the pump, going to the surface, is connected to through a fitting.
- A hydraulic accumulator, a consumption water supply and a control system are connected to the same fitting. Thus, a five-socket fitting is needed.
Take into account: it is very important to make all connections airtight, for which you can use FUM tape or ordinary tow impregnated with sealant.
Surface pump installation
If the water is pumped into the system from the water supply and the pump does not need to be submerged, it can be installed next to the battery itself.
At its core, the connection scheme does not change, but there are some nuances that are important to know.
Before connecting, it is necessary to calculate the working and minimum pressure. Different systems may require a different water pressure indicator, but the standard for small water supply systems with a small number of water intake points is a pressure of 1.5 atm.
If the system has equipment that requires high pressure, this figure can be increased to 6 atm, but not more, since higher pressure will be dangerous for pipes and their connecting elements.
Definition of critical pressure
Based on the operating value, it is determined what the minimum pressure should be, that is, such an indicator at which the pump will start to work.
This value is set using a relay, after which the pressure in the empty accumulator must be measured.
The result should be lower than the critical value by 0.5 - 1 atm. After that, the system is assembled.
Its center, as in the previous case, will be a five-socket fitting, to which they are connected one after another:
- the accumulator itself;
- a pipe from a pump connected to a water source;
- household plumbing;
- relay;
- manometer.
Pressure switch connection
 In order for the relay to work correctly, it must not only be correctly connected to the fitting, but also configured.
It needs electricity to function.
The top cover is removed from the device, under which there are contacts for connecting the relay to the network and to the pump.
Usually the contacts are signed, but may not have designations. If you are not sure where something is connected, it is best to contact a professional electrician.
Pumping station
 A pumping station is a complex of equipment that includes powerful pumping equipment, a hydraulic accumulator and control devices.
As a result, the connection diagram in this case does not differ from connecting to a conventional pump.
If the station is designed for large volumes of water - for example, in the case of feeding several houses from one well - the connection becomes somewhat more complicated.
In this case, several pumps and two fittings are used - the pumping system is connected to one, and the first fitting and the rest of the equipment are connected to the second.
The accumulator can be connected not only to a well or water supply for a water supply system, but also to a heating system. The functions of the unit in this case will be somewhat different, although the principle of operation does not change.
Watch the video in which the specialist explains in detail how to connect the accumulator to the water supply system with your own hands:
The hydraulic accumulator maintains the necessary pressure in the water supply and smoothes out interruptions in the operation of the pump.
If the house has such a unit, then you do not need an archaic tank in the attic.
From the article you will learn how to connect a hydraulic accumulator to a well or well.
Using a hydraulic accumulator
How is a hydraulic accumulator arranged and working? The basis of the unit is a steel container, separated by an elastic rubber membrane. One compartment is filled with air, the other is filled with water. The more water, the more the membrane stretches, reducing the space of the first chamber. The more filled the second chamber, the higher the pressure in the first. Compressed air presses on the membrane, increasing the water pressure. When the consumer uses water, the pressure is reduced.
The upper and lower pressure limits are monitored by a sensor that sends a signal to the pump or control unit. When the water pressure in the system is below the set level (the sensor and the controller are regulated by selecting the necessary response limits), the pump relay is turned on, and water from the well enters the system. When the required pressure is reached, the pump switches off.
Pros and cons of using a hydraulic accumulator
The battery capacity, depending on the model, ranges from 5 to 100 liters. Therefore, a hydraulic accumulator, as a place for storing water, cannot be compared with any tanks. The cost of a 100-liter accumulator is 10-15 thousand rubles. The cost of a plastic tank with a capacity of 2-3 cubic meters is 2-4 thousand rubles.
A hydraulic accumulator is used in conjunction with a deep or additional pump to create pressure in the water supply system necessary for the operation of household appliances. For example, washing and dishwashers, instantaneous water heaters (columns) do not work at pressures below 0.5-0.7 atmospheres (Bar).
Deep pumps and pumping stations supply water with a pressure of 3-5 atmospheres. Working with a closed system from which no water is drawn increases pump wear by 15-25 percent. Therefore, the water supplied by the pump is stored in a water tank or a hydraulic accumulator. The higher the tank is installed, the greater the pressure. Each meter of height increases the water pressure by 0.1 atmosphere.
The larger the volume of the accumulator and the smaller the water withdrawal, the less often the automation turns on the pump. Turning on more than 6 times per minute increases pump wear by 20 percent. When turned on more than 10 times per minute, wear increases by 30-40 percent.
Connecting the accumulator
Owners of private houses are interested in how to connect a hydraulic accumulator to a well. Next, you will learn what connection methods exist, and how to choose one or another method in various conditions.
Scheme "pump - check valve - hydraulic accumulator - pressure sensor". This is the simplest scheme that is used with submersible and semi-submersible pumps. The pump supplies water to the system to which the accumulator is attached. Immediately behind the battery, a pressure sensor is installed that controls the pump.
How to choose a pump for such a system? If you are using more than 10 liters of water per minute, then use centrifugal pumps. They are 40-80 percent more productive, so they supply more water per minute than vibrating ones. If the flow is less, use vibrating pumps. If the depth to the water in the well or well is more than 3 meters, use only centrifugal pumps. The power of vibration pumps is not enough for the required water pressure.
Scheme pump - check valve - tank - additional pump - hydraulic accumulator - pressure sensor.
This scheme reduces the load on the main pump, because it works in a stable mode until the tank is filled. Turn the pump on and off manually or install a water level sensor in the tank to automatically control the main pump. With this scheme, use submersible vibration pumps for the main and additional pumps. They are cheaper, and their power is enough to consume up to 20 liters per minute.
For higher flow rates, use a submersible centrifugal pump for the main pump and a surface centrifugal pump for the secondary pump.

Use of pumping stations
The pumping station is a ready-made unit consisting of a surface centrifugal pump, a hydraulic accumulator with a capacity of 5-10 liters and a pressure sensor. If the water is more than 5 meters, use the pumping station as an additional pump and pressure sensor, this is due to the peculiarities of the operation of surface pumps.
Why the station needs an additional accumulator? The station pump, like other types of pumps, does not respond well to switching on more than 5-6 times per minute. The capacity of the built-in HA is only enough to equalize the pressure drops when the pump is turned on and off. By connecting an additional GA, you will ensure comfortable working conditions for the pump and extend its service life.
Vertical or horizontal accumulator? The arrangement of vertical and horizontal HAs is the same. Therefore, the one that best suits your conditions is better. If you have a lot of free space, use horizontal. If there is not enough free space, use vertical. The photographs show a horizontal accumulator aquasystem and a vertical reflex with a volume of 200 liters.


Where to buy pumps, a station, a hydraulic accumulator and a pressure sensor? These devices are sold in hardware and construction stores. They are also ordered through online stores.
Connect the accumulator to the deep pump in compliance with safety regulations, turn off the electricity to avoid accidentally turning on the pump. The pressure in the water supply is 1.5-2.5 atmospheres, by connecting a hydraulic accumulator or a sensor, check all connections for leakage.
The use of a hydraulic accumulator prolongs the life of the pumps, increases the pressure in the water supply system. The correct use of a hydraulic accumulator turns a plastic water tank, two cheap vibration pumps and an inexpensive pressure sensor into a complete pumping station. In terms of its performance, such a station is 2-3 times superior to industrial analogues of the same cost.
oskada.ru
The device and purpose of the hydraulic tank
A hydraulic accumulator, which is otherwise called a hydraulic tank or a membrane tank, is a sealed metal container in which an elastic pear-shaped membrane partially filled with water is placed. In fact, the membrane, placed in the body of the hydraulic tank and attached to its body with a flange with a pipe, divides its capacity into two parts: water and air.
As the volume of water in the hydraulic tank increases, the volume of air naturally decreases. As a result, the pressure in the water supply system increases. When the pressure parameters set by the user are reached, it is fixed by a relay, which systematically gives a command to turn off the pump.
The body of the tank is made of metal, but water does not come into contact with it: it is enclosed inside a membrane chamber, which is made from durable rubber butyl. This bacteria-resistant material helps water not to lose the qualities that sanitary and hygienic standards require. Drinking water, when interacting with rubber, retains all its wonderful properties.
Water enters the membrane tank through a connecting pipe equipped with a threaded connection. The pressure pipe and the outlet of the connecting water supply should ideally have the same diameter. This condition allows avoiding additional hydraulic losses inside the system pipeline.
To regulate the pressure inside the device, a special pneumatic valve is provided in the air chamber. Air is pumped into the compartment allotted for it through a conventional automobile nipple. By the way, through it you can not only pump air, but, if necessary, bleed its excess.
Air is pumped into the membrane tank using a compact automobile or simple bicycle pump for this purpose. When water enters the rubber bulb, compressed air resists its pressure, preventing the membrane from breaking through. The pressure inside the accumulator is also regulated using compressed air.
The principle of operation of the accumulator
If the system has just been installed, most of the internal volume of the accumulator is occupied by the chamber that is designed for air. Entering the pear-shaped membrane through the pipe, water compresses the air. This continues until the prescribed pressure is reached. The relay then turns off the pump. Relay operation can be adjusted.
When we open the valve and use water for our needs, the system is depressurized. Air, pressing on the membrane, helps the water to exit the container. This process will continue until the pressure in the system drops to the set minimum of -1.5 atm. At this point, the pump should start pumping water into the tank.
As you know, water also contains dissolved air. When it accumulates inside the membrane bag, the operation of the accumulator deteriorates, so it must be bled off. Some models have a special valve for this purpose. If there is no valve, it is necessary to arrange prophylaxis for the membrane tank every 1-3 months.
It is important to properly mount the accumulator in the water supply system. Then, if it breaks down or when maintenance work is carried out on it, the device can be easily disassembled so that you do not have to completely drain the water from the entire system.
Role in the water supply network
It would seem that the device simply passes water through itself. Could you do without it? In fact, it is with the help of a hydraulic tank that a stable pressure is maintained in the water supply system. The water pump, if present, does not turn on so often, which makes it possible to economically use its operational life. In addition, the system for extracting and transporting water is reliably protected from water hammer.
If for any reason the voltage in the mains is lost, a small "emergency" supply of water in the tank will help solve the primary economic problems. Let's clarify the list of advantages that this rather simple device provides.
- Premature pump wear. There is some water supply in the membrane tank. It satisfies the primary needs of the owners of the cottage. And only when the supply runs out, the pump will turn on. It should be noted that all pumps have a rate of inclusions for an hour. In the presence of a hydraulic accumulator, this indicator will not be exceeded, and the unit will last longer.
- Stabilization of pressure in the system. If two taps are turned on at the same time, for example, in the bathroom and in the kitchen, pressure drops can affect the temperature of the water. This is very unpleasant, especially for those households who are taking a shower at this moment. Thanks to the hydraulic accumulator, such misunderstandings can be avoided.
- Water hammer. These phenomena, which can harm the pipeline, can occur at the moment the pump is turned on. With a hydraulic tank, the risk of water hammer is practically eliminated.
- Water supply. In a country house, the problem of water supply is particularly acute. If there is a sudden power outage and the pump cannot perform its functions, then it is no longer necessary to store a supply of water in a bucket or other container to solve urgent problems. It is available in the accumulator tank and is regularly updated.
Obviously, the presence of this device in a water supply system independent of centralized networks is not accidental. It is necessary and useful.
Variants of membrane closed containers
Membrane tanks are operated as part of pipelines mounted for various purposes.
- Cold water supply. The tank is used to accumulate and supply cold water, protects a variety of household appliances from water hammer when the pressure in the system changes. Extends the life of pumps by reducing the number of starts.
- Providing hot water. The device used in this case must successfully operate in high-temperature conditions.
- Heating systems. Such tanks are called expansion tanks. They function as part of closed heating systems and are their important components.
Depending on the configuration, hydraulic tanks are horizontal and vertical. However, the principle of their operation does not depend on the configuration.
A special feature is the presence of a special valve for bleeding air in the upper part of vertical models, the volume of which exceeds 50 liters. This air, as mentioned above, accumulates in the upper part of the chamber as the device operates. Therefore, the presence of a bleed valve in this place is a well-founded measure.
If it is necessary to bleed air masses when operating horizontal models, then a drain or a separate tap located behind the membrane tank is used for this purpose. To remove air from small devices, you will have to completely drain the water from it.
Since vertical and horizontal models are equally effective and functional, the choice of a suitable device should be based on the dimensions of the room in which it will be located. Which model fits the room better, that one is taken.
Hydraulic accumulator connection diagrams
This device can be connected to the plumbing system in many ways. The choice of a hydraulic accumulator connection scheme depends on the capacity in which it will be used and what functions it is supposed to be assigned to. Consider those connection schemes that are most popular.
For a normal connection to the water circuit, the hydraulic tank is usually equipped with an angled pipe, which is connected to the flange:
Use with booster pump station
Booster-type pumping unit is used to constantly maintain and regulate pressure in pipelines with active water consumption. Typically, such stations have a pump that operates continuously. If there is a need to connect additional pumps, the accumulator helps to compensate for the pressure surges that occur in the system.
The same scheme is used if the power supply to the booster pumps in the system is unstable, and the water supply, nevertheless, must be uninterrupted. During a power outage, the supply of water that is contained inside the accumulator is used. In fact, the membrane tank plays the role of a backup source of water supply during this period.
The more powerful the pumping station, the larger the tasks that are assigned to it. It must maintain greater pressure, and the volume of its accumulator must also be large.
Application in circuits with a submersible pump
In order to maximize the service life of the submersible pump unit, the number of its inclusions per hour must correspond to the declared technical characteristics of the device. Usually this indicator is about 5-20 times.
If the pressure in the water supply network drops, when it reaches the minimum value, a relay is activated, which turns on the pump that supplies water. At maximum pressure values, the relay turns off, the water supply stops.
If the water supply system is autonomous and small, even a small amount of water consumption can start the pump. In this case, the operation of the pump will be inefficient. And the device itself will not last as long as its owner would like. The supply of water contained in the membrane tank will save the situation. In addition, it will not allow a pressure surge at the moment when the submersible pump starts its work.
To choose a hydraulic tank of a suitable volume, you need to know the following characteristics: the power and frequency of the pump, the estimated water flow per hour and the installation height of the device.
If a storage heater appears in the connection diagram, then the accumulator performs the functions of an expansion tank in it. If water is heated, its volume will increase. It will expand. For a closed space, which is the water supply system, such a process could lead to devastating consequences if it were not for the hydraulic tank.
To be included in this scheme, it is necessary to choose a hydraulic accumulator, taking into account its following characteristics: the maximum temperature of the heated water and the maximum allowable pressure in the plumbing system.
Choosing a membrane tank with skill
A hydraulic tank is a container, the main working body of which is a membrane. Its quality determines how long the device will last from the moment of connection to the first repair. The best are products made of food (isobutary) rubber. The metal of the body of the product is important only for expansion tanks. Where water is contained in a pear, the characteristics of the metal are not critical.
Particular attention when choosing a device should be focused on the flange, which, as a rule, is made of galvanized metal. The thickness of this metal is very important. With its thickness of only 1 mm, the service life of the product will be no more than 1.5 years, since a hole will certainly form in the flange metal, which will disable the entire device.
At the same time, the guarantee for the tank is only a year with a declared service life of 10-15 years. So the hole will appear just after the expiration of the warranty period. And it will be impossible to solder or weld thin metal. You can, of course, try to find a new flange, but most likely you will need a new tank.
To avoid such misfortunes, you should look for a tank whose flange is made of stainless steel or thick galvanized.
Connecting the accumulator to the water supply circuit
As it became clear from everything written above, a membrane tank is not just a container with water. This is a special device involved in a continuous workflow. Therefore, the installation procedure is not at all as simple as it might seem. It should be fixed very carefully, taking into account vibration and noise factors.
It is fixed to the floor with the use of rubber gaskets, and to the pipeline - with the help of rubber adapters. And it should also be taken into account that the diameter of the eyeliner cannot decrease at the outlet of the hydraulic system.
A new tank should be handled with particular care, filling it with water under low pressure. The membrane from long storage could be caked. A sharp jet of water can damage it and even disable it completely. It is more correct to remove all air from the membrane pear before you start filling it with water. The location for the installation of the accumulator must be selected taking into account its accessibility.
The process of connecting the accumulator is carried out in the standard sequence:
Proper setup of a new device
A new hydraulic tank should be checked to see what the level of its internal pressure is. It is assumed that it should be 1.5 atm. But in the process of transporting the product from the place of production to the warehouse and during storage, a leak could occur, which reduced this important indicator at the time of sale. You can check the pressure by removing the cap on the spool and taking measurements.
Different types of manometers can be used to measure pressure.
- Electronic. These are expensive devices. The result of their work can be affected by temperature and battery charge.
- Mechanical. They are produced in a metal case, otherwise called automobile. If this device has successfully passed the test, then it is better not to find it. To get the most accurate value, since you will only need to measure 1-2 atm., It is better to buy a device with a large number of divisions on the measuring scale.
Inexpensive pumping stations and automatic pumps are most often equipped with pressure gauges in a plastic case. The error in the readings of such Chinese models is too great.
If there is less air in the tank than necessary, water will take its place. This will affect the water pressure in the plumbing. At high pressure, the pressure will always be high. More pressure will provide a smaller supply of water in the membrane pear, so the pump will have to turn on more often. If there is no light, the water supply may not be enough for all needs.
Therefore, sometimes it will be wiser to sacrifice pressure to achieve other important goals. However, it is better not to reduce the pressure below the recommended values, as well as not to exceed the limiting characteristics. Lack of pressure can cause the surface of the bulb to come into contact with the tank body, which is undesirable.
Optimum air pressure
In order for household appliances to work normally, the pressure in the hydraulic tank must be in the range of 1.4-2.8 atm. For better preservation of the membrane, it is necessary that the pressure in the water supply system be 0.1-0.2 atm. exceeded the pressure in the tank. For example, if the pressure inside the membrane tank is 1.5 atm, then in the system it should be 1.6 atm.
It is this value that should be set on the water pressure switch, which works in conjunction with the accumulator. For a one-story country house, this setting is considered optimal. If we are talking about a two-story cottage, the pressure will have to be increased. To calculate its optimal value, the following formula is used:
Vatm.=(Hmax+6)/10
In this formula, V atm. is the optimal pressure, and Hmax is the height of the highest point of the water intake. As a rule, we are talking about the soul. To get the desired value, you should calculate the height of the shower head relative to the accumulator. The resulting data is entered into the formula. As a result of the calculation, the optimal pressure value that should be in the tank will be obtained.
Please note that the value obtained should not exceed the maximum allowable characteristics for other household and plumbing fixtures, otherwise they will simply fail.
If we talk about an independent water supply system at home in a simplified way, then its constituent elements are:
- pump,
- accumulator,
- pressure switch,
- check valve,
- manometer.
The last element is used in order to be able to quickly control the pressure. Its permanent presence in the water supply system is not necessary. It can only be connected at the moment when test measurements are being made.
When participating in the surface pump scheme, the hydraulic tank is mounted next to it. At the same time, the check valve is installed on the suction pipeline, and the remaining elements form a single bundle, connecting to each other using a five-outlet fitting.
The five-terminal device is perfectly suited for this purpose, since it has terminals of various diameters. The incoming and outgoing pipelines and some other elements of the bundle can be connected to the fitting with the help of American women in order to facilitate preventive and repair work in certain sections of the water supply system. However, this fitting can be replaced by a bunch of connecting elements. But why?
So, the accumulator is connected to the pump as follows:
- one inch outlet connects the fitting itself to the hydraulic tank pipe;
- a pressure gauge and pressure switch are connected to the quarter-inch leads;
- there are two free inch outlets, to which the pipe from the pump is mounted, as well as the wiring going to the water consumers.
If a surface pump works in the circuit, then it is better to connect the accumulator with it using a flexible hose with a metal winding.
The accumulator is connected to the submersible pump in the same way. A feature of this scheme is the location of the check valve, which has nothing to do with the issues that we are considering today.
Conclusions and useful video on the topic
If, after reading the text, it is still not clear to you how exactly the accumulator should be connected, watch this video, which briefly but very clearly displays all the nuances of this procedure.
The hydraulic tank is an important component of the plumbing system. With its help, a whole range of tasks is solved. And it’s not at all difficult to make a competent connection of a hydraulic accumulator with your own hands, as it turned out. But the benefits of using it are undeniable.
sovet-ingenera.com
What it is?
 Any hydraulic accumulator is a container in the form of a tank, the body of which can be made of steel, cast iron or especially durable plastic. Inside is a membrane or, as it is often called, a pear. The membrane is attached to the body with a flange with a pipe through which water enters.
A technical hole for a nipple is provided in the body, through which the required volume of air is pumped into the tank. For ease of placement, the accumulator is equipped with legs and a platform in the upper part of the body for installing the pump.
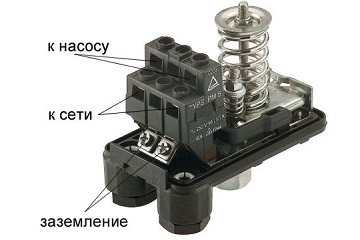
An automatic control unit with a pressure gauge and a pressure switch is mounted on the branch pipe - this is the "heart" of the entire plumbing system.
Working mode
The principle of operation of the device is extremely simple and at the same time effective. With the help of a pump, water is pumped into the pear, causing it to expand. The air under the casing of the housing (between its walls and the pear) creates an external pressure that pushes water into the water pipes, thereby creating the necessary pressure and water pressure. Also, air prevents rapid wear and tear of the pear. The air pressure is 1.5 bar.
 Pressure control in the system is carried out automatically using the control unit, which is responsible for the timely switching on and off of the pump. The upper and lower indicators (for switching off and on) can be seen on the pressure gauge. The relay is configured according to the technical data sheet of the pump. It is not recommended to exceed the maximum value recommended by the pump manufacturer.
All accumulators are divided into three types:
- designed for cold water and water pipes (painted blue);
- designed for hot water (red);
- special for heating systems (they are often called expansion tanks).
It is believed that the hydraulic accumulator, due to the correct regulation of pressure, saves pumping equipment from rapid wear. The more capacious the accumulator tank, the less often the pump turns on and wears out. However, the larger the battery, the higher its cost in the market. And this factor holds back many owners when buying a battery for home plumbing. Manufacturers today offer various models, with a capacity of 5 to 100 liters. The largest battery will cost 15,000 rubles. With the help of these devices, you can establish an autonomous water supply for a private house.
How to connect?
The algorithm for connecting the accumulator has slight differences depending on the type of installation and the type of pump.
Plumbing with surface pump
 This is the most common engineering solution for a country house. In this case, the pump is always located inside the utility room, and sometimes the living room. Next to it is a hydraulic accumulator with an automatic control unit.
Battery connection algorithm:
- The air pressure is checked using a car pressure gauge through the nipple. Its indicator should be 0.3 bar less than that set by the manufacturer on the pressure switch.
- The components and materials for connection are being prepared: a fitting with five leads, a FUM tape or tow, a pressure gauge and a pressure switch (complete with the equipment).
- The fitting is mounted to the battery using a flange with a bypass valve.
- All other elements are fixed. Water pipes for water intake and supply are screwed in, connected to the corresponding terminals of the relay fitting and a pressure gauge.
- The pump is turned on and all connections are checked for leakage.
Plumbing system for two residential buildings from one pump
This is a rare engineering solution that allows using one source for water intake.
Battery connection algorithm:
- The air pressure in both accumulators is checked in the manner indicated above. The pressure must be the same otherwise water will not flow into one of the batteries!
- The plumbing is divided into two separate systems. To do this, a tee is installed in the well, connected to a pump and two water pipes in different houses.
- Automation is mounted only to one of the accumulators. Pipes for the inflow and supply of water, as well as a pressure gauge, are connected to the second.
A more practical solution would be to install one battery for two houses with a tee cut in. Such an installation requires more powerful pumping equipment, but there are no problems with setting up hydraulic accumulators (pressure synchronization is not needed).
A similar connection principle is used to reinforce an already installed pumping station. The second hydraulic accumulator will reduce the load on the engine, allowing the pump to turn on less often.
Connecting a submersible or borehole pump
 The most important thing in such a water supply system is the installation of a check valve, which is mounted immediately after the pump in front of the water intake pipe and ensures that the pressure in the system is maintained (water does not flow arbitrarily).
The order of work is as follows:
- The depth of a well or well is measured using a rope equipped with a sinker.
- The pump is lowered into the shaft to a depth of about 0.5 meters from the bottom. A non-return valve is pre-installed on it!
- The water intake hose or pipe is connected to the pressure switch. To do this, use a fitting for five connectors.
- A pressure gauge and water supply are connected to the fitting. And the fitting itself is attached to the accumulator.
- All connections are checked for leakage. It is necessary to use FUM tape to ensure the tightness of the entire system.
Mounting the pressure switch
When connecting this most important technical unit, you need to pay attention to special labels. To do this, the protective cover is removed from the relay. Below it are the contacts indicated by the corresponding pointers. "Pump" - the connection point of the specified unit, "network" - the point for supplying the power cable.
If no tags are found (such a drawback is present in some models of hydraulic accumulators), the owner will have to contact an electrician, since it is impossible to determine the connection method by eye. To seal the junction of the relay with the fitting, technical linen (tow) with sealant or FUM tape is used.
Operating rules
 When choosing a hydraulic accumulator, experts recommend focusing on the intensity of water consumption and the number of family members. For a family of two, a 24-liter device is enough. Houses with large families and high water consumption need a larger battery. When installing a 24 liter model and connecting powerful household appliances, the pressure in the system will constantly drop, causing the pump to turn on frequently and wear out.
The maintenance of the device includes a regular check of the air pressure using a car pressure gauge. Too frequent turning on of the pump should alert. This is a sign of a depressurization of the accumulator or a rupture of a rubber bulb. Both breakdowns are easily repaired. However, a delay in repair can cause the pump to fail.
Be sure to adjust the factory settings of the pressure switch for a specific plumbing system and pump. The optimal difference between the upper and lower pressure indicator (according to the built-in pressure gauge) is one to two atmospheres.
A large battery will prevent the pump from turning on frequently and provide a supply of water in case of an emergency.
Accumulators with a horizontal position are used for mounting surface pumps.
Vertical accumulators with larger capacity are great for submersible pumps.
greenologia.ru
Functions, purpose, types
In the water supply system of a private house without a hydraulic accumulator, the pump turns on whenever water flows somewhere. These frequent inclusions lead to wear of the equipment. And not only the pump, but the entire system as a whole. After all, every time there is an abrupt increase in pressure, and this is a water hammer. To reduce the number of pump turns on and smooth out the water hammer, a hydraulic accumulator is used. The same device is called an expansion or membrane tank, hydraulic tank.
Purpose
We found out one of the functions of hydraulic accumulators - to smooth out hydraulic shocks. But there are others:
- Reducing the number of pump starts. There is some water in the tank. With a small flow - wash your hands, wash yourself - water flows from the tank, the pump does not turn on. It will turn on only when there is very little of it left.
- Maintain stable pressure. This function requires another element - a water pressure switch, but they maintain pressure within the required limits.
- Create a small supply of water in case of a power outage.
It is not surprising that this device is present in most private water supply systems - there are many advantages from its use.
Kinds
A hydraulic accumulator is a sheet metal tank divided into two parts by an elastic membrane. There are two types of membrane - diaphragm and balloon (pear). The diaphragm is attached across the tank, the balloon in the form of a pear is fixed at the inlet around the inlet pipe.
By appointment, they are of three types:
- for cold water;
- for hot water;
- for heating systems.
Hydraulic tanks for heating are painted red, tanks for plumbing are painted blue. Expansion tanks for heating are usually smaller and cheaper. This is due to the material of the membrane - for water supply it must be neutral, because the water in the pipeline is drinking.
According to the type of location, accumulators are horizontal and vertical. Vertical ones are equipped with legs, some models have plates for hanging on the wall. It is the models that are elongated upwards that are more often used when creating the plumbing systems of a private house on their own - they take up less space. The connection of this type of accumulator is standard - through a 1-inch outlet.
Horizontal models are usually completed with pumping stations with surface-type pumps. Then the pump is placed on top of the tank. It turns out compact.
Principle of operation
Radial membranes (in the form of a plate) are used mainly in gyroaccumulators for heating systems. For water supply, a rubber bulb is mainly installed inside. How does such a system work? As long as there is only air inside, the pressure inside is standard - the one set at the factory (1.5 atm) or which you set yourself. The pump turns on, starts pumping water into the tank, the pear begins to grow in size. Water gradually fills an increasing volume, more and more compressing the air that is between the tank wall and the membrane. When a certain pressure is reached (usually for one-story houses it is 2.8 - 3 atm), the pump turns off, the pressure in the system stabilizes. When you open a tap or other flow of water, it comes from the accumulator. It flows until the pressure in the tank drops below a certain level (usually about 1.6-1.8 atm). Then the pump turns on, the cycle repeats again.
If the flow is large and constant - you are taking a bath, for example, - the pump pumps water in transit, without pumping it into the tank. The tank begins to fill after all the taps are closed.
The water pressure switch is responsible for turning the pump on and off at a certain pressure. In most accumulator piping schemes, this device is present - such a system works in the optimal mode. We will consider connecting the accumulator a little lower, but for now let's talk about the tank itself and its parameters.
Large volume tanks
The internal structure of accumulators with a volume of 100 liters and above is slightly different. The pear is different - it is attached to the body both above and below. With this structure, it becomes possible to deal with the air that is present in the water. To do this, there is an outlet in the upper part, into which a valve for automatic air release can be connected.
How to choose tank volume
You can choose the volume of the tank arbitrarily. There are no requirements or restrictions. The larger the tank, the more water you will have in case of a shutdown and the less often the pump will turn on.
When choosing a volume, it is worth remembering that the volume that is in the passport is the size of the entire container. Water in it will be almost half less. The second thing to keep in mind is the overall dimensions of the container. A 100 liter tank is a decent barrel - about 850 mm high and 450 mm in diameter. For her and the strapping, it will be necessary to find a place somewhere. Somewhere - this is in the room where the pipe comes from the pump. This is where most of the equipment is installed.
If you need at least some guidelines to choose the volume of the accumulator, calculate the average flow rate from each draw-off point (there are special tables or you can see it in the passport for household appliances). Sum all these data. Get the possible flow rate if all consumers work at the same time. Then estimate how many and which devices can work at the same time, calculate how much water will go in this case per minute. Most likely by this time you will already come to some kind of decision.
To make it a little easier, let's say that the volume of the hydraulic tank of 25 liters is enough to meet the needs of two people. It will ensure the normal functioning of a very small system: a faucet, a toilet bowl, a sink and a small water heater. In the presence of other household appliances, the capacity must be increased. The good news is that if you decide that the existing tank is not enough for you, you can always install an additional one.
What should be the pressure in the accumulator
Compressed air is in one part of the accumulator, water is pumped into the second. The air in the tank is under pressure - factory settings - 1.5 atm. This pressure does not depend on volume - and on a tank with a capacity of 24 liters and 150 liters it is the same. More or less may be the maximum allowable maximum pressure, but it does not depend on the volume, but on the membrane and is indicated in the technical specifications.
Pre-check and pressure correction
Before connecting the accumulator to the system, it is advisable to check the pressure in it. The settings of the pressure switch depend on this indicator, and during transportation and storage the pressure could drop, so control is very desirable. You can control the pressure in the gyro tank using a pressure gauge connected to a special inlet in the upper part of the tank (capacity of 100 liters or more) or installed in its lower part as one of the piping parts. Temporarily, for control, you can connect a car pressure gauge. His error is usually small and it is convenient for him to work. If this is not the case, you can use the regular one for water pipes, but they usually do not differ in accuracy.
If necessary, the pressure in the accumulator can be increased or decreased. To do this, there is a nipple at the top of the tank. A car or bicycle pump is connected through the nipple and, if necessary, the pressure is increased. If it needs to be bled off, the nipple valve is bent with some thin object, releasing air.
What air pressure should be
So the pressure in the accumulator should be the same? For the normal operation of household appliances, a pressure of 1.4-2.8 atm is required. To prevent the tank membrane from tearing, the pressure in the system should be slightly higher than the tank pressure - by 0.1-0.2 atm. If the pressure in the tank is 1.5 atm, then the pressure in the system should not be lower than 1.6 atm. This value is set on the water pressure switch, which is paired with a hydraulic accumulator. These are the optimal settings for a small one-story house.
If the house is two-story, you will have to increase the pressure. There is a formula for calculating the pressure in a hydraulic tank:
Vatm.=(Hmax+6)/10
Where Hmax is the height of the highest draw point. Most often it is a shower. You measure (calculate) at what height relative to the accumulator its watering can is, substitute it into the formula, you get the pressure that should be in the tank.
If the house has a jacuzzi, everything is more complicated. You will have to select empirically - by changing the relay settings and observing the operation of the water points and household appliances. But at the same time, the working pressure should not exceed the maximum allowable for other household appliances and plumbing fixtures (indicated in the technical specifications).
How to choose
The main working body of the hydraulic tank is the membrane. Its service life depends on the quality of the material. The best for today are membranes made of isobutyl rubber (it is also called food grade). The body material matters only in membrane type tanks. In those in which a "pear" is installed, water contacts only with rubber and the material of the case does not matter.
What is really important in tanks with "pears" is the flange. Usually it is made of galvanized metal. In this case, the thickness of the metal is important. If it is only 1 mm, after about a year and a half of operation, a hole will appear in the metal of the flange, the tank will lose its tightness and the system will stop working. Moreover, the guarantee is only a year, although the declared service life is 10-15 years. The flange usually deteriorates after the end of the warranty period. There is no way to weld it - a very thin metal. You have to look for a new flange in service centers or buy a new tank.
So, if you want the accumulator to serve for a long time, look for a flange made of thick galvanized steel or thin, but made of stainless steel.
Connecting the accumulator to the system
Typically, the water supply system of a private house consists of:
- pump;
- hydraulic accumulator;
- pressure switch;
- check valve.
In this scheme, a pressure gauge may also be present - for operational pressure control, but this device is not necessary. It can be periodically connected - for test measurements.
With or without 5-pin fitting
If the pump is of a surface type, the accumulator is usually placed near it. In this case, a check valve is installed on the suction pipeline, and all other devices are installed in one bundle. They are usually connected using a five-pin fitting.
It has leads with different diameters, just for the devices used for tying the accumulator. Therefore, the system is most often assembled on its basis. But this element is not at all necessary and everything can be connected using ordinary fittings and pipe pieces, but this is a more time-consuming task, and there will be more connections.
With one of its inch outlets, the fitting is screwed onto the tank - the branch pipe is located at the bottom. A pressure switch and pressure gauge are connected to the 1/4 inch outlets. A pipe from the pump and wiring to consumers are connected to the remaining free inch outlets. That's all the connection of the gyroaccumulator to the pump. If you are assembling a water supply scheme with a surface pump, you can use a flexible hose in a metal winding (with inch fittings) - it is easier to work with it.
As usual, there are several options, you choose.
Connect the accumulator to the submersible pump in the same way. The whole difference is where the pump is installed and where to supply power, but this has nothing to do with installing a hydraulic accumulator. He puts it in the place where the pipes from the pump go. Connection - one to one (see diagram).
How to install two hydraulic tanks on one pump
When operating the system, sometimes the owners come to the conclusion that the available volume of the accumulator is not enough for them. In this case, a second (third, fourth, etc.) hydraulic tank of any volume can be installed in parallel.
There is no need to reconfigure the system, the relay will monitor the pressure in the tank on which it is installed, and the viability of such a system is much higher. After all, if the first accumulator is damaged, the second one will work. There is another positive point - two tanks of 50 liters each cost less than one of 100. The point is a more complex technology for the production of large containers. So it's also more cost effective.
How to connect a second accumulator to the system? Screw a tee onto the input of the first one, connect the input from the pump (five-pin fitting) to one free output, and the second container to the remaining free output. All. You can test the circuit.