Do-it-yourself tester probes. Search probe as additional equipment for a treasure hunter What is a search probe, how to do it correctly
If you like to wander through the fields with a metal detector in search of lost coins, then it is unlikely that you will need any other equipment other than your favorite metal detector and shovel. The only thing else you can equip yourself with for your loved one is this. By and large, nothing more is needed.
However, if you are seriously involved in treasure hunting, studying ancient maps, checking legends, purposefully looking for treasures, then it would be nice to also have a search probe in your arsenal. Oh yes, I almost forgot, another cool thing - . For those who don’t have a metal detector and want to look for coins and treasures, it is indispensable. .
This is a fairly simple device that you can make with your own hands in the garage if you have fittings and a welder. A handle and a long thin metal rod. It looks something like this.
This is a homemade probe, which, just like a purchased one, does an excellent job of its direct responsibilities - checking the soil for voids and various objects. It is worth noting that search teams engaged in searching for the remains of those killed in the Second World War for the purpose of their further burial - they all use search probes in their searches. Paired with a metal detector, the probe helps quite noticeably when it comes to searching over a vast territory. Roughly speaking, a search probe is for reconnaissance of the area.
Let's say you obtained information that a treasure of silver coins was buried in such and such a garden. Naturally, a metal detector will be simply necessary to check the legend, but a probe will also come in handy. You can use a probe to check the ground for voids; it happened that treasures were buried in special niches lined with stone/brick. A simple metal detector may not be able to cope with depth and mineralization, or penetrate through the thickness of the earth and bricks, so a preliminary check with a probe can help to understand what we are dealing with. By penetrating the soil with a probe, you can poke at an object, understand by the sound whether it is iron or something else, and then decide for yourself whether it is worth spending time and digging. Each type of target sounds different when struck with a probe - iron, wood or bone.
It is quite difficult to understand what is in the ground the first time, but an experienced search engine will easily determine that there, for example, there was a dugout or a trench, which was then buried. During the Second World War, the Nazis forced prisoners to throw the corpses of soldiers into the trenches and bury them. So places of voids in the ground can be found much more successfully than with a metal detector. If the soil is loose, then you can “probe” it very deeply.
Very often, search probes are used when drilling, saving a lot of time for diggers. If you are looking for war, a dipstick is necessary. And it is even more necessary if you are purposefully digging ferrous metal for its subsequent delivery to the acceptance point.
That's where, and when digging ferrous metal, a probe is an essential thing. When working on war, remember that if you hit the detonator of a mine/land mine/shell with the tip of the probe once, your hobby will end there. Follow safety precautions when coping with war, or even better, don’t go there at all without experienced comrades who will advise and help with advice. Imagine what could happen if you hit such a find with a shovel or probe.

Therefore, if you are digging in the old-fashioned way, still do not furiously hammer at a metal object with a shovel, who knows that you are ours there in the ground.
For professional seekers and lovers of quality equipment, factory-made collapsible probes are produced. This is a real thing that can be conveniently folded, there are many attachments for different types of soil. It is much more convenient to work with such a probe than with a homemade one. Therefore, if you are seriously engaged in various types of searches, then it is better to buy a probe in a store, they are inexpensive. They come in different lengths, long ones for working in depth and short ones for shallow searching, something like a large awl about 20 centimeters long.
If you decide to buy this equipment for yourself, I recommend buying my friend Nikolai from this store.
I also dug up a video on how to work with a search probe and in general about war diggers. Interesting, I recommend watching it.
Hi all!
Nowadays there are various testers on sale, but in most cases the probes for them are of low quality.
There was a case where in the cold the wires of the probes broke like matches. So I decided to make the missing probes myself.
Stylus manufacturing process
Trying on a dart tip. It needs to fit the size of the pen tip. If it doesn't fit, you'll have to cut off the thread on the handle. If this does not help, then you will have to find other pens.

We take the tip of the dart and heat it with a gas burner. After sufficient heating, take a piece of solder dipped in soldering acid and throw it inside. We lower the wire there and wait for the solder to cool.

We assemble the dipstick. It is better to glue the tip.

Second set. Probes with needles for puncturing insulation. We take pencils with replaceable leads and take them apart.

We take needles and try them on instead of leads.

Solder the wires to the needles.

Insert the needle and wire into the pencil from behind. It may not work the first time; you need to hit the center of the pencil collet. The needles must be glued into the collet, otherwise they will go inward when pressed.

In general, everything is ready, all that remains is to solder the plugs to the wires and cover the probes with colored heat shrink. Be careful with the hairdryer! The plastic of office supplies may become deformed.

Pen caps came in handy too.

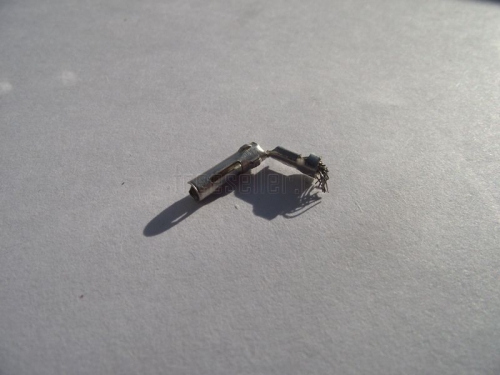
Addition. While disassembling the computer power supply, I discovered a connector whose terminals fit very well on all probes, including Chinese and Soviet ones.

Therefore, I decided to also make crocodile attachments. We remove the terminals; they are held in the block by latches. Press the latch with an awl and remove the terminal. We cut off the shank at the terminal and bend the latch inward.
We take the alligator clip, insert the terminal, and solder it.
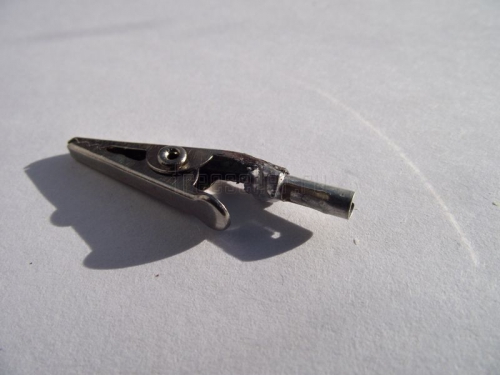
The crocodile is ready.


Thanks everyone. In conclusion, I will say that I bought wires with frost-resistant insulation with a cross section of 0.75 mm?.
Hi all! I would like to share a method for making reliable probes. When I bought the DT9208A multimeter, it came with probes, but they were made very poorly and soon became unusable. The weakest point of these probes is where the wire enters the plastic tube. There is no wire fixation at this point and if you accidentally pull the cable without applying much force, it will come off. This is what happened with my probes. So here’s some advice: to prevent the cable from coming off, you need to fix it. This can be done using regular electrical tape or adhesive tape.
But if you have the opportunity, it is better to buy high-quality branded probes or, like me, do it yourself. So, we will need:
Soviet plug. You can use another one, but it is better to be made in the USSR, since Soviet plugs have brass pins. It is not difficult to find such a fork; in extreme cases, you can buy it on the market. You can use this option. The main thing is to pay attention to the metal from which the pins are made.

When you find such a fork, you need to remove the brass pins from it. This is very simple to do: to do this, you need to unscrew the bolts from the top of the fork, and it will split in half. Next you need to unscrew the pins themselves. This is what the pins from my plug look like:

As I already said, we will take the base from the old probes that came with the kit. Namely, we need a plastic tube into which we will insert the pins from the plug. To do this, we need to remove the old probe pins with pliers. This is what you should end up with:

So, we have pins from the fork and plastic tubes from old probes. Now we need to prepare the pins for inserting into the tubes. As we can see, the pins are not straight, but in the shape of an “G”, so you need to cut off the excess with a hacksaw. Or rather, the part that is bent. In addition, we need to sharpen the pins. This can be done with a file or on a sharpening machine. We process them in such a way that they fit tightly into the plastic tube.
Next, we need to decide which wire we will use for the probes. I went to the radio market and chose the right one. It is better to take a wire with a thick copper core. The only such wires on our market were double speaker wires.

If you also bought a double wire, you need to carefully separate it into two using a blade or knife. Also, when purchasing a wire, you should choose the correct length. I bought a 1.5 meter long wire, although my original probes had less than a meter of wire. I don’t know about you, but I find it more convenient when the wire is long. So choose the length of the wire based on your own considerations, but not shorter than 0.7 meters, as it will be very inconvenient to use such probes.

When you go to buy wire, don't forget to buy plugs for connecting the probes. When purchasing plugs, take a multimeter with you to check whether the plug fits your device or not. But most multimeters will accept banana plugs. I bought these:

Now we have everything we need to make probes. The first step is to separate and strip the wire. Then tin all soldering points, i.e. the ends of the wires and the ends of the pins where the wire will be soldered. There is no need to tin the plugs, since the wire is inserted into them and clamped with a bolt.
Once everything is ready for assembly, thread the wire through the plastic tube and solder the brass pin to it. Then you need to pull the wire back so that the pin is inserted into the tube. Now you need to fix the place where the wire enters the tube and the place where the pin enters the tube. I did this using heat shrink.

The red probe turned out to be a little crooked because the wire was soldered not in the center of the pin, but on the side. But this does not affect the work in any way.
Now all we have to do is thread the other end of the wire into the connector and tighten the wire with a bolt and the probes are ready to go.

These are the probes I got:

The resistance of the probes came out to be 0.6 Ohm, which is quite good. The resistance of the original probes was about 1 Ohm, since the wire was thinner.

These are the kind of probes you can make with your own hands without much expense. Before buying probes, think about whether it would be cheaper for you to make them yourself? But if you are soldering SMD elements and you need thinner ends of the probes (like needles), then you can sharpen the brass pins () more strongly. Of course, if you have the opportunity to buy expensive branded probes, then buy them, but I decided to save money and buy parts. In addition, our market prices are very high. Good luck everyone! Especially for - Kirill.
Discuss the article DIY MULTIMETER PROBE
Greetings to all those who like to make something out of nothing. A treasure hunter I know approached us with a request to make him a search probe. It’s unclear why he needs it along with the metal detector, but that’s his business. He also brought the material, a meter-long pin and various bolts and nuts. The only thing I didn’t take into account was the strength of the stud.

We will do it our way.
Tools needed.
1. Welding inverter.
2. Angle grinder.
3. Sharpening machine.
4. Vise.
5. Hacksaw for metal.
Materials needed.
1. Steel reinforcement Ø10 mm.
2. Bolts and nuts.
3. Ball from the bearing.
4. Unnecessary drill.
5. Legs from an old Soviet-era TV.
From steel reinforcement Ø 10 mm. we cut off two sections of 50 cm each. We came across ribbed fittings, so we grind the ribs with a grinder with a flap disk and on a sharpening machine.


General view of the planned product.

The probe is supposed to be made collapsible; to do this, we will weld a thread to one piece of reinforcement and a nut to the other. It is better to use elongated nuts.


We clean the weld seams on a sharpening machine.

To attach the handles of the future probe, we weld two elongated nuts together, clean the seam and weld it to the piece of reinforcement to which the thread is welded. To the section to which the nut is welded we weld a thread for attaching removable attachments.


Now we make removable attachments for the probe. Since this part of the probe bears the largest part of the loads, we will make the nozzles from a metal stronger than reinforcement. For soft soil we will make a drop-shaped nozzle. We weld the ball from the bearing to the extended nut and process it on a sharpening machine.


For denser soil we make a pointed nozzle. To do this, we weld the shank of a broken or unnecessary drill to the nut.


We cut off the excess and process it on the sharpening machine.


Legs from a Soviet-era TV worked wonderfully for the probe handles. Screw it in, mark the desired size and cut it.


While working, I came up with the idea of welding another thread between the handles, so as not to carry a spare attachment in my pocket.


They did not paint the probe, since it is unlikely that any paint on this product will last long. And the case was lying around in the workshop for a long time, but it waited its time.
Anyone involved in treasure hunting and archeology is well aware of this simple tool. A search probe is a long, thin metal rod with a handle. The main performance characteristic of the probe is its ability to easily penetrate the entire length of the soil. Therefore, it is better to sharpen the tip of the probe. This applies if you decide to make the dipstick yourself. If there is no opportunity or desire to manufacture a probe, then you can buy a factory-made search probe. Factory copies can be equipped with replaceable tips for different types of soil, have a folding design, a rubberized handle, etc. You can buy a search probe in Moscow at a low price in our online store.
The search probe is especially useful for treasure hunters, people interested in archeology and war searches. Using a probe, you can check the soil for the presence of voids (when excavating dugouts, bunkers, cellars, basements, hiding places, etc.), probe the ground for the presence of deep-lying metal or clay objects, etc. By testing the ground with a probe, you can determine whether it is worth digging up a deep-lying object detected by a metal detector.