Homemade table made of wood with your own hands. We make a picnic table with our own hands: step by step instructions
This piece of furniture is one of the most versatile in use. The table can be a dining table, household table, installed in a living room, on a veranda, territory, in a workshop, and so on. In a word, it is impossible to do without it. But purchased products do not suit many for a number of parameters - size, design features, shape, or for another reason.
Given that the tree is relatively easy to cut, grind, make a table out of it according to your own drawing, with your own hands for a good owner is not a problem. Yes, and it will be much cheaper. Plus - satisfaction from such work.
room
This is ideally an extension, a barn, an empty garage, although a small area under a canopy is also suitable. To work with a tree on a site, in the open air, means to be completely dependent on the vagaries of the weather. If there are “square meters” suitable for making furniture, then you should worry about high-quality ventilation in advance. Natural is sometimes not enough (besides, it depends on the change in wind direction and pressure), and an exhaust hood is installed.

Arguments that if you use protective equipment, then you can work in a closed space, do not stand up to scrutiny. Wood dust will immediately settle on everything, including the sample with which some actions are performed. Neither an accurate cut along the line, nor a high-quality surface treatment of wood (not to mention the impregnation and finish coating with a paint and varnish composition) can not be obtained.
It is impossible not to take into account the fact that many preparations used for wood processing contain toxic components. For example, varnishes, paints, impregnations, if they are not natural, then harmful fumes are guaranteed.
Instruments
Their set depends on the extent to which it is planned to “ennoble” a simple wood structure, what shape to give it and a number of other nuances. If the master does not claim the elegance of a wooden table, does not aim to achieve its originality, then the usual carpentry set will be enough.
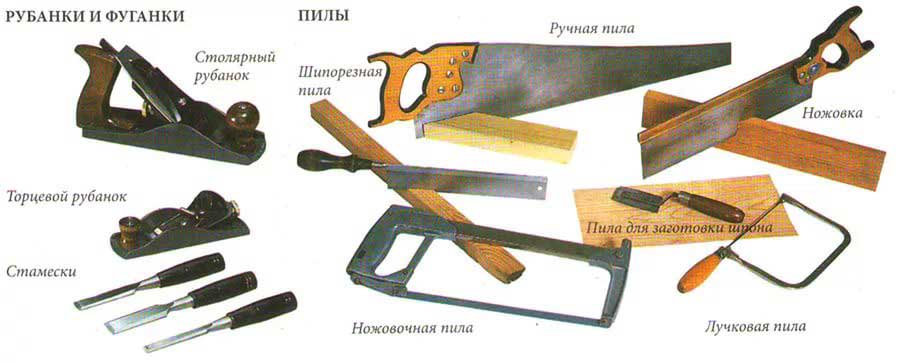
For more “fine” work in the process of making a table of unusual shapes, external design, special devices will be needed.
El / jigsaw. With a conventional saw, it will not work to make an inclined vertical cut, accurately maintaining the angle. The canvas will “play”, and therefore the quality of the work will be extremely low. The electric jigsaw is universal in use, besides it gives high accuracy in cutting wood or cuts in it.


Many of the listed fixtures can be rented if furniture making is not a hobby, but a necessity.
Impregnation and other compounds
Rotting protection:
- Working off engine oil is an effective, moreover, free tool. But not for dinner tables.
- Linseed oil. A natural and effective product that penetrates deep into the wood structure and protects it from mold and mildew. Minus - high cost. But if the table is intended for eating - a great option. The drug has no color, therefore, after processing the lumber, it does not leave any traces in the form of darkening, stains, streaks, unlike mining.
- The emulsion is water-polymer. It is characterized by duration of action and safety for health.
- Acrylic varnishes. They practically replaced their predecessors of the "NC" category, as they are harmless and in many respects better than compounds that are diluted with solvents.
- PVA, bone glue and a number of others. More detailed information about carpentry compositions -.

To decorate a tree:
- Colorless varnishes are used not only to protect the material from moisture. With their help, you can save the texture of the tree, shade it.
- Wood stains.
- Varnishes with a coloring effect (toning).
- Paints (but only for wood!).
- Putties.
Using a colorless varnish and pigments, you can make a coloring composition, and any shade. It is enough just to correctly determine the proportion of components. This is easy to do by experimenting with mixing and applying a sample to a rejected board. This will allow you to choose an acceptable tone. More than expedient, since it is not always possible to buy exactly what you need on the market.
Fasteners
All tips for assembling a wooden table with nails (the argument is simple, fast and cheap) are best ignored. The reasons are as follows:
- A nail easily pricks a dry tree (and this is exactly what is taken; more on that below).
- Correctly directing his leg (strictly vertically) is quite difficult. In some cases, it is even more difficult to redo your oversight.
- A tree, even the most protected from rot, eventually succumbs to it. The maintainability of a table knocked down with nails is extremely low. Practice shows that it is rarely possible to remove such fasteners without damaging adjacent structural parts. As a result, instead of the planned replacement of one element, 2 - 3 will have to be changed.
- When assembling a wooden table, if one glue is not enough, you should use only self-tapping screws.
- Sometimes its individual parts (at the joints) require reinforcement. It is not advisable to strengthen the strength with a hardware with a thicker and longer leg. The reason is the same - the probability of splitting the tree. For these purposes, metal strips, brackets, corners are used.

Features of the choice of wood
Someone focuses on the cost of lumber, another is important for the resistance of the tree to decay, for the third - its texture. What can you recommend to a novice furniture maker? Do not use for the table, unless it is intended to be installed somewhere in the back room or garage, the same type of wood. This is exactly what many novice "craftsmen" do, picking up the same type of boards and bars from what is left of the construction or repair and gathering dust in the barn.
When making a wooden table for living quarters, verandas, and so on, you need to take into account the properties of individual species. Naturally, if there is not enough experience in assembling furniture, you should pay attention to cheaper wood. The first table (chair, stool) in life is just a kind of training in manufacturing, gaining experience.
Tabletop. Here in the first place - strength and minimal absorption of moisture. It is on this part of the table that something is constantly spilled. The best choice is pine, larch, oak (although the latter is more expensive). Thickness - at least 3 cm.If the dimensions of the countertop are small, then wood-based slab products (OSV and the like) can be used. But only with lamination to prevent swelling of the material when liquid enters the surface of the table. For example, LDSP.

In the furniture industry, low-grade lumber is not used. This is not economically feasible, since pre-treatment of wood increases the duration of the production cycle. But in the manufacture of something, wood of lower grades, substandard - just right. The same pallets left after using stacks of foam blocks or bricks.
And not just because it's free or relatively cheap. Many of the disadvantages of such wood with a competent approach can be turned into pluses. For example, after coating with a colorless varnish, the countertop acquires a unique original look.

The main thing is that the boards do not have obvious defects in the form of rot, cracks, falling knots and wormholes.
If pine is chosen for the countertop (this also applies to many other conifers), then you need to pay attention to the location of the annual rings. These arcs are called humpbacks. The cuts of the boards show how they are oriented, and this is taken into account in the process of laying them in a row. Samples obtained by the tangential sawing method are arranged in alternation (pink down, the next one up); radial cutting - the same way (with arcs in the same direction). The nuance is insignificant, but it is the observance of this recommendation that eliminates the risk of warping and splitting of the boards.

For furniture, if you think about its durability, you should take only dry lumber. During the drying of the wood, it will deform; this is a natural process, and its consequences in the form of twisting, warping, bending are inevitable. Such a table will quickly begin to warp, and you will have to deal with its repair. And here you need to decide whether to purchase high-dry wood or rid it of moisture yourself. The first option is simpler, but such a tree is more expensive. The second will cost less, but there are a number of purely technical difficulties.
- Firstly, it is necessary to ensure a stable temperature regime in the place where the blanks are stored. Changes in its value will lead to uneven evaporation of moisture, which will negatively affect the strength of the tree.
- Secondly, good ventilation must be organized.
- Thirdly, and, perhaps, this is the most unpleasant moment - you will have to wait, up to about six months, depending on the initial moisture content of the tree. But this is not a guarantee that the result will be expected; Even this takes practice.
This once again confirms the idea that when starting to make wood furniture for the first time, one should focus on the simplest table for household needs from cheap lumber, without pretensions to its sophistication and originality of design. For example, for a barn, garage and the like.
Variants and schemes of wooden tables
It should be noted right away that any work related to the design and self-assembly is a creative process. There are no stereotypes in this business, so you can only take the model you like as a basis, and everything else - linear parameters, shape, manufacturing specifics - depends on the purpose of the product and your own imagination. Here are just a few examples of what wooden tables can be. For example, for summer cottages, small utility rooms, it is worth choosing structures whose geometry can be easily changed - folding, hiking, hanging, garden, level, and so on.
Tables that are supposed to be used for eating, playing games, as coffee tables for installation in living rooms for a specific purpose, are made stationary, that is, of unchanging size. These assemblies are more “solid”, since all articulated parts are fixed rigidly; no articulated joints.


Features of the assembly of wooden tables
If a person undertakes to make something, then he knows how to use the tool, read the drawings and work with lumber. Such a home master does not need to be taught the basics of carpentry. But a number of nuances in the manufacture of a wooden table will be useful to note. These notes will only help in the process of work.
Let's start with the types of connections. There are quite a few of them, but for a table that is assembled with your own hands, the following are quite enough.
On dowels
In this case, the parts are fastened by landing on the adhesive composition (Fig. 1 - 3).

The nuance is that for the manufacture of "cylinders" that are inserted into pre-drilled "channels", a tree of a denser structure is taken than the elements of the table. This is what ensures the strength of the connections. Before installing them, chamfers are removed from the edges of the dowels and holes.
These round sticks are commercially available, in any furniture store, in several sizes. To grind them, even with a carpentry machine, is a waste of time. It is not recommended to purchase plastic dowels for the table; they are used for collapsible connections. For example, frame furniture (walls, multi-level racks, etc.).
Nails should not be used to fix table elements (Fig. 4). Metal and wood differ in the degree of thermal expansion. Such a connection will not last long - a “shat” will begin, especially if the table is intended for installation on the territory or in an unheated room.
On the tsargs
It is advisable to make such connections if the table has to be either periodically disassembled, or without it it cannot be moved through the doorway. Although not all kings involve the dismantling of the structure. The most practiced options are shown in the figures.


Bolted
Such connections are mainly used for garden or outbuilding furniture; for utility tables. An example is shown in the figure.

The nuance of working with fasteners
In order for the self-tapping screw to be easily screwed in and “go” in the right direction, a hole is first made at the point of its installation with a drill, with a diameter slightly smaller than the fastener leg. The main thing is to maintain the coincidence of the center lines, that is, to prevent skew. In this case, for the "landing" of the self-tapping screw, you can do without a screwdriver.

Features of wood processing
Everyone knows that a planer is used first, an abrasive with a large grain, and then a fine one. But sometimes it turns out that the last stage, grinding, has to be done repeatedly. Here much depends on the type of wood and the degree of its drying. After applying the first layer of varnish, the villi may “stand up”. Nothing wrong with that. You should wait for the workpiece to dry and repeat its processing with an abrasive. The work is painstaking and takes time. But it is by this technique that you can bring the "problem" wood to the ideal "smoothness".
To eliminate the risk of injury to a person, all edges and corners of the table should be slightly rounded.
Features of the exterior
- Minor defects in the form of cracks, chips are eliminated with a putty composition.
- After sanding, all wood dust must be removed. In this case, an ordinary household vacuum cleaner with an appropriate nozzle will help out. After such cleaning, it is recommended to wipe the entire table with a slightly damp cloth, let it dry and repeat the cleaning of the remaining dust. After that, you can safely proceed to applying stain or varnish - there will be no “pellets” on the tree.
- You can give originality to the table not only with the help of curly cutouts, an unusual shape of the tabletop or legs, a combination of textures of different species, and so on. One of the good options is art painting.
And finally. Work on the independent manufacture of something from wood (the same table) is just the initial stage in mastering the skill of the “assembly designer”. Having worked out the technologies, techniques on wood, having acquired the necessary skills, it is enough just to switch to other materials - metal, plastic, glass. So the benefits of a wooden table, made according to even the simplest drawing (except for the pleasure of work and the money saved) are obvious - not wasted time.
It is difficult to overestimate the importance of the table, both in terms of domestic comfort and any interior design of an apartment or cottage. Moreover, a kitchen without a table loses its functionality, so the table is deservedly considered a necessary piece of furniture for this room. A huge selection of different models of tables that can be purchased in furniture stores does not detract from the desire of some of us to make a table from the boards with our own hands - according to our own project, with the personality and charm of a valuable handmade item.
The fact that you can choose any model, the shape of the tabletop and dimensions, as long as they are comfortable and suitable for the room in which the table will be installed, gives a special charm to the prospect of making a table with your own hands from the boards.
A few examples below will help you make your choice and help in the manufacture of the model that suits you. In addition, drawings on how to make a simple table from boards will help to more clearly present the future design and assembly processes.
Table 1. Sturdy and stable dining table for home
To make this table, we need tools such as a jigsaw, an electric drill, a screwdriver, a grinder. You can, of course, do without some of the above "helpers" by using a screwdriver and a bar with sandpaper fixed on it - just such a replacement will cause an increase in time and effort spent on making the table.
The material for the manufacture of the countertop is a grooved board, at least 30 mm thick. The tongue provides a tight connection of the boards, increasing the life of the table, since with this method of docking, the likelihood of food residues getting into the gaps between the boards is practically eliminated.
For the manufacture of the remaining elements of the table, an ordinary 50 mm board is taken.
- Boards, if they are not processed, must be thoroughly sanded - in addition to aesthetic considerations, this is required by elementary safety and practicality: a sanded board is easier to paint, and much less paint is required for such a surface;
- Cut out the details of the table:
- Tongue-and-groove boards for countertops, 230 cm long - 6 pcs.;
- Spacer board about 170 cm long;
- Bars for fastening the tabletop (their length must match the width of the tabletop, or be slightly less) - 4 pcs.;
- Bars for legs - 4 pcs., 2 pieces of board for their base.


To improve the appearance of the product, saw the ends of the fastening bars at an angle of 45 degrees, carefully cut the tongues of the outer boards, and slightly round the corners of the table top with a jigsaw.


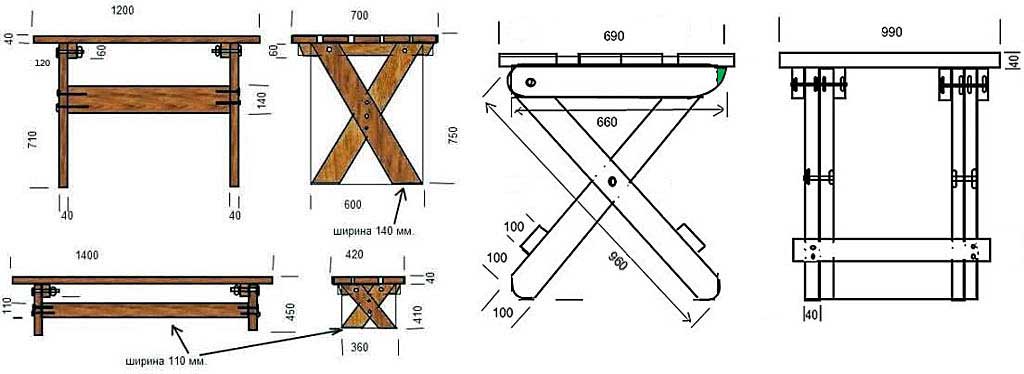
Table 2. The simplest table for a summer house or gazebo
Perhaps there is nothing easier than making this version of the table from the boards with your own hands, shown in photo 5. Table dimensions: 1200x740 mm, height - 750 mm.

For its manufacture you will need:
- Edged board, smoothly planed 40x140 mm;
- 2 bars 40x60x740 mm;
- 8 confirmations 70-75 mm long; self-tapping screws of various lengths;
- Chisel and planer;
- Electric jigsaw, drill with a special drill for konfipmatov, furniture key, grinder.
The first step is to assemble the countertop by fastening the boards with two transverse bars, placing them at a distance of 120 mm from both ends of the future countertop and using self-tapping screws, up to 80-85 mm long (so as not to reach the outer surface of the countertop). If ordinary boards are used, in the manufacture of countertops it is better to leave small, only 10 mm, gaps of the same width between them: through slots will prevent contamination of the countertop with food debris, without interfering with cleaning and without reducing its aesthetic appeal.
To achieve the same width gaps in the countertop, it is necessary during its assembly to lay a centimeter standard made of lath or other solid material between the boards.
Second step: assembling the table legs. On a sheet of chipboard or plywood, we draw a template - a rectangle with sides of 600mm (width) and 690mm (length). First, we make one pair of legs, then the second one in the same way: we lay 2 boards on the template in an X-shape, mark the lines of the upper and lower cuts of the legs, as well as the lines of their intersection - in this place the boards will be fastened together. We saw off the ends of the boards along the marked lines, and at the intersections with a chisel we select recesses 20 mm deep to connect "in half a tree". We fasten the legs with 35 mm self-tapping screws;
Third step- final assembly of the table. The drawing shows in detail how to make this simple table from the boards: thanks to him, the assembly process will not cause difficulties (Figure 6).
Table - furniture without which you can not do either in the city or in the country. The table can be placed on the veranda, in the gazebo or just in a shady place. Behind him you can dine, arrange feasts or play board games in the fresh air. Inexpensive, you can only buy a plastic, not large table, a large wooden table for giving is cheaper to do it yourself. The article will present three options for tables and drawings for their manufacture.
Table dimensions and construction features
The optimal size of the tabletop for a summer house is 80x120 cm. A smaller table will be significantly inferior in functionality, a large table will be too bulky and it will be difficult to clean it for the winter. The size of the table 80x120 cm will allow you to hold solemn feasts with the number of participants 8 - 10 people.
A table for a summer residence is easiest to make from boards. In addition, it is the most accessible and inexpensive material. The advantage of making a wooden table is that the boards can be sawn to the desired size at any construction base, and brought to the dacha without any problems, thereby saving on transportation. It should be noted that with a table dimensions of 75x80x120 cm, the longest board will be a table top board 120 cm long. A board of this length will fit into almost any car.
There are a lot of varieties of table designs, but by and large the difference is only in the form of legs on which the table top rests. Therefore, the legs of the table are the most complex element of the entire structure.
Table top
The tabletop at the table in the country is made of boards. The thickness of the boards can be from 30 to 50 mm. However, the best option is a board with a thickness of 40 mm.
An important point is cutting boards. With a worktop length of 120 cm, you need 5.3 boards 150 mm wide, 6.6 boards 120 mm wide and 8 boards 100 mm wide. Considering that the boards are sold with a length of just over 6 m, it is advisable to choose a board with a width of 100 mm for the countertop.
By choosing a board with a width of 100 mm, you will not have to adjust or resize the table top, which will greatly simplify the work on setting up the table. In addition, there will be 2 more boards 120 mm long, which can be used for other parts.
If you can’t get the right board, you can make the countertop not solid, but at intervals. Such a countertop will look no less interesting. At the same time, water that can accumulate on a table with a solid top will drain through the gaps between the boards.
Table with straight legs
A table with straight legs is the simplest design of a table for a summer residence. This is a stable, comfortable table that will serve well both indoors and outdoors.

Fig.1.
The legs for the table consist of 4 elements, 2 vertical posts and 2 horizontal ones. The upper horizontal rack is attached to the tabletop, the lower one is a support.

Fig.2.
Leg design may vary. For example, instead of resting on the bottom board, you can make sure that the support is on vertical posts, and the bottom board can be made as an additional one for strength.
Pay attention to this design, the connection of the boards is carried out without additional grooves. This greatly simplifies the assembly of the table. In order for all elements to be well fixed, it is necessary to glue all joints with wood glue. In this case, the boards can be connected with self-tapping screws.

Fig.3.
- Collect legs. To do this, you need to saw according to the drawing of the board. Treat the joints with glue and tighten with self-tapping screws or a confirmant.
- On a flat area, lay out the boards for the table top, mark the position of the legs and fix the boards of the table top through the top bar of the legs.
- Install a horizontal tie between the legs.
- Wait 2 - 3 hours until the glue dries and clean the table from burrs and sharp edges.
- Next, the table can be varnished. Or just treat with an antiseptic.
Table with X shaped legs
A table with X-shaped legs is essentially not much different from a table with straight legs, it just has a different shape of the legs. However, it is impossible to manufacture without creating additional grooves on the legs. This makes the job a little more difficult.

Fig.4.
Table legs consist of 3 elements. Two crossed supports and a vertical top bar. The top bar, as in the previous case, is necessary for fixing the table top.

Fig.5.
To connect the legs in inclined supports, it is necessary to make a slot in the floor of the board.

Fig.6.
The assembly order of the table is as follows:
- Cut the boards to the required length.
- In the legs make a groove in the floor of the board. The groove can be made with a jigsaw or a milling cutter.
- Collect legs. The connections are glued. Parts are fastened with self-tapping screws.
- The tabletop boards are laid out and the assembled legs are attached to them.
- Install the bottom screed board.
- Treat the table from burrs and varnish.
Table with benches
A table with benches is quite often installed on verandas or in the open air. Unlike the designs described above, it does not require additional benches or chairs, the benches are included in the design of the table.

Fig.7.
The disadvantage of this version of the table for the country house is that the design turns out to be rather cumbersome, and it becomes very problematic to remove it for the winter.

Fig.8.
The design feature of the table is that the benches are fixed directly on the legs of the table. The crossbars on which the benches are attached are at the same time a coupler of the legs, and the benches play the role of a longitudinal coupler.

Fig.9.
The assembly order of the table with benches is as follows:
- Cut boards to desired length.
- Assemble the legs and support for the flooring of the bench. The joints are glued and tightened with self-tapping screws.
- Mark the boards for the countertop and mount them to the legs.
- Fix benches.
- Treated with impregnation or antiseptic.
Examples of tables for giving

Fig.10.

Fig.11.

Fig.12.

Fig.13.

Fig.14.

Fig.15.

Fig.16.

Fig.17.
This kind of useful furniture, such as do-it-yourself wooden table is not only a way to save money or show off your carpentry skills to others. First of all, such a home or is an opportunity to make a thing that is ideal for the tasks assigned to it, both in size and configuration, in material and strength. And, if everything is done according to the instructions and recommendations of the masters, then making a new table will not be much more difficult than assembling the finished one, brought in a box from the store.
How to make a wooden table with your own hands
Before disassembling specific items and recommendations of what how to make a wooden table with your own hands, it is worth deciding whether you need to get a wooden product at the output and what exactly its design will be. Ideally, such a texture is suitable for, because the naturalness and ecological cleanliness of wood is the best match with the dacha concept.
But even in city apartments, especially in those whose design is decided in Provence, rustic, Scandinavian styles, small wooden tables, as if deliberately aged, fit perfectly. Yes, and a loft or other modern varieties can not do without a wooden texture, however, rather, plank pallets can be the main material there. They are more likely to talk about this type of furniture as about, since its assembly resembles the assembly of a designer. If you want just such a coffee table, then keep in mind that the pallets must first be well dried (so that they do not change their shape, they are not “led” after one season of use), bring all the boards to an absolutely even shape using a power tool, and after that paint. Therefore, think about whether you can spend the same efforts on making even a small do-it-yourself wooden table, video with a master class on which you will find on the net, but it will be durable furniture, which will certainly not go out of fashion for a long time and will serve its owner faithfully.
Do-it-yourself wooden dacha table
In most cases, we need advice on creating exactly do-it-yourself wood tables. There for this piece of furniture there is a huge number of tasks, we can safely say that there are not enough tables in the country. Therefore, a dining table, and a kitchen table, and a picnic table, round, for a gazebo or folding, with which you can sit on the terrace or on the river bank while fishing. And for each option there are individual tips for creating.

However, there are general guidelines that you can keep in mind when creating do-it-yourself wooden table, photo which you see in our today's article. This applies to the selection of wood, for example. It is believed that countertops, especially items that stand outdoors, should be hardwoods such as oak or walnut, but today with the availability of a large number of quality protective products and varnishes, you can easily use pine boards, which are much cheaper and , with proper processing, they will serve you for a very long time. If you want to practice intricate carving or carving, choose soft woods such as basswood, but be prepared for scratches or dents with too much use.

The second important common point in creation is the choice of a configuration suitable for it. You can take a look at completed projects do-it-yourself table made of wood, drawings which are, including, in our article. They already have dimensions, but this should be treated only as a recommendation. After all, what makes independent work good is that you have the right to make your own decision on size and shape. It is under the number of members of your family that you can choose the width and length of the countertop, and the shape is selected according to the height or parameters of the terrace, gazebo, inside which the furniture will stand. The standards are considered to be a height of 75-85 centimeters and a rectangular tabletop 120x70 centimeters.

Based on all of the above, the first step can be called the creation of a drawing, on which you will not only mark all the necessary dimensions, but also make an approximate cutting of the parts that you will need for assembly. You can use illustrations as an example. do-it-yourself table made of wood, drawings, photos which you see above. The diagrams show the sequence of actions that must be followed in order for the product to turn out to be stable. In general, the stability of the legs and the evenness of the surface of the countertop are two prerequisites for such. For evenness, you must observe the exact dimensions of the length of the legs and cut their lower surfaces well. The finished product can even be checked with a level whether it will stand in the correct plane. But there are different ways to be sustainable. For some, this is achieved using a different number of legs, that is, not the classic four at all corners of the rectangle, three or even one, strictly in the center. If there are four legs, then they are additionally supplied with stiffeners, supports and jumpers between themselves. By the way, it is very convenient to put your feet on such supports during a feast, this can be called another nice bonus.
DIY wooden tables and chairs
Set wooden tables and chairs, handmade made, will be an excellent option for filling the summer terrace, where you can have lunch and dinner in the fresh air. Even if there is a canopy or a roof above the headset, anyway, in this case, timely care and wood processing is very important before starting work. The boards should not have bumps, knots, holes, they should be completely dry so that later you do not get deformation during operation, because there will be plenty of humidity in the surrounding space. It is also a good idea to make the countertop and the top of chairs or benches not solid, but with gaps between the boards, which will allow rainwater to drain from the surface without stagnation.

One version of that, you can see in the photo. To do this, boards are taken, they should not be too thick, since on such surface deformation can be stronger, but not thin, so that sufficiently heavy pots or other utensils can be placed on the surface. If you cannot afford to make the entire product completely with the help of hard, valuable rocks, then you can combine it by making the countertop itself durable and resistant to damage. The model that we offer you is made on four points of support, so it is perfect for a stationary table that is fixed in one place. For fasteners, metal pipes are used, which are deepened into the ground and, if necessary, concreted.

First, the boards are knocked together, and special self-tapping screws are used, since ordinary metal nails can damage the material. The assembly takes place on two boards, which are located below, all the rest must be screwed onto them. After that, the surface must be processed using a manual or electric planer, of course, if you use an electric one, it will save you much more time. In the same way, the boards are cleaned, which will create the frame of the tabletop, as well as the beam for the legs. Final grinding with sandpaper is carried out after the product is assembled. You can cut the edge with a router both on a finished, assembled countertop and on boards, you just need to mark the borders if you want to repeat the rounded shape, as in our example.


In another example, the step-by-step production of which you see above, the countertop is literally assembled from scraps of boards that were previously used in repairs or construction. In this case, it is only very important that their thickness is the same, because they will be assembled by the ends. An interesting visual effect is provided by the assembly technology, because the boards are literally strung on metal pins and additionally glued. Then the legs are nailed to the surface, made at an angle of 45 degrees.

Do-it-yourself wooden gazebo table
If we single out the models that are the most complex and require special attention, then among them wooden gazebo table. DIY it is not so difficult to make it, but it is very important to correctly calculate its dimensions and fit it into the existing gazebo space as efficiently as possible. When we, then, nevertheless, we care more about its functionality than about some decorative properties. In the case of a gazebo, a place that attracts increased attention of guests, you need to take care of the visual decoration of the countertop. Both carving and interesting design with the help of cuts will be appropriate here.

As for the form, you need to be guided by the shape of the building itself, inside which the furniture will stand. That is, in a rounded gazebo, a square or round tabletop will not only look ugly, but also the space will be used extremely irrationally. That is, most often they use a simple rule - in a round gazebo they put a round table, in a hexagonal one - a hexagonal one, in a spacious and wide rectangular one - a rectangular one.
Do-it-yourself round table made of wood

Since the round gazebo is the most popular variety, we can say what exactly do-it-yourself round table made of wood and is the #1 model that home craftsmen want to make. The particular difficulty that distinguishes this particular shape is cutting out the shape, you need not to spoil the material and try to make a perfect circle.

For those who doubt their abilities and the evenness of their hands, we can advise a compromise option - buy a round finished tabletop and make furniture based on it. For a round top, it will be relevant to use a tripod system, which is shown in the photo above. First, a base is created, three boards are interconnected, legs are nailed to them. The last step is to fix the countertop on the screw in the center.
An integral attribute of any home is a table. Despite the fact that the variety of forms and materials of execution of this piece of furniture can amaze even the most demanding and sophisticated buyers, many amateur furniture makers try to make a table with their own hands. There is nothing complicated in this, because the design of the table is not much more complicated than an ordinary stool. Armed with a saw, drill, hammer and other tools, you will be able to assemble such a product in just half a day, and it will look no worse than the purchased one. One of the main advantages of hand-made furniture manufacturing is the possibility of creative self-expression. In addition, a do-it-yourself table can become a central element of any interior.
It's no secret that the main function of the table is to organize a place for dining and receiving guests. In addition, it often serves as a place for family pastime, during which you can enjoy various entertainments: playing cards, monopoly, lotto, dominoes, etc. In addition to significant savings and demonstrating your carpentry skills to others, making a table with your own hands provides a person with an excellent opportunity create a unique little thing that is ideal in all respects: shape, size, material and reliability. Following the instructions and recommendations of professionals, you will see from your own experience that this piece of furniture is quite capable of being made by yourself at home.
Today, various building materials are used for the production of tables: metal, glass, plastic, stone, but furniture is often made from such high-quality material as wood. To create a wooden table with your own hands, you can use soft (spruce, pine, cedar, fir), hard (birch, walnut, oak, maple, ash) or very hard (dogwood, yew) wood species that have good resistance to decay and mechanical influences.

Walnut has the most valuable qualities for furniture - it combines high hardness and excellent viscosity. If you are new to carpentry, it is recommended to give preference to furniture made of pine, birch and oak. Having decided to make an original pine table with your own hands, you can use cheap knotted boards, but they should not have falling knots, cracks, stains and traces of rot.
Before proceeding with the analysis of specific points and recommendations that will help you make a table with your own hands, it is important to decide on the design of the desired product. Due to the perfect combination of naturalness and environmental friendliness of wood with a country concept, a homemade wooden table will be an excellent option for garden furniture. A small do-it-yourself table made of wood, as if deliberately aged, will also fit well into the design of a city apartment made in Scandinavian or Provence style. It is noteworthy that in terms of the complexity of the work, this piece of furniture for most craftsmen is almost like a homemade wooden table, since a homemade table is assembled very easily. This fascinating process is reminiscent of assembling a constructor.