Straw garden paths. Do-it-yourself garden inexpensive paths
Creating garden paths with your own hands at low cost is a subject of tireless care and thought at the beginning of the arrangement of a new site. But it only seems that, once having arranged the transitions between important objects, you can calm down and no longer deal with this problem. Tracks tend to collapse under heavy use. There is also the problem of the impact of natural destructive conditions on them. The decision to make tracks with your own hands at low cost, that is, rationally and economically, with an unprofessional approach, easily turns into the need to update them after a short time. And the desire to create a truly original design project can lead to the fact that the paths in the garden will require a radical alteration in a year.
Creating garden paths with your own hands at low cost is a subject of tireless care and thought at the beginning of the arrangement of a new site.
The choice of means, materials and methods for creating the final chord of landscape design should be dictated not only and not so much by the low cost and not even the originality of the project, but by the need to create a truly durable and convenient means of transition.
Modern consumer-oriented industry has provided many options for those who, with some means, prefer to work on the site themselves. The use of such things can save time and solve several problems at once:
- lay out beautiful paths in the country (decorative and designed in a certain style);
- allow laying on any surface, carry it out with minimal time and improvised means;
- simultaneously obtain a durable and aesthetic structure.
In order to be convinced of this, it is enough to visit any hypermarket of building materials. Choosing the right material is only a matter of personal preference and the state of his finances. The most popular materials are:
- Garden parquet (specially treated wood). A rather expensive material that can also be used for terraces, arbors, verandas. It is easily and quickly assembled with the help of special tools and just as easily disassembled if necessary.
- Plastic plates. The path of them is equipped easily and quickly; they are made of frost-resistant plastic, do not slip, fit both in length and in width. This coating can be easily and quickly dismantled for the winter, and in the spring to lay paths in any convenient place. Such installation and dismantling make it easy to correct errors in calculations when country paths are laid in an inconvenient place or unaccounted moves are trodden.
- Plastic garden parquet. In appearance and the visual effects obtained, it resembles wooden parquet, but is much cheaper and more resistant to natural influences. The paths from it will last until you want to update them.
- Ready-made concrete slabs of small size. Concrete is a resistant and durable material, and the use of a ready-made form has its undeniable advantages: slabs can be laid without special preparation - directly on compacted dirt paths. True, their appearance will not be very aesthetic, but it is durable and functional.

Modern consumer-driven industry has provided many options for those who, with some means, prefer to work on the site themselves.
When buying ready-made styling products, it is best to consult a specialist who will help you calculate the required amount, give some practical advice. But with the use of such functional modules, in a day or two, the tracks in the country house will be equipped with their own hands.
Gallery: garden paths (25 photos + video)


Difficult and laborious
For lovers of thorough and labor-intensive work, associated with measurements, kneading, pouring and waiting for the result, there are tracks for perfectionists.
You can make a path with your own hands from concrete by pouring, from paving slabs, from wooden rounds, from natural stone, from river flat pebbles.
It should be borne in mind that even for a simple concrete pour, you will need:
- formwork;
- shovel;
- improvised concrete mixer;
- cement;
- sand;
- stone chips or gravel;
- covering material until the concrete is in place.
If the calculation of the necessary sand or crumbs is unsuccessful, such a path will begin to crumble over time and require additional refilling.

When buying ready-made styling products, it is best to consult a specialist who will help you calculate the required amount, give some practical advice
For laying paving slabs, you will have to prepare an even more impressive list of tools:
- wooden mallet;
- rubber mallet;
- tiles;
- Master OK;
- cord;
- rake and broom;
- cement, sand and gravel;
- manual rammer;
- level;
- channel;
- hose.

Do-it-yourself path can be made of concrete by pouring
Paths from paving slabs are laid out for a long time and thoroughly:
- Sod is cut.
- Layers of sand and cement are poured.
- Geotextiles are laid for strength.
- The tile is cut at the end to fill in the places where unformatted pieces of space remain.
- A curb is laid out to secure the path.
But it's worth it. Everything will be like in the best houses, that is, beautiful, stylish, decorative and fashionable. A few days spent on work will more than pay for itself with the appearance of the site. You won't be ashamed to post a photo. It is quite possible to make such paths in the country with your own hands.
The most difficult and original in choosing how to make a garden path are transitions from round river pebbles and wooden roundels. This is a real challenge for those who like to put thousands of puzzles on long winter evenings or collect ships in a bottle with tweezers. It will take several days to prepare the base, which would reliably withstand and fix such handmade masterpieces. And in order to lay out the paths with small pebbles (and even whimsical patterns), it will take even more time. If you wish, you can have fun with this all summer long, carefully selecting pebbles according to the pattern, format and shades. Only a path made of plastic bottle caps can compete with this, the photo of which was posted by its proud author.

It will take a long time to collect the required number of covers, but the paths will be no worse than the mosaics in Rome.
Paths in the country from wooden round logs should be made, focusing on sawing material. The only thing to remember before deciding on such a laborious process is to carefully study the technology of wood processing. Just putting wooden rounds on the ground means that you will have to make a new track next year. The earth will sag, the tree will crack, the path will become unusable. Therefore, the process is expected to be long and complicated. These do-it-yourself tracks will be very convenient. Natural stone for paths is very reliable, fashionable and, with a certain skill, also decorative.
With limited means and quickly
The simplest solution is to leave the already trodden dirt paths. This comes with some inconvenience in rainy weather, but is extremely budget-friendly and delightful in its simplicity. A slightly more complicated process is to fill the curbs from improvised material or wooden slats and fill the space between them with stone chips or gravel. There are many tips on how to make paths in the country without spending much money and effort. For example, you can use waste building materials left after the construction of a country house. This is much cheaper than making a lawn path wide enough for a lawnmower to pass and maintaining it so that the grass grows exceptionally evenly.
Having a personal plot, you immediately want to equip it, ennoble it. And then plant, and this ... Fantasy is in full swing, and there are so many ways to realize your plans! We just need to understand what exactly we want and HOW to do it? And you don’t need to immediately rush in search of a newfangled designer, calm down, you can arrange everything YOURSELF! And our site will help you make the right choice.
What can give each garden a special individuality, exclusivity? Of course, garden paths!
There are many different types of garden paths that can be made at low cost. And there is nothing complicated in their manufacture, and the savings are obvious. Having done everything with your own hands, you will save on the services of a designer, and by correctly “seeing” and selecting materials from those already available on the site, you will also reduce these costs to zero.
The most popular country paths from improvised materials, which you can easily make with your own hands, we will now take a closer look at:

- Here's everything you need to get started:
- Gravel (pebbles, expanded clay), at the rate of 1 ton per 15 m ^ 2;
- Dense film or geotextile;
- Sand;
- Boards made of wood or concrete on both sides of the track.

- Mark your future path on the plot, draw all its turns and bends (if any);
- On both sides of the future path, dig in the sides of wooden blocks, or concrete strips;
- Remove the top layer of turf along the entire path by 15-20 cm;
- Take a geotextile or a dense film and lay it along the entire path, while trying to put the edges under the sides of the path;
- Sprinkle the cleaned place with sand for 5 cm;
- Carefully level the sandy surface;
- All preparatory work is completed, now you can finally start filling the prepared space of the path with gravel;

- That's all the difficulty when doing a gravel path!
Related video: the secret to a quality gravel path
Paths made of natural stone are considered the most durable and durable. However, to make them, you will need to purchase natural stone, if one is not available in your area.
- Prepare the following materials:
- Booth or chipped cobblestone;
- Sand;
- Sand compacting tool.
Stages of laying a stone path:
Work should begin with marking the future path, after which the turf should be removed from the place along which the path will be laid. Moreover, the largest of the stones you prepared will indicate the depth to you (dig 5-10 cm more than the largest stone);

Then you should fill the entire path with sand and evenly level it, the height of the sand embankment should be about 10 cm;
Lay the stones on the sand, pressing them well into the sand. For large stones, the distance between the stones can be up to 8 cm, subsequently it is covered with earth and, for beauty, can be sown with grass. For a small stone, a distance of 2-3 cm will be sufficient. Such seams are subsequently sealed with a cement mortar;
The stone path is ready! Do you have installation difficulties?
Do-it-yourself concrete garden paths
For concreting garden paths, modern manufacturers have come up with a special plastic frame. With this device, your concrete garden path with their own hands will appear in the garden very quickly and will not require any extra time or delivery of the stone. What materials are needed for garden paths - sand, fine gravel or small gravel, cement, water.
Related video: Concrete garden path, mold for making
- We prepare the path in almost the same way as the gravel one, only the trench under the path should be dug 20 cm wider than your finished path will be.

- We take out the excess soil and tamp everything down well;
- Fix the formwork with pegs along the entire path on both sides;

- Attach transverse rails to the formwork every 2.5-3 m. This will help protect the concrete from cracking during operation;
Apply the form to the prepared sections of the track and proceed to fill the form with cement mortar. At the same time, it is very important to ensure that the entire form is filled with cement evenly and that there are no voids anywhere. If you still haven’t noticed the void that has formed somewhere - don’t worry, apply the form again and fill it with cement - everything will be fixed;

Thoroughly compact the concrete with a heavy flat object, possibly a board;
Move from one section of the track to another. At the same time, cover the finished one with polyethylene - so as not to inspire debris on the freshly prepared and not yet completely cured concrete;

Fill the space between the cement tiles with earth and sow them with herbaceous plants - it should turn out very beautiful!
The remaining spaces around the path (remember, we dug a larger trench than necessary) can be lined with bricks, covered with earth or small pebbles.
Related video: We concrete the garden path with our own hands
An excellent and very popular material for your garden path can be an ordinary tree. Thanks to the variety of colors and textures of wood, you can get a unique and very beautiful path!

We will send the material to you by e-mail
T it is difficult to imagine a well-groomed garden without garden paths, enveloping flower beds and arbors. Originally designed, they not only perform a utilitarian function, but are also part of the landscape. The coating can be the most diverse, the main thing is that it is not difficult to care for it, and it is strong enough to last for decades. The task of any summer resident is to make garden paths with their own hands at low cost, but with optimal results.
Garden path can be made from ordinary boards
Choosing the style of the trail, you need to consider the overall design of the residential complex. You can classify garden paths according to the material used:
- Gravel. Behind the simple structure and the attractive appearance of such a coating, significant drawbacks are hidden. Such coatings are difficult to clean from foliage and snow, they will not tolerate the arrival of vehicles.
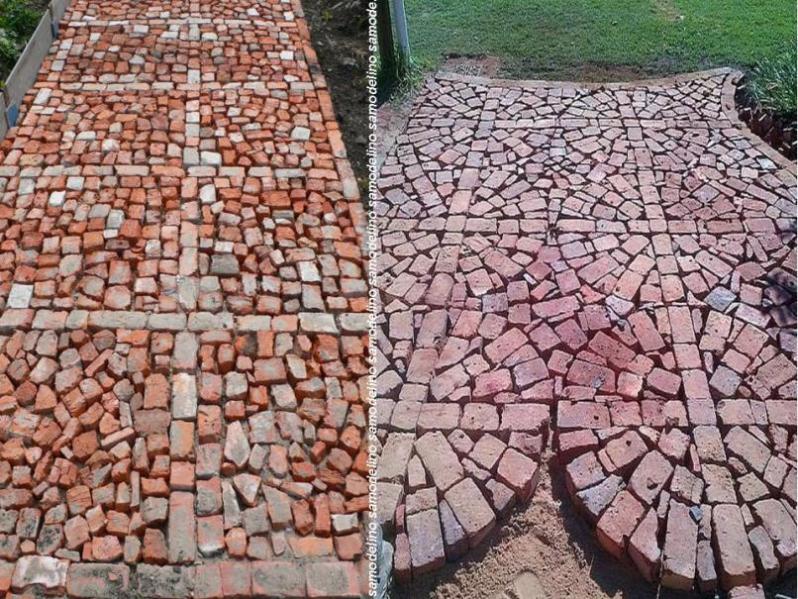
- Brick. Such a coating is not expensive, it can be laid without special skills. If you use not a simple solid brick, but clinker material, the path will last a very long time.

- Concrete. Making a concrete walkway in the country with your own hands is not as difficult as it seems. Materials for work are available at a price. If you tint the concrete and use figured forms, you can achieve excellent results.

- Wooden. Paths made of cuts of tree trunks look very original. If the wood is treated properly, it will not decompose for a long time.

- Herbaceous. Green paths require careful maintenance. They need to be cut regularly, watered in drought and planted. But on the other hand, they fit perfectly into any summer cottage landscape.

- Ground. This option is suitable only for temporary use. In wet weather, dirt will stick to shoes, they can become overgrown with weeds.

Related article:
Molds for making concrete garden paths
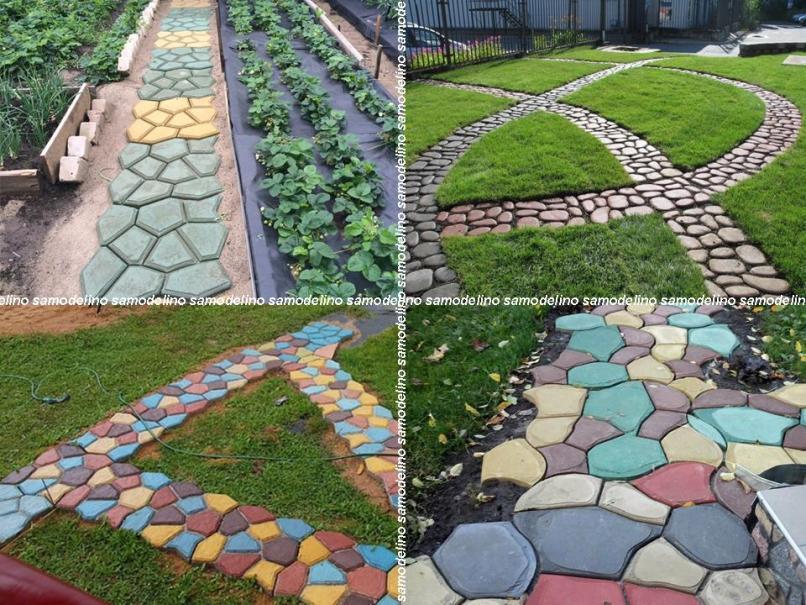
One of the most affordable options is paths created using a mold for making garden paths. Such a coating is able to withstand a solid load, for example, the passage of a tractor. Plastic molds can be bought at the store, their average cost is about 900 rubles. Working with them does not require special skills.

Before you start pouring, you need to remove the top layer of soil by about ten centimeters and prepare a sand and gravel cushion. After the form is installed and poured with concrete composition. After 10-15 minutes, the form is removed and rearranged to another place. You can use such a sidewalk for its intended purpose in five days. Dyes can be added to the cement composition.
Important! It is necessary to pour concrete on a damp base and, after pouring, during the solidification period, moisten it, preventing cracking.
The form for concreting can be made independently from boards or iron. After the formation of the solution, sand is poured into the gaps between the tiles.

Sand and gravel paths
Do-it-yourself garden paths can be made at low cost from crushed stone, gravel or special colored backfill. Such sidewalks, among other functions, will also serve as a burglar alarm, it will not be possible to pass silently along them.
Helpful information! Gravel paths can only be laid on flat areas, on slopes and depressions, gravel will roll and collect.

Backfill coatings do not tolerate even geometric lines. They should be sinuous and curly. The top layer of soil is selected along the contour of the future path. Geotextiles must be laid at the bottom of the trench, it will not allow the material to “leave” into the ground. The edges are fixed with curb tape or laid out with pebbles. You can lay large flat stones among the gravel.

Do-it-yourself brick paths: photo of masonry options
Often, on a suburban area, after construction or repair work, a simple brick remains, which can be an excellent material for paving. To work, you will need a shovel, a building level, a rubber hammer, manual tamping, sand and cement. As with any other coating, it is best to remove the top layer of soil by about fifteen centimeters. A pillow of gravel and sand is laid on the geotextile. The following do-it-yourself brick walkway photos show different patterns:


Having decided on the pattern, first set the borders. Their role can be played by the same bricks placed on edge or finished elements. Then, bricks are installed on a flat surface (this must be checked with a building level). There should be a small distance between them, which will later be filled with sand. During installation, the bricks are slightly knocked together and leveled with a rubber mallet.
Wood and other materials
A colorful and unusual version of garden paths - from saw cuts. Hardwoods are particularly durable. Oak, acacia, beech saw cuts are the best choice.

The tree trunk is cleaned of bark and cut into pieces 10-15 centimeters thick. Each element must be treated with drying oil. If it is not at hand, you can use the usual mining. After the saw cuts dry out, you can start laying. The base is prepared in the traditional way, using geotextiles and a sand and gravel mixture. Geotextiles will allow moisture to pass through, but will not allow weeds to grow through the coating.

The cuts are placed on the pillow. This work requires a certain diligence: each element differs in size and shape, you need to select them so that there are as few empty spaces as possible. Small spaces are filled with saw cuts of thick branches. You can use small pebbles and pebbles for voids. After some time, the tree on the path will darken, this is a natural process.
Helpful advice! So that you can walk barefoot along the path, it is better to sand the upper side of the cuts.
Natural stone paths will be a logical continuation of the alpine landscape. Large flat stones of different sizes and colors are stacked together with small ones. A special chic is the paths of colored pebbles laid with patterns. Such a garden path will require a lot of time and patience, but the result is worth it. Stones are laid on cement mortar. Such coatings are almost eternal, do not fade and do not need to be looked after. DIY garden paths, photo of pebble paths:


Do-it-yourself garden paths can be easily and quickly made from ready-made plastic modules at low cost. They are sold in garden stores and are relatively inexpensive. Elements can be removed for the winter and washed if necessary.

Article
It is unnecessary to prove the need for arranging paths in the country: without them, in bad weather, you can neither pass nor drive. Of course, I want them to be both reliable and beautiful. It is clear that the paths in the country serve us for a limited time, and a small number of people use them.
In such a situation, it makes no sense to spend significant funds on garden paths.
Techniques for arranging inexpensive paths
The total length of the paths in the country can reach hundreds of meters. Simple calculations show that a lot of materials are required for their arrangement. Consider a few tricks that will help you decide what tracks can be made cheaply from:
- use as few materials as possible;
- apply the most budgetary components;
- use improvised means;
- do-it-yourself track elements;
- use local materials;
- use economical options and technologies.
We make budget trails on our own

If we talk about standard options, then the most inexpensive garden paths are obtained from local bulk materials: crushed stone, pebbles, sand and gravel. If the path in the garden of bulk material is properly arranged, it will turn out not only cheap, but also beautiful.

Cement-based paths will cost a little more than bulk ones. An economical option can be obtained by equipping a cover with a width of only 60cm. To reduce costs, broken bricks and local rubble stone can be used instead of crushed stone for concrete preparation.
The method of execution is very interesting. In this case, it is possible to make budgetary and at the same time beautiful coatings. Note that the construction of a track of this kind requires a lot of time.

Of course, graceful and durable paths in the garden can be made using natural stone. In this case, in order to make paving inexpensively, thin layers of material should be used.

A great option is to use bulk material in combination with natural stone, concrete, brick and wood. In this way, you can make a cheap and original coating. Of course, you will have to work hard with your own hands to implement a non-standard solution. In this case, you can use the technology of manufacturing bulk tracks.

Another way to reduce the cost of coating is not to make it solid, whether it be concrete, stone or tile. The option is quite acceptable for those places where they do not go very often - a lawn, a flower garden, paths between the beds.
We use improvised materials for paths in the garden
A cardinal way to reduce the cost of pedestrian pavement is to use the available material at hand. At the same time, it is quite easy to ensure the exclusivity of the path, and if you try, the durability and quality of the pedestrian pavement in the garden will not suffer either. You just need to carefully look at what material is available and get acquainted with possible solutions.
Budget paths made of wood, bark and grass

If you have an old withered tree at your disposal, you can make a beautiful path out of it. Unsuitable pallets can be dismantled and a covering made of planks can be built.
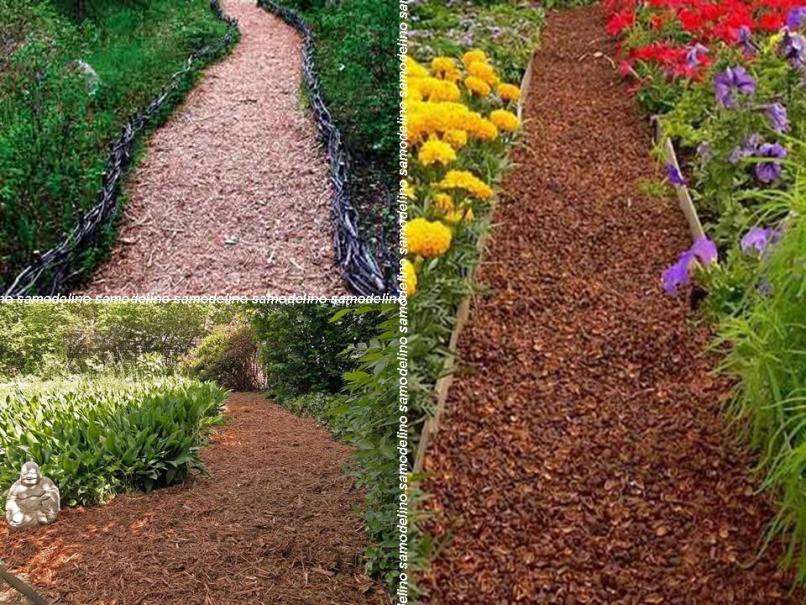
More than one season, a budget path made of bark, poured on flat and compacted ground, will last. The coating will be more stable if you first prepare a trench 10 cm deep for it and fill it with sand. Next to the trail, a miniature wattle fence made of branches will organically look.
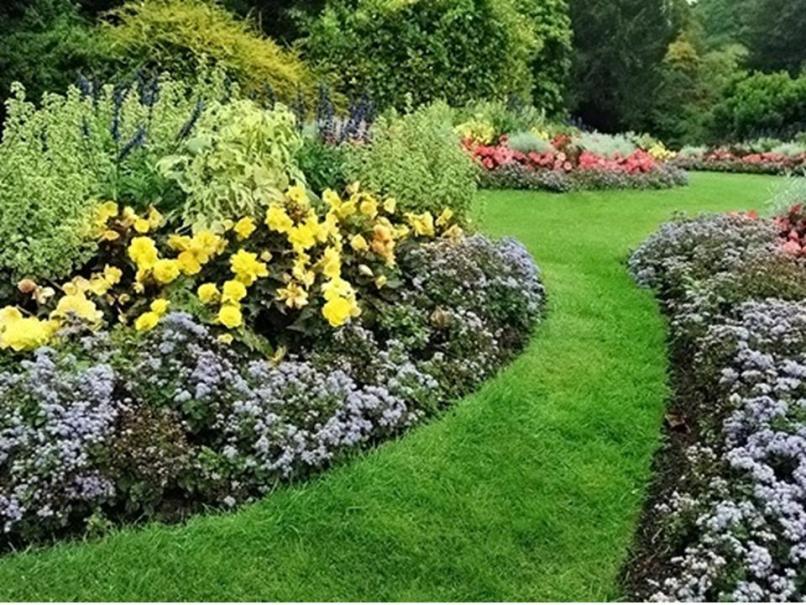
The living path made of grass looks attractive, and it is quite inexpensive. It is pleasant to walk barefoot on the lawn, but if you do it too often, it will quickly lose its charming look. It is better to plant the green path with ryegasse or bluegrass. You can buy packaged seeds for sports turf. The grass should be cut, watered, fertilized.
Inexpensive and reliable tracks made of tires and asphalt waste

When repairing asphalt roads, the old coating is often cut off. The resulting crumb is inexpensive and will last a long time in the yard. The material is poured in an even layer on a flat and compacted ground. Then it is heated until softened with a blowtorch and rammed. The crumb is fastened, and a reliable coating is obtained. Of course, it is better to equip the curb near the path.

The most inexpensive garden paths can be made from car tires. The resistance of tires to moisture, sun and frost is beyond doubt. The coating does not become slippery during rain.
From the tire of a passenger car, a strip with a length of a strand of 2 meters is obtained. This means that to cover a width of about 60 cm and a length of 2 m, three old tires will be required. We stock up on the necessary number of tires and act according to the following plan:
- We level and ram the surface of the soil under the future path.
- Cut off the sidewalls of the tires with a jigsaw.
- We cut the tire tread across every 30-40 cm. It is better to use a grinder, since the jigsaw cuts the wire cord of the tire with difficulty.
- We prepare U-shaped staples measuring 50X25mm from wire. The best option is 3mm galvanized PVC coated wire, which can be cut from the appropriate mesh.
- We put adjacent fragments of the coating on the board and drill holes in the tread with a diameter of 4 mm for staples. They are placed 25mm from the edges of the rubber opposite each other.
- We insert the staples into the holes and bend from the back.
- We collect the track of the required length and put it in place. Elements of the canvas can be painted in different colors.
Economy version of paths from bottles, plastic corks and broken tiles

Plastic and glass bottles are free materials for arranging paths. This type of coverage has the following features:
- beverage containers are not afraid of frost, sun, moisture and serve for a long time;
- protrusions on the bottom of the bottles provide a massage for the feet;
- the track has an original look;
- when it rains, the surface becomes slippery.
A path of plastic and glass bottles can be built according to the following scheme:
- At the site of the coating, they dig a trench a little deeper than the height of the bottles.
- The bottom of the groove is leveled and covered with a layer of sand 5-10 cm.
- Plastic bottles are filled with sand or gravel.
- The container is installed upside down at the bottom of the trench. A board is laid on top, which is tapped with a hammer to level the canvas from the bottles.
- A mixture of cement and dry sand is prepared in a ratio of 1:6. The composition is poured into the gaps between the bottles until completely filled.
- The path is moistened with a garden watering can.
As follows from the photo, glass bottles can also be used to equip a curb for the track. To mount such a fence, a groove is dug under it, sand is poured and rammed. The bottles are placed on a cement mortar prepared in a ratio of 1:3.
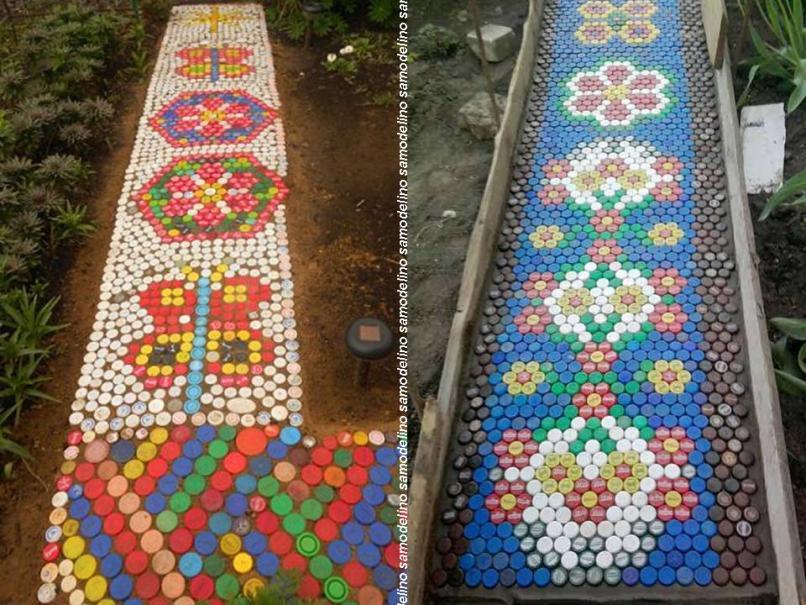
The colorful canvas of the track can be equipped with plastic bottle caps. Cork paths do not fade and are not afraid of the influence of the atmosphere. However, when it rains, the covers can become slippery.
The corks are placed in a hardening mortar of the cement track. Then the coating is leveled by tapping on the board laid on the coating. To simplify installation, fragments of the mosaic of corks can be pre-fastened with fishing line through the holes in the sidewalls of the covers.

Homemade cement-based country paths are easy to decorate with broken tile mosaics. Such material is sufficient after completion of construction work. Fight tiles can also be purchased very cheaply from the respective store.
It is more convenient to use tiles of approximately the same thickness.
In the simplest case, to obtain a mosaic, pieces of broken tiles are pressed into a hardening solution and leveled by tapping on a board laid on top. To equip a beautiful and large canvas, do-it-yourself mosaic tiles are laid according to the following scheme:

We examined examples and methods for arranging inexpensive, convenient and beautiful paths on the site. In most cases, they need to provide
Neat paths gracefully winding between green spaces and landscape decor are an essential attribute of any garden. So, if you want your site to be truly well-groomed and complete, by no means neglect the paths. Fortunately, for their arrangement you do not need to spend fabulous sums and involve professional designers - you can make beautiful paths with your own hands, seriously saving both on materials and on work. How? There are many answers to this question, because there are a huge number of types of garden paths that can be laid at low cost. Next, we offer you instructions for the most popular options with accompanying photos and videos - after reading them, you will definitely be able to effectively ennoble your site.
The original path from saw cuts of wood
Wooden round logs are a very simple, but original material for garden paths. Raw materials for them can be found at every site - for sure, there are old trees everywhere, which it would be time to replace with new seedlings. It is advisable to use larch or oak - they are the most resistant to external influences, which means they can boast a long service life. The path of saw cuts is made according to the following scheme:

Advice. In order to protect the path from moisture and increase its durability, equip the simplest drainage - pour a layer of fine gravel between the sand cushion and the cuts.
Durable stone paths
One of the most durable garden path options is natural stone. Here you can use cobblestone or but - they are equally durable. The path is laid out as follows:
- Mark out the garden path.
- From the area where the path is planned to be laid, remove the top layer of the drain. The depth of this layer should be 7-10 cm more than the height of the largest stone prepared for the path.
- Fill the resulting trench with a 10 cm layer of sand, carefully level it and compact it.
- Alternately lay the stones on the sand cushion, pressing them firmly into the base. The distance between small stones should be no more than 2-3 cm, and between large ones - up to 8-10 cm.
- Carefully fill the remaining gaps with cement mortar. When the track sets, fill the seams with earth or fine sand to make them look more natural.
Classic concrete paths in the country
Concrete is a traditional material for laying paths, which is always popular due to its low cost and ease of use. Everyone can definitely make a cast track:
- Mark the boundaries of the path - drive in pegs along its contour and stretch the wire between them.
- Within the marked contours, dig a small trench - up to 30 cm deep.
- Lay on the bottom of the base a layer of gravel 5 cm and the same layer of sand. Seal the resulting pillow.
- Cover the base with a chain-link or any other thin metal mesh.
- Install lumber formwork along the perimeter of the future track.
- Prepare a cement mortar: 1 part dry cement, 1.5 parts sand, 2 parts gravel and 1 part water.
- Pour the cent and evenly, with vibrating movements, using a spatula, distribute the composition over the entire area of \u200b\u200bthe track. During installation, pierce the mixture with a rod to prevent the formation of voids.
- Using the rule, finish the alignment of the path and cover it with polyethylene.
In 3-4 days the track will be ready. During this time, remember to gently moisten it with water to protect the concrete from cracking and give it maximum strength.
Advice. To make the path more interesting, even before the concrete mixture finally sets, “drown” various decorative pebbles, glass or shells in it.
Budget garden paths made of tires
Transport tires have long been widely used in summer cottages: they make flower beds, ponds, swings, and now also garden paths. This trend is not surprising, given the performance characteristics of the material: tires are resistant to moisture and temperature extremes, easy to care for, do not slip and are durable. You can equip a garden path from them like this:
- With a knife, divide the tires into two parts: rolling tracks and sidewalls. To make the knife easier to enter into the rubber, regularly lubricate it with oil or soap.
- Cut out the resulting rings of ribbon. Trim them to length and trim the edges.
- Take wide wooden boards and carefully fasten rubber bands on them with nails so that they completely cover the wood - there should be no empty spaces between the elements.
- Remove the top layer of soil with a depth of no more than 5 cm along the entire length of the future path and press wooden boards into the base. If desired, the rubber can be painted.
Country paths made of bricks
Another traditional material for garden paths is brick. It is recommended to use clinker products, as they are characterized by high resistance to various kinds of chemical and mechanical influences. It is important that the bricks are intact and without chips, otherwise the path will turn out not only unaesthetic, but also unsafe.
The track is laid out like this:
- Mark the path: drive a peg around the perimeter and pull a rope between them.
- Dig a trench along the marked contour - up to 25-35 cm deep.
- Along the trench, lay the limiters from the bars or boards.
- The space between the limiters, that is, the "body" of the track, cover with a 10 cm layer of gravel and carefully compact it. Lay a layer of sand no more than 5 cm high on top.
- Remove the limiters and make curbs in their place: on both sides of the path, lay one row of bricks in the “on the ribs” position.
- Form the interior space of the path with the bricks: lay them in their usual position, gently tapping with a wooden spatula or rubber mallet so that they sit down.
Advice. Bricks do not have to be laid closely - to give the path a more original look, leave small gaps and fill them with pebbles. In addition, you can not even close the gaps - after a while, grass will sprout in them and decorate the path.
Variety of wooden walkways
Wood is one of the most fertile materials for making garden paths, as it can be used in completely different guises. Consider two common options: board paths and bark paths.
Site preparation in both cases looks the same:
- mark the path and remove the top soil - about 20 cm;
- lay geotextiles on the resulting trench;
- top with a 10 cm gravel layer.
Further technologies diverge. So, if you are making a path from boards, prepare the constituent elements: adjust them in length and width and treat with an antiseptic. If desired, you can give them a sinuous shape. Further along the edges and in the center of the trench along its entire length, install wooden supports and fix them with cement mortar. The final stage is to nail already prepared planks to the supports.
If you want to build a path from the bark, make sure that the material is durable - it should not crumble. Be sure to treat the bark with an antiseptic. Before fixing the material in the trench, lay a sand cushion on its base, and then drown the bark in it.
Tiled garden paths
Although tile cannot be called a very cheap material, it is still used very often for the manufacture of garden paths. There are several reasons for this: aesthetic appearance, good performance and ease of working with the material. The technology of laying a tile track will convince you of the latter:

Now you know many interesting ways to make a garden path with your own hands at low cost. Following simple instructions, you can implement any of the above options on your site, so feel free to get to work and discover new opportunities for ennobling the garden area.
Garden paths in the country: video
DIY garden paths: photo


