Carved circles made of wood for cash. Real art: how to make carved window frames with your own hands
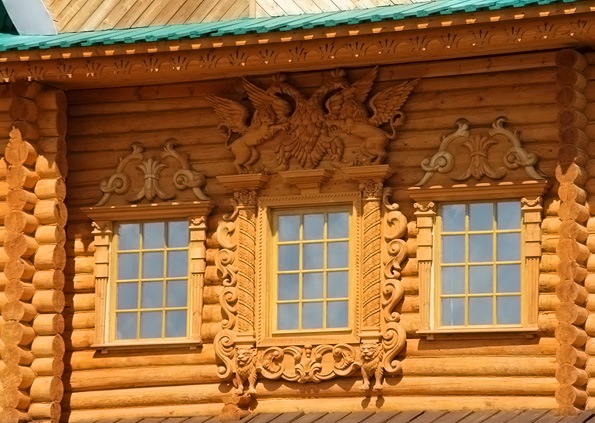
Platbands are a decorative part of a window or door structure, which allows you to transform it and make it original. They have been used since ancient times and still have not lost their relevance. Even if we take the old Russian huts, not one of them could do without a window casing. They complemented the design and created some color. In addition to the frame, the wooden frame looked impeccable. Look at the photo to see this.
What is the advantage of such platbands? What functions do they perform? How to make window frames with your own hands? All this can be found out by reading this article.
Let's start with getting acquainted
These products appeared quite a long time ago, along with glazed windows and mica. Initially, they were intended to cover insulation and windproofing. But decorative items that had patterns and were distinguished by beauty were found among the ancient Celts. But the true dawn of window frames is the period of the revival of Rus', which was marked by the overthrow of the Mongols. Russian woodcarving masters were famous throughout the world. Platbands on windows in a wooden house photo
But at the same time, window frames were unrecognized by the Bolsheviks, who considered them relics of philistinism and intended to destroy them. Although in our time, such decorative elements, which make it possible to ennoble a home, are being revived. What are they like now? What are their features and pros and cons? Now it is difficult to overestimate the demand for platbands for windows and doors. They allow you to create traditional decor and protect the window structure. Here are the main advantages of the products:
- They serve as a decorative element, decorate the building and visually expand or stretch it.
- Complement the architecture of the structure. And it is simply impossible to imagine the Russian style without platbands.
- They protect the space between the wall surface and the window opening. With them, dust and humidity are not a problem.
- Allows you to reduce heat loss and noise levels.
But, in addition to obvious advantages, window frames in a wooden house also have their disadvantages:
- wood is an excellent building material. But, it requires proper processing and protection from external influences;
- during operation, platbands require regular treatment and maintenance;
- do not quite fit with metal-plastic windows.

Note! There is an option to combine wood with metal-plastic windows. However, then everything will need to be done in one color so that the window frame looks harmonious.
If we highlight the functions of window frames, then they perform decorative and protective functions. It is noteworthy that there are different types of platbands. Let's look at them.
Types of products for wooden windows
Why many people love this or that material is the large number of options that differ from each other in materials, design, price and other parameters. After all, the more choice, the easier it is to choose exactly what everyone likes. Not everyone remembers the era of the Soviet Union, when it was impossible to boast of diversity. Today, users have access to a variety of types of platbands. In fact, they are similar to each other, only they differ in the installation method, material and price.

So, let's start with installation. You can find two types of platbands on sale:

What is the difference? The first option is the simplest and, so to speak, classic. It has been used in construction for a long time. It's quite easy to work with. Installation is carried out on top of the window frame. It will protect the structure from the sun, moisture and dust.
But telescopic platbands are considered more modern. Their installation is carried out in the space between the wall and the window opening. For fixation, additional fastenings in the form of screws and bolts will be required. But thanks to this, the platband is more securely attached to the height and width of the window.
For wooden houses, telescopic platbands are better suited. The advantage is their convenience and reliable protection of the room and preventing deformation of the window opening. The catch is that installation requires removal of the window frame. For a wooden house this can be problematic. For self-installation, it is better to resort to the use of overhead products.

The trim for windows in a wooden house can also vary in material used. Here are the types of products:

Let's start with wooden products. The advantage is their simplicity, versatility and practicality. They can be installed for any interior. You can also make them yourself. Products can be ordinary or carved with patterns. To do this you will have to use templates or stencils. Then a beautiful ornament will decorate the window.

This is the type of platbands that are most amenable to processing. You can use them to make a work of art or just create simple products. This is why designers love them so much that they introduce them into their projects. After all, the same plastic trims cannot be processed in any way. But wood also has some disadvantages. It does not tolerate temperature changes and high humidity. The structure may change and the casing may become deformed.
The same cannot be said about plastic products for windows. They are also used for wooden houses. The material has many advantages. It is practical, convenient, cheap, lightweight and durable. In production, plastic frames are created in various shapes and colors. One cannot help but rejoice in the fact that the surface can imitate natural wood and other materials.

Plastic is less susceptible to deformation and is not afraid of moisture and temperature changes. Thanks to this, products can last longer than wooden ones. If we talk about installation, then everything is also simple. No additional fasteners are required. The platbands are simply fixed to the built-in elements. Due to this, the front side has no holes or visible marks from nails.
One cannot fail to mention the main disadvantage of plastic. We are talking about artificial components in the composition of the material. If the building is wooden, then few people want to introduce a touch of artificiality into a natural and environmentally friendly house.
And finally, let's look at MDF trim. We can say that MDF products are something in between the first and second options. The MDF board itself is made from waste wood and its residues. This means that the products will be natural. And thanks to the special compositions in the impregnations, the product can last a long time and is not afraid of moisture.

As for the disadvantages, one can note one - low strength. Plastic and wooden window frames are much stronger. But everyone decides for themselves which type of platbands to choose for their windows. You need to build on the available means, the advantages and disadvantages of the material and personal preferences. But, when your goal is to make window frames with your own hands, then the choice is obvious. You need to stop at a tree. How exactly can you make them? This is what we will consider.
A few points before creation
You need to understand that platbands on windows in a wooden house should not prevent the sashes from opening, at least not less than 90 degrees. As for other parameters, everything is chosen according to personal preference. Fastening occurs using spikes or the half-tree method.

If the design requires it, then the upper part of the platband is further expanded. It is popularly called kokoshnik. To create a specific pattern on it, you need to use templates. With them the work will be done much faster and easier. The lower part is made according to the same principle. Only now it must be made with a bevel so that water flows down it.
Advice! The thickness of the upper and lower parts should be different, namely the upper one is 1 cm thinner.

Small slats are placed on both sides of the opening, which will hide differences in the walls, of course, if there are any. The final fastening is carried out after precise adjustment of the joints. By the way, in the case when the shutters open towards the street, the platbands will have to be mounted 3 cm above the window.
Selecting a pattern for the platband
The first stage of creating platbands with your own hands is choosing their appearance. It directly depends on the pattern of the products. They are the ones who help create that Russian flavor. It is clear that complex and intricate patterns can only be created by qualified craftsmen. But, in our era of accessibility of information and auxiliary tools, everyone can do this. Templates will become indispensable assistants for beginners.
It is noteworthy that now even professionals use templates and stencils, because they do their job perfectly. A stencil or template for the platband consists of several elements:
- Bottom bar.
- Top bar.
- Vertical slats.
In addition, sometimes the template has additional decorative details, such as hangers, flowerpots, etc. Some of the templates can be seen below.
All that remains is to choose the best option for yourself and get ready for the next stage.
Creating a Frame
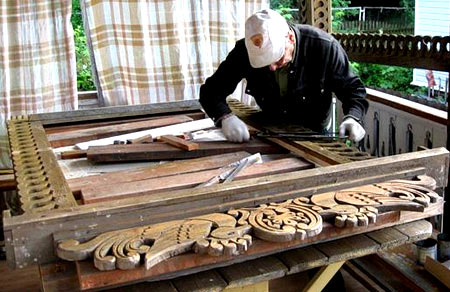
First of all, a frame is created from the prepared elements. Its installation is carried out using spikes fixed in the hole with dowels. To create these spikes, a jigsaw is used, but if you don’t have one, you can use a regular hacksaw with fine teeth. A knife is used to remove sawdust. The frame is the basis of our platbands. Next we will transform it.
Do not forget that the width of the finished casing should allow the doors to open freely. The platband frame is made 2-4 cm larger than the window frame. Now let's talk about making the platband. Let's look at the step-by-step instructions:

That's all the work. All that remains is to install the platbands. Creation is not as difficult as you might think at first. You just need to make high-quality markings and carefully cut everything along the contours. We invite you to watch a video that will help you create platbands for a wooden house with your own hands.
Mistakes to Avoid
It is impossible not to consider some manufacturing errors that lead to common problems. Here is the list:


I would also like to remind you that before starting a task, it is better to calculate in advance all production costs (time and money). This will show whether it’s worth doing everything yourself. If you do not have the proper skills, it would be easier to buy window casings.
Let's sum it up
Those who own wooden houses have some advantages. One of them is the possibility of creating original Russian design in combination with wooden window frames. These are excellent products that help protect the window structure and make it more attractive. At the same time, everyone has a choice - to make them with their own hands, or spend from 2.5 to 15 thousand on average on ready-made platbands. And to make it easier for you to install them, we have prepared a visual video on this topic.
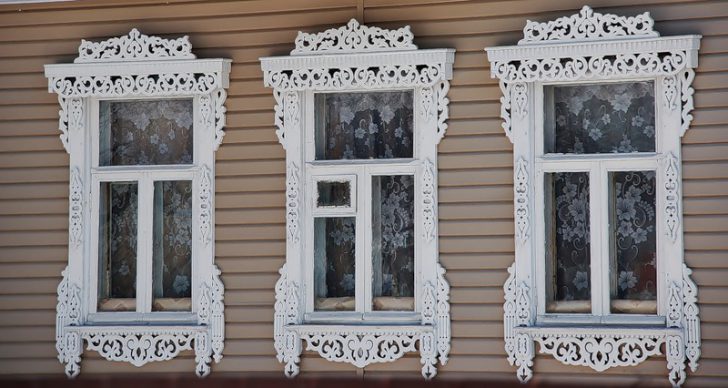
Carved platbands serve as an incredibly beautiful decoration for wooden residential buildings. The owner can make such elements with his own hands, which will add individuality to the residential building. The part has its own characteristics. One side of the casing is straight. The second is a figured carving.
DIY carved wooden frame
The framed windows on the façade evoke memories of grandma's house in the countryside. The structural element - the platband - serves as reliable protection from drafts, noise, rain, snow and dust. It completely covers the gap formed between the window frame and the opening. The carving gives the part an attractive appearance. The whimsical pattern can be modern or borrowed from ancestors.
The master must first decide on the method of manufacturing the platbands:

If desired, the master can combine two different types of carvings together.
Repair of dilapidated platbands
If the owner of a summer cottage inherited a house, then dilapidated frames may remain on the windows. Damaged items that cannot be repaired should be removed. Replace them with new parts. Carefully remove the old paint layer.
Wood is a soft material, so it is easy to damage. How to remove old paint depends on the thickness of the layer and the presence of damage. If the previous paint coating is thin, without cracks or blisters, then the surface of the wood is treated with sandpaper to remove the gloss and painted with appropriate paint.
 The process of repairing carved platbands
 When the surface has been painted in several layers or there are swellings and cracks on it, then the coating cannot be left. It is scraped down to wood with a metal spatula.
The thin layer of old paint does not need to be completely removed.
It is also necessary to remove paint from wood when you plan to use another type of coloring composition. When incompatible substances interact, they destroy wood and coatings. To protect the wood, coat it with a special primer and apply new paint. 
Preparatory stage
Prepare the necessary tools and materials for slotted carving:
- planed edged boards from coniferous trees with a thickness of 18 - 20 mm;
- a simple pencil;
- carbon paper;
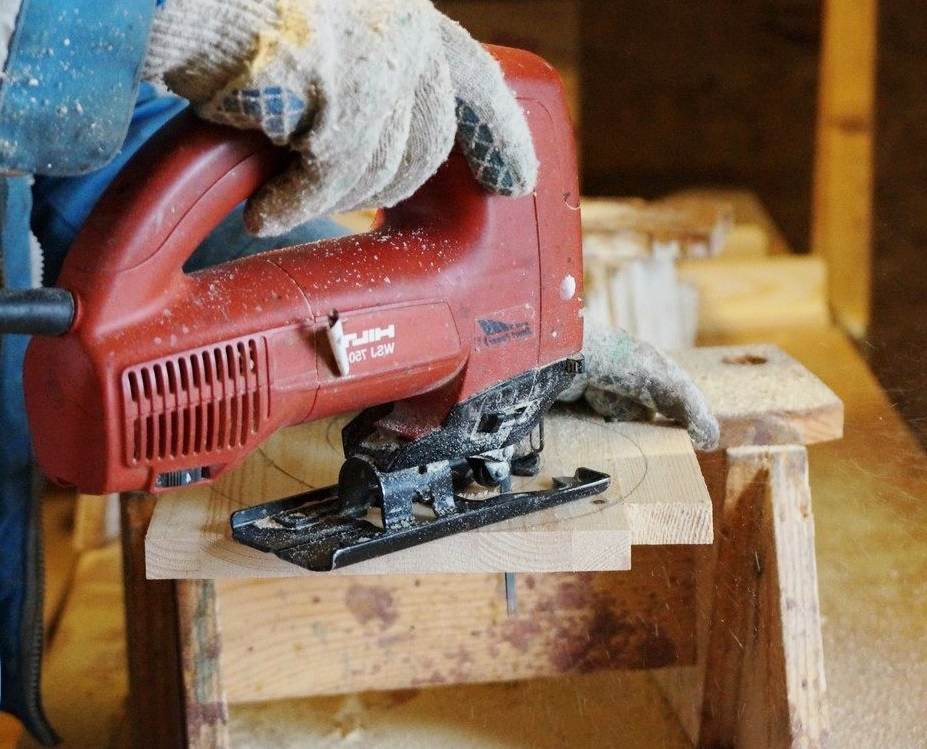
- jigsaw
Instead of a jigsaw, you can choose a set of chisels and knives, but an electric hand tool has a number of advantages:
- house carving is performed quickly, accurately, and with high quality;
- compact dimensions;
- light weight;
- the ability to make straight and curved cuts;
- making round and rectangular holes with different diameters.
Professional carvers note that a universal jigsaw is convenient and easy to use. When choosing a tool, power is of paramount importance. Using a household jigsaw, you can cut wooden trims for windows with a thickness of less than 70 mm.
Read also
Decorative carved panels
 Carved window casing ready for painting
 The professional model has more capabilities: a jigsaw cuts wood with a thickness of 80–135 mm. The cost of high-performance tools is influenced by the presence of additional functionality.
What equipment is required to work with a jigsaw?
The following items are often included with a jigsaw:
- replaceable files;
- several screwdrivers;
- lubricating fluid;
- storage case.
The master will also need a table on which the tool will be mounted at the workplace. This handy tool lets you move the material instead of the jigsaw. This is necessary when processing small parts. By attaching a replacement plate to the support platform, optimal gliding can be achieved.
Carving with a jigsaw
The process of manufacturing carved elements is carried out in several stages: 
Making a sketch
The jigsaw begins only when the master has prepared the templates. Those who are trained will help you execute exactly what you want on wood. Take your time to get to work on wood as quickly as possible. Let you have not one sketch, but several. Sculpt the pattern to feel its volume. When choosing a design, you can start with simple elements of an openwork pattern, characteristic of slotted carvings in Russia.
Look for inspiration in the contemplation of immortal masterpieces of folk art. You can look at samples if you look at furniture in the Baroque or Rococo styles. Select a sketch of a baroque ornament used by Russian master carvers. The pattern depicts national characteristics. Rococo motifs include motifs of plant elements, small birds, curved shells, and fancy curls. 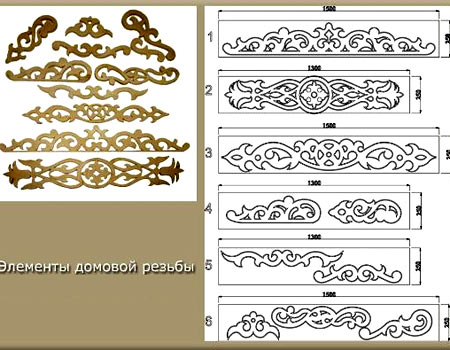
in any of the above-mentioned styles involves the preparation and execution of complex technical compositions for window decoration. House painting contains all the richness of traditional patterns.
Any woodwork is available to skilled craftsmen today.
Modern CNC machines do an excellent job of bringing a sketch to life. With the help of high-precision equipment, any design idea can be easily realized.
Multifaceted and sophisticated elements can cause admiration among others. House carving can be represented by a combination of different types. In order not to spoil the future product, be sure to use templates or stencils to make markings. House paintings from the past are a rich source of inspiration, in which you will find all kinds of Russian ornaments.
Creating a template is the best option
In the process of making a template, the following steps are distinguished:

Select a file and install it in the tool
Never use saws designed for working with metal.
Buy wood saws for window frames in advance. It's better to take the whole set. These parts can quickly wear out and break.
 A selection of sketches for carving platbands
 It is difficult to cut according to the intended markings with a jigsaw with a narrow file, but with it complex shapes will be obtained accurately. The quality of the cut and the lifespan of the jigsaw file depend on how correctly the file was installed. The tension should be optimal.
Please note which files you don’t need to buy for a jigsaw:
- The nozzle is selected in accordance with the maximum possible length of the cutting part for a specific jigsaw model.
- Do not buy files with kinks. House carving will be of poor quality due to the bending of the blade of the cutting part. The quality of the cut will deteriorate or it will become impossible to make it completely.
Hand-made window trims are a wonderful decoration for the facade of a house (ready-made stencils and templates will be given in the article below). They make the house unlike any other, visually changing its proportions.
Today, with certain skills, you can independently create elegant frames for windows in a wooden building. Moreover, they can be made not only from wood, but also from other materials.
Specifics
 When the owner decides to install platbands, he strives to arrange traditional decor in his possessions.
Platbands have the following advantages:
- Excellent decorative function. This visually enlarges the building.
- Complementing the overall style of the architectural design.
- The space between the window opening and the wall plane is protected from moisture and dust.
- Heat losses and noise levels are reduced.
- The individual features of the house and the style of the chosen era are highlighted.
Platbands also have some disadvantages:
- Wood needs certain treatment to prevent high humidity and deformation.
- Products require regular care and treatment.
- They do not harmonize with metal-plastic windows. In this case, the platbands are made in the same color scheme.
Create your own templates
 Today there are many platbands. Their types are determined by the methods of their installation to the window. According to this criterion, there are two varieties:
- Telescopic. Their specifics: L-like protrusions that coincide with the grooves of the window frame.
- Invoices. Installation takes place on the window frame. Fasteners - construction glue or nails with screws.
For your information: finished samples are created in full size. They are printed in compliance with the required parameters.
An elegant solution is the installation of carved products. It is possible to independently implement such plans only if you have special equipment.
Popular materials

- The most common material for platbands is wood. Products made from it have an elegant and harmonious appearance.
- Plastic versions are also often used. They are characterized by strong resistance to temperature changes and ultraviolet radiation. Plastic options are sold ready-made.
- Another popular material is MDF. It is prepared from wood waste. It is more environmentally friendly than plastic. In addition, products made from it have a look reminiscent of natural wood.
- Polyurethane. Variations from it are highly practical. Facade stucco is often made from this material.
The nuances of choosing the right wood
 As already noted, wood is the most popular material for platbands. And the performance characteristics of wooden platbands depend on the type of wood used.
Here we usually pay attention to such options.
- Hard deciduous. These varieties include oak and beech. They are very durable. But it is quite problematic to create patterns on them.
- Soft deciduous. These are: linden, aspen and alder. They are easier to process. Patterns are even created on their surface by hand. And such surfaces are thoroughly treated with special means.
- Cherry and apple tree. They are optimal for creating small components that can be attached to the base.
- Pine and birch. They are also easy to handle. And they have excellent working qualities.
- Various combinations of wood types. The use of special protective compounds for powerful impregnation here is mandatory.
With the help of high quality wood, a beautiful original design of the window opening is obtained.
The nuances of creating templates with your own efforts
The basis of the work comes down to creating stencils and design.
Printing stencils on your own is something that everyone can do. It is important to achieve a combination of the chosen ornament with the entire style. Mixing geometric and floral patterns is not allowed.

When working on platbands, the following subtleties are taken into account:
- There should be harmony in the color palette of the walls and decorative elements.
- It is imperative that the appropriate parameter is selected correctly. The platbands should not be very wide or small.
- A high-quality version of the coating is selected. Special paints and varnishes are used.
- A template is required for making external carved components.
- The pattern is correctly positioned on the workpiece. The details follow along the wood grain.
When it is possible to achieve a color combination of platbands and the plane of the walls, a complete and harmonious facade is obtained.
Manufacturing stages
Before creating window decor, carved platbands are selected from photographs. You need to make a template in advance. It should turn out to be the same for the design work of all openings.

The following methods for creating patterns are usually used:
- Overlay thread. It has separate pattern elements. They are attached to the same base.

Installation of overhead components should be on the base in compliance with the template pattern.
- Slotted thread. Here they make a through ornament. It looks like wood lace.

For all working methods, the presence of stencils is mandatory. This is what they look like:
Advice: For simple patterns it is not necessary to make a large-scale stencil. A piece of notebook paper is enough.
 Also in your work you must have the following tools:
- Jigsaw.
- Hacksaw (oriented for wood).
- Knives and chisels.
- Drill.
- Milling technology
Platbands must be created from prepared materials. The working stages are:
- Meticulous measurements are taken.
- The selected tree must be dry. If it is wet or humid, then it must be brought to dry conditions. The width of the boards is determined by the parameters of the window opening. The thickness of the material reaches at least 3 cm if a slotted thread is made, and at least 1 cm when an overhead thread is made.
 All workpieces are pre-treated with a protective compound. They are cut using templates. And the cutting of ornaments is done using a jigsaw. It is better to use different types of files for this tool.
Working with an electric jigsaw requires certain skills and special care. The created holes must be filled. An excellent tool for this is sandpaper. After powerful grinding, the part is treated with special impregnation.
Next, all prepared parts are installed on the base. Here you need to use glue or special nails. In such work, it is better to avoid using self-tapping screws. They will cause the products to crack.
Installation specifics
 The created platband can be attached to the desired position using the following methods:
- On a dull thorn. Installation of such parts is carried out on the inside. Special holes should be made in the frame for them. Glue is applied to the spike and distributed evenly. The tenon is inserted into the groove. This fastening protects the platbands from dust and moisture.
- Using a through tenon. The joint area here is thoroughly treated with varnish.
These techniques are justified when working with a wooden window. To attach to metal-plastic, a special powerful liquid glue is used.
Required care
 The installed platbands require constant attention and care. For processing, special preparations are used - powerful impregnations. They create high-quality protection against:
- wood pests;
- appearance of cracks;
- sudden fire.
Carved versions must be coated with a primer, then varnish or paint. The intensity of such treatments is once every 3-5 years. This way the service life of the products will be seriously extended, and at the same time their attractive appearance will be preserved.
When installing plastic or metal products, no special care is required. It is necessary to provide high-quality protection against corrosion for products. Periodic paint updates are also required.
Thus, it is very possible to independently make platbands of extraordinary beauty with elegant patterns. Some carpentry, carpentry and tool handling skills are required. This way you can decorate window openings in a very original way and add an elegant twist to your chosen architectural style.
How carved frames are made using the slotted carving technique, see the following video:
Reading time ≈ 4 minutes
Decorating the facade of the house is an important step. Since ancient times, people have tried to make the face of their home unique by covering the space near the door and windows with intricate carvings. Our ancestors attached sacred meaning to each turn they made and hoped that these golden laces would protect their home from the penetration of dark forces. The fashion for antiquity leads to the fact that today ancient traditions have become again in demand. In this article we will talk about how to make window frames with your own hands.
Project
Any business should start with a project. First, they draw the façade of the building, taking into account all the actual details. Then you need to make a drawing of carved window frames. You can also use the drawings and diagrams presented on the site.


Using a visualization program, if you have one, you can make a 3D design of the house. It will show you everything in its entirety and will allow you to evaluate how appropriate the wooden window frames you like are appropriate.

When the design documentation is ready, a set of tools is prepared that will be useful for the upcoming work.
- screwdriver;
- feather drill for wood (12 mm);
- a jigsaw, preferably with a soft start, without it it will be difficult to cut out complex elements;
- Sander.
You should take care of the material for future platbands. Traditionally, high quality pine boards are used, which have a minimum number of knots. If there are knots on the surface of the boards, then the cuts must be made in such a way as to prevent a knot from getting into place.
Sawing out platbands

The manufacture of window frames begins with cuts that need to be made from the inside. First, holes are drilled along the contour of the pattern, where it is planned to make openwork patterns in the future. The video shows that when working, the drill must be held perpendicular to the surface of the board.


When the end-to-end patterns are ready, cut out the outer contour.

The tool must be guided from one end to the other, the direction does not matter. Pre-cuts are made in the middle part.

The result is a finished part for window decoration. Next, a similar one is made in mirror image to be used on the opposite side.
Surface grinding

To give the wood an optimal appearance, it is processed using a sanding machine, the sanding wheel of which should have a grit of 80. The result is a smooth surface, ready for painting.
Primer and painting

Before painting, the wood is treated with an antiseptic, which will protect it from rotting and bark beetles. This composition must be applied to the entire surface, not missing even hard-to-reach places. Scrupulousness in work will allow the platbands to last for many years.

When the composition is applied, you need to thoroughly dry the workpieces, and only then begin painting the parts. The best option is water-based paint intended for woodwork. The window frames in a wooden house are painted in the color specified in the project. For this project we use two colors of paint: white and cherry.


The work is carried out using 2 brushes: wide (50 mm) and narrow (20 mm). The first is for painting external surfaces, the second is for internal ones.


It is necessary to carefully paint over the parts, leaving no uncovered areas. After the first layer has dried, apply the second.


One layer is enough. They are careful in their work. Smudges can completely ruin the overall picture. Products should dry under normal conditions - in the open air.
Assembly
It is better to assemble the blanks into a single composition on a horizontal surface. This is much more convenient than directly on the window.


For log buildings, carved platbands simply beg to be used for decorating window openings. Making them yourself is not at all a whim or an attempt to save money, because there are very few really good woodcarvers now.
Minimum required tools
The production of platbands, in contrast to artistic wood carving, involves repeated execution of the same type of operations, resulting in a rather primitive repeating pattern. Therefore, most of the work is done with an electric tool: this not only increases the processing speed, but also achieves uniform quality in different areas.
 1 - jigsaw; 2 - drill; 3 - belt sander; 4 - vibration grinder; 5 - manual router
The main work is done with a jigsaw and drill. The tool must be reliable and of high quality, capable of being in continuous use for a long time. To clean and polish products, it is better to use an electric grinder, at least a simple belt grinder. Quick finishing of the relief is possible using vibration-type machines.
If you intend to add additional small details to the edges of your product, you cannot do without a router. Slopes, chamfers and figured borders can also be done manually, but only if you have a variety of chisels, cutters and specific skills in working with wood.

How to choose wood
Hardwood species are best suited for platbands: oak, birch, ash, maple, alder. Since the thickness of the finished product is relatively small (30-45 mm), hard rocks will be less susceptible to rotting and drying out, and therefore will retain their appearance longer.

If you plan to decorate carved frames with flat-relief elements with many small details, you should give preference to softer species with a fine texture pattern. Linden, poplar, aspen, walnut and spruce are suitable.
The wood for platbands must be selected and, preferably, chamber dried, with a moisture content not exceeding 12%. The presence of traces of warping or other pronounced defects or large branches is not allowed. Ideally, you should immediately order calibrated boards with a width of 100-150 mm and a thickness of 30-40 mm.

The length of the blanks should be sufficient to completely cover the window opening horizontally and vertically with an overlap in each direction of 1.5 times the width of the board. It is important that you initially calculate the number of required blanks and, in addition to them, purchase several more boards of the cheapest species for training and practicing carving skills.
Making templates and stencils
Almost any wood carving begins with applying a design to the workpiece according to a pre-made template or stencil. There are plenty of thread diagrams online; the main difficulty comes down to transferring the lines onto the part exactly and without distortion. Let us warn you right away: do not chase the high complexity of the drawing. A set of even the most primitive elements in the correct sequence and with well-chosen indents impresses with its modesty and quality of processing.


The first option for applying markings is to make a small pattern from plastic or hard sheet material, on which a single element of a repeating pattern is applied. Such a template is sequentially applied to the workpiece and outlined with a pencil.
It is also possible to produce a one-piece template. You need to take a strip of paper of the appropriate width, fold it like an accordion several times, and then cut out the pattern according to the principle of a Christmas tree garland. The resulting tape must be glued onto cardboard or LMDF, and then cut out the desired shapes. This method is welcome for a significant amount of work.

The resulting stencil is subsequently simply applied to the board and outlined with a soft pencil. Ideally, rich but precise cutting lines and boundaries for further processing should remain. When marking out the details, you need to take into account the layout of the pattern so that the platbands form a solid and complete outline, and the repeating pattern is not interrupted inappropriately.

Sampling through holes
The first step is to trim the edges of the workpiece and make holes in the center. Everything is simple with the edges: we cut out the excess with a jigsaw, retreating 1-1.5 mm outward from the marking line for subsequent processing. To cut out shapes in the center of the plane, drill the part at the very line of each cutout, then select the inner contour with a jigsaw.

For making large holes, it is wise to use core drills. In this case, it is necessary to mark on the template not the contours, but the centers of the circles into which the centering drill bit of the crown will be installed. A similar technique can also be used when making oval holes or elements with small rounding radii: a complex bend is drilled with the appropriate radius, and everything else is cut out with a jigsaw.

When the excess parts of the workpiece are cut out, the cut edges must be carefully processed with a rasp and then with sandpaper. It is recommended to use bars of square, round and rounded profiles, which are filled with sandpaper. This way you'll be less likely to fray the edges and will be able to get straight corners on each edge.

Rectangular ribs look rather rough, so they are smoothed with chamfers and slopes of different profiles. The easiest way to diversify the product is to go along the external and internal contours of the casing with a figured cutter. But manual processing options are also possible:
- to remove a chamfer, walk along straight edges with chips, keeping the angle of inclination of the handle to the part constant;
- a semicircular convex bevel can also be made with chips, changing the inclination of the blade, or use a concave cutter for this;
- a concave semicircular mate is made with a chisel or cutter with a rounded edge. Such elements must be cut out in stages, removing small chips layer by layer and carefully controlling the depth of the tool and the tilt of the handle;
- if the descent has a profile of a complex shape with several convex, concave and straight elements, this profile is divided into several stages and cut in a strict sequence, starting from the widest outer part and ending with the deepest and shallowest tier.


Blind carving: applying relief
When you're done with the shaping, it's a good idea to vary the remaining flat elements with simple designs or floral designs. Here are the simplest working methods:
- A groove (branch, groove) is made with a narrow chisel or cutter with a square, triangular or concave blade shape. The carving is carried out strictly along the line, the relief is selected with small shavings and then polished.
- The leaf has several small grooves imitating veins, trimmed with a disc knife. From the center between the veins to each of them, small notches are made with a semicircular chisel, imitating the body of the leaf, then the outer contour is drawn with a thin cutter.
- The flat areas adjacent to the descent can be diversified with blind carvings of small ornaments. For example, cut two grooves from the edge, forming a triangle with it, and punch an asterisk in the center.


Wood processing and installation of platbands
Due to the carved elements, the wooden product has a larger surface shape, due to which it is more susceptible to aging. Therefore, the wood should be specially treated.
First of all, carved items to be placed on the facade should be soaked in an antiseptic composition for 5-8 hours, for which you can dig a small trench in the ground and put a plastic film there for temporary arrangement of the bath. After soaking, the parts are dried for several days, stacked with pads every 30-40 cm.

When the wood has dried, it must be thoroughly sanded, achieving smoothness and finally eliminating all traces of sawing and carving. The protective composition is selected in accordance with the type of facade finishing; it can be either alkyd enamel or polyurethane varnish, tinted or transparent.
Finally, for proper installation of the platbands, the window opening should be framed with a flat strip 10-15 mm thick and such a width that its outer edge is not visible through the carved pattern along the contour of the platband. The purpose of this strip is to eliminate the remaining unevenness of the wall and provide a reliable base for securing the carved element. Often this strip is painted in a color that contrasts with the coating of the casing itself to make the pattern more expressive.

Platbands can be attached with straight or oblique cutting, which depends on the type and density of the pattern. Oblique trimming is performed with a cut on each side at 45°, while the cutting line should pass through identical sections of the pattern and not intersect the figures cut out inside.

With direct trimming, a horizontal element is located between two vertical ones. Their top edge should be 1-2 cm above the crossbar if the cut end is straight. It is also possible to manufacture on the edge of the thread according to the general scheme, if during the manufacturing process you carry out fitting and precise adjustment of the platbands. The very fastening of the platbands is elementary - ordinary rough nails without a head are used for it. It is only important that the nail pierces the platband and the strip, protruding at least 5 mm from the inside.