Projects of houses from a bar. Do-it-yourself timber house What is a timber house
The decision to build a house from a bar is not taken immediately and not suddenly. It's just that this technology, with a simpler assembly of walls, allows you to get excellent characteristics for housing: for the Moscow region, a beam of 195 mm thick is enough. With such a thickness of the outer walls, it will be warm, but to save on heating, it is better to insulate it (outside 10 mm of mineral wool) and make a ventilated facade. Then there will be more savings on heating.
Plasticity in processing is one of the advantages of wood
What wood to choose
Coniferous wood is usually used to build a house. There are several reasons. Firstly, the high content of resins, which are natural preservatives and antiseptics. Due to their presence, the wood is not destroyed for a long time. Secondly, affordable price. You can, of course, build a house from beech or oak timber, but the price will be simply sky-high. Thirdly, the wood is soft and easy to process.
Of all conifers, most often they put a house from a pine beam. With good performance, it is relatively inexpensive. Houses made of larch and cedar are rarely built: they are too expensive. From spruce even less often, but for a different reason: it is destroyed the fastest, and even difficult to process. So, regarding the type of wood, there is, in fact, no choice. 95% is pine. But with the type of timber you need to understand.
According to the processing method, timber happens:
- Ordinary or solid, unplaned timber. Sawn from a solid log, the section is a quadrilateral (square or rectangle).
- Profiled bar. It is also sawn from a solid log, but after it is processed: spikes and grooves are formed with milling cutters - profiles with which one beam is joined to another. The side faces are also processed. They come out of the machine already planed. The section is of complex shape. The side faces can be even, rounded, curly - with chamfers, the shape of the "castle" - numerous beards and recesses.
- Glued beam. Outwardly similar to profiled, but assembled (glued) from several boards.
We will analyze the features of each type of timber, regarding the construction of a house.
House made of ordinary timber
If earlier they said that they decided to build a house from a bar, then they clearly understood the usual rectangular bar. There was simply no other, or it was too expensive: it was brought from abroad. Ordinary timber is the most affordable, if we take the cost per cubic meter. But, as a result of all the required measures, the cost of construction may be higher than from a profiled one. It's all about the characteristics of the material. They lead to significant additional costs even at the construction stage: when building a house from unplaned timber, interventional insulation is necessarily used. Its geometry is not ideal, and if this is not done, it will be very strong to blow through the gaps between the crowns. The second feature is that the surface of the walls turns out to be uneven and one cannot do without finishing inside and outside.

In addition to laying the interventional layer, the delivered log house is caulked, additionally sealing the seams. A caulk is needed not one, but at least two, sometimes more. And all because it is made from wood of natural moisture. In practice, this has the following consequences:

Another feature of a house made of ordinary timber: the walls are uneven. To give them a “decent” look, they are either sheathed with finishing materials or polished. But grinding is a controversial undertaking: the interventional sealant makes it almost impossible. Even if you manage to grind the timber, where to put the seams?
So it turns out that the cost of the house as a result may be more: add interventional insulation, material for caulking and the work itself (and it is not cheap), the cost of exterior and interior decoration to the cost of the timber. Please also note that moldings are brought to your site - bars of the ordered length. The bowls are sawn on the spot. This means that the qualifications of carpenters must be high. How the cut is made determines how warm the corners will be. And in a log house, it is the corners that are the most problematic place.
Features of profiled timber
Considering the profiled timber, the first thing that catches your eye is the almost perfect geometry and smooth surfaces. Anyway, that's how it should be. With good workmanship, finishing is not needed: the wall immediately turns out to be even and smooth, even if it is immediately ready for painting.
The second, also quite obvious feature, is due to the fact that the edges that join two profiled beams have recesses and protrusions (locks) through slots cannot be. Manufacturers of profiled timber say that it is possible to lay walls without interventional insulation: it will be warm anyway. But few people listen to them. They put at least a thin, but a heater. Someone uses a thin substrate for a laminate, someone uses a self-expanding tape for mounting plastic windows, as well as jute tape and similar materials.

In the photo, by the way, the most common profile among developers lately is the “comb”. It can have a “tooth” of different heights and widths, and is loved by everyone because, in theory, it is impossible to “blow through” it. However, even here they insure themselves by laying insulation.

Several typical beam profiles (the two on the far right in the picture are glued beams, but profiled beams are made of exactly the same profile)
In general, there are a lot of profiles. Some of them are in the photo. When choosing a supplier, it is necessary to pay attention not only to the shape of the locks, but also to how they are made. Matching in any pair should be maximum.
Having decided to build a house from a bar with a profile, you need to decide on its moisture content. Profiled timber can be of natural humidity (cheaper), it can be chamber dried with a moisture content of no more than 14-16%. Features of lumber of natural moisture have already been considered, now let's talk about chamber drying. The company installs large drying cabinets, into which the finished profiled timber is loaded. There, at elevated temperatures, it loses excess moisture. At the same time, all the processes that usually accompany the drying of wood take place in the chamber: it bursts, it twists. Accordingly, part goes into marriage, and the rest is sold at a higher price. The reasons seem to be clear.
If you decide to build a house from kiln-dried timber, you can start finishing earlier. The log house should still stand, but it will take 9-12 months. At the same time, new cracks are rarely formed, only existing ones expand. But it should be borne in mind that due to the high cost of drying, most often they only reduce the humidity to operational - 16-18%, while chamber drying is considered wood 8-12%.
Either way, gaps will need to be sealed. The caulk is needed in very limited volumes: first of all, you will have to look through all the corners and cuts, if any (this is the name of the places where the walls are attached). Even a well-made bowl can dry out unevenly, causing a gap to appear. Also, the beam can turn out, which will also lead to the appearance or expansion of the gap. So a periodic revision of the corners is also required during operation. Wood is a living material and will change all the time. Also, after a year of sludge, too large cracks in the timber will have to be repaired (without fanaticism, so that the tow does not open the crack).

The frame is assembled from numbered blanks with a molded bowl (numbers in blue on the ends)
It may be easier with the assembly. If you simply order lumber, you can cut corners from a profiled beam, as from a regular one, on the site. But many enterprises, in the presence of a project, offer to take on part of the work. With the help of a special program, they make a layout on the beam: they make a list of "spare parts" from which the house will be assembled. Then, according to this list, blanks are cut out, and with molded thickets. The blanks are numbered and brought ready to the site, where it remains to fold the house, like a designer: folding the bars according to the numbers marked on the plan.
This is convenient, especially if you are going to cost a house with your own hands without construction experience. It is clear that the service is not free, but you can save on paying for carpenters: it is not required to assemble such a highly qualified designer. Only in this case, whether your house will be warm or not depends on how accurately the bowls are made at the factory. Sometimes there are companies that make very low-quality cuts. You can see a few of these in the photo.

Poorly made bowls - it will blow incredibly, and the caulk will not save you well
In general, there are pluses and minuses, but compared to ordinary timber, profiled timber is more convenient in construction, and at a price it can also come out cheaper, if you count with finishing.
Glued laminated timber
It is clear from the name that it consists of glued parts. First, the lamellas are sawn, they are treated with antiseptics, dried to a certain humidity, then glued. Due to the complex manufacturing process, the price tag of this material is approximately 2.5-3 times higher than that of conventional and 80-90% than profiled.
What are its benefits? Properly made, it does not crack, it does not lead: dry material cannot shrink, and glued beads should have a moisture content of no higher than 12-15%. Therefore, the finishing process, with a beam width sufficient to compensate for heat loss, can only be reduced to painting or varnishing, since protective impregnation is also carried out at the enterprise (should, in any case).

What does glued laminated timber and its profiles look like?
Another consequence of the lack of shrinkage is that after a few weeks the folded log house can be immediately put under the roof, and after a few more weeks you can start finishing. This time is necessary for the shrinkage of the bowls, and the geometric dimensions of the glued beam should not change. That is, a significant time saving is obtained - everything, including finishing work, can be done in one season.
But is glued beads really that good? In terms of build speed, yes. But it has serious shortcomings. First: it is glued. What crosses out one of the main advantages of wood - environmental friendliness. Secondly, its vapor permeability is low. Many people choose wooden houses precisely because of their ability to naturally regulate the humidity in the room. Glued laminated timber is deprived of this due to the presence of layers of glue. Of all the advantages of wood, only an attractive appearance remains, but, finished with a clapboard of the appropriate profile or a block house, it looks exactly the same. Therefore, the use of glued laminated timber for building a house is a very controversial issue.
Stages of building a house from a bar
A log house has several advantages:
- The walls are light, which is why the load on the foundation is low, which means that the cost of its installation will be lower.
- Wood is an elastic material and it compensates for small movements in the foundation without compromising the integrity of the building. And this, again, allows you to make shallow foundations on well-draining soils.
The choice of the type of foundation depends largely on the soil, but most often they do it, if there is no need for a basement, you can put a columnar (for small buildings of temporary residence - cottages, baths, etc.) or or without). The choice should preferably be based on the results of geological studies. The process is described in more detail.
While the foundation is “setting”, prepare the wood. All timber and dowels are treated with antiseptics and fire retardants. Use compositions that do not form a film on the surface of the log. They will not interfere with the drying process. After preparing the timber, the actual construction of the house begins:
- Cut-off waterproofing. So that the wood from the foundation does not draw moisture, it is necessary to lay a layer of hydrophobic material. Previously, two layers of roofing material were laid under the first crown. Today there are more modern materials - coating and rolled. You can use them, and in combination: coat, stick rolled.
- Laying crown crown. The beam is chosen without signs of blue, with a minimum number of knots. Preferably - from the middle part of the tree - with the maximum density of annual rings. It is additionally treated with impregnations designed for wood in direct contact with the ground. In order to ensure better preservation of the first crown, there is a trick: a wide board impregnated with bituminous mastic with working off is laid on the waterproofing. Another layer of waterproofing is placed on it, and on top - the first crown. All these layers are connected to the foundation with studs, which are poured into the foundation.
- Draft floor. Floor logs are attached to the first crown - a bar with a section of 150 * 100 mm. They are laid out in increments of at least 70 cm. To make it more convenient to work, the subfloor boards are laid out along the logs without nailing them.
- Assembly of walls from a bar. If a wall kit with ready-made bowls is not ordered, they are “slaughtered”. Cut out according to the pattern. A template is drawn from a piece of plywood, it is outlined, then it is cut out. They use a chainsaw more often, but a rather high degree of proficiency in the tool is required: how warm the house will be depends on the accuracy of the sawing. The forms of connecting the beam are in the picture.

We have already talked about laying interventional insulation: when using an ordinary beam, it is mandatory, under a profiled one it is desirable in bowls, the rest is optional. Between themselves, the crowns are connected by dowels - long round bars carved from a single piece of wood, dowels - rectangular in shape or studs - metal rods. In any case, a hole is drilled under the connection, into which the connecting element is hammered.
- The order of work depends on the type of roof chosen. When arranging a simple installation, rafter legs are installed, with a different order. A windproof membrane is rolled out and fixed onto the assembled truss system. In this form, the house is left for a long time to shrink.
- Door and window openings. For speedy shrinkage and shrinkage, you can cut window and door openings, put a pigtail or fixing strips. Door and window blocks are not installed until the end of the main shrinkage.
After a year or two, you can start finishing work. All the time while the log house is settling, it is necessary to monitor the processes occurring in the wood. It is immediately necessary to inspect the corners and, if necessary, caulk them. Then monitor their condition, as well as the joints of the timber. If the dowels were driven in with great effort, during shrinkage, the timber may hang on them, which causes cracks to form. You can solve the problem by hanging around: they take a huge wooden hammer and knock on the walls, causing faster shrinkage. The same technique is used if the house sits too slowly.
The video shows the main stages of how to build a house from a bar. Despite the lyrical digressions, a lot of valuable information.
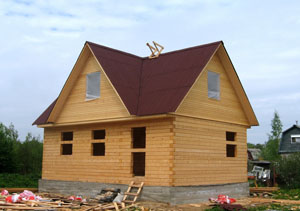
How to build a house from a bar: photo report
They built such a house.

We ordered a wall kit according to the project, a strip foundation was poured under it.

They brought blanks with sawed-down bowls. They were carefully unloaded, while examining for flaws. One beam turned out to be problematic - it was in the middle of the bundle and suffocated - it was covered with a fungus. It was postponed for a separate "treatment". The rest were covered with impregnation (Valti Pohjust) and stacked.

So that there are no problems with the fungus, a gasket is laid under each - boards lying across.

Also, rolls of insulation and dowels were purchased. Nagels were sent to bathe in impregnation. Impregnation was poured into the old bath and left for half a day, then taken out and dried.

On the waterproofing laid on the foundation, the first crown was laid out - a half-beam. It has no grooves at the bottom.

It was pulled to the foundation with anchors to studs cast into concrete.

Laid the first crown. The one that was previously fixed on the foundation is often called "zero".

Let's change the diagonals. In order for the cups to fit without problems and there is no skew, they must be equal. The allowable skew is a couple of millimeters.

Having aligned the diagonals, we drill holes for the dowels. So that there were no holes larger / smaller than necessary in length, a limiter tree was planted on the drill.


The walls are gradually rising. In a checkerboard pattern, we fasten them with dowels.

In general, the timber is more or less normal, but there are problems with incorrectly sawn cups. When laying the timber, we get a huge gap. The only way to deal with this is to manually adjust the cups so that everything lies flat.

It takes a lot of time to eliminate these inconsistencies, but gradually all the walls are laid out.

Walls made of profiled timber are driven out
We proceed to the assembly of the truss system. First, as is customary, two extreme farms are installed, then everything else, according to the project.

The finished crate was sheathed with roofing material. Let's leave the house to dry.
Inside we lay out the boards of the subfloor, nailing every fifth. They will dry with the house.

Related videos
The mistakes that are made when building houses from profiled timber are described in detail and analyzed in this video. Very useful. Look.


For the construction of country cottages, various wall materials are used, each of which has its own characteristics. Many private developers who want to have an environmentally friendly and comfortable housing that does not require large construction costs choose timber. Today it is possible to build a log house using modern advanced materials and technologies, resulting in a beautiful, reliable and durable cottage. What are houses made of profiled timber, a photo and a description of the construction process in our article.

If you are thinking about how to build a house in the forest, then timber is the best option. Source ecolife33.ru
What is a bar
This is a building material that is made from wood by hewing. It has a square or rectangular section. The minimum cross-sectional size is 10 by 10 cm, the maximum is 40 by 40. This is a fairly strong and “warm” natural material that allows you to build houses on light, inexpensive foundations. A bar of resinous wood saturates the premises of the cottage with phytoncides (useful bactericidal substances). In addition, it refers to vapor-permeable materials. Thanks to this, a microclimate favorable for humans is formed inside the house.
The correct geometry of the beam facilitates the process of assembling the log house, and allows you to build walls without cracks and gaps. In the manufacture of timber, it is treated with special compounds that protect it from moisture, insects and rodents, while making the wood fire resistant. After completion of all stages of manufacturing, the material is dried using special equipment, as a result of which it shrinks by about 10%. There is also a bar of natural moisture, which dries (settles) under normal conditions for several months.

Professional developers use the following types of timber to build a house:
-
insulated.
profiled;
profiled
This is a wood material with a rectangular cross section, which has recesses designed for the most dense joining of individual bars to each other. The front side of such a bar can be rounded or flat. The inside is usually flat. Profiled material eliminates the possibility of cracks in the wall. Thanks to the recesses, the construction of the log house is very quick and easy.

Glued
Glued laminated timber is made from individual lamellas, which are pre-dried and then glued together with non-toxic glue. Due to the different direction of the fibers in the lamellas, the glued material is very durable. It almost does not shrink. Such a material can have a large length, which increases its versatility in application.

insulated
This version of the beam is distinguished by the presence of a hole between the front and back sides. This hole is filled with cellulose. The result is a material with improved thermal insulation characteristics.

On our website you can get acquainted with the most popular projects from construction companies presented at the exhibition of houses "Low-Rise Country".
wood species
Timber for building houses is made from rocks that are less susceptible to rotting and rodent attack than others. Mostly it is larch, spruce or pine. The tree with the most attractive characteristics is larch. It is durable, fireproof, and does not rot even in sea water. The resin secreted by larch acts as a natural antiseptic that protects it from insects. The only disadvantage of this type of wood is the high cost.
Spruce and pine are considered more economical options. Spruce is looser in structure and has many knots. However, with the right approach, high-quality building timber is made from it. Pine is more practical in every way. According to its characteristics, it is second only to larch.

What material to choose
Currently, profiled and glued beams are especially actively used. The choice between these two options is based on their differences. So, glued wood is produced in a wider range of standard sizes. Due to the fact that the lamellas can be “spliced” in length, glued laminated timber can reach 18 linear meters, while profiled material has a length of up to 6 meters.
The thicker the wall elements, the better the walls made of it retain heat. However, solid profiled material with a cross section of more than 200 cm is rarely used, since thick bars are difficult to dry. Glued and here has less restrictions. If desired, you can purchase glued laminated timber with a cross section of 275 mm.
In terms of environmental friendliness, profiled material is considered more attractive, which is made without the use of glue. But in this matter, it should be remembered that responsible manufacturers use adhesives only from the class of safe compounds. In addition, profiled timber also does not remain completely environmentally friendly, since it must be covered with protective substances.

The level of vapor permeability of profiled timber is higher. At the same time, glued material gives minimal shrinkage, has higher strength and is a more fire-resistant type of construction wood. In addition, a house made of glued laminated timber can be prepared for moving in immediately after assembly, and a building made of profiled material should stand for about six months until the shrinkage process is completed. In general, the indicators of glued wood are more acceptable, but profiled wood costs about 30% less, therefore it is in no less demand.
Recently, insulated (or double) timber has been increasingly used. Houses from it are warmer and stronger than from glued, as it is a structure made of wood, insulation and cross joints. Insulated timber weighs less than glued timber, but costs less. However, before building a wooden house from a bar of this type, you need to think carefully about its disadvantages. The main one is the rapid destruction of the insulation, which cannot be replaced in any way.

double beam
Video description
Glued laminated timber and thermal timber differences and the cost of a turnkey house made of thermal timber - see the following video:
Construction stages
The technology of building a house from a bar at home is not particularly different from building a cottage from other building materials. But there are still some nuances.
Project
The engineering basis of a log house should be a high-quality professional project created by specialists who know how to properly build a house from a log. The architectural development takes into account all the characteristics of the material, and uses such solutions that enhance the dignity of wood buildings.
The beam is ideal for building small and medium-sized houses. But if you wish, you can build a large wooden mansion with complex architecture. In any case, the length of the walls is calculated taking into account the standard length of the timber (6 meters). In order for the designed log house to be built quickly, and at the same time a minimum of waste remains, the length of the walls, a multiple of 2 or 3 meters, is included in the project.

Purchase of materials
Materials are purchased in accordance with the architect's calculations. It is very important to purchase all the necessary timber in a single purchase. This is especially true for profiled wood, in which the percentage of moisture content can differ significantly in different batches.
Site preparation
Any construction begins with the preparation of the site. At this stage, old buildings are dismantled, trees and shrubs that may interfere with construction are removed, and the ground is leveled.
Foundation
Timber cottages are built on strip foundations. Such a foundation is equipped in several steps. First, a trench is dug around the perimeter of the future building. Sand and gravel fall asleep at the bottom. All this is well tamped. Next, a wooden formwork is installed and concrete is poured.

Draft floor
The erection of a directly timber building begins with the laying of the lower crowns and the arrangement of the subfloor. At this stage, it is very important to know how to build a house from a bar so that it turns out to be warm and dry. The first step is to ensure effective waterproofing of the foundation. After that, the first crown is laid from carefully processed bars. Next, the floor is mounted.
For the subfloor, logs are first laid - usually with a section of 150 by 100. To increase the reliability of the structure, a paddle from wider bars is also laid. Floor boards are laid across the lag. Put waterproofing, insulation and vapor barrier on top. After that, the subfloor is covered with boards 40 mm thick.

Box assembly
The walls of the log house are laid out by layering crowns. All crowns with the help of dowels are pulled together. Internal and external wall structures are erected simultaneously. To fasten the internal partitions on the inside of the front walls, cuts are made through a row, into which the ends of the beams of the partitions are sunk.

Roof
The roof consists of a truss system, lathing for fastening the roofing and the roofing itself. First, the upper crown is pulled together by laying solid beams with a section of 100 by 150. Then they are made of boards and rafter legs are installed. After that, the pediments are laid out.
A crate is constructed for laying the coating. After that, the roof is insulated and the coating is laid.
Windows and doors
Door and window openings are framed with racks. It is very important to provide a competent system of grooves and technological gaps around the openings so that double-glazed windows and doors do not interfere with the natural shrinkage process. Otherwise, wooden elements may deform and crack.
Video description
Installation of plastic windows in a house from a bar
Warming
In the construction of log houses, a practice is often used in which walls are built from a material with a small thickness, and then an insulation system is mounted. You can insulate the house from the outside or from the inside. In order for the wood to last longer, it is better not to cover it with insulation from the outside, but to make internal insulation. In this case, the wooden wall is insulated with hydro and vapor barrier, then a heater is installed, another layer of vapor and waterproofing is installed on top. The warming cake is sewn up with drywall, after which you can decorate the walls with any facing material.
Communications
All communications are brought to the house, according to a pre-prepared project. Particular attention is paid to safety when laying the electrical network and arranging the heating system.
Video description
Communications in a house from a bar
Finishing
Timber walls do not need front finishing. The exception is houses with insulation. Usually, after the construction of the insulation cake, the walls are decorated with natural wood panels so that the facades of the house and its internal walls form a single harmonious composition.
The floor in the house is covered with any floor covering. Usually the floors in timber cottages are quite warm. However, if desired, you can install a "warm floor" system.
The ceiling can be left open or decorated with a stretch fabric. Other ceiling finishes are undesirable due to shrinkage.
Video description
Let's talk about materials, about the entire cycle of the production process, the pros and cons of technology:
On our website you can get acquainted with the most popular projects of houses from glued beams from construction companies presented at the exhibition of houses Low-rise Country.
Conclusion
Every year in the Moscow region more and more actively build a house from a bar. Such houses are being built quite quickly. But if you yourself do not know how to properly build a house from a bar, then professional builders can complete all the stages in a couple of months. The main thing is to take into account the features of the materials and provide everything so that it lasts as long as possible.
Despite the development of modern technologies and the availability of a large range of high-tech raw materials on the market, natural wood remains one of the most popular materials used for the construction of residential buildings. One of the most popular and economical materials on the construction market today is timber, which allows you to build durable, practical and outwardly attractive houses.
Advantages of timber houses
Wooden houses made of timber are reliable buildings with a large number of advantages, namely:
- aesthetics. There is no need for external decoration, which significantly reduces the cost of building a building. At the same time, if you plan to use the building for seasonal living, you can also exclude interior decoration;
- erection efficiency. Building a house from a bar takes on average no more than one season;
- excellent heat-saving properties. High energy efficiency of timber materials makes it possible to significantly reduce heating costs;
- environmental friendliness;
- high sound insulation;
- resistance to decay and mechanical damage.
Types of projects of houses from a bar
There are two types of timber house projects:
- typical. The main advantage of this type of design is practical approbation. Our specialists have implemented such projects more than once and worked out every detail;
- for individual projects. They make it possible to realize all the wishes of the client in terms of layout, size and cost and put them into practice.
In addition, you can make changes to an already existing standard project and adapt it to suit your needs.
Checkout
WoodHouse LLC offers its customers the implementation of turnkey timber house projects at an affordable price. Our specialists have extensive experience in carrying out this kind of work and in a short time will carry out the necessary calculations, draw up an estimate and erect a reliable and durable structure.
We inexpensively design and build turnkey timber houses, carry out communications and produce a fine finish.
In the catalog presented on our website, you can get acquainted with examples of our work, study already implemented projects, choose the best solution for you or order the development of your own individual one. We carry out all work on the territory of Moscow and the Moscow region.
The choice of material is the primary problem that everyone who decides to build a small, reliable and comfortable house on their site with their own hands faces. The modern building materials market can safely boast of a huge range of raw materials for every taste and budget. Most people prefer wood. And it is not surprising, because a wooden beam is an environmentally friendly and inexpensive material.
This material is presented in several variations, but in the article we will talk about how to build a house with our own hands from profiled timber, since it is he who is the most common and has the simplest installation technology. It is very malleable for processing, which means that you can easily carry out electrical wiring, plumbing and sewerage.
Drawing up a plan, preparing materials and tools
Building a house without a good project is simply unrealistic, so it is very important to take this stage extremely seriously, especially since it is on it that you can clearly understand what you can save on.
Ideally, you can seek help from special design agencies. For a fee, they will individually draw up a complete layout of the future home, taking into account the size and shape of your territory, soil composition, financial capabilities and, most importantly, personal preferences.

If you do not have a need for some miracle of design ideas, then you can build a building using standard options. To do this, all the necessary documentation can be found on free Internet resources or you can use one of several 3D editor programs, including FloorPlan3D, CyberMotion 3D-Designer, SEMA and many others. The latter, by the way, is designed just for the planning of houses from a bar. SEMA will help you carry out all the necessary statistical calculations, choose the type of truss system and much more.
Everything should be indicated on the drawing, from the overall dimensions of the building and the number of floors to the location of door and window openings, furniture, all communications (light, water, heat).
As soon as the plan is in your hands, you can proceed to the calculation, if this has not already been done, and the choice of the required materials and tools, including:
- Beam as the main building material.
You can buy ready-made beams with the necessary cut grooves and spikes - bring it, install it - use it, also thanks to the perfectly flat and smooth surface of the edges there is no need for additional finishing work, or you can buy wooden blanks, and make the cuts yourself, there is nothing complicated in this, and you can save a lot.

Experts recommend taking a beam with a section of 150x150 mm during construction. But since you have to work alone or with an unskilled assistant, it is better to use material with a section of 150x100 mm. Such a beam is much lighter, and the missing volume can be restored in the future by insulating the facade outside the building.
- Insulation.
To further save money, as a heater, you can use materials that, so to speak, are "at hand". The best among these is considered moss. It is not difficult to find and process, and in terms of its technical characteristics it is identical to its artificial counterparts.

- Nails, self-tapping screws and other fastening structures (metal corners, wooden dowels, and so on).
- Waterproofing material (for example, roofing material).
- Ready-made concrete mortar or components necessary for its preparation (water, sand, crushed stone, cement).
- Reinforcement (if a strip foundation is planned).
- Saw.
- Electric jigsaw.
- Screwdriver.
- A hammer.
- Construction rubber hammer.
- Roulette.
- Building level.
- Plumb.
- Circular Saw.
- Pipes for water supply and sewerage.
- Cable for wiring electricity, TV.
- Master OK.
- Caulker.
- Other tools for small and decorative work.
Harvesting wood and moss for construction
In order to build a warm and cozy house from a bar, in addition to knowing the technology of laying crowns, it is important to understand which type of wood is best suited for this purpose.
Each species, of course, has its own advantages and disadvantages, but the main thing that you need to pay attention to when choosing lumber is strength, density, moisture resistance and degree of drying. So, if the tree is fragile, then your house may simply fall apart very soon, if the density is low, then such material can shrink up to 20 or even more percent. If a lot of moisture accumulates in the wood fibers, then such a house will never be warm, but if the raw material is under-dried, then it will be simply impossible to work with it, over-dried - the material will become too unreliable.

Very serious requirements are imposed on the walls of the house, as they must provide warmth, comfort and low noise levels in the premises, especially since wood is a rather fire hazardous material that can deform due to precipitation. That is why experts recommend purchasing timber from conifers, such as spruce, cedar, fir, larch and some others. Due to the high content of resinous substances, conifers are resistant to decay, cracking and other deformations. Also, the trees of this breed are very durable, light, so they do not create too much load on the foundation.
By choosing a softwood timber, you can save money by building a foundation using a simplified system.
If you decide to harvest the wood yourself, then you should know that the humidity coefficient should not exceed 20%, otherwise cracks will soon appear in the walls, which will require additional processing, and this is an extra cost of effort, time and budget.
When harvesting, take into account the fact that it is better to do this in the winter period of the year (from January to March), since in winter the process of photosynthesis slows down and the speed of movement of juices along the tree trunk becomes minimal.
Cut the lumber to the desired shape and size, treat with an antiseptic and leave to be stored in a dry place inaccessible to sunlight. The bars must be stored compactly in special stacks, at a height of at least half a meter from the ground. There should be a gap of 4-5 and 10-15 cm between the crowns and rows. To do this, several transverse beams are inserted between them. After lying like this for 5-6 months, the tree is ready for further processing and installation.

In order to keep your house warm in inclement weather, you should think about choosing an interventional insulation. Professional builders use modern tape materials, but the price for such a pleasure is quite high, so we recommend paying attention to moss.
There are more than 300 species of this plant in the world, but only a few varieties are used for construction purposes, among them: sphagnum, cuckoo moss, red and peat. All of them have excellent bactericidal properties and are excellent natural antiseptics. Among the minuses is a high flammability, since after drying the moss becomes dry and brittle, for example, at high temperatures it can spontaneously ignite, to prevent this it is treated with special means.
Moss must be collected, you can find it in a swampy area - these are long, up to 30 cm, stems with small leaves, dry and store in a dry place for about two weeks. Plastic bags can be used as bags, but then the moss will be a little wet. There is nothing wrong with this.
Foundation construction
A high-quality foundation is the key to a reliable, stable and durable home. Since it is he who is the main supporting structure, which must withstand the total weight of the building, such high requirements are placed on him.

When building a house from a bar, three main types of foundation are used:
- Pile-screw.
- Nest.
- Tape.
The choice of the type of foundation depends mainly on the soil on which the construction of the house is planned. This issue needs to be resolved at the planning stage. You should conduct a soil analysis, you can also ask your neighbors what foundation their houses stand on, or look for information in documents on the purchase of a plot or other reference literature.
If the soil is heaving or watery, and also if you plan to use the house only seasonally, and not live there permanently, then one of the first two options is used. If it contains a large amount of sand or clay, then a strip foundation is suitable.
The first thing to start with is cleaning the area from debris, thickets, bushes and other objects that may interfere. Immediately before digging, it is necessary to mark up. To do this, use ordinary wooden pegs, which are placed in the corners of the site, as well as along the bearing walls, and the thread that is pulled between them is simple. The next steps depend on the selected type of foundation.
Pile screw foundation
After the territory is cleared and ready for further manipulations, we proceed to earthworks. It is better to pre-purchase metal piles in a specialized store, since it is quite difficult to build such structures manually. Choose supports of the same size and be sure to have drills already welded on one end.

Due to the special design, the piles are easy to install on their own, while keeping an eye on the angle of inclination. A building magnetic level can help you with this. Also, if there was no cap on the screws, you need to install it yourself. To do this, use a processed sheet of metal 25x25 cm and 5-6 mm thick.
Nest foundation
The nested foundation differs only in that instead of metal piles, either monolithic concrete supports or hollow pipes with a diameter of 250-300 mm are used, into which cement mortar is poured after installation.
As soon as the marking of the territory has been carried out, at selected points along the perimeter it is necessary to dig holes with a depth of 2/3 of the height of the support. A layer of sand is poured to the bottom, moistened and tightly packed. After that, support structures are inserted into them at a right angle, if necessary, a solution is poured inside and into the space around them at the bottom. The remaining gaps between the supports and the ground are covered with a mixture of sand and gravel.

There is also an option to install formwork in dug pits and pour concrete mortar to the ground level, we recommend using M400 cement in a ratio of 1: 3 with sand. After the cement has completely dried, the formwork is removed and aerated concrete or foam blocks 20x20x40 cm are laid on top.
Strip foundation
The strip foundation is the most common, as it can be used in the vast majority of cases, for example, if you are planning to build a heavy two- or more-story house.
The first step is to dig a trench with a width of 10-15 centimeters more than the thickness of the walls and a depth of 50-70 cm. It should be located at a height of at least a meter from the groundwater level.

There are several options for the strip foundation, among them:
- Brick.
- Concrete.
- Stone.
For any of them it is necessary to prepare the basis. A layer (10 cm) of sand is laid at the bottom of the trench, moistened with a small amount of water and carefully compacted; if necessary, sand can be poured in two layers. A layer (15-20 cm) of rubble, broken bricks or small stones is poured over it.
By the way, geotextiles can be pre-laid at the bottom of the trench, and heat-insulating material can be installed along the outer edge - this will help prevent freezing of a shallow foundation.
On the resulting pillow, if it is planned to build a brick or stone base, a little before reaching the top of the foundation, you can install the formwork. Inside, it is necessary to pour a layer of mortar to the level of the ground surface and tamp. To increase stability, we recommend creating a reinforcing frame from metal rods with a diameter of 1.2-1.5 mm.

Already on top, after the solution has completely solidified, bricks or stones are laid, which can be ordered, or used independently found near any reservoir. On top of the masonry, another reinforcement belt is installed and concreted (height 5-10 cm) and leveled.
If a concrete base is planned, then the height of the formwork should reach 30-50 cm, the thickness is 2-3 cm. If the formwork is planned from wood, then the material should be free of cracks, chips, bumps and other defects.
The reinforcement is installed in increments of 10-20 cm. The distance between rows is 5-10 cm. The result should be a grid with cells of 15-20 sq. cm. prepare personally. We recommend spending money on a concrete mixer - this will save you time and nerves, since mixing cement manually is quite long and difficult. Preliminarily, the formwork must be moistened with water or wrapped with a layer of plastic film.

It is very important to prevent the appearance of bubbles before the solution solidifies. A vibrating hammer will help with this, or you can simply punch holes in several places, later they will need to be filled with mortar.
The foundation is left to dry for 3-4 weeks. The formwork can be removed after 5-7 days, during which and a few more days, the solution must be sprayed with water in order to prevent cracking of the foundation. Don't forget to make holes for wiring.
Construction and insulation of walls and floors
The crowns of the first row are connected to each other traditionally, regardless of the method of connecting the subsequent rows, the “half-tree” is a fairly reliable and simple type of end cuts, and they are not laid directly on the foundation, but on a lining of small slats located transversely to the beam itself , at a distance of 5-10 cm from each other. The gaps between the rails can be filled with mounting foam. To cut the end cut, you can use a hacksaw, in order to remove excess material, go through the chisel.

So, if the slats rot, they will be easier to replace than a whole row of timber. The boards also need to be treated with an antiseptic or ground to prevent the development of fungus and various microorganisms, and laid out on a foundation covered in two layers with waterproofing material, such as roofing material.
The beam of the first row should be slightly larger than the crowns of the other rows, for example, if material with a section of 150x150 mm is used for walls, then for the first row use the option with a section of 200x200 mm.
It will be possible to mount logs for the subfloor on the lining of the boards using steel corners and nails or self-tapping screws. It is necessary to attach to them, the so-called cranial beam, on which the edged board for the subfloor will be laid in the future. A layer of waterproofing should be laid on top of the draft, and on top of it, insulation boards, such as mineral wool, polystyrene foam, or any other modern analogue. The next layer is a vapor barrier, and after - a finishing floor.

All subsequent rows are stacked identically to each other. There are two main ways to fasten bars:
- "With the remainder" is when a small part of the timber sticks out from its two ends.
- "Without a remainder."
The picture below shows different types of end cuts.

This manipulation can be done using a circular saw or a jigsaw. Options "A" and "D" ("no residue") are the most reliable for residential buildings, but also the most difficult to install. Recommended for areas where annual precipitation does not exceed 300 mm. Option "Z" is used to connect internal load-bearing walls. Also note that the tenon-groove joints must be left with a gap of half a centimeter for the insulation.
Between themselves, the rows are fastened with wooden or metal dowels. We recommend using the second ones, since the lumber will not crack during drying, which will ensure the durability of your building.
Using pins for fasteners, it is necessary to drill holes with a diameter of 30-40 mm. It is necessary to drill so that the beam of one row of dowels passes through, and the beam of the lower row is only partially, or you can use short dowels, for this, holes are cut from two opposite sides, a dowel is driven into one with a hammer, and simply inserted into the next. Remember that pins should not be located on top of each other. In order for the design to be as stable as possible, arrange them in a checkerboard pattern, as shown in the figure below.
If the walls of your house turned out to be longer than the timber - it does not matter. In this case, it is necessary to cut a rectangular hole at the end of one beam, and a rectangular protrusion right in the center at the end of the second, so you get a tenon-groove connection.

The space between the crowns can be insulated with pre-collected and dried moss and tow. The tow is laid across the beams, while the moss is simply thrown over the top. Thus, when installing the upper crown, part of the insulation will stick out - this is not scary, since work on caulking is planned in the future, and it, in turn, will provide maximum thermal insulation.
In order for the bars of one row to be at the same height, we use a rubber mallet, tapping it along the walls after installing each bar. The planer is used at the end, only after you have noticed that due to the unevenness of the bottom row, it is impossible to install the timber of the upper row.
*Important! Don't forget to alternate corner joints.
The last two rows of crowns are not attached, since in the future, after shrinkage, a rafter system will be installed. To do this, you will have to temporarily dismantle these two rows.

To design door and window openings, you can use two methods: either lay out all the rows, and then, after making a mark, cut out the necessary holes with an electric jigsaw, or use beams of this length in advance so that they later form windows and doors. Remember that the size of the openings must exceed the size of the door itself or the window, as there is still room for the installation of window and door frames. It is also necessary to leave a gap of 10-15 cm above the windows and doors. This is necessary so that in the future, when the timber shrinks, not to damage the construction of windows and doors. It will need to be filled with liquid insulation.
Roofing roof
After the last row of crowns has been erected, the building must be covered with roofing felt or slate and allowed to settle. The shrinkage period on average takes up to 6 months, only after that you can proceed to the installation of the roof and facing work.
There are a huge number of variations of roofs. The most reliable and stable is considered to be a four-pitched or hipped roof, it is used in regions with high humidity and strong winds, but since it is quite difficult to build it without the help of specialists, we recommend installing a gable roof. We will briefly describe the installation steps and the main elements.

First you need to isolate the surface of the walls from moisture, using, for example, roofing material. It needs to be applied in two layers. After the Mauerlat is attached - the base for the rafter system, in which special cutouts are made, with which the rafter legs are attached. Mauerlat will serve as the top row of crowns, pre-treated with an antiseptic.
The rafters themselves, depending on the area of \u200b\u200bthe house, must be made of timber with a section of 100x50, 150x50 or 200x50 mm. They should not protrude beyond the house by more than half a meter, if more, it is planned to install additional supports. A wooden crate of slats 5-6 cm thick and 10-20 cm wide is installed on the rafter legs in increments that depend on the roofing material (tiles - planks are laid end-to-end, if slate or corrugated board - at a distance of 30 cm from each other). Sometimes a counter-lattice is installed, on top of which the roofing material itself is mounted. Insulation, vapor and waterproofing are laid in the resulting space between the two crates.

The ceiling consists of several ceiling joists, which are fastened using the tongue-and-groove method to the top row of timber. The rest of the manipulations are identical to the floor. Between the finishing and rough ceiling, you can additionally lay insulation, insulation. In the future, this can reduce heat loss by up to 30%.
In order for the roof to be stable, strong, withstand strong winds and last for many years, it is worth thinking about additional supporting structures, such as crossbars, struts, puffs, racks and others. All of them are fastened with hardware, such as steel corners and self-tapping screws.
Do not forget to leave ventilation gaps, a hole for the chimney and an attic, if one is planned. The fronts of the roof can be sewn up with clapboard, decorative block house.
Remember! Every roof needs repair over time. Therefore, in order to reduce financial costs, experts recommend checking the coating annually for damage and various deformations, such as deflection and leakage. The first is eliminated by installing additional supports (crossbars, racks, and so on), and the leak is eliminated by replacing the rotten roofing material.
Let's summarize
The last stage of construction work is the installation of entrance and interior doors and windows. If necessary, work is carried out to insulate and decorate the walls either inside or outside the house. Conduct electricity, water, heat, connect the sewerage system.

Now that you know the main stages of building a house from a bar on your own, as well as ways to save money, you can start building a warm, cozy and reliable home that will warm and delight you for many years.
Houses made of timber, of course, deserve significant attention.
This technology is quite well developed in Russian practice, so modern construction practices have made such buildings not only quite cheap, but also comfortable to live in in all respects.
Many enthusiasts of the old school are quite difficult to convince: they perceive natural wood as the only right solution that can compete with even the most advanced materials.
Such houses are really good, but they have quite obvious disadvantages, which are found both at the construction stage and during operation.
Pitfalls are inevitable, but having reliable knowledge, it is much easier to reduce all such effects to a minimum.
You can’t ignore them, since you are seriously puzzled by construction and want your home to serve you for a really long time.
Key Features
 It's no secret that the vast majority of houses in this category are economy class solutions.. Behind the warmth and low cost of such buildings, there are a lot of nuances that can become a headache. First of all, the specificity of the material itself plays a role.
Most often, when building a house, the most familiar timber of natural moisture is used, which, like any tree, is not very impressive in terms of some properties, first of all, we are talking about strength and elasticity. Further, timber, both profiled and edged, takes time to shrink, in the future you can wait a year or even a year and a half.
After that, subject to all technologies, the material dries out to a certain extent, as a result of which cracks appear, the size of which is unpredictable and often exceeds the allowable one. At a certain point, there is a need for additional maintenance: the cracks should be caulked, the window and door frames should be adjusted to the changed terrain. By itself, the deformation due to weather phenomena usually does not frighten the owners, but for some, and this can be understood, this type of house seems somewhat unaesthetic.
A wooden house significantly changes its geometry: it dries out by 10% in winter and swells by 15% by summer. This problem should be taken into account when forming gaps and door hinges. If the calculation is wrong, the door may well stop opening by the summer.
All this is unnecessary trouble, to which the owners of such dwellings are already accustomed. However, it is worth noting that the edged beam is much more prone to the appearance of a large number of cracks.
A profiled analogue, of course, is more expensive, but behaves much better in practice. Overpaying a certain amount for it is a fairly good idea, because over time it will become obvious that this waste was not in vain. Despite the fact that a tree in the form of a bar perfectly retains heat, modern frame houses are often in no way inferior to similar competitors.
With the help of heaters, you can achieve excellent properties for maintaining a favorable temperature indoors. That is why the demand for frame houses today is simply huge, unlike wooden ones, they require much less labor for construction.
Humidity
 Any material of wood origin is very strongly affected by water and steam. On an intuitive level, it is quite difficult to understand exactly what processes are causing the destructive impact, however, the evidence of the need to isolate the tree is beyond doubt.
One of the more interesting effects in this regard is the dew point. This is a specific physical phenomenon, when, at sub-zero temperatures outside, a layer of space appears in the walls of the house, in which ice turns into water due to a drop. Inevitably, rotting occurs, which leads to rapid wear of the wood. To level this process, it is recommended that the walls of the house be first of all completely isolated from moisture from the inside. This requires the hard work of a person with experience.
Poorly sealed cracks can also lead to the fact that the house will be blown through by the wind, in a snowstorm this can significantly disturb residents. Strict adherence to this simple but rather specific technology is important.
 Timber is a fairly versatile material, it is believed that it is convenient to work with it, most often it is considered as an environmentally friendly option, completely safe for human health. It should be noted that all these statements require significant reservations.
Modern shop timber is not dried in a completely natural way: in a very short period of time it is dehydrated in ovens at high temperatures.
Externally, the material looks almost the same, but the internal properties deteriorate: in this process, resin crystallizes in the composition of the wood, which negatively affects the strength and resistance to decay.
Environmental friendliness is a conditional concept, since a tree remains completely safe for human health no longer than before the first treatment with impregnations and fire retardants. Varnishes are also synthetic substances, and such construction is extremely rare without them.
Soundproofing
 Today, many construction organizations look at this parameter especially strictly, since it really affects the quality of living. In a completely wooden house, external sounds can behave in completely different ways, but most often you have to deal with the phenomenon when they are not only not extinguished, but are also enriched with new overtones and noises. It's hard to say how bad it is, but for some owners, the creaking of the floorboards and the howling of the wind are exactly what can annoy and disturb.
Wiring
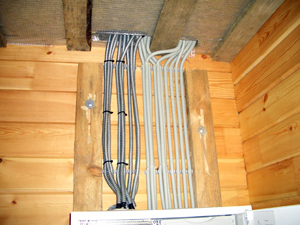 Unfortunately, for every house made of timber there is a risk of fire. To avoid such incidents, it is worthwhile to think carefully about the wiring in accordance with all standards.
The laying of wires must be carried out in special channels made according to the standard at the manufacturer's factory. Mount it, again, should be a knowledgeable and responsible person. Open wiring was a good solution 15 years ago, but today it is absolutely not the same quality standard.
The cost of timber houses
It is worth recognizing that modern frame houses are often cheaper. A good wooden hut made of glued laminated timber often comes out expensive due to materials and finishes.
Materials of artificial origin are likely to continue to push analogues out of the market. Edged timber is more economical, but it is extremely problematic to make a chic house in a short time by a small team from it.
In an attempt to pay less, there is always a risk of losing quality. It is typical for Russian practice when a defective timber purchased at a low price eventually begins to delaminate due to the fact that low-quality glue was used in it. Materials are strictly recommended to be taken only from trusted suppliers.
Differences in materials
 Almost always, only the use of profiled timber makes it possible to quickly and efficiently fit all elements. In addition, quite intricate designs can be made from this type of material, which is problematic when working with ordinary timber.
Glued profiled timber is ideal in terms of construction productivity and at the same time the least environmentally friendly: almost all impregnations that prevent decay in it contain phenol.
An ordinary timber undergoes minimal chemical treatment, but due to the lack of grooves for fixing, the technology becomes noticeably more complicated, assembling a house will take much more time. When using it, you will have to take thermal insulation much more seriously.
Trying to save on one when building a house from a bar, it is very easy to burn out on another - all items of expenditure are largely interconnected.
Heating specifics
Taking into account the fact that the house had time to settle, and the density of the tree returned to normal, additional monitoring of its condition is required in the first winter.
The first heating season is carried out under careful control: the temperature inside should not exceed 20 degrees, otherwise deformations are possible.
Warm up the building slowly and gradually, sharp drops can provoke the appearance of cracks in the beam at an extremely inconvenient moment in time. The installation of heating systems should also take into account the specifics of natural wood and its possible deformations.