Building a house using frame technology. What is the technology of building a frame house: step by step and with pictures
When an unsightly radiator spoils the interior, there are several ways to solve the problem: replace it with a designer or underfloor model, or simply close it with a screen / box. The latter method has several advantages:
- A screen or box not only hides a bulky structure, but often decorates a room.
- The screen / box can be used to build an additional console, a shelf for decoration, a bench, a rack, a desktop.
- A closed battery is safer for children - there is no risk of burns and accidental shock. However, one can argue with this argument, because it is in the children's room that heat loss is least needed.
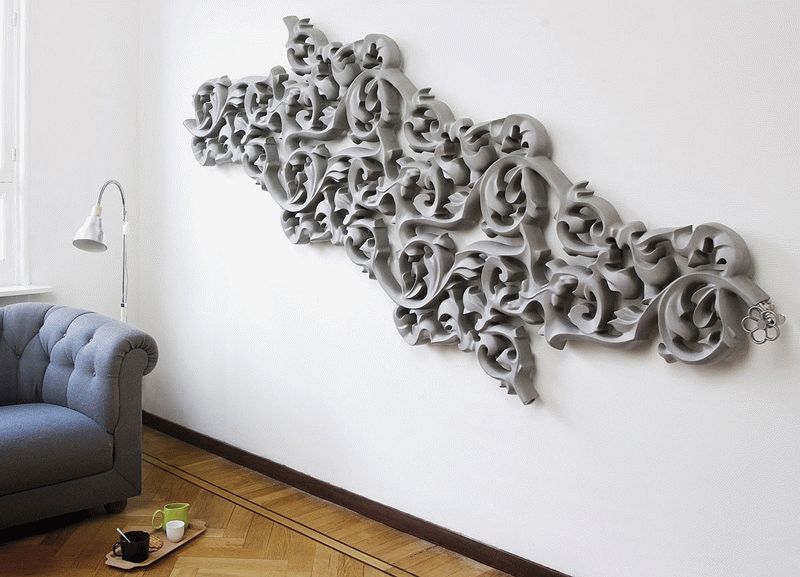
In the children's room, the radiator should be closed with a nice grill with a lot of holes, for example, carved as in this photo
- If the house is too hot and dry, then closing the battery will help create a comfortable microclimate for households, their pets and plants.
- The screen prevents dust from settling in the inside of the radiator and thus simplifies cleaning.
There are also disadvantages:
- The heat transfer of a closed battery decreases on average by 10-15% or more (depending on the degree of closeness);
- Screens and boxes often make it difficult to maintain radiators, and sometimes completely block access to them.
- Often, improperly closed batteries lead to fogging of windows, and then to the appearance of harmful mold on slopes and walls.
- A screen or a box, at least a little, but “eats up” the space around the radiator. After all, any elements should be installed at a distance of 5-10 cm from the battery.
- Battery fencing requires additional expense and hassle.
How to close radiators - 11 ways from a drywall box to a fabric screen
1. Decorative screen/HDF box
This option is one of the most popular because of the average price and beautiful appearance.

What is the difference between a box and a screen? The screen is designed for a battery located in a niche or under the window sill (pictured above), therefore, it covers only its front part. The box completely closes the radiator on the wall from all sides.

The screen, like the box panel, is made of perforated HDF (3 mm high density fibreboard), while the box profiles are made of MDF. Both materials are quite strong, durable and non-toxic when heated.
Advantages:
- Due to the original perforation, HDF screens/boxes look beautiful and fit into any interiors, especially into classic .
- Heat resistance (the design does not dry out like natural wood, and does not turn yellow like plastic).
- Easy to assemble and install without the help of specialists.
- Finished HDF screens/boxes can be white or imitate wood (wenge, beech, oak), and custom-made ones can be painted in any color, laminated, veneered with natural wood. True, the complexity of the design always affects the price of the screen.
Disadvantages:
- MDF and HDF do not tolerate prolonged contact with water. If the battery leaks or the pipe breaks, then the elements of the box / screen may swell. Therefore, any emergencies must be dealt with immediately.
- Perforated panels, despite their thinness, are quite durable due to the high density of fiberboard. However, they must be protected from shock and sharp objects.
- Perforation sections in factory screens are not painted, and therefore are visible.
Price: from 1500 rubles for a finished model and from 2300 rubles for an individual order.
Selection Tips:
- The size of the radiator niche must match the size of the inner side of the screen.
- Screens and boxes for the battery can be either ready-made (assembled as a designer), or made to individual sizes and designs (you can choose a perforation pattern).
Here is a small selection of photos of closed batteries.

Closed battery in the interior of a small kitchen in Khrushchev


2. Drywall box
How to close the battery with drywall? With this material, you can sheathe the radiator with a box or create a niche for it in a false wall.


Advantages:
- Environmental friendliness;
- Can be used in wet areas;
- material is available;
- With a false wall, you can close the pipes, expand the window sill;
- You can close the battery with a drywall box with your own hands without special skills in a few hours of work;
- You can think over the configuration of the box and the false wall yourself, if you wish, equip it with shelves and niches, additionally close the pipes connected to the battery. Next, you can see a photo of a closed battery in a plasterboard false wall with an enlarged bench window sill and a built-in niche for books.


Disadvantages:
- The main disadvantage of a drywall box is that this material is afraid of shocks and leaks. If something goes wrong, you will have to completely change the casing of the battery along with the finish.
- A false plasterboard wall for the battery and pipes "eats up" the space, as it is moved forward 30-35 mm from the extreme point of the radiator.

- As a rule, a GC box should be made at the repair stage, because its finish must match the wall finish.
In the following photos you can see the finished kitchen interior with a closed battery and a drywall box in the process of being repaired.


Design and manufacturing tips:
- Before closing the radiator with a drywall box, be sure to put it in order: blow, rinse (this is done at the end of the heating season) and paint. In the future, it will be difficult or even impossible to do this without dismantling the box.
- The box can be installed on the floor or "hang" on the wall.
- When designing the box, please note that the visor of the window sill must protrude above the front of the box by at least 30 mm. If necessary, the old window sill should be replaced with a wider one.
A visual instruction on how to close the battery and pipes with a false plasterboard wall is presented in the video below.
And here is a video tutorial on how to close the radiator with a box.
3. Furniture
In the kitchen, the battery, together with the window sill, can be built into a suite or bar counter, and in the living room, bedroom and hallway - into a bench, console or shelving.


This slider contains a selection of photos of closed radiators under the bench.

- The main condition: enough holes must be provided in the window sill / lid above the battery for air circulation, and the facade (if any) covering the battery should be equipped with a grill (see photo below). Otherwise, there is a risk of fogging windows and cold indoors.


Sometimes, to hide the heating battery, it is enough to rearrange the furniture and close the device, say, with a sofa, armchair or console. In order not to disrupt air circulation, it is better to place a piece of furniture away from the battery (at least 10 cm), it is also desirable that it stand on legs - so convective flows will not be blocked.

4. Fabric curtain
This method of disguise is good for rented housing or when you need to solve the problem of ugly batteries at minimal cost. The advantages of the curtain are obvious: a piece of fabric is inexpensive, and the choice of colors is very large (you can change the “screens” according to your mood), while the battery is always available for repair and inspection.


5. Natural wood screen
Advantages:
- Beautiful and expensive appearance even in the simplest design;
- Environmental friendliness;
- Good heat dissipation and heat storage capacity.
Disadvantages:
- The tree is capricious - a poorly prepared tree can swell from a leak or warp from heat;
- The wooden screen requires special care;
- High price.
Prices: from 3000 rubles for the simplest models and from 10 thousand rubles for premium wooden screens.
Here are some photos of beautifully closed batteries.


6. Glass screen
A glass screen is an excellent decorating solution, but from a thermotechnical point of view it is very controversial.


Advantages:
- Design for every taste - the glass panel can be transparent and colored, matte and shiny, with and without sandblasting, with facet or polished edges;
- Glass can look neutral or very bright;
- Glass visually looks light and adds airiness to the interior;
- Ease of care;
- Strength;
- Durability;
- Heat resistance;
- moisture resistance;
- Absolute environmental friendliness.
Disadvantages:
- More suitable for modern rather than classic interiors;
- "Eats" up to 40-50% of heat (infrared radiation);
- High price;
- Fingerprints may remain on the glass;
- The panel does not cover the ends of the battery;
- Screen installation most often requires the help of a specialist.
- The screen for the battery must be made of tempered glass only. Only in this way will it be absolutely safe and shockproof.
- The glass screen is good for use in rooms with excess heat.

7. Metal box
Advantages:
- Virtually do not interfere with heat transfer;
- Low price;
- Easy care;
- Absolute moisture and heat resistance.
Disadvantages:
- "Office" appearance, which will not fit into every interior.

Selection Tips:
- A metal screen for a battery can look very nice if you have it made by a company that specializes in laser metal cutting or forging.

8. Rattan box or screen
Most often, rattan cloth means a mesh made of artificial rattan, woven from cellulose-based fibers with reinforcement with nylon thread. Artificial rattan is very similar to natural, but unlike it is more practical and can be dyed in any color. Natural rattan screens have natural beauty and durability, but they cost twice as much, and it is much more difficult to find them on sale.

Benefits of a rattan screen:
- Environmental friendliness;
- Beautiful view;
- Strength;
- Elasticity;
- Good heat dissipation.

Disadvantages:
- Weaving of artificial rattan is quite dense, which can affect heat transfer;
- The screen must be protected from water.
Prices: from 1700 rubles (artificial rattan screen).
Rattan fabric (both artificial and natural) can be used to make a do-it-yourself battery screen. To do this, you need to assemble a box with a frame on the corners, attach a mesh to the inside of the frame, then install the box on the radiator using brackets.
9. Hinged metal screen
The metal structure consists of a cover and a screen and is hung on top of the battery without fixing.

Advantages:
- Easy installation;
- Simple dismantling, which facilitates the maintenance of the radiator;
- Profitable price;
- Durability;
- Does not reduce battery efficiency.

Disadvantages:
- The ends of the battery remain visible;
- Almost always hanging screens are lattices without any decorative effect.
- There must be high-quality enamel, not scratched;
- Should be strong and easy to remove;
- The shield metal must not corrode.
10. Curtains to the floor
Masking the radiator with curtains is a great idea, approved by both heating engineers and decorators. The only problem is that it will not work to hide the battery under the window behind the curtain without shading the room. Is it possible to hang a very light tulle as in this photo.


Disadvantages:
- Looks simple, no frills;
- Over time, the plastic may turn yellow;
- When heated, low-quality plastic can release toxic substances, such as formaldehyde.
Prices: from 300 rubles.
Selection Tips:
- Plastic screens for the battery are available in basic colors: white, gray, brown, beige. If desired, the screen can be painted in the desired color with alkyd spray paint on plastic;
- When choosing a plastic screen for a battery, make sure it is heat-resistant and non-toxic.
How to close batteries correctly - technical rules and tips
Before closing the heating battery, it is necessary to take into account several technical nuances:
- Keep in mind that the heat transfer of a closed radiator is reduced in any case, no matter which masking method you choose. The main thing is that the change should not be significant. Ideally, the decrease in air temperature in the room should be about 1-1.5 degrees.
- Before closing the battery, put it in order: blow, rinse (this is done at the end of the heating season) and paint.
- Keep in mind that the denser the weave of the grille, the better it masks the radiator, but the worse it conducts heat. Therefore, when choosing a screen for a battery, try to look for a middle ground or rely on heat saving.
- To minimize heat loss, the screen can be placed on legs, and a groove can be cut in the center.

- When closing the radiator, it is very important not to block convective air currents, otherwise it will blow in the room, and the windows will start to fog up, which will eventually lead to mold on the walls. Ideally, the visor of the window sill should protrude above the battery by no more than 30 mm, the top and bottom of the battery should be as open as possible.
- There should be a distance of at least 35-50 mm between the battery and the screen. There should be a gap of about 60-70 mm from the radiator to the floor and to the window sill.
- To solve emergency situations, it is necessary to provide free access to the radiator. For example, the grate of the box can be removable, folding (see photo), opening on hinges or retractable on profiles.

At a minimum, for trouble-free service, the following should remain in good accessibility: pipe connections, valves, thermal head and threaded connections.
- You can increase heat transfer by 20-25% by placing a heat-reflecting screen on the wall behind the radiator, for example, fumisol. Often this is quite enough to fully compensate for the heat loss of a closed battery.
The cold is just around the corner, and it is already worth paying attention to heating radiators, and thinking about how they can be hidden so that they do not spoil the interior. There are many creative ideas that will allow you to turn batteries into a decorative element and use them in a practical way.
Interior style disguise

In a beautifully designed interior, all objects and elements should one way or another overlap with each other and form a single style. Heating generators in this case are also no exception. They, of course, are simply obliged to fit into the common space and only decorate it, and not spoil it. Therefore, it is worth worrying about a decent disguise of the batteries in advance. In the classic versions, screens in an elegant style, made in light shades - ivory, beige, noble white, will be appropriate. Laconic wooden models without elaborate decor will look good in a Scandinavian or modern interior.

Choosing the Right Material

The choice of material from which the screen will be made must be approached no less scrupulously than the design of the product itself. First of all, the selected material must be resistant to high temperatures. Today, such screens are made of metal, plexiglass, wood, plastic and plywood. The most reliable and popular of them are metal and plywood. Wood can deform over time, and it is expensive, plastic is only suitable for offices and non-residential premises, glass can interfere with heat transfer during heating.

Warmth or beauty?

When choosing a screen, there is another dilemma: what to put in the first place - beauty or to take care of warmth to a greater extent. Here it is already necessary to build on how severe winters are where the apartment is located. If you want to reduce the flow of heat and it is hot in the apartment in winter, then you should take a closer look at the closed options. If space heating is in the first place, then you need to choose options without additional gratings, as well as as light and patterned as possible.


Practical use of the radiator

The most interesting thing is that thanks to the screens, the battery can be used as an additional place to rest, as a shelf or stand for decorative elements. Thus, two birds with one stone are in the hands at once - the battery is disguised, the interior looks great and at the same time it has an additional element that performs practical functions.


Any communications that have been laid or are located in plain sight have always been a problem. It can be very difficult to fit them into the overall interior of the room. But especially often there is a problem - how to properly close the radiator in the room. After all, it is necessary to maintain an important condition - nothing should be an obstacle to good heat transfer.
There are many ways that allow you to close heating radiators and at the same time ensure a comfortable temperature regime.
If this is not possible, then screen creation options are perfect. Namely, the design of the radiator in various ways that allow you to hide it. Several options should be highlighted:
- Hanging screen installation.
- Creation of a wooden - removable element.
- The use of drywall boards - for the box.

It should be noted that the last item is the most popular at the moment. At the same time, it cannot be regarded as the most ideal. The fact is that the creation of a solid box is a rather controversial decision. Indeed, in case of any breakdown, leakage, you will have to disassemble it completely, which is very inconvenient.
Therefore, the first step is to revise the heating system. Check the joints and connections, inspect the radiator for leakage or blockage. Only after such preventive work and replacement of damaged areas do the direct installation of the structure begin, which will close the battery.
The design for hiding the radiator must meet the following parameters:
- Warm air flows should not meet obstacles in their path. This ensures uniform heating of the entire room.
- All threaded connections and air and water discharge valves must be easily accessible.

Attention! Very often, an option is allowed that can be found in some apartments. It lies in the fact that heating radiators are completely hidden by plasterboard plates. This is invalid.
Screen for battery
This option is the simplest and most popular. Screens can be of different appearance. Often there are structures made of metal. There are two types:
- Hanging. They are simply superimposed on the battery, without having any additional attachment. Therefore, with any contact they can fall.
- Embedded. They are inserted into specially prepared boxes made of wood or drywall. A very convenient option. In addition to those made of metal, there are plastic, wood and HDF (high density fibreboard).
Which option to choose depends on the specific situation.
Creating a GKL box for a built-in screen
This option is the most common. It is quite convenient to make a box while finishing the walls with drywall, then you can immediately create a frame for it, which will be part of the overall design.
Stage one: preparation
Before you hide the heating radiator, it must be prepared. It is very convenient when modern batteries are used, but with cast iron ones you will have to tinker.
- Using an iron brush, remove the old layer of paint.
- The surface is degreased.
- Check joints, nuts and seams. If necessary, tighten or change.
- Paint the surface with paints for metal with a high temperature threshold.
 Usually, through the holes in the battery-covering structure, it is still partially visible, so the finish of the device itself cannot be ignored.
 Prepare the necessary tool:
- perforator with a drill or impact drill with drills;
- screwdriver, metal scissors or jigsaw;
- construction knife and level;
- sandpaper with a bar;
- hacksaw;
- brushes;
- capacity and a set of trowels;
- ruler (roulette) and a pencil.
You will need the following materials:
- Plasterboard boards.
- Perforated corner.
- Metallic profile.
- The grid is sickle.
- Self-tapping screws and dowels.
- Primer.
- Putty.

On a note! Sewing a battery with drywall is not as easy as it seems. At least minimal experience with metal profiles and gypsum boards is required.
Stage two: markup
It is determined how the box will look like - hanging in the air or standing on the floor:
- When the box is joined to the flooring, then immediately measure and mark three main lines - two side and front.
- If it hangs, then beat off the distance from the floor. A line is marked on the wall and checked by level.
Then make markings on the walls. Do not forget that from the edge of the box being erected to the edge of the radiator - there should be at least ten centimeters.
The result is a rectangle that will indicate the edges of the attachment of the future structure.
Stage three: creating a frame
 Profile frame for a box
 To do this, use a metal profile. Mounting technology:
- Profile guides are applied to the lines marked on the wall. They are pre-cut at the desired height. A drill drills several mounting holes. Do it so that there are marks on the wall.
- According to these points, holes are drilled into which dowels are inserted.
- The profile is placed on the attachment points and fixed with screws.
- Thus, all parts of the metal frame are installed. Do not forget to fasten them with connecting elements.
Advice! Between the metal profile and the surface, it is necessary to provide for laying a special shock-absorbing material.
You should get a metal frame that will be securely attached to the base. It would be better to close the heating pipes right away - for greater convenience, they are considering a removable option.
Stage four: sheathing

The further process will be completely uncomplicated when compared with the work that has already been carried out.
The sequence is:
- To close the heating point in the room, markup is done in advance on a sheet of drywall. Using a hacksaw (electric jigsaw) cut it into the desired elements. Small parts can be easily cut with a construction knife.
- Immediately calculated and the place under the screen. It can be of different sizes, most often they use 60 * 90 cm and 60 * 120 cm. It is better to measure the chosen option on the internal frame. A couple of millimeters are removed from the result.
- For greater convenience, each cut section is marked on the wrong side. Or they do it differently - they immediately install them.
- Details cover the necessary places. For this, self-tapping screws are used. They are screwed in increments of fifteen centimeters.
- Screws are screwed flush with the surface.
Stage five: finishing

The final stage of finishing begins. It lies in the fact that the created box is treated with putty. It is necessary to close all seams well. The process looks like this:
- The seams are slightly embroidered, a construction knife is suitable for this.
- The separated areas are primed.
- Perforated corners are placed on the corners.
- The outer seams are smeared with a mixture and a sickle mesh is applied.
- A finishing layer of putty is applied to the surface.
It turns out a design that has a "window" into which the screen is inserted. Thus, it is possible to close any heating battery.
On a note! Very often it is possible to create a fairly large box that can be used to store unnecessary things.
If a wooden structure is more suitable for the room, then it can be made completely removable (shown in the photo below). So, it is possible to close the heating radiator and not carry out numerous works.
Do the following:
- The markup is removed. Take into account the places of supply of pipes.
- A box is made of wood, which is immediately equipped with an external crate.
- Corner hooks are installed along the outer perimeter, the hinged part of which is screwed to the wall.
Now it remains to put the box in its place. Taking it off is also easy.

Conclusion
To close any heating element, special screens are used, which can be done independently. The main thing is to correctly calculate the size of the structure and complete the frame.
The heating radiator very rarely can harmoniously fit into the interior, in other cases it has to be somehow masked. In an attempt to bring beauty to the apartment and hide the batteries, many make big mistakes, the result of which can be an even greater protrusion of the place where the radiator is located, or a violation of convection air flows. How to hide a heating radiator in such a way as to preserve its necessary functions and make it truly invisible? We reveal the secrets of designers and learn how to apply them in the independent arrangement of an apartment.
No. 1. What needs to be considered?
The radiator, which some do not hesitate to compare with a log in the eye, performs in an apartment essential function, and we must not forget about it, because it is impossible to survive the harsh winter without proper heating. That is why all attempts to decorate the radiator should not go beyond common sense.
Deciding how to disguise, it's worth take into account such nuances:
The easiest way get a battery that is not conspicuous and 100% preserve all its functions - this is buy designer radiator. Such products are made to order and fully comply with the design of the room. The downside is the high price, which forces you to look for more affordable options.
No. 2. Radiator painting is the easiest way
In any case, it is better to paint the radiator in such a way as to “dissolve” it as much as possible against the background of the walls. It is necessary to use thermal paint, ideally - exactly repeat, but discrepancies in a couple of shades are allowed.
If the walls are not white, then a white radiator, clearly contrasting against their background - big mistake. Often, those who decorate the walls with patterned wallpaper also glue them into the niche behind the battery, thereby emphasizing the latter. In this case, it is recommended to leave the entire niche white: against its background, the white radiator will be almost invisible.
No. 3. Radiator painting
With painting and decoupage you have to be very careful, because there just cross the line from simply disguising a battery to protruding it. If a radiator with a pattern applied to it contrasts sharply against the background, it will catch the eye, although a completely different task was originally set. Such a battery, as if, suggests that it greatly interfered with the owners, and they tried to hide it.
Designers recommend painting not only the radiator itself, but part of the wall against which it is located. The drawing can be made in any technique and colors. If there is talent, then we take paints in our hands and start creating: do not forget that the paint must be resistant to heat. If there are no special artistic talents, then you can use ready-made stencils for drawing, use the decoupage technique or even vinyl stickers. The main thing is that everything looks harmonious, and the battery turns out to be really disguised. 
No. 4. Hinged screens (grilles) for radiators
Hinged screens, as a rule, are made of metal, have a lot of holes, so they do not interfere with free air convection. Among others benefits ease of installation, providing access to the radiator at any moment, a good assortment, besides, the metal heats up quickly. Hinged screens differ not only in color, the nature and size of the holes, but also in some functional features: there are models designed for one-sided and two-sided pipe connections.
It is better to choose grilles with rounded corners to reduce the risk of injury. From cons this option is not a very pleasant sound when struck, but it can be experienced. Dust from such a grid will have to be wiped regularly. It can also be advised to take the screen to the entire width of the window sill, and not to the width of the radiator: in this case, it will be possible to really disguise the radiator rather than underline its location.
The metal hinged screen can be of any color and style. You can even find a stainless steel screen with a shiny surface. If the former look good in a classic style, then the latter will complement the interior in. Forged screens, due to their openwork, provide excellent air circulation, but a radiator is visible through them, so they are often duplicated with a metal perforated sheet.
To be able to hide the radiator with glass, you need to pay attention to the method decoration surfaces. Of course, you should not leave the glass without a picture: in this case, the outlines of the radiator hiding behind the screen will be clearly visible, and the screen itself will play the role of drawing attention to the battery. It is desirable to at least give the glass some shade. Among the ways to decorate glass allocate:
- photo printing. You can apply absolutely any pattern to the glass, even a photograph taken with your own hand, so it will turn out to fit the screen perfectly into the existing interior;
- . You can use expensive stained glass techniques (fusing, Tiffany technique or faceted stained glass), or you can create a pseudo-stained glass window using films or paints, which is much cheaper, and the effect will be no worse. Another option is sandblasted stained glass, perfect for modern interiors;
- independent decoration. Typically, screen decoration is entrusted to companies specializing in this issue, but it is possible to decorate an ordered matte screen. with your own hands. This is a sticker of stained glass films, rhinestones, etc.
With glass screens, the same rule applies as with hinged metal screens: it must harmoniously fit into the space under the window, so it is advisable to choose glass with a width equal to the width of the window sill. If you highlight with glass only a part of the space under the windowsill where the battery is located, you will get an effect that is the opposite of what you expected. 
No. 6. Wooden screen for radiator
To mask the batteries, you can also use wooden screens, which are both attached and flat, if the radiator is located in. Such an option can be called the most environmentally friendly and one of the most attractive in appearance, since from wood that is malleable for processing, screens with the most bizarre patterns can be obtained. Externally, such a screen can have any look, it can be purchased both ready-made and to order.
Wooden screens are best used in classic interiors, and in order to successfully fit them into the room, they must overlap with other elements of the interior(furniture and doors), and optimally, have similar elements. In any case, such an overlay for radiators should cover the space from wall to wall or be as wide as a window sill. The wooden side screen can be used as a stand, table or even a bench. Main minus- this is a feature of deforming and drying out under the influence of temperature changes and with significant fluctuations in humidity levels.
chipboard screens not very common due to their not the most outstanding performance. Outwardly, they are not bad, but for use in a residential apartment, it is necessary to choose chipboard with a formaldehyde emission level of E0 or E1.
Plastic screens amaze with variety and low price. The main thing is to make sure the material is safe by examining the accompanying documentation. For screens, plastic should be used that can easily tolerate heat up to 60-80 0 C. Such products are great for, as they are hygienic and not demanding to maintain. 
No. 8. Creating a false wall with a niche for a radiator
If the radiator protrudes above the wall surface, then it can be quite difficult to disguise it with all the methods described above. In this case, they resort to mounting a plasterboard structure around the radiator, the main goal is to create a kind of niches for batteries. As a result, it is possible to achieve an excellent effect, but part of the usable area of the room will have to be abandoned. 
You can cope with all the work yourself: a frame made of a metal profile is constructed the same as with, or. Drywall sheets are mounted on the frame, special attention is paid to the area near the radiator. After all this, puttying the seams, priming and applying the finishing material to the walls follows. Himself radiator sometimes closed drywall with a number of small holes for air circulation, but this is not the best option - it is much better to use a metal grill or, in extreme cases, a plastic ventilation grill. 
No. 9. Several original ideas
If for some reason the standard solutions do not suit you, you can use more original methods:
- pull on picture frame fabric to match the walls and use as a regular screen. The option, of course, is suitable for radiators located in a niche;
- - a very unusual way to hide a radiator, but in some cases it has a place to be. Installation work is minimal;
- creation above the heating radiator. The frame of the fireplace can be made of drywall or plywood, close the hole with a metal grate. With the right finish, the design will resemble a real fireplace as much as possible, and in winter real heat will come from there.