Portrait light that the photographer should be aware of. The Secret to High Quality Portraits: Proper Studio Lighting
In classic portrait photography, there are some specific points to keep in mind and keep in mind in order to show off the unique features of your subject. For each individual case of shooting a portrait, depending on the features of the appearance, as well as the mood of the model, a special lighting mode is required, the correct ratio of light and shadow (black and white pattern), rotation and tilt of the model’s head, as well as the shooting angle (angle). Every portrait photographer needs to be familiar with these basics of portrait photography in order to be able to vary them at a professional level, competently breaking the rules. In this article, I propose to consider such an important aspect of portrait photography as lighting or portrait light: what it is, how to use it, and why it is so important when shooting.
According to my definition, portrait light or black and white drawing is a play of light and shadow on the face of the model, and their varied ratio gives the portrait the necessary mood, helps to hide or emphasize certain features of the person’s face. When shooting a classic portrait, as a rule, 4 main light models or schemes are used:
- Dividing or side lighting
- "Rembrandt" lighting
- Butterfly style lighting
There is also "short" and "wide" lighting, but this distinction is more about shooting styles than patterns, and can be used in conjunction with the aforementioned types of lighting. Let's now take a closer look at each type of lighting scheme separately.

The definition of dividing lighting fully corresponds to its name, in other words, it divides the face of the model into two equal parts, illuminating one part, and vice versa plunging the other into shadow. This type of lighting is often used to give an image a dramatic effect. It is especially popular when photographing portraits of musicians and artists. It is generally accepted that dividing lighting is more suitable for shooting male portraits. Although there are no hard and fast rules, I would still recommend that a beginner use this information as a guide until he learns to play with light on his own. The lighting scheme is shown in the figure below.

To achieve the effect of dividing or side lighting, it is necessary to place the light source to the left or right of the subject at an angle of 90 °. The height of the light source should be adjusted depending on the face of the model. By moving the source up or down, carefully watch how the cut-off pattern on the model's face changes.
With proper dividing lighting on the shadow half of the face, the light falls only on the eye, forming a glare. But if the light also hits the model's cheek and any changes in the position of the source do not give the desired effect, then perhaps this type of face is simply not suitable for side lighting.
NOTE: All lighting schemes are quite applicable to any position of the face, be it frontal, semi-frontal or even profile. Just keep in mind that your light source must be positioned relative to the face according to the type of lighting chosen. If you change the position of the face, then the type of light will also change. Try to use this advantage to your advantage: without moving the light source, you can easily change the look of the lighting by simply moving the model's head.
What is a "glare"?

Please note that in the eyes of the child shown in the photo above, two small white dots are visible, which are a reflection of the light source. This is what glare is. If you zoom in on the image, you can see the shape of the light source used to capture this portrait.

See, this bright dot is actually a hexagon with a dark spot in the center. It was the hexagonal softbox that I put on my Canon flash for this portrait.
If the eyes in the portrait do not have highlights, then they look dark, lifeless and even dead. So before you take a shot, make sure that at least one eye catches the glare. When shooting portraits, never forget about highlights, because they add sparkle to the eyes and enhance the feeling of life.

Loop lighting is a lighting scheme that casts a small shadow from the nose on the subject's cheek area. To create a loop lighting effect, set your flash slightly above the model's eye level and rotate it 30-45° from the point of view. It should be borne in mind that a more accurate location of the light source will depend on the individual characteristics of each individual person, and for this you will have to learn how to read people's faces.

Look at the picture above and you will see exactly how the shadow falls: on the left cheeks of the newlyweds, subtle shadows from their noses are visible. With loop lighting, you need to make sure that the shadow from the nose does not come into contact with the shadow from the cheek. When setting the lighting, try to create only a small shadow from the nose, slightly pointing down. Avoid the most common mistake when setting a light source - setting the flash too high, which can create a strange long shadow and disappear highlights. The loop lighting scheme is very popular among many photographers because it is easy to create and results in pictures that many people like.

The figure above shows a loop lighting scheme, where the black background is the background, which consists of trees. Sunlight comes from behind the trees, but the trees themselves are in complete shade. The white reflector is located on the left side of the camera, reflects and directs the incident sunlight onto the faces of the models. The reflector can be installed both in the sun and in the shade. In any case, he will catch the light you need. Most importantly, make sure that the reflector is turned 30-45° from your camera towards the model and is slightly above the level of the model's eyes so that the shadow from the nose falls down at a slight slope towards the corner of the mouth. The most common mistake inexperienced photographers make is incorrect reflector placement; if you set the reflector below eye level with loop lighting, then the shadows will not go down, but up, and this will lose the desired effect.
"Rembrandt" lighting

The following lighting scheme is called Rembrandtian in honor of the great artist Rembrandt, who very often used it when creating his portraits. If we look at the artist's self-portrait above, we notice the presence of an inverted triangle of light on the shadow cheek. Unlike loop lighting, in which the shadows from the cheek and nose should not touch, in this type of lighting they are connected, forming a small triangle on the model's cheek.

To create a Rembrandt lighting scheme, you need to set the lighting device at an angle of 45 ° to the model-camera axis and raise the flash to such a height that the light falls on the model’s face also at an angle of 45 degrees. When setting the light, make sure that the eye on the shadow side of the model's face has a highlight, otherwise, not only the eye itself will look dead, but the whole portrait may seem empty and lifeless.
Like dividing lighting, Rembrandt light can bring a touch of drama to a portrait, and with incredible accuracy. At the same time, reflect the deep feelings of the person depicted in the photo portrait.

When building a Rembrandt lighting scheme, the subject should be slightly turned away from the light source, which in turn is located above the level of the head of the model. It should be noted that not all face types are suitable for this type of lighting. For example, if a person has a flat and small nose, then this type of light will not suit him at all, but if your subject has high cheekbones and a clear facial contour, then the photo will surely turn out.
Natural light from a window can also be used as the main source of illumination, but if your window drops to the floor, then its lower part must be closed so that the light falls on the face of the model from above at an angle of 45 degrees.
Butterfly style lighting

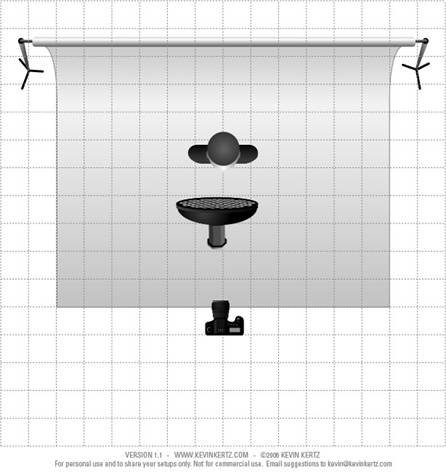
This type of portrait lighting got its name because the shadow that forms under the nose resembles a butterfly in its shape. This effect is obtained if the main light source is placed on top right behind the camera itself. With this lighting scheme, the photographer shoots directly under the light source itself.
Butterfly style lighting is often used in glamor photo shoots and to create shadows under the cheeks and chin. Since wrinkles are the least visible under this type of lighting, this type of light is considered ideal when photographing elderly people.

To build a butterfly lighting scheme, you need to set the light source above the camera and slightly above the level of the head or eyes of the model. Sometimes an additional reflector is used, which is placed directly under the model's chin and, as a rule, the model holds it herself! This type of light effectively emphasizes high, clearly protruding cheekbones and thin faces.
People with round, wide faces are more suitable for loop and dividing lighting. When building a "butterfly" light, a flash or other powerful light source should be used as the main source of illumination; reflected light or natural light from a window is clearly not suitable here.
wide coverage
Wide lighting has more to do not with lighting schemes themselves, but with shooting styles. It can be used in combination with the aforementioned types of light: so loop, split and Rembrandt lighting can be both short and wide.

Wide lighting is when the model's face is slightly turned away from the center. The part of the face that is closer to the camera is illuminated and at the same time it looks visually wider than the shadow side. Wide lighting is quite often used when shooting high-key portraits. With wide lighting, the face in the picture turns out to be wider than it actually is, hence the name. This type of light is ideal for narrow and thin faces and is completely unacceptable when shooting people with round and wide faces.

To create wide illumination, turn the model's face away from the light source. Then the side of the face that is closer to the camera will be illuminated, and the shadow will fall on the other side farthest from the camera.

Short lighting is the complete opposite of wide lighting. In the image above, you can see that the side of the face that is closer to the camera is darkened, and the light falls on the part of the face farthest from the camera. Such lighting is often used when shooting portraits in low key. Due to the fact that the main part of the face is in shadow, the face looks visually narrower and tightened, so this type of light is suitable when shooting people with round faces.

To create a short lighting effect, turn the model's face towards the light source. Then, the side of the face that is turned away from it, that is, which is farther from the camera, will be illuminated, while the shadow will fall on the side of the face located closer to the photographer.
Let's sum up total!
Only after you learn to recognize and build different patterns of light, you can safely begin to learn when exactly to resort to them. If you learn to analyze and read people's faces, then soon you will be able to quickly and correctly select the most suitable type of light for each individual person, taking into account not only the external features of the face, but also the character and mood of your model.
Portable light sources greatly facilitate the process of photography, as they can be easily moved around to create the necessary lighting schemes. But what if the main sources of light are the sun or a window? Here you will have to tinker a bit, moving the camera or changing the position of the model in relation to the light source, and thereby achieving the desired ratio of shadow and light on the face. In general, if the main light source is stationary, then you need to move all those objects that can be moved in relation to the light.
Workshops
First, find a subject for your photography (you need a live person, your dog is definitely not suitable for this purpose), and then start practicing building different lighting schemes for portrait photography.
- "Butterfly"
- Rembrandt lighting
Also, don't forget about the short and wide light styles and practice practicing each type of lighting first with a short style and then with a wide one. At this stage of the tutorial, focus only on the types of light and do not worry about other settings and parameters. If you do not have a professional flash, it does not matter, at the initial stage, a window, the sun, and even a simple floor lamp will do as a light source. Begin your practice by learning about short and wide light by placing your subject directly in front of your camera lens.
There are several nuances that should be constantly monitored in order to get a great portrait. These nuances include: the ratio of light and shadow, the lighting of the subject, the position of the face, as well as the angle of view. You should become familiar with these aspects of portrait photography in order to be able to vary them professionally in the future. In a specific article, such an aspect as portrait light will be described, namely, what it is, why it is so important in shooting, how to use it.
Portrait light can be defined as follows: it is a varied ratio (play) of light and shadow, due to which new forms are created. And the shape is created by the shadow on the face. There are four main types of light in portraits, namely:
- breaking light
- "the loop"
- rembrandt light
- "butterfly"
There is also a short and wide light, but it is more about shooting style and can also be used in combination with any of the types of light mentioned above. It is worth considering in more detail each of the types of portrait light.
The definition of breaking light is fully reflected in its name, in other words, it divides the face into two equal parts, plunging one part into shadow, and illuminating the other. Often this light is used to give the photo a dramatic effect, great for portraits of musicians and artists. Breaking light is considered to be more suitable for male portraits than for female ones. But it is worth remembering that there are no strict rules. However, a beginner should still follow some tips until he can play with light on his own.
To achieve the effect of breaking light, you need to place the light source to the right or left of the subject, and if possible, a little behind his head. The position of the light source directly depends on the face of the person being photographed. You should carefully monitor how the light falls and adjust the position of the source accordingly. Ideally, the break light allows only the eyes of the shadow side to be illuminated. If, at any position of the source, the light falls on the cheek of the object, then perhaps the face simply does not fit its shape for the separating light.
Important: all types of lighting can be applied regardless of the position of the face (front, semi-front, and even profile). It is only necessary to remember that the light source must be located relative to the face according to the chosen type of lighting. If the position of the face changes, then the type of light will change. So this can be used as an advantage: if you need to change the type of light, then you can not move the light source, but simply ask the person to change the position of the face a little.
What is a "glare"?
In the eyes of the child in the photo above, you can see the reflection of the light source. It looks like a small white dot, but if you zoom in, you can even see that this dot is shaped like the light source used in this photo shoot.
In this case, the bright dot has the shape of a hexagon with a black dot inside. This is the shape of the light that was used (a small hexagonal softbox on a Canon camera).
This effect is called "glare". Without it, the eyes in the photo will appear dark and lifeless. You need to make sure that at least one eye will have a highlight that will “revive” the face. Looking closely, you can see that the highlight also illuminates the iris and the eye as a whole. With a lens flare effect, the eyes of a person in the photo are full of life.
"The loop"
A kind of light called "loop" creates a shadow of the nose in the cheek area. To create the "Loops" effect, you need to set the light source slightly above the eye level of the person being photographed, and position it at 30-45 degrees from the camera (but you should also take into account the characteristics of each individual face, and for this it is worth learning to read people's faces).
In the photo above, you can see how the shadow falls, and on the cheeks of people you can see subtle shadows from their noses. In this type of light as a "loop", the shadows of the nose and cheeks do not touch. It is necessary to create a small shadow that is slightly directed downward. Many people set the light source too high, thereby creating strange shadows and missing highlights. Loop is the most used and well-known type of light in photography, as it is easy to create and the end result delights most people.
In the diagram above, the black background is the trees behind the people. The sun comes out from behind the trees, but people are completely in the shade. The white reflector, which is used on the left side of the camera, directs the light onto the faces of the subjects. The reflector can be in the sun, or maybe in the shade, but in any case, it will be able to catch the right light. By changing the angles and position of the reflector, you can vary the types of light in photography. For the "loop" you need to place the reflector at 30-45 degrees from the camera. It should also be slightly above the level of the eyes of the objects so that the shadow or loop of the nose is tilted towards the corner of the mouth. The most common mistake made by beginners is the incorrect position of the reflector; setting it below eye level, they thereby direct the shadow up, and not down, as required. This illuminates the tip of the subject's nose and the desired effect is already lost.
Rembrandt light is named after the famous artist Rembrandt, who quite often used such lighting when painting his paintings. This can be seen by looking at his self-portrait. Rembrandt light creates a triangle of light on the cheek. Unlike the loop, where the shadows of the nose and cheek do not touch, in this kind of light they are connected in such a way that a small triangle remains on the subject's cheek. To create a Rembrandt light, you first need to make sure that the eye on the shadow side is lit or catches the light, otherwise it will come out lifeless in the photo. Rembrandt light gives a dramatic effect to a photograph, just like breaking light, it reflects the mood and deep feeling of the photograph. It must be used correctly.
To create Rembrandtian light, the object must be slightly turned away from the light. Place the light source above the level of the subject's head. So that the shadow from the nose falls on the cheek. Not all people's faces are suitable for creating this type of light. If a person has high and distinct cheekbones, then the photo will turn out. In case the subject has a small and flat nose, most likely this light will not work at all. And again, it is worth remembering that this type of light in photography should not be used if the person does not like the result, and there is no suitable mood that you want to convey. If you are using natural light from a window, which in turn is located all the way to the floor, you will need to cover the bottom of the window with a gobo to achieve the desired illumination.
"Butterfly"
This type of portrait light, like the "butterfly", is so named because of the similarity of the shape of the shadow that is under the nose, with the shape of an insect. The "butterfly" is created by positioning the light source above and directly behind the camera. In this light, the photographer shoots directly under the light source. Usually the "butterfly" is used in photography for glamor magazines and in order to create shadows under the cheeks and chin. Butterfly light is also ideal for photographs of older people, as wrinkles become less visible.
The "butterfly" is created by a light source located behind the camera and above eye or head level (depending on the individual). Sometimes resorted to using a reflector, which is placed under the chin of the subject, in most cases the subject himself holds it! Photos with such light touch people with the effect of clear cheekbones and a thin face. For people with a round, wide face, a “loop” or breaking light is more suitable. And such a portrait light as a "butterfly" is more suitable for people with clearly protruding, high cheekbones and a thin face. Such light looks harsher when using a window or a reflector alone. Often hard light from a window or flash is needed to make the shadow under the nose more defined.
Wide light is more about the style of lighting a subject than when shooting a photo. "Loop", Rembrandtian and breaking light can be both wide and short.
Wide light is when the face is slightly turned away from the center, and the side of the face facing the camera is illuminated. The illuminated side of the face appears visually wider than the one in the shadow. Wide light is often used in High Key portraits. This style of light makes the face appear wider and is ideal for portraits of people who have narrow and thin faces. However, most people tend to appear slimmer in photos, so it's best not to use this light on people with wide, round faces.
To create a wide light, the face must be turned away from the light source. In this case, the side of the face facing the camera is the most illuminated, and the shadow falls on the other side of the face, which is turned away. Simply put, in a wide light, light falls on most of the face.
Short light is the complete opposite of wide light. In the example, you can see that the side of the face turned towards the camera is in shadow. Such light is often used in Low Key (darkened) portraits. Most of the face is in shadow, the portrait looks like a sculpture, the face looks slimmer, and also many people are delighted with the result.
In the case of short light, the face is turned towards the light source. It is worth paying attention to the fact that the side of the face that is turned away from the camera is most illuminated, while the shadow falls on the side of the face that is closer to the photographer. Simply put, in short light, a shadow falls over most of the face.
Putting it all together!
Once a photographer learns to recognize and create different types of light, you can begin to learn when to use them. By analyzing the face of the subject being photographed, the photographer learns how to choose the right type of light that is most suitable for a particular person and the portrait as a whole, as well as take into account the mood. A person with a small, round face who wants to look thinner in his portrait will not fit the light, which was ideal for a rock band, where people looked malicious and bloodthirsty.
The process of taking photographs is much easier if the main light source can be moved. But what to do if the light source is the sun or a window - everything is a little more complicated here. All that is required in this case from the photographer is to change the position of the object depending on the light source in order to get different shadows and lights on the face. Or change the position of the camera. In short, it is necessary to move objects that can move in relation to the light source if the latter is stationary.
Workshops
First you need to find a subject for photography (a living person, a dog will not work), and then start practicing in different types of light in.
« Butterfly»
« The loop»
Don't forget about the wide and short styles of light and practice each light with two styles. Do not worry about other parameters at this particular moment. It is worth focusing on learning and applying only types of light in portrait photography. As light sources, you can use a window, a floor lamp with a bare lamp, or the sun. Flash is best used by professional photographers, as only at the end of the photo you can see the play of light and shadow on the face. You can start by studying wide and short light by placing the subject directly in front of you.
The role of lighting in a portrait cannot be overestimated. The expressiveness and truthfulness of a photo portrait depends not only on its composition, but also to a large extent on the pattern created by light and shadow on the face and figure of a person.
Pay attention to portraits in photo albums and magazines. On how people are lit on them. I think that many of you will first notice how voluminous these pictures look. This is precisely the main task of portrait lighting - to show the volume of space and the subject in a two-dimensional image, to create a "3D effect" for our view. In addition, lighting helps set the mood of the photo. For example, when shooting a portrait in the so-called "low key", that is, with a predominance of dark shades, we give it drama, some mystery and mystery:
But the functional purpose of lighting is still primary - to show the roundness of features by outlining the face and figure of a person. In addition, good lighting makes it possible to show the texture of the skin. After all, good lighting idealizes our portrait, allowing it to grab the viewer's attention.
Light and shadow. The concept of key light
Key light is the basis of portrait lighting. This is the light that creates the main chiaroscuro pattern on the face and figure of a person. It is the key light that determines the volume of the portrait. Key light sources can be either natural (sun) or artificial (constant light lamps, flashes). The position of the key light source is extremely important when shooting a portrait. It should be exactly as much as you need, and exactly where you need it.

The second most important characteristic of light in a portrait is the volume and character of the shadows. The photographer must understand that the more shadows in the portrait, the more small details are hidden, the more dramatic it looks. When shooting, we can evaluate the quality of the falling shadows and dose them to obtain the desired result. For example, in the following portrait, the shadow very well emphasizes the figure of a young man, allowing you to focus not only on his face, but also on his muscles:

Hard and soft light
Before moving on to the main question of the lesson - "How to take a good portrait indoors?" Let's look at two more concepts. These concepts are hard and soft (or diffused) light.
Hard light is produced by a light source whose power far exceeds that of all other light sources, and whose rays fall on the subject almost parallel to each other. An example of such a source is the sun, an openly burning light bulb, the light from car headlights, searchlights. Since the power of the hard light source dominates the rest, we get sharp, contrasting shadows in the photo.


Hard light is very textured and brings out details. In the case of hard light, you need to carefully monitor the cut-off pattern - incorrectly cast shadows or overexposure can easily “kill” a good frame.
Soft light is the exact opposite of hard light. He, on the contrary, tends to hide details and soften the black and white pattern. If you want to smooth out uneven skin, then soft light is the best way to do this. An example of diffused lighting is a cloudy sky, the light of a light bulb through a ceiling, the light from a window passing through a curtain.
Continuous Light Sources When Shooting Indoors
Let's take a look around the house and see which light sources we can spot first. Surely many will immediately name the window. Indeed, this is the largest source of light in our apartment (during daylight hours, of course). Also, each of us in the apartment can find a lot of different lighting fixtures - chandeliers, sconces, spotlights, floor lamps, lamps for illuminating paintings. At a corporate event, indoor club or restaurant, spotlights or special lamps may be used.
Obviously, we still have something to pay attention to, and without resorting to flash. Therefore, let's analyze the features of these sources in more detail.
Light from the window
Natural light from a window is a source of light that has long gained fame among many photographers. As you know, the great Rembrandt was very fond of using window light when creating his works. It's time to feel like a Rembrandt!
The use of direct light from a window is not always justified. First of all, due to the fact that if you put the model in such a light near the window, you will get a very strong difference in brightness and, as a result, unnecessary overexposure and dips in the shadows. To avoid this, you need to achieve softer lighting.

If the weather is cloudy outside the window, the sky is covered with clouds, then there is nothing to think about - the diffused light is already there, it remains only to shoot.

But if there is a bright sun in the sky, then it is worth softening it so that the portrait is not spoiled. You can do this by covering the window with tulle or, for example, with a white sheet. Thus, you will turn the window into a kind of studio softbox.

Another option for softening harsh shadows is to use a special reflector (silver or gold).
Let's do a little experiment. Place the model perpendicular to the window. You can see that one side is lit, while the other goes into deep shadow. Try to bring a sheet of thick white paper to the shaded side of the model's face, and you will see how the shadow becomes lighter. The reflector works in the same way, brightening the shadows. Moreover, you can choose the color of the reflector - for example, silver will preserve more natural skin colors, and golden will give them warmth. When working with reflectors, it will be difficult for you to handle it alone, so you may often need an assistant to hold it at the right distance.
What shooting point should we choose when shooting? It all depends on what result you want to achieve. If side light is needed, place the model sideways to the window. If you need a front one, place the model opposite the window.


Many people like to shoot a spectacular silhouette in the backlight from the window - for this you need to build an exposure according to the illumination of the window. If you want to shoot a portrait in front of a window, then you may have to use an on-camera flash to brighten the figure of a person or, alternatively, enter exposure compensation in a positive direction.
The location of a person at an angle of 45 degrees to the window is very impressive - this way you get very voluminous lighting. The camera is placed as close as possible to the window and the lens is turned into the room.
Good to know!
- If an element of the interior gets into the frame, keep it presentable. If there are fatal claims to the interior, then try to work more with close-ups;
- The more a person moves from the center to the edge of the window, the softer the light falling on him;
- Keep an eye on the brightness histogram in your camera, especially if you feel like your face is overexposed. Remember that it is better to underexpose the skin, since it is much more difficult to remove overexposure, and sometimes it is simply impossible;
- Glare in the eyes is an important part of the portrait, which gives it life. Empty, black eyes won't stop you looking at a portrait for long, so be sure to keep your eye on the reflection of light.
room lighting
We can have many different lamps in our apartment - chandeliers, sconces, floor lamps. And it would be unwise not to try to use their capabilities. The first thing you should pay attention to is the color temperature of such sources. Many of them, like conventional incandescent bulbs, have a warm light, so before you start shooting, it's worth setting the white balance on your camera to match the available lighting. However, if you shoot in RAW format, the balance can also be corrected when converting in a special editor.
As a rule, indoor lights are not very bright, so slow shutter speeds may be needed to get sharp pictures, and, accordingly, a tripod to reduce camera shake. A very big plus will be the presence of high-aperture optics (although the presence of such optics is a priori a plus when shooting a portrait). Otherwise, you will have to shoot at high ISO numbers, and in these cases there is a big risk of digital noise appearing in the picture.
Below I have given a couple of examples of shots that can be taken using indoor lighting. In the first case, the lighting bulbs on the wall play the role of key light, they are matte, so the light is not very hard. In the second example, I used the same light bulbs to create backlighting, and also added light from the lamps in the room.


How to make the light fall correctly?
It is extremely important to understand in what position this or that source gives the most interesting light on the face. Surely many of you in childhood scared grandmothers, parents, friends and girlfriends, highlighting your face from below with a flashlight. Indeed, such light (as many people call it - "Hitchcock" - by analogy with the films of the famous master of thrillers) looks scary, so we shine in this way if necessary to convey a similar effect.

We have already mentioned in passing about the light "on the forehead" - with such light at the output you will get a fairly flat picture. We need to achieve volume!
The most correct location of the light source is just above the model's head. Try to take a regular flashlight and use one of your friends as a "guinea pig". As soon as you start shining a flashlight just above the face and direct the light at an angle of approximately 45 degrees to it, you will see how the face begins to “draw”: shadows will appear under the nose, eyes, lower lip, chin. If a person has pronounced cheekbones, then they will also be emphasized by shadows.

Another question may immediately arise -
How to follow the shadows?
If you put a person under a light falling vertically from above, then your eyes will instantly draw attention to strong shadows under the nose, eyes and chin.
The shadow of the nose is the first thing we pay attention to. Ideally, it should occupy a maximum of 2/3 of the area between the nose and the upper lip, without touching the latter. It is especially important to observe this when you shoot a person with a massive or very long nose. If it is not possible to put the source lower (for example, in the case of a chandelier or floor lamp), you can ask the person to raise their chin. Then the length of the shadow under the nose will become smaller.

If the light is held over the model, but also rotated at an angle to the face, then the shadow from the nose will begin to slide onto the cheek. This also needs to be monitored so that we do not get a long “Pinocchio nose”. If the light falls on the model from the side, then the shadow from the nose should either not be very pronounced, or fall in such a way as to merge with the shadow on the cheek. The result is a classic triangle under the eye.

The light falling from above creates a shadow from the superciliary arches on the eyes. We all remember how important the eyes are in a portrait, so don't go overboard with shadows. As a general rule, the shadow from the brow ridges should cover the eyelids and some of the upper eye area as much as possible. If your eyes completely fall into the shadow, then we will get a portrait of not a person, but a panda bear.


Using a camera flash
If you want to avoid digital noise in your photo and do without using a tripod, then the on-camera flash becomes a real lifesaver in low light. The rotary mechanism of the flash head allows you to achieve various black and white patterns. This can be evidenced by my experimental experiment.


In the first photo, I fired the on-camera flash head-on, resulting in a low-contrast, whitish image with a hard shadow on the wall and no pattern on the model's face.
The second photo looks more interesting - I turned the flash head towards the wall on the left and took a picture. As we can see, here the volume is obtained due to the cut-off pattern formed by the difference in brightness. Facial features began to look more interesting, the shadow beautifully outlined the muscles on the young man's arms.
The last picture was taken with a flash to the ceiling. This result also turned out better than the original one, but I liked it less than the second one. First of all, this was due to the fact that the ceiling in the room was quite dark and could not fully reflect the light from the flash. What's more, the color of the ceiling was brownish, and the light reflecting off of it tinted the photograph with the appropriate hues.
However, you can easily use ceiling light for portraits. If the light falls vertically, the model will get “panda eyes” in the portrait, this effect can be extinguished using the white cap on the flash (for example, it is built-in in the Canon Speedlite 580 EX flash, otherwise it will not be difficult to make it yourself from white cardboard) or a special diffuser. Part of the light from the flash will go to the ceiling, and part will be reflected on the person's face, which will highlight unnecessary shadows.
With on-camera flashes, you can achieve very good results, as, for example, in the following photographs, which I took at a meeting of veterans dedicated to Victory Day:


The light reflected from the ceiling created a very beautiful pattern on the faces. After giving the necessary texture in a graphic editor, I got two very dramatic portraits. When shooting, I used a long-focus lens, which allowed me to "grab" these portraits without attracting the attention of the heroes, and also opened the aperture as much as possible - up to 2.8, which allowed me to blur the extra background and focus all the attention on the faces.
As a rule, when working with on-camera flash indoors, I do not use its manual mode (except when I work with the flash remotely). Modern automatic camera flashes correctly calculate the exposure and put as much light into the frame as needed. If you need to give more or less light to the frame, then in this case you can set the pulse power manually.
Creative ways to use on-camera flash indoors
The pulse, when triggered, stops movement in the frame. If you shoot at the same time at a slow shutter speed, then the areas not illuminated by the light of the flash will be blurred. That is, there is a mixture of pulsed and constant light. I often use this creative technique to show movement in the frame, to give it the necessary dynamics.
As an example, I will give photographs of people dancing at a wedding banquet. After the flash fired, I began to turn the camera in different directions, swing it, in general, set it in motion by any means (I don’t recommend dropping it, of course).


As a result, the movement of the characters is frozen, and the unlit parts of the scene are blurred. At the same time, if there are sources of constant light in the frame, they will give bizarre lines that make the frame at least unusual. By the way, this method is called "shooting with wiring."
There is one more option. Below you can see a picture I took in a limousine. The camera is set to a slow shutter speed. During the shutter release, I turned the zoom ring on the lens. The flash froze the protagonist's expression, and the constant light from the window turned out to be unusually radiant.

Be careful when shooting with flash in very low light, avoid head-on shooting. Otherwise, you risk getting an illuminated fundus and, as a result, the notorious red eyes of your heroes. Currently, there are many remedies for this problem, but, you will agree, it is much easier to redirect the light from the flash than to waste your time.
A little about the possibilities of the photo studio
A photo studio is a true paradise for a photographer. Personally, I consider the studio a real forge of experiments. Here you can simulate absolutely any lighting - hard, diffused; control the power of sources and the size and direction of light fluxes; experiment with mixing pulsed and constant light, color filters, special nozzles, and even build scenery. If you wish, you can invite professional make-up artists and stylists to shoot, who will create fantastic looks for your models.


Personally, I am a big fan of the studio, and I embody most of my images here. I believe that a photographer who wants to learn how to shoot beautiful portraits will sooner or later end up in the studio anyway and feel how great opportunities it has.
Club lighting as an example of the use of natural light
My passion for photography began with shooting concerts. Even now, I sometimes shoot concert reports, because it is in such a lively atmosphere that emotional, vivid portraits are born, which you can easily brag about and surprise your friends.

As a rule, when shooting events in good, large clubs, lighting technicians work at concerts, adjusting the light for each group, dance group, etc. Many famous artists have their own lighting technicians - they know exactly where to use the filter of the desired color, in which - turn on the strobe, and in which one - specifically dim it. And since the light on the artists is directed in most cases from above, we get a beautiful picture.

It is natural stage light that is the main "chip" of concert photography. Personally, I absolutely do not accept the use of flashes when shooting concerts, because I think that they spoil the whole atmosphere (and, in addition, greatly interfere with the artists). In order to get beautiful, sharp photographs in such lighting, it is necessary to resort to the use of fast lenses. For example, I rarely shoot concerts at apertures narrower than 2.8. In addition, when shooting like this, I use high ISO values - from 400 to 800, and vary the shutter speed from 1/80 to 1/200 (depending on the intensity of the lighting and the focal length of the lens).
Read our article on how to take pictures using only one light source. It will be useful for both novice photographers and amateur photographers!
There are a lot of ways and types of lighting in the studio. Starting from lighting with one source, ending with the use of several sources along with diffusing umbrellas and screens. I would like to start with the basics, which is why in this article we will talk about lighting with a single light source.
Although this method of lighting is rarely used by photographers in studio photography, we have tried to find illustrations that reflect these lighting schemes as fully as possible, even if photographers used more than one light source when creating them.
Theoretically, the best source of light is natural light, since the sun itself is a single source. But the lighting from a single source in a studio is never the same as in direct sunlight, because in the studio the lamps are always very close to the subject.
Nikon_light_1" height="466.6666666666667" src="https://ic.pics.livejournal.com/nikonofficial/39162016/599304/599304_original.png" title="(!LANG:Nikon_light_1" width="700">!}
When the light source is directly above the camera, exactly above the optical axis of the lens, rather sharp shadows appear under the chin and in the background under the hair. The eyes, however, are well lit. Note that direct lighting gives a special shine to the hair. But there is also a big “but”, in this case the light does not model the shape of the face, and it turns out to be quite wide, with small features.
Lighting at an angle of 45 degrees

The primary task of such light is to illuminate the most important elements, to emphasize the volume and shape of the object or model being photographed. Such light is rarely used on its own, as it provides contrasting lighting, which makes it difficult to work out details due to the large range of brightness.
90 degree lighting

Purely side lighting sharply divides the face into illuminated and shaded halves. As a result, the face appears significantly narrower, but the shadow side appears wider than the illuminated side. This can be avoided by making the background very dark.
Keep in mind that under such lighting, the eyes are dimly lit, and the nose lengthens. The hair casts a shadow over the forehead. The structure of the skin begins to stand out more and more towards the border between light and shadow on the illuminated side.
Lighting from above

When illuminated from above, the source is directly above the head and slightly ahead of the model. The nose casts a clear shadow vertically down on the lip, the eyes are set off by the eyebrows and forehead, which in turn is shadowed by the hair. The cheekbones are clearly defined. Such a scheme can give good results with some types of faces.
Direct illumination from below

When illuminated from below, from a source located in front of the model at floor level, the picture produces a dramatic and ghostly impression. This type of lighting is never natural unless the subject is lying down. Theatrical lighting from low points provides the same effect.
back lighting

When backlit, namely when the light source is located exactly behind the model and hidden behind her head, a silhouette image is created. A stream of light forms a luminous halo or halo on the hair and shoulders. The form allows you to accurately recognize the portrait, but not a single detail will be worked out on the face.
Backlight is also called contour and accent. It reveals the shape of the entire subject of photography or any part of it, and also "tears" the subject from the background. To obtain a light contour line, a backlight source is placed behind the object at a close distance from it. You can adjust the thickness of the line of the light contour in the photo by increasing or decreasing the intensity of the backlight.
Lighting at a 45 degree angle using a diffusing umbrella

Soft lighting at a 45-degree angle is generally considered best for general portrait photography. To create such light, soft boxes and reflective panels, light panels, light disks are used.
Side profile lighting

Lighting perpendicular to the camera is used for full profile shots; in this case, the illumination can be direct or diffused. This determines the sharpness of the facial contour sculpting. The eyes are completely illuminated. To avoid a slight shadow on the side of the nose, the light source should be placed slightly closer to the model than the camera. You can add fill light or hair lighting to soften the shadow behind the head.
What methods can be used to soften the light?
- Diffusion. A translucent object, namely an umbrella, softbox, octabox or diffuser, must be placed between the subject and the light source.
- Reflection. Position your subject so that only reflected light hits it. This is why photographers shoot indoors by pointing their flash at the ceiling. It should be taken into account that when light is softened by scattering or reflection, a significant part of it is lost, and the illumination of the subject will decrease, as a result of which it is necessary to make adjustments to the shooting parameters (increase the power of the light source or increase shutter speed, open the aperture, increase ISO).
What are the characteristics of soft light? In contrast to hard, it well hides the flaws and defects of the surface being removed, makes the skin of the model more attractive, and the border of the transition between the shadow and light areas is less noticeable.
Of course, multi-source coverage produces a much more interesting impression, but we will talk about this in one of the following topics. Therefore, if you want to follow our publications, then do not forget to subscribe to our LiveJournal.
In preparing the article, materials from David Kilpatrick's book "Light and Lighting" were used. Thanks for the illustrations
Hi friends! In this material, from a series about studio shooting for beginners, I will tell you about a female portrait, why you can use both soft and hard lighting for this type of shooting (unlike a male portrait), which is extremely undesirable when shooting women and show not too complex lighting schemes for shooting a female portrait in a studio, which, I am sure, even beginners can master in practice.
So, when photographing a woman, it is important for us to convey ... what? That's right, her femininity! And also natural beauty, tenderness, sensuality, smooth lines of the body, expressiveness of the look. Be sure to reveal the character and personality in the photo - after all, there are no two identical women in the world, however, like men :)
It is important to emphasize what is inherent in this particular woman, whom you are looking at through the viewfinder lens - what is her specialty? It can be shyness and modesty, or it can be emotionality, artistry, or even a cool disposition and a desire to be a queen in any situation.
Find a starting point. What does it take to make a natural, natural and lively portrait? Position the model. When a trusting atmosphere has arisen between you, you can start shooting - so it will be easier for you to figure out in which direction to move when creating a female portrait.
If you read the previous article in which I talked about the specifics of a male portrait, then you know that the key to the success of such a shooting is the use of hard light. For a female portrait, in most cases, soft light is suitable, without sharp transitions from light to shadow, with low contrast. Why? It is the soft, filling light that will emphasize all the advantages of the face and body, without focusing the viewer's attention on the irregularities of the skin texture - because. there are not very many people with perfect skin, this is a very important aspect.
Hard light can also be used to capture a female portrait. This approach to photography is most popular in the fashion industry. But in this case, there must be an idea, a design that justifies the use of hard light. And the implementation is flawless.
So what are the pitfalls for a photographer who wants to use a key light scheme? Yes, in general, there is only one "stone", but it is very weighty - it is a sliding light. One that focuses on even the slightest skin imperfections. Therefore, my dears, if you are not 100% confident in your abilities - do not risk it, use fill light. Otherwise, you will probably have to be patient, making deep retouching of the captured portraits using the wrong key light scheme.
Of course, you can spend time looking for a model with an impeccable skin texture, on which, no matter what, you will always get a good result. But! Such models, as a rule, are worth their weight in gold, do not pose for free, and even are constantly busy. So I advise you to take your first steps in the studio shooting of a female portrait using soft light.
So we come to light shaping nozzles on monoblocks that generate fill lighting in the studio. These are nozzles equipped with diffuse surfaces: all kinds of soft boxes and strip boxes, octoboxes, white umbrellas through the light. But it’s not enough to know which nozzles form diffused light, you also need to know two simple rules: the hardness of light depends on the distance to the subject and on the size of the source. For example, a small portrait soft box standing 3 meters away from the model will produce hard light. A two-meter octobox a meter from the model is soft. And the closer we move the portrait soft box to the model, the softer the light it will give us, and accordingly, the further the octobox moves, the harder light we will get as a result.
Having mastered these principles, you can not be limited to diffuse nozzles, but experiment with reflectors and a beauty dish - they give a pattern different from diffuse nozzles, and given the variety of sizes and coatings of reflectors, additional devices for them - finding "your own light" for a specific task will be very exciting occupation.
Now let's go through the lighting schemes for shooting a female portrait in a studio.
(ss) Michall Korchia
how it's done:

Two light sources are used. The octobox is located slightly to the right of the model. Stand height is at face level. A reflector with curtains is installed to the rear-left of the model, about one and a half meters high, with the help of petals a narrow beam of backlight is modeled, highlighting the hair and figure.

(ss) Sean McGrath
how it's done:

This scheme also uses two light sources. The main source (gives a more powerful impulse) is a monoblock with a softbox nozzle, it is located in front of the model, the light is directed downwards at an angle of 45 degrees. The height of the rack is about 2.5 meters. The octobox is also located frontally, at about the same point as the softbox. The height of the stand with the octobox is at the level of the model's waist, the light source is directed upwards at a slight angle. A soft light-and-shadow pattern is created that evenly illuminates the face and figure of the model. Due to the large size of the light sources and the small distance (about two meters) between them and the background, there is also a uniform illumination of the background, with a pleasant vignetting of the upper part of the frame.

(ss) Yuri Hakhalev
how it's done:

The scheme uses one light source - a strip box installed at a short distance above the model's head, strictly in the center, the strip box is deployed along the camera-model line. Due to this position of the strip box, the accents are very well placed - the main one on the face and the secondary one - on the clothes. The result is a minimalistic composition, in which, in my opinion, there is nothing superfluous.

(ss) Yuri Hakhalev
how it's done:

In this scheme, two light sources were used: a beauty dish in front, a height slightly above the level of the model's eyes, and a reflector behind the model at a height of about one and a half meters, creating a backlight and highlighting the developing hair.

(ss) Yuri Hakhalev
how it's done:
A single light source was used for this photo, a beauty dish with a honeycomb. The source is located above the model from above using a crane or a suspension mounting system so that the racks do not interfere. The plate is directed downward at an angle of about 60 degrees. A monoblock with a nozzle is located half a meter from the face of the model.
Of course, these are far from all the lighting schemes used by photographers in practice for shooting a female portrait. Since my goal is to introduce beginner photographers to the basics of studio photography, as an example, I showed those schemes that do not require a large number of light sources or skills to work with attachments such as Gobo masks or Fresnel lenses :)
I would like to believe that for someone my article will be a good start and a cozy haven in the endless ocean of studio photography opportunities. Favorable wind to you, dear friends.