Do-it-yourself hanging planter for indoor. DIY flower pots: ideas and detailed workshops
All photos from the article
Wooden flower pots can be a real decoration for your home, apartment or suburban area. Such structures are easily assembled with their own hands from the cheapest materials, they look great and serve for a long time, and if necessary, they can either be repaired with minimal labor or just as easily disposed of.
In the article we will tell you what advantages such products have, as well as give tips on making the simplest models.

Advantages of wooden flowerpots
Flowerpots made from wooden parts are a little less common than plastic or ceramic ones.
At the same time, these structures have a number of obvious advantages:
- The material is very easy to process, therefore, not only a professional carpenter, but also any of us with a minimum set of tools and skill can make a flowerpot or planter.
Note! The second aspect of this advantage is the wide range of design possibilities. Using a saw, a jigsaw and a hammer, you can make a flower pot of almost any shape and size.

- The price of products is quite low: neither expensive raw materials nor complex devices are required for work.. In principle, pots can be made literally from what is at hand, spending only on fasteners and decoration.
- If the technology is followed, a protective flowerpot can last up to ten years. At the same time, worn parts are replaced quite quickly and simply, so repair is also not difficult.
As for the cons, the main problem that we will have to face is the hygroscopicity of wood. Upon contact with wet soil, the walls of the flowerpot can either begin to deform or rot, so we will definitely include moisture-proof and decorative processing in the manufacturing algorithm.
Manufacturing of wooden structures
Option 1. From a log or stump
If you plan to grow flowers on the site, then a stump, log, half-deck and other fragments of a tree of this type will serve as an excellent preparation for a pot or flowerpot.
The appearance of such "pots" will perfectly fit into any site design, while the manufacturing instructions will be extremely simple.

- To begin with, we select a stump or a log of the diameter we need. The larger the plant that we plan to plant, the larger the flowerpot should be, otherwise the root system will not be able to fully develop, and we will not wait for beautiful flowers.
Note! From thick trunks, you can make containers even for small flower beds - if only the diameter allows.
- Next, using a saw, cut off a part of the log of the desired length. As a rule, flowerpots for soil are made about 40 cm high, and for a high location - 1 - 1.2 m.
- Then we take a drill with a drill up to 25 cm long and about 20 mm in diameter. In the upper plane, we drill several holes at the same distance from the walls. Also, using a drill, we make a series of nests in the center of the deck, destroying the core.

- With the help of a chisel, we remove the wood, forming a container for the soil. We carefully align the edges, forming sufficiently thick and strong walls.
Now we can act in two ways:
- if there is a ceramic or plastic pot of the desired diameter, then we simply install it in a log flowerpot, protecting the wood from moisture;
- If there is no pot, then we carefully treat the inside of the stump with moisture-proof impregnations, then line it with polyethylene and only then fill up the drainage and soil mixture.
Let's see how you can transform your favorite indoor flowers? For example, if you create a flower pot with your own hands, then such decor will please the eye and add zest to the interior. In addition, having equipped flower stands and / or shelves for flowers with your own hands, it will also become convenient for you to take care of your pets.
Pot design options for indoor flowers
What is the difference between a planter and a regular flower pot? Translated from French cache-pot means "to hide the pot". Thus, the planter is a decorative "wrapper". Of course, a clay pot will be the best home for flowers, but it quickly loses its attractive appearance, since ceramics let water through and stains appear on its surface that cannot be removed. Glaze is often used as a protective film, but it cracks and crumbles over time, and then the pot will either have to be replaced or decorated. In this case, a planter comes to the rescue - with its help you can easily hide unsightly places and create decor in the same style.
If you have a couple or three pots, then the easiest way is to arrange them beautifully on the windowsill. But if there are more than a dozen colors, then placement can be a problem. The most common way to hang a planter is to use ready-made hanging hooks or make holes for a rope. But you can make the mounting method creative.
You can organize a simple crossbar or build a whole structure under the ceiling, on which, for example, hang several.

The design of a one-piece planter does not provide for drainage holes, and openwork ones do not retain excess moisture, so this must be taken into account when watering.
Or here is such an idea of \u200b\u200bhanging a planter, even those who can’t do it can implement it:
If you need to place a lot of flower pots in a small space, then this idea is for you!

With the help of simple tricks from wooden blocks and a rope, you can make a whole shelf for flowers with your own hands by equipping hanging structures. More detailed instructions in this video:
Imagine, combine different ways, the more flowers you can place, the more comfortable your home will be.
Making flower pots with your own hands from scratch: materials and master classes
In this section, we will consider options for independent "cases", which are made separately, and then a flower pot is "populated" in them. For indoor planters, the choice of materials is unlimited and correlates only with the overall design and your preferences. The most common and used for hand made:
- cardboard,
- paper tubes,
- felt,
- recyclables.
From felt
From simple materials for needlework and children's creativity, wonderful things are obtained, you just have to apply your imagination. Look, a charming planter from.


Do-it-yourself stands and shelves for pots
Making a planter or decorating a pot is not all. This beauty needs to be put somewhere! Here you can not do without special shelves and stands. You can build a structure on the wall.

And you can order a whole bookcase on the floor.

Or here is such a bookcase-ladder.

And it is not necessary to ask someone. If you buy blank parts sawn to size in a store, then even a gentle female hand can cope with the assembly. Like in this video:
But it is much more interesting to turn on the fantasy and adapt unusual objects under the shelves to place the flower pots. For example, pallets. Paint with a stain or dark paint and now - a great shelf is ready.

And in this tool trolley, various plants coexist perfectly, creating a mini-.

"Cross" will not advise bad! :)
Categories ,A popular topic among landscape and interior designers has become the idea of creating interesting flower pots with your own hands, since primitive plastic pots have not surprised anyone for a long time. Today we will consider how to make a planter yourself without much effort and material costs.
Materials for planters
The most commonly used as materials for the manufacture of decorative are:
- wood is natural and beautiful, you need to choose its high quality and resistance to moisture;
- ceramic pots for indoor flowers are very diverse, can be painted or glazed;

- stainless steel is characteristic of hi-tech style;

- metal products can be made multi-tiered or forged;
- plastic pots are practical and light, so they are often used outdoors;

- polystone is very plastic, so you can make planters from it on the wall or on the floor of any shape, besides, it is absolutely harmless.

Cache-pot from mirror tiles
Often, small mirror tiles are used to decorate walls, but decorative pots look beautiful and stylish with their help.
- To create one product, you will need 5 pieces of tiles and a hot glue gun.
- Lay one tile on a flat surface of the table with the mirror part down - this will be the base of the figure.
- Attach the remaining 4 tiles perpendicularly to its sides in turn, fastening the joints with hot glue.
- As soon as the glue finally sets, place a light pot with a plant in the resulting box. Everything is ready.
- The ability to reflect the surrounding objects makes this interior detail quite interesting to contemplate.

Wooden model from a bar
It is better to make street planters from a bar, as the material is quite wear-resistant. This option is suitable for amateur home carpenters who like to tinker with wood.
- For a natural product, you will need 24 sticks of 15-20 cm each (depending on how high the pots you want).
- It is necessary to lay the bars like a well, forming a square box with through openings, attaching a couple of boards as a bottom.
- It is better to connect pieces of wood with one another with self-tapping screws.
- Hanging ropes are tied to the corners of the upper row of bars.
- Such flower pots are hung from any tree in the garden or on the veranda.

Coconut flowerpot
From the shell of the most ordinary coconut, you can make an exotic planter. They look especially interesting and harmonious in such products.
- In the part of the nut where there are three dark "eyes", carefully make holes with a knife or screwdriver. Drain the juice through them.
- Bulgarian (hacksaw) cut the dense shell across.
- When the nut dries, cut off all the inner flesh with a knife.
- Use a drill to make 3 holes closer to the top edge of the shell for hanging.
- Pass wire, ropes, chains or special metal hangers through the holes.

"Clothes for the pot" from burlap
If you are interested in how to make a planter for decorating a fence, pay attention to the seasonal fabric model.
- To make a rustic country-style planter, any dense fabric will do.
- Cut out two blanks in the form of semicircles or squares like a pocket, and hang it on the fence.
- In order to strengthen the pot into it, a strip of cloth or a wire threaded into the fabric should be sewn to the upper edge.

Vinyl planter from an old record
It is unrealistic to meet intricately curved pots or coasters in the store, so after spending only 20 minutes of your time, you will get a unique little thing. Required materials:
- an old record for a gramophone;
- pan or jar for molding;
- acrylic paint;
- thick work gloves to prevent burns.
A decorative pot stand is created according to the following plan.
- Place the plate on a plate.
- From above, install a jar of the diameter that you need later.
- Place the entire structure in an oven preheated to 150 degrees for a couple of minutes.
- Very soon, the plate will begin to soften and melt. As soon as you notice this process, immediately put on mittens and remove the structure from the oven.
- Immediately start molding the product around the pot or jar.
- While the material remains soft, make 3 holes in the walls with a screwdriver to later install the hanger.
- Finish the design of the cooled product by painting with acrylic paints on the outside, and, if desired, inside.

Cache-pot from branches or sticks
Wooden planters most harmoniously fit into the garden interior. Note that large planters are decorated with large branches, so prepare the right amount of material in advance.
- sticks or branches;
- thick twine;
- a piece of burlap;
- hot glue;
- simple plastic pot.

Weaving pots for indoor plants from wooden sticks is performed as follows:
- Smooth twigs or sticks are cut into equal pieces about 20 cm.
- From below and from above, the branches are connected to each other to form a single canvas. Tie a knot on the first branch, lay the next branch, and tie the knot again. Continue like this until you have tied all the branches together.
- Screw a piece of burlap onto the desired plastic pot, fixing it with a glue gun.
- Wrap a canvas of wood around a flower pot, and tie the ends of the ropes together.

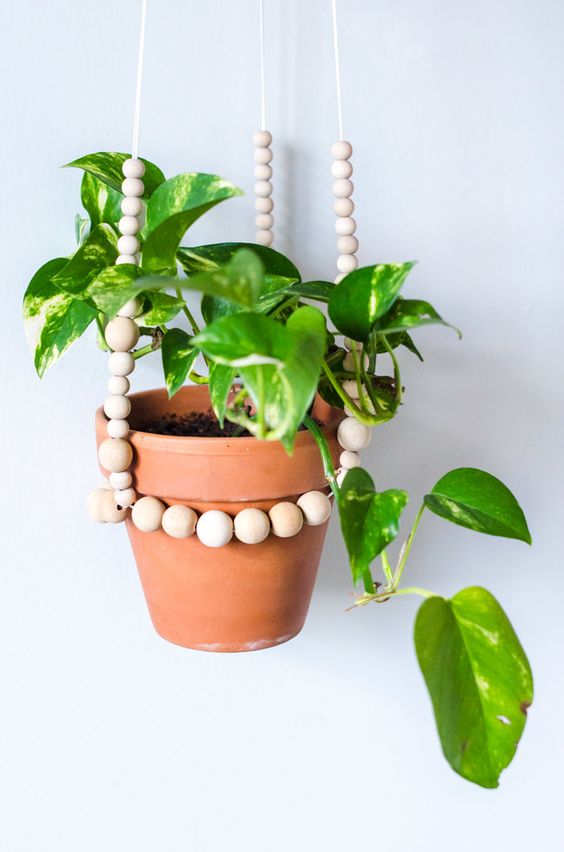
Wicker macrame planter
Macrame hanging planters for flowers are suitable if there is no more space left on the windowsills. Need:
- 8 m of natural fiber rope;
- pot with a diameter of 10 cm;
- 4 large and 4 small balls (a rope folded in half should pass freely into their holes);
- wooden ring for curtains;
- masking tape;
- acrylic paint with a brush.

Before weaving a flower pot with your own hands, familiarize yourself with the technology:
- Color the balls and the wooden ring. Glue the tape on the pot, forming a pattern, paint on top, and tear off the tape until the paint layer is completely dry.
- Cut the rope into 4 equal pieces of 2 m each.
- Fold them in half, thread them through the ring, and fasten them so that a loop forms.
- Thread each pair of ropes first through a small, and then through a large wooden ball.
- On each pair of ropes, measure 40 cm, and tie a knot on them. You will have 4 knots at the same height.
- Separate pairs of ropes, and tie each of them to the next one. You will get some kind of zigzags. The distance between the lower and upper rows of knots should be 6 cm.
- Now tie the rightmost rope to the leftmost one. So you will have a circle.
- Repeat the procedure. Divide the ropes again and tie a series of knots, retreating from the previous 6 cm.
- At the end, collect all the ropes, and tie them into a large knot. Step back 6 cm from the previous row of knots, cut the ropes, leaving a small brush.
- Take the pot and insert it into the formed cocoon.

The resulting wall planter can be hung in the room or decorate the facade of the house with it. Below is a tutorial video for your reference.

putty swan
This floor planter for flowers is suitable for decorating the garden. An artificial swan looks expensive and interesting, and the cost of such an idea is cheap. You will need:

- 5 liter plastic bottle;
- small pieces of reinforcing mesh;
- metal rod;
- gypsum starting putty;
- water;
- bandage;
- Oil paint;
- sand.

Manufacturing instructions:
- Turn the bottle on its side.
- Cut off the top of the bottle, screw on the cap.
- Lay on a flat surface, fill with wet sand.
- Bend the rod in the form of a deuce, fixing it in a cork.
- Mix the plaster according to the instructions on the pack. Lay it out on a cling-lined work surface. Place a sand bottle on top of the plaster. Form the body of the swan and the beginning of the neck.
- On the walls of the bottle, also apply plaster, leveling it with a wet brush.
- Bend the mesh for the wings a little and reinforce it to the putty on the sides.
- With wet hands, form the “feathers” and neck, wrapping layer after layer of plaster with a bandage.
- From a piece of twig and putty, make a ponytail.
- Eliminate all the shortcomings, and after 2-3 days clean the product with sandpaper.
- Apply a layer of primer for painting, after drying, cover the bird with white enamel, decorate the eyes and beak.

As you can see, making an original and modern planter with your own hands is as easy as shelling pears, and the result will not only decorate the house and yard, but also inspire you with new ideas. What decor options do you like the most? Share your experience in the comments.
Video: Weaving macrame pots
To decorate the garden and the house, gardeners often use hanging planters.
Baskets made of vines look very nice, which can be made in a wide variety of shapes, for example, in the form of a ball, cone or rectangular box.

Perhaps, flowerpots made of wire or forged metal will become a harmonious decoration of any landscape design. This option is especially attractive in that it creates the feeling of a certain complete "flight" of the flower bed.

In addition to the shape, material and design of the flowerpot itself, when choosing it, it is important to pay attention to the fastening. In addition, the fastening of containers for hanging flower beds must be very strong and reliable.

This is necessary so that when decorating a flower bed in the yard, you can rotate the plant from time to time to protect it from the sun's rays.


The specifics of planting suspended flower beds
Planting a hanging flower bed depends on the shape of the flowerpot. In simple flowerpots, reminiscent of potted plants, that is, those that have only one open surface, the plants are planted as usual.
It is a completely different matter if the flowerpot is designed to create a hanging ball. In this case, the walls of the frame are filled with moss, which is designed to retain moisture, and the entire basket is covered with a special film, which is most often sold complete with such flowerpots.

Then, in those places where the shoots should subsequently grow, it is necessary to make small holes. The seedlings should be carefully inserted into the holes made, and the soil should be poured into the flowerpot and the plants should be planted at the top.
Having planted flowers to create a hanging flower bed with your own hands, you should water the soil a little and hang the flowerpot in a cool place for several days.

Hanging flowers in the garden: which plants are suitable for hanging flower beds
To create hanging flower beds, it is better to choose plants that are unpretentious in care and do not have special requirements for the condition of the soil.
In addition, when choosing inhabitants for such flowerpots, it is important to consider the ratio of the size of their root system to the size of the pot.
For example, petunia roots grow very quickly, and if the pot for this flower is less than 6-8 liters, then its root system will soon fill the entire volume of the container, due to which the plant may die.

A do-it-yourself hanging flower bed will have a very beautiful design when planting luxuriantly blooming annuals in flowerpots, for example, pansies, petunias, verbena, marigolds, etc.
Almost all domestic plants, including Kalanchoe, nasturtiums, daisies, rejuvenated, stonecrops, etc., also get along well and grow in a hanging planter or flowerpot.

Of course, bright colorful flowers will always be a worthy decoration of any garden or interior, but you should not think that only flowering plants can be used in the design of hanging flower beds. For example, flowerpots with herbs - mint, rosemary, etc. look very beautiful and stylish.

And for those who love originality, we can advise you to make a very unusual, but very useful decoration - a hanging basket with small-fruited vegetables, for example, strawberries, which will bear fruit even on the veranda or balcony.
Specific care for hanging flower beds
Caring for plants planted in hanging pots depends on whether they have pallets.
Baskets without a pallet prevent stagnation of moisture in the soil, which, on the one hand, is good, since it slows down the decay of the root system of plants, and on the other hand, it can lead to a lack of moisture if the flower bed is in a sunny area.

If the flowerpot is equipped with a tray, then you should not water the plant too often, and also install it in darkened areas.
In addition, the soil in hanging flower beds must be periodically fertilized, because. during watering, minerals in it are washed out.

In all other aspects, caring for plants in hanging garden beds is no different from caring for plants planted in open ground - they also need to be watered regularly, eliminate dried leaves and fight pests.

Hanging flower beds are exactly the addition that can give brightness and expressiveness to any suburban area. They can be hung in gazebos and pergolas, on fences and poles, on garden benches, in a recreation area, on a summer terrace, balcony and even on the walls of the house - everywhere they will look beautiful and harmonious.

However, when designing suspended street flower beds, it is also important to take into account the style of the backyard plot. You can beautifully emphasize the beauty of the landscape with bright colors or unusual shapes, or you can focus on the natural beauty of plants.

If such hanging flower beds "settle" in your garden, be sure that this decision will not disappoint you. Beautiful flowers and plants, neat and well-groomed, always delight the eye and create an atmosphere of comfort, and if they are also suspended in beautiful, original flowerpots, then such an arrangement of the site can only be envied.
Old enameled bowls, flower pots, buckets will be used to create planters. The containers are hung on chains and hung as high as possible so that any passer-by can see and appreciate this beauty.


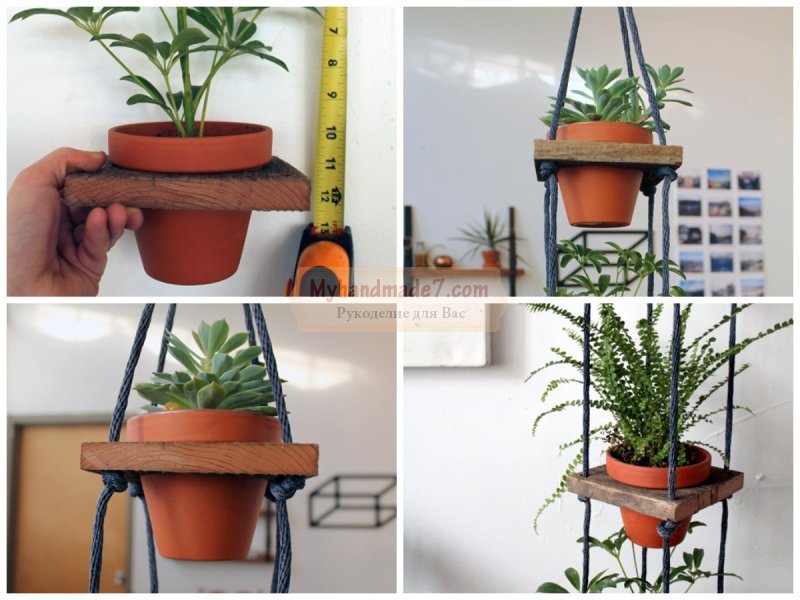
It is such a pleasure to make simple things for the garden with your own hands. Please yourself with a hanging flower pot, it can perfectly decorate the porch of a private house or a balcony in a city apartment. And we will share with you a master class on its manufacture ...


What you will need:
- Wicker basket, you can use an old one or even weave it yourself
- Sphagnum is peat moss, it is used in gardening and construction, you can find and collect it in a marshy forest or purchase it in specialized stores
- Rubber gloves
- land for landing
- Small plastic trash bag
- Bucket of water (for soaking the moss
- Beautiful flowers and plants for planting

Soak the sphagnum fibers in a bucket of water, wring out a little and lay out the bottom of the basket.

Once you've laid out enough moss, place a piece of polyethylene on top and poke small holes in it to help trap some of the moisture.

Fill the remaining space with potting soil.

Start planting your flowers and plants. It seems to me that ampelous petunias or other ampelous flowers will look great in this pot.

We decorate the garden with our own hands. Enjoy)))

wooden planter
For the original hanging planter, you will need 24 bars 15-20 cm long. Laying them in a checkerboard pattern, they form a square box with through holes.
Connect the bars with nails or screws. Ropes are tied to the bars, at the corners of the upper edge of the planter and a homemade planter is hung on any tree in the garden.
Wooden planter with viols:

A wooden planter, similar to a hanging swing, will “hold” an entire flower bed with pansies (violas) on itself
burlap pots (tarpaulin, felt)
A heavy fabric, such as burlap, is great for making rustic planters. All that is needed for this is to cut two blanks from the fabric in the form of a semicircle or square, sew them like a pocket and hang them on the fence.
For hanging, you can use a fabric strip sewn to the upper edge of the planter or a wire threaded into the fabric.
Hanging planters for the garden made of felt

In a felt pot, you can put a pot with garden annuals.
New outfit for the watering can.
If you have old watering cans or buckets with basins lying around in your country house, do not throw them away, treat the surface with rust sandpaper and paint them in bright colors. Inside it is fashionable to put pots (or bags of soil) and flowers. And these items will turn into funny pots
You can hang them on racks, trees, fences

How to make a hanging flower pot from a plastic container
1. Materials and tools. Plafond itself. Galvanized wire with a diameter of 2 mm from the latest project. Key ring. Round nose and pliers.
2. We prepare three pieces of wire 25 cm long.
3. With the help of round-nose pliers at one end of each wire, we bend a round eye.
4. At the other end of each wire, we make a “P”-shaped bend. After all the modifications, the length of the three blanks should be the same.
5. Using an awl or the sharp end of scissors, we make three holes with our own hands in the area of \u200b\u200bthe neck of the ceiling.
6. Insert "P" -shaped hooks into the holes
7. We put wire blanks on the key ring. The pot is ready.
8. We plant plants. Plants can be varied, but it should be noted that the pot does not provide drainage and, if the plant requires frequent transplantation, it may be difficult to extract the plant in this pot design.
Pots can be built not only from cans, but also from plastic bottles(the most common source material. which is always at hand).
Paint the surface of the pots

You can decorate the pots with twine
To do this, we need a plastic bucket of ice cream or other products:  and you will also need jute twine


Glue the beginning of the skein together to fasten the handle.
And we begin to wrap the twine around the bucket. Make sure that each circle fits snugly together, without gluing the twine. When you have reached the bottom of the bucket, you can glue the last few circles, and also glue the end of the twine well.


Then it remains to make 4 holes and hang a bucket-planter decorated with twine.
Wicker flower pot
You can braid a flower pot to hang it in a simple way that imitates macrame.

In order to make a hanging planter, we need about 10 pieces of thick rope, about 90-120 cm long, several large buttons and a metal ring. And decide on the size yourself.

Instructions:
We fold our pieces of rope in half and fasten with a simple loop as shown in the figure:

Then select two loops located side by side and fasten their adjacent ends with a button, as shown in the figure. It is better to place buttons at a distance of 5-7 cm from the ring.
Even the brightest flower beds need framing - "outfits" that will further emphasize their beauty. The most spectacular and at the same time simple “outfits” are considered to be street planters. Making them with your own hands will not be difficult. Do you want hanging planters from bottles, wicker from a vine or ground from a tree stump? No problems! Read the instructions on how to make a planter from these and other materials, as well as watch educational photos and videos - they will help you transform your garden beyond recognition.
We make pots from rags and cement
To make this pot, you will need:
- cement;
- old tablecloth;
- a vase, pot, or other vessel for form;
- water;
- bucket;
- "Mixer" - nozzle for a drill;
- dye.
The procedure for creating a pot is very simple. First you need to prepare a cement mixture. To accurately determine its volume, take a tablecloth, place it in a bucket and mark on the walls how much space it takes - follow this mark and pour water for the solution. Add cement to the water and mix them with a “mixer”. The result should be cement milk, reminiscent of the consistency of slightly watery sour cream.
Then, when the mixture is ready, place a tablecloth in it and leave it for a couple of minutes so that it is completely soaked. After that, remove the material and make sure that there are no dry spots left on it.
Next, take the prepared container for the form and hang a wet tablecloth on it. Gently spread the material and leave to dry. When the cement mortar has completely hardened, remove the product from the container-mould and paint. Use special paints for concrete - they are stronger and more durable. Once the paint has dried, you can use the planter for its intended purpose.
We make pots from plastic bottles with our own hands
Plastic containers are a universal material for flower pots, since several models of “outfits” can be built from it at once.
The first option is a classic planter. Take a plastic bottle, two CDs, sandpaper, scissors, glue and paint. Cut the bottle with a wavy line into two equal parts. Sand both discs with sandpaper. Take the bottom of the bottle and glue it to the stripped first disk. Then take the top part: first unscrew the cap and glue it on the second disc, and once the glue has dried, screw the plastic part of the bottle back onto the cap. When finished, cover the blanks with paint.
The second option is a hanging planter. Here you will need: bottle, rope, paints, scissors. First, cut off the neck of the bottle - only the straight bottom of the container will be used in the work. Then cut small holes on the sides for the rope. Then decorate the design: paint, cut out patterns, draw an animal, cut off the top edge - everything you can do neatly. And then thread a rope into the holes, put a flower pot in a flower pot and hang the structure on strong nails.
We make wooden flower pots
The easiest way is to make a flower pot from a stump or a log. Take:
- wood;
- drill: drill length - at least 25 cm, diameter - at least 20 cm;
- chisel;
- protective impregnation for wood.
- Pick up a log or stump of the required diameter. Measure a part to the height of the flower pot or flowerpot and cut it off - this is again a planter.
- Drill a series of holes in the top plane of the wood to destroy the core.
- Remove the wood with a chisel - you should end up with an empty container. The edges need to be aligned.
- Treat the inner walls of the planter with a protective compound and place a pot of flowers in it.
Advice. The wooden planter itself can also act as a pot, but for this you need to put durable polyethylene in the container and fill it with drainage from above. And only after that you can put the soil mixture with a flower.
A more complex option is a cache-pot made of boards and timber. You will need:
- bars with a section of 25x25 mm;
- boards 15 m thick;
- self-tapping screws;
- wood glue;
- drill;
- protective impregnation for wood.
The algorithm for making pots is as follows:
- From the bars, assemble a frame in the shape of a cube.
- Cut out the details for the bottom and walls from the boards. Sand the panels on all sides.
- Drill a few holes in the bottom for drainage.
- Assemble the planter structure together: attach the side and bottom panels to the cubic frame using self-tapping screws. In order to give the product even greater reliability, carefully glue all the joints.
- Cover the surface of the finished structure with a protective compound.
Weave pots from the vine
Another simple but interesting version of the flower "outfit" is a vine planter. Prepare for work:
- flexible vine - it can be both fresh and dried;
- plywood sheet;
- moisture protective impregnation;
- drill;
- awl;
First, soak the vine in water to give it the extra flexibility needed for easy weaving. Cut out an oval or round bottom blank from a plywood sheet. Drill the same holes along the edge of the resulting bottom with a diameter slightly smaller than the diameter of the vine. All holes must be at the same distance from the edge of the bottom. Then insert a strong twig into each hole - this will be a blank for the planter frame.
The next step is direct weaving: lay the vine between the rods, gently pressing each new row with an awl. Wrap around the twigs until the product reaches the height you need. Laying methods can and even need to be changed through the row - this way you will achieve a different textured surface of the pots.
At the end of the weave, either cut the rods or weave them into the main rows of the vine. Then let the structure dry a little and get stronger. The last stage is the treatment of the cache-pot with moisture-proof impregnation and varnishing.
We carry out a cache-pot from plaster
To make such a planter, prepare:
- gypsum;
- wire;
- textile strips no more than 10 cm wide;
- paint;
- bucket;
- protective varnish.
The first step is to prepare the frame. Turn the bucket upside down and braid its surface with wire. Turn the edges over and hide. Carefully remove the finished frame from the bucket.
The second step is the dilution of the gypsum mortar. Take gypsum and mix it with water until the composition begins to resemble sour cream.
The third step is the construction of the "body" of the pots. Dip all textile strips into the gypsum solution and soak for 3 minutes. Then, one at a time, take out the tapes and put them on the frame layer by layer. The wall thickness should be at least 2 cm. Then carefully treat the walls of the structure with the remaining gypsum mortar. After this, the planter should dry completely - set it aside for 10-12 hours.
The fourth step is the design of the structure. The cache-pot can not only be painted, but also decorated with a variety of glass, beads, pebbles - any small details that you like.
Advice. After drying, the walls of the pots will not be completely even, so the paint will fall poorly. To avoid this, carefully clean the surface with sandpaper and treat the structure with a white water-based composition, and then apply the paint of the desired color on the planter with the second layer.
Now you know that you can make a beautiful flower pot from almost any material without spending a lot of time or a lot of money. The main thing is to turn on your imagination and be smart. So if you want to effectively decorate your garden, do not rush for store pots - take the initiative in your own hands and do not be afraid to experiment.
How to make a planter: video
Planters for the garden: photo


