Small cooking stove made of brick, drawings. How to build a simple brick oven with your own hands: examples with step-by-step diagrams
Cooking stoves include kitchen stoves of various designs. They come in various sizes and are used only for cooking. Kitchen stoves are connected to main or top pipes.
Brick kitchen slabs
Based on their design, kitchen stoves can be divided into simple, medium and complex.
A simple kitchen stove has a combustion and blower doors, a grate and a smoke damper. It is the simplest of all household stoves.
Kitchen stoves of average complexity have, in addition to the above-mentioned stove appliances, an oven, and complex ones also have a hot water box. Ovens are made of black steel with a thickness of at least 1 mm, and hot water boxes are made of galvanized steel. The casing of the water heating box is made of black steel with a thickness of at least 1 mm. The thicker the steel, the more durable the devices.
Stove with two-burner stove and oven
In a simple cookstove, hot flue gases from the firebox are directed under the cast iron stove and then discharged through an opening under the chimney into the chimney.
In other kitchen stoves, hot flue gases are directed under the cast-iron stove and then, descending, heat the walls of the oven or one wall of the water-heating box, and then are discharged into the pipe, while heating the bottom wall of the oven, the bottom and the other wall of the water-heating box.
The above-mentioned kitchen stoves do not have a cooking chamber, therefore, during cooking, steam and odor are released into the room, which negatively affects the microclimate of the room. This article provides drawings of sections and ordering of a kitchen stove of an improved design, which includes a cooking chamber connected to a pipe using a ventilation duct closed by a ventilation valve.
Simple kitchen stove
A simple kitchen stove has dimensions, mm: 1160x510x630 (without foundation, i.e. without two rows of brickwork on the floor).
To lay a kitchen stove, the following materials are required:
- red brick - 120 pcs.;
- red clay - 50 kg;
- sand - 40 kg;
- grate - 28×25 cm;
- fire door - 25×21 cm;
- blower door - 25×14 cm;
- cast iron stove for two burners - 70×40 cm;
- slab trim (angle 30x30x4 mm) -3.5 m;
- roofing steel sheet under the slab - 1160×510 mm;
- construction felt - 1 kg;
One stove maker can build a simple kitchen stove within 3 hours (not counting the laying of the chimney); in addition, it takes 1.5 hours to carry the material and prepare the clay-sand solution. To erect a chimney, additional time is required: depending on its height, you need to calculate the time from calculation of half an hour per 1 m of pipe laying (when laying a pipe in a quarter of a brick).
The heat output of a simple kitchen stove when cooking food twice a day is about 0.7-0.8 kW (660-700 kcal/h).
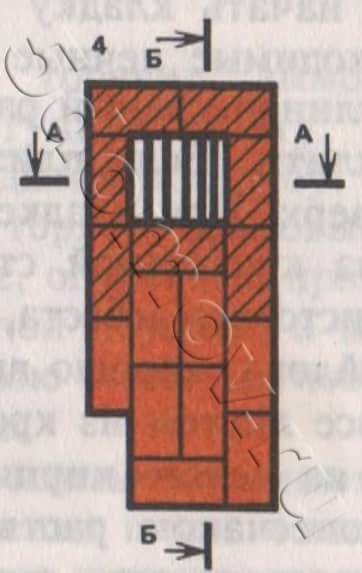
The figure below shows vertical and horizontal sections of a simple kitchen stove. Next, masonry drawings will be given in rows (orders). From the sections and drawings of the masonry along the rows it is clear that the masonry of a simple kitchen stove does not present any difficulties.

Sections of a simple kitchen stove: a - facade; b - section A-A (longitudinal vertical section of the furnace); c - section B-B (transverse vertical section). Designations: 1- firebox; 2 - ash chamber; 3 - grate; 4 - smoke valve; 5 - cast iron plate (flooring).
Before you start laying a simple kitchen stove, you should purchase the necessary stove equipment.
Having prepared the clay-sand mortar, proceed to laying a simple kitchen stove. If the slab is placed on a foundation, then level it upward. When laying a slab on a wooden floor, it is necessary to cut a sheet of roofing steel to fit the size of the slab. Place a layer of sheet asbestos on the floor, and if it is not available, two layers of construction felt, well soaked in a clay-sand solution, cover everything with a sheet of roofing steel and nail it to the floor. Then a platform is made from a whole brick in two rows of masonry on clay-sand mortar. After this, they begin laying the slabs from the first row strictly in order.
First row laid, observing the rules for bandaging seams from selected whole bricks, as indicated in the figure below. The completed masonry is checked for squareness.

First row of a simple kitchen stove
During laying second row arrange a ash pit, install a blow-off door, which is attached to the masonry using furnace wire. Temporarily, the blower door at the front can be supported by bricks, which are stacked on the floor in front of the blower door. The bottom of the ash chamber is 380×250 mm.

Second row of kitchen stove
Third row similar to the previous one, but the seams should be well bandaged.

Third row
Fourth row covers the ash door, leaving only a hole in the ash chamber measuring 250×250 mm, on which the grate is placed. If possible, it is advisable to lay the fourth row using refractory bricks, as shown in the figure below.
Laying the fourth row. The shaded bricks are fireproof. The arrows indicate the direction of movement of hot flue gases in the heating furnace.
Fifth row forms a firebox measuring 510×250 mm. The brick adjacent to the back of the grate is cut off to form an inclined plane along which the fuel will roll onto the grate (see section B-B along A-A). When laying this row, you need to install a firebox door, having previously attached roofing steel legs to it using rivets.

Laying the fifth row of the furnace
Sixth row laid in the same way as the previous one, but the seams should be bandaged.

Laying the sixth row of the furnace
Seventh row placed according to the figure below. This is where a chimney is left under the stove, connecting the firebox to the chimney.

Seventh row of the oven
Eighth row performed strictly horizontally, with this row blocking the combustion door. A cast iron slab is laid on the eighth row laid out using a thin layer of clay-sand mortar. Factory-made cast iron slabs have protrusions or stiffeners on the bottom side that extend 15 mm from the edges of the slabs.

Eighth row of the oven
The internal dimensions of the eighth row of masonry must be such that the slab fits freely there with its ribs and has a gap on all sides of at least 5 mm, intended for the expansion of the metal when it is heated. If you do not comply with this, the cast iron stove, expanding, will destroy the stove masonry. To ensure that the masonry is strong, a frame made of angle steel is laid on the eighth row. It is advisable to cover the frame with fireproof varnish, which protects the steel from rust.
After laying ninth row Using a thin layer of clay-sand mortar, install a smoke damper. This row is the final one, followed by the laying of the chimney.

The final row of a simple kitchen stove
The kitchen stove works as follows. Flue gases from the firebox enter under the cast-iron stove, then through a hole under the pipe through a smoke valve they are discharged into the chimney.
The kitchen stove does not have a cleaning hole, since the chimney can be cleaned through the hole under the pipe, where it is easy to stick your hand through the burner of the cast-iron stove.

An example of laying a hob
Firstly, in a kitchen stove the fire door is installed at the same level as the grate. In the stove, flue gases constantly maintain a high temperature in the chimney, as a result of which it is not necessary to lay thick fuel on the grate. Secondly, with this installation of the fire door, the distance from the grate to the cast iron stove will be only 280 mm, which makes it possible to quickly cook food even with low fuel consumption.
After finishing laying the furnace, it must be dried by opening the furnace and blower doors and the valve in the pipe.
The longer the oven dries, the stronger the masonry will be. The kitchen stove can be dried using small test fires, but after the test fires, the valve in the pipe and the blower door must be left open.
After complete drying, the kitchen stove is plastered with clay-sand mortar, followed by whitewashing.
Exterior finishing is best done as follows: after laying the eighth row and installing the cast iron slab, as well as before installing the corner steel frame, the kitchen slab is walled up on all sides in a case made of roofing steel (galvanized steel can be used). Pre-cut the corresponding holes according to the size of the combustion and blower doors. The case is secured to the floor using a plinth, which is nailed around the slab. The outer surface of the case is cleaned and coated with oven varnish, which can withstand high temperatures well.
In front of the combustion door, the pre-furnace sheet is nailed to the floor with nails 50 mm apart from one another. If the plinth was nailed earlier, then the pre-furnace sheet must be folded onto the plinth.
Kitchen stove with oven
The kitchen stove with oven has dimensions, mm: 1290x640x560 (without foundation, i.e. without two rows of brickwork on the floor).
To lay a kitchen stove with oven, the following materials are required:
- red brick - 140 pcs.;
- red clay - 60 kg;
- sand - 50 kg;
- grate - 26×25 cm;
- fire door - 25×21 cm;
- blower door - 14×25 cm;
- cleaning doors 130×140 mm - 2 pcs.;
- cast iron stove made of five composite plates measuring 53x18 cm with two burners;
- smoke valve - 130×130 mm;
- oven - 45x31x28 cm;
- slab binding (angle 30x30x4 mm) - 4 m;
- roofing steel pre-furnace sheet - 500×700 mm;
- roofing steel sheet under the slab - 1290×640 mm;
- construction felt - 1.2 kg;
- metal box for collecting ash in the ash chamber - 350x230x100 mm.
One stove maker can put this stove together within 3-4 hours; in addition, it takes about 2 hours to carry the material and prepare the clay-sand solution. The heat transfer of the stove when cooking food twice a day is about 0.8 kW (770 kcal/h). The figure below shows a general view, longitudinal and cross sections of a kitchen stove with an oven. Below are the order drawings for each row. Laying a kitchen stove with an oven is also not difficult and is similar to laying a simple kitchen stove, but here you have to install an oven and cleaning doors.

Kitchen stove with oven: a - general view; b - sections A-A, B-B (vertical sections), B-C, D-G (horizontal sections). Designations: 1 - ash chamber; 2 - grate; 3 - firebox; 4 - cast iron plate; 5 - oven; 6 - smoke valve; 7 - combustion door; 8 - blower door; 9 - cleaning holes.
When laying slabs on an independent foundation, before starting work, level its top with a layer of clay-sand mortar.
When installing a slab on the floor, before starting to lay the first row, it is necessary to carry out the same work as when laying a simple kitchen stove.
Masonry first row made from selected whole bricks, strictly adhering to the rules of bandaging the seams. The length of the kitchen stove should correspond to the length of five bricks, the width - to the length of 2.5 bricks. Using a cord, check the equality of the diagonals.

Laying the first row of a kitchen stove with an oven
Second row laid out strictly following the order. Here an ash chamber measuring 380×250 mm is left, a blower door is installed and secured, and cleaning holes are left on the back wall (the width of the holes should be equal to the width of the brick, i.e. 12 cm). If possible, cleanout doors measuring 130×140 mm are installed. At the cleanout hole at the farthest from the ash chamber, a brick is laid on its edge, as shown in the masonry order. To better secure the oven, place half a brick on its edge in the middle of the installation site.

Laying the second row of the slab
Third row similar to the previous one, only you must follow the rule of ligating the seams.

Laying the third row of the slab
Fourth row covers the blower and cleanout doors. After finishing the laying of the fourth row, an oven is installed on a thin layer of clay-sand mortar at a pre-marked place. After this, a grate is installed. With the same brick installed on the edge, the chimney into the chimney is blocked.

Laying the fourth row of the stove with oven
During laying fifth row The combustion door is installed and fastened, the brick is cut off before installation behind the grate so that the fuel gradually rolls onto the grate during the combustion process.

Laying the fifth row of the slab
Sixth row looks like the fifth one.

Laying the sixth row of the slab
Seventh row laid out in order. The resulting chimney channel from the front side is laid with three bricks, as a result of which the internal size of the resulting channel under the chimney will be 130 × 130 mm. In the image of this row near the oven, a steam pipe with a diameter of 10 mm and a length of 160 mm is visible, which connects the oven to the rising duct. This pipe is designed to remove steam and odor.

Laying the seventh row of the stove with oven. The arrows indicate the direction of movement of hot flue gases in the heating furnace.
Eighth row
perform strictly horizontally in level. This row covers the oven and the fire door. The upper wall of the oven is coated with a layer of clay mortar up to 10-
15 mm, which will protect the oven from rapid burning.

Laying the eighth row of a brick oven (before installing a cast iron stove)
In this case, it is necessary that the distance between the top of the clay coating and the cast iron plate is at least 70 mm. After this, a cast iron slab and lining made of angle steel are installed on a thin layer of clay-sand mortar.

Eighth row of brick oven (after installing the cast iron stove)
After laying ninth row All that remains is the laying of the vertical channel. The ninth row is placed according to the image below.

Ninth row of the oven
After laying tenth row install a smoke damper.

Tenth row of the oven
Masonry eleventh row start the chimney. Further laying of the pipe does not present any difficulties.

The final row of the furnace (the masonry of the chimney is not taken into account)
A kitchen stove and oven works like this. From the firebox, flue gases are directed under the cast-iron stove, from where they, heating the oven from behind on both sides, fall under the oven and are directed to the hole under the chimney. Rising through a vertical channel, they enter the chimney through a smoke valve and are released into the atmosphere.
Kitchen stove with oven and hot water box
To lay a kitchen stove with an oven and a hot water box measuring 1290x640 mm, the same materials are required as for the previous stove. Additionally, you should purchase a water heating box measuring 510x280x120 mm.
The figure below shows a general view, a horizontal section along A-A and a vertical section along B-B of the slab.

Kitchen stove with oven and hot water box: a - general view; b - cuts. Definitions: 1 - firebox; 2 - cast iron plate; 3 - oven; 4 - water heating box; 5 - smoke valve; 6 - ash chamber; 7 - angle steel harness
A kitchen stove with an oven and a hot water box is placed in the same order as a kitchen stove with an oven. The only difference is that after laying the third row, instead of a brick partition, a water-heating box in a case is installed on the edge between the oven and the vertical channel. The height of the hot water box should correspond to the height of four rows of flat brickwork. The rest of the masonry is completely similar to the masonry of a kitchen stove with an oven.
Kitchen stove with oven and hot water box of improved design
In rural areas, kitchen stoves are used not only to prepare food for people, but also to cook feed for livestock and boil laundry when washing. During combustion, a lot of steam enters the room and extraneous unpleasant odors are released. Because of this, the air humidity in the room increases, which negatively affects its microclimate. Therefore, to remove foreign odors and steam from kitchen stoves, it is advisable to provide a cooking chamber, which is connected to the chimney using a ventilation duct. A ventilation valve must be installed in the ventilation duct.
Installing a double door in the cooking chamber allows you to keep food hot for a long time and thus prevent it from souring.

Cooking chamber in a brick oven
The firebox and ash chamber (ash chamber) are closed from the outside with appropriate doors. The upper surface of the oven is protected from hot gases by a layer of clay mortar 10-12 cm thick. It is advisable to lay the stove from the fourth to the ninth row from refractory bricks (especially the firebox).

An example of covering an ash pit
It is advisable to make the kitchen slab up to the ninth row of masonry from sheet steel, and to enhance its strength, after installing the frame on a clay-sand mortar, install a frame made of angle steel. Since the mass of such a slab will be more than one ton, it is installed on an independent foundation.
If it is impossible to construct an independent foundation, the floor must be strengthened with additional beams, which are mounted on brick columns. Instead of brick pillars, you can use pillars made of hardwood logs, reinforced concrete pillars, iron pipes with a cross-section of at least 180-200 mm.
The kitchen stove has an improved design and is equipped with a “direct” valve. During prolonged heating of the stove, evaporation of water in the water heating box is possible. To stop this, you need to add a little cold water into it and open the “direct” valve. In this case, the flue gases from under the cast iron stove do not go down, but immediately go into the chimney. As a result, the water heating box stops warming up and the evaporation of water in it stops.

Example of a “direct” valve
To make it easier to clean the ash chamber from ash, a special roofing steel box measuring 350x230x100 mm is installed in it. This prevents contamination of the room when cleaning the ash chamber from ash.
A kitchen stove of this design has the following advantages compared to the previous kitchen stove with oven and hot water box:
- during cooking, steam and foreign odors do not enter the room, which are removed into the atmosphere through the ventilation hole;
- food cooked on the stove in the cooking chamber remains hot for a long time and does not sour during the day;
- With the help of a “direct” valve, it is possible to cook food without warming up the water heating box and thereby preventing further evaporation of the water in it.
The figure below shows a general view of the kitchen stove from the front; here are also drawings of sections of the stove in the most difficult places. Drawings of the masonry in rows will follow, and they give a comprehensive idea of the internal structure of the slab. Using the orders and drawings for the rows, you can fold the slab yourself, without the help of a stove maker.

Kitchen stove with oven and hot water box of improved design: a - facade; b - sections A-A, B-B, c - sections B-C, D-G, D-D, E-E. Definitions: 1 - blower door; 2 - combustion door; 3 - oven; 4 - cooking chamber door; 5 - smoke valve; 6 - ventilation valve; 7 - “direct” valve; 8 - water heating box; 9 - cleaning holes; 10 - cast iron stove.
A kitchen stove with an oven and a hot water box of improved design has dimensions, mm: 1290x640x1330.
The following materials are required for masonry:
- red brick - 250 pcs.;
- fireproof brick - 80 pcs.;
- red clay - 180 kg;
- sand - 90 kg;
- combustion door - 250×210 mm;
- blower door - 250×140 mm;
- grate - 280×250 mm;
- oven measuring 250x280x450 mm;
- cast iron stove with two burners - 700×400 mm;
- water heating box - 250x140x510 mm;
- pre-furnace sheet - 500×700 mm;
- strip steel measuring 400x250x6 mm;
- door to the cooking chamber - 750x350x5 mm;
- corner steel for tying a slab measuring 30x30x3 mm - 4.1 m;
- strip steel for covering the cooking chamber measuring 450x45x4 mm - 4 pcs.
A stove can be assembled by one stove-maker in 18-20 hours; preparing the solution and carrying the material requires an additional 6 hours.
To fold the stove with the firebox on the left side, you need to look at the drawings using a mirror placed edge-on on the drawing.
The kitchen stove is laid out as follows. Masonry first row produced on a foundation built to floor level. The first row determines the main dimensions of the slab. The length of the slab is equal to the length of a laying of five bricks in clay-sand mortar, and the width is equal to the length of 2.5 bricks.

First row of improved cooker with oven and hot water box
During laying second row two cleaning doors and a blower door are installed in front. They are attached to the masonry using furnace wire.

Laying the second row of the furnace; 1 - blower door, 9 - cleaning holes.
Masonry third row produced according to the order, it is similar to the previous row. After laying the third row, a water heating box is installed.

Laying the third row of the furnace; 11 - steel sheet 3 mm thick.
Firebox fourth row they are laid from refractory brick; in its absence, sorted first-class red brick is used. The fourth row covers the cleaning holes and the blower door, forming the beginning of the hearth. After laying the fourth row, the grate and oven are installed.

Laying the fourth row of the furnace
Masonry fifth row presents no difficulties. The brick adjacent to the back of the grate is cut off halfway to form an inclined plane.

Laying the fifth row of the furnace; 3 - oven.
Before masonry sixth row prepare the combustion door, for which strip steel is attached to the top and bottom with rivets, which should be 10 cm longer than the combustion door on both sides. For greater strength, the ends of the strip steel are screwed with furnace wire, the ends of which are embedded in the masonry. The door is installed on a clay-sand mortar, having previously wrapped the frame of the combustion door with asbestos fiber.

Laying the sixth row
Masonry seventh row secure the base of the combustion door.

Laying the seventh row
Eighth row blocks the water heating box.

Eighth row masonry
Ninth row covers the fire door and oven. The top of the oven is protected from burning through a layer of clay mortar 10-12 mm thick. It is advisable to lay this row entirely of refractory bricks.

Ninth row masonry
After finishing the laying of the ninth row, a cast iron slab is installed above the firebox on a clay-sand mortar. The large burner of the stove is placed above the firebox. Next to the main plate, an additional one is placed, made of a steel sheet measuring 400x200x6 mm. After this, angle steel is laid, to which the lower frame of the cooking chamber door is welded. For strength, it is advisable to tie the angle steel through special holes in it with furnace wire, which is attached to the masonry.

Installation of a cast iron stove on the ninth row; 12 - steel sheet 6 mm thick; 13 - angular steel.
Tenth row They are made of ordinary red brick. A window is left on the right side for cleaning the “direct” channel. Some of the bricks that cover the slab are cut with a pick before laying so that if the slab breaks, it can be easily replaced.

Laying the tenth row
Masonry eleventh row does not present any difficulties, you just need to follow the rules for dressing the seams.

Eleventh oven row
Twelfth row blocks the cleaning window.

Twelfth row of the oven
After laying Tthirteenth row a “direct” valve is installed on the clay-sand solution.

Thirteenth row of the oven; 6 - ventilation valve.
Masonry fourteenth row must correspond to the level of the upper frame of the door to the cooking chamber. Angle steel measuring 45x45x800 mm is installed next to the upper frame of the door to the cooking chamber.

Fourteenth row of the oven
Fifteenth row blocks the door to the cooking chamber.

Fifteenth oven row
Sixteenth row blocks the “direct” channel.

Laying the sixteenth row of a kitchen stove
Masonry seventeenth row provides a ventilation duct to remove odors and steam from the cooking chamber.

Laying the seventeenth row of the kitchen stove
After finishing the masonry eighteenth row Four pieces of strip steel measuring 4x45x500 mm are installed above the cooking chamber to cover the cooking chamber.

Laying the eighteenth row of a kitchen stove
Nineteenth row covers the cooking chamber. After finishing the laying of this row, a ventilation valve is installed.

Laying the nineteenth row of the kitchen stove; 6 - ventilation valve.
Masonry twentieth and twenty-first rows is not difficult, you just need to bandage the seams well.

Laying the twentieth row of a kitchen stove

Laying the twenty-first row
Masonry twentysecond row reduces the size of the chimney, it will be 130x130 mm.

Laying the twenty-second row
Twenty-three and twenty-four ranks put in order.

Twenty-third row of the oven

Twenty-fourth row
After laying twenty fifth row install a smoke damper, which is also a control valve.

Laying the twenty-fifth row of the furnace; 5 - smoke valve.
Masonry twenty-sixth row start the chimney. Laying a chimney is not difficult.

Laying the final row (not counting the chimney)
After finishing the laying of the stove, before coating it, clean the chimneys from fallen mortar and crushed stone residues through cleaning holes. Holes for cleaning are then filled with brick halves in clay-sand mortar.
When installing the cleaning doors, they are closed tightly, and leaks are covered with clay-sand mortar.
After this, the stove can be dried in two ways: by opening the combustion and blower doors and valves, or by using small test fires. After complete drying, the slab is plastered with clay-sand mortar, and after drying the plaster, whitewashing is performed twice. A pre-furnace sheet is nailed to the floor in front of the fire door.
Do-it-yourself brick oven: step-by-step masonry instructions + photos
The comfort of a country house built far from gas supply networks is unthinkable without a stove. In the cold season, it gives us pleasant warmth, relieving the air of dampness.
The market today offers customers all kinds of designs of metal “stove stoves”. Despite this, many summer residents prefer the classic version - a heating stove made of brick. Its advantages are obvious: due to its large weight, it accumulates a lot of heat and releases it for a long time, warming the room well.
The service life of a brick structure significantly exceeds that of a metal one. Minimal costs for materials and simplicity of arrangement attract the attention of home craftsmen to a simple stove for a summer residence.
Our article will help you test yourself as a stove maker. In it we will look at several options for simple wood-burning stoves and give practical recommendations for their installation.
You will be convinced that there is nothing complicated in the drawings of these structures. Having learned to read “orders” - brick layout diagrams, you can build a full-fledged heat-generating device with your own hands.
How to build the simplest brick oven?
First you need to decide what you want to get from your future stove. If you only need to heat the rooms, and use bottled gas or electricity to cook food, then choose an option without a stove and oven. Anyone who loves soft healing warmth chooses the option with a bed.
For regular cooking of large quantities of food and pet food, a simple oven with a hob will be just right.
We will look at three examples of stoves with step-by-step guidance on how to lay them:
- Simple direct flow;
- With hob;
- Heating.
Let’s say right away that you cannot expect high heat transfer from a simple design devoid of gas circulation. For this reason, such stoves are installed in garages and other small rooms with an area of no more than 16 m2.
We will consider this option so that beginners get their first simple lesson in practical masonry.

Such a stove does not require a strong foundation. Having poured large crushed stone in a layer of 15-20 cm, filled it with cement mortar and leveled the surface, after a couple of days you can begin laying.
Stove dimensions in plan: width 2 bricks (51 cm), depth 2.5 bricks (64 cm). Since there is no blower chamber in it, holes for air intake are drilled directly in the combustion door.

The procedures for this design are simple. The main condition during work is to ensure that the seams are bandaged so that the top brick covers the seam between the two lower ones.
On the eighth row, the firebox is narrowed, using halves and “three-quarters” - ¾ of a whole brick. The exit from the firebox is thus obtained with a cross-section of 1 brick (125x250 mm).

The next row (ninth) is laid out in the same way as the seventh, using a whole brick.
After this, the brick tier is placed on the edge flush with the inner edge of the bottom row. The new tier is laid flat, using two whole bricks and four “three-quarters”. In this way, the smoke channel is again narrowed in order to trap gases and increase heat transfer.

On the next tier, the stones are placed on edge. A brick is placed in the middle of the smoke channel. In this way, the oven is raised another five rows (one tier on an edge and a brick in the middle, the other tier flat).

The remaining four tiers are laid flat. With the last two rows of masonry, the smoke channel is narrowed to a size of 12x12 cm (half a brick). At this level, a smoke damper is placed in the furnace. A steel pipe is inserted into it from above.

Oven with hob
In the simplest version, this design has small dimensions (width 2 and depth 3 bricks - 78x53 cm). However, even in such a limited area it is possible to place a single-burner stove.
Work goes smoothly when you have everything you need at hand.
Therefore, purchase the following materials and accessories in advance:
- Solid red brick – 107 pcs;
- Blower door – 1 piece;
- Grate – 1 piece;
- Single-burner cast iron stove – 1 piece;
- Fire door – 1 piece;
- Pipe valve – 1 pc.
Fire bricks are not needed for a wood burning stove. Buying it is a waste of money. But red should be chosen carefully, discarding cracked and uneven ones.
Preparation of the solution
The masonry mixture is made by mixing four parts clay with one part water and adding eight parts sifted sand. The normal consistency is determined simply: the solution easily slides off the trowel, leaving no drips on it. When laying, it should not leak out of the seams.
The volume of the mortar is determined based on the amount of brick. With an optimal seam thickness (3-5 mm), one bucket is enough for 50 pieces.
Having prepared the masonry mixture, you can begin laying the foundation. Its width is made 10 cm larger than the width of the oven. The height of the foundation is selected so that the bottom of the first row of bricks is at floor level.

If the underground is deep enough (50-60 cm), then there is no need to dig a hole for the foundation. It is enough to make formwork on the ground with a plan size of 76 x (51 + 10 cm). Two layers of roofing felt are placed on its bottom to protect it from moisture. Having laid the concrete, it is given a week to gain strength, after which they begin laying.
The dimensions of the stove with hob we are considering are 3 x 1.5 bricks (76x39 cm).
Expert advice: lay out each new tier of brick without mortar (dry). After adjusting the bricks to size, you can begin laying.
The first row is placed on a layer of clay mortar (4-5 mm). Having leveled the base, lay out the second one, leaving space for the blower door.
Before installing the door, you need to screw a soft wire to it and put its ends into the seams for better fixation.

To compensate for the thermal expansion of the metal, a gap is left between the door and the brick. Before installation, its frame is wrapped with wet asbestos cord.
The third row is laid by overlapping the seams of the second. At this level, a grate is installed in the firebox.

The fourth row is placed on the edge, observing the ligation of the seams, and the walls of the combustion chamber are formed. Behind it will be the first and only smoke circulation (see section A-A in diagram No. 2). To clean its bottom, a so-called knockout brick is placed in the rear wall without mortar, which is periodically removed to remove ash. Inside the chimney, two stands are made from pieces of brick to support the internal partition.
The stones of the fifth row are placed flat, leaving space for the firebox door. At the back of the stove, in order, we see the walls of two smoke channels. During work, their surface must be thoroughly cleaned with a wet cloth to remove any clay protruding from the seams. This is an important condition for ensuring good traction.
Helpful advice! When focusing on the order drawings, do not forget to look at the two sections of the stove. They will help you better imagine its design and not make mistakes when laying out the bricks.

Having raised the masonry up to the eighth row, they close the furnace door, placing wire in the seams to secure its frame. At the same level, in the back of the fuel chamber, a brick with a beveled end is placed - a smoke tooth. It improves heat output by preventing flue gases from quickly escaping into the chimney.
Having completed the ninth row, an asbestos cord is laid along it on a clay mortar. It is necessary for sealing the joints of a cast iron slab and brick. On the tenth row, the firebox is covered with a hob.
On the eleventh, a smoke valve is installed in the pipe. It is also compacted along the contour with an asbestos cord soaked in clay.
Rows 12 and 13 - formation of the pipe walls. After they are completed, a lightweight sheet metal pipe is placed on the stove, leading to the roof.
Heating stove
Now let’s see how to build a brick stove with your own hands, designed to heat a small country house.

Its dimensions:
- width – 2 bricks (51 cm);
- depth - 3.5 bricks (90 cm);
- height – 2 meters 38 cm.
For construction you will need the following materials and accessories:
- Red solid brick – 390 pcs;
- Clay - 9 buckets;
- Sand - 18 buckets;
- Grate (25x40 cm) – 1 piece;
- Fire door (20x30 cm) – 1 piece;
- Blower door (14x20 cm) – 1 piece;
- Cleaning door (14x20 cm) – 1 piece;
- Gate valve - 1 piece;
- Pre-furnace steel sheet (50x70 cm) – 1 piece;
- Roofing felt for waterproofing (100x60 cm) – 1 pc.
Sequence of work
The first row is the base of the oven. It should be laid out especially carefully, checking the horizontality using a level.
The corners are the hardest part for beginners. To ensure that they are even, we recommend immediately installing four template posts on the edges of the masonry. They can be made from planed boards, knocking them down in pairs at right angles.
By installing such “formwork” from floor to ceiling, you can easily create ideal angles.

On the second row, two bricks with a beveled edge facing into the ash chamber are laid at the end of the furnace. The laying of the third row begins with the installation of a blower door, fixed with wire in the seams of the side bricks.

Rows 4 and 5 continue to form the walls of the ash chamber. In the sixth row, they begin laying the walls of the fuel chamber and install a grate in it.
At the level of the 7th and 8th rows, a combustion door is installed. At the back of the chamber, beveled bricks are placed to improve traction. The ninth row covers the firebox door.
From rows 10 to 16, the fuel chamber and vertical smoke exhaust duct are being laid. On the seventeenth, a cleaning door is installed in the oven.

Rows 18-30 form smoke circulation channels. They need to be laid out as evenly as possible, rubbing the inner walls with a wet cloth.
Rows 31-32 form a vault covering the oven.
33 and 34 form the chimney.
Having finished laying, the stove is left for a week with the doors and pipe open to dry. After this, a test fire is made, burning small portions of wood chips, branches or straw.
Do-it-yourself mini-brick oven for a summer residence - simple design and efficiency
A dacha or a small country cottage can easily be heated with a mini-stove. The designs of mini-ovens are similar to metal potbelly stoves - in terms of heating speed and compactness, but have a significantly higher efficiency. Many designs and technologies for constructing brick mini-stoves have been invented. One of the simplest mini-stove designs will be discussed.
Sequence of a small brick oven
There is no need to lay a special foundation for a mini-stove. Wooden floors, provided that the board is at least 50 mm thick, can serve as a base for a stove.
- After choosing a place for the mini-stove, in the corner of the building, in a wall or in a niche, waterproofing is carried out under the base of the stove. For this purpose, any rolled waterproofing materials in two layers and coating insulation - bitumen and bitumen-polymer mastics are applicable.
- Coarse dry sand 10 mm thick is poured onto the waterproofing layer and leveled to the horizon. In the first row of the stove base there will be 12 bricks, laid dry, without mortar. Horizontal alignment is carried out using a building level
- A layer of clay mortar is applied to the starting row of bricks, then a blower door is installed, wrapping it with an asbestos cord. Fastening into the masonry is done with wire.
- The second row and all subsequent ones are laid on clay mortar. A row of fireclay bricks, rather than red ceramic bricks, is laid under the grate to ensure the lining of the mini-firebox
- In the fourth row, bricks are placed on edge. Starting from the level of the beginning of the chimney channel in the rear wall of the stove, several bricks are made to “knock out” - they are laid without mortar, for subsequent cleaning of the chimney from soot. It is possible to install another door instead of knockout bricks, but the heat loss from a metal door will be greater than from several bricks without mortar. The laying of the rear wall with knockout bricks is done with a slight offset outward. Linings made of asbestos cardboard or fireclay are placed under the internal partition of the chimney duct.
- Before installation, the fire door is wrapped with asbestos cord and fastened with wire. The door should open in an upward direction. Fix the door in the brickwork with wire anchors

- In the fifth row, the bricks are laid flat, in the sixth - edgewise, in the seventh - flat, the dressing must be done, and the last brick of the row is always laid out, observing the dressing with the first. But the back wall of the mini-stove in question is laid only with bricks on edge.
- In the eighth row, a brick is laid to cover the firebox door. In this area, above the firebox, a brick with a beveled edge is required, since the flame must be directed towards the cast iron hob of the stove, towards the center of the burner
- It is unacceptable to install a cast iron hob on a clay mortar or directly on a brick, due to the significant difference in the linear thermal expansion of cast iron and ceramics. Heating to high temperatures will cause deformation in the contact zone, followed by the formation of cracks and destruction. The perimeter of the mini-stove under the slabs must have a gasket made of asbestos cord, and the slab is mounted on the cord
- After laying the ninth row, a chimney channel is formed in the tenth. A small-sized stove can have a different chimney design - direct, direct-flow or counter-flow, bell-type, horizontal or vertical, or combined. When laying the rear wall bricks offset outward, as in the example under consideration, you will need a chimney pipe that has a rear extension
- The eleventh row is the area where the joint is made: the brick and metal sections of the chimney are connected. At the joint level, a view valve is mounted with preliminary winding of asbestos cord and subsequent clay sealing
The final stage is the first cleaning of the chimney. They take out the knockout bricks and remove construction debris from the chimney, then install the bricks in their original place
To complete the work, finishing is required:
- The sand bedding under the starting row of bricks should not spill out; for this, the seam between the floor and the bricks is sealed with clay mortar and covered with a plinth to strengthen the seam and give the building overall aesthetics
- Finishing is the simplest and most economical - whitewashing the stove with lime in two times. Particular care must be taken to pass the joint between the hob and the lower brick row. It is very difficult to wash off lime from the metal of stove fittings and stoves, so it would be wise to cover them with polyethylene or other material from splashes and streaks of whitewash

In the ordering diagrams of small stoves, there are few technical difficulties, and by precisely following the order of the stove with a brick of the specified format, it is possible to obtain a stove unit that will work correctly, have economical fuel consumption and not smoke into the room. A few more nuances that are common for laying brick kilns of any design:
- Drying of the stove before the accelerating firebox must be complete - the clay solution must be completely dry. In this case, when fired, it will become “stone”. An uncured clay solution will release water too quickly when heated and will crack.
- The accelerating furnace is produced using fast-burning fuel - wood chips, paper. The combustion chamber should be heated gradually, with an initial low temperature. The brick and mortar in the joints must warm up slowly, with complete drying, this adapts the materials and the entire structure for subsequent extreme operating conditions - prolonged contact with open flames and thermal shocks. If you immediately heat a built stove with coal or large logs, you can get cracking of the mortar mixture in the seams, which are not necessarily visually noticeable. But the flue gases and inflow air will change the movement in the current and the chimney channel, and this is a direct decrease in efficiency, incorrect operation of the unit and smoke in the room.
- The first starting rows of the stove are laid out on cement-sand mortars using Portland cement PTs400 or fast-hardening PTs500, subject to quick laying skills. Classic proportions C:P = 1:4 and 1:5.
- Clay solutions for furnaces are prepared experimentally, selecting the amount of sand depending on the fat content of the clay used. The usual proportion is ½ – 1/3. A small oven does not require a large amount of clay, so it is easier to buy ready-made dry clay with the fat content indicated on the package. Sometimes fireclay powder and salt are added to the clay solution (to prevent rapid dehydration of the solution in the joints - a glass of table salt per bucket of water for the solution).

The most difficult thing in the design of a small stove is the chimney pipe and the transition section to the chimney. Chimneys are laid out with bricks on edge. Reducing the thickness of the masonry is possible because the temperatures in the chimney are incomparable with the heating of the combustion chamber. In addition, the overall dimensions of the stove are reduced.
Mini-stoves are used in garages, for heating small service buildings, as well as country houses. Despite its small size and simplicity, a mini-oven performs all the functions of a heating unit - it heats the room, you can cook food and dry things. To install a hob with two burners, you will need a larger design with internal separation above a single firebox - for the chimney pipe and the hob. But changes in designs are not fundamental; to install a stove with a different placement of the hob, you should also have a good ordering scheme and carefully carry out the masonry steps.
Making the simplest stove with your own hands (10 photos)
There are many options for stoves for cottages and houses. Some of them involve financial expenses, others require direct hands. What should we do for those who have not succeeded either with money or with skill? A simple brick stove that even a “humanitarian” can put together will help out.
The article discusses two options. The first one is suitable for those who want more or less “decent” heating and cooking equipment. The second will be useful to readers who generally do not pretend to be either a penchant for handicraft or any kind of aesthetics of the result.
 Figure 1. Simple brick oven
How to make a simple but effective stove?
This option can serve as an alternative to the simplest metal heating devices - for example, a potbelly stove. With the help of this stove you can heat the room, cook food, and even admire the flames.
The structure occupies just over half a square meter. Unlike full-fledged brick ovens, this one does not require a foundation. The weight of the structure is not so great as to make a strong base - it is enough to lay a strong board.
The oven can be made in just a day. One of the advantages of this option is that starting heating is possible in the evening. Certain skills are necessary, but they do not go beyond the skills of the average male.
On a note! No qualifications are required to build stoves. But it is necessary to maintain order - this will make the design as effective as possible in the context of its potential.
What will you need for the job?
This is not only a simple, but also a budget option. To build the structure you will need:
- brick:
- *fireclay – 37 pcs.;
- *red – 60 pcs.;
- ash door;
- firebox door;
- lattice;
- valve;
- hob made of cast iron.
Clay solution is used as a binder. In total you will need about 20-25 liters of the mixture.
It will also be interesting: barbecue oven - types and characteristics.
Preparation
The first step is to decide on the location of the stove. Since the mass of the structure is small, there are no limitations inherent in traditional brick solutions. By securing strong boards or a suitable alternative material, the “foundation” is thermally and waterproofed.
The role of an insulator can be played by a non-flammable material - for example, basalt wool. Polyethylene or roofing felt is placed on top of the base. The size of the latter corresponds to the dimensions of the base plus a small allowance.
A layer of sand 1-2 cm thick is poured on top. The bedding is leveled. It is important to make the base level - the quality of the design and the convenience of subsequent work depend on this.
Masonry scheme
- The first row is laid on sand without using a solution. A dozen bricks are leveled strictly. The bricks are coated with a thin layer of the mixture, after which the blower door is mounted at the end. The door is pre-wrapped around the perimeter with an asbestos cord, which compensates for the thermal expansion of the metal.
- After fixing the door with wire, lay the second row according to the diagram. Form a ash pit.
- Fireclay is used (in the diagram it has a yellow tint). After laying, a grate is installed above the ash pit.
- Before this, bricks were laid flat. On this row it is placed on its edge. A smoke exhaust channel is formed, inside which a base for the partition is made. One of the bricks (seen in the illustration) is laid “dry” - it will later be removed. After this, the firebox door is installed, which is wrapped several times with asbestos strips before installation. But this must be done so that the door opens well to the top. The element is fixed with wire and a pair of bricks.
- The brick is laid flat again, duplicating the previous row.
- Again the “rib” row is the second and last row in which the brick is laid in this way. The exception is the next row, in which one of the walls is formed by laying on edge. The walls of the chimney channel should be wiped with a damp cloth.
- The brick is laid flat according to the diagram. The back wall is made using the edge-on format again.
- This row closes the firebox. A couple of bricks should hang over the firebox so that the flame moves to the middle of the hob - in case the stove will be used as a fireplace (without closing the firebox door).
- The bricks are moved slightly towards the back wall to support the firebox door. Strips of asbestos soaked in water are laid in front of the brickwork. Thanks to this, they ensure sealing of the gap between ceramics and cast iron. A cast iron panel cannot be placed directly on a clay solution, otherwise the difference in the thermal expansion parameters of the materials will lead to the appearance of cracks.
- At this stage, the formation of the smoke exhaust pipe begins. The latter, according to the plan, should gradually expand towards the back side. But only the chimney base is made of brick. The rest is made of light metal. Otherwise, the excess mass of the element may lead to a shift in the center of gravity of the stove.
- A valve sealed with asbestos strips is installed here. It is recommended to pre-coat the latter with clay mortar. This is the final row, which is used to complete the construction of a brick oven directly with your own hands. The remaining couple of rows are given to the chimney, which will then be connected to a lighter metal channel.
After this, those bricks that were laid “dry” on the 4th row are removed. At the same stage, the smoke exhaust duct and the surface of the stove are cleaned of construction debris.
Final works
The simplest stove does not require serious decorations. The only decoration is whitewashing. It is recommended to add a little blue and milk to the composition - this will protect the coating from the formation of a yellow coating and bleaching.
Important! Brick and metal should be protected before work. If this is not done (for example, using film), you will not be able to get rid of the stains.
It is necessary to coat the seams between the brick and the metal of the chimney very well, as well as the seams between the ceramics and cast iron.
It is imperative to close the joint between the stove brick and the floor. This will prevent oven sand from getting into the room. It is advisable to cover the joint with an L-shaped sheet. Then they make a plinth edging, which serves both as decoration and as an additional element that prevents the “foundation” bedding from spilling out.
 Figure 3. Functioning oven
The stove is ready. The entire process took no more than one working day. Now you can try making low-power kindling. You cannot use logs - only wood chips or paper. Wood burning will create too high a temperature and the structure will crack. For the mixture to fully set, you need to give it a week or two. After this, you can already heat it “like an adult.”
An even simpler version of the stove
If the previous option seemed complicated to someone (although it is not), we can offer an extremely simplified heating design. You can lay out this oven with your own hands in literally an hour, even if your hands are far from being called golden.
 Figure 4. The simplest version of a brick oven
The operating principle of the structure is simple. Solid fuel burns below, and settles here under the influence of its own mass. Temperature changes create a draft that carries hot air currents upward. In this case, the firewood burns almost without a residue - the smoke is minimal.
For masonry you will need only two dozen whole bricks and two halves. The stove consists of five rows. The design is so simple that there is no point in describing the order. The procedure is clearly shown in the illustration.
 Figure 5. Order of the simplest brick structure
 Figure 6. Masonry process
  Figure 7. Finished mobile brick oven
For those who want an intermediate option, we can recommend a slightly more complicated option.
 Figure 8. Diagram of a simple stove
 Figure 9. L-shaped stove
To create this structure you will also need 20-30 bricks. This option can be completed by yourself in a couple of hours, if the skills of a mason are completely absent. A specialist will complete the construction in a matter of minutes.
Advantages of the simplest furnace designs
- very high installation speed – from a day to several minutes;
- does not require a foundation; the stove can be folded anywhere; and if you do not use a binder mixture, the stove comes out collapsible and can be easily moved;
- as fuel - everything that burns: logs, branches, cones, corn stalks, leaves, chipboard, furniture remains, etc.;
- fuel consumption is several times less than, for example, in the case of a potbelly stove;
- the simplest option - without using clay - allows you to get greater heat transfer than from a fire; therefore, such structures are a godsend for those who do not want to constantly maintain a fire while camping;
- almost complete absence of smoke - fuel burns with a minimum of waste;
- the temperature of the bricks reaches 1000 degrees – good heating and fast cooking are guaranteed.
Conclusion
Even the most advanced version of this review does not require qualifications and a lot of time. The choice of design depends on the goals of the stove maker. In a stationary case, the first option is suitable. For mobile situations and completely inexperienced users, it is better to use even more simplified schemes.
Easy to make, unpretentious to use! Building the simplest brick oven with your own hands

A simple brick oven is required if indoors it is necessary to maintain constant temperature and humidity.
The stone from which it is made releases water vapor into the air when heated, and when it cools, it takes it away. Thus, the humidity remains approximately at the same level.
In addition, it allows you to maintain the indoor temperature at 18–20 °C, which is optimal for medical reasons.
Diagram of the simplest brick stove for a summer house and home

Heating stone stove in general it looks like this:
- Below the floor level is located foundation, on which the insulation is laid.
- Trenches are installed on the floor - legs, providing heating of the lower part.
- Directly above them is located an air vent and also a choke. It is needed for uniform heating throughout the height.
- It is separated from the main room blower door.
- Directly above it is located firebox. It fits on its bottom grate, which is also the vault of the ash pit.
- Located directly above the firebox door firebox vault, behind which is hailo or mouth.
- Above start cleaning, pass and convectors.
- Located above the cleaning two valves.
- Almost at the very top there are exhaust outlet into the room, smoke channel and roof.
- The chimney separates from the ceiling internal cutting.
- Located at the very top chimney mouth.
How to build the simplest brick stove with your own hands, ordering the device
First of all, you need to decide on the shape of the stove. There are several criteria by which you can do this:
- The size of the stove corresponds to the area of the room - the side walls give off more heat at the front wall, this indicator 3-4 times less.
- One of the most effective solutions is T-shaped oven- it can heat up to four small rooms.

Photo 1. Option for arranging a simple brick stove for heating houses. Contains 21 rows.
- Correct location - this partly follows from the first point. So, if the stove will serve not only for heating, but also for cooking, then it is better to place the mouth of the hob on the kitchen side, and direct the side walls to the living rooms.
- It is not worth making large stoves for small rooms - the efficiency of the structure depends not on the size, but from the internal structure.“Cap” type ovens work well.
- To avoid unnecessary fuel consumption and maintain room temperature, it is advisable to insulate the walls.
There are several rules furnace masonry:
- Seams in the entire structure, with the exception of the firebox, must be wide 3 mm with deviations up to 2 and up to 5 mm down and up, respectively. Seam width for firebox – 13 mm.
- The width of the seams between materials having different expansion rates is 5 mm. This is relevant for ceramic - fireclay or steel - concrete joints.
- Each masonry seam is overlapped by an adjacent brick by at least a quarter of the length of the latter.
- You need to lay bricks starting from the corners. Verticality is checked with a level or plumb line. To do this (in the first case), a nail is driven into the ceiling and a weight is tied to a string. The second end is secured to the seams. They then use the string to guide them.
- Doors and dampers are fixed with wire, and in very hot compartments (for example, an oven) with a steel strip 25x2 mm.
The following types of bricks are used for masonry:
- Red ceramic- for the lower part of the stove and sections of the chimney with a temperature no more than 80 °C.

Photo 2. Ceramic brick used for laying the outer sides of a heating furnace.
- Stove ceramic- for the firebox.
- Chamotte- they lay out the inner surface of the firebox. Such a brick can withstand up to 1600 °C, and is also a good conductor and heat accumulator.
Tools:
- Hammer-pick - may be required if you have to trim bricks.
- Trowels - for fastening bricks.
- Rubber hammer - for leveling masonry.
- Painting cord - for marking.
- Plumb line - for vertical alignment.
- Laser level - optional.
- The construction rule is for checking the evenness of the walls.
- Level - control when leveling horizontally.
You may also need:
- Container for solution.
- Jointing for finishing seams.
- Drill with mixer (instead of a drill).
- Tape measure, pencil.
- Grinder and mechanic's chisel.
- Safety glasses and gloves.
Masonry process

- Foundation- any brick can be used, even crushed stone will do. The base layer is filled with cement and leveled.
- Furnace body- the horizontal marking is pushed off from the wall of the room. For masonry, stove mortar is used. Using a level, each row is leveled. A grate is placed in the place where the fireplace is planned to be placed.
- For fire safety purposes, the wall adjacent to the wall of the house reinforced with additional bricks. An empty space is left where the chimney will be, the rest is filled in completely. At the same stage, a door for removing ash is installed.
- The door is secured with mortar and leveled. For additional stability, it is fixed with wire laid between the bricks.
- 3 more rows are laid, then a stop for the grating is placed - two more rows of a quarter of a brick.
- On fireclay brick the grating is installed.
- Mounted next to the grille big door.
- The door is installed in the same way as the small door.
- The first row of the firebox is placed above the fireplace. It is reinforced with metal corners or tin, and slots of the required sizes are made in the bricks.
- The next row is placed. Along with it, there is another lattice on the fireclay brick.
- The door is fixed and the brick fits exactly under it.
- Placed above the firebox another layer of fireclay.
- Chimney- the space left for it is divided into wells and reinforced with metal plates.

- Stacked chimney wells.
- Placed above the firebox soot removal doors.
- The wells are divided again. It won't hurt to reinforce them with metal strips.
- On the stove body, with the exception of the chimney space, the ceiling is being installed.
- Is being built body cornice and chimneys.
- The last division of the wells is covered with a sheet of tin, and two more rows of bricks are laid on it to compensate for the internal pressure.
- Installed by valve for each chimney.
- Installed waterproofing, and the chimney intensifies once again.
- A hole for the chimney is cut in the roof.
- The chimney is strengthened again and the minimum is removed half a meter above the roof level, but not lower than the height of the ridge.
Attention! Areas exposed to the greatest thermal impact are laid out exclusively with fireclay bricks(other types may crack from heat).
Possible difficulties
- Door fastening- one option is to hook the wire onto the masonry seam.
- Laying pipes above the roof- well-selected bricks are used, held together with cement-lime or cement-clay mortar.
Useful video
Watch a video that demonstrates the process of laying a brick heating stove.
Brick or metal?
If the room is planned to be heated only by a stove, then brick would be better- it takes longer to release heat into the room and cools down more slowly. It needs to install a strong foundation that holds the structure.

Photo 3. A finished simple stove for heating a summer house. Additionally equipped with a hob.
A metal stove is suitable when the house already has heating or the room is used only from time to time and it needs to be warmed up quickly. Metal oven lightweight and does not require installation of a foundation.
The choice of one type of stove or another depends on the conditions where it is planned to be used.
Do-it-yourself country brick oven


In the cold season, you can’t do without a stove in a country house or village. After all, with its help it is convenient to cook food and warm up the room using a commonly available type of fuel - firewood. To build a simple stove, you don’t need to be a professional, it’s enough to know the basics of physics, have straight hands and at least a little understanding of the types of stoves and their structure. In this article we will look at how you can build a small stove for your summer house yourself. Such a stove will have a stove and a cooking chamber for cooking, and will also be able to heat the room in which it is installed.
Materials and tools for building a furnace:
Materials:
– red brick 500 pieces and plus another 600 pieces for the pipe;
– red clay (6-8 buckets will be needed);
– 0.5 cubic meters of sand;
– 3-4 bags of cement;
– water.

Metal elements:
– combustion and blower doors;
– three doors for cleaning the chimney;
– grate;
– 4 cast iron valves;
– cast iron plate (dimensions 710×410 mm);
– two steel corners measuring 55×55×3300 mm;
– four steel corners measuring 45×45×850 mm;
– four aluminum corners measuring 45×45×1550 mm;
– two aluminum corners measuring 25×25×1200 mm;
– eight steel strips 370×60×2 mm.
Required tools:
– rectangular sledgehammer;
– sharp-angled sledgehammer;
– combined trowel;
– wooden and metal rammer;
– template for marking openings and laying channels;
– hammer-pick;
– spatula for mortar;
– jointing for concave and convex seams;
– mooring brackets (made of a metal rod with a latch and a galvanized sheet with a cord);
- level;
– roulette;
– plumb line;
– folding meter;
- square.
The reliability of the stove directly depends on the chosen brick. First of all, it must be durable, otherwise the stove will not last long. The strength of a brick can be determined by its color; if it has a purple tint, it means the brick has been burned. If the brick is orange, then it was most likely burned too lightly. If you hit a high-quality brick with a hammer, a clear sound should be heard, and the color of such a brick is pink.
The author recommends using Vitebsk brick for such work. The bricks should not have chips or cracks, at least they are not desirable. It is also good that all the bricks are the same size. If it so happens that when purchasing, you came across defective bricks, they should not be used in the construction of the chimney and firebox.

The structure of the Russian stove is such that it has a foundation. The author uses a foundation pit with a depth of 1 meter using a sand cushion 11 cm thick as a foundation. The upper part of the pit was filled with concrete. According to fire safety techniques, the foundation must be located at least 250 mm from the wall of the house.
Oven assembly process:
Step one. Lay out the first row
First you need to lay the first row of bricks on the prepared foundation. The result should be a regular quadrilateral. Accuracy here is extremely important, since it will determine how smoothly the entire oven will be built. The first layer is first laid without mortar; the horizontalness of the row can be checked using a level. It is important to note that each row is assembled strictly according to the drawings created earlier. The author only got 20 rows.


Step two. Waterproofing
At the next stage, the author makes waterproofing; roofing felt is suitable for such purposes. A total of three layers will be needed. The material is placed on top of the laid row of bricks. Well, after that, you can start laying out the second row of bricks, which, according to the rules of masonry, is usually called the first. When laying out each row, it is important to check that it is horizontal.


Step five. Further assembly process
Now you can install the firebox door; you will need wire or special brackets. In order for the door to open freely, it must be wrapped with asbestos cord. Next, the fifth row is laid out, the bricks are installed flat.


To make it possible to install baking sheets in the oven, special steel strips are installed in the cooking chamber. They need to be mounted after the 14th row, every two. You can extend beyond the seams up to 20 mm.
After the twentieth row has been laid out, a corner measuring 55x55 mm is installed above the door of the cooking oven. Next, from the same corner, a frame is installed with the edge up, as well as a sheet of the exhaust duct 2 mm thick (hole 120X120 mm)


After the furnace is built, you can remove construction debris and remove knockout bricks. Then the painting work begins. The stove needs to be plastered and whitewashed. To create a plaster mixture, you can take clay and sand in a ratio of 1 to 2, add 0.1 part asbestos and one part cement. Before applying the solution, you need to wait until the surface is dry. The first layer will be liquid and not thick, and the second, when the first has set, can be applied thicker.
To hide the gap between the floor and the first row of bricks, a metal sheet is installed. You can install a plinth around the perimeter of the stove.
It is not recommended to heat the stove right away; it should be allowed to stand for about a week. After all, the slower the solution dries, the stronger it becomes. Then you need to slowly warm up the stove using wood chips until it is completely dry. If you immediately heat the stove too much, it may crack.
If you want to protect the corners of the stove masonry, they can be trimmed with a corner. You can also equip the cooking chamber from the inside in the same way.

Receive a selection of new homemade products by email. No spam, only useful ideas!
*By filling out the form you agree to the processing of personal data
A small brick stove can sometimes be quite useful, especially if you do not have a large room and do not live in it permanently. It will quickly warm up the room and create a comfortable environment.
Today we will tell you how to make a small brick oven with your own hands, what you need to take into account for this, and we will offer instructions on manufacturing rules. You can also watch the video in this article and select the modification you need.
Mini ovens and their features
Small brick stoves for summer cottages also have their own characteristics; you should familiarize yourself with them before making a final decision.
- The compactness of a brick or appliance structure is considered the main condition for a small room;
- An important condition for such a stove is safety, because usually country houses are built from wood, which dries quickly in the sun and, if hit, can easily flare up like a match. Among other things, the chimney pipe and the device itself must be sealed, they have excellent internal draft, because carbon monoxide that gets inside can lead to quite dire consequences;
- The stove, which is placed in a summer cottage in the winter, must withstand without kindling for quite a long time and not become damp;
- Warming up and quickly lighting the device, spreading heat is also the most important condition for a stove of this type, because when it rains or when completing difficult work, you want to relax in a warm room and drink hot tea;
- It is desirable that such a stove be equipped with large doors so that it can perform the functions of a fireplace, because it is almost impossible to do without evening gatherings next to the fire;
- Long-term heat retention is extremely necessary if you are going to a house overnight;
- It is almost impossible to do without a hob in a country house, especially if the electricity in the village periodically turns off and there is no gas supply;
- Also an important factor is the fuel used for the stove. To save money, choose an omnivorous heating device that can be heated in various ways - brushwood, coal, firewood or household waste;
- It is desirable that the stove has the ability to install a hot water supply register;
- The simplicity of the design of the heating device allows you to fold and install it yourself, which saves a tidy sum, because the services of craftsmen in this regard are not cheap;
- An important point is aesthetic appeal, because with the help of the device you can transform a room, or add a certain gray spot to the overall design.
Brick ovens
A small brick stove for a summer residence is used quite often.
But during installation you will need to consider the following points:
- The stove can be installed in such a way that it will distribute heat to several rooms without heating circuits. If the furnace was installed correctly and the valve was installed, it is considered fireproof, but a strong foundation will need to be created for this building, which will be isolated from the foundation walls. This is a basic condition; if it is not met, the masonry may lose its integrity, because when the foundation of the house shrinks, it can begin to pull on the base of the stove;
Attention: Do not forget that such stoves do not like long periods of downtime and dampness, therefore, in order for the heat transfer to be maximum after a period when it was not in use, you need to carry out several drying fires without significant loads. In each of them we gradually increase the amount of fuel - this process is usually called acceleration.
- It is precisely because brick is afraid of dampness that such stoves are installed in a dacha only when people live in the house most of the time and there is the possibility of burning it;
- Residents of private houses consider only those buildings made of brick to be useful and real. At the same time, heating devices made from other materials are not recognized at all. In fact, such a stove will give the room a special coziness and unique atmosphere. And what’s more important is that they are multifunctional. Professionals in the stove business have developed a huge number of different models from which you can choose for a specific option.
Installation of a small stove
A small brick oven can be installed with your own hands without any problems.
There are two options here:
- First option, you are simply making a stove with a foundation. Then the price of the building will increase, but it will be a fairly heat-intensive structure;
- Second option, this is if you do not have enough funds and do not have the skills. Then it is quite possible to install a metal stove and simply cover it with bricks to increase the heat capacity.
Attention: In the first option, your structure will take up more space and the heat transfer will be higher.
Materials that will be required for the work
You will need:
- Twenty liters of clay mortar;
- Boards;
- About sixty bricks;
- Blower door;
- Cast iron plate;
- Fire door;
- Lattice;
- Fireclay brick.
The size of a small stove occupies 0.4 m2 and is made of brick, which is laid on an edge or flat. This type of stove perfectly retains and distributes heat.
The design is quite simple, because the mini-oven does not weigh too much and the construction of a foundation is not a prerequisite. The floor should be made of thick and durable boards that are well secured.
Such a stove on its own is an alternative to a potbelly stove, but it has more functionality and a heating part, which includes a cooking part. It also plays the role of a fireplace. Such a furnace can be erected without any problems and within 24 hours.
At the very beginning, you need to light the stove with paper and wood chips, but do not take logs, because sudden temperature changes may cause cracks in the solution. This will further lead to smoke or improper air movement.
Before starting the oven, it is necessary that it dry thoroughly. Usually this takes about a week.
Masonry mixture
Everything can be done with your own hands. Then the price will be significantly lower. It is quite possible to use several compositions in masonry. What to choose is up to you.
So:
- For bricklaying, clay-sand, cement mortar is used. For example, screenings instead of sand for the mixture are used to fill the foundation, and a mixture of cement and sand is used for one or several rows of masonry. If for the M400 cement grade sand is added ¼, then for the screed the screenings must be mixed in a proportion of 1/6;
- It is a little more difficult to prepare a solution of sand and clay, because it will take much more time. In order for the lumps of clay to break, they must be soaked in water in the evening, and those that remain in the same state should be kneaded with your hands so that no small lumps remain;
- The ratio of clay and sand is one to two or one to three - everything here depends on the degree of fat content of the solution (this is checked using a trowel). The consistency is considered normal when the solution slides off the trowel without any problems, leaving no traces, and in its thickness it should resemble mashed potatoes.
How to make a stove
Now let's look at how to make a small brick stove in detail. It has its own technology and procedure.
In order to properly build a stove yourself, you must follow the following recommendations:

Attention: Fire-resistant material must be used for the combustion part. It will also withstand coal burning. It is better to use a clay mixture as a solution. It is the most practical and durable.
- We choose a suitable place for the mini-stove, and instead put roofing felt, film, glassine or hydrosol into it. The size of such material should be 78x53 centimeters;
- You need to pour sand onto the bedding (the thickness of which is about a centimeter);
- On top of it we lay the first row of twelve bricks, which do not need to be fastened together. After this, we align all the bricks to the same level so that they are strictly horizontal;
- A small layer of clay is applied to the initial row, after which you can begin installing the blower door. It is extremely important that it is wrapped in asbestos cord or cardboard. We secure it with wire, after which you can safely move on to laying the next one;
- Fireclay brick is used for the third row of the mini-stove, after which the grate is installed. It is mounted above the ashpit only when the third brick row is completely formed;
- We make the following from bricks, but we lay them on edge; in the middle of the chimney it is necessary to lay supports for the internal partitions. The back wall of the stove is laid with a small protrusion outward and without the use of clay - they are called knockout bricks;
- After this we install the combustion door. Again, before you begin installing the door, you need to wrap it with cord in such a way that it can be opened from the bottom up. It is secured with wire and fixed for a while with several stones. The first one is placed at the back, and the second one is placed on top of the door;
- Also, to ensure reliable fastening, a wire is inserted into the holes, twisted and the ends are laid in order;

- The fifth row is made flat; here we make sure to check the outline of the previous row. But the sixth row is laid edgewise. Then we rub the walls of the large stove with a wet rag and proceed to the next stage;
- On the 7th row we lay the brick flat. Next, we place a couple of bricks edgewise and proceed to the back wall;
- When the time comes for the 8th row of the stove on your own, make sure that it overlaps the combustion door above which it will end. It is at this time that we install a beveled brick over the firebox so that the flame is directed to the center of the stove burner;
- We lay out a soaked asbestos cord in advance so that the space between the bricks and the slab is completely sealed. Since cast iron and clay have different coefficients of thermal expansion, we do not lay the slab on clay. Afterwards you can move on to the ninth row, but here it needs to be shifted so that the doors are kept open;
- When working with the following, you will need to form a chimney that will expand at the rear. To make a stove of this type, there is no need for a mounted pipe that will expand at the top, since this type of pipe will lead to a change in the center of gravity. There are various chimney designs. They are: horizontal, straight, countercurrent, combined, and so on. In our design, the stove should have a direct version;
- When working with the next row, do not forget to insert a plug, which is sealed with a cord (it is advisable to additionally coat it with clay);
- Thus, the pipes will be connected to the metal one. If the chimney goes to the side, then it must be covered with several rows of bricks;
- After this, we remove the brick from the fourth row and clean the pipe from dirt that has accumulated during construction work;
- We whiten the stove. We protect the metal part of the stove itself and its walls with film. To prevent it from turning yellow over time, you need to add milk and a small amount of blue to the solution. Each piece of the stove must be processed in the most careful way, special attention is paid to the joints of bricks and cast iron surfaces;
- Carefully seal the gaps between the first row and the floor. This is necessary so that the sand that was poured under the brick does not spill;
- Afterwards, we nail a plinth along the edge of the building, which will protect the stove from sand spills. We nail it level and tightly to cover all the cracks. Thanks to such actions, the stove will look even better;
- As soon as you carry out the first fire with wood chips and paper, leave all the doors and burners in the open position for several days so that everything dries thoroughly.
A small brick stove for a summer house is made quite quickly and will last a long time. The main thing is to look at the photo and choose the option you want. The instructions will prevent you from making mistakes.
How to make a brick stove with your own hands - an introduction to the topic of stoves for the home, as well as detailed instructions with drawings and step-by-step descriptions, useful tips.
Classification by intended use
- Heating. Such stoves are used only for heating a room as a sole or additional heater. Heating stoves circulate and heat the air.
- Heating and cooking. Such stoves can be used to warm up the room and for cooking instead of a stove.
Classification depending on design
Straight-through.
The operating principle of such furnaces is as follows: air moves into the ash pan, goes up and, bypassing the grate, exits through the pipe.

Disadvantages of once-through furnaces:
- Low efficiency, due to the fact that along with cold air, warm air also leaves the furnace, which could still be used to heat the room.
Pros:
- Due to the fact that such stoves are made of brick, which retains heat well, the room warms up evenly and retains heat.
Duct.
This type of furnace is an improved direct-flow furnace. That is, due to the many channels, warm air does not immediately go into the pipe, but, following them, warms the room. When installing channel furnaces, the linear dependence of the efficiency on the length and number of channels should be taken into account.

Bell bells.
Such stoves serve to retain heat in a room. Warm air, in accordance with the laws of physics, tends upward, where the cap holds it. As the air currents cool down, they become heavier and fall down. And, since the cold air is no longer needed, it comes out through the undercoat.

Advantages of bell furnaces:
- They ensure uniform heating of the room due to their design.
- Soot can be easily removed, as it accumulates in one place - under the hood.
Classification depending on material
Brick
Pros:
- Autonomy. That is, having “refueled” the stove once, you don’t have to worry about it for a long time.
- Heat retention. Brick structures conduct heat poorly, so it remains in them for a long time.
Minuses:
- They take a long time to warm up.
Cast iron
Pros:
- Easy to install and does not require a foundation.
- Not fire hazardous.
- Compact.
- Heats up quickly.
- Huge selection of stoves according to external data.
- No additional lining required.
- There are automatic cast iron stoves that independently regulate the temperature.
- High efficiency.
- Performance is relatively less dependent on the amount of fuel.
- Low price.
Minuses:
- They cool quite quickly and require additional heating.
Preparatory work, necessary materials and tools for work
How to build a stove with your own hands? Let's look at the preparation:
- Foundation. If the stove is designed to be large (more than 500 bricks), then you need to build an additional foundation for it. If the oven is small, this is not necessary.
- Thermal insulation is mandatory for all types of stoves: both large and small.
- Chimney. Under no circumstances should the chimney be adjacent to the ceiling beams. Also, the distance between it and all beams should be approximately the same.
- Pipe. The projection of the pipe must be half a meter higher than the roof, but no more than one and a half meters.
- Furnace location. The location should be chosen in accordance with the data on the pipe and chimney, that is, take into account what will be located above the stove.
If these points are taken into account, then there are a few more tips:
- It is better to position the stove so that it heats as many rooms as possible. For example, if the house has several adjacent rooms, it is better to place the stove not in one of them, but between them, so that it heats everything.
- If you need to heat one room, then it is better to place the stove closer to the wall, but not right next to it.
Tools and materials
Materials:
- Clay (for making masonry mortar).
- Sand.
- Brick. Red fireproof. Fireclay.
- Pipe.
- Gravel.
- Tree.
- Cement.
- Ruberoid.
- Grate grate.
- Angle steel.
- Roofing steel.
- Wire.
- Nails.
- Steam valve.
- Oven.
- Doors (for the cooking chamber, ash chamber, combustion chamber).
- Cast iron tiles.
Tools:
- Furnace hammer.
- Ruler.
- Master OK.
- Pick.
- Square.
- Plumb.
- Level.
Design and drawings.
How to build a stove with your own hands? There are main types of structures:
Pros:
- Efficiency can reach 80 percent.
- It keeps warm for a very long time, in some cases – two days.
- The firebox surrounds the fire on all sides and reduces the level of fire hazard of the structure.
Minuses:
- Big size.
- It weighs a lot.
- Long warm-up time.
- After the break, daily heating is required.
- It has the most complex design of all possible types of furnaces.
A Russian stove is suitable as a constant source of heat, will completely replace and even surpass a stove, and can even serve as a bed, but such a stove has huge dimensions, and its installation must be justified.

The oven is Dutch.
Belongs to the channel type.
Pros:
- Simple masonry
- It takes up relatively little space, as it has an elongated shape.
- Heats up quickly.
- Weighs relatively little.
- Allows cooking.
- No need to heat regularly to maintain performance.
Minuses:
- Cools down quickly.
- Low efficiency.
It turns out that a Dutch oven is not suitable as the main source of heat and will not be able to heat a large room. But such a stove is convenient for small rooms and irregular use.

Regular rectangular.
Pros:
- Doesn't take up much space.
- Simple design.
- Low prices for materials and fuel.
Minuses:
- Average efficiency.
- Doesn't keep warm for very long.
A regular rectangular stove is an average option that is suitable for standard heating of a not very large room.
The stove is Swedish.
Belongs to the heating and cooking type.
Pros:
- Allows cooking.
- High efficiency.
- Fast heating.
- “Saves” fuel.
- Relatively small in size.
- There are modern options with an oven, hob, and a place to dry clothes.
Minuses:
- Acceleration firing is required.
- It has complex masonry for a beginner.
A Swedish stove is suitable as the main source of heat in a room, can completely replace a stove and has many design options, but it is difficult to assemble.

Pros:
- Very low fire hazard.
- Aesthetic.
- High efficiency.
- Heats the room evenly.
A stove with a fireplace is suitable both for home decoration and for intended use as a heater.

Blueprints
How to build a stove with your own hands? First, let's draw up the drawings. In order to draw up drawings, you need to know what must be included in the furnace.
- Foundation.
- Frame.
- Chimney.
The oven consists of the following levels:
- Foundation
- Rubble masonry.
- Bookmark depth.
- Waterproofing.
- Furnace array.
Array composition:
- Six.
- Undercoat.
- Sub-bake.
- Dushnik.
- Overlap.
- Valve.
- Half door.
Pipe composition:
- Overlap.
- Cutting.
- Insulation.
- Otter.
- Header.
- Metal cap.
- Pipe riser.
- A metal sheet.
- Pipe neck.
Orders - a detailed diagram of the laying of a brick stove.
How to build a stove with your own hands? Let's look at how to do this using the example of a Russian stove.
Row number..
- Designed for waterproofing foundations. Lay beveled bricks and ¾. During laying, use cement-sand mortar.
- The second row represents the bases for the walls of the care area.
- The third row is the walls of the guardhouse (3/4 brick).
- The fourth row is the support support.
- The fifth row is located in the corners to create support for the arch. Also use this row to lay out the baked goods.
- The sixth row is laid out according to a wooden template, which will be a temporary arch for the guardianship.
- The row for the vault begins to be laid from the edges to the middle. The center brick is driven in with a mallet to ensure strength. Also, bricks should be placed as close to each other as possible, and brick fragments should be placed in the openings between them.
- The walls of the mantle consist of bricks from this row.
- The walls of the stove and the walls of the cold stove are laid out in this row.
- The final row for guardianship. Fill the gaps between the bricks with sand for insulation.
- Strengthening the roof of the guardhouse with the addition of beveled bricks.
- The use of clay-sand cement begins. Shetsk masonry. The brick should lie flat, but then you still need to sand it.
- The bricks of this row will become the hearth and cooking chamber. Additional installation of the mouth arc.
- Walls of the hearth and furnace.
- Walls of the hearth and furnace.
- Walls of the hearth and furnace.
- Fold down the supports for the roof of the cooking chamber.
- It is made of refractory bricks with a vault.
- Pole walls.
- Pole walls. Fill the gaps with sand.
- Laying the furnace, the beginning of the samovar.
- End of the ceiling. Installation of a choke.
- Samovar canals and over-pipe.
- Same channels.
- Additional channel for views.
- Same channels.
- Half door installation.
- Ligation of sutures and the same channels.
- Ligation of sutures and the same channels.
- Connection of pipe and vent.
- Installation of the valve.
- Pipe laying.
33+ pipe laying.

How to build a stove with your own hands: description of the process.
- Lay the foundation of.
- Place the first row (along the cord).
- Place the next rows using a level.
- Control corners using body kits.
- From rows 1 to 11 use cement-sand mortar, then clay-sand mortar.
- The pipe is removed at the end of all work.
How to build a stove with your own hands from brick video:
- Follow the instructions carefully during installation.
- Choose a drawing that suits your needs.
- Place the stove not close to the walls, but not in the center of the room (unless, of course, it is a traditional Russian one).
- Be careful when transporting fire bricks as they are very fragile.
- The side walls of the oven are the warmest, so place them closer to the areas that need to be thoroughly heated.
- Don't forget about automated ovens that will control the temperature.
Laying any of the stoves discussed above will not cause difficulties with careful planning and perseverance. Good luck!
The comfort of a country house built far from gas supply networks is unthinkable without a stove. In the cold season, it gives us pleasant warmth, relieving the air of dampness.
The market today offers customers all kinds of designs of metal “stove stoves”. Despite this, many summer residents prefer the classic version - a heating stove made of brick. Its advantages are obvious: due to its large weight, it accumulates a lot of heat and releases it for a long time, warming the room well.
The service life of a brick structure significantly exceeds that of a metal one. Minimal costs for materials and simplicity of arrangement attract the attention of home craftsmen to a simple stove for a summer residence.
Our article will help you test yourself as a stove maker. In it we will look at several options for simple wood-burning stoves and give practical recommendations for their installation.
You will be convinced that there is nothing complicated in the drawings of these structures. Having learned to read “orders” - brick layout diagrams, you can build a full-fledged heat-generating device with your own hands.
How to build the simplest brick oven?
First you need to decide what you want to get from your future stove. If you only need to heat the rooms, and use bottled gas or electricity to cook food, then choose an option without a stove and oven. Anyone who loves soft healing warmth chooses the option with a bed.
For regular cooking of large quantities of food and pet food, a simple oven with a hob will be just right.
We will look at three examples of stoves with step-by-step guidance on how to lay them:
- Simple direct flow;
- With hob;
- Heating.
Let’s say right away that you cannot expect high heat transfer from a simple design devoid of gas circulation. For this reason, such stoves are installed in garages and other small rooms with an area of no more than 16 m2.
We will consider this option so that beginners get their first simple lesson in practical masonry.

Direct-flow heating design is designed to heat a small room
Such a stove does not require a strong foundation. Having poured large crushed stone in a layer of 15-20 cm, filled it with cement mortar and leveled the surface, after a couple of days you can begin laying.
Stove dimensions in plan: width 2 bricks (51 cm), depth 2.5 bricks (64 cm). Since there is no blower chamber in it, holes for air intake are drilled directly in the combustion door.

The sixth row covers the combustion chamber door. The top view helps to better understand the brick laying method.
The procedures for this design are simple. The main condition during work is to ensure that the seams are bandaged so that the top brick covers the seam between the two lower ones.
On the eighth row, the firebox is narrowed, using halves and “three-quarters” - ¾ of a whole brick. The exit from the firebox is thus obtained with a cross-section of 1 brick (125x250 mm).

The next row (ninth) is laid out in the same way as the seventh, using a whole brick.
After this, the brick tier is placed on the edge flush with the inner edge of the bottom row. The new tier is laid flat, using two whole bricks and four “three-quarters”. In this way, the smoke channel is again narrowed in order to trap gases and increase heat transfer.

On the next tier, the stones are placed on edge. A brick is placed in the middle of the smoke channel. In this way, the oven is raised another five rows (one tier on an edge and a brick in the middle, the other tier flat).

The remaining four tiers are laid flat. With the last two rows of masonry, the smoke channel is narrowed to a size of 12x12 cm (half a brick). At this level, a smoke damper is placed in the furnace. A steel pipe is inserted into it from above.

Oven with hob
In the simplest version, this design has small dimensions (width 2 and depth 3 bricks - 78x53 cm). However, even in such a limited area it is possible to place a single-burner stove.
Work goes smoothly when you have everything you need at hand.
Therefore, purchase the following materials and accessories in advance:
- Solid red brick – 107 pcs;
- Blower door – 1 piece;
- Grate – 1 piece;
- Single-burner cast iron stove – 1 piece;
- Fire door – 1 piece;
- Pipe valve – 1 pc.
Fire bricks are not needed for a wood burning stove. Buying it is a waste of money. But red should be chosen carefully, discarding cracked and uneven ones.
Preparation of the solution
The masonry mixture is made by mixing four parts clay with one part water and adding eight parts sifted sand. The normal consistency is determined simply: the solution easily slides off the trowel, leaving no drips on it. When laying, it should not leak out of the seams.
The volume of the mortar is determined based on the amount of brick. With an optimal seam thickness (3-5 mm), one bucket is enough for 50 pieces.
Having prepared the masonry mixture, you can begin laying the foundation. Its width is made 10 cm larger than the width of the oven. The height of the foundation is selected so that the bottom of the first row of bricks is at floor level.

An approximate prototype of a stove
If the underground is deep enough (50-60 cm), then there is no need to dig a hole for the foundation. It is enough to make formwork on the ground with a plan size of 76 x (51 + 10 cm). Two layers of roofing felt are placed on its bottom to protect it from moisture. Having laid the concrete, it is given a week to gain strength, after which they begin laying.
The dimensions of the stove with hob we are considering are 3 x 1.5 bricks (76x39 cm).
Expert advice: lay out each new tier of brick without mortar (dry). After adjusting the bricks to size, you can begin laying.
The first row is placed on a layer of clay mortar (4-5 mm). Having leveled the base, lay out the second one, leaving space for the blower door.
Before installing the door, you need to screw a soft wire to it and put its ends into the seams for better fixation.

The frame of the cast iron door has four holes for wire, which is used for fixing in the masonry
To compensate for the thermal expansion of the metal, a gap is left between the door and the brick. Before installation, its frame is wrapped with wet asbestos cord.
The third row is laid by overlapping the seams of the second. At this level, a grate is installed in the firebox.

Order scheme from 1st to 8th row
The fourth row is placed on the edge, observing the ligation of the seams, and the walls of the combustion chamber are formed. Behind it will be the first and only smoke circulation (see section A-A in diagram No. 2). To clean its bottom, a so-called knockout brick is placed in the rear wall without mortar, which is periodically removed to remove ash. Inside the chimney, two stands are made from pieces of brick to support the internal partition.
The stones of the fifth row are placed flat, leaving space for the firebox door. At the back of the stove, in order, we see the walls of two smoke channels. During work, their surface must be thoroughly cleaned with a wet cloth to remove any clay protruding from the seams. This is an important condition for ensuring good traction.
Helpful advice! When focusing on the order drawings, do not forget to look at the two sections of the stove. They will help you better imagine its design and not make mistakes when laying out the bricks.
Order scheme from 9th to 11th row
Having raised the masonry up to the eighth row, they close the furnace door, placing wire in the seams to secure its frame. At the same level, in the back of the fuel chamber, a brick with a beveled end is placed - a smoke tooth. It improves heat output by preventing flue gases from quickly escaping into the chimney.
Having completed the ninth row, an asbestos cord is laid along it on a clay mortar. It is necessary for sealing the joints of a cast iron slab and brick. On the tenth row, the firebox is covered with a hob.
On the eleventh, a smoke valve is installed in the pipe. It is also compacted along the contour with an asbestos cord soaked in clay.
Rows 12 and 13 - formation of the pipe walls. After they are completed, a lightweight sheet metal pipe is placed on the stove, leading to the roof.
Heating stove
Now let’s see how to build a brick stove with your own hands, designed to heat a small country house.

Approximate prototypes of the considered heating stove option for a country house
Its dimensions:
- width – 2 bricks (51 cm);
- depth - 3.5 bricks (90 cm);
- height – 2 meters 38 cm.
For construction you will need the following materials and accessories:
- Red solid brick – 390 pcs;
- Clay - 9 buckets;
- Sand - 18 buckets;
- Grate (25x40 cm) – 1 piece;
- Fire door (20x30 cm) – 1 piece;
- Blower door (14x20 cm) – 1 piece;
- Cleaning door (14x20 cm) – 1 piece;
- Gate valve - 1 piece;
- Pre-furnace steel sheet (50x70 cm) – 1 piece;
- Roofing felt for waterproofing (100x60 cm) – 1 pc.
Sequence of work
The first row is the base of the oven. It should be laid out especially carefully, checking the horizontality using a level.
The corners are the hardest part for beginners. To ensure that they are even, we recommend immediately installing four template posts on the edges of the masonry. They can be made from planed boards, knocking them down in pairs at right angles.
By installing such “formwork” from floor to ceiling, you can easily create ideal angles.

Homemade template for laying corners
On the second row, two bricks with a beveled edge facing into the ash chamber are laid at the end of the furnace. The laying of the third row begins with the installation of a blower door, fixed with wire in the seams of the side bricks.

Order diagram from 1 to 10 and cross sections of the heating furnace
Rows 4 and 5 continue to form the walls of the ash chamber. In the sixth row, they begin laying the walls of the fuel chamber and install a grate in it.
At the level of the 7th and 8th rows, a combustion door is installed. At the back of the chamber, beveled bricks are placed to improve traction. The ninth row covers the firebox door.
From rows 10 to 16, the fuel chamber and vertical smoke exhaust duct are being laid. On the seventeenth, a cleaning door is installed in the oven.

Rows 18-30 form smoke circulation channels. They need to be laid out as evenly as possible, rubbing the inner walls with a wet cloth.
Rows 31-32 form a vault covering the oven.
33 and 34 form the chimney.
Having finished laying, the stove is left for a week with the doors and pipe open to dry. After this, a test fire is made, burning small portions of wood chips, branches or straw.