Architraves internal on windows in the wooden house. Window trims - stylish ideas for a modern wooden house (105 photos)
> Platbands for plastic windows - what is it, why do you need it and how to install it
Hello!
On the weekends, my family and I went to friends at the dacha, celebrated their country housewarming.
The house turned out great, only the design of the windows immediately caught my eye. The joints between the window structure and the wall were not very nicely made.
Upon arrival home, he sent his specialist to them to install the platbands.
Now the connecting seam is securely hidden, and the window trim looks decent.
Are your windows decorated the right way? If not, then read what's what, further.
Do-it-yourself procedure for finishing plastic windows
 Finishing of plastic windows is regulated by standards. If we take preliminary work, then this is GOST 30971. You can see firsthand how the window perimeter is finished, where anchor plates should be used (Appendix B), why a vapor barrier membrane is needed.
Compliance with the norms almost guarantees that the structure will not be led by the wind, the mounting foam will not crumble, leaving the frame without support.
In fact, it is the method of fastening, and not the finishing of plastic windows, that causes the most controversy.
As for the finishing work, here you can practically observe the same thing.
Helpful advice!
Finishing plastic windows consists in installing window sills, slopes and platbands.
And so that it all looks beautiful. Actually, the topic of conversation today is about the decoration of plastic windows.
 Upon completion of the installation of the frame, we usually see a bare span with sections of mounting foam. As can be seen from the standards, it is necessary to cover it from the inside with a vapor barrier membrane, which is recommended if the builders have forgotten this.
Even before finishing plastic windows. This guarantees the outflow of moisture from the thermal insulation layer, and water tends to penetrate everywhere.
Have you noticed such plastic plugs on the outside of the frame? Did you think that these are mounting elements that are not related to the decoration of plastic windows? Plugs cover the holes leading directly to the double-glazed window.
This eliminates the suction cup effect caused by the presence of multiple rubber seals. Which is exacerbated by the presence of moisture inside.
How? But like this. Moisture will still penetrate inside the plastic window through the seals. As a result, it would be difficult to open the sashes, as well as to remove the double-glazed window itself if necessary.
The successful operation of plastic windows shows that these measures are useful. This means that a vapor barrier membrane, regulated by the standard, is also needed to keep the insulation dry.
The vapor barrier membrane still costs more than a film for greenhouses, so hotheads came up with the following scenario:
- It is necessary to buy polyethylene for greenhouses instead of a vapor barrier film for finishing plastic windows.
- Then a rolling machine is taken, similar to the one used in the USSR for manual asphalt laying. This is such a shaft of a decent diameter, freely rotating on the grips of a long handle.
- The shaft in our case is made of a flat log. For example, you can try to find a suitable log in the store and saw off enough of it so that it is not difficult to roll.
- The cylinder is seated as uniformly as possible with small, sharp nails. It is done like this. It is necessary to drive in nails row by row and bite off with tongs at an acute angle. That work, also do not forget that you only need to leave a small spike on the surface.
- The resulting unit (do not forget about the handle) rolls polyethylene for finishing plastic windows.
The essence of this invention is as follows. Everyone knows that the vapor barrier membrane still passes water. Yes, yes, just the speed of penetration is very limited. This is what it's for.
 As we said, moisture will still penetrate everywhere. As a result, thermal insulation loses partially or completely its abilities. There are also a number of other negative factors.
If we tightly seal a layer of mineral wool, then condensate will surely fall inside when the temperature drops. All this will rot (bacteria are everywhere too). Nothing good will come of it.
The bottom line is that the excess moisture will gradually evaporate through the vapor barrier membrane. And the new water will no longer penetrate in such a volume as to cause any negative consequences.
Ordinary leaky polyethylene will let water in in large portions. Outside, it will be atmospheric precipitation, and people live in the room, breathing, throwing out steam.
Why does Malysheva say that in winter we have low levels of relative humidity in our apartment?
Steam leaves concrete buildings under the action of heating systems.
Have you ever wondered how he does it? Correctly! Through concrete walls and other paths.
As a result, polyethylene passes water well in places - namely water, not steam - but otherwise creates a sealed storage. The liquid will be stored inside, looking for a way out and not finding it.
On the inner surface of the polymer, condensate will also accumulate in drops. In general, this is not the best solution to save on such trifles as a vapor barrier membrane. But for the most stubborn, let's give an example.
So imagine:
- Rain is coming. The drops fell behind the trims of the plastic windows and got to our leaky polyethylene.
- It's like trying to hold water in a sieve. Through small holes in the film, moisture will rush inward.
- Mineral wool (polyurethane foam to a much lesser extent) is perfectly saturated with liquid. Then the rain will pass. But moisture will remain inside. We believe that there is no need to explain how difficult it is to dry cotton wool. Who does not believe, let him try to wash the mattress in his bathroom. And then in the comments he will share his impressions about how - willingly or not - cotton wool was dried in it.
The difference between a vapor barrier membrane is that it does not let water through. Quite quite. Steam - yes, but not a drop of water.
So, any finishing work begins with the fact that the presence of a vapor barrier membrane is checked.
If this step is missed, then you need to fill in the gaps in the knowledge of construction with your own actions.
We also mention that the use of polyurethane foam also does not relieve the need to install a vapor barrier membrane, but we will save a joke on this for another time, because the review is too long.
Installation of slopes and platbands of a plastic window
We would also like to add that in order to install a vapor barrier film, sometimes you need to slightly cut off the excess mounting foam. So! The starting profile is placed first. Most of all, it looks like the old Russian letter G.
 That is, unlike the modern one, another stick hangs down from its end, about a third of the distance to the base. So.
With semi-cylindrical screws, this profile should be screwed with the long side outward along the perimeter of the window. The upper face of the letter G lies on the border of the window, forming a beautiful joint.
Under the other edge of the slopes you need to put a crate. Along the perimeter of the inner part of the window opening, a small thickness of the rail is nailed. What is the value in centimeters?
Choose from two considerations:
- When mounting on dowel-nails, the tree should not crack.
- The hold-down screws used for mounting will enter here at an angle of approximately 45 degrees. The thickness and width of the rail should be just enough for this. Again, no cracks.
The next step is to install the slopes in place. Their inner end, adjacent to the room, is usually bifurcated under the F-profile.
It is customary to fill the gap with a glazing bead or a piece of plastic for greater strength and more rigid fastening.
The slope is inserted into the starting profile, then the opposite end is screwed onto the crate. The places of the corner joint will be closed by platbands. In fact, this is an F-profile, which must be slipped down the slope with the middle border.
For this place, where there are self-tapping screws, it should be cut off by 20 - 30 mm. Carefully insert the platbands.
It remains to seal the corners with sealant. Silicone glue is placed in a thin stream in all corners, the excess is removed with a plank or directly by hand. Finishing of plastic windows is not finished yet.
The window sill remained, and many rightly consider it the main part of the whole work.
 A self-respecting building materials company always creates training videos on the use of products. So the buyer immediately sees what is being charged for, and is more willing to spend money.
As for window sills, the Werzalit company tried here. They offer as many as three options for interior decoration.
We do not exclude, however, that there are others:
1. The first method is based on the use of ordinary cement. While the solution is being prepared, you need to level the window sill. One end of the profile sits under the window, the other hangs over the wall.
This is a separate conversation, because many do not like this position of the window sill. An adult man may well break the profile if he sits down. That is why Werzalit limits the maximum overhang of the window sill to ten centimeters.
Note!
Werzalit limits the maximum overhang of the window sill to ten centimeters.
In each place you need to put just enough so that the window sill stands horizontally. It is recommended to use only hardwood impregnated with antiseptics for this.
Cement is applied not entirely, but in large cakes. And opposite each, on the inside of the window sill, fastening plates of an intricate configuration are attached.
For a day (minimum), the window sill is pressed against the upper part of the window opening with special spacers. In everyday life, this is replaced with good, weighty bricks.
 2. In the second case, the installation is carried out completely with glue. Moreover, the bases of the planks should stick to the window opening, and between the planks you need to anoint.
It turns out a fairly solid construction, and after drying, the gaps can be filled with mounting foam or heat-insulating material. In the training video, it is generally recommended to lay mineral wool.
3. Installation on steel consoles is also carried out with glue.
This was an overview of how plastic windows are finished.
source: remvizor.ru
Carved plastic platbands on the windows with a photo
 Plastic platbands on windows have a number of advantages over wooden ones: they do not rot, do not dry out from time to time, and are not affected by fungus.
The functions are the same as those of wooden ones: to close the joints of the window frame with the wall, to prevent the penetration of moisture into the mounting gaps, to increase the heat-insulating and sound-proofing characteristics of windows.
Carved plastic window trims (see photo) are most often used for PVC windows, but can also be used for wooden structures: their color, design and texture are very diverse, from ordinary white to dark, colored, various wood imitations: oak, walnut, ash, wenge, etc.
You can choose the material to match the facade (for example, if the facade is lined with siding), or make the windows contrast.
The main thing is that the new elements do not violate the stylistic unity of the facade.
Helpful advice!
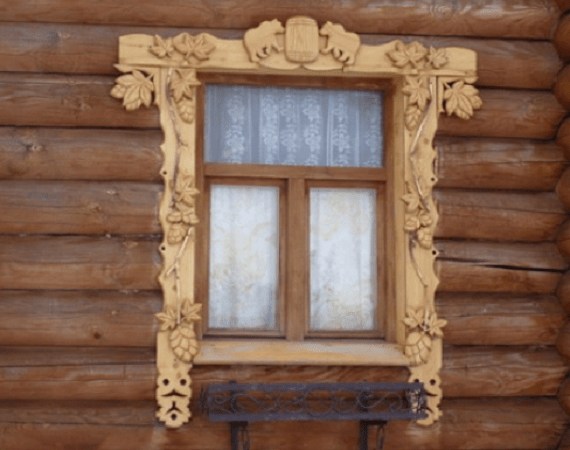
For example, on the windows of a log house, a white PVC trim will be out of place.
But the product with the texture of wood and made as a carved wooden casing will perfectly fit into the design of a log building. See photos of the best solutions below.
 PVC trim for windows is not the only solution - there are also polyurethane trim. This material is light, resistant to temperature extremes, moisture and other vagaries of the weather, aesthetic and plastic.
Polyurethane platbands do not have to be straight, they can be made on a round porthole window.
Polyurethane platbands are often used not by themselves, but as part of the overall design of the facade: polyurethane can be used to make "stucco" bas-reliefs and other decorations.
There are platbands made of dense foam. But due to their fragility, they are practically not used.
Window platbands can be overhead and telescopic: the latter are a kind of constructor (often complete with extensions), where all the elements are joined together by ready-made locks.
They often use a plastic trim for slopes.
 Plastic platbands for plastic windows are fastened with self-tapping screws, nails, synthetic adhesives. In the absence of locks for fastening the elements to each other, their ends are cut off at 45 degrees.
There are removable products: in this case, metal fasteners are installed on the windows and trims are snapped onto them. It is very convenient if you want to change them from time to time.
Or there was a need to replace the damaged one.
On outbuildings, platbands can be fixed with double-sided tape. But this method of fastening is not very reliable and will not withstand strong winds.
The shape of the platbands for plastic windows are flat (the most common option - see photo) or profiled, for example, convex.
The profile can be symmetrical and asymmetric, curvilinear and combined, it can contain various combinations of corners and bulges.
Note!
Shaped platbands can be used both indoors and on the facade.
Plastic platbands on windows usually do not have a very high coefficient of thermal expansion. Plastic does not get wet and does not swell from water. Installation is quite simple and does not require the creation of large technological gaps.
source: enoza.ru
Plastic windows - products are very functional and reliable. But in some cases, when the window is installed flush with the wall, the question arises of how to ennoble the joint between the window frame and the wall itself.
Even with a very high-quality installation, the joint always remains. And this problem can be solved by platbands for plastic windows.

The functions of the platband on plastic windows
 The main function is to connect two mating surfaces in such a way that the appearance of the wall, along with the windows, looks complete.
In addition, the platband closes the connecting seam from the effects of external negative factors: moisture, direct sunlight.
To a certain extent, the platband also protects against temperature changes. But it depends on the material from which it is made.
Well, the last function is decorative. Although many put this feature in the first place. But it all depends on the material and shape of the platband.
What are the platbands for plastic windows
 The simplest options for platbands are flat. This is the most common and budget option. The advantage of such platbands is the simplicity of their installation, ease of production.
If no frills are required in decorating plastic windows, then flat platbands are installed.
Profiled platbands differ from flat platbands by the presence of a certain bulge on the outer surface. Moreover, this surface can have a different profile, both symmetrical and asymmetrical.
The profile can be made not only in the form of a curved surface, but also have different angles. It can have a complex, combined profile, where rounded surfaces and corners are combined.
Architraves of shaped type having a relief surface from outside.
Helpful advice!
The relief on the surface of the architraves can be quite complex. And these architraves can be made of wood or imitate wood.
Carved platbands are real works of art made from various types of wood. Although, by and large, carved wooden architraves do not always look beautiful with plastic windows and do not always fit into the style of the house.
Materials for the manufacture of platbands for plastic windows
One of the most common materials is sheet-type plastic. Basically, plastic is used for the manufacture of flat platbands. Plastic can be monolithic or have a structured interior.
Plastic perfectly tolerates temperature changes, humidity, direct sunlight. It can be produced with different colors, which makes it possible to choose platbands for plastic windows to match the color of the walls.

What is very important, the plastic has a low elongation coefficient. Due to this, with a temperature difference, plastic platbands do not begin to deform.
And it is not required to leave large thermal gaps during installation. Due to the fact that plastic does not absorb water, its deformation from swelling and other similar processes is excluded.
The second option for platbands made of artificial materials is platbands made of PVC or polyurethane. Compared to conventional plastic, the use of PVC or polyurethane makes it possible to make architraves not with a flat surface, but with a profiled one.
Or to receive platbands having a complex external configuration by casting or pressing.
The platbands for plastic windows are made of polyurethane, imitating carved platbands made of wood. In this case, the drawing can be quite complex.
PVC and polyurethane perfectly tolerate changes in humidity, react little to heating in direct sunlight, and are resistant to low temperatures.
Platbands of this type can be used for installation both indoors and outdoors.
 The next material used for the production of platbands is MDF. Usually these are flat platbands or profile-type platbands. Basically, such platbands are used for indoor installation.
The fact is that with all due respect to MDF, this material does not tolerate the serious changes in humidity that can be observed during outdoor installation. If you install a platband made of MDF on the street, its service life is drastically reduced.
Another option for the material of the platbands is dense foam. The advantages of such a casing are lightness, high thermal insulation, resistance to moisture and frost. However, foam platbands have very low mechanical strength.
The most expensive are platbands made of natural wood. They can be flat, profiled, shaped. In addition, they can have carvings on their surface, obtained both by machine and by hand.
 It is the hand-carved platbands that have the highest cost.
Profiled platbands for plastic windows are somewhat cheaper. This is due to the fact that the main operations for creating a profile are performed on machines.
In the same way, shaped surfaces on wooden platbands are made on the machines.
Wood has some disadvantages. If the finish is not correct, moisture can penetrate into the wood structure.
Over time, this moisture can cause warping or cracking when it dries.
Moreover, wooden architraves do not always match the style of plastic windows. It is rational to use them only if the house is made of wood, and not of other materials.
Methods for attaching platbands to plastic windows
Platbands on plastic windows can be mounted in various ways. The most common fastening with mounting elements to the wall or to the frame of a plastic window.
In some cases, fastening with adhesives is used.
There are removable platbands for plastic windows, which are fastened with special latches. According to the principle of operation, such latches resemble buttons on clothes. Metal elements are attached to the window frame, onto which the trim is latched.
Another way to attach the platband is with double-sided construction tape. But such fastening is possible if there are no serious wind loads.
source: gennadiy.info
Do I need platbands for plastic windows
 The first and, perhaps, the main purpose of overhead strips, which are better known as flashings or platbands on plastic windows, is to decorate mounting gaps.
Far from always (and, to be honest, almost never), it is impossible to install a window in such a way that there are no bumps, cracks, gaps and other “production costs” that are obtained between the frame and the wall.
Moreover, some of these gaps do not appear immediately, but over time, due to the natural shrinkage of the building.
Accordingly, in order for the installation to look completely finished, and the window to look beautiful and aesthetically pleasing, it is easier and cheaper than other types of finishing work (plaster or drywall), just install a ready-made frame (slope system) and, as my grandmother says, “cover the shame” .
But, this is not their only, so to speak, duty.
In addition to a purely decorative function, platbands serve as an additional barrier to drafts, moisture and dust that try to penetrate from the street into the room, using the most microscopic cracks and holes.
And with this, by the way, flashings prolong the life of windows.
Note!
So do not hesitate - platbands for plastic windows are needed.
Platbands are used for both interior and exterior decoration, they can be in the form:
- flat;
- rounded;
- curly;
and according to the method of fastening there are:
- waybills;
- telescopic;
Recently, platbands with a cable channel have also been produced, in which you can hide the wire from the air conditioner or Internet wiring.
Installation of platbands
 Before installing the platbands, the window opening must be carefully leveled (cleaned and sanded the remains of the mounting foam) and checked with a level so that the corners are straight and the joints are perfectly even.
Fastening of overhead platbands on plastic windows is carried out using special glue, "liquid nails" or screws (self-tapping screws). The joints of the panels with the window frame are treated with silicone sealant so that they are completely sealed.
This work is delicate, requires special skills, therefore, in order not to damage the thin bar, it is better to entrust the installation to specialists.
Telescopic ones have an additional protrusion (builders call it a “wing”), which is located at a right angle to the plank plane.
This protrusion is inserted into the groove of the box and, as a result, a complete closure of the joint is obtained.
Such a mounting system is called hidden, since there are no fastener caps or decorative plugs left on the front side.
Trim care
Platbands do not require any special care. The conditions are the same as for the PVC profile: use a soft cloth or a regular sponge and liquid detergents (pasty ones may contain abrasive substances).
When washing glasses, do not use any harsh chemical solutions (these are those that contain acids or solvents), as they can also damage the plastic.
Where can I buy
As a rule, PVC architraves can be bought in the same company where you place an order for the manufacture and / or installation of plastic windows.
They are classified as accessories, but platbands are not a prerequisite for installing a window, they can be included in the order, or they can be bought and delivered separately.
You can order platbands of individual sizes from manufacturers or purchase from their official representatives.
The standard sizes are:
- Length: 2200 mm
- Width: 40, 50, 60, 70mm
Just like the PVC profile, the platbands for plastic windows can be white, colored or laminated.
source: vibiraem-okna.ru
 Plastic platbands and methods of their fastening
Platbands are intended for decorative registration of a window or doorway.
Platbands are not at all obsolete, as many people think, an element of decor. These overlay strips allow you to hide the various gaps that form between the wall and the frame.
Even significant defects that have become noticeable, for example, after shrinkage of the building, can be hidden with their help.
Frames installed on the windows give them a finished look.
The shape of the platband can be any: flat, rounded, figured (carved).
Currently, the building materials market boasts a wide variety of overlay strips made of different materials:
- veneer;
- steel and aluminum;
If the house is wooden, then the architraves should be made of wood (exclusive carved). If the house is stone or brick, then frames made of natural or artificial stone will perfectly decorate it.
Such windows will acquire a well-groomed, elegant look and become a bright element of the facade of the house. Decorative window slats made of artificial sandstone look great. They will retain their beauty for decades.
 However, PVC platbands (made of plastic) are the most popular and inexpensive today. They are fastened with nails, self-tapping screws, screws, special glue.
To avoid damage, installation work must be done carefully. If you do not have the skills of such work, then it is better to contact experienced professionals.
PVC slats are available in various colors, so it is easy to match them to any interior of the room.
According to the method of fastening, platbands are:
- telescopic;
- overhead.
Telescopic slats have a protrusion (wing) located at right angles to its plane. This protrusion enters the groove of the box, due to which a complete closure of the junction is achieved.
 After installing a plastic window, installation of slopes is always required. Having installed the top panel in the mounting profile, we bend the casing onto the wall and fasten it to the wall with screws. We also install side panels.
And finally, apply silicone sealant to the corner joint.
Frames for windows and doors with a cable channel are also currently being produced. They have a channel inside in which you can hide telephone, computer, television wires, which usually hang in garlands.
In addition, nails are not needed for their fastening, so there are no decorative caps, nail heads or screws on the front side. Platbands have a hidden mounting system.
Master of Architecture, graduated from the Samara State University of Architecture and Civil Engineering. 11 years of experience in design and construction.
The design of PVC windows after their installation includes the finishing of slopes. After completion of these works, the corners are decorated with decorative corners or internal slopes are installed on the windows.
Why do you need window trim?
The interior decoration of plastic windows has not only a decorative function, but also a protective one. The mounting seam must be reliably protected from the impacts exerted on it, so that the window system as a whole functions correctly: the glass does not fog up and freeze, and condensate does not accumulate on the slopes.
The assembly seam from the outside must also be reliably protected from the effects of precipitation, wind and sunlight, under the influence of which the expanded polystyrene is destroyed. You can effectively protect it by installing metal slopes and platbands on plastic windows for exterior decoration, which will give the window a neat, finished look.
For the interior decoration of the window opening in the house, different types of material are used. This can be decorative plaster, do-it-yourself installation of PVC panels or drywall on the slopes of plastic windows. The decoration of internal slopes with decorative artificial stone looks spectacular. To understand which of these methods is better, it is worth considering each of them separately.
Decorative plaster
When making repairs in the house, interior decorative plaster is often used as a finishing material for walls. This material will make the slopes on the windows unusual and spectacular.
 Decorative plaster is often used for interior decoration of slopes.
 The composition of decorative plaster may include fillers of various fractions and origins - these can be natural wood fibers or stone chips or artificial granules of various sizes. Decorative plaster is used as a finishing layer, creating an unusual textured surface or intricate pattern, like Venetian plaster..
As a material for interior decoration of slopes, decorative plaster has the following characteristics:
- effectively masks the unevenness of the base;
- it can be applied to any base material: brick, concrete, drywall, wood;
- this material does not absorb odors;
- safe, non-flammable and environmentally friendly composite;
- has soundproofing qualities;
- with minor defects in the base, its preliminary repair is not required;
- when waxed or painted, the plaster layer becomes water-repellent;
- has breathability;
- repair of the plaster layer is very simple, there is no need to remove the entire finish;
finishing of arched window designs is possible.
Types of decorative plasters
Depending on the type of filler and the base substance, decorative plasters are:

Surface preparation
The durability of the plaster layer depends on a well-prepared surface.. Therefore, finishing window slopes inside with decorative plaster should begin with the preparation of the base.

Drywall slopes
Finishing slopes with drywall is quick and does not require special building skills. Installation is possible using mounting foam or putty as an adhesive or on a metal frame. Drywall for windows must be marked GKLV.
 Drywall on slopes can be mounted on a metal frame
 It has the following positive qualities:
- environmental friendliness;
- affordable cost;
- simple installation;
- decorative effect when finishing with any materials;
- flat solid surface;
- durability;
- the possibility of designing arched openings.
Preparatory work
Surface preparation consists of the following steps:

With the help of mounting foam, you can finish the window opening without having building skills. It is important to remember that drywall is a fragile material, so the necessary details must be cut out of it carefully, without effort.
To get smooth edges at the cut points, it is necessary to make an incision along the drawn line on a drywall sheet, attaching a ruler, using a sharp construction knife. It is necessary to cut the top paper layer and a little inner one. Then, along the incision, you can lightly knock - the drywall will break itself along the intended line.
Foam mounting

Finishing slopes with plastic panels
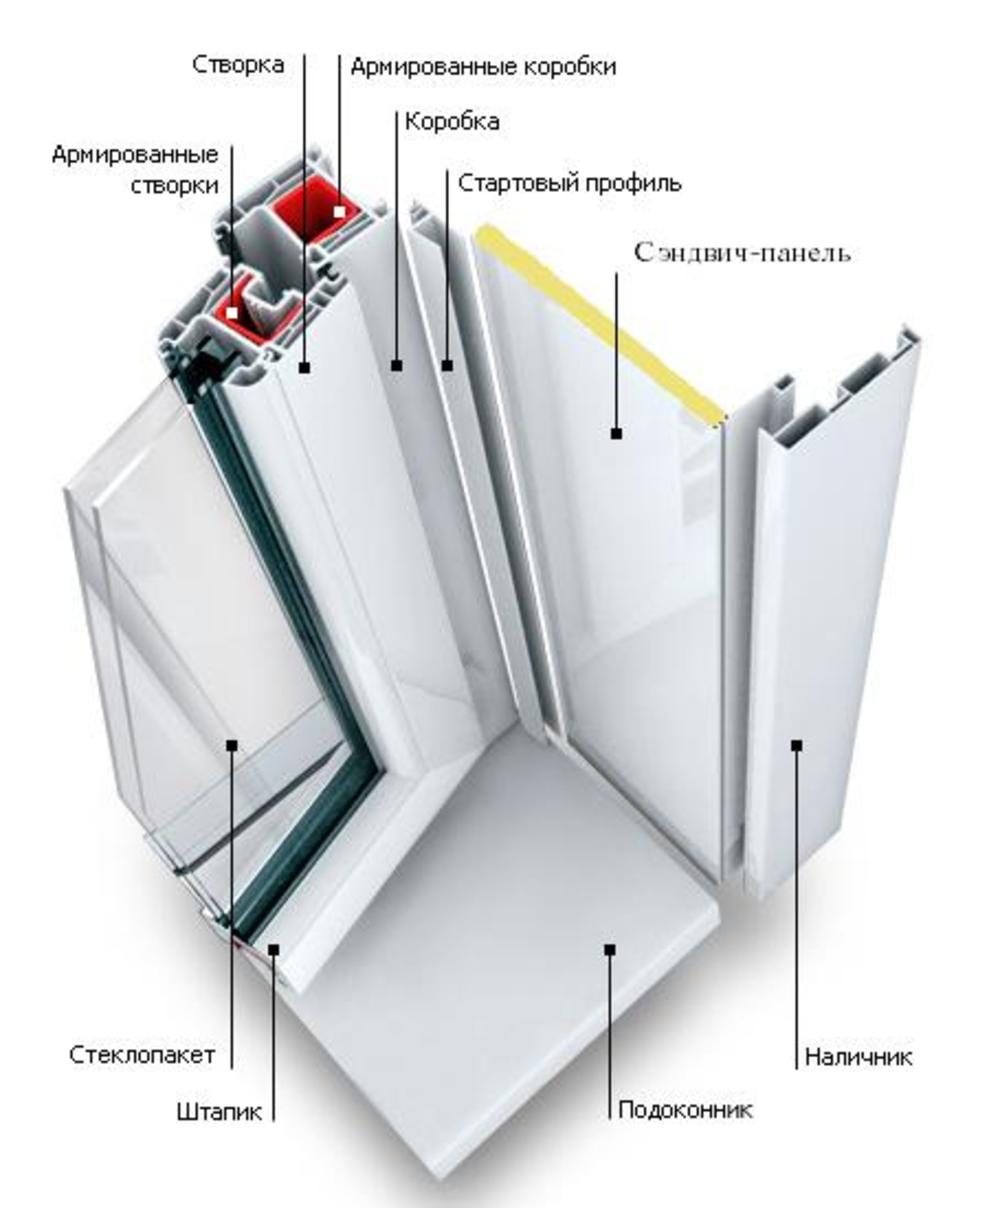
Finishing the slopes of windows inside can be carried out using plastic ceiling panels or multilayer sandwich panels. The installation of this material is so simple that it is possible to finish the plastic windows inside with your own hands. How to make slopes for plastic windows made of plastic in the house will be described below.
 For finishing slopes from the inside, PVC panels are most often used.
 Sandwich panels are better than ceiling panels due to the presence of a layer of insulation inside. However, ceiling tiles also have thermal insulation qualities due to the air chambers between the internal stiffeners..
Installation and repair of slopes inside the building with the help of these finishing materials is possible due to their qualities:
- PVC slopes are durable;
- the use of panels for finishing window slopes gives them an attractive, neat appearance;
- finishing options can be very diverse thanks to a wide range of colors,
- which have outer surfaces of panels;
- it is possible to install plastic on arched structures;
- repair of plastic slopes is not difficult;
- ease of installation - window openings are finished with their own hands, while installation does not take much time;
- pvc lends itself well to processing;
- slopes trimmed with plastic from the inside are easy to maintain;
- finishing window openings with this material increases the energy efficiency of the window system;
- interior window trim prevents them from fogging and freezing.
Mounting
How to install internal slopes for windows made of PVC panels is shown below.
- we remove excess mounting foam with a clerical or construction knife;
 To remove the remaining foam, use a clerical or construction knife.
 - along the perimeter of the window opening near the frame, with the help of self-tapping screws, we fix a wooden block;
 Fasten a wooden block around the perimeter of the frame
 - we attach the starting profile to the bar;
 A starting profile is attached to the bar
 - install a rail along the outer perimeter of the window;
 The rail is fixed along the outer perimeter of the frame
 - first it is better to insert the side elements;
 Side panels installed first
 - then we insert the top panel, bend it, foam it a little and fix it in the required position;
 A small layer of foam is blown between the upper slope and the PVC panel
 - in the same way we fix the side parts;
- after the structure dries, the corner parts are trimmed with decorative elements - corners or platbands.
 Corners are covered with platbands
Sandwich panels can be installed in the same way or without a starting profile. In this case, the panel is placed in a groove cut in the mounting foam. This method of installation is relevant when it is not possible to place a bar around the perimeter of the window frame.
platbands
Platbands or cashing for internal slopes for pvc windows can be made of different materials, but its functional purpose is the same - protecting the mounting seam from destruction and giving the window opening an aesthetic appearance.
Types of platbands
Platbands differ in appearance and functionality:
| Flat platbands. This is the easiest and cheapest type of cashing out. | |
| Profiled architraves have a convex surface of a different profile, aimed at enhancing the decorative function of the cashing. | |
| Shaped platbands can have a complex relief and imitate natural wood. | |
| Carved platband is the most expensive type of cashing, made to order according to individual sizes. |
Materials for manufacturing
The most common material for the manufacture of cashing is sheet plastic. It is used for the manufacture of budgetary flat platbands, which can be used when finishing windows indoors and out.
This material is not afraid of temperature changes, exposure to moisture or sunlight. Its surface can be laminated and acquire any color or imitate various types of natural wood. Therefore, it will not be difficult to choose cashing to match the color of the window facade.
 Plastic cashing can be made for any facade
 For plastic platbands, deformation from temperature changes and exposure to moisture is unusual.
Profiled platbands made of PVC profile have the same properties, but may have a figured surface. They are also used for indoor and outdoor window decoration.
MDF platbands can also be flat or profiled, but they are used exclusively indoors, since the properties of MDF do not allow them to be used outdoors under the influence of natural phenomena.
For outdoor use, dense foam cashing can be used. This material is easy to process and install. From foam, you can cut the most intricate and complex shapes. It can be decorated with any finishing materials. It has a negligible weight, so it does not exert a load on the wall.
 Styrofoam platbands can be used for exterior window trim.
 The most expensive window design option is a carved wooden cashing device. The carving can be done manually or mechanically. Handmade is very expensive due to its individuality and exclusivity.
Profiled and shaped platbands made of natural wood, made on a machine, will be cheaper.
Careful care is required for wooden platbands, since wood, when used in conditions of exposure to the external environment, has some disadvantages:
- wood can be deformed when absorbing moisture or crack as a result of shrinkage;
- such cashing harmoniously looks on windows made of wood or on facades made of timber. On modern facades, such cashing will look ridiculous.
Fastening
Most often, when mounting platbands on a plastic window, mounting elements are used that are fixed to a frame or wall.
 Platband mounting scheme
 The use of removable platbands, which are attached to special latches, allows for quick and high-quality installation.
The appearance of the house largely depends on how the windows are decorated. They emphasize, and sometimes form the style of the building. And the main way to give them character is platbands on the windows. Here we will talk about them further.
Purpose and classification
Platbands are narrow long strips that frame windows or doors. According to this principle, window and door are distinguished. They usually differ in width, but, in order to maintain a single style, they must be made of the same material. In addition, they are made in a similar manner, using repeating elements and painting in one color.
Door and window platbands serve not only to give the building / room a finished look, although this is also important. They also close the technological gap that is formed between the door or window frame and the wall. After installing windows and doors, this gap is filled with insulation, but the view does not get any better, and water, dust and sound continue to penetrate into the room, albeit in smaller quantities. So they came up with the idea to close that gap with slats, and even decorate them.

At the place of installation, platbands are external and internal. The protective role is mainly played by platbands for outdoor installation. Therefore, they are made from materials resistant to climatic factors (or coated with protective compounds) and the thickness of this material is usually greater. Internal platbands, basically, perform a decorative function. They are operated in gentle conditions, because the requirements for the properties of the material are different - decorativeness is important, and not resistance to climatic influences.
Materials used to make platbands for windows
Window platbands are selected depending on the general style of home decoration. Houses are built and finished differently, respectively, and the materials and style of additional decorative elements are different. For brick houses, for example, plastic or metal is better suited, but not wood (this is if there are platbands at all). Windows are also decorated with plastic or metal. For wood, on the contrary, it is wood that is more suitable. But this is not a rule either. The choice of platbands is a personal matter of the owner. What he wants, he puts them. It is only important to understand all the pros and cons of each material.
Wood
Platbands for a wooden house, most often, are made of wood. But any type of wood requires constant care - painting and / or varnishing. Once every two or three years, you have to renew the coating. Only in this case, products made from it look normal for many years.

The advantage of wooden window casings is that they can be carved, with figured elements of various shapes. This gives an almost infinite number of options. There are also very simple models - ordinary planks, possibly with some additional elements. The choice depends on the style of the house.
Wooden platbands are used, both from the side of the street and indoors. Just during installation, various protective impregnations and coloring compositions will be used.
Plastic
If PVC windows are installed in the house, then plastic trim is also installed. They are good because all care is periodic wiping from dust and dirt. No other operations are needed.
Plastic platbands are made of plastics resistant to climatic factors, adding a dye that is resistant to fading to the composition. Components are added to the mass that protect the material from high and low temperatures.

The advantage of plastic platbands is their low price. Minus - a limited selection of models and styles, not too large a range of colors. Available are usually white, a couple of shades of brown. The rest - can be available only on order, and even then not always. And one more minus - it's still an artificial material. Not everyone wants to put plastic trim on a wooden house. Even despite the fact that wooden ones are not cheap at all.
The scope of use of plastic platbands is indoors or outdoors. If you need external plastic trim, pay attention to the operating temperature. Plastic must withstand the most severe frosts in your area.
MDF
MDF platbands - an option for indoor use. You can’t put it on the street - it will quickly become worthless. Represents the compressed crushed fibers of wood from which products are molded. Their surface is laminated with a film that can be smooth, colored, imitate the surface of a stone (marble, for example) or wood.

If you do not like plastic on the windows, the second possible budget option is MDF trim. In any case, most often it is them. There are even special models - telescopic. They are good because a special additional board is cut to the desired size, due to which they can change the width and fit into any opening. With their help, the doorway is made quickly and efficiently.
Caring for MDF platbands is no more difficult than for plastic ones - wet wiping. In case of heavy soiling, non-abrasive (liquid) and non-aggressive (without chorus, etc.) detergents can be used.
Metal platbands
This type of platband is usually placed on the street with plastic or metal-plastic windows. This is a thin sheet of galvanized metal coated with weather-resistant paint (usually powder paint).

Metal platbands on the windows are classified as budget. They don't cost very much. Suitable for private houses decorated in a modern style. Metal platbands are perfectly combined with houses finished with metal and aluminum composite. The second area of application is for industrial and office premises. They are good because they combine practicality, durability, low price.
Platband device
Classic platbands for windows consist of four elements: upper and lower trim, two side strips. They can be connected using a single spike (as in the figure). They can also be joined end-to-end, as they do not carry any load. In this case, they simply tightly fit the strips one to the other, fixing each element separately.

If the window provides for a window sill, there is no need for a lower trim. During installation, the window sill is first fixed, then the side strips, and lastly, the upper harness.

The width of the platbands is selected individually each time, but usually lies in the range of -100-250 mm. When choosing a width, two technical parameters are taken into account:
- the platband should go onto the frame by at least 5-10 mm;
- in order not to interfere with opening windows, they should deviate from the hinges by 10-20 mm (the farther, the wider the sashes open).
The final width is chosen based on the style of the house. Somewhere narrow strips are more suitable - 100-130 mm wide, somewhere you will need wide ones - 200-250 mm. In order not to be mistaken, you can “try on” the planks by nailing them on a couple of nails and looking from afar which option you like best.

The thickness of the strips for the manufacture of platbands is 20-35 mm. In most cases, a board 20-25 mm thick is used, since this is the optimal size for independent execution - it is not too difficult to process, but quite voluminous to obtain a decorative pitchfork.
Platbands in a wooden house
Most questions arise when decorating windows in a wooden house. Most are inclined to believe that only wooden platbands are suitable for a wooden house. There is a reason for this - a tree with a tree looks the most organically. But choosing the material is far from everything in this case. There are several important points to pay attention to:

So the choice of the appearance of the platbands is far from the last one, of those that will have to be decided. It is also necessary to choose the method of processing wood, the method of installation, and the type of casing too.
Types of wooden platbands
Wood is an extremely plastic and very beautiful material, therefore the number of variations in the design of platbands tends to infinity ... All of them can be conditionally divided into several types: simple and carved. Simple ones look great on modern-style houses, carvings are good for ethnic buildings.

Simple in shape from moldings
Industry and private traders sell strips of various sections:

From this molding, you can make simple platbands with your own hands. To do this, you need to calculate the amount of material needed (according to the results of window measurements). At the same time, it should be taken into account that the length of one plank is 220 cm. You are unlikely to make composite elements, therefore it is worth considering that there will be a lot of trimmings. The most successful case is if two elements can be “cut out” from one plank - usually this is the sidewall and the upper / lower part.

Planks are joined in two ways - at 90° and floor 45°. At the same time, the appearance of the platbands is different. When joining the floor at 45°, a neat frame is obtained, and when joined at 90°, a more expressive design is obtained. The protruding edges can be left straight, can be cut at any angle, rounded, curly cut ... Here, as you like more or what is enough skill, desire, imagination.
The simplest homemade platbands
The option differs from the one described above in that we carry out the primary processing ourselves. Edged and unedged boards are suitable. From edged ones, a modest finish is obtained for a country house or for a house made of planed / glued beams. We grind the board first with coarse sandpaper, then with finer and finer sandpaper. When the surface becomes smooth and even, you can start cutting.

Nothing complicated at all - just well-crafted boards
The bark is removed from the unedged board, the surface is also polished. There are options here. You can achieve smoothness by removing flaws. You can only remove the upper rough layer, leaving all the imperfections of the wood in the future, only emphasize it during processing.
Carved architraves
Openwork wooden platbands on the windows are a beautiful, but expensive option. Expensive - if you order their execution, and time-consuming if you do it yourself. There are, however, simple, but spectacular patterns that, if you have a jigsaw and desire, you can do it yourself.

There are two types of openwork platbands - with slotted and overhead elements. Slotted - this is when the holes in the platbands are made through and through them the wall is visible. Overhead - this is when the window is decorated with ordinary planks, and on top of them elements of slotted carving or decorative protruding elements (linings in the form of rhombuses, rectangles, etc.) are fixed.

In the case of overlays, contrasting colors are often used. For example, planks are painted dark, and openwork is painted light. But this trick is easy only at the installation stage - you can separately paint both parts. Subsequently, you have to carefully, with a thin brush, apply different paints.
How and why to fix platbands in a wooden house
In a timber or log house, windows and doors are placed on casing - a special frame of the opening made of wood, which is not rigidly fixed to the walls, but is held by friction in a tongue / groove lock. The casing is made of thick wooden beams. The window or door frame is attached to the casing. When installing platbands, they are also attached to the casing. Since there is no load on them, the planks are usually fixed on both sides, stepping back 10-15 cm from the edge.
Fasteners can be used in two types:

Mounting on dowels is more laborious, but it is absolutely invisible. If this process is too complicated, use finishing nails.
How to fix platbands to a log wall
There are no problems when installing platbands on a bar from a bar: the surface is flat, it is easy to attach to it. If the log house is made of logs, everything is more complicated. There are two options:

Which way to choose is your decision. Both are viable and both are not ideal - it is difficult to ensure tightness.
How to prevent moisture from leaking under the platbands
Ensuring tightness is the main concern when installing architraves on a wooden house. Most of the questions arise about how to prevent moisture from leaking under the top bar. Water, flowing down the wall, inevitably falls into the gap between the casing and the wall. There are several options for solving the problem, mostly traditional, but using new materials.

Platbands with a wooden "visor"
Such architraves are also called "Finnish", since almost all houses in Finland are framed in this way. In them, in addition to the traditional four slats, they also make an additional inclined visor, which is supported by consoles resting on the side slats. It is desirable to choose the angle of inclination of the bar the same as the angle of inclination of the roof or close to it. Although an insignificant detail, such a finish looks more organic.

When installing, under the visor in a log or beam, you can cut a few millimeters, “drown” the edge of the visor there, seal the remaining gap from below and above with a sealant (silicone, frost-resistant, with adhesion to wood).
Finnish platbands are good for everyone, but they are poorly combined with carving. The style is not the same. They are great for a simpler, concise design. Although, there are similar options in the Russian style, but making them is not at all easy.
metal visor
By the same principle - to divert water from the platbands - this method solves the problem. Only a metal bar in the form of the letter Z is used - part of the standard ebb. The color is selected to match the walls or the color of the cashing.

The installation method is the same: they make a cut in the wall, only its size is much smaller - the thickness of the bar is several millimeters. The installation is the same as described earlier: we put one part into the groove, seal the gaps with silicone sealant. The only difference is that the free edge can be fixed to the top trim of the trim (using self-tapping screws).
Installing the bottom trim at an angle
The lower lath of the casing washes at the same time to serve as protection against precipitation. To do this, it is set at an angle. The choice of the angle of inclination is the same - close to the angle of the roof.

With the installation of this bar, everything is simple. From below, it is supported by triangles carved from wood, fixed on a frame. Water will not flow down the wall, but at some distance from it. Here it is already important to do it right - so that the water does not wash away the foundation.
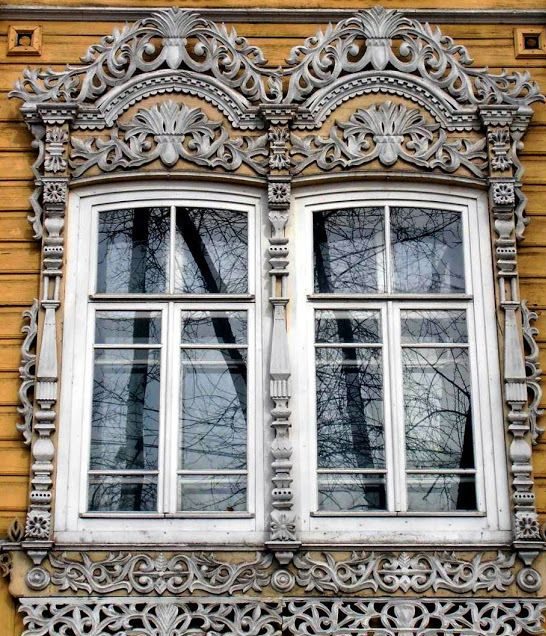
Photos of platbands on windows of various types


Simple architraves with only small elements of carving - these are often seen on a Scandinavian-style house

Carved overhead platbands - delicate carving on a dark background


Shutters and architraves - this can often be found on old houses


Few people do not know that platbands are small decorative elements that are installed around windows both outside and inside any building. By the way, they not only give the windows a finished and neat look. Platbands are also needed in order to protect the seam between the wall and the window, usually filled with mounting foam, from the effects of a number of external factors, such as light, water, wind, etc. Also, the purpose of using platbands is to increase the security of the house from drafts .
Visually, the platbands look like small rectangular strips. They can have a different color, and among them there are also beautiful decorative models (carved, patterned, etc.).

Previously, most often, platbands were made of wood, but now, when the world, it is from it that they are mainly made. This is due to the ease of manufacture of products, durability and low cost of the material. The advantages of plastic platbands are as follows.


On a note! Previously, it was believed that plastic platbands are placed only in combination with plastic windows, but this is an erroneous opinion. They can completely replace the decor of wooden windows. It’s just that in this case it’s better to choose the option that will imitate a tree in appearance.
Also, plastic platbands go well with, harmonize with other materials intended for facade decoration. You can simply pick up elements that are ideally suited in color, or choose a contrasting color option.

Types of plastic platbands
Plastic platbands can be divided into several types depending on the method of production, appearance, method of fastening, etc. In appearance, embossed and smooth are distinguished. Here they don’t have any special differences in quality, the only difference is that some are perfectly smooth, others have a certain relief (for example, they imitate the structure of wood). By the way, embossed ones are a little more difficult to keep clean - dust can clog into the grooves of the relief, which is quite difficult to remove from there.

Important! When choosing platbands, one should take into account not only their appearance, but also the method of fastening, manufacturer, cost, etc.
Table. Types of plastic platbands depending on the manufacturing technology.
| View | Description |
|---|---|
| Material such as sheet plastic is used to create ordinary flat platbands. In some cases, the product has a monolithic structure, and sometimes it can be heterogeneous inside. The tensile coefficient of the material is quite low, so such a casing will not deform under the influence of temperature. Therefore, large thermal gaps, which are necessary when installing these elements, will not be needed here. This is the simplest version of plastic platbands. Usually they are mounted outside the house. The main thing is that the facade of the building and the plane of the window coincide. |
| Such platbands can be embossed or cast. Suitable for installation both outside and inside the house, because they are not afraid of exposure to temperatures or ultraviolet radiation. Thanks to the use of materials such as polyvinyl chloride for the manufacture of products, it was possible to significantly expand and diversify the types of platbands. This is one of the most commonly used types of elements. |


Also allocate overhead and telescopic architraves. The latter, unlike standard invoices, are a kind of constructor, which is assembled into a single system using special locking joints. Often in a complete set to such platbands there are also extras. The section of the telescopic casing is G or T-shaped. The platband is simply applied and fixed in the right place with decorative nails or self-tapping screws, it can also simply be glued to the adhesive or mastic.
Prices for plastic trim on windows
Platbands for windows
Installation features. Window opening preparation
Oddly enough, the finishing of plastic windows must be carried out strictly according to a certain standard, which is regulated GOST 30971. If you follow all the requirements and norms of the document, then the window will not be afraid of the wind, and the foam used for installation will not crumble and will not collapse over time, the windows will serve for many years without any complaints. In general, the finishing of a plastic window, and indeed of any window, consists in the installation of such elements as platbands, slopes and window sills.

First, of course, the window frame is installed. However, this design looks unfinished and sloppy. As a rule, layers of mounting foam are clearly visible between the wall and the window, which, even with the protruding parts cut off, looks unpresentable. To begin with, it is important to cover it with a membrane vapor barrier - it will ensure the outflow of moisture, which can penetrate even through the smallest cracks. The presence of a vapor barrier will keep the insulating materials dry.

Important! Do not replace the vapor barrier with ordinary polyethylene. It is not as good as the specialized material. It is important to understand that moisture can penetrate from everywhere, and not just from the outside, so that the insulation separated by polyethylene will still get wet - as soon as the temperature outside the window drops, condensation will appear. The vapor barrier will help bring it out, but the film will not allow it to leave, because of which the materials will still be damp and this will not end in anything good.
Installation of platbands
Platbands can be installed in various ways. Most often they are mounted on the wall or directly to the window frame, using special mounting elements - for example, latches. That is, by installing such elements on the frame, the platbands on them can simply be snapped on. The main thing is that all latches are intact and not deformed.

You can also attach platbands using double-sided tape. The most important thing is to choose good and high-quality material. But in any case, it should be understood that the method is not very reliable. In severe frosts, as well as winds, the adhesive tape may not be able to cope with its task, and the platbands will simply fall off. So this method is not recommended if you want to do everything qualitatively.

Platbands are always home decoration
The joints of the two platbands must be cut at an angle of 45 degrees. The easiest way to do this is to use the mounting angle with the desired markings. Also, cuts can be made at right angles. In this case, they should be on horizontal architraves on both sides.
Installation of platbands with glue method
Step 1. When the window frame has already been installed and the rest of the preparations have been completed, it is required to make markings on the outside of the wall, which will facilitate the installation of the casing. The easiest way to do it is with a coated thread stretched from one edge of the window to the other. To the extreme points it is also necessary to add the width of the platband on one side and on the other. Marking must be applied both below and above the window opening.


Step 2 Now you need to attach the trim to one of the edges of the windows (to the one to which it will be attached) and then make a mark on it with a pencil, drawing a line from the corner of the window at an angle of 45 degrees.


Step 3 Now the extra parts of the trim need to be cut off or sawed off using special tools for cutting even corners (such as a miter box).

Step 4 After that, you need to prepare a special adhesive solution or buy ready-made. The composition must be prepared in accordance with the instructions.

Step 5 The adhesive composition must be applied to the back of the casing, and it must also be applied to the wall where it will be mounted, in accordance with the markings.


Step 6 The next step is gluing the trim. It needs to be well pressed against the wall.

Step 7 It is important to connect the vertical and horizontal platbands securely and without gaps.

Step 8 Residues of the adhesive composition along the perimeter of the platbands, as well as in the places of their joining, must be removed.

Step 9 The lower trim needs to be bolted. To do this, in it and the wall of the house you need to make 3-4 holes of the required depth.

Step 10 A little glue or sealant is required to be poured into each of the holes.

Holes are filled with sealant
Prices for polyurethane sealant
Polyurethane sealant

Step 12 All joints between the platband and the wall of the house must be smeared with sealant. The holes into which the bolts were screwed are also filled with sealant.

Video - Installation of platbands
Installation of window slopes
The window will not be finished if the inside of the house is not framed with slopes and a window sill is not installed. Consider how this type of work is performed.
Step 1. In order to install a standard slope system, consisting of platbands, starting profiles, corner covers, latches and slopes, you will need a pencil, tape measure, square, masking tape for measurements, a drill, a screwdriver, self-tapping screws and dowels, a grinder.

Step 2 First you need to measure the width of the sloping panels in the lower, upper parts on each side, as well as the height of the starting profile. You need to attach the rule to the wall and measure the distance with a tape measure to the rule.

Step 3 The heights of the sloping panel are also measured in the area where it adjoins the window and from the outer edge.

Step 4 All values obtained as a result of taking measurements must be transferred to the sloping panels. It is best to apply them on the back of the panel. The edge with which the panel is turned towards the room has a special lock. It is important to take this into account. A platband is latched onto such a lock.


Step 5 The excess panel must be cut off using a grinder or other tool.

Step 6 On the side of the panel that will be turned towards the window, you need to put on the start profile. This will make it easier to cut to the desired length.

Step 7 Before the final installation and fastening of the slope panel, it is important to simply attach it to the window and see how well it fits, if it still needs to be trimmed, how well it adjoins the window sill.

Step 8 Now it is important to correctly attach the panel along the entire height of the frame. First, the starting profile is fixed on the wall. You can attach it either with double-sided tape or with self-tapping screws. Starting profiles are attached immediately to the right, left and top of the window.


Step 10 Snapping the panels into start profiles is easy. They need to be inserted into the profile at an angle of 45 degrees, and then put pressure on them and snap into place, setting them in the desired position. The side panels are also attached.


Step 11 Between the panels and the wall, you can lay pieces of foam as sealants. This measure will allow you to get rid of the gaps that may form between the slopes during the installation process.

Step 12 If necessary, the gap between the wall and the slope can be insulated with foam.

caulking gun prices
Sealant gun
Step 13 You can fix the slopes at a certain angle to the window using a special latch. Along the perimeter of the window, you need to install several latches at a distance of 30-35 cm from each other. The two latches at the corners of the window should come together. This is important because otherwise the corner cover of the slopes will not be able to snap into place and snap into place.


Step 14 Finally fix the latches on the windows using self-tapping screws. Holes in the wall for dowels and screws are made using a drill.

Step 15 Now you can start installing the platbands. First you need to measure the desired length on them, attaching the trim to the window, and then cut off the excess.

Step 16 Putting the trim on the latches is very simple - you need to press them along the latches and fasten them to the clips with a blow of your hand until a characteristic click. It remains to install decorative corner covers and be sure to remove the protective film. The work has been completed.

Learn how to install, and also check out the installation options in a special article on our portal.
In general, installing platbands on windows is not as difficult as installing windows themselves. The main thing is to perform all actions consistently and accurately. And then everything will definitely work out. But, if there are any doubts about your abilities, it is better to invite experienced craftsmen to help so as not to spoil the material.
The ancient tradition of making and installing carved architraves on windows in a wooden house was remembered relatively recently, when the first boom in the construction of log cabins from logs and timber passed. After living in a new wooden house for several years, the owners almost always begin to treat it as a living creature, so it is not surprising that amazingly beautiful carved patterns began to appear on the windows and front doors made of wood, serving both as decoration and protection.
Functions and purpose of carved platbands
Most experts involved in the culture and history of wooden architectural monuments note that carved platbands on windows, photos, are almost a status thing. A house without carved patterns looks like a wooden hut, even if it is very large and beautifully decorated, with platbands - it turns into a tower.
Traditionally, carved platbands on windows are installed for two purposes:
- Protection of cracks along the perimeter of the window frame from the penetration of rain, snow and wind blowing;
- Additions and decorations of the window opening, the facade of a wooden house as a whole.
For a wooden house, builders traditionally offer wooden window frames or metal-plastic window profiles complete with double-glazed windows. Ordinary PVC plastic architraves can also be ordered in a carved version. It’s just that you most likely won’t be able to choose a drawing or a pattern; carved plastic window trims are made according to traditional patterns by stamping and only give a handmade look.

Advice! Today, many restoration workshops and firms have at their disposal three-axis milling machines that can automatically cut out a pattern of any complexity from polycarbonate, foam and epoxy plastics.
Such work will be expensive, but the quality of carved platbands for plastic windows will be even higher than manual cutting. It remains to choose a pattern and a pattern.

Rarely any of the owners of the house can tell more or less clearly and reliably about the third task of the window trim. We are talking about protective functions that protect a wooden house from the "evil eye", diseases and uninvited guests. You can relate to beliefs and traditions in different ways, but taking into account the specifics of choosing a pattern for platbands in your home will obviously not be superfluous.
Patterns and figures on carved wooden architraves
It is clear that any self-respecting owner will not hang the first platbands on the windows of a wooden house, the process of selecting a theme and pattern can be delayed, so do not abuse the use of symbols whose meaning is incomprehensible or unknown. If the mystical and culturological part of the carved architraves creates psychological discomfort, carving can be regarded as a way of decorating the window openings of a wooden house.
It was no coincidence that they were invented to decorate carved architraves, and they were carefully stored and transferred almost unchanged. Most master wood carvers cut just like copiers, so you will have to plan and decipher the drawing on your own.
Advice! In any case, before using carved wooden architraves on windows with patterns and pictures of incomprehensible content, it makes sense to try to understand the meanings of carving elements, patterns and figures.
For example, figurines and images of animals have always symbolized positive wishes for the house of prosperity and well-being:
- The serpent or dragon has always signified wisdom and strength to protect the home;
- Birds in flight mean cordiality and friendliness, sitting in the corners - attention to guests and news;
- Fish, deer, bunches of wheat and grapes mean a wish for prosperity.
It was not customary to depict pets and figures of people, especially in the same canvas with climbing plants and flowers.
More modern designs on carved wooden architraves usually have a traditional regular ornament.

It can be intertwined flowers, vine leaves arranged in a regular pattern. In the carved compositions of the 18th-19th centuries, more modern images of columns, porticos and drops, used in the wooden architecture of that era, already appeared.

Most of the carved architraves are ordered from master carvers. If desired, it is not difficult to make carved platbands for windows with your own hands according to templates or ready-made schemes. The simplest lines and drawings can be transferred to a blank and cut out with an engraving nozzle, with more complex patterns you will have to tinker and remember drawing lessons at school.

The upper part of the architraves was called an ochelie, this is the most complex and beautiful part of the decor, on the one hand, the ochelie set the general tone of the carved composition, on the other hand, it served as a visor over the window opening. At the top of the composition was a diadem, symbolizing the rising sun, and in the center a medallion or a crown of plants was always depicted. The lower part of the window was covered with a carved apron, usually in the form of an open fan.
If the mystical and culturological part of the carved architraves creates psychological discomfort, carving can be treated simply as a way of decorating the window openings of a wooden house.
The usual intertwined pattern of vines or flowers will be far from any mystical content, while the beauty of the platbands and carvings of the window frame of a wooden house will only intensify. Carved architraves with a regular pattern have a serious advantage over a complex multi-tiered composition:
- Firstly, the patterns of carved platbands for windows are transferred to a wooden or plastic blank much easier and faster than a pattern with a complex multi-tiered composition;
- Secondly, even if you cut out an intertwining vine or edging with your own hands and make small flaws, it will be almost impossible to see them in a patterned field, this is how human psychology works.
Therefore, before making carved platbands on the windows, choose a simple pattern for yourself, with a minimum number of individual details. Even the most uncomplicated pattern on the cladding planks can transform the appearance of a window of a wooden house beyond recognition.

Do-it-yourself options for making carved platbands
Woodcarving has always been and remains a rather expensive undertaking, so instead of buying ready-made platbands cut or stamped on furniture equipment, you can try to make decorative strips with simple patterns with your own hands. At home or in a carpentry shop, you can use one of three methods:
- Transfer the template to the prepared board and cut out the patterns using the engraving kit;
- Cast patterns under a carved platband made of polyester or epoxy resin, followed by painting or finishing with a wood-like laminate film;
- Cut out the overlay pattern of the casing with a jigsaw.
Before you try your hand at making carved platbands, you need to choose the right material. For carving and engraving, hardwoods will be required, beech or oak is good, pine or spruce is a little worse, poplar and aspen are not suitable. An ordinary floorboard can be used to cut an overlay pattern, but the material must not have knots, defects, or complex interlacing of fibers.
Templates for cut-out overlay pattern
To make the simplest patterns, you can use the simplest patterns of intertwining plants, flowers, grapes. In fact, this is a flat tracing paper from more complex carved reliefs. This pattern can be used to decorate the vertical side trims of the casing.

To decorate the window frame, you need to look not for regular, but for single patterns, for example, a composition of symmetrically arranged figures or weaves of plant stems.

The same pattern can be translated into a contour line and turned into a flat ornament, which is quite simply cut out of plywood, boards or even MDF boards.

The most complex relief or three-dimensional patterns are made in typesetting. Initially, ordinary wooden architraves are made from planks, individual elements of the cladding are carefully adjusted to the size of the window and assembled into a finished frame.

All other decorative elements are sequentially cut out of wood, cast from a casting polymer or sawn out of an MDF board, after which they are sanded, primed and glued onto the prepared frame.

Making carved platbands with your own hands
Most often, patterns for window decoration are cut out of waterproof OSB boards in the form of overhead decorative elements. Initially, on tracing paper, a piece of graph paper and with the help of the program, the necessary template for the drawing is developed.


Next, you need to make a working template with which you can transfer the pattern to a wooden substrate an unlimited number of times, photo. To do this, the pattern printed on the printer is glued onto a sheet of fiberboard and cut out with a perforated nozzle for a drill or with ordinary metal scissors.
After marking the wooden blank, you can start cutting the casing. The easiest way is to make cuts with an electric jigsaw on a carpentry workbench.

Along the line of the cuts made, it is necessary to carefully chamfer with sandpaper so that during further processing the front surface of the carved pattern does not chip off. If a sufficiently thin plank was chosen as a blank, then the cut-out carved part of the decor can be glued onto a fabric base.
In the same way, small overhead elements are cut out in the form of rhombuses, squares, rings, braids. After sanding, the cut out elements are turned on an electric grinder with a stone for grinding wood. With the help of a circle, you can simply give a rhombus or any other geometric figure the necessary shape, form faces or transitional curvilinear planes.
After gluing the decor, carved platbands are primed with hydrophobic impregnations and subjected to aging. This is done in order to remove the whiteness of freshly polished wood. For this, solutions of salts of iron, copper, chromium are used. As a result, it is possible to match the color and shade of the carved platband to match the wooden window frame. It remains to open the tree with varnish or oil impregnation and install the carved decor on the window.

Conclusion
Very often, instead of making new decorative elements, the owners of wooden houses prefer to buy old carved architraves, preserved in villages, abandoned houses and buildings. Often, the cost of a set of carved architraves for three windows of a building's facade is cheaper than hand-carving one architraves by a modern craftsman. In some cases, real works of art made by hand by craftsmen of the last century are found among the old decor. Such carved platbands are usually subjected to deep restoration and are installed not on the outer parts of the windows, but inside the room.